
Search results for "Extracts" in Home Design Ideas

 Old Saratoga Restorations Incorporated
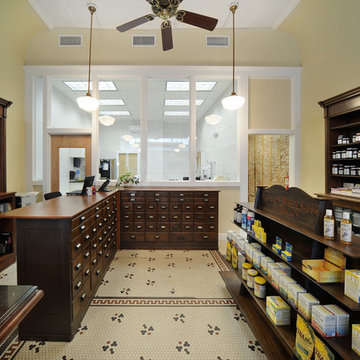
When Menges & Curtis Pharmacy opened during the height of the Industrial Revolution on Saratoga Springs’ main street, its druggists mixed tinctures and remedies to their own formulas, examined and treated patients and even applied leeches if it was deemed appropriate.
By 2010, the family that had owned the Menges & Curtis for the past 50 years was struggling with the conventional pharmacist’s lot in modern life: handing out prepared medications for an increasingly lower insurance reimbursements, and trying to make up the difference by selling spa and personal care products. All the while, M&C’s traditional clientele was drifting away to chain drugstores, supermarkets and retailers such as Walmart stores, which were dispensing medications at low margins to lure shoppers into their aisles while they waited for their prescriptions.
The owner restructured his business plan, selling his traditional pharmacy assets to a chain and creating a partnership with a “compounding shop” in Latham to go back to time-honored methods of creating personally formulated nutritional and vitamin supplements, hormone balancers and natural wellness herbal extracts for preventative health maintenance, chronic illnesses, veterinary and pediatric care.
Now a new business with an old-school ethos, Fallon Wellness Pharmacy needed substantial renovations to its iconic storefront in the S.W. Ainsworth Building in Saratoga’s Broadway Historic District. The low ceilings made the space feel cramped, and storage was ineffective. The new partners called upon Old Saratoga Restorations to project manage a complete modernization of the space, adding graceful private consultation rooms and compounding labs to comply with health and safety codes, while respecting the integrity of the ornate High Victorian 1871 brick commercial block building.
 SOMMA Studios
As a designer it is often hard to walk through a home and not have ideas of transforming the space. Some seem frivolous but fun, others stem from necessity. The ability to work within a historic home, maintain its integrity, but breathe new life from another time is a precious opportunity.
This home in Portsmouth’s popular Atlantic Heights neighborhood had, as we say, “good bones.” It’s a traditional gambrel style cottage built of flemish bonded brick. The interior was an equally traditional layout, with central staircase, living spaces to either side, and bedrooms stacked above. There was nothing to improve upon with the layout-some things have staying power for a reason. They’re efficient, they work –its GOOD.
READ MORE >>
However, the rooms were made smaller by their narrow passageways, the home had no true entrance-guests would be through the door and nearly seated on your couch before coats could be extracted, and certainly and most importantly, the home’s age was evident throughout.
The primary goal for this renovation was to improve the home’s basic infrastructure. I created a design to open up the interior and add street appeal.
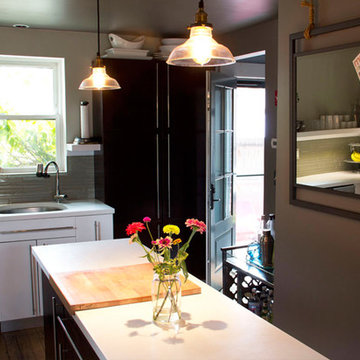
A farmer’s porch, new paint colors, and landscaping achieved the cottage feel. Door openings were removed and wall lengths reduced to create a greater sense of space on the interior. New electrical, plumbing, windows and doors were added to improve the home’s efficiency. A new, larger kitchen was also accommodated and turned out to be icing on the cake for this designer turned domestic diva. That being said, it begins and ends in the kitchen- I don’t sew.
- See more at: http://sommastudios.com/project/designers-home-2-0/#sthash.O8tmRegy.dpuf
Find the right local pro for your project
 Missouri Botanical Garden
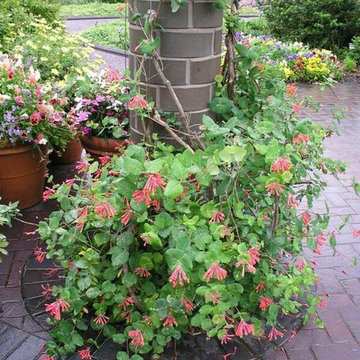
Lonicera sempervirens / Trumpet honeysuckle
Courtesy Missouri Botanical Garden PlantFinder
 Tile Doctor Ltd
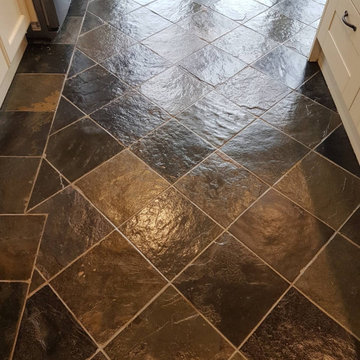
Pictured below is a Slate tiled kitchen floor that had been installed in the kitchen of a property in Harrogate around fifteen years prior. I discovered that the tiles had never been cleaned and resealed since installation and this explained why they were now looking dull and un-interesting. They had lost all character and it wasn’t until I started cleaning them that I realised the must be of the multicoloured Brazilian Slate variety.
As well as looking dull and unattractive, there was also some water damage to some tiles caused by a leak, this had resulted in some shaling and efflorescence staining. This had occurred some time ago and the floor had now dried out fully, so I was not expecting any further efflorescence issues going forward.
Brazil, I understand is the world’s 2nd biggest producer of Slate, it is also exceptionally durable and reasonably priced so its not surprising you see a lot of it over in the UK. Like any natural stone however it is porous and without a sealer to protect it and bring out those natural colours it soon ends up like the example on this pad.
I cleaned the floor with a strong dilution of Tile Doctor Pro-Clean using my usual method of spraying the cleaning solution onto the Slate and grout and then leaving it for a ten minutes to soak in and get to work breaking down the dirt and old sealers. Although I doubted there was much sealer left on the floor after all this time you need to be sure to remove all of it to get the best result. The floor was then scrubbed with a rotary floor buffer fitted with a black scrubbing pad, then after rinsing with water and extracting the soil I inspected the floor.
I detected there was still some sort of sealer present in some of less used parts of the floor, it was proving stubborn to remove so I suspect it may have been an old fashioned wax based product that was used. Not a problem though we Tile Doctors have a solution to every problem, so I spot treated the stubborn areas with Tile Doctor Wax Away to see if I was right. After scrubbing that in followed by another rinse and extraction with the wet vacuum I was pleased to see I was right and was happy all the old seal had now been removed. I gave the floor another rinse at the end of the day and dried it as much as possible with the wet vacuum, then left it to dry off fully overnight.
I came back the next day and checked the floor was dry with a damp meter. The readings were good, so I was able to crack on and seal the tiles using several coats of Tile Doctor Seal and Go. Each coat was applied leaving time to dry between each layer. This gave the floor a uniform appearance which disguised the damaged tiles. It will also help to stop more cracking and reduce the appearance of the efflorescence. The sealer really brought out the natural colours in the Brazilian Slate and the floor looked transformed.
I’m sure you will agree it was a vast improvement, certainly my client was very happy and couldn’t believe the difference I had managed to achieve. Before leaving I recommended, they should invest in some Tile Doctor Neutral Tile Cleaner which would ensure the newly applied seal was prematurely eroded away which is a problem with many of the stronger products you find in supermarkets.
Nigel Stoker
North West Yorkshire Tile Doctor
 Tile Doctor Ltd
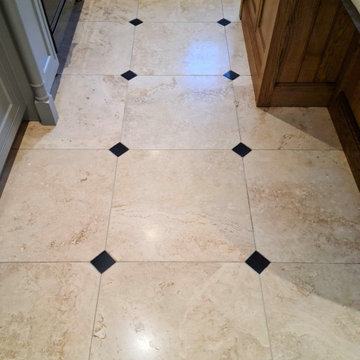
The pictures show a large Limestone floor laid through much of the ground floor of a property situated on the outskirts of York seventeen years prior.
The owners had three dogs that slept in their own doggy room. The floor in this room was in the worst condition of the five rooms as it had been subject to significant wear and tear. The Limestone tiles looked dull with ingrained dirt and the grout was stained and patchy.
The original tiler had laid the floor well, but he had applied a satin topical sealer to the stone most of which had worn off over the years. A floor like this would need a little maintenance and the sealer reapplying from time to time to maintain it.
I completed a test clean for the client to show them what could be achieved which came out well. Happy with the result they accepted my quote for the restoration work, and we booked in a suitable time to complete the work.
The area was quite large, so I separated the job into rooms and started by protecting the skirtings and woodwork from splashing etc. I decided to do a chemical clean first to remove what was left of the old sealer but more importantly to give the grout a thorough clean which was making the floor look scruffy.
For this I opted to apply a strong dilution of Tile Doctor Pro-Clean which was left to dwell for a short while and then worked in with a mechanical rotary cleaner. It gets to work on the ingrained dirt and sealer. It should also help to get rid of the doggy smells. This process turns the cleaning solution black and is then extracted using a wet vacuum keeping the mess to a minimum. I paid particular attention to the grout which was deeply discoloured and found that some areas required going over a couple of times to get them clean. I was only just getting started on the cleaning but immediately the floor was looking so much better.
I then deep cleaned the Limestone with a set of diamond burnishing pads, working in sequence from the 400 grit through to 1500 grit. A small amount of water was used to aid the lubrication and after each pad have been over the entire area few times the solution is rinsed off with more water and extracted with the wet vacuum.
The floor came back to almost new and as the client wanted a satin finish, I ended by applying a 3000-grit pad to add a deeper polish to the Limestone. The floor was then left overnight to dry.
The last step of polishing with the 3000-grit pad already leaves the floor quite dry however I always like to check before sealing so just to be sure I took some reading with a damp meter. The readings were fine, so I started applying the first of two coats of Tile Doctor Ultra Seal to finish the floor. This is an impregnating sealer (as opposed to the previous topical sealer) that soaks into the stone protecting it from within but without affecting its appearance. This product was chosen in consultation with the client who was specific about how they wanted to floor to look.
The floor now looked superb. Both the client and l were very pleased with the finished floor and so where the dogs! For aftercare I recommended Tile Doctor Stone Soap which is designed for cleaning polished stone floors like these, it’s a gentle stone cleaner that helps maintain the patina and ideal for this type of floor.
Nigel Stoker
North West Yorkshire Tile Doctor
 Tile Doctor Ltd
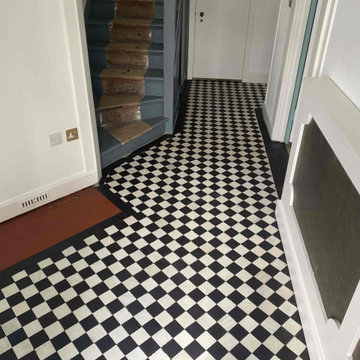
This client from North London had recently bought a property in Highgate N6 and during renovation had discovered an original Victorian tiled floor in the hallway. The floor was laid in a classic black and white diamond pattern but unfortunately a large section was missing and had been filled with concrete. Furthermore, most of the remaining floor had been covered in cement and glue.
I carried out a survey of the floor to determine the main issues and was then able to email over a quote later that day that included rebuilding the missing section of flooring. I suspect the floor had been excavated at some point in the past to install central heating and then rather than have the excavated section restored it was simply back filled and then levelled with a cement screed before finally gluing down a carpet on top.
Once the quote was accepted, I sourced replacement tiles from the Vintage Floor Tile company. Situated in Kent they are a reclamation yard that specialises in supplying original geometric and encaustic tiles including the major historical makers such as Minton and Craven Dunnill.
Armed with replacement tiles I started by removing the concrete that had been used to backfill the missing section and prepare a new surface for tiling with quick drying cement. When ready I was able to carefully build back the original pattern using the replacements. The tiles were secured with tile adhesive and once that had gone off, they were grouted.
The floor was left to set fully overnight and then the next day I was able to return and clean the whole floor using a strong dilution of Tile Doctor Remove and Go. As usual this was left to soak into the tiles for a good ten minutes before being scrubbed into the tiles using a black scrubbing pad. The Tile Doctor Remove and Go did a good job of cleaning the floor and the cleaning solution soon turned black with dirt during the scrubbing. The floor was rinsed with water and the soil extracted with a wet vacuum. After inspecting the floor any areas that needed further work were hand scrubbed and rinsed again until I was happy the floor was clean.
The last part of the cleaning process was to give the tiles an acid wash using Tile Doctor Acid Gel which further cleans the floor by removing old cement residue and grout haze. It also neutralises efflorescent salts in the tiles which are a common issue with floors of this age with no damp proof membrane. After another rinse and extraction, the floor was given a final rinse and then dried as much as possible using the wet vacuum.
I left the floor to dry out for a couple of days before returning to apply a protective sealer. Tile and Stone should be dry before sealing so I use a damp meter first to double check. All was well so to seal the tiles I proceeded to apply the first of what would be three coats of sealer. I used Tile Doctor Colour Grow for this, it works by impregnating the tile occupying the pores and thereby preventing dirt from becoming ingrained there. This product also enhances the black and white colour of the tiles and makes the floor much easier to clean.
Once done the floor was transformed and needless to say my customer was very pleased with the result. For the aftercare of Victorian Tiled floors, I recommend the use of a ph neural tile cleaner such as Tile Doctor Neutral Cleaner; most supermarket tile cleaners are simply too strong for use on sealed floors and can strip off the sealer prematurely.
Andrew Newstead
North London Tile Doctor
 Tile Doctor Ltd
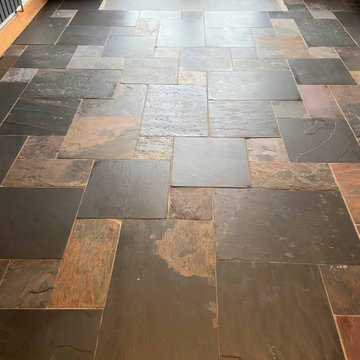
The pictures below are of Chinese Slate floor in the Kitchen of a property in the small village of Clifton just south of Penrith. We often get asked what the difference is between Rough and Semi Riven Slate, and this floor was a mixture of both.
If you look closely at the pictures and check out the darker parts of the floor you will see these smoother Semi Riven Slate, whereas the light copper-coloured parts of the floor were of the rougher textured variety. It’s not that unusual for stone to be mixed in this fashion as it can be supplied from different quarries in order to achieve a particular look.
The blend of different slates makes little difference when it comes to cleaning as the process is essentially the same. I would advise though if you intend to clean the floor using a mop then you should opt for Semi Riven Slate as Rough Slate can shred your mops and make it harder to maintain. We tend to use industrial floor buffing machines which work well on both surfaces so are less effected.
There was a bit of wax on this floor so to remove this Tile Doctor Wax Away was applied. The product was left to stand for fifteen minutes before being scrubbed into the stone, rinsed and then the soil extracted with a wet vacuum.
We then finished the cleaning with an Acid Rinse which involves scrubbing the Slate with Tile Doctor Grout Clean-up. This not only works well at cleaning up the stone and grout but also neutralises the alkaline pH left over from using Wax Away. I am very wary of the pH level of the floor as it could have an impact on the new sealer, giving the floor an acid rinse before sealing also ensures a better bond with the sealer.
Naturally, you can’t leave a strong product like Grout Clean-up on the Stone for long as it could etch the surface so once done the floor was thoroughly rinsed with water and extracted again with a wet vacuum. A mop and bucket and lots of sponges won’t do the job on a large area like this.
Once we finished the clean, we left it to dry off overnight and came back the next day to apply the sealer. We were originally going to apply a satin finish sealer, but the client had a big dog with sharp claws which could of scratched and marked the sealer so decided against it. I advised the client to use an Impregnating sealer called Tile Doctor Colour Grow, which lifts the natural colours in the stone, but is not a topical shiny sealer as the seal soaks into the Slate and leaves a a nice matt finish instead. Only two coats of sealer were needed, and the floor looked like new again.
My client was very happy with the difference in the appearance of the stone and how much cleaner the grout was, so much so they the following feedback for us, which is always appreciated.
“Totally impressed with the team they couldn’t have been more professional and even left me with some cleaner. My horrible 12 year old slate tiles look fabulous”
As usual we left a free bottle of Tile Doctor Neutral Tile Cleaner for aftercare, it’s very important not to undo all that hard work by using a product which will damage the seal, using a pH neutral cleaner will keep the seal looking sharp and fresh for years to come.
Heidi Taylor
North Cumbria Tile Doctor
 Tile Doctor Ltd
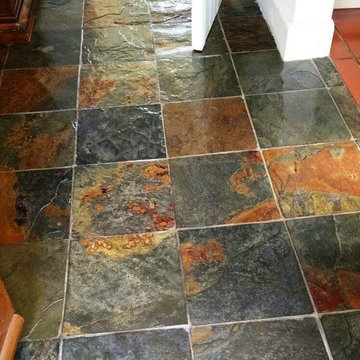
The photographs below are of rough Chinese Slate floor tiles installed at a house in Dorchester; they had not been deep cleaned in a long time and the combination of pets and grandchildren had taken its toll on the floor. Rough Slate from China is a relatively inexpensive product and although long lasting and value for money the texture of the Slate is difficult to maintain and thus difficult to keep clean even if fully sealed
To clean the tiles I used a strong dilution of Tile Doctor Pro-Clean which was left to soak into the Slate for a good ten minutes before working it in with a buffing machine fitted with a black scrubbing pad. This action removed the ground in dirt and any old sealer and a stiff brush was then run along the grout lines with more Pro-Clean to get them as clean as possible. The floor was then rinsed thoroughly and any stubborn areas retreated; a wet vacuum was used to extract the soiled water from the surface of the stone in order to get it as dry as possible.
The floor was left to dry overnight and I returned the next day to seal using three coats of Tile Doctor Seal and Go sealer which is a water based sealer (so no smell) that leaves a nice subtle shine to floor.
The slate and the grout looked really dull and dirty before we started and now the floor looks like it was recently laid.
For aftercare we don’t recommend the use of a Floor Steamer as they work on a 100 degrees and this damages the sealer; for regular cleaning use Tile Doctor Ph Neutral Cleaner using a two bucket system, whereby you apply the cleaning solution with a jug, wipe the floor and then squeeze off the excess into the second bucket, this stops you reapplying dirty water onto a clean floor.
Stuart Tibu
Dorset Tile Doctor
 Spin Design Limited
The kitchen and Dining areas are a popular gathering spot in most homes. A lot of entertaining is done in this room as family and friends gather in an area close to where meals and appetizers are being prepared. It also is a place where the family may meet at the end of the day to talk about the day’s events.
There is no doubt about the fact that these spaces are where memories are made and shared on a regular basis.
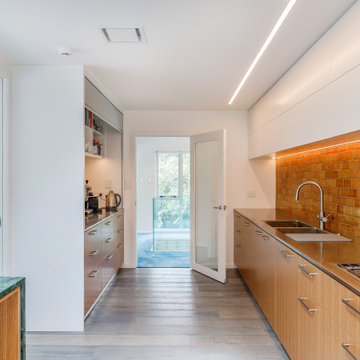
The colour of the earth beneath your feet, a cup of coffee in the morning, a dollop of honey on toast and a bar of caramel chocolate. The tiles bring warmth and contentment to the space. MIDDLE EARTH TILES’ GOLDEN MANUKA Tile was laid with 33% offset. The tile was chosen as not only for the wonderful tone in colour, but because Middle Earth tiles are a “Cradle to Grave” product. The raw material are extracted close to the manufacturing site, they will last for many years, even centuries and the designs are timeless. Middle Earth tiles can be returned to the environment with no ill effects at the end of their life cycle.
The European Oak Rutherglen Engineered Wood Flooring was chosen because of its subtle blue hue. Continuing the theme of the sea from the carpet. The grain of the wood adds texture and interest and works beautifully with all the other materials in the space.
The VERDE GUATAMALA Stone BENCHTOP is simply gorgeous. Its intensity of colour and its grain make for a wonderful feature island benchtop. The clients fell in love with this stone, as for them it evoked Pounamu.
 Eppright Homes, LLC
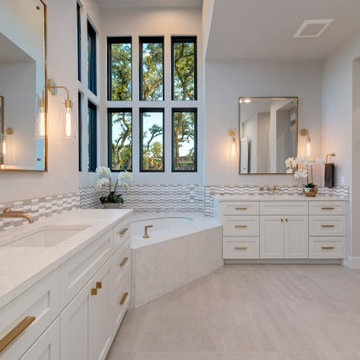
Located in the Exemplary Lake Travis ISD and the new Signal Hill Estates at Bee Cave features One Acre minimum homesites with ease of access to the heart of Bee Cave and TX HWY 71. Neighborhood amenities—Gated access to 61 homes on over 80 acres. 10 acre private park including hike and bike trails, and community playscape.
 Tile Doctor Ltd
This job was for a repeat client in Toft near Cambridge who had aa stunning large hallway that was tiled in beautiful pale Limestone. My client had asked me back to work on the floor having previously completed the deep clean and seal of a Terracotta floor previously.
The Limestone tiling in the entrance hall had years of some type of topical sealer applied to it. This caused the stone to look slightly discoloured and from certain lights showed up hundreds of scratches and smudges embedded in the seal. I’ve tried to capture this problem in the photographs on this page, but it was very difficult.
A topical sealer sits on the surface of the tile where it is vulnerable to scratching, hallways are generally high traffic areas and so more likely to see this sort of problem. Ideally an impregnating sealer should have been applied, impregnators work by occupying the pores in the stone thus preventing soiling from becoming ingrained in the stone.
Before starting we protected the woodwork against splashing with blue film, I don’t usually make a great deal of mess, but you can never be too careful when working in someone’s property especially one as beautiful as this.
To strip off the old sealer I began by applying a strong dilution of Tile Doctor Remove and Go to the Limestone tiles. I split the floor into sections and used a 400-grit diamond burnishing pad to work the Tile Doctor Remove and Go into the tiles. The floor was then rinsed off using our high-pressure cleaning system that applies pressurised hot water to the floor whilst simultaneously extracting the soil with its built-in vacuum. The system is quite heavy, so it is built into my van, and I run a large flexible hose to a spinner tool that does the cleaning. It is an expensive tool, but it saves a lot of time and leaves the floor fairly dry afterwards.
The 400-grit pad had released a lot of the sealer but there were quite a few layers to get through, so I changed the burnishing pad to a coarse 200-grit pad and repeated the process. After another rinse and extract I would see it had the desired effect and I was able to carry on building up the finish on the Limestone by apply the 400-grit followed by the 800, 1500 grit pads. It was a large floor and so this took up much of the day so once complete I left for the day so it could dry off overnight.
The next day I finished the polishing process with the application of a 3000-grit burnishing pad which is applied with a little water sprayed onto the tile and really brings up the polish on the stone. This process has the added advantage of leaving the floor dry so not long afterwards I was able to move on to sealing.
For this floor two coats of Tile Doctor Ultra-Seal were applied, it is an impregnating sealer that won’t alter the colour of the tiles leaving a natural look.
My client was much happier with the new finish and has asked for another quotation on some more Terracotta flooring that needs attention. For aftercare I recommend using Tile Doctor stone soap, it’s a special formula that builds on the patina which will help maintain the polished appearance of the Limestone.
Tom Conlon
Cambridge Tile Doctor
 Valentini Kids Furniture Brooklyn NY
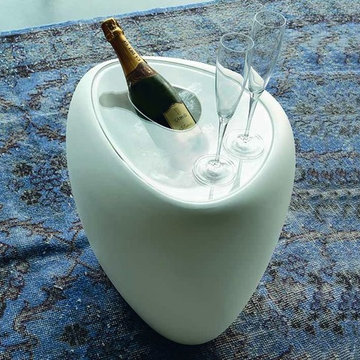
Ios End Table by Tonin Casa
Made in Italy
The Ios by Tonin Casa is a uniquely-shaped modern end table with a plexiglass top. The base is made using polyethylene rotational molding technology and is available in a matt white, beige or anthracite color. The Ios end table comes in two versions: the ordinary top end table and the end table with a bottle holder top. The ordinary end table top can be ordered in transparent, black, red ruby, white opal, transparent fuchsia or transparent smoked gray plexiglass and the bottle holder top is available in either transparent or transparent smoked gray plexiglass. Both versions of the Ios end table feature an internal storage area that can be revealed by a simple extraction of the end table top. Optionally, an internal light can be installed (not included in the price, can be purchased separately).
Features:
Designed by Nicola Tonin
The base is made of molded polyethylene available in a white, beige or anthracite matt color
Available in two table top versions: an ordinary top and a bottle holder top
The end table ordinary top is available in a transparent, black, red ruby, white opal, transparent fuchsia or transparent smoked gray plexiglass
The bottle holder top is available in either transparent or transparent smoked gray plexiglass
Features internal storage
Optionally, an internal light can be installed (not included in the price, can be purchased separately)
The starting price is for the End Table with an ordinary top in transparent plexiglass. The light is not included and can be purchased separately.
Dimensions:
End Table: W20" x D18.5" x H19.7"
 Tile Doctor Ltd
This detailed Victorian tiled hallway at a property in Camden was overdue some much-needed repair and maintenance. The owners of the property appreciated that original period features like this add a lot of value to a property and asked me to visit the property to quote for renovating it. The property was in a terrace of similar properties most of which appeared to have retained their Victorian character.
I inspected the floor and found there were a couple of loose, cracked, worn and broken tiles that needed to be replaced. In addition, the floor tiles needed a deep clean and then seal to bring back the wow factor. I was confident we could renovate the floor but at that point unsure if we would be able to find exact match replacements for the damaged tiles. Fortunately, Victorian tiles are still in demand and I knew of several companies I could check with so I was confident they could be found.
We discussed how long the work would take and assuming I could source the replacements agreed a price for the full restoration of the floor. After doing some research I managed to find suitable replacements with a company called Original Style and the work was scheduled for the following month.
Firstly, we prepared all areas with protective tapes to threshold edges and skirting.
This was followed by spaying the tiles with a strong dilution of Tile Doctor Remove & Go which is product designed to remove old sealers and coatings. After about ten minutes the tiles were scrubbed with black scrubbing pads and scrubbing brushes. Fresh water was used to rinse the floor and the slurry was extracted using a wet vacuum.
The floor was inspected and then a second clean carried out, this time using Tile Doctor Pro-Clean which is a Tile and Grout cleaning agent. The same process of application was used and after rinsing and extracting the dirt the tiles were given a steam clean. This ensured all the dirt was lifted out of the pores of the tile and the floor was now as clean as it possible could be.
The next step was the remove the loose and cracked tiles using the reclaimed tiles we had sourced earlier. Some cuts were necessary to get the replacements to match the originals but overall the plan worked. A quick drying adhesive was used to secure the tiles so we could apply the grout shortly after. The whole floor was then re-grouted and cleaned off to ensure a good match. The floor was left to dry off overnight, and you could already see it was now looking considerably improved.
Returning the next morning we checked the floor was dry using a moisture meter, this is important as to apply a sealer to damp tiles will lead to a patchy experience. All was well so we were ready to apply the sealer.
To start a single base coat of Tile Doctor Colour Grow sealer was applied to the floor and left to dry. This sealer is an impregnator that protects from within by occupying the pores in the clay tile improving colour in the process. This sealer does leave a matt finish however and the client wanted a subtle shine so one dry it was followed by four coats of Tile Doctor Seal & Go. The combination of the two sealers works really well to add long lasting protection to the tiles and provide the desired finish to the floor.
The floor was much improved, and the client was delighted. The detailed pattern and colours were now much more prominent, and the hallway looked much more inviting for both the owner and their guests. For the aftercare of Victorian tiles, I recommended the use of Tile Doctor Neutral Cleaner which is pH neutral and won’t prematurely erode the life of the sealer.
Nigel Voyce
North London Tile Doctor
 Utopia 360 Studio
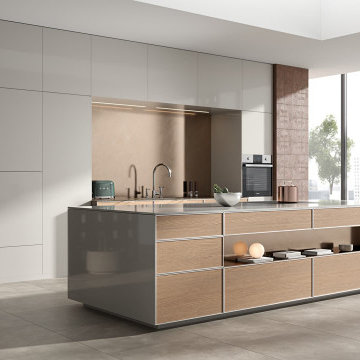
SieMatic Kitchen 3D Visualization
This 3D visualization captures the timeless elegance and precision engineering of a luxury SieMatic kitchen. Designed around the brand’s iconic handleless aesthetic (inspired by the SieMatic SLX concept), the render highlights a harmonious balance between functional minimalism and warm, tactile materials.
Key Visual Highlights
Signature Handleless Cabinetry: Features SieMatic’s integrated recessed handle channels with subtle, dimmable LED strip lighting that creates a floating effect across seamless matte-lacquered cabinet fronts.
Monolithic Island: A central waterfall island crafted from book-matched Calacatta marble, paired with an integrated cantilevered smoked-oak breakfast bar to introduce organic warmth.
Material Palette: A refined contrast of velvety, finger-print-resistant matte slate surfaces, warm dark timber, and subtle bronze anodized aluminum accents.
Lighting & Atmosphere: Soft, natural daylight streams through floor-to-ceiling glass doors, creating realistic soft shadows and highlighting the micro-textures of the stone grain and wood veneers.
Architectural Integration: Flush-mounted induction cooktops, concealed pocket-door appliance garages, and integrated ceiling extraction maintain a clean, uncluttered spatial flow.
 Hoke Ley
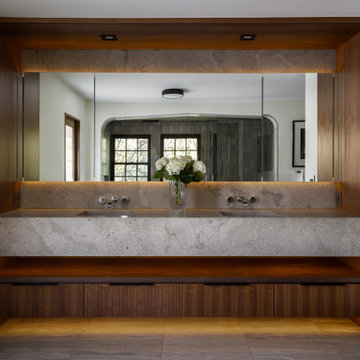
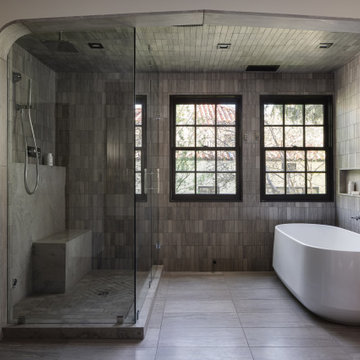
As designers, we have a responsibility to honor the planet we extract precious materials from. One of the best ways that we can do this is by creating spaces that are timeless in their aesthetic, eliminating the desire to tear out and replace what is still in great physical condition.
We used Missouri-mined @phenixmarble extensively throughout the interior and exterior of the Oakwood Residence. The seamless vanity, custom depressed arch, wall base, and shower feature fossilized Fleuri slabs while the floor, wall, and ceiling tile feature various sizes of Napoleon Gray marble.
Our hope is that this beautiful natural stone serves many generations of homeowners over its lifetime.
Plumbing fixtures are Kohler Components. Switches and outlets are Legrand Adorne. Decorative lighting by Rejuvenation. Custom walnut cabinetry. Custom marble tile, countertop, sinks, and wall base in Phenix Fleuri and Napoleon Gray.
 Spin Design Limited
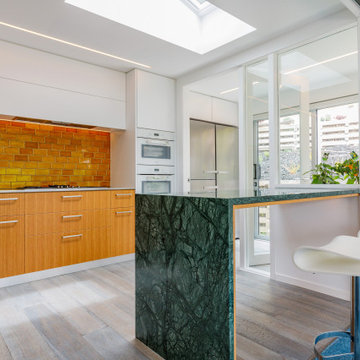
The kitchen and Dining areas are a popular gathering spot in most homes. A lot of entertaining is done in this room as family and friends gather in an area close to where meals and appetizers are being prepared. It also is a place where the family may meet at the end of the day to talk about the day’s events.
There is no doubt about the fact that these spaces are where memories are made and shared on a regular basis.
The colour of the earth beneath your feet, a cup of coffee in the morning, a dollop of honey on toast and a bar of caramel chocolate. The tiles bring warmth and contentment to the space. MIDDLE EARTH TILES’ GOLDEN MANUKA Tile was laid with 33% offset. The tile was chosen as not only for the wonderful tone in colour, but because Middle Earth tiles are a “Cradle to Grave” product. The raw material are extracted close to the manufacturing site, they will last for many years, even centuries and the designs are timeless. Middle Earth tiles can be returned to the environment with no ill effects at the end of their life cycle.
The European Oak Rutherglen Engineered Wood Flooring was chosen because of its subtle blue hue. Continuing the theme of the sea from the carpet. The grain of the wood adds texture and interest and works beautifully with all the other materials in the space.
The VERDE GUATAMALA Stone BENCHTOP is simply gorgeous. Its intensity of colour and its grain make for a wonderful feature island benchtop. The clients fell in love with this stone, as for them it evoked Pounamu.
 24-7 LOCKOUT
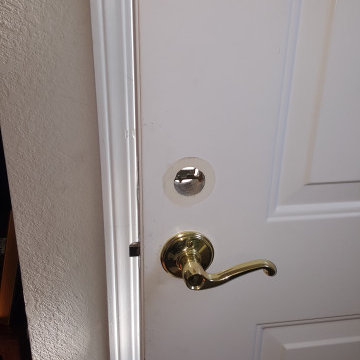
24-7 Lockout offers Up to 50% Discounts for Residential & Automotive locksmith services.
☑️Re-key 3 Locks & Get 1 for Free:
https://www.24-7lockout.com/rekey-services
☑️Re-key 5 Locks & Get 2 for Free https://www.24-7lockout.com/rekey-services
☑️AUTOMOTIVE KEYS
Buy 1 get 1 for 50% OFF https://www.24-7lockout.com/automotive-locksmith
☑️RESIDENTIAL LOCKS
Buy 2 Locks & get 1 for free https://www.24-7lockout.com/residential
☑️COMMERCIAL LOCKS
Buy 2 Locks get 1 for 50% OFF https://www.24-7lockout.com/commercial-locksmith
☑️LOCKOUTS SERVICES:
25% OFF - 1st time customer received https://www.24-7lockout.com/emergency-locksmith-services
For more information, you can contact us at:
✅ Email: service247lockout@gmail.com
✅ WhatsApp: https://wa.me/14088999039
✅ Yelp: https://m.yelp.com/biz/24-7-lockout-sunnyvale-3
✅ Website: WWW.24-7Lockout.com
• Top Local Mobile Locksmith Services •
#car_Keys #cars_Keys_sunnyvale #SunnyvaleCA #BMW #BENZ #Locksmith #Tool_ #Programdevice #DiagnosticDevice #KeyProgramming #Locksmith #Automotive #Diagnostic_tool #CarDiagnostic #CarProgram #basic_diagnostic #new_year #christmas #promotion #special_price #limited_time #Gift #Price #Offer #SunnyvaleCA #24_7lockout #California #mobilelocksmithservices
 Hoke Ley
As designers, we have a responsibility to honor the planet we extract precious materials from. One of the best ways that we can do this is by creating spaces that are timeless in their aesthetic, eliminating the desire to tear out and replace what is still in great physical condition.
We used Missouri-mined @phenixmarble extensively throughout the interior and exterior of the Oakwood Residence. The seamless vanity, custom depressed arch, wall base, and shower feature fossilized Fleuri slabs while the floor, wall, and ceiling tile feature various sizes of Napoleon Gray marble.
Our hope is that this beautiful natural stone serves many generations of homeowners over its lifetime.
Plumbing fixtures are Kohler Components. Freestanding bathtub in Kohler Ceric. Steam shower with Kohler Anthem and Kohler Components trims. Switches and outlets are Legrand Adorne. Decorative lighting by Rejuvenation. Custom walnut cabinetry. Custom marble tile, countertop, sinks, and wall base in Phenix Fleuri and Napoleon Gray.

29