
Search results for "Extremely difficult" in Home Design Ideas
 Fiorito Interior Design
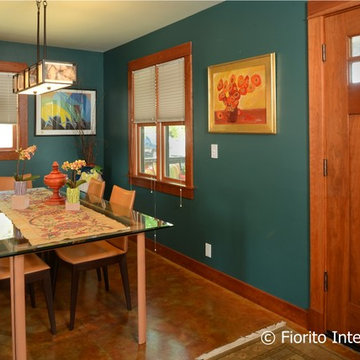
After a decade of being bi-coastal, my clients decided to retire from the east coast to the west. But the task of packing up a whole lifetime in a home was quite daunting so they hired me to comb through their furniture and accessories to see what could fit, what should be left behind, and what should make the move. The job proved difficult since my clients have a wealth of absolutely gorgeous objects and furnishings collected from trips to exotic, far-flung locales like Nepal, or inherited from relatives in England. It was tough to pare down, but after hours of diligent measuring, I mapped out what would migrate west and where it would be placed once here, and I filled in some blank spaces with new pieces.
They bought their recent Craftsman-style home from the contractor who had designed and built it for his family. The only architectural work we did was to transform the den at the rear of the house into a television/garden room. My clients did not want the television to be on display, and sticking a TV in an armoire just doesn’t cut it anymore. I recommended installing a hidden, mirror TV with accompanying invisible in-wall speakers. To do this, we removed an unnecessary small door in the corner of the room to free up the entire wall. Now, at the touch of a remote, what looks like a beautiful wall mirror mounted over a Japanese tansu console comes to life, and sound magically floats out from the wall around it! We also replaced a bank of windows with French doors to allow easy access to the garden.
While the house is extremely well made, the interiors were bland. The warm woodwork was lost in a sea of beige, so I chose a deep aqua color palette for the front rooms of the house which makes the woodwork sing. And we discovered a wonderful art niche over the fireplace that the previous owners had covered with a framed print. Conversely, a warm color palette in the TV room contrasts nicely with the greenery from the garden seen through the new French doors.
Photo by Bernardo Grijalva
 Gayler Design Build
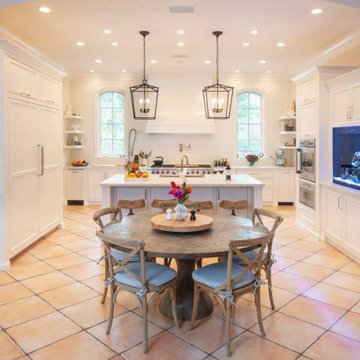
Gayler’s design team and construction crew worked closely with the aquarium experts. Several meetings were held to discuss and review every aspect of the 250-gallon saltwater fish tank. Among those details it was determined that the cabinet needed to be built with a steel frame in order to support the weight of the 3,000-pound tank. A chase cooling system was also installed below the tank in order to keep the water at a required, cooler temperature.
New cabinetry had to be measured with extreme care to cover the original cabinet footprint. Since the existing kitchen tile flooring would be difficult to find, Gayler also took special care during construction to protect the tile. The dated cabinetry in the kitchen and butler’s pantry was replaced with all new semi-custom inset maple cabinets painted in a Swiss Coffee finish.
A full overlay, custom-built kitchen hood, also in painted maple, anchors the kitchen’s large size and is complimented by a full ceiling-height backsplash in a herringbone pattern. Since the tile was custom-made, it had variations. Gayler Design Build took meticulous care to select and lay the tile to preserve the beautiful pattern.
The kitchen counters, the island, and the butler's pantry are finished in a marble-inspired Sereno Bianco Quartz.
To the delight of our client, they selected all new high-end appliances. Their appliance package included a SubZero 36” Integrated column refrigerator and freezer, a Wolf 60” dual fuel, 6 burner with a double griddle, a Thermador oven and microwave, a Thermador warming drawer, a Cove 24” dishwasher, a SubZero 15” Ice Maker and a SubZero 24” undercounter wine refrigerator.
Finally, pendant lighting, open and glass shelving, and dual sinks make a dramatic statement to this fantastic kitchen and butler's pantry transformation.
 LaMantia Design and Remodeling
To fully enjoy the winter holidays, with all the snow and cold, was the basis for our client’s decision to maintain their Chicago home when they were transferred to the warm and sunny west coast. A trusted caretaker was put in place to oversee and maintain their property; however, even excellent planning sometimes runs off-track.
In the midst of winter the caretaker left on a well-planned vacation. The homeowner’s were apprised of dates and, without a worry, everyone went on about their daily routines. That is, until the caretaker returned and found the home in such utter devastation, he could not believe what had happened in such a short amount of time.
The ill-timed vacation, planned during what became an extremely cold timeframe, was the home’s undoing. With the heat in the home turned slightly lower, to accommodate the emptiness, paired with the below zero temperatures, the hot water pipe in the main floor Sunroom froze and burst. The gushing, steaming water, unchecked, moved in so many directions, it is difficult to comprehend.
As the water soaked through the Sunroom flooring to the walk-out Lower Level Area below, ice blocks were freezing before the water reached the ground; Ice blocks so thick only time and warmer temperatures were able to thaw. Since the heating systems were unaffected, the heat, paired with the steaming moisture, raised the humidity levels in the entire home; what wasn’t wet ultimately became mold covered.
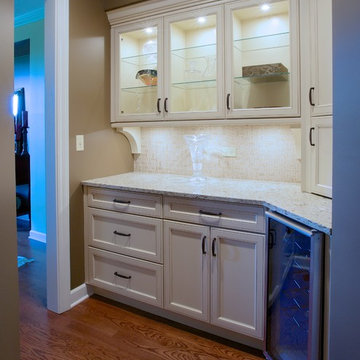
The humidity in the home was raised to such a level that window and door seals were compromised and condensation clouded most of the interior glass panes. The Kitchen wood flooring, saturated with water, buckled, causing the cabinets to lift and the granite to crack.
The ceiling in the lower level Bar Area fell as the water flooded both the Bar and the adjoining Billiards Room, wreaking havoc on cabinetry, carpet, artwork, etc.
After the insurance estimation determined the home was salvageable, the design phase began in earnest headed by LaMantia’s James Campbell, CKD and aided by Katie Suva, CKD, CBD as the guides. After a very long march towards recovery, the home is now back to the pristine beauty it once was.
Find the right local pro for your project
 Tile Doctor Ltd
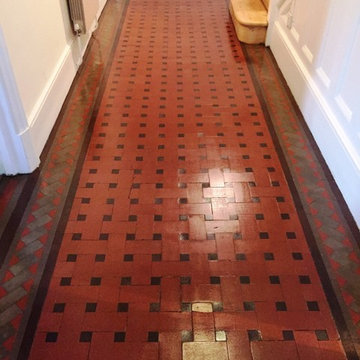
This fantastic Victorian tiled hallway floor in Oxford was in good physical condition for its age; however like any sealed floor the sealer had worn down with use and with dirt becoming trapped in the pores of the tile it was now becoming difficult to clean effectively and had become dull and un-inviting. It was now due a really good deep clean and re-seal. Oxford as I’m sure your aware has a rich history and is home to one of the world’s best universities, so not surprisingly many houses here have interesting floors such as this one.
Upon my arrival at the house, my first task was to protect the skirting boards, as well as the wooden floors leading into the other rooms. I then mixed a solution of Tile Doctor Pro-Clean, a versatile, high alkaline cleaner combined 50:50 with Tile Doctor NanoTech HBU, a particularly strong cleaner that utilises nano-sized particles to penetrate into areas of the stone that standard products simply cannot reach.
I applied the solution to the surface and allowed it to soak for thirty minutes, allowing it to get to work on the ingrained dirt so it could be easily removed. Following this, I agitated the solution with a soft brush attached to a rotary scrubbing machine. I then applied more solution and left it for a further thirty minutes, before scrubbing this into the tiles using a black pad fitted to the rotary machine.
After the clean had been completed, I rinsed the entire floor multiple times and vacuumed up the resulting slurry using a wet-vac machine.
I left the floor overnight, allowing the surface enough time to dry and returned then next day to seal the floor, checking first to ensure the tiles had dried. To seal the floor I used several coatings of Tile Doctor Seal & Go. Seal & Go which is a water-based, topical sealer that is suitable for use on unsealed, porous surfaces such as Victorian tile, textured Quarry, Slate, and Sandstone; being water based you don’t get the smell so it’s much more pleasant to work with.
As you can see from the before and after photos, the result was an aesthetically pleasing and – most importantly – clean, Victorian tiled floor. Needless to say, my client was extremely pleased with my work.
Barry Woodward
Oxfordshire Tile Doctor
 Columbia Roofing Inc.
Mr. Mescher – Home Owner Shares Story
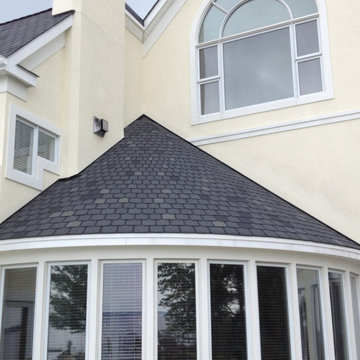
“I wanted to take this opportunity to tell you that I am extremely pleased with the work that Columbia Roofing did in replacing the roof on our Kent Island home. The house has a complicated roof structure with multiple gables and a quarter round conical roof which spans between two vertical walls in the back. We choose a 50 year Owens Corning shingle and to assure a good job, we only obtained quotes from roofing companies that received outstanding reviews.
We were pleased when the Columbia production crew roofed the house without issue and brought the full visual effect of slate using the 4 tab asphalt shingle with its distinctive keyway.
When it came to the conical roof, we were faced with the possibility of having to install a metal roof in lieu of maintaining the slate like appearance that was so prominent on the other roof sections of the house. Our preference was to maintain the appearance of slate on the conical section similar to that seen on the old slate roof cathedrals. While this is easy to say, I can now appreciate how difficult it is to do.
To honor our wishes, Ben Alsop came to the house and worked through the complicated layout necessary to use the same 4 tab shingles on the conical section. To do the job properly, every single 4 tab shingle had to be cut into individual tabs.
Each tab was then taken up on the roof where the keyway was aligned to vertical through a system of straight lines drawn from the point of the conical roof to the starter shingle at the roof’s edge. Each tab had to be cut again (often multiple times) after the tab alignment was complete. To assure the accuracy necessary to maintain the visual effect, Ben took it upon himself to personally perform the roofing of the conical section.
Ben is a manager for Columbia Roofing who no longer performs the physical roofing work after coming up through the ranks of the roofing trade. His personal dedication to getting this job done for us in a way that is simply stellar could not go without acknowledgement. Ben is not only a craftsman, he is an artisan whose skill set can clearly be seen in the pictures that I have attached.
I want to thank Columbia Roofing for a job well done and particularly I want to thank Ben for taking the time and putting in the effort to truly make this a stellar installation.”

 lost love spells 0739143863 lost love spell caster
love spellsINTERNATIONAL TRADITIONAL HEALER SPECIALIZED IN THE FOLLOWING; *Powerful love spell. *Revenge of the raven curse. *Break up spells. *Magic spells. *Protection spell. *Curse removal. *Remove negative energy. *Curse spells. *Spiritual cleansing. *Africa witch craft healers. *Hex removal. *Spiritual healing spell. *Wicca witch craft. *Good luck charm. *Break up spells. *Magic love spells *Sangoma traditional medicine. *Gay love spell. *Real magic spells. *The spell to defeat your rival. *Fertility spells. *Divorce spell. *Marriage spells. *Native healer. *Traditional healer. *Herbalist. *Fortune teller. *Madness coursed by witch craft. Break Up & Come Back To Me Get your ex back, even if they are currently with another lover. They will break up and he or she will come back to you, to be in your loving arms, the way it should have been all along. Break them up and bring back your lost love with The Break Up and Come Back To Me Love Spell . Binding Love Spells Meant for more serious relationships like marriage, or the path to something very special and permanent. Once the binding love spell is cast, it is extremely difficult to reverse. It is highly recommended that you ensure you are choosing the right person for yourself before asking us to cast The Binding Love Spell . Stop Divorce Are you going through a divorce you just don’t want? Still feel strong love towards your husband or wife and they no longer feel the same way? If it’s not about the legal fee’s, division of personal property, the countless arguments, or nights on the couch. Stop a divorce with The Stop a Divorce Love Spell, PLEASE NOTE THAT MY SPELLS ARE BASED ON AFRICAN TRADITIONAL HEALING AND A BELIEF IN THE MYSTICAL. RESULTS VARY FROM INDIVIDUAL TO INDIVIDUAL. Have a serious problem that needs fixing? +27739143863 Rustenburg, Brits, Moruleng, Mafikeng, Zeerust, Vryburg, Ventersdorp, Nelspruit, Secunda, Witbank, Middelburg, Pongola, Piet Retief, Malelane, Evander, Kinrose, WITBANK Kriel, Carolina, Bethal, Ermelo, Naas, , Hazyview, Hendrina, Bushbuckridge, Belfast, Polokwane, Mokopane, Northam, Thohoyandou, Louis Trichardt, Musina, Entabeni, Ladybrand, Ficksburg, Kroonstad, Klerksdorp, Odendaalsrus, Vareeniging, Sasolburg, Carltonville, Westonarea, Parys, Kimberly, Kuruman Grahamstown, Queenstown, East London, Port Elizabeth, King Williams Town, Somerset East, Alice Cape Town, Bellville, Paarl, Beaufort West
 Columbia Roofing Inc.
Mr. Mescher – Home Owner Shares Story
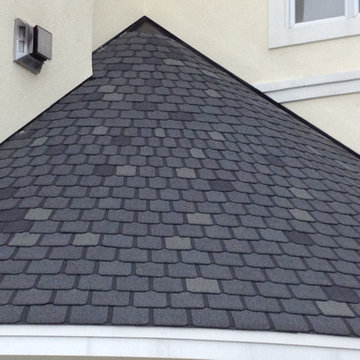
“I wanted to take this opportunity to tell you that I am extremely pleased with the work that Columbia Roofing did in replacing the roof on our Kent Island home. The house has a complicated roof structure with multiple gables and a quarter round conical roof which spans between two vertical walls in the back. We choose a 50 year Owens Corning shingle and to assure a good job, we only obtained quotes from roofing companies that received outstanding reviews.
We were pleased when the Columbia production crew roofed the house without issue and brought the full visual effect of slate using the 4 tab asphalt shingle with its distinctive keyway.
When it came to the conical roof, we were faced with the possibility of having to install a metal roof in lieu of maintaining the slate like appearance that was so prominent on the other roof sections of the house. Our preference was to maintain the appearance of slate on the conical section similar to that seen on the old slate roof cathedrals. While this is easy to say, I can now appreciate how difficult it is to do.
To honor our wishes, Ben Alsop came to the house and worked through the complicated layout necessary to use the same 4 tab shingles on the conical section. To do the job properly, every single 4 tab shingle had to be cut into individual tabs.
Each tab was then taken up on the roof where the keyway was aligned to vertical through a system of straight lines drawn from the point of the conical roof to the starter shingle at the roof’s edge. Each tab had to be cut again (often multiple times) after the tab alignment was complete. To assure the accuracy necessary to maintain the visual effect, Ben took it upon himself to personally perform the roofing of the conical section.
Ben is a manager for Columbia Roofing who no longer performs the physical roofing work after coming up through the ranks of the roofing trade. His personal dedication to getting this job done for us in a way that is simply stellar could not go without acknowledgement. Ben is not only a craftsman, he is an artisan whose skill set can clearly be seen in the pictures that I have attached.
I want to thank Columbia Roofing for a job well done and particularly I want to thank Ben for taking the time and putting in the effort to truly make this a stellar installation.”
 Columbia Roofing Inc.
Mr. Mescher – Home Owner Shares Story
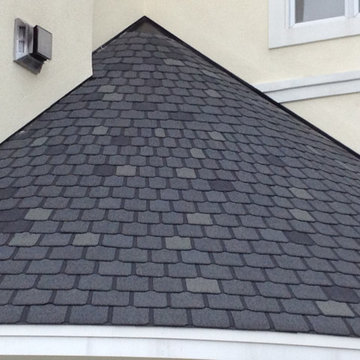
“I wanted to take this opportunity to tell you that I am extremely pleased with the work that Columbia Roofing did in replacing the roof on our Kent Island home. The house has a complicated roof structure with multiple gables and a quarter round conical roof which spans between two vertical walls in the back. We choose a 50 year Owens Corning shingle and to assure a good job, we only obtained quotes from roofing companies that received outstanding reviews.
We were pleased when the Columbia production crew roofed the house without issue and brought the full visual effect of slate using the 4 tab asphalt shingle with its distinctive keyway.
When it came to the conical roof, we were faced with the possibility of having to install a metal roof in lieu of maintaining the slate like appearance that was so prominent on the other roof sections of the house. Our preference was to maintain the appearance of slate on the conical section similar to that seen on the old slate roof cathedrals. While this is easy to say, I can now appreciate how difficult it is to do.
To honor our wishes, Ben Alsop came to the house and worked through the complicated layout necessary to use the same 4 tab shingles on the conical section. To do the job properly, every single 4 tab shingle had to be cut into individual tabs.
Each tab was then taken up on the roof where the keyway was aligned to vertical through a system of straight lines drawn from the point of the conical roof to the starter shingle at the roof’s edge. Each tab had to be cut again (often multiple times) after the tab alignment was complete. To assure the accuracy necessary to maintain the visual effect, Ben took it upon himself to personally perform the roofing of the conical section.
Ben is a manager for Columbia Roofing who no longer performs the physical roofing work after coming up through the ranks of the roofing trade. His personal dedication to getting this job done for us in a way that is simply stellar could not go without acknowledgement. Ben is not only a craftsman, he is an artisan whose skill set can clearly be seen in the pictures that I have attached.
I want to thank Columbia Roofing for a job well done and particularly I want to thank Ben for taking the time and putting in the effort to truly make this a stellar installation.”
 Fiorito Interior Design
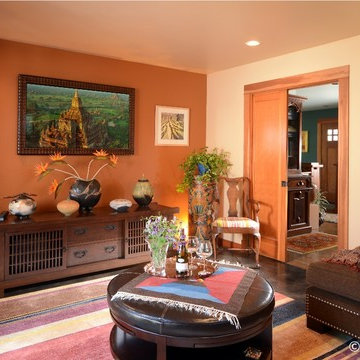
After a decade of being bi-coastal, my clients decided to retire from the east coast to the west. But the task of packing up a whole lifetime in a home was quite daunting so they hired me to comb through their furniture and accessories to see what could fit, what should be left behind, and what should make the move. The job proved difficult since my clients have a wealth of absolutely gorgeous objects and furnishings collected from trips to exotic, far-flung locales like Nepal, or inherited from relatives in England. It was tough to pare down, but after hours of diligent measuring, I mapped out what would migrate west and where it would be placed once here, and I filled in some blank spaces with new pieces.
They bought their recent Craftsman-style home from the contractor who had designed and built it for his family. The only architectural work we did was to transform the den at the rear of the house into a television/garden room. My clients did not want the television to be on display, and sticking a TV in an armoire just doesn’t cut it anymore. I recommended installing a hidden, mirror TV with accompanying invisible in-wall speakers. To do this, we removed an unnecessary small door in the corner of the room to free up the entire wall. Now, at the touch of a remote, what looks like a beautiful wall mirror mounted over a Japanese tansu console comes to life, and sound magically floats out from the wall around it! We also replaced a bank of windows with French doors to allow easy access to the garden.
While the house is extremely well made, the interiors were bland. The warm woodwork was lost in a sea of beige, so I chose a deep aqua color palette for the front rooms of the house which makes the woodwork sing. And we discovered a wonderful art niche over the fireplace that the previous owners had covered with a framed print. Conversely, a warm color palette in the TV room contrasts nicely with the greenery from the garden seen through the new French doors.
Photo by Bernardo Grijalva
 All Marble Tiles
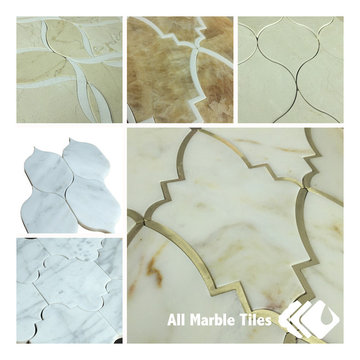
Crema Marfil Tile and the Waterjet Mosaic Multi-Purpose Beige Tile
The world keeps getting sophisticated and it’s hard to go by without noticing. And can we be amazed that this sophistication keeps creeping and has finally reach the house of the most moderately life-styled persons; even in their kitchens.
I case you don’t know what I’m driving at, it may be better if I break the good news to you about the crema marfil brand of tiles.
The first time I saw one, I was completely in awe. Much as tried, trust me, I could not differentiate the tile from natural marble; so clean and smoothly polished, tumbled finishes and they were such a delight to watch.
I finally chose to fall in love with one though; the Basket weave crema marfil tile. You could call it moderate but I would peg that at a higher standard. This finely polished surfaces of carefully interwoven model of nature were a comfort to touch and will pass as one of the best that I have ever reviewed in my years of experience with tiles and ceramics.
The Basket weave crema marfil tiles, you should know how it looks like from its name, will definitely be good for very natural settings including the floor for the summer hut on your lawn or the edges of your swimming pools and your kitchen floors and the list goes on. So this beautiful masterpiece has great prospects indeed and could prove to be extremely convenient for any commercial or residential architecture.
Of course this brand of tile could very well fit any purpose but the Basket weave model is preferred as a floor tile, considering its aesthetic quality and easy to clean nature. This natural stone or “gem” comes in various ranges and sizes. Most of the customers I interviewed about the crema marfil marble tiles were particularly excited about my personal favourite the Basket weave crema marfil tiles but others were equally excited about the Crema Marfil Marble Basket Mosaic Tileand the Crema Marfil hexagon mosaics and few others also liked the Crema Marfil herringbone mosaic and the Dark emperador marble.
So if you are yet to make the hard decision of choosing a range of tiles for one of your building project, well, there’s one that I can vouch for. The crema marfil brand of tiles. They come in many colors so just be ready to have a hard time making the difficult decision to choose. Remember to try the basket weave but if you don’t, any other crema marfil tile variation is a good choice well made.
http://AllMarbleTiles.com
 otile
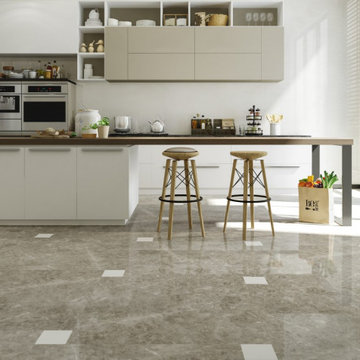
otileyou could choose ceramic tiles for the flooring o the kitchen, that's certainly an exquisite idea. Kitchen flooring is victim of spills every day, which means that the kitchen floor's floor ought to be wiped clean every day. Then again, ceramic tiles have a tendency to be wiped clean without difficulty, and they're a notable option for kitchen flooring. The ceramic tiles do not absorb microorganism and smell, that's critical for the kitchen. Ceramic tiles are also excellent due to their water-resistant nature and are a crucial element for kitchen floors. What are ceramic tiles made up of? Ceramic tiles are defined to be made from clay, and they're also recognized to be very sincere and can be set up easily as kitchen flooring. It must be referred to that every one of the tile must be set up properly over the sub tiles if you choose a higher result at the stop. The subfloor must be very smooth and flat so that while you install the ceramic tiles within the kitchen, you must make certain that every one of the edges are instantly and make the technique of grouting, however, less difficult and quicker. The ceramic kitchen tiles in addition to the porcelain tiles
ceramic tiles and porcelain tiles do have a difference between them, however, the difference is very moderate. The porcelain can soak up water, and the ceramic tiles can take in more water in amount compared to the porcelain. It ought to be brought that the porcelain wood pattern tiles have sand in them, and it's far brought to the clay mixture easily. Those all were made essentially below stress and warmth to produce a robust, tough, and even dense tile with a view to be porous in comparison to the ceramic tiles present. It must be stated that the porcelain timber tiles are suitable for getting used inside the kitchens and bathrooms, and you may even use them exterior as nicely. The unique nature which could stand and tolerate the weather conditions and climate is remarkable. Ceramic tiles and natural stones like marble and slate are extremely good for the kitchen floors as they are very long-lasting and strong. The porcelain is likewise considered to be from the tile family, and as we understand, tiles are an excellent option with regards to kitchen and toilet floorings. What are the advantages of ceramic tiles for kitchen flooring? Ceramic tiles have multiple benefits, and consequently, it's miles considered to be perfect for the kitchen floorings including:
it's miles incredible information that the ceramic kitchen flooring does now not have a tendency to burn. The ceramic tiles can't be charged electrically and purpose no friction. The tiles for the kitchen floors do no longer have any health hazards and are subsequently very safe for people. In the end, it should be said that the ceramic kitchen tiles are very long-lasting and lengthy-lasting. After all those huge benefits and blessings of the ceramic tile kitchens, nevertheless, you are unsure about what to select for the kitchen floor?

 Tile Doctor Ltd
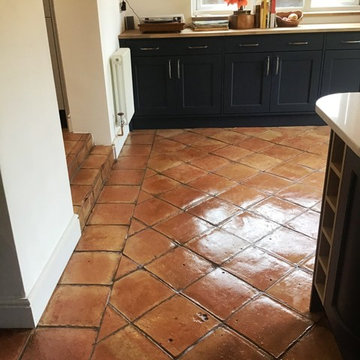
We were contacted by the owner of a property in Moulton with a problematic Terracotta tiled kitchen floor. She was seriously considering ripping up the entire area of tiling and replacing it as she was having a new kitchen installed. Both her and her husband were concerned that unless I could restore this floor to somewhere near to its original condition, they would need to replace it.
I went over to inspect the Terracotta tiles and could see the entire surface was deeply ingrained with soiling and the grout lines were filthy. After carrying out a test it became obvious that the previous sealer had been applied very sparingly and had mostly worn away, leaving the stone prone to staining. Terracotta is a very porous tile and dirt had become ingrained in the pores leaving it looking very dull and difficult to clean.
I completed the test on a small part of the floor and the customer could see the results which could be achieved. Happy with the result they agreed my quote and we set a date for my return to complete the floor.
The tiles turned out to be made of a fairly soft Terracotta which meant that we were able to deep clean them extremely effectively using a strong dilution of Tile Doctor Pro-Clean. We used Tile Doctor Remove and Go in particularly stubborn areas.
The process I use is to spray the Pro-Clean onto the floor and leave it to soak in for about ten minutes before being worked in using a heavy rotary machine fitted with a black scrubbing pad. The resulting slurry is removed using a wet pick up vacuum. All the dirt and virtually all of the old sealer was removed at this stage; the remaining patches around the edges of the area being finished by hand with a 200-grit burnishing block. The grout lines were then cleaned by hand with an angled grout brush.
Finally, the deep-seated oil stains in front of the cooker were brought out using Tile Doctor Oxy-Gel which was left to dwell on the marks for an hour before being agitated with a diamond burnishing pad and rinsed away with a wet pick up machine. The floor was rinsed with water and allowed to dry off overnight.
The following day I inspected the floor and checked it was ready to be sealed. All was well so I applied an initial coat of Tile Doctor Colour Grow which is an impregnating sealer that occupies the pores in the tile enhancing the natural colours of the Terracotta and provide a base layer of protection from staining.
I returned at a convenient time once the kitchen was completely installed to finish the job. This involves carrying out a light maintenance clean with Tile Doctor Neutral Cleaner and once the floor was dry, I applied 5 further coats of Tile Doctor Seal and Go which provides a pleasing satin finish which is really suited to this type of floor.
The customer was very happy with the results and has left the following feedback.
“We were really pleased with the results, thank you!”
Phil Vissian
Northamptonshire Tile Doctor
 Lori Jolin Design, LLC.
Sutter Photographers
The Hardware Studio - hardware
Martinwood Cabinetry - millwork
Studio GlassWorks - glass countertop
Window Design Center - awning window
Nonn's Showplace - quartz, granite countertops
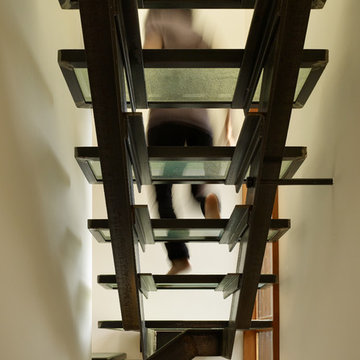
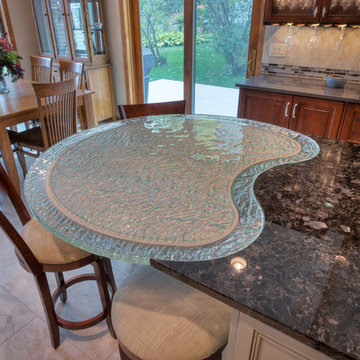
• The most difficult part of the project was figuring out all the technical details to install the glass counter-top, which would weigh about 300 pounds!
• One goal was to avoid seeing the cabinet supports through the glass. The glass itself proposed problems because it had a wavy texture and separate confetti glass that could be added to the bottom. Therefore, we needed to add something below it.
• A custom steel base was designed to carry the weight yet float the glass so you are able to see the beauty of the glass itself. A small 1/2 inch trim piece on the steel was added to accomplish this task.
• Once the steel was made, we took it to the glass distributor. We turned the very heavy base upside down, traced the 1/2 inch trim piece on a full size piece of paper, and sent it to the glass manufacturer.
• After this, the base was sent to a powder coater and the raw steel was transformed into a beautiful champagne color.
• In the meantime, the glass manufacturer molded a channel for the glass to rest that would suspend the glass 1/2 inch higher than the powder coated steel base.
• The glass manufacturer was instructed to make the top of the glass smooth so it would hold a plate without rocking; they added an extra layer of 1/4 inch glass after it was fired the first time to accomplish this.
• When the base was brought to the job site, the carpenter installed a thick 6 inch block of wood through the tile and into the floor joists. The hollow 6 inch square base of the steel table was glued and screwed into the wood. The base was leveled and ready for the top to arrive several days later.
• The glass installers put it over the base, and it fit PERFECTLY! (whew)
• The steel base is 3 inches smaller than the glass, creating a see-through effect around the entire perimeter of the kidney bean shape.
• The granite was then templated by using a
specialized camera that measured the curve of the glass. However, upon arrival, the fit was less than perfect. Thanks to a patient and skilled granite installer from Nonn's Showroom who spent several hours hand grinding and polishing the curve on site until it fit perfectly.
• A small bead of silicone between the granite and the glass was all that was needed to complete the perfect installation.
• With a few shims under the end of the granite, the top is perfectly level!
• Our client was extremely excited and very patient with the process because they trusted our abilities so that the end result would be spectacular.
 Tile Doctor Ltd
Pontcanna is a popular residential area in the western district of Cardiff, in South East Wales. Known for its rather large houses and spectacular foliage, interestingly enough roughly a quarter of the population are English folk.
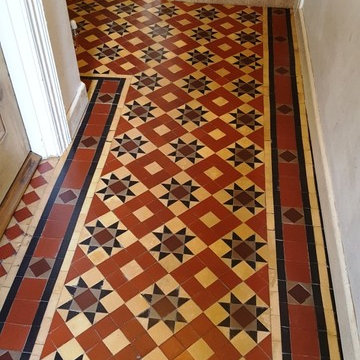
I was called down to a property in the area to take a look at a Victorian tiled floor which was in quite poor condition. Along with the typical amount of dirt and muck seen on poorly maintained tiles, there were a number of missing tiles and a fair bit of cement caked on the surface of the floor.
It would require a robust clean, fresh seal, and several repairs to get this floor back into optimum condition.
To begin, I checked for excess moisture problems using a damp meter in various places of the hallway floor and, thankfully, it was showing dry results. Any dampness could have potentially caused problems later on in the restoration process, so it was s good idea to run tests before starting.
Next, I manually scraped as much of the dry paint and cement off the tiles as possible, with no lubrication necessary. I then proceeded to clean the floor with a solution I mixed early, consisting of equal parts Tile Doctor NanoTech HBU and Tile Doctor Pro Clean, rinsing as I went. Both products are designed to tackle heavy soil build-up, with the former uniquely using nano-sized particles (as the product name suggests) to penetrate deep into difficult to reach areas in the tiles in order to lift out ingrained muck.
Following the initial clean, I removed all of the loose tiles and those heavily affected by cement, before retiling as necessary with fresh Victorian tiles, and grouting the whole floor. Of course, these replacement tiles were carefully sourced to ensure consistency, as far as possible, with the original pattern of the floor.
The next day, I went over the whole floor with an application of the acid-based Tile Doctor Grout Clean Up, diluted with a little alkaline Pro Clean to form a cleaning solution. I then used a black pad to scrub the cleaner into the tiles, similarly to the previous day’s cleaning. This was followed by a through rinse with water to neutralise the floor.
It was at this point that I noticed some stubborn cement stains remained so I set about breaking them down using a 60 grade hand held diamond polishing block, and this technique proved successful.
After completing the clean, I left the floor to dry out for roughly 24 hours. Upon my return to the property to seal the tiles, I tested again for moisture. It is recommended to run damp tests before sealing, as excess moisture can cloud the sealer, affecting its performance in the long run.
Fortunately, no dampness was detected and I was proceeded to seal the floor with seven coats of Tile Doctor Seal & Go, which enhances the natural colours in the stone and provides a nice satin gloss appearance, as requested by the customer.
I was extremely pleased with the results of this restoration, as was the customer. The extent of the soil build up and damage was such before the restoration that, after completion, the floor looked like it had been newly laid!
Julian Iancono
South East Wales Tile Doctor
 Tile Doctor Ltd
The pictures showed are of an Encaustic Cement tiled floor that had been installed in the bathroom of a property in Twickenham. At the time the tiles were installed, they did not seal them and had since accumulated dirt, especially in the grout lines.
Encaustic cement tiles have become extremely popular in the last few years with many beautiful artistic often geometric patterns available to choose from. The very nature of the cement-based tile however does make it slightly porous, and if left unsealed dirt will become ingrained in the tile making it difficult to remove and keep clean. Like grout they do therefore need to be sealed in order to keep them looking at their best for longer.
Now we normally recommend using diamond encrusted burnishing pads when renovating Encaustic Cement tiles however in this case the face of the tiles were not too bad and it was really the grout that needed the most attention. So, to cut the cost for customer, I advised a straightforward alkaline scrub clean and seal.
To clean the tile and grout I sprayed the floor with a strong dilution of Tile Doctor Pro-Clean and left it to soak into the dirt for ten minutes. Space in the bathroom was quite tight so instead of using a mechanical floor scrubber I scrubbed the tile and grout by hand working the alkaline cleaning solution into the pores to release the grout in dirt.
After scrubbing the floor was rinsed with a little water and the soil removed with a wet vacuum. Afterwards the floor was inspected, and any stubborn areas retreated with repeat of the process. After a final rinse, the floor was dried as much as possible with the wet vacuum.
Fortunately, the weather has been amazing of late and so it did not take long for the floor to dry, being a small space and a little encouragement from a heat gun always helps. Removing excess moisture before sealing is essential as even a small amount can cloud the sealer resulting in an uneven appearance.
Once satisfied that the floor was dry, I proceeded to seal it by applying a couple two coats of Tile Doctor Colour Grow across the Encaustic tile and grout. As an impregnating sealer Colour Grow penetrates the pores of the cement occupying the space and thus prevent any dirt from becoming ingrained there. Colour Grow’s colour intensifying properties also helped to deepen the black colour of the tile enhancing the contrast between the tiles and grout.
Now the floor has been properly sealed it will be far easier for the customer to keep them clean in future. For maximum longevity of the sealer I recommend maintenance cleaning with Tile Doctor Neutral Cleaner. Don’t be tempted to use supermarket cleaning products without reading the label first, many are simply too strong for cleaning sealed surfaces and will strip off the sealer prematurely leaving the tiles unprotected.
Jonathan Oldham
South Middlesex Tile Doctor
 Tile Doctor Ltd
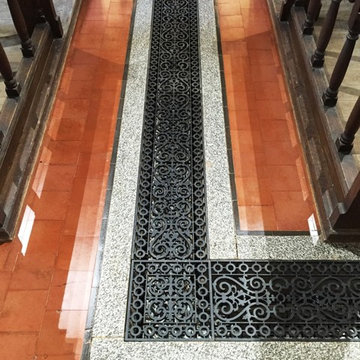
Did you know that Wantage, the town in Oxfordshire where I completed this job, is the birthplace of Alfred the Great? The town is certainly a historic area – in fact, I was contacted by the warden of a church dating back to the 12th century, who asked Tile Doctor Oxfordshire to help restore the building’s flooring, consisting of Quarry and Marble tiles.
This is an interesting mix of hard wearing and high end tiles, and while the floor was in
dire need of a deep clean, it could be restored back to looking fantastic once again.
The church has recently undergone a complete refurbishment with the help of a grant from lottery money. We were called after the builders had finished their work, to restore the floor to the finish required by the church warden.
His specification was to provide the Marble with a Matt finish and the Quarry tiles with a sheen finish. The floor was, at one point in its history, covered in carpet which had been taken up, no doubt exposing many years’ worth of muck.
My first task was to clean the floor with a diluted solution of Tile Doctor Pro-Clean, a high alkaline cleaner safe to use on tile and stone. This was left to dwell for a short period to seep into the tile, before being scrubbed in to remove the initial layers of muck. The resulting residue was promptly vacuumed away.
To tackle the tougher areas of soil buildup, I opted to use Tile Doctor Nanotech HBU which was spread over the floor and left to dwell for about 30 minutes. This product differs from most cleaners in that it uses nano-sized cleaning particles to deal with difficult to reach dirt ingrained in the stone. I then rinsed the area with water and vacuumed this up.
Due to the substantial size of the church floor I had to work in multiple sections, and so the cleaning process took three days to complete. After finishing, I left the church for a few days to allow the floor time to dry.
When I returned to the church I checked the floor with a damp meter and was satisfied that it was dry enough to seal.
First, I sealed the Marble tiles with Tile Doctor Colour Grow, which is a colour enhancing impregnating sealer suitable for use on high end stone such as Marble and Limestone. I applied two coats, leaving a few hours between coats; this brought the colour back without a high shine, as per the church warden’s request.
The next day I returned to seal the Quarry tiles, this time using Tile Doctor Seal & Go Extra which is a topical sealer specially formulated to lea e a nice sheen as requested. I applied several thin coats of the sealer to build up solid protection on the floor.
The warden was extremely pleased with the finished floor, leaving the following feedback:
“We found the Tile Doctor online and watched some of the very helpful slideshows on YouTube. The Victorian Quarry tiles in our 12th century church had been covered with carpet for many years and needed a thorough clean and polish at the end of our major restoration project. Barry was very quick to respond to our enquiry and over the course of a week he did a brilliant job on our tiles. We’re delighted with the results, just in time for our reopening service with our bishop and MP.”
Barry Woodward
Oxfordshire Tile Doctor

 Lore Patterson
Autumn blooming Chrysanthemum | Lore Patterson
Inspiration for a country home design remodel for fall in Seattle
Inspiration for a country home design remodel for fall in Seattle

 Pool & Hot Tub Alliance
One of the initial challenges for this project was the fact that I was asked to come in with a concept and design a after a number of other pool professionals. That can be an advantage in some situations where the people that preceded you all had a similar idea and concept and we go drastically in a different direction. Either way, that approach usually opens the eyes of the customer to the fact that there are other ways of seeing things and other ways of tackling a difficult site. In this case there was a more level area in a more remote part of the property which would've been easier to build on. Without question. What we offered was the ability to create something dramatic and unique and in the end became actually breathtaking. This involved doing a raised pool and spa combination built into an existing ledge that needed to be exposed and chopped out not only for the raised spa area but for the entire depth of the pool. A large amount of tree clearing was also going to be necessary as well as a plan to deal with the mountains of rock,ledge and granite that was going to come out of this excavation site. Another large challenge was that the choice of this location also made the proximity of the pool to the home extremely close. We needed to come up with a design that included planters and buffers so that the pool would not look and feel like it was too close to the house. By modifying the existing pressure-treated deck off the back of the house as well as raising what would be the final grade of the pool we were able to eliminate any railings that were present for that deck . What that achieved was a wide-open feel and look to the project . Now ,from anywhere in the back of the house the view of the pool the spa and the ledge rising up and around the entire area is a dramatic one, to say the least. The act of removing the ledge that was necessary to create this oasis closely resembled actually sculpting the ledge. We wanted and needed to preserve certain aspects of the exposed ledge areas as we wanted them to blend into the rest of the masonry that we were going to create. Steps and walkways etc. Besides aesthetics, practical solutions, for storm runoff, pockets for future planting and screening of the neighbors properties was a large part of our design and challenge. We were able to blend some of the larger ledge pieces that were excavated into the hard scape, the retaining walls the stone veneer surrounding the spa as well as unique coping pieces and the diving rock. We even used pieces of the ledge as grab rails for the custom swim out in the deep end. Matching granite was used to veneer all the underwater steps benches and swim outs. The spa was designed and constructed with party mode in mind. From the custom stone veneer entrance steps to the multilevel benches and our exclusive" deep soak" hydrotherapy well, it was all part of a custom concept. We actually measure as a tailor would, the dimensions of our hydrotherapy wells to the specific customer. which sometimes comically means that one spouse might be in over their head. In this case we were lucky as the dimensions seem to fit both spouses correctly. In other projects we have actually done his and hers deep wells so that everyone is happy!
 Lori Jolin Design, LLC.
Sutter Photographers
The Hardware Studio - hardware
Martinwood Cabinetry - millwork
Studio GlassWorks - glass countertop
Window Design Center - awning window
Nonn's Showplace - quartz, granite countertops
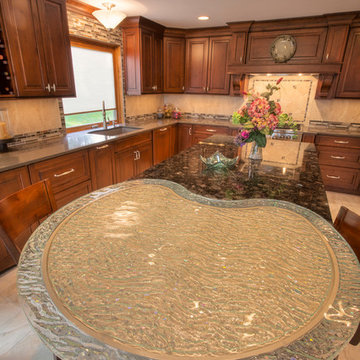
• The most difficult part of the project was figuring out all the technical details to install the glass counter-top, which would weigh about 300 pounds!
• One goal was to avoid seeing the cabinet supports through the glass. The glass itself proposed problems because it had a wavy texture and separate confetti glass that could be added to the bottom. Therefore, we needed to add something below it.
• A custom steel base was designed to carry the weight yet float the glass so you are able to see the beauty of the glass itself. A small 1/2 inch trim piece on the steel was added to accomplish this task.
• Once the steel was made, we took it to the glass distributor. We turned the very heavy base upside down, traced the 1/2 inch trim piece on a full size piece of paper, and sent it to the glass manufacturer.
• After this, the base was sent to a powder coater and the raw steel was transformed into a beautiful champagne color.
• In the meantime, the glass manufacturer molded a channel for the glass to rest that would suspend the glass 1/2 inch higher than the powder coated steel base.
• The glass manufacturer was instructed to make the top of the glass smooth, so it would hold a plate without rocking; they added an extra layer of 1/4 inch glass after it was fired the first time to accomplish this.
• When the base was brought to the job site, the carpenter installed a thick 6 inch block of wood through the tile and into the floor joists. The hollow 6 inch square base of the steel table was glued and screwed into the wood. The base was leveled and ready for the top to arrive several days later.
• The glass installers put it over the base, and it fit PERFECTLY! (whew)
• The steel base is 3 inches smaller than the glass, creating a see-through effect around the entire perimeter of the kidney bean shape.
• The granite was then templated by using a specialized camera that measured the curve of the glass. However, upon arrival, the fit was less than perfect. Thanks to a patient and skilled granite installer from Nonn's Showplace spent several hours hand grinding and polishing the curve on site until it fit perfectly.
• A small bead of silicone between the granite and the glass was all that was needed to complete the perfect installation.
• With a few shims under the end of the granite, the top is perfectly level!
• Our client was extremely excited and very patient with the process because they trusted our abilities so that the end result would be spectacular.
9