
Search results for "Formula" in Home Design Ideas

 threshold interiors
Location: New York, NY, United States
This Loft was tastefully renovated back in the '90s, but was due for an update and an expansion of the kitchen and dining areas to accommodate the client's cooking skills and entertaining needs. EnlargIing the island and adding cabinetry to delineate the office, bar and dining areas was a priority. The bathroom was updated to feel like a tranquil spa with beautiful new tile, plumbing fixtures and cabinets. Our biggest challenge was coordinating the entire renovation while our client was out of town for the Summer!
Photographed by: James Salomon
 TreHus Architects+Interior Designers+Builders
Example of a large classic u-shaped dark wood floor eat-in kitchen design in Minneapolis with a double-bowl sink, recessed-panel cabinets, white cabinets, white backsplash, stainless steel appliances, an island and black countertops

 All Surface Restoration
Exposed aggregate driveway after cleaning & sealing with Paver Gloss Sealer.
Photo of a mid-sized front yard driveway in Detroit.
Photo of a mid-sized front yard driveway in Detroit.
Find the right local pro for your project


 Kloud 9 Kitchens
Brian Mikec
Mid-sized elegant master white tile and ceramic tile mosaic tile floor alcove bathtub photo in Milwaukee with a pedestal sink, black cabinets, a two-piece toilet and blue walls
Mid-sized elegant master white tile and ceramic tile mosaic tile floor alcove bathtub photo in Milwaukee with a pedestal sink, black cabinets, a two-piece toilet and blue walls

 HaiJoe Stamped Concrete Patios and Decks
Stamped concrete patio with fieldstone pattern, the darker gray border, and the curves makes this patio look amazing.
Example of a large classic backyard stamped concrete patio design with a fire pit and no cover
Example of a large classic backyard stamped concrete patio design with a fire pit and no cover


 Kelsey Leigh Design Co.
Small farmhouse kids' white tile and porcelain tile marble floor and white floor alcove shower photo in Oklahoma City with shaker cabinets, blue cabinets, a one-piece toilet, white walls, an undermount sink, quartz countertops, a hinged shower door and white countertops

 Tile Doctor Ltd
This job was for a repeat client in Toft near Cambridge who had aa stunning large hallway that was tiled in beautiful pale Limestone. My client had asked me back to work on the floor having previously completed the deep clean and seal of a Terracotta floor previously.
The Limestone tiling in the entrance hall had years of some type of topical sealer applied to it. This caused the stone to look slightly discoloured and from certain lights showed up hundreds of scratches and smudges embedded in the seal. I’ve tried to capture this problem in the photographs on this page, but it was very difficult.
A topical sealer sits on the surface of the tile where it is vulnerable to scratching, hallways are generally high traffic areas and so more likely to see this sort of problem. Ideally an impregnating sealer should have been applied, impregnators work by occupying the pores in the stone thus preventing soiling from becoming ingrained in the stone.
Before starting we protected the woodwork against splashing with blue film, I don’t usually make a great deal of mess, but you can never be too careful when working in someone’s property especially one as beautiful as this.
To strip off the old sealer I began by applying a strong dilution of Tile Doctor Remove and Go to the Limestone tiles. I split the floor into sections and used a 400-grit diamond burnishing pad to work the Tile Doctor Remove and Go into the tiles. The floor was then rinsed off using our high-pressure cleaning system that applies pressurised hot water to the floor whilst simultaneously extracting the soil with its built-in vacuum. The system is quite heavy, so it is built into my van, and I run a large flexible hose to a spinner tool that does the cleaning. It is an expensive tool, but it saves a lot of time and leaves the floor fairly dry afterwards.
The 400-grit pad had released a lot of the sealer but there were quite a few layers to get through, so I changed the burnishing pad to a coarse 200-grit pad and repeated the process. After another rinse and extract I would see it had the desired effect and I was able to carry on building up the finish on the Limestone by apply the 400-grit followed by the 800, 1500 grit pads. It was a large floor and so this took up much of the day so once complete I left for the day so it could dry off overnight.
The next day I finished the polishing process with the application of a 3000-grit burnishing pad which is applied with a little water sprayed onto the tile and really brings up the polish on the stone. This process has the added advantage of leaving the floor dry so not long afterwards I was able to move on to sealing.
For this floor two coats of Tile Doctor Ultra-Seal were applied, it is an impregnating sealer that won’t alter the colour of the tiles leaving a natural look.
My client was much happier with the new finish and has asked for another quotation on some more Terracotta flooring that needs attention. For aftercare I recommend using Tile Doctor stone soap, it’s a special formula that builds on the patina which will help maintain the polished appearance of the Limestone.
Tom Conlon
Cambridge Tile Doctor

 VIVA TILES INC
Modern Bathroom Design.
By using Carrera Polished White Porcelain Tiles on the floor you will get the most "wow" reaction from any guest.
You also can use another two selections which are Statuario White Polished and Astoria White Polished porcelain tiles.
Designer & Builder #Alireza Ghanbari
Provided by #Dizeh Design Build
Tile Supplier #VIVA TILES INC
 Tile Doctor Ltd
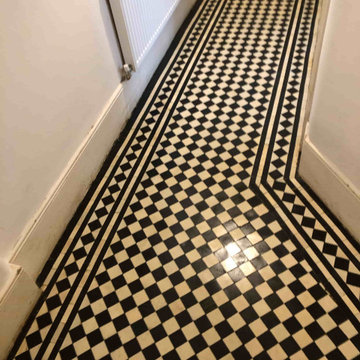
This property was in theLadbroke Grove area of West London near Kensington. The client had found an old and probably original black and white checkered pattern Victorian tiled floor under their cork tiled flooring. They also reported that it was badly damaged so I thought it would be best if I paid them a visit first to see how extensive the damage was and whether it was repairable. The floor was in a quite a state, the tiles were covered in glue from the cork and had several areas had been back filled with cement.
I reassured them that the damage could be rectified, and that it would be possible to completely restore the floor back to a good standard. I would have to remove the glue, remove the cement that had been used to level the floor and replace with reclaimed tiles to match. They were relieved to find out it could be done and happy with my quote I was instructed to go ahead with the work.
We started by taping up the skirting boards to protect the woodwork. With this done attention was turned to the glue which was softened using a strong dilution of Tile Doctor Remove and Go so it could be carefully scraped off. Multiple techniques and tools were needed to remove the glue including hand-held scrappers and a black pad fitted to a buffing machine. For the stubborn areas steam was applied to help lift the adhesive out the tile.
Once all the glue was removed the floor was rinsed and the alkaline cleaner neutralised with Tile Doctor Grout Clean Up which further cleaned the tiles and removed old traces of grout from the floor. Old floors like this generally don’t have a damp proof membrane underneath so the acids in the Grout Clean-up also counter any efflorescent salts trapped in the tile.
Once this was completed the slurry was removed with a wet vacuum and left to fully dry out overnight.
The following day focus turned to repairing the areas of the floor where the tiles were missing or broken. The main issue being the cemented areas, we see this a lot with Victorian Hallways and generally what happens is a heating engineer digs out the floor to install pipework. Not being tilers, your average plumber then repairs the floor with a self-levelling cement that brings the level up to the surface of the tile so it can be covered with lino, carpet of in this case cork.
The sub floor was then rebuilt with rapid setting self-levelling compound but this time to below the level of the tile.
Once the new base was dry it was a just a question of re-tiling with the replacement tiles to match the original checkered pattern. The replacement reproduction tiles were sourced from Original Features in Crouch End North London. After grouting we left the floor to dry out over the weekend.
When we returned to seal the floor our first step was to check the floor was dry using a moisture meter. This is critical as the sealant will not cure correctly if there is too much moisture in the floor. In this case the extra two days we had allowed had done its job and the test had confirmed it was ready to accept a sealer.
The client wanted the floor finish not to be too shiny once sealed so we opted to seal with two coats of Tile Doctor Seal and Go Extra. This is good choice for old Victorian floors such as this example as it’s special acrylic-based formula allows for moisture vapour transmission which as mentioned previously is a concern where no damp proof membrane has been installed.
I’m please to confirm my clients were delighted with the result, as you can see from the pictures the black and white floor restoration makes for a dramatic entrance well in keeping with the style of the property. For aftercare I recommended the use of Tile Doctor Neutral Tile Cleaner which will keep the tiles in good condition going forward without damaging the new sealer.
Jackson Davis
Central London Tile Doctor

 Action Flooring and Design Abilities
JUST SHOOT ME PHOTOGRAPHY
Basement - mid-sized modern underground porcelain tile basement idea in Calgary with gray walls and no fireplace
Basement - mid-sized modern underground porcelain tile basement idea in Calgary with gray walls and no fireplace

 Renovisions
The owners of this 1980’s built-home wanted to create a completely new look for their outdated master bath and turned to Renovisions for design and build services. Having perused Renovisions website, they were confident they made the right choice to help them transform their ordinary space into something truly extraordinary. The design team created several configurations for the homeowners review until they nailed down one particular design that would create that wow factor.
The main challenges were creating an open, spacious feel and maximizing natural light and ventilation with plenty of storage and customizations. The addition of a second window allows ample light into the space throughout the day along with the recessed and sconce lights which were perfectly placed. Storage, which was a key element of this design, includes two separate vanity cabinets (his and hers) with plenty of space for needed toiletries, a matching framed medicine cabinet for her and a custom built cubby for him. Built on site was a linen closet with both roll out and stationary shelves for towels and shower supplies. The spacious walk-in, all tiled shower boasts ‘no door’ access with lineal drain, traditional fixed and hand-held shower heads and a rounded shower seat. Polished black granite was used inside the cubby and topping both the threshold and seat creating a nice contrast to and tying in with the floor. The decorative grab bar ensures safety for these homeowners while showering. The heated floors added throughout the bath take the edge off when stepping out of the warm shower and are conveniently operated by a 24 hour programmable thermostat. Classic white subway tile and chair rail trims adorne all walls and tie in nicely to each vanity station. Carrera look quartz was the perfect choice for countertops creating a clean fresh look. Stunning marble basket-weave mosaic floor tile set the stage in this exquisite bath as the beautiful white painted cabinetry softened the overall feel of the space.
These homeowners are not saving spa retreats for once-a-year vacations anymore, they now enjoy a relaxing spa-like shower experience every day in their own home!

 Debbie Constangy
Foothills Fotoworks
Large elegant master black and white tile and stone tile marble floor drop-in bathtub photo in Charlotte with louvered cabinets, white cabinets, a two-piece toilet, gray walls, an undermount sink and marble countertops
Large elegant master black and white tile and stone tile marble floor drop-in bathtub photo in Charlotte with louvered cabinets, white cabinets, a two-piece toilet, gray walls, an undermount sink and marble countertops
 Simply Perfect
Many homeowners have their own ideas about how light or dark their home interiors should be. Some folks love nothing more than sunny, light-filled rooms. Other people adore their comforting, softly-lit spaces.
While light levels can be a matter of personal preference, lighting can also be a powerful tool for shaping the mood, emotional tone and usage of every room. In fact, lighting is just as important as furnishings.
Lighting Tips
1. Stay Warm
Cool light looks brighter to the eye and can seem more like daylight. It can also make your home feel like a hospital or grocery store, which is not what we’re going for. Warm light is softer and creates a more relaxed mood. That’s what you want in your home.
2. Yes, You Can
We’re big fans of can lighting. These in-ceiling lights draw zero attention to themselves while creating a foundation for excellent interior lighting. We add lamps for emphasis and mood in particular areas and put everything on a dimmer switch (see #3). This formula gives you maximum flexibility.
3. The Great Dimmer
What did people do before the dimmer switch was invented? We suspect they shielded their eyes or huddled together in the dark because there was nothing inbetween. We use dimmer switches everywhere except the bathroom. Controlling the level of every light in your home allows you to create the right mood for the moment every time.
4. Beam Me Up
We’re head over heels in love with this stunning raw wood beam wrapped with light bulbs on cords. Flip one dimmer switch and all the lights go on, at the exact intensity level you choose. The can lights in the ceiling gently illuminate the room, so this fabulous fixture can serve its true purpose—which is to create an irresistibly inviting space and a found-object, vintage vibe.
5. Open Bulb Policy
Many of our light fixtures feature exposed bulbs. Once upon a time, light bulbs might have been ugly, but clear Edison bulbs, showing the filaments within, are themselves works of art. In a chandelier with an open, orb structure, candelabra bulbs are reminiscent of candle flames. A small lamp with a square metal base and a single bulb takes the open concept one step further.
6. Double Up
Above a long dining table or bar, consider using multiple light fixtures. Especially with hanging light fixtures, we tend to think of putting just one in the middle. But lighting only the center of a long table would leave some of your dinner guests in the dark while others take the spotlight.
7. Reflections
Reflections off mirrors, glass and tile bring a secondary light source into play and add a soft, beautiful touch. Candles create particularly compelling reflections.
8. Looking Up
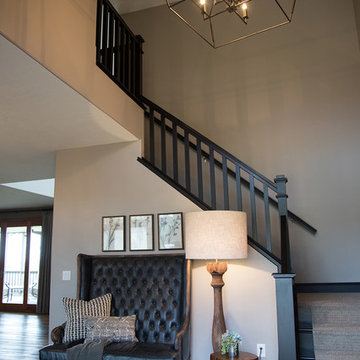
In high, open spaces, a light fixture can help balance the space, bringing the eye downward and helping make the area less cavernous and more inviting.
9. Looking Out
Lighting is also a safety issue. Make sure you can turn on the stair lights at the top and the bottom of the stairs. Incorporate the flexibility to light up the room you’re entering before you get there, so you aren’t stumbling around in the dark, trying to find the switch.
10. How Low Can You Go?
While low light may be flattering, people tend to err on the side of too little light, rather than too much. Turn up that dimmer a notch more than you would normally and you may like what you see. Having sufficient light is particularly important in areas such as basements, where there may be little to no natural light.

 Legacy Glass Studios
Custom leaded glass panel for privacy in front door, with peek-a-boo holes through the beveled glass
Glass: glue-chip bevels with clear textured glass (granite and 1/16" reed)
Lead: 3/16" rounded
Size: 1 @ ~9" x 16" x 1/4" thick
*This product was commissioned and made-to-order. If you're interested in this design, let's chat! We can recreate it for you to your specified dimensions, or we can discuss any design changes you'd like, as well as additional options for materials (glass texture, color, lead size, etc.). Reach out to hello@legacyglass.com to get started!

 Tile Trends, Inc.
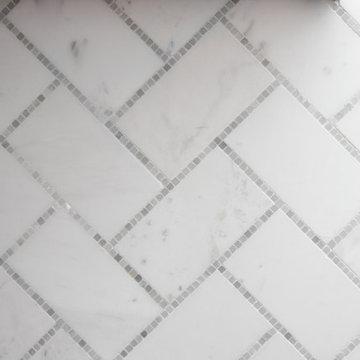
Subway Tile-Herringbone
Inspiration for a mid-sized rustic l-shaped dark wood floor and brown floor eat-in kitchen remodel with a farmhouse sink, raised-panel cabinets, dark wood cabinets, quartz countertops, white backsplash, subway tile backsplash, stainless steel appliances, an island and beige countertops
Inspiration for a mid-sized rustic l-shaped dark wood floor and brown floor eat-in kitchen remodel with a farmhouse sink, raised-panel cabinets, dark wood cabinets, quartz countertops, white backsplash, subway tile backsplash, stainless steel appliances, an island and beige countertops
 Simply Perfect
Many homeowners have their own ideas about how light or dark their home interiors should be. Some folks love nothing more than sunny, light-filled rooms. Other people adore their comforting, softly-lit spaces.
While light levels can be a matter of personal preference, lighting can also be a powerful tool for shaping the mood, emotional tone and usage of every room. In fact, lighting is just as important as furnishings.
Lighting Tips
1. Stay Warm
Cool light looks brighter to the eye and can seem more like daylight. It can also make your home feel like a hospital or grocery store, which is not what we’re going for. Warm light is softer and creates a more relaxed mood. That’s what you want in your home.
2. Yes, You Can
We’re big fans of can lighting. These in-ceiling lights draw zero attention to themselves while creating a foundation for excellent interior lighting. We add lamps for emphasis and mood in particular areas and put everything on a dimmer switch (see #3). This formula gives you maximum flexibility.
3. The Great Dimmer
What did people do before the dimmer switch was invented? We suspect they shielded their eyes or huddled together in the dark because there was nothing inbetween. We use dimmer switches everywhere except the bathroom. Controlling the level of every light in your home allows you to create the right mood for the moment every time.
4. Beam Me Up
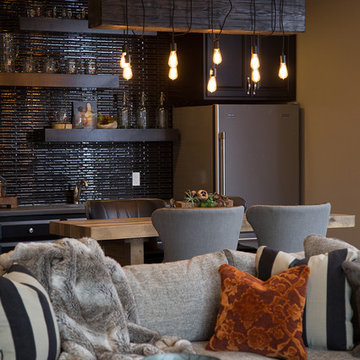
We’re head over heels in love with this stunning raw wood beam wrapped with light bulbs on cords. Flip one dimmer switch and all the lights go on, at the exact intensity level you choose. The can lights in the ceiling gently illuminate the room, so this fabulous fixture can serve its true purpose—which is to create an irresistibly inviting space and a found-object, vintage vibe.
5. Open Bulb Policy
Many of our light fixtures feature exposed bulbs. Once upon a time, light bulbs might have been ugly, but clear Edison bulbs, showing the filaments within, are themselves works of art. In a chandelier with an open, orb structure, candelabra bulbs are reminiscent of candle flames. A small lamp with a square metal base and a single bulb takes the open concept one step further.
6. Double Up
Above a long dining table or bar, consider using multiple light fixtures. Especially with hanging light fixtures, we tend to think of putting just one in the middle. But lighting only the center of a long table would leave some of your dinner guests in the dark while others take the spotlight.
7. Reflections
Reflections off mirrors, glass and tile bring a secondary light source into play and add a soft, beautiful touch. Candles create particularly compelling reflections.
8. Looking Up
In high, open spaces, a light fixture can help balance the space, bringing the eye downward and helping make the area less cavernous and more inviting.
9. Looking Out
Lighting is also a safety issue. Make sure you can turn on the stair lights at the top and the bottom of the stairs. Incorporate the flexibility to light up the room you’re entering before you get there, so you aren’t stumbling around in the dark, trying to find the switch.
10. How Low Can You Go?
While low light may be flattering, people tend to err on the side of too little light, rather than too much. Turn up that dimmer a notch more than you would normally and you may like what you see. Having sufficient light is particularly important in areas such as basements, where there may be little to no natural light.

 Erica Bryen Design
Ryan Garvin
Open concept kitchen - contemporary galley medium tone wood floor open concept kitchen idea in Orange County with an undermount sink, flat-panel cabinets, white cabinets, stainless steel appliances, an island and multicolored backsplash
Open concept kitchen - contemporary galley medium tone wood floor open concept kitchen idea in Orange County with an undermount sink, flat-panel cabinets, white cabinets, stainless steel appliances, an island and multicolored backsplash


33