
Search results for "Formulation" in Home Design Ideas
 Plain & Posh
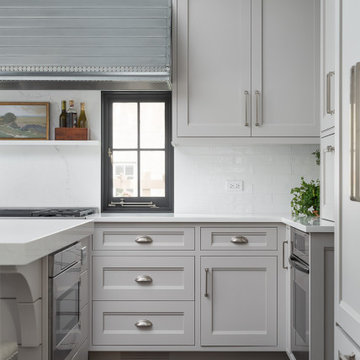
When these homeowners first approached me to help them update their kitchen, the first thing that came to mind was to open it up. The house was over 70 years old and the kitchen was a small boxed in area, that did not connect well to the large addition on the back of the house. Removing the former exterior, load bearinig, wall opened the space up dramatically. Then, I relocated the sink to the new peninsula and the range to the outside wall. New windows were added to flank the range. The homeowner is an architect and designed the stunning hood that is truly the focal point of the room. The shiplap island is a complex work that hides 3 drawers and spice storage. The original slate floors have radiant heat under them and needed to remain. The new greige cabinet color, with the accent of the dark grayish green on the custom furnuture piece and hutch, truly compiment the floor tones. Added features such as the wood beam that hides the support over the peninsula and doorway helped warm up the space. There is also a feature wall of stained shiplap that ties in the wood beam and ship lap details on the island.
 Tile Doctor Ltd
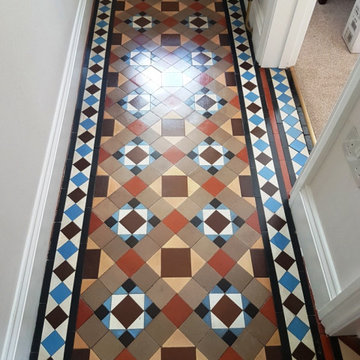
I was contacted by a homeowner who had moved into a property in the small Yorkshire market town of Masham and discovered a Victorian tiled floor under the hallway carpet. Realising this was a valuable period feature he was keen to see if it could be restored. As you can imagine he was delighted when I told him that it should be possible, and he was keen to get it uncovered and back on show.
After discussing the floor on the phone, I visited the property and removed the carpet so we could take a long look at the Victorian tile’s underneath. The carpet had protected the floor well and it was in good physical order, (i.e. no cracks etc.) it was just very dirty but was also marked with paint splashes from some untidy decorating work from the past. I confirmed none of these issues should present a problem and got the go ahead for the work to start.
There was no sealer on the floor, so I started the cleaning process using a medium dilution of Tile Doctor Pro-Clean which was worked into the tiles using a coarse 200-grit pad fitted to a rotary floor buffer. I then used a 400-grit hand-held diamond block to clean the edges which couldn’t be reached by the machine. This also removed the paint splashes which should have been on the skirting boards and not the floor!
The floor was then rinsed with water and the soil extracted with a wet vacuum. I was able to inspect the floor at this stage and spot treat areas that needed more work as they were a little stubborn. It wasn’t a large hallway and except for the paint it only needed a light clean. The result was I was able to complete the cleaning process by lunch time. I dried the floor as much as possible and left an air blower in the space for a couple of hours.
I returned later that afternoon and checked the floor for moisture using a damp meter. The floor was mostly dry, but some areas needed some more help with a heat gun. It was late summer and so still warm and so there was no need on this occasion to leave the floor overnight.
Once I was happy the floor was dry, I started sealing the tiles with the first of four coats of Tile Doctor Seal and Go. This is a specially formulated water-based blend of acrylic polymers that provides both a stain resistant surface seal and a durable low-sheen finish. It is perfect for a floor of this age as it allows moisture vapour to pass through, this is an important feature when considering a sealer for old floors which will not have a damp-proof membrane installed. If you were to apply a non-breathable sealer moisture can get trapped under the floor causing it to spread out to the walls resulting in rising damp.
The combination of the cleaning and new sealer brought the floor back to life and it now looked in keeping with the rest of the property which had numerous other period features. My client was over the moon with the difference and very happy to see the back of the grubby carpet.
Nigel Stoker
North West Yorkshire Tile Doctor
 Tile Doctor Ltd
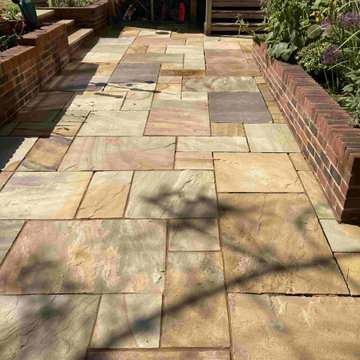
A customer from the Tunbridge Wells borough of Southborough got in touch with me regarding the renovation of their Sandstone Paved Drive and Patio. The paving surrounded the property and since all the facias had recently been renewed on the house the stone was letting the overall appearance of the property down.
It had been sometime since the Sandstone had been cleaned and as you can see from the photos what was once a beautiful stone had now darkened and lost much of its natural colour. I went to the property to do a quick site visit to check what needed to be done. I worked out a quote for cleaning to the stone which was accepted and a convenient time to carry out the work was agreed.
I have a very powerful high pressure cleaning system installed in my van which makes short work of cleaning stone and brick. Not only is it very effective at cleaning its designed as a closed system, so all the waste is extracted back to a large grey water tank in the van. Now you can use an everyday power washer to clean up external stone however they are not as powerful and so take much longer, also the result does not tend to be as good.
It was a large area, so I approached the job in sections and started by pre-wetting the stone with water. Then I applied Tile Doctor Patio & Brick Driveway Cleaner which is a powerful outdoor cleaning solution formulated to power through patio blackspots, lichen, moss, and stains. This is a commercial product designed for professional use so if you are looking at using it yourself, please take care and use the right protection.
The cleaner was left to soak into the really dirty areas whilst I focused on the cleaning the other parts of the drive and patio with the van mounted pressure washer. I was then able to return to the deeper stains later. Using a combination of the Tile Doctor Brick and Patio Cleaner along with our van mounted pressure cleaning system we were able to completely transform the properties kerb appeal.
Applying a sealer now the Sandstone was clean would have improved the look of the stone further and made the patio easier to keep clean going forward; however, it was a very large area which would require a lot of sealer. Keen to keep the cost down it was agreed not to apply a sealer and instead they intend to do more regular cleaning. The patio did look in great condition following the deep cleaning and so difficult to justify at this stage.
My customer was very happy with the transformed patio and the look of delight was clearly visible. It’s a great feeling when you have a happy customer and this was one of those jobs where their satisfaction was so uplifting, especially during these times.
Michael Conlon
South Kent TIle Doctor
Find the right local pro for your project

 Tile Doctor Ltd
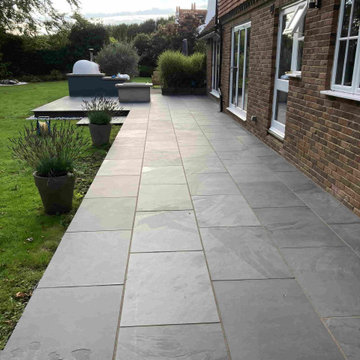
Our client in the villager of Pembury was feeling really deflated after having a Slate Patio laid adjacent to the full length of her house, however the builder had not applied the sealer correctly creating a mess which ruined the appearance of the stone.
Unfortunately, it is not that unusual to be contacted about this sort of situation, applying a sealer is not as easy as manufactures make out. There are lots of factors to consider, choosing the right sealer, is the stone damp, how do you know if you have applied too much, and it often catches tradesmen out. I was able to reassure them that with the right combination of products and equipment the problem could be rectified.
The first job was to strip off the old sealer which was done using a product called Tile Doctor Remove and Go. The name of this product pretty much says it all and once applied to the stone it is left to soak in for ten to twenty minutes before being scrubbed in with a rotary machine fitted with an abrasive burnishing pad.
Tile Doctor Remove and Go is a multi-purpose stripper which will remove most coatings and sealers, including epoxy grout haze which is another common problem we encounter when tradesmen have not cleaned up properly after grouting. It is also good for removing heavy build ups of grease. I used several burnishing pads of different grits going from coarse to smooth on this patio, rinsing and extracting the soil after each pad.
It was a large area, so this process took up most of the day on its own, fortunately I use a van mounted high pressure cleaning and extraction system to remove the soil which is very efficient and leaves the stone bright clean and reasonably dry afterwards. This ensures the process can be carried out with minimal mess.
It was a nice warm summers day and although cloudy we didn’t get any rain overnight, so after checking the forecast I was able to return the next day and apply a fresh sealer to the Slate.
My client wanted a natural look, so I used Tile Doctor Ultra Seal. This product is a no-sheen, natural-look, impregnating sealer which is formulated to provide maximum stain protection. These impregnating sealers work by penetrating the stone, occupying its pores, and thus preventing dirt from residing there.
The client was so happy and relieved to see the results on what a very expensive patio and commented she was eager to get the first barbecue of the season underway.
We recommended that a regular with the jet wash should keep the patio in good condition and in a few years time we could return to reapply the sealer for them.
Michael Conlon
South Kent Tile Doctor
 Windy City Painters
Refresh Your Space with the Best Kitchen Cabinet Painting in Chicago!
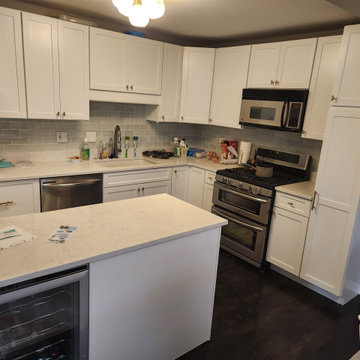
Looking for a Kitchen Cabinet Painting Transformation in Wicker Park? Our premier Chicago painting company just completed this stunning cabinet refinishing project, proving that you don't need a full remodel to achieve a high-end, designer look.
As local Chicago painters specializing in professional cabinet painting, we understand the unique aesthetic of Windy City homes—from historic bungalows to modern West Loop condos. Our team focuses on high-durability finishes and meticulous cabinet spraying techniques that deliver a smooth, factory-like appearance. From thorough degreasing and sanding to the final topcoat, every step is handled with the expert care your home deserves. These Wicker Park homeowners are absolutely thrilled with their kitchen's modern new vibe!
Kitchen Cabinet Painting: Frequently Asked Questions
How long does the professional kitchen cabinet painting process typically take from start to finish?
Most residential projects take between five to seven business days. This timeframe includes the removal of doors for off-site spraying, meticulous on-site masking of your kitchen "shell," and the necessary curing time between coats to ensure a rock-hard, durable finish.
What type of paint or finish do you use to ensure the cabinets don't chip or peel over time?
We utilize industrial-grade Italian coatings or high-end waterborne alkyd enamels specifically formulated for cabinetry. These products are much harder than standard wall paint, providing superior resistance to moisture, kitchen grease, and the daily wear and tear of a busy Chicago household.
Do I need to empty all of my kitchen cabinets and drawers before the painters arrive?
While you don't necessarily need to empty the backs of the shelves, we require all items to be moved at least six inches back from the front edges. However, for the best dust-free results, we highly recommend emptying them completely to protect your cookware.
Can you paint cabinets that are made of laminate, thermofoil, or or dark-stained oak?
Yes, we can! The secret lies in the bonding primer. We use specialized high-adhesion primers that "bite" into slick surfaces like laminate or seal the grain of deep oak, ensuring the color stays vibrant and the surface remains perfectly smooth without peeling.
How should I clean and maintain my newly painted cabinets to keep them looking fresh for years?
To maintain the finish, simply wipe them down with a soft microfiber cloth and a gentle mixture of warm water and mild dish soap. Avoid using harsh chemical cleaners, abrasive scrubbing pads, or wax-based polishes, as these can break down the protective topcoat over time.

 Tile Doctor Ltd
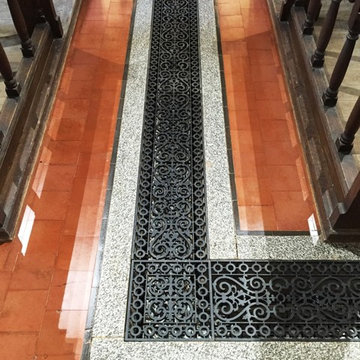
Did you know that Wantage, the town in Oxfordshire where I completed this job, is the birthplace of Alfred the Great? The town is certainly a historic area – in fact, I was contacted by the warden of a church dating back to the 12th century, who asked Tile Doctor Oxfordshire to help restore the building’s flooring, consisting of Quarry and Marble tiles.
This is an interesting mix of hard wearing and high end tiles, and while the floor was in
dire need of a deep clean, it could be restored back to looking fantastic once again.
The church has recently undergone a complete refurbishment with the help of a grant from lottery money. We were called after the builders had finished their work, to restore the floor to the finish required by the church warden.
His specification was to provide the Marble with a Matt finish and the Quarry tiles with a sheen finish. The floor was, at one point in its history, covered in carpet which had been taken up, no doubt exposing many years’ worth of muck.
My first task was to clean the floor with a diluted solution of Tile Doctor Pro-Clean, a high alkaline cleaner safe to use on tile and stone. This was left to dwell for a short period to seep into the tile, before being scrubbed in to remove the initial layers of muck. The resulting residue was promptly vacuumed away.
To tackle the tougher areas of soil buildup, I opted to use Tile Doctor Nanotech HBU which was spread over the floor and left to dwell for about 30 minutes. This product differs from most cleaners in that it uses nano-sized cleaning particles to deal with difficult to reach dirt ingrained in the stone. I then rinsed the area with water and vacuumed this up.
Due to the substantial size of the church floor I had to work in multiple sections, and so the cleaning process took three days to complete. After finishing, I left the church for a few days to allow the floor time to dry.
When I returned to the church I checked the floor with a damp meter and was satisfied that it was dry enough to seal.
First, I sealed the Marble tiles with Tile Doctor Colour Grow, which is a colour enhancing impregnating sealer suitable for use on high end stone such as Marble and Limestone. I applied two coats, leaving a few hours between coats; this brought the colour back without a high shine, as per the church warden’s request.
The next day I returned to seal the Quarry tiles, this time using Tile Doctor Seal & Go Extra which is a topical sealer specially formulated to lea e a nice sheen as requested. I applied several thin coats of the sealer to build up solid protection on the floor.
The warden was extremely pleased with the finished floor, leaving the following feedback:
“We found the Tile Doctor online and watched some of the very helpful slideshows on YouTube. The Victorian Quarry tiles in our 12th century church had been covered with carpet for many years and needed a thorough clean and polish at the end of our major restoration project. Barry was very quick to respond to our enquiry and over the course of a week he did a brilliant job on our tiles. We’re delighted with the results, just in time for our reopening service with our bishop and MP.”
Barry Woodward
Oxfordshire Tile Doctor
 Tile Doctor Ltd
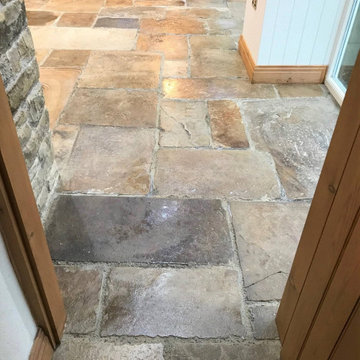
We had been to maintain this Sandstone floor about two years previously at a property in the pretty area of Windermere in the English Lake District. The client had run out of our Tile Doctor Neutral Tile Cleaner that we left after completing the job and had started using a standard cleaner instead (a well-known ecological cleaner). Unfortunately, this product has a 5% non-ionic surfactant in its chemical structure, which will strip a coat of stone sealer off the surface within 6 months, once that topcoat has been removed the sealed surface is only 50% as strong as it should be.
Readers of this article should be aware that even washing up liquid which is a degreaser will strip sealers although it will take many months of regular use before you will start to notice an issue. Stronger bleach-based cleaning products such as Flash and Domestos will cause instant damage to stone sealer which will often go an off-white colour as a result. So, the importance of using the right cleaner is imperative. Having used our services on this floor previously he client knew what to expect and was happy to go ahead with our quote.
My first task would be to clean the floor and completely remove what was left of the old sealer to ensure the floor would have a consistent appearance. On this occasion I used a strong 1:3 dilution of Tile Doctor Pro-Clean worked into the floor with a Black buffing pad fitted to a rotary buffing machine. The Sandstone floor was then rinsed with water, scrubbed again and then the waste extracted using a wet vacuum.
This was followed with acid rinse using a 1:5 dilution of Tile Doctor Grout Clean-Up, this is a Phosphoric Acid (not a Brick Acid). After being scrubbed into the tile it was rinsed off the floor as before using water and the wet vacuum. This process further cleans the stone and neutralises the floor after the use of the strong alkaline Pro-Clean used earlier.
Before leaving for the day I gave the floor one final rinse with water and then dried the floor as much as possible with the wet vacuum. The floor was now clean and free of sealer and left to fully dry off overnight.
I came back the following morning and started by testing the floor with the moisture meter. I always do this as I know from experience how important it is to ensure the floor is dry before applying a sealer.
Happy the Sandstone was dry I then proceed to apply the first of what would be four coats of sealer. For this I used Tile Doctor Seal and Go which leaves a nice low sheen finish. This product is specially formulated blend of acrylic polymers that provides will protect the floor from ingrained dirt and staining; it will make the floor easy to clean and has the added advantage of being water based so it doesn’t leave a solvent smell as it dries.
The client was left another complimentary bottle of Tile Doctor Neutral cleaner and hopefully the seal will last a long longer the 2nd time around. The client was pleased the floor had been restored and vowed to use nothing but Tile Doctor products on it in the future.
Heidi Taylor
South Cumbria Tile Doctor

 Adobe Interiors
The Chisum Quill Barstool is stunning, not only for its solid hardwood framing, but particularly for its hand burnished-tufted leather with a contrasting ostrich pattern leather on the outback. Crafted to be either bar or counter height, this fine rustic barstool will make a statement in any home dining room or living area. Brass-studded accents and solid hardwood framing provide the perfect motif for this accent piece. The armrests' gentle sloping feature is a juxtaposition to the sturdily squared hard lines of the base of the barstool. All handcrafted and designed, the Chisum Quill Stool provides a uniquely authentic experience and rustic elegant charm to any space. If beauty and charm along with a stand alone character are what you seek, dive into the experience with our Chisum Quill Barstool and bring life to your home. Best as a dynamic set, these barstools are hand made classics for you. 100% American Made to the highest standards of quality and craftsmanship.
Overall Barstool Dimensions: 43" H x 26" W x 22" D
Seat Height: 30"
Top of Arm Height: 40"
Overall Counter Stool Dimension: 38" H x 26" W x 22" D
Seat Height: 25"
Top of Arm Height: 35"
Leather Description: Dyes and waxes are hand applied to South American raw material to impart a transparent clarity. This coupled with substrate gives the leather a sophisticated, pebble grain appearance. All of the aniline dyes applied to the hides are hand rubbed in North Carolina by skilled artisans drawing from years of creative experience creating an impressive patina. The absence of pigments adds to the natural softness of the hides. A light protective top, utilizing a proprietary formulation developed by the tannery creates the exquisite touch Legends is know for and makes the leather suitable for active family homes. Because of the depth and transparency of this leather, natural markings will be exposed and should not be confused as defects or deficiencies, but appreciated as Nature's Autograph of Authenticity found in the finest full grain leathers.
Embossed Leather Description: The leather hide is first embossed with an ostrich pattern and then colored by applying two base color coats of micro pigments. The leather is then wiped-off to give it a contrast of colors utilizing the base color combination. This color contrast is further accented by two additional top coat colors that are wiped-on by hand to give the leather a beautiful antique look. The last step is to slightly protect the hand work of the leather hide with a lacquer topcoat that provides great depth and warmth to the finished product.
100% top grain cowhide leather is characterized by variations in shade, texture, color and grain. Healed marks and scars are to be expected and enhance the natural beauty of the hides. These variations should not be considered defects as they are normal and unique features of genuine 100% top grain cowhide leather.
Frame Construction: Made with American Alder Wood, our frames are glued, screwed and dowelled at the joints. Two coats of high quality stain is hand rubbed on the wood finish and then sealed with industrial grade clear coat.
 Skylar Morgan Furniture + Design
Bar Countertop
Materials: Zinc
Large transitional u-shaped dark wood floor eat-in kitchen photo in Atlanta with recessed-panel cabinets, distressed cabinets, stainless steel appliances and a peninsula
Large transitional u-shaped dark wood floor eat-in kitchen photo in Atlanta with recessed-panel cabinets, distressed cabinets, stainless steel appliances and a peninsula

 Mayita Dinos Garden Design
mayitadinosphotography.com
Design ideas for a tropical landscaping in Los Angeles.
Design ideas for a tropical landscaping in Los Angeles.

 Coco Maison Design
We reimagined a closed-off room as a mighty mudroom with a pet spa for the Pasadena Showcase House of Design 2020. It features a dog bath with Japanese tile and a dog-bone drain, storage for the kids’ gear, a dog kennel, a wi-fi enabled washer/dryer, and a steam closet.
---
Project designed by Courtney Thomas Design in La Cañada. Serving Pasadena, Glendale, Monrovia, San Marino, Sierra Madre, South Pasadena, and Altadena.
For more about Courtney Thomas Design, click here: https://www.courtneythomasdesign.com/
To learn more about this project, click here:
https://www.courtneythomasdesign.com/portfolio/pasadena-showcase-pet-friendly-mudroom/

 Fratantoni Interior Designers
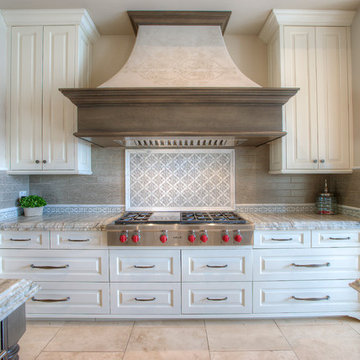
Luxury Transitional Home by Fratantoni Design, Fratantoni Interior Design, and Fratantoni Luxury Estates.
Follow us on Twitter, Facebook, Instagram and Pinterest for more inspiring photos of our work!
 Richmond Commercial Painting
Richmond Commercial Painting provides full-service Milwaukee commercial interior painting for commercial buildings.We are skilled at applying all types of floor and wall coverings. We perform electrostatic painting for heat registers, bathroom stalls, or elevator doors and frames.
There is a lot more to commercial interior painting than just brushing, rolling or spraying a coating on a substrate. Preparation for painting, particularly on rehabilitation jobs, can be very involved and require elaborate equipment and technical expertise. In commercial painting and repaints there is usually production and office equipment and furniture to protect. There is a need for project coordination to assure the smooth, non-disruptive flow of the work.
Milwaukee commercial interior painting often calls for specialized coatings because of environmental and high traffic concerns. The right equipment and expertise are required for the proper application of highly technical coatings. Unlike some of the other painting companies in the area, these production elements are readily available at Richmond Painting. The highly experienced staff of project coordinators and applicators is familiar with the equipment and coatings materials to assure owners of the best possible experience in any commercial interior painting project.
Our commercial painting pros apply coatings to ceilings, walls and floors with attention to detail and care for the surrounding elements of the room. They apply acrylic ceiling and wall textures as well as latex paints. They finish floors in a wide variety of materials formulated to provide attractive, durable, high-traffic surfaces. Richmond Painting is a one-stop source of all commercial interior painting projects, large or small.
Our successfully completed projects list includes schools, hospitals, hotels, nursing homes, office complexes, warehouses, factories, high-rise apartment buildings and a host of others. We have experience in every type of commercial structure between Racine and Milwaukee.
commercial interior painting in milwaukeeRichmond Painting is in Racine, WI and from this central point we dispatch crews to projects throughout the Milwaukee area, including the northern suburbs of Washington Mequon, Grafton, Cedarburg, and southern areas like Pleasant Prairie, Sommers , Racine, Oak creek, and even as far south as Libertyville, IL in some cases. We serve any professional commercial coatings needs within Racine, Kenosha, Milwaukee, Waukesha , Walworth, Washington and Ozaukee counties.
The estimating and project coordination experts at Richmond Painting and Decorating are available to assist in every step of a Milwaukee commercial interior painting project. We work with owners on budgeting, with general contractors on the critical flow chart for the coatings part of their contracts and with designers on materials and color selections. Where coatings are the majority of a contract, we assume the overall project coordination and completion responsibilities. We take pride in our work and do everything humanly possible to assure a successful completion of the job.
When a project is done right the first time, the proper material is used by highly qualified applicators and the job is done with a minimum of disruption to an active business, it is well worth the money spent. It really costs no more to get the very best.
Again, we provide commercial painting services to a wide local area including; but not limited to: Bethesda, Alexandria, Potomac, Arlington, Great Falls, Vienna, Silver Spring, Fairfax, McLean, Rockville, and Woodbridge.
 Richmond Commercial Painting
Richmond Commercial Painting provides full-service Milwaukee commercial interior painting for commercial buildings.We are skilled at applying all types of floor and wall coverings. We perform electrostatic painting for heat registers, bathroom stalls, or elevator doors and frames.
There is a lot more to commercial interior painting than just brushing, rolling or spraying a coating on a substrate. Preparation for painting, particularly on rehabilitation jobs, can be very involved and require elaborate equipment and technical expertise. In commercial painting and repaints there is usually production and office equipment and furniture to protect. There is a need for project coordination to assure the smooth, non-disruptive flow of the work.
Milwaukee commercial interior painting often calls for specialized coatings because of environmental and high traffic concerns. The right equipment and expertise are required for the proper application of highly technical coatings. Unlike some of the other painting companies in the area, these production elements are readily available at Richmond Painting. The highly experienced staff of project coordinators and applicators is familiar with the equipment and coatings materials to assure owners of the best possible experience in any commercial interior painting project.
Our commercial painting pros apply coatings to ceilings, walls and floors with attention to detail and care for the surrounding elements of the room. They apply acrylic ceiling and wall textures as well as latex paints. They finish floors in a wide variety of materials formulated to provide attractive, durable, high-traffic surfaces. Richmond Painting is a one-stop source of all commercial interior painting projects, large or small.
Our successfully completed projects list includes schools, hospitals, hotels, nursing homes, office complexes, warehouses, factories, high-rise apartment buildings and a host of others. We have experience in every type of commercial structure between Racine and Milwaukee.
commercial interior painting in milwaukeeRichmond Painting is in Racine, WI and from this central point we dispatch crews to projects throughout the Milwaukee area, including the northern suburbs of Washington Mequon, Grafton, Cedarburg, and southern areas like Pleasant Prairie, Sommers , Racine, Oak creek, and even as far south as Libertyville, IL in some cases. We serve any professional commercial coatings needs within Racine, Kenosha, Milwaukee, Waukesha , Walworth, Washington and Ozaukee counties.
The estimating and project coordination experts at Richmond Painting and Decorating are available to assist in every step of a Milwaukee commercial interior painting project. We work with owners on budgeting, with general contractors on the critical flow chart for the coatings part of their contracts and with designers on materials and color selections. Where coatings are the majority of a contract, we assume the overall project coordination and completion responsibilities. We take pride in our work and do everything humanly possible to assure a successful completion of the job.
When a project is done right the first time, the proper material is used by highly qualified applicators and the job is done with a minimum of disruption to an active business, it is well worth the money spent. It really costs no more to get the very best.
Again, we provide commercial painting services to a wide local area including; but not limited to: Bethesda, Alexandria, Potomac, Arlington, Great Falls, Vienna, Silver Spring, Fairfax, McLean, Rockville, and Woodbridge.
 Douglah Designs
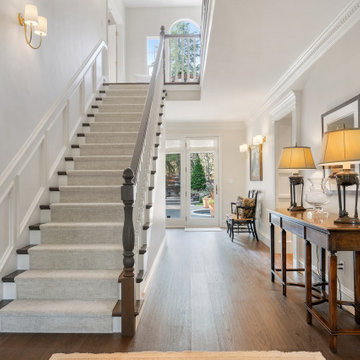
This traditional renovation project by our Lafayette studio was a joy to work on. The entryway sets the tone with its grandeur and sophistication, boasting a warm and welcoming ambiance that's perfect for greeting guests. The bedrooms are peaceful retreats, featuring a cozy and comfortable atmosphere ideal for rest and relaxation.
The family room exudes elegance and charm, creating a space that's ideal for both entertaining and unwinding. The dining room is designed for gathering with loved ones, with its tasteful decor and comfortable seating. The bathrooms, with luxurious amenities and a serene atmosphere, promotes relaxation and rejuvenation.
The kitchen is a chef's dream, with its top-of-the-line appliances, high-quality finishes, and ample counter space for meal prep. The laundry room is both functional and stylish, making this household task a breeze. Whether you're hosting a dinner party or simply spending a cozy night in, this traditional renovation project has everything you need to live comfortably and luxuriously.
 Tile Doctor Ltd
This ground floor flat in the City of Oxford had been converted from a shop which as you can imagine, was quite complex. One significant element involved in the conversation was the restoration of an old Quarry tiled floor which ran through the main hallway and had for many years been covered in a commercial linoleum covering.
When the linoleum covering was removed, the sheer amount of glue which had been used to affix it had completely ruined the appearance and condition of the Quarry tiles. There was also a lot of concrete in the bathroom, and our client was keen to have this removed in the hope that the tiles beneath were salvageable.
My first task at the property was to deal with the adhesive. I covered the entire floor area with Tile Doctor Remove and Go and then covered it with a plastic sheet and leaving it to soak into the glue and break it down overnight. Remove and Go is powerful stripper with a long-dwell time, formulated to break down adhesives and paint stains, amongst other coatings.
I returned the next day and, removing the plastic sheeting, I scrubbed the floor with a carbon brush attached to a rotary floor scrubber to remove the huge glue deposits. I worked in sections, rinsing each area of the floor with water after it had been scrubbed. Once I had finished the entire floor there was still some glue remaining, so I covered it again with a solution of Remove and Go combined with Tile Doctor HBU Nanotech, which utilises nano-sized particles to get underneath tough stains, dissolve them, and lift them out. I left this solution on the floor for about two hours to dwell and scrubbed it again.
During the next day of work, I used a very coarse 100 grit diamond burnishing pad to manually grind away the remaining stubborn bits of glue. Paying attention to the bathroom, I used a 50-grit coarse milling pad followed up with a 100-grit diamond burnishing pad to do the same to the area of concrete.
The next part of the process was to use Tile Doctor Grout Clean Up to acid wash the floor. This was successful in removing the last bits of cement and the remaining residue of the glue. To complete the cleaning process, I then rinsed the floor with plenty of water and vacuumed up any soiled solution.
I opted to leave the floor alone for a couple of days to fully dry off so that it could be sealed upon my return. This is crucial as any moisture or damp issues can damage the performance of the sealer and expose the floor to further ingrained dirt and staining.
To seal the floor, I used Tile Doctor Colour Grow. This is an impregnating sealer that also enhances the natural reddish shades in the Quarry. I applied two coats of the sealer, giving the floor the natural look matte finish the customer desired.
The customer was very impressed with the results of this thorough restoration. She even left the following feedback:
“I cannot recommend this service enough. The Oxford Tile Doctor (Barry) was a superstar: he cleaned up the tiles in my hallway, which were covered in a very thick layer of glue, and removed concrete from the tiles. They now look superb and I’m really happy with the outcome. Barry was always on time, considerate, and kept me up to date. The quote for the job was exactly right. I would not hesitate to recommend him.”
 Windy City Painters
Does your iron fence look like Chicago winters have been winning the battle for years? That slow orange spread across pickets and rails is not just an eyesore - it is active corrosion undermining the structural integrity of metalwork that frames some of Chicago's most architecturally significant residential properties. Windy City Painters addresses iron fence rust at the source, using professional-grade rust conversion chemistry and direct-to-metal coatings engineered for the specific abuse Chicago's climate delivers.
PROJECT OVERVIEW
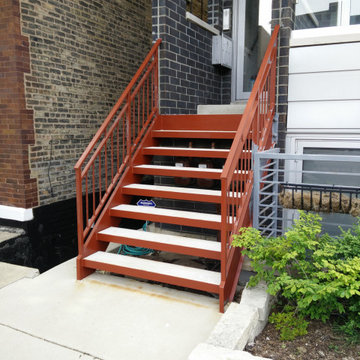
This project involved a heavily rusted ornamental iron fence on a Chicago North Side residential property. Rust had progressed beyond surface oxidation into moderate pitting on lower rails, a pattern Windy City Painters sees frequently on properties within blocks of treated roadways where salt drift accelerates corrosion. The scope included mechanical descaling, chemical rust conversion, DTM priming, and a durable gloss topcoat matched to the original fence color.
MATERIALS AND PRODUCTS
Ospho Rust Converter: A phosphoric acid-based treatment that chemically reacts with iron oxide, converting it to iron phosphate - a stable, paintable compound. Corroseal Water-Based Rust Converter is an alternative for situations requiring lower VOC handling. Rust-Oleum Professional DTM Primer and Sherwin-Williams DTM Acrylic Coating serve as the primary coating system, formulated for direct metal adhesion with built-in rust inhibitors. For structurally compromised sections, welding is coordinated before any chemical or coating work begins.
THE PROCESS
Step 1 - Mechanical Preparation: Wire wheel grinding on an angle grinder removes loose rust scale, mill scale, and flaking paint. For advanced pitting, Windy City Painters deploys a needle gun descaler, which impacts the metal surface thousands of times per minute to drive scale from deep cavities. This step determines whether the fence can be coated or needs welding first.
Step 2 - Chemical Rust Conversion: Ospho or Corroseal is brushed onto all remaining rust surface. These products do not simply seal rust - they react with it. The conversion process takes 24 hours to fully cure before topcoating. Skipping this step is the single most common reason iron fence paint jobs fail prematurely.
Step 3 - DTM Priming: Sherwin-Williams DTM or Rust-Oleum DTM primer is applied by brush to ensure full penetration around decorative elements, picket tips, and weld joints. Spray application is used on open sections for even film build. DTM formulations bond directly to prepared metal without a separate shop primer.
Step 4 - Finish Coating: A DTM topcoat in gloss or semi-gloss provides the final weather barrier. Gloss is preferred for iron fencing because the harder surface sheds water more effectively and resists dirt adhesion between maintenance cycles. Windy City Painters applies two finish coats for maximum film thickness.
CHICAGO-SPECIFIC CHALLENGES
Chicago's freeze-thaw cycle is the primary enemy of iron fence coatings. Water infiltrates micro-cracks in paint film, freezes, expands, and delaminate coating from beneath. Properties on the North Side and Near West Side also contend with lake-effect humidity that keeps metal surfaces damp for extended periods, slowing cure times and promoting under-film corrosion if preparation is inadequate. Greystones and Victorian brownstones typically feature ornate cast iron or wrought iron fencing with complex geometries that trap moisture and demand hand-brush application to fully coat recesses.
WHAT TO EXPECT LONG-TERM
A properly prepared and coated iron fence in Chicago should hold 5-8 years before requiring recoating. Annual inspection of weld joints, picket tips, and base rails closest to grade will identify early rust return. Addressing small spots with touch-up converter and primer extends service life significantly between full recoats.
PRO TIPS
Tip 1: Never pressure wash a rusted iron fence immediately before painting. Water drives moisture into pits and delays the surface drying needed for chemical converter adhesion. Allow 48 hours of dry weather before prep begins.
Tip 2: Picket tips and rail ends are the first failure points. These end-grain equivalent areas on metal concentrate corrosion. Ask your painter to apply an extra brush coat to every tip and terminus.
Tip 3: Black is the traditional and most durable color choice for iron fencing. Dark pigments absorb UV rather than reflecting it, reducing thermal cycling stress on the paint film at color change boundaries.
FAQ
Q: What does iron fence painting cost in Chicago?
A: Most residential iron fence painting in Chicago ranges from $400 to $1,200 depending on linear footage, rust severity, prep method required, and whether structural welding is needed before Windy City Painters can coat the surface.
Q: How do I know if my fence needs a welder before painting?
A: If you can press a screwdriver through a rail or picket, the metal wall has failed. Windy City Painters inspects all fencing before quoting and identifies weld-required sections so repairs happen before any coating investment.
Q: Is Ospho or Corroseal better for my fence?
A: Both convert rust effectively. Ospho is solvent-based and fast-acting, preferred for heavy rust. Corroseal is water-based with lower odor, preferred in enclosed or residential settings where off-gassing is a concern. Windy City Painters selects based on site conditions.
Q: Can iron fence painting be done in winter in Chicago?
A: Application requires temperatures above 50 degrees Fahrenheit for DTM coatings to cure properly. Most iron fence painting in Chicago runs April through October, with scheduling flexibility based on extended warm stretches.
Q: How do I maintain my fence between professional recoats?
A: Inspect annually in spring. Sand any rust spots to bare metal with 80-grit paper, apply Ospho, let cure 24 hours, then spot-prime with DTM primer and touch up with finish coat. Windy City Painters offers maintenance inspections.
Q: Do you paint courtyard building fences and coach house gates?
A: Yes. Multi-unit courtyard buildings and coach houses are common in the North Side neighborhoods Windy City Painters serves. We coordinate with property managers and HOAs for larger perimeter fence projects.
Q: How long after painting can I touch the fence?
A: DTM coatings are typically dry to touch in 2-4 hours and hard dry in 24 hours. Full cure for maximum hardness takes 7 days. Windy City Painters advises against pressure washing or heavy contact during that cure window.
Visit windypainters.com to request your free iron fence assessment and project quote.
24