
Search results for "Framework" in Home Design Ideas

 Worth Design Build, Inc.
Studio Laguna Photography
Staircase - mid-sized modern wooden straight staircase idea in Minneapolis with wooden risers
Staircase - mid-sized modern wooden straight staircase idea in Minneapolis with wooden risers

 Sanford Custom Builders, Inc
Built by Sanford Custom Builders and custom designed by Jan Gleysteen Architects, this classical shingle and stone home offers finely crafted architectural details throughout. The home is situated on a gentle knoll and is approached by a circular receiving court. Amenities include 5 en-suite bedrooms including a master bedroom with adjoining luxurious spa bath, walk up office suite with additional bath, media/movie theater room, step-down mahogany family room, first floor office with wood paneling and barrel vaulted ceilings. On the lower level there is a gym, wet bar and billiard room.
 Denyne Designs
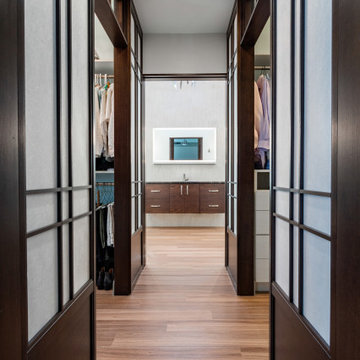
Luxurious Zen best decribes this Asian inspired master bath suite. Custom shoji screen panels line the hallway as you enter flanked by his and hers walkin closets. A foating vanity with lift up LED mirror sits center stage, with a generous free standing soking tub on the left, and an oversized custom shower on the right. Walnut wood floors and a cedar clad ceiling give warmth and ground the space.
Find the right local pro for your project

 Maher & Greenwald Fine Gardens
This is an example of a large traditional partial sun backyard stone garden path in New York.
 Skill Construction & Design, LLC
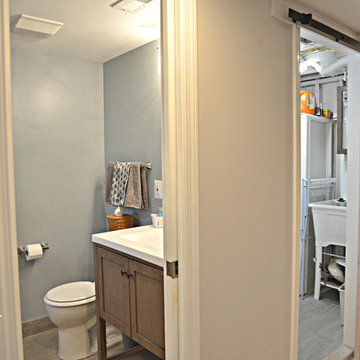
Our Customer wanted to add an additional bathroom in basement to accommodate her growing family. Basements are often an overlooked and underutilized area of the home. With careful design considerations for a basement remodel, the once cold and dark underground space can go from dark and scary to warm and inviting. Whether you are looking to completely remodel your space or increase your footprint by adding in a bathroom to your basement, there are countless transformation ideas to meet your family needs.
We created a comfort and style bathroom with a rustic feel laundry room in this dark and unfished area of the basement. This new simple basement bathroom was transformed with multi-sides subway tiles in the shower surround, the unique personalized Elongated Hex Moon Gate 1x3 tile shower pan, the reclaimed wood-look tile floors, a modern-rustic feel to the sink area, warm grey-blue paint and a fun Kohler Exhale® B120 2.0 gpm multifunction handshower as a showerhead. Cozy Decorative accents such as the 12x12Gray Blend Waterfall Glass tile in the large wall-to-wall niche and the soft Vibrant Brushed Nickel finishes, created a tranquil vibe to the room. The Optic tempered window and Kohler Fluence Sliding shower door allows natural light in this sunken lair of the house.
This simple basement laundry room was transformed by continuing the reclaimed wood-look tile floors, off-white paint and multipurpose laundry rooms sink. Cozy decorative accents like a whitewashed barn door and painting the framework and ceiling gave this space a rustic feel the Customer wanted. The Whitewash barn door added a distinctive rustic look, while providing dual function of privacy and decor without taking up extra space.
Photo Credit: Suzanne Kalmin, Social Bug


 Advance Design Studio, Ltd.
After six years of living in their Huntley IL home, Chris and Meghan were tired of their dark, dingy, outdated kitchen and it was finally time for a long-anticipated change. “The kitchen is the place where we live, it’s where we do everything,” Meghan said. “It was important that it be a space where we wanted to be.” Meghan loves cooking and enjoys including their girls in healthy meal prepping, this led them to want a brighter, more enjoyable kitchen with increased functionality and improved storage.
For Chris especially, the laundry room was an entirely dysfunctional eyesore. “We had a washer and a dryer, but it was all kind-of cobbled together!” Chris said. “There were always laundry piles everywhere, we weren’t really sure what we wanted to do in there, but it was time for us to make a change.” The mess of the space was stressful every time they walked in the door from the garage each day. Kids’ backpacks and shoes piled up haphazardly in the makeshift boot-bench closet left the family feeling disorganized and stressed. They needed space for folding clothes and locker cubbies to help keep the family organized.
Having known Christine and Todd in the Huntley community for years, Chris and Meghan were familiar with their work. “We already trusted them personally and having seen their projects for years we knew they did top notch work. After we reviewed the initial round of designs, we knew that hiring them was definitely the right choice,” Meghan and Chris said. Although Chris had done a lot of work in their home himself, the kitchen and laundry room renovation was such a large undertaking that he didn’t want to steal time away from his family to spend what would surely be many long weekends doing the job himself. “That would not have been a wise choice for us,” Chris laughed.
“Our designer, Michelle was very, very, easy to work with; anything we wanted to see or weren’t sure about, she went above and beyond to make this easy for us. She was easy to get hold of and always quick to respond,” the couple said. Michelle pulled ideas that mirrored the couple’s taste and style and was adept at directing the couple to limited choices that didn’t overwhelm them and kept the process moving. “I have a hard time making decisions. Michelle made the decision-making process so easy. I loved how she listened to what I liked and then presented three great options for me to choose from,” Meghan said.
The main objectives for the kitchen were better storage solutions, they wanted the space to reflect their lifestyle and taste, and they wanted it to last for years with low maintenance. One of the first steps in creating a more functional kitchen was relocating the refrigerator, creating an improved workflow for the busy family.
“We didn’t know that we could even move the refrigerator to a new location where it is now, that was something that we never would have thought of,” Chris said. “The new refrigerator location makes the kitchen feel so much bigger. We didn’t add any space, but our whole kitchen with the new design just seems like it’s so much larger than before!” Meghan said.
The perimeter mist colored cabinets helped warm and brighten the entire room, while the graphite colored cabinets on the island added contrast. Using this fresh, clean color palette satisfied the couple’s desire for a bright space that was the exact opposite of what they had before. Organization accessories were also added to the cabinets such as a spice drawer tray and roll outs to create hidden convenience.
“I absolutely love the hidden spices – it makes cooking so much more enjoyable!” Chris said. “And all the pull outs, and the double trash bin, who would think you could get so excited about organization!” the couple said in unison.
One thing they hated in their original kitchen was how dark the space felt. Added lighting on the ceiling with the new light fixtures combined with the lighter cabinetry colors throughout solved this problem. “Our new kitchen has this warm, almost cozy feeling that our old kitchen never had, it’s just a space that I love spending my time in now,” Meghan said. The light airy feeling was accentuated with the use of floating white shelves on either side of the decorative range hood. “We have so much cabinetry space, the new design is amazing we actually have more storage space than we will ever need,” Meghan said.
The island was extended to create more work surface and added space for stool seating. “The new island changes how we live. Now the kids can be in the kitchen with us, doing homework, eating breakfast, and the three of us have special dinners there when Chris is working late,” Meghan said.
The Carrara Marmi Quartz countertops were chosen because they are, not only beautiful, but are made from hard-working material that doesn’t require maintenance. The white subway tile backsplash that wraps to the ceiling behind the focal point cooktop range/hood compliments the crisp white countertops perfectly, while brushed brass hardware and light fixtures keep the design fresh and new.
The couple had a few fears at the beginning of the project, as most homeowners do. Their biggest fear was being out of their kitchen and laundry room for an extended time. The crew made it very easy for the family to work in a limited space keeping the washer and dryer hooked up the majority of the time, and also getting appliances working with minimal downtime.
“They above and beyond accommodated us to get us through the process,” Meghan said. “They did a great job making sure we were as comfortable as possible throughout the process,” Chris added.
“Our project manager DJ did a great job. He was very good at updating us on schedule changes, getting guys in as quickly as possible. Everyone that stepped in the house was nice and did great work,” said Chris. They thought Advance’s carpenter was phenomenal and were impressed when he took a conceptual idea from a photograph and worked with designer Michelle to create a one of a kind range/hood that has become the topic of conversation with friends and family who visit the new kitchen. “He was in our house literally every day for several weeks. He was easy to work with and good at what he did,” Meghan and Chris said.
The focal point of the kitchen; a hand-crafted, custom-built ventilation hood was clad with handpicked reclaimed barnwood. Advance Design’s carpenter built the framework and the cladding to create a one-of-a-kind design element that the couple loves.
“I think it was especially fun for him to create something unique from scratch, showcasing his talent in this area,” Meghan said. “I love that my kitchen is not like everyone else’s. I got to pick out the wood on my hood and watch it being built and was able to choose what pieces of wood went where on it. It’s totally unique.”
Red Oak flooring was toothed-in throughout the kitchen and the rest of the first floor anywhere changes were made. Then the whole floor was refinished to tone down the orange undertones in the existing floor stain, ultimately changing the color complexion of the entire first floor. The result is a completely new feeling to the entire home.
Renovating the laundry room was extremely important to Meghan and Chris, but they had trouble visualizing what the possibilities were for the seemingly small space. Michelle produced beautiful 3D illustrations that helped them envision the space in a whole new way.
“I must have told Michelle 100 times that I am a visual person, seeing the designs in 3D made it so easy to make decisions and see what we could really do with our space,” Meghan said.
A dividing wall and doorway were removed between the existing laundry room and hallway formerly containing a coat closet, providing space to design specialized graphite colored cabinetry matching the kitchen island to house custom storage cubbies for each family member. Adding the tall utility cabinetry in the new laundry area helped solve the storage issue, tucking away cleaning supplies, household items, and even the cat got its own cubby.
“I love how everything is now hidden in its own space. I can’t tell you how much I hated coming home and seeing everything sitting around on counters,” Chris said.
Electrical outlets were planned for the inside of utility cabinets, so devices could charge in hidden locations. Stacking the washer and dryer allowed for wider countertop space to provide a folding area and a special space for clothes to hang. “The way I do laundry has been completely transformed! I can actually fold clothes and hang them now right out of the washer and dryer,” Meghan said.
“The end result in the kitchen and the laundry/mud room was an updated light and bright space, with a smarter work flow that better meets the needs of this family,” Michelle said.
“I would totally recommend Advance Design,” Meghan said. “Sometimes I sit and just look at my kitchen and laundry room and think ‘Wow, I can’t believe I get to live here!’ It’s an understatement to say we love our new space.”

 Dakota Unlimited
Custom pergola designed and installed by Dakota Unlimited.
Photo of a mid-sized rustic partial sun backyard mulch landscaping in Minneapolis.
Photo of a mid-sized rustic partial sun backyard mulch landscaping in Minneapolis.
 SM Design
St. Andrews Project — Primary Bathroom & Spa Retreat
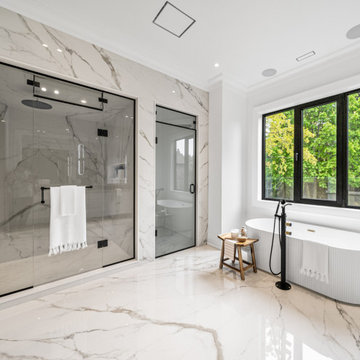
This St. Andrews primary bathroom is conceived as a private spa retreat, where material continuity, sculptural forms, and architectural restraint create a sense of understated luxury. The design intentionally avoids visual clutter, allowing the quality of the materials and precision of the detailing to define the space.
The room is anchored by a dramatic marble-look stone that extends continuously across the shower enclosure and floor, creating a seamless visual envelope. The expressive veining introduces movement and natural variation, transforming what could otherwise be a minimal white bathroom into a richly layered composition. Carrying the stone through multiple surfaces also gives the room a sense of scale and architectural cohesion.
The freestanding bathtub is treated as a sculptural object rather than simply a functional fixture. Its softly curved silhouette and vertically fluted exterior introduce an organic counterpoint to the linear geometry of the surrounding architecture. Positioned directly beneath the large black-framed window, the tub becomes a quiet focal point while taking advantage of abundant natural light and views toward the greenery beyond.
Black-framed glass creates another important layer of contrast. The expansive shower enclosure and adjacent glazed opening establish a crisp graphic framework against the pale stone, while black plumbing fixtures and hardware reinforce the same architectural language. This repeated use of black creates visual continuity without overwhelming the light palette.
The oversized window is particularly important to the atmosphere of the room. Instead of treating the bathroom as an enclosed, highly private environment, the design establishes a connection to nature, allowing daylight and greenery to become part of the experience. The result is a space that feels bright, open, and restorative.
A restrained wooden stool introduces warmth and an organic material note against the stone and glass. Its natural finish prevents the monochromatic palette from feeling overly clinical, while the simple form complements the sculptural bathtub.
The overall design is based on material continuity, contrast, and calm geometry. Veined stone provides movement, fluted surfaces provide texture, black metal provides definition, and natural wood introduces warmth. The result is a contemporary luxury bathroom that feels architectural, serene, and highly considered, more like a private wellness retreat than a conventional ensuite.

 Heritage Construction Companies, LLC.
Example of a huge trendy metal floating open staircase design in Minneapolis

 User
This custom built greenhouse was just installed in the Denver metro area. The kit combines our standard 12' wide framework with a custom built octagon end with door. Landscape timbers used for the perimeter foundation, and customer installed a beautiful Trex style decking floor.
Greenhouse, Greenhouse, Greenhouse, Greenhouse, Greenhouse, Greenhouse, Greenhouse, Greenhouse, Greenhouse, Greenhouse, Greenhouse, Greenhouse, Greenhouse, Greenhouse, Greenhouse, Greenhouse, Greenhouse, Greenhouse, Greenhouse, Greenhouse, Greenhouse, Greenhouse, Greenhouse, Greenhouse, Greenhouse, Greenhouse, Greenhouse, Greenhouse, Greenhouse, Greenhouse, Greenhouse, Greenhouse, Greenhouse, Greenhouse, Greenhouse, Greenhouse, Greenhouse, Greenhouse, Greenhouse, Greenhouse, Greenhouse, Greenhouse, Greenhouse, Greenhouse, Greenhouse, Greenhouse, Greenhouse, Greenhouse, Greenhouse, Greenhouse, Greenhouse, Greenhouse, Greenhouse, Greenhouse, Greenhouse, Greenhouse, Greenhouse, Greenhouse, Greenhouse, Greenhouse, Greenhouse, Greenhouse, Greenhouse, Greenhouse, Greenhouse, Greenhouse, Greenhouse, Greenhouse, Greenhouse, Greenhouse, Greenhouse, Greenhouse, Greenhouse, Greenhouse, Greenhouse, Greenhouse, Greenhouse, Greenhouse, Greenhouse, Greenhouse, Greenhouse, Greenhouse, Greenhouse, Greenhouse, Greenhouse, Greenhouse, Greenhouse, Greenhouse, Greenhouse, Greenhouse, Greenhouse, Greenhouse, Greenhouse, Greenhouse, Greenhouse, Greenhouse, Greenhouse, Greenhouse, Greenhouse, Greenhouse, Greenhouse, Greenhouse, Greenhouse, Greenhouse, Greenhouse, Greenhouse, Greenhouse, Greenhouse, Greenhouse, Greenhouse, Greenhouse, Greenhouse, Greenhouse, Greenhouse, Greenhouse, Greenhouse, Greenhouse, Greenhouse, Greenhouse, Greenhouse, Greenhouse, Greenhouse, Greenhouse, Greenhouse, Greenhouse, Greenhouse, Greenhouse, Greenhouse, Greenhouse, Greenhouse, Greenhouse, Greenhouse, Greenhouse, Greenhouse, Greenhouse, Greenhouse, Greenhouse, Greenhouse, Greenhouse, Greenhouse, Greenhouse, Greenhouse, Greenhouse, Greenhouse, Greenhouse, Greenhouse, Greenhouse, Greenhouse, Greenhouse, Greenhouse, Greenhouse, Greenhouse, Greenhouse, Greenhouse, Greenhouse, Greenhouse, Greenhouse, Greenhouse, Greenhouse, Greenhouse, Greenhouse, Greenhouse, Greenhouse, Greenhouse, Greenhouse, Greenhouse, Greenhouse, Greenhouse, Greenhouse, Greenhouse, Greenhouse, Greenhouse, Greenhouse, Greenhouse, Greenhouse, Greenhouse, Greenhouse, Greenhouse, Greenhouse, Greenhouse, Greenhouse, Greenhouse, Greenhouse, Greenhouse, Greenhouse, Greenhouse, Greenhouse, Greenhouse, Greenhouse, Greenhouse, Greenhouse, Greenhouse, Greenhouse, Greenhouse, Greenhouse, Greenhouse, Greenhouse, Greenhouse, Greenhouse, Greenhouse, Greenhouse, Greenhouse, Greenhouse, Greenhouse, Greenhouse, Greenhouse, Greenhouse, Greenhouse, Greenhouse, Greenhouse, Greenhouse, Greenhouse, Greenhouse, Greenhouse, Greenhouse, Greenhouse, Greenhouse, Greenhouse, Greenhouse, Greenhouse, Greenhouse, Greenhouse, Greenhouse, Greenhouse, Greenhouse, Greenhouse, Greenhouse, Greenhouse, Greenhouse, Greenhouse, Greenhouse, Greenhouse, Greenhouse, Greenhouse, Greenhouse, Greenhouse, Greenhouse, Greenhouse, Greenhouse, Greenhouse, Greenhouse, Greenhouse, Greenhouse, Greenhouse, Greenhouse, Greenhouse, Greenhouse, Greenhouse, Greenhouse, Greenhouse, Greenhouse, Greenhouse, Greenhouse, Greenhouse, Greenhouse, Greenhouse, Greenhouse, Greenhouse, Greenhouse, Greenhouse, Greenhouse, Greenhouse, Greenhouse, Greenhouse, Greenhouse, Greenhouse, Greenhouse, Greenhouse, Greenhouse, Greenhouse, Greenhouse, Greenhouse, Greenhouse, Greenhouse, Greenhouse, Greenhouse, Greenhouse, Greenhouse, Greenhouse, Greenhouse, Greenhouse, Greenhouse, Greenhouse, Greenhouse, Greenhouse, Greenhouse, Greenhouse, Greenhouse, Greenhouse, Greenhouse, Greenhouse, Greenhouse, Greenhouse, Greenhouse, Greenhouse, Greenhouse, Greenhouse, Greenhouse, Greenhouse, Greenhouse, Greenhouse, Greenhouse, Greenhouse, Greenhouse, Greenhouse, Greenhouse, Greenhouse, Greenhouse, Greenhouse, Greenhouse, Greenhouse, Greenhouse, Greenhouse, Greenhouse, Greenhouse, Greenhouse, Greenhouse, Greenhouse, Greenhouse, Greenhouse, Greenhouse, Greenhouse, Greenhouse, Greenhouse, Greenhouse, Greenhouse, Greenhouse, Greenhouse, Greenhouse, Greenhouse, Greenhouse, Greenhouse, Greenhouse, Greenhouse, Greenhouse, Greenhouse, Greenhouse, Greenhouse, Greenhouse, Greenhouse, Greenhouse, Greenhouse, Greenhouse, Greenhouse, Greenhouse, Greenhouse, Greenhouse, Greenhouse, Greenhouse, Greenhouse, Greenhouse, Greenhouse, Greenhouse, Greenhouse, Greenhouse, Greenhouse, Greenhouse, Greenhouse, Greenhouse, Greenhouse, Greenhouse, Greenhouse, Greenhouse, Greenhouse, Greenhouse, Greenhouse, Greenhouse, Greenhouse, Greenhouse, Greenhouse, Greenhouse, Greenhouse, Greenhouse, Greenhouse, Greenhouse, Greenhouse, Greenhouse, Greenhouse, Greenhouse, Greenhouse, Greenhouse, Greenhouse, Greenhouse, Greenhouse, Greenhouse, Greenhouse, Greenhouse, Greenhouse, Greenhouse, Greenhouse, Greenhouse, Greenhouse, Greenhouse, Greenhouse, Greenhouse, Greenhouse, Greenhouse, Greenhouse, Greenhouse, Greenhouse, Greenhouse, Greenhouse, Greenhouse, Greenhouse, Greenhouse, Greenhouse, Greenhouse, Greenhouse, Greenhouse, Greenhouse, Greenhouse, Greenhouse, Greenhouse, Greenhouse, Greenhouse, Greenhouse, Greenhouse, Greenhouse, Greenhouse, Greenhouse, Greenhouse, Greenhouse, Greenhouse, Greenhouse, Greenhouse, Greenhouse, Greenhouse, Greenhouse, Greenhouse, Greenhouse, Greenhouse, Greenhouse, Greenhouse, Greenhouse, Greenhouse, Greenhouse, Greenhouse, Greenhouse, Greenhouse, Greenhouse, Greenhouse, Greenhouse, Greenhouse, Greenhouse, Greenhouse, Greenhouse, Greenhouse, Greenhouse, Greenhouse, Greenhouse, Greenhouse, Greenhouse, Greenhouse, Greenhouse, Greenhouse, Greenhouse, Greenhouse, Greenhouse, Greenhouse, Greenhouse, Greenhouse, Greenhouse, Greenhouse, Greenhouse, Greenhouse, Greenhouse, Greenhouse, Greenhouse, Greenhouse, Greenhouse, Greenhouse, Greenhouse, Greenhouse, Greenhouse, Greenhouse, Greenhouse, Greenhouse, Greenhouse, Greenhouse, Greenhouse, Greenhouse, Greenhouse, Greenhouse, Greenhouse, Greenhouse, Greenhouse, Greenhouse, Greenhouse, Greenhouse, Greenhouse, Greenhouse, Greenhouse, Greenhouse, Greenhouse, Greenhouse, Greenhouse, Greenhouse, Greenhouse, Greenhouse, Greenhouse, Greenhouse, Greenhouse, Greenhouse, Greenhouse, Greenhouse, Greenhouse, Greenhouse, Greenhouse, Greenhouse, Greenhouse, Greenhouse, Greenhouse, Greenhouse, Greenhouse, Greenhouse, Greenhouse, Greenhouse, Greenhouse, Greenhouse, Greenhouse, Greenhouse, Greenhouse, Greenhouse, Greenhouse, Greenhouse, Greenhouse, Greenhouse, Greenhouse, Greenhouse, Greenhouse, Greenhouse, Greenhouse, Greenhouse, Greenhouse, Greenhouse, Greenhouse, Greenhouse, Greenhouse, Greenhouse, Greenhouse, Greenhouse, Greenhouse, Greenhouse, Greenhouse, Greenhouse, Greenhouse, Greenhouse, Greenhouse, Greenhouse, Greenhouse, Greenhouse, Greenhouse, Greenhouse, Greenhouse, Greenhouse, Greenhouse, Greenhouse, Greenhouse, Greenhouse, Greenhouse, Greenhouse, Greenhouse, Greenhouse, Greenhouse, Greenhouse, Greenhouse, Greenhouse, Greenhouse, Greenhouse, Greenhouse, Greenhouse, Greenhouse, Greenhouse, Greenhouse, Greenhouse, Greenhouse, Greenhouse, Greenhouse, Greenhouse, Greenhouse, Greenhouse, Greenhouse, Greenhouse, Greenhouse, Greenhouse, Greenhouse, Greenhouse, Greenhouse, Greenhouse, Greenhouse, Greenhouse, Greenhouse, Greenhouse, Greenhouse, Greenhouse, Greenhouse, Greenhouse, Greenhouse, Greenhouse, Greenhouse, Greenhouse, Greenhouse, Greenhouse, Greenhouse, Greenhouse, Greenhouse, Greenhouse, Greenhouse, Greenhouse, Greenhouse, Greenhouse, Greenhouse, Greenhouse, Greenhouse, Greenhouse, Greenhouse, Greenhouse, Greenhouse, Greenhouse, Greenhouse, Greenhouse, Greenhouse, Greenhouse, Greenhouse,


 Contemporary Home Construction, LLC
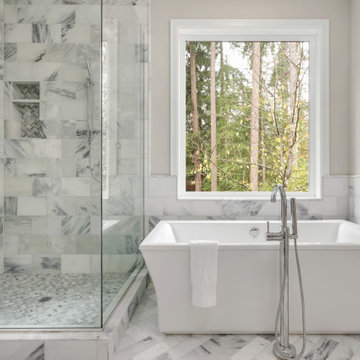
Nestled in the charming city of Powell, Ohio, the "Serenity Flow" project transforms a conventional master bathroom into a luxurious retreat, featuring an advanced body spray shower system. This renovation focuses on creating a spa-like atmosphere, where functionality meets relaxation, crafting an escape within the comfort of home. Designed for homeowners seeking a sanctuary to unwind, this master bath offers the ultimate showering experience, combining modern technology with timeless aesthetics.
Design Highlights:
Body Spray Shower System: At the heart of the renovation is a state-of-the-art body spray shower system, designed to envelop the body in a comforting embrace of water. Adjustable body jets, combined with a rain shower head, deliver a fully immersive experience, customizable to each user’s preference for intensity and temperature.
Elegant Aesthetics: The shower area is encased in frameless glass, accentuating the open, airy feel of the space. The walls and floors are adorned with premium marble tiles, creating a seamless look that elevates the overall design. Brushed nickel fixtures add a touch of sophistication, perfectly complementing the neutral color palette.
Integrated Lighting: Soft, recessed LED lighting is strategically placed to enhance the serene atmosphere. Dimmable controls allow for adjustable lighting levels, ensuring the space can be tailored to various moods and times of the day.
Functional Elegance: The master bath also features a double vanity with ample storage, a freestanding soaking tub, and a private toilet area. Each element is carefully selected to maintain the balance between beauty and practicality, ensuring the space is both inviting and efficient.
Project Execution:
The transformation of the Powell, Ohio master bath into the "Serenity Flow" oasis was executed with meticulous attention to detail. From the initial design phase to the final touches, every aspect was crafted to achieve a harmonious blend of luxury and comfort. The body spray shower system, serving as the centerpiece, required precise installation and integration with the bathroom's existing plumbing framework, showcasing the skill and expertise of our team.
The Outcome:
"Serenity Flow" emerges as a beacon of relaxation and rejuvenation. This master bath renovation in Powell, Ohio, redefines the concept of a private retreat, offering homeowners an exclusive spa experience every day. The combination of the advanced body spray shower system with the elegant design elements ensures this master bath is not just a functional space but a haven of tranquility.
Reflections:
This project illustrates the transformative power of thoughtful design and innovative technology in creating spaces that nurture the body and soul. The "Serenity Flow" master bath in Powell, Ohio, stands as a testament to our commitment to delivering bespoke living experiences, where every detail contributes to the well-being and comfort of the homeowners.

 Green Mountain Builders
 has recently completed a luxury remodel in one of Naples’
premier communities, Audubon Country Club. The remodel included the outdoor living area, including pool, spa, deck and fabulous screen enclosure. Also included was a guest suite with bedroom and bath, plus the front facade and and back entry from the lanai into the house. The focal point of the outdoor living area is the magnificent screen enclosure. State-of-the-art construction allows for a MegaView picture window featuring unobstructed views of the beautifully landscaped championship golf course. The middle screen section provides 34 clear feet of no obstruction, while the side sections are 32 feet and 23 feet, respectively. The middle section is arched to follow the arch design of the deck. This is a stunning development in screen enclosures that is destined to become extremely popular.
 Cassoni Furniture & Accessories
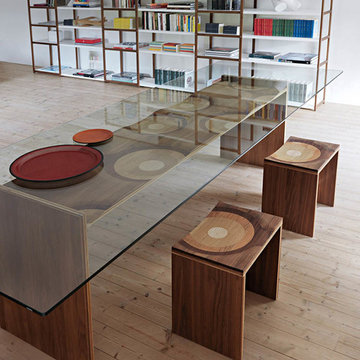
- RIPPLES TABLE.
The Ripples bench by Toyo Ito, winner of the 2004 Compasso d'Oro, has blossomed into a collection of different furniture types. Amongst them, we may highlight the Ripples table, featuring a transparent glass table top that presents its impressive structure, fabricated with a laminated composite of five different solid woods namely, walnut, mahogany, cherry, oak and ash. The fibre colors and directions are purposefully defined to produce an elegant polychromatic effect. This unique and poetic woodwork, created within a strict aesthetic framework, is reminiscent of fluid motion, not unlike the ripple-effect produced by a stone tossed in the water.
98''3/8W x 39''3/8D x 29''1/2H.
98''3/8W x 43''3/8D x 29''1/2H.
110''1/4W x 39''3/8D x 29''1/2H.
110''1/4W x 43''3/8D x 29''1/2H.
http://ow.ly/3yApfZ
- RIPPLES STOOL.
The Ripples bench by Toyo Ito, winner of the 2004 Golden Compass, has blossomed into a collection of different furniture complements. Amongst them, we may highlight the Ripples stool, fabricated with a laminated composite of five different solid woods. The seat shape, carved with industrial technology yet entirely hand-finished, feels soft and rich due to both the ductility of wood and Horm's passion for craftsmanship. Slide your hand along the surface to feel the seamless transition between walnut, mahogany, cherry, oak and ash.
16''1/8W x 16''1/8D x 17''3/4H.
16''1/8W x 16''1/8D x 30''3/8H.
http://ow.ly/3yzwu5
- ’93-’08 BOOKCASE.
The '93-'08 bookcase features a solid wood structure that never breaks the MDF shelves flow nor resorts to backs. The result is a composition of great visual lightness and excellent stability. Each shelf presents a different shoulder and height to create an orthogonal, ever-present, visual rhythm. Is a versatile bookcase system that allows you to build many combinations.
80''3/4W x 13''5/8D x 85''7/8H.
Other widths: 89''3/8 - 107''- 122,83.
http://ow.ly/3yzTGT


 Talon Construction Inc.
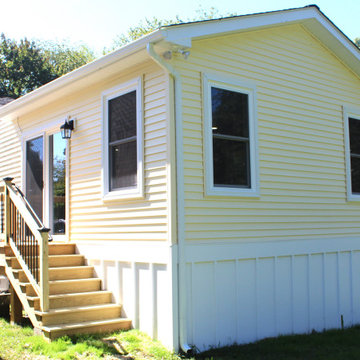
Designing and building a kitchen addition is a complex process that involves multiple steps and considerations. Here is a general outline to help you get started on your kitchen addition project:
Define Your Goals and Budget:
• Determine the purpose of the kitchen addition. Is it for more cooking space, a dining area, or a combination of both?
• Establish a realistic budget for your project. Consider all costs, including construction, permits, materials, and furnishings.
Hire a Design Professional:
• Seek the services of a design build company who specializes in kitchen additions.
• Discuss your vision, needs, and budget with the design professional to create a design concept.
Site Evaluation:
• Assess the existing space and structural condition of your home to ensure it can support the addition.
• Consider factors like zoning regulations, setbacks, and building codes.
Design Development:
• Collaborate with your design professional to refine the concept, including the layout, size, and architectural style.
• Choose materials, finishes, and fixtures that fit your design and budget.
Obtain Permits:
• Consult with your local design build contractor to determine the necessary permits and approvals.
• Prepare and submit all required documents, including architectural drawings and engineering plans.
Create Construction Documents:
• Work with your design build professional to develop detailed construction drawings and specifications.
• These documents will serve as a guide for contractors during construction.
Hire a design build contractor:
• Check references, credentials, and licenses before selecting a contractor.
• Sign a detailed contract that outlines the scope of work, timeline, and payment schedule.
Construction Phase:
• Demolition: If needed, remove any existing structures or walls.
• Foundation: Construct the foundation for the addition.
• Framing: Build the structural framework of the addition.
• Plumbing, Electrical, and HVAC: Install or update utilities as required.
• Insulation: Ensure proper insulation for energy efficiency.
• Drywall and Finish Work: Complete the walls and ceilings.
• Flooring and Cabinetry: Install flooring and kitchen cabinets.
• Appliances and Fixtures: Add appliances, plumbing fixtures, and lighting.
• Paint and Finish: Apply paint and finishes to achieve the desired look.
• Final Inspection: Schedule inspections to ensure compliance with building codes.
Final Inspections and Approvals:
• Arrange for final inspections to ensure the addition meets all safety and code requirements.
• Obtain any necessary certificates of occupancy or compliance.
Move In and Enjoy:
• Once all inspections and approvals are received, you can move into your new kitchen addition and start enjoying it.
Remember that every kitchen addition project is unique, so adapt this outline to your specific needs and circumstances. Consulting with professionals and obtaining the required permits and inspections is crucial to a successful and safe project.
 Talon Construction Inc.
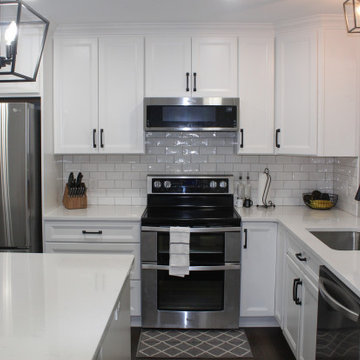
Designing and building a kitchen addition is a complex process that involves multiple steps and considerations. Here is a general outline to help you get started on your kitchen addition project:
Define Your Goals and Budget:
• Determine the purpose of the kitchen addition. Is it for more cooking space, a dining area, or a combination of both?
• Establish a realistic budget for your project. Consider all costs, including construction, permits, materials, and furnishings.
Hire a Design Professional:
• Seek the services of a design build company who specializes in kitchen additions.
• Discuss your vision, needs, and budget with the design professional to create a design concept.
Site Evaluation:
• Assess the existing space and structural condition of your home to ensure it can support the addition.
• Consider factors like zoning regulations, setbacks, and building codes.
Design Development:
• Collaborate with your design professional to refine the concept, including the layout, size, and architectural style.
• Choose materials, finishes, and fixtures that fit your design and budget.
Obtain Permits:
• Consult with your local design build contractor to determine the necessary permits and approvals.
• Prepare and submit all required documents, including architectural drawings and engineering plans.
Create Construction Documents:
• Work with your design build professional to develop detailed construction drawings and specifications.
• These documents will serve as a guide for contractors during construction.
Hire a design build contractor:
• Check references, credentials, and licenses before selecting a contractor.
• Sign a detailed contract that outlines the scope of work, timeline, and payment schedule.
Construction Phase:
• Demolition: If needed, remove any existing structures or walls.
• Foundation: Construct the foundation for the addition.
• Framing: Build the structural framework of the addition.
• Plumbing, Electrical, and HVAC: Install or update utilities as required.
• Insulation: Ensure proper insulation for energy efficiency.
• Drywall and Finish Work: Complete the walls and ceilings.
• Flooring and Cabinetry: Install flooring and kitchen cabinets.
• Appliances and Fixtures: Add appliances, plumbing fixtures, and lighting.
• Paint and Finish: Apply paint and finishes to achieve the desired look.
• Final Inspection: Schedule inspections to ensure compliance with building codes.
Final Inspections and Approvals:
• Arrange for final inspections to ensure the addition meets all safety and code requirements.
• Obtain any necessary certificates of occupancy or compliance.
Move In and Enjoy:
• Once all inspections and approvals are received, you can move into your new kitchen addition and start enjoying it.
Remember that every kitchen addition project is unique, so adapt this outline to your specific needs and circumstances. Consulting with professionals and obtaining the required permits and inspections is crucial to a successful and safe project.
 Talon Construction Inc.
Designing and building a kitchen addition is a complex process that involves multiple steps and considerations. Here is a general outline to help you get started on your kitchen addition project:
Define Your Goals and Budget:
• Determine the purpose of the kitchen addition. Is it for more cooking space, a dining area, or a combination of both?
• Establish a realistic budget for your project. Consider all costs, including construction, permits, materials, and furnishings.
Hire a Design Professional:
• Seek the services of a design build company who specializes in kitchen additions.
• Discuss your vision, needs, and budget with the design professional to create a design concept.
Site Evaluation:
• Assess the existing space and structural condition of your home to ensure it can support the addition.
• Consider factors like zoning regulations, setbacks, and building codes.
Design Development:
• Collaborate with your design professional to refine the concept, including the layout, size, and architectural style.
• Choose materials, finishes, and fixtures that fit your design and budget.
Obtain Permits:
• Consult with your local design build contractor to determine the necessary permits and approvals.
• Prepare and submit all required documents, including architectural drawings and engineering plans.
Create Construction Documents:
• Work with your design build professional to develop detailed construction drawings and specifications.
• These documents will serve as a guide for contractors during construction.
Hire a design build contractor:
• Check references, credentials, and licenses before selecting a contractor.
• Sign a detailed contract that outlines the scope of work, timeline, and payment schedule.
Construction Phase:
• Demolition: If needed, remove any existing structures or walls.
• Foundation: Construct the foundation for the addition.
• Framing: Build the structural framework of the addition.
• Plumbing, Electrical, and HVAC: Install or update utilities as required.
• Insulation: Ensure proper insulation for energy efficiency.
• Drywall and Finish Work: Complete the walls and ceilings.
• Flooring and Cabinetry: Install flooring and kitchen cabinets.
• Appliances and Fixtures: Add appliances, plumbing fixtures, and lighting.
• Paint and Finish: Apply paint and finishes to achieve the desired look.
• Final Inspection: Schedule inspections to ensure compliance with building codes.
Final Inspections and Approvals:
• Arrange for final inspections to ensure the addition meets all safety and code requirements.
• Obtain any necessary certificates of occupancy or compliance.
Move In and Enjoy:
• Once all inspections and approvals are received, you can move into your new kitchen addition and start enjoying it.
Remember that every kitchen addition project is unique, so adapt this outline to your specific needs and circumstances. Consulting with professionals and obtaining the required permits and inspections is crucial to a successful and safe project.
147