
Search results for "Initial setup" in Home Design Ideas
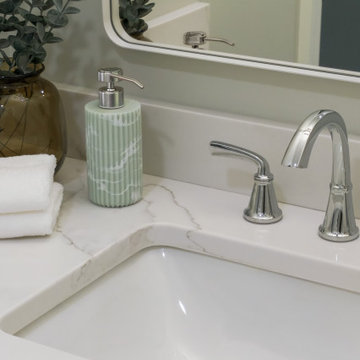
 Drury Design
The Setup
This project reimagines a shared bathroom for three young sisters, balancing functionality, aesthetics, and future growth. Originally affected by a flood, the space required a full renovation. The homeowners initially planned to retain the existing layout, but the need to incorporate a second-floor washer and dryer prompted a fresh approach to the design.
Design objectives:
Create a layout that accommodates three growing sisters while ensuring privacy and functionality.
Win space for a new second-floor stacked washer and dryer to meet the family’s laundry needs.
Design a bathroom that feels youthful yet timeless, growing with the girls as they transition from toddlers to teens.
Include ample storage for everyday essentials.
The Remodel
Design challenges to be solved:
The need to incorporate a washer and dryer without compromising existing bedroom/bathroom storage.
Creating functional storage for a shared bathroom.
Designing a space that is both child-friendly and timeless.
Maximizing privacy in a shared bathroom.
Adding personality without making the space feel overly juvenile.
The Renewed Space
Design solutions:
Repurposed a small walk-in closet in an adjacent bedroom to house a stackable washer and dryer accessible from the hallway. Built a new, larger closet on the opposite side to maintain bedroom storage.
Installed spacious base cabinets and drawers in each vanity area, ensuring sufficient storage for all three sisters.
Used feminine yet subtle plaid patterned mosaic tiles, neutral countertops with light movement, and soft tones to ensure longevity and adaptability.
Improved the Jill-and-Jill layout with two separate vanity areas and a shared toilet and shower zone. Kept pocket doors for enhanced privacy and space efficiency.
Incorporated blingy light fixtures, decorative mirrors, and hooks for towels to strike the perfect balance between fun and elegance.
This refreshed bathroom blends thoughtful functionality with a timeless aesthetic, meeting the immediate needs of a busy household while creating a space that can adapt to the family’s future.
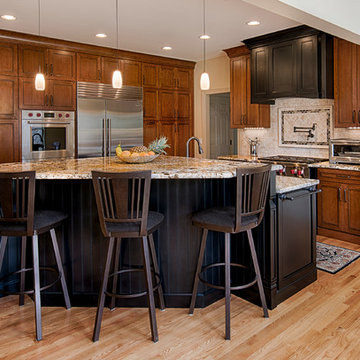
 Morris Black Designs
Sometimes the design solutions we come up for a homeowner extend beyond their kitchen — as was the case at the Burfeind residence. Julia Burfeind was unhappy that her home’s nearly 20-year-old kitchen was not well suited to entertain guests, which is something she’s been doing more of recently. She was also not satisfied with how the adjacent sunroom and mud/laundry rooms were laid out and being used (or in the case of the sunroom, not being used) by the family. Julia was recommended to Morris Black Designs whom she was told would be excellent at resolving all three issues.
“Our house was built in ‘98 I believe, so the kitchen was in need of a facelift but more importantly its setup was not particularly helpful for socializing,” explains Julia. “Among other things, there was a small island in the kitchen which was not suitable for accommodating guests.
“In addition, our kitchen was attached to a “sunroom” which was essentially a stepdown separate room that was attached to the kitchen but really wasn’t part of the kitchen — and so it felt like a lot of wasted space for us,” she continues. “We had our kids’ art supplies and the dog bed out there. The space was kinda useless. We didn’t like that setup particularly.”
“And then thirdly, we had a room attached to the kitchen that served as both a mudroom and a laundry room but didn’t do a good job of being either. I’ve got two active young kids that play a lot of sports. There wasn’t enough room in there for all their stuff. And not enough room to do the laundry. The problems we had with all three spaces convinced us to renovate.”
Julia met with one of our designers in her home to discuss and show first-hand the issues that were plaguing the kitchen area of the home. Initial designs were created and approved quickly. The need to address three distinct areas required a bit more planning and time to go from initial ideas to installation than typical kitchen-only projects, but when it was all finally said and done, Julia had three rooms that now meet her needs much better than they did before.
“By itself the kitchen would be fantastic,” she happily expresses. “We have a really large island now where we have four comfortable stools where people can sit and relax while others cook which is exactly what we wanted. You know the kitchen is always the central part of your home and when you entertain, which we do fairly often, people always end up in the kitchen so this big new island works great for us.”
“And now the area that was called a sunroom is incorporated with the kitchen — it was brought physically up to the same level as the kitchen which opened the two rooms up to each other as much as they can be so it’s really all one room now. We now have a dining room table out in that area and a wet bar where we have our bar stuff and our coffee makers and all of that. So those areas now work together great.”
“We completed a small addition to bump the laundry room out behind the kitchen. We then had Morris Black Designs build four big storage lockers in our mudroom for the kids’ gym bags and sports stuff. They’re not like gym lockers; they’re more like nice cabinets with wooden doors which we keep closed to hide the mess inside each — so it looks very nice in that room despite having all of my kids’ gym bags secretly piled up in there. And we have the great big, beautiful, sunny laundry room with a door and a window and a skylight and a big granite countertop where I can fold clothes.”
As much as she loves the distinct improvements made to each individual space, Burfeind will quickly tell you, however, that this project is truly an example of when the whole is greater than the sum of its parts
“The whole house is just much more usable now,” she surmises. “The work done by Morris Black Designs has really increased our daily satisfaction of being in the house which is fun and makes it all worthwhile.”

 Beth Dotolo, ASID, RID, NCIDQ
design by Pulp Design Studios | http://pulpdesignstudios.com/
This project for a large family with six young children had to be functional, durable and comfortable. With the home being located outside of the city in a rural part of town, Pulp Design Studios took inspiration from nature, choosing warm neutrals as the back drop for pops of green, blue and red.
Find the right local pro for your project

 Beckony Kitchens & Baths
This Colorado master bath is a Rocky Mountain retreat, thanks to two-tone knotty alder cabinetry, a spacious and bright glass-block shower wall, and a splurge-worthy jetted tub. (Photography by Phillip Nilsson)

 Stephanie Kraus Designs, LLC
Kyle Born Photography
Inspiration for a transitional family room remodel in Philadelphia
Inspiration for a transitional family room remodel in Philadelphia



 Bolen Designs
A fun, modern update to this teenager's bedroom that will last well into adulthood. A custom, built-in headboard, chrome swing-arm wall sconces, a fun splatter paint wall treatment and swivel guest chair, along with new bedding, art and accessories and this room is completely transformed!
 Tile Doctor Ltd
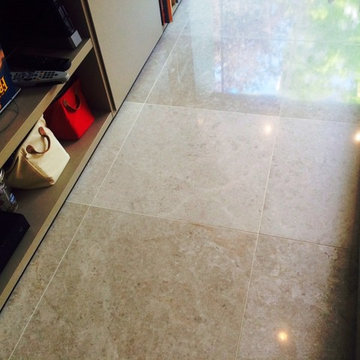
I was recently engaged to refresh the Limestone tiled floor at a house in St. John’s Wood, which is a very affluent area and apparently has the 5th most expensive postcode in London so as you can imagine this was a very expensive floor. The client had requested an improvement condition of the Limestone tiles in the living room and a thorough clean, polishing and seal was required. Over time, the floor in this busy living room – which was also used as a play area for young children – had become dirty and certainly worse for wear with all the use it had been getting. So, I set about my work to get this floor back to looking its best.
Cleaning and burnishing a Limestone floor
My initial task before beginning the cleaning process was to remove any furniture (as well as toys) from the room so I would have a clear area to work in. I then applied a layer of Tile Doctor Pro-Clean cleaner, diluted with water, to the floor. Pro-Clean is also suitable for use on other natural stone floors such as Slate, Granite and Travertine.
After leaving the solution to dwell for a period of a few minutes, I began to scrub the floor with a stiff hand brush. Whilst helping to remove a lot of the built up dirt on the surface of the tiles, the product also stripped off the old sealer and polish. Following this, I paid special attention to the dirty grout lines, cleaning them with Tile Doctor Oxy-Pro, a powerful, high-alkaline cleaner.
After completing the cleaning, I rinsed the floor with clean water to remove any excess cleaning products. I then began to burnish the floor using Tile Doctor Diamond encrusted burnishing pads. This was done in four steps, as I used four different pads (coarse, medium, fine and very fine) rinsing the floor with water between each pad. I would recommend using this setup of four pads for restoring the appearance of polished stone floors; you starting with a coarse pad and the gradually work your way up to the very fine pad achieving a high polish finish in the process. I finished of the process with a quick rinse and a buffing pad to give the floor a final polish before I commenced the sealing.
Sealing a Limestone floor
My choice of sealer was Tile Doctor Colour Grow, which is specifically designed to not only provide durable surface protection, but also to intensify the colour of the tiles. The sealer penetrates deep into the pores of the stone, providing water resistance and long-term protection from ingrained dirt and stains. As you can see from the photos, the sealer really helped to accentuate the fantastic natural colours in the Limestone.
My client was very pleased with the final result, and was amazed by how quickly I had been able to improve the state of her floor which, with a colourful and shiny finish, has really brightened up the living room.

 Riemer Floors, Inc.
Riemer Floors installed Milliken Carpet, Stitches in Silver Taupe.
Mid-sized transitional carpeted u-shaped staircase photo in Detroit with carpeted risers
Mid-sized transitional carpeted u-shaped staircase photo in Detroit with carpeted risers
 Babcock Custom Pools & Environments
Elevate Your Pool Experience with Babcock Custom Pools’ Portfolio Pool Equipment
Introduction
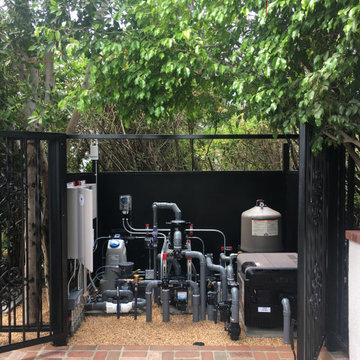
When it comes to creating the ultimate backyard oasis, Babcock Custom Pools is the name to trust. With an unwavering commitment to excellence, Babcock Custom Pools brings together cutting-edge technology, superior craftsmanship, and stunning design to transform your dream pool into a reality. In this article, we will explore the remarkable portfolio pool equipment offered by Babcock Custom Pools, highlighting their expertise in delivering straight lines with plumbing precision and a flawless compilation of pool plumbing, all aimed at ensuring your pool not only functions seamlessly but also looks perfect.
Excellence at Every Step
At Babcock Custom Pools, excellence is the cornerstone of their work. From the initial design consultation to the final installation, their team of skilled professionals leaves no stone unturned in delivering exceptional results. Every pool project undertaken by Babcock Custom Pools is treated as a work of art, crafted with attention to detail and a commitment to surpassing customer expectations.
Straight Lines with Plumbing Precision
One distinguishing feature of Babcock Custom Pools’ portfolio pool equipment is their unwavering dedication to achieving straight lines with plumbing precision. Proper plumbing is vital for a well-functioning pool, and Babcock Custom Pools understands this importance. They employ experienced technicians who meticulously plan and execute every plumbing aspect, ensuring that your pool’s plumbing system is not only efficient but also aesthetically pleasing.
Babcock Custom Pools takes pride in their ability to seamlessly integrate the plumbing elements into the pool’s design, creating a visually appealing and functional masterpiece. By utilizing the latest technology and employing industry best practices, they guarantee that your pool’s plumbing will not only withstand the test of time but also provide optimal performance.
A Flawless Compilation of Pool Plumbing
The compilation of pool plumbing is an intricate process that requires expertise and finesse. Babcock Custom Pools excels in this area, showcasing their mastery by delivering flawless pool plumbing systems. From the pump and filter setup to the water circulation and drainage, every component is skillfully installed and interconnected, creating a cohesive and efficient plumbing network.
By employing advanced techniques and using high-quality materials, Babcock Custom Pools ensures that your pool’s plumbing operates smoothly, minimizing the risk of leaks, blockages, or other issues that can disrupt your pool experience. Their team’s attention to detail and commitment to perfection guarantees that your pool’s plumbing will be a seamless part of the overall design, enhancing the beauty and functionality of your pool.
Conclusion
When it comes to creating a remarkable pool experience, Babcock Custom Pools stands head and shoulders above the competition. Their portfolio pool equipment exemplifies excellence, with a particular focus on achieving straight lines with plumbing precision and delivering a flawless compilation of pool plumbing. By entrusting Babcock Custom Pools with your pool project, you can rest assured that your pool will not only be a stunning visual centerpiece but also a meticulously engineered and reliable oasis for years to come. Contact Babcock Custom Pools today and let their expertise transform your dream pool into a reality.

 Advance Design Studio, Ltd.
Karen and Chad of Tower Lakes, IL were tired of their unfinished basement functioning as nothing more than a storage area and depressing gym. They wanted to increase the livable square footage of their home with a cohesive finished basement design, while incorporating space for the kids and adults to hang out.
“We wanted to make sure that upon renovating the basement, that we can have a place where we can spend time and watch movies, but also entertain and showcase the wine collection that we have,” Karen said.
After a long search comparing many different remodeling companies, Karen and Chad found Advance Design Studio. They were drawn towards the unique “Common Sense Remodeling” process that simplifies the renovation experience into predictable steps focused on customer satisfaction.
“There are so many other design/build companies, who may not have transparency, or a focused process in mind and I think that is what separated Advance Design Studio from the rest,” Karen said.
Karen loved how designer Claudia Pop was able to take very high-level concepts, “non-negotiable items” and implement them in the initial 3D drawings. Claudia and Project Manager DJ Yurik kept the couple in constant communication through the project. “Claudia was very receptive to the ideas we had, but she was also very good at infusing her own points and thoughts, she was very responsive, and we had an open line of communication,” Karen said.
A very important part of the basement renovation for the couple was the home gym and sauna. The “high-end hotel” look and feel of the openly blended work out area is both highly functional and beautiful to look at. The home sauna gives them a place to relax after a long day of work or a tough workout. “The gym was a very important feature for us,” Karen said. “And I think (Advance Design) did a very great job in not only making the gym a functional area, but also an aesthetic point in our basement”.
An extremely unique wow-factor in this basement is the walk in glass wine cellar that elegantly displays Karen and Chad’s extensive wine collection. Immediate access to the stunning wet bar accompanies the wine cellar to make this basement a popular spot for friends and family.
The custom-built wine bar brings together two natural elements; Calacatta Vicenza Quartz and thick distressed Black Walnut. Sophisticated yet warm Graphite Dura Supreme cabinetry provides contrast to the soft beige walls and the Calacatta Gold backsplash. An undermount sink across from the bar in a matching Calacatta Vicenza Quartz countertop adds functionality and convenience to the bar, while identical distressed walnut floating shelves add an interesting design element and increased storage. Rich true brown Rustic Oak hardwood floors soften and warm the space drawing all the areas together.
Across from the bar is a comfortable living area perfect for the family to sit down at a watch a movie. A full bath completes this finished basement with a spacious walk-in shower, Cocoa Brown Dura Supreme vanity with Calacatta Vicenza Quartz countertop, a crisp white sink and a stainless-steel Voss faucet.
Advance Design’s Common Sense process gives clients the opportunity to walk through the basement renovation process one step at a time, in a completely predictable and controlled environment. “Everything was designed and built exactly how we envisioned it, and we are really enjoying it to it’s full potential,” Karen said.
Constantly striving for customer satisfaction, Advance Design’s success is heavily reliant upon happy clients referring their friends and family. “We definitely will and have recommended Advance Design Studio to friends who are looking to embark on a remodeling project small or large,” Karen exclaimed at the completion of her project.


 LA Home Contractor
FULL HOUSE REMODEL – COMPLETE SCOPE OF WORK
1. Pre-Construction Phase
• Initial site inspection and measurements
• Architectural design and layout planning (if required)
• Structural engineering (if load-bearing walls are modified)
• Preparation of plans for city approval
• Permit application and plan check
• Obtain required building permits
• Scheduling of inspections
• Homeowner responsible for permit fees unless otherwise stated.
2. Site Preparation & Protection
• Protect flooring and non-work areas
• Install plastic dust barriers with zipper access
• Cover windows and furniture as needed
• Temporary utility setup if required
• Daily job site cleanup
• Final professional cleaning upon completion
3. Demolition
• Remove existing flooring (tile, wood, carpet, etc.)
• Remove cabinets, countertops, vanities
• Remove interior walls per plans
• Remove drywall where required
• Remove plumbing fixtures
• Remove electrical fixtures
• Haul away all debris
4. Structural & Framing
• Install structural beams if required
• Reframe modified walls
• Install new partitions per approved plans
• Repair or replace damaged framing
• Subfloor repair or replacement as needed
• Install blocking for cabinets and accessories
5. Plumbing (Up to Code)
• Replace old water supply lines (Copper Type L or PEX)
• Replace or modify drain lines (ABS)
• Relocate plumbing fixtures as needed
• Install new shut-off valves and cleanouts
• Water heater replacement if included
• Call for rough and final plumbing inspections
6. Electrical (Up to Code)
• Upgrade electrical panel if required
• Rewire entire house as needed
• Install new outlets and switches
• Install GFCI/AFCI protection per code
• Install recessed lighting and fixtures
• Install smoke and carbon monoxide detectors
• Dedicated circuits for appliances
• Call for rough and final electrical inspections
7. HVAC
• Replace or upgrade HVAC system if included
• Install new ducting and registers
• Install thermostat or mini-split system if applicable
8. Insulation
• Install wall insulation per code requirements
• Install ceiling insulation per code requirements
9. Drywall & Plaster
• Install new drywall
• Tape and mud (Level 4 or 5 finish)
• Texture to match existing or smooth finish
• Patch all affected areas
10. Flooring
• Install tile flooring
• Install engineered wood / hardwood / laminate / vinyl
• Install baseboards
• Floor leveling if required
11. Kitchen Remodel
• Install new cabinets
• Install countertops
• Install backsplash
• Install sink and faucet
• Install appliances (owner supplied unless specified)
12. Bathroom Remodel(s)
• Install new tub or shower system
• Waterproofing system installation
• Install tile on floors and walls
• Install vanity and toilet
• Install shower valve and fixtures
• Install shower glass if included
13. Doors & Windows
• Replace interior and entry doors
• Replace windows if included
• Install hardware
14. Interior & Exterior Paint
• Surface preparation
• Prime and paint walls, ceilings, and trim
• Exterior painting if included
15. Exterior Work (If Included)
• Stucco repair
• Roofing repair or replacement
• Concrete work or pavers
• Drainage improvements
16. Final Phase
• Final inspections
• Punch list completion
• Final cleaning
• Final walk-through with homeowner
Standard California Contract Terms (Summary)
• All work performed in compliance with California Building Code.
• Change orders must be approved in writing.
• Unforeseen conditions may require additional cost.
• One-year labor warranty unless otherwise stated.
• Progress payments per agreed payment schedule.
• Contractor is licensed and insured.
 LA Home Contractor
FULL HOUSE REMODEL – COMPLETE SCOPE OF WORK
1. Pre-Construction Phase
• Initial site inspection and measurements
• Architectural design and layout planning (if required)
• Structural engineering (if load-bearing walls are modified)
• Preparation of plans for city approval
• Permit application and plan check
• Obtain required building permits
• Scheduling of inspections
• Homeowner responsible for permit fees unless otherwise stated.
2. Site Preparation & Protection
• Protect flooring and non-work areas
• Install plastic dust barriers with zipper access
• Cover windows and furniture as needed
• Temporary utility setup if required
• Daily job site cleanup
• Final professional cleaning upon completion
3. Demolition
• Remove existing flooring (tile, wood, carpet, etc.)
• Remove cabinets, countertops, vanities
• Remove interior walls per plans
• Remove drywall where required
• Remove plumbing fixtures
• Remove electrical fixtures
• Haul away all debris
4. Structural & Framing
• Install structural beams if required
• Reframe modified walls
• Install new partitions per approved plans
• Repair or replace damaged framing
• Subfloor repair or replacement as needed
• Install blocking for cabinets and accessories
5. Plumbing (Up to Code)
• Replace old water supply lines (Copper Type L or PEX)
• Replace or modify drain lines (ABS)
• Relocate plumbing fixtures as needed
• Install new shut-off valves and cleanouts
• Water heater replacement if included
• Call for rough and final plumbing inspections
6. Electrical (Up to Code)
• Upgrade electrical panel if required
• Rewire entire house as needed
• Install new outlets and switches
• Install GFCI/AFCI protection per code
• Install recessed lighting and fixtures
• Install smoke and carbon monoxide detectors
• Dedicated circuits for appliances
• Call for rough and final electrical inspections
7. HVAC
• Replace or upgrade HVAC system if included
• Install new ducting and registers
• Install thermostat or mini-split system if applicable
8. Insulation
• Install wall insulation per code requirements
• Install ceiling insulation per code requirements
9. Drywall & Plaster
• Install new drywall
• Tape and mud (Level 4 or 5 finish)
• Texture to match existing or smooth finish
• Patch all affected areas
10. Flooring
• Install tile flooring
• Install engineered wood / hardwood / laminate / vinyl
• Install baseboards
• Floor leveling if required
11. Kitchen Remodel
• Install new cabinets
• Install countertops
• Install backsplash
• Install sink and faucet
• Install appliances (owner supplied unless specified)
12. Bathroom Remodel(s)
• Install new tub or shower system
• Waterproofing system installation
• Install tile on floors and walls
• Install vanity and toilet
• Install shower valve and fixtures
• Install shower glass if included
13. Doors & Windows
• Replace interior and entry doors
• Replace windows if included
• Install hardware
14. Interior & Exterior Paint
• Surface preparation
• Prime and paint walls, ceilings, and trim
• Exterior painting if included
15. Exterior Work (If Included)
• Stucco repair
• Roofing repair or replacement
• Concrete work or pavers
• Drainage improvements
16. Final Phase
• Final inspections
• Punch list completion
• Final cleaning
• Final walk-through with homeowner
Standard California Contract Terms (Summary)
• All work performed in compliance with California Building Code.
• Change orders must be approved in writing.
• Unforeseen conditions may require additional cost.
• One-year labor warranty unless otherwise stated.
• Progress payments per agreed payment schedule.
• Contractor is licensed and insured.

 Budget Blinds of Cedar Falls / Waterloo, IA
Budget Blinds blackout roller shades, photo credit installer Adam Brannick
Example of a mid-sized transitional guest bedroom design in Cedar Rapids with gray walls and no fireplace
Example of a mid-sized transitional guest bedroom design in Cedar Rapids with gray walls and no fireplace
 Advance Design Studio, Ltd.
Karen and Chad of Tower Lakes, IL were tired of their unfinished basement functioning as nothing more than a storage area and depressing gym. They wanted to increase the livable square footage of their home with a cohesive finished basement design, while incorporating space for the kids and adults to hang out.
“We wanted to make sure that upon renovating the basement, that we can have a place where we can spend time and watch movies, but also entertain and showcase the wine collection that we have,” Karen said.
After a long search comparing many different remodeling companies, Karen and Chad found Advance Design Studio. They were drawn towards the unique “Common Sense Remodeling” process that simplifies the renovation experience into predictable steps focused on customer satisfaction.
“There are so many other design/build companies, who may not have transparency, or a focused process in mind and I think that is what separated Advance Design Studio from the rest,” Karen said.
Karen loved how designer Claudia Pop was able to take very high-level concepts, “non-negotiable items” and implement them in the initial 3D drawings. Claudia and Project Manager DJ Yurik kept the couple in constant communication through the project. “Claudia was very receptive to the ideas we had, but she was also very good at infusing her own points and thoughts, she was very responsive, and we had an open line of communication,” Karen said.
A very important part of the basement renovation for the couple was the home gym and sauna. The “high-end hotel” look and feel of the openly blended work out area is both highly functional and beautiful to look at. The home sauna gives them a place to relax after a long day of work or a tough workout. “The gym was a very important feature for us,” Karen said. “And I think (Advance Design) did a very great job in not only making the gym a functional area, but also an aesthetic point in our basement”.
An extremely unique wow-factor in this basement is the walk in glass wine cellar that elegantly displays Karen and Chad’s extensive wine collection. Immediate access to the stunning wet bar accompanies the wine cellar to make this basement a popular spot for friends and family.
The custom-built wine bar brings together two natural elements; Calacatta Vicenza Quartz and thick distressed Black Walnut. Sophisticated yet warm Graphite Dura Supreme cabinetry provides contrast to the soft beige walls and the Calacatta Gold backsplash. An undermount sink across from the bar in a matching Calacatta Vicenza Quartz countertop adds functionality and convenience to the bar, while identical distressed walnut floating shelves add an interesting design element and increased storage. Rich true brown Rustic Oak hardwood floors soften and warm the space drawing all the areas together.
Across from the bar is a comfortable living area perfect for the family to sit down at a watch a movie. A full bath completes this finished basement with a spacious walk-in shower, Cocoa Brown Dura Supreme vanity with Calacatta Vicenza Quartz countertop, a crisp white sink and a stainless-steel Voss faucet.
Advance Design’s Common Sense process gives clients the opportunity to walk through the basement renovation process one step at a time, in a completely predictable and controlled environment. “Everything was designed and built exactly how we envisioned it, and we are really enjoying it to it’s full potential,” Karen said.
Constantly striving for customer satisfaction, Advance Design’s success is heavily reliant upon happy clients referring their friends and family. “We definitely will and have recommended Advance Design Studio to friends who are looking to embark on a remodeling project small or large,” Karen exclaimed at the completion of her project.


 TradeMark GC, LLC
TradeMark GC w/ Designer Traci Whatley of 75 Cabinets
Minimalist wine cellar photo in Philadelphia
Minimalist wine cellar photo in Philadelphia


9