
Search results for "Inspection" in Home Design Ideas

 User
Model: LOOAN - Color: Trendy Gray
Shape: rectangular - trough sink-wall mount-vessel sink
Finish: honed inside and outside
US Dimensions: 47-1/4" x 18-1/5" x 5-1/5"
US Drain size: standard hole size (1.5") x 1
Holes: With
Faucet holes size: 1.38" X2 (back side of the sink is hollow)
Material: granite grade A
Weight: 202 lbs
LOOAN is a 47-1/4" x 18-1/5" x 5-1/5" rectangular natural stone Bathroom trough sink with two faucet holes made in and carved from a a genuine Deco Trendy Gray Granite Block. You will definitely not let anyone feel indifferent with this 100% natural stone unique in the US and exclusively available on Livingroc.net.
Discover the well-being provided by our piece of granite stone; Aesthetic and practical, its beautifully curved inner sides allows an easy flow and minimal maintenance. Find the real natural stone authentic qualities, in sober and sleek lines with LOOAN. All our basins are made from high quality standard grade A, pure genuine materials that will last for years to come. Granite is a material perfectly adapted to bathroom uses.
All of our vessel sinks are the creation of a combined group of talented masons dedicated to the idea of creating bathware made from natural stone material, which is environmentally friendly. Waterproofed LOOAN is ready to use, sitting on a vanity counter top. If you wish to standardize your project, you can choose among a wide range of our Trendy gray granite shower trays carved from the same material (very similar color and same honed finish) as it came from the same quarry and most often from the same block of stone. Spacium, Palaos, Quasar or Dalaos.
This vessel sink is Highly resistant to chipping and scratching, withstands hot temperatures, tolerant to very high temperature changes.
Our creation is delivered without an overflow drain and faucet (not included) - every US drains and faucets models you can find on the market will fit perfectly on Living'ROC vessel sink. This model is ready to use over the countertop.
The photos you see online have been taken with extreme care by our Founder CEO - Florent LEPVREAU to give our visitors the best idea on how it might looks like. However our creation may vary from block to block as only mother nature will decides what you may receive (each sink is unique) even if our Gray and black Granite are very stable and are super close to our porfolio photos. We also draw your attention to the fact that veining, crystallization, that may appear to be cracks, but are actually indigenous to the stone, variations of colors (more on marble and onyx) and various stone features make all the charm of the stone and distinguish it from non-natural materials!. The Quality Inspection photos example shown on our portfolio are not available to choose by numbers. Our Customer service would be more than happy to share any additional photos with you if you would like... Simply Our Living'ROC Style

 Pennsylvania Landscape & Nursery Association
Terren Landscapes http://www.terrenlandscapes.com
Project Entry: Pembrooke Estate Rain Garden
2014 PLNA Awards for Landscape Excellence Winner
Category: Sustainable Landscape &60,000-$120,000
Award Level: Silver
Project Description:
The client contracted our company to solve multiple existing drainage problems. In a heavy rain event the existing French drain system would overflow, causing water to pool in the driveway. After investigating the system we found that the capacity of the French drain was undersized for the amount of storm water from the large rain events received in recent years. As a result of our findings and at the request of the homeowner, we designed a storm water management system to capture all storm water from the structures on the property and regenerate the underground aquifers for the volume of a 5.8” rainstorm. In addition to the new drain system, the homeowners wanted a rain garden to provide a backdrop for an existing formal garden, provide a habitat for wildlife, and provide screening from an adjacent neighbor.
Throughout the design process many challenges were presented, including an existing gas line, which ran directly through the area that best suited the bioswale. The existence of the gas line caused us to alter the shape and depth of the bioswale in some areas. We also inspected the existing downspouts to make sure there were no obstructions that would impede the system’s efficiency, and then conducted a test pit dig to make sure we had sufficient percolation rates for disposal of storm water.
To effectively capture the storm water runoff, the existing downspouts were piped from the main house and the large detached garage to a large catch basin located at the low point in the driveway. The driveway catch basin contains two outlet pipes at different elevations within the basin allowing water from smaller rain events to enter the bioswale and rain garden area to percolate into the soil before excess water overflows into a sediment trap which filters out any debris and is then piped to an underground StormTech® pit to slowly percolate into the ground. The other outlet pipe in the driveway catch basin is used for larger storm water events, taking the water directly to the StormTech® pit.
Accepting and slowing the velocity of the storm water, mitigation of erosion, and filtering out pollutants contained in the “first flush” of rainfall are the primary functions of the bioswale and rain garden. Planting these areas with mostly native plant species helps carry out these functions while attracting and providing shelter for wildlife.
The ‘Niobe’ weeping willow is the centerpiece of the rain garden, connecting with the axis of the existing formal garden. To screen the neighboring property we chose Chamaecyparis nootkatensis ‘Pendula’ for its graceful evergreen habit and tolerance of wet sites. ‘Ivory Halo’ dogwood and Panicum ‘Cloud Nine’ were used for screening as well as winter interest. To provide deciduous structure to the garden Taxodium distichum and Magnolia virginiana were used in conjunction with witch hazel. Mostly native wetland perennials were used due to their tolerance of wet conditions and occasional drought.
The area above the StormTech® pit provides space for the client’s family to relax. The rain garden and bioswale provide screening, storm water management, a habitat for wildlife, and plants that enhance the adjacent formal garden.
Photo Credit: Terren Landscapes
 ALL Renovation & Design LLC
Could a dreadful dishwasher leak be a blessing in disguise?
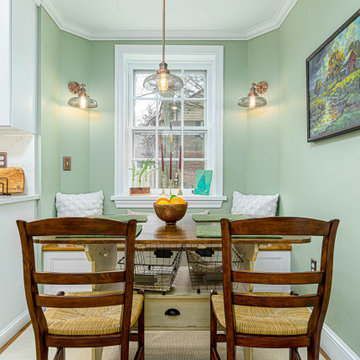
The Redding kitchen was very odd. The house was a beautiful brick house from the early 1900’s, but the kitchen had been renovated since then with an impractical layout. It worked, but, for as much time as Mr. and Mrs. spend in the kitchen, it left much to be desired. Because they enjoy cooking so much, they dreamed of having a functional kitchen that added to the character of the home and respected the history of it.
So that’s why Mr. and Mrs. went to a Lancaster Home Show where they meet ALL Renovation & Design. They were impressed with our process which guides clients through the design phase in a unique way that guarantees a customized remodel, tailored to their dreams. We really hit it off, but, since they were still in the idea stage, the years passed quickly.
Then one morning they discovered a puddle under the dishwasher. And, as is often the case, the damage had already spread to the surrounding cabinets and a large area of the floor. And upon further inspection, it was discovered that part of the floor was made with asbestos – which would require expert remediation. This was turning into a major rehab project.
That’s when they were faced with a tough call: do they patch it up now and rip it out in a few years when they remodel the entire kitchen, or, do they remodel now? They called ALL Renovation & Design.
First we worked with the insurance company to raise the damage claim to what it would have actually cost to repair the damage done by the leak… several thousand dollars higher than what they had initially appraised it.
Then we guided Mr. and Mrs. through the design process that carefully articulated the goals and vision for the new kitchen. Functionality and complementing the home’s character were top priority. They were extremely pleased with the help we provided in guiding them through the cabinet choices, layout, and color selections.
Communication was key. Especially when we got into the demolition and construction work. One thing you can be sure of when working with older homes is that there are almost always surprises between the walls. For the Redding kitchen it took the form of a steel support beam that we discovered on the second day of demolition. Because it prevented us from opening up the doorway, we had to pivot and adjust the cabinet spacing. Electrical access was also a serious problem that required added creativity to be sure the new space would include all the functionality of a modern kitchen. But all the challenges were overcome through creativity and almost constant communication.
At last, it was complete. Together we transformed the space into a beautiful transitional kitchen that is a joy to work in.
The maple cabinets with full-overlay doors were painted in matte white with copper hardware. The countertop and backsplash were Hanstone Quartz in the Strato color. It included a 30” single-basin sink in 14-gauge hammered copper. For the floor they chose Lauzan Maple Hardwood in the Sahara finish, installed in the herringbone pattern. And to really set off the kitchen, the old appliances were replaced with new GE Café appliances in their classy matte white with brushed copper accents.
Find the right local pro for your project


 Tuscanbasins
The Berkeley is designed with clean and simple styling in mind and finished in an elegant mocha stain. The Berkeley makes any living room, den or man cave really stand out.
The Berkeley TV lift cabinet was inspired by the same construction and finish of the Brookside TV lift cabinet. Taking from it's subtle lines and mocha finish it has quickly become one of our most popular units. The Berkeley features interior shelf lighting and tons of room behind the cabinet doors for your component and media storage.
The Berkeley accommodates most 60" diagonal flat panel plasma and LCD TVs, measuring 55"W x 4.5"D x 35"H. Behind the front doors is ample storage space for your DVD movie & video game boxes. The cabinet is equipped with sliding rear panels for easy access to your TV connections.
Video
Product Features:
Universal Mounting System: Simple mounting kit includes all the hardware and brackets you need to hold your flat screen TV on the Touchstone lift mechanism.
Component Storage Space: The Berkeley has 8" of vertical storage height and 50" of width horizontal space for your Satellite Box, Cable Box, Recorders, Amps, Surround Sound, and Video Games.
Personal Storage Space: The Berkeley has 4 adjustable shelves for your DVD boxes, Video Game boxes and CD cases.
RF Remote Control: Includes 1 RF remote control for raising/lowering the lift mechanism without requiring line of sight.
Backup Wired Remote Control: Each unit has a backup on/off switch and set control switch inside the cabinet.
Finishing Process: Our thorough 7 step finishing process uses a combination of hand-staining and automated application tools that insures all woods and stains are applied uniformly and precisely to produce a quality cabinet that will last a lifetime.
English Dovetail Joints: A time-honored fine cabinet-making technique, Dovetail joints become self-locking even before the glue is applied, so solid overall construction can be guaranteed.
Solid Wood Tongue and Groove Corner Blocks: Incorporates the side panels of the cabinet with the foot of the cabinet, adding structural support which enhances durability.
24 point QC audit inspection of every cabinet.
Specifications
Cabinet Wood Finish: Mocha
Unit Dimensions: 59"W x 23"D x 41.5"H
Maximum Cabinet TV Size: 55"W x 4.5"D x 35"H (TV plus component height)
Unit Weight: 321 lbs.
Unit Shipping Weight:395 lbs.
Touchstone's TV Lift System
The Berkeley is ready for entertainment action with Touchstone's quiet and smooth TV lift system for your flatscreen television. The Berkeley includes a wireless RF remote control for operation of the cabinet's lift as well as a backup controller wired into the inside of the cabinet just in case you ever lose or can’t find the wireless remote.
 Tile Doctor Ltd
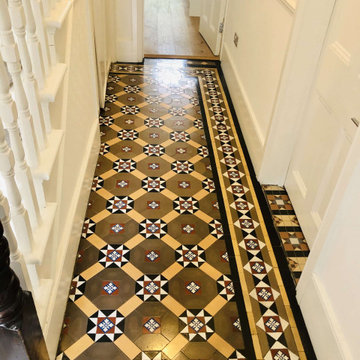
This customer had just moved into a property in Chesham around eighteen months ago. During that time, they had completely renovated the property and in the process had pulled up the hallway carpet to discover a lovely Victorian tiled floor which appeared to be in good condition but very dirty. Period features like these can add a lot of value to a house these days and so they decided to investigate having it professionally cleaned and contacted me for a quote.
Although I can give some indication of price over the phone you never know exactly what to expect so my preference is to visit the property a conduct a test clean. It’s a little trickier to do this now due to COVID-19 but using a combination of PPE, maximum ventilation and social distancing measures I was able to work on the floor. The tiles were in good order with no replacements needed so my focus would be removing carpet adhesive and ingrained dirt. The test went well, and I followed up with a quotation which was accepted, and a date arranged to do the work.
I had worked out previously that the quickest was to deep clean the floor and remove the glue and any old seal was to apply Tile Doctor Remove and Go which as its name suggests is a coatings removed designed for Tiled floors. My method was to spray strong a dilution of Remove and Go onto the Victorian tiles and leave it to soak in for fifteen minutes. Then it was scrubbed in with a black scrubbing pad fitted to a rotary machine. The soil was rinsed off using a minimal of water and extracted with a wet vacuum.
Once the floor had dried, I inspected the tiles and could see more work would be needed to get the white tiles really sparkling. For this I went over the floor using a 200-grit resurfacing pad using water to lubricate the process, I also used handheld burnishing blocks of different grits to do the edges. With this extra effort and another rinse with water to remove the soil the floor looked great, and so I left for the day so it could dry out ready for sealing.
I came back the next day and started by taking moisture readings with a damp meter to ensure the tiles were dry and ready for sealing. This is important as you don’t want to apply sealer to a damp tile and old floors can suffer from damp issues due to the lack of a damp proof membrane.
All was well with the floor, so I was able to move straight onto sealing which started with the application of a single coat of Tile Doctor Colour Grow. This is an impregnating sealer that soaks into the pores of the tile enhancing colour and adding protection. Once this had dried, I followed up with another seven coats of Tile Doctor Seal and Go which adds further protection and leaves a nice subtle sheen to the tiles. This product works really well on old Victorian Tiles like these and being water based it doesn’t leave a smell as it dries.
Andrew Newstead
South Buckinghamshire Tile Doctor
 Gallery KBNY
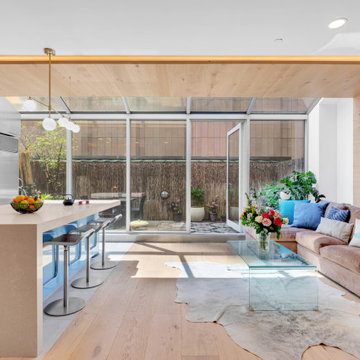
For our full gut renovation of this Manhattan loft penthouse, we partnered with architecture firm Todd Zwigard Architects. Many of our clients know us as experts in the full design-build approach, where we handle every aspect of the project. But in this case, architectural plans were already drawn, the full schedule was finished, and our clients needed a partner to execute on the architectural plans – enter Gallery. Construction management is as vital to a project as the design phase, so we’re happy to offer our expertise in this type of scenario.
A DIFFERENT APPROACH
Construction and design are often the face of most renovations, but the planning and follow-through are naturally just as necessary to make it all come together. The project itself was a fairly straightforward gut renovation of the loft. Everything was included: new floors, a new kitchen, new bathrooms, new lighting. Our task was to manage every aspect of the construction, ensuring that the planning work of Todd Zwigard Architects was executed to the exact vision imagined for this Manhattan loft renovation.
CONTEMPORARY GOES ECLECTIC
Although we didn’t contribute to the aesthetic of the interior design in this project, we did carry out the plans that brought it life. The tone was very modern, with some eclectic touches. The kitchen, featuring an island with a baby blue lacquered finish, blends contemporary clean lines into an industrial-tinged, almost futuristic aesthetic. Reclaimed wooden doors and art pieces collected throughout the years are an ode to the client's travels, an artistic touch from Todd Zwigard Architects.
LET’S TALK
Quality of work is of course important, but there are several components of construction management that are equally vital: communication; processes that make sure you're able to adhere to schedules; protocols with both safety and communication. You might say this is the nerding out of the construction process. It’s not often the face of a project, but it’s absolutely massive in terms of carrying out a successful renovation, whether it’s a penthouse loft in Manhattan, a condo in Prospect Heights, or a kitchen in a Brooklyn brownstone. Quality construction management is probably one of the biggest ways to separate professional contractors from those who aren’t.
ART FROM CHAOS
This was such a large project, so our ability to procure and source all the finishes and fixtures was hugely important to our clients. The sheer number of floors, tiles, and plumbing fixtures alone that need to be ordered, in addition to everything else, plus figuring out lead times, shipments, deliveries, and inspections. It can quickly become chaotic, but there’s an art to the planning and organization, and we’ve mastered it.
The larger a project is, the more likely that havoc will rear its head. The antidote is not only really proper planning and construction management, as we achieved in this Manhattan loft penthouse renovation, but also a great working relationship with everyone else involved in the project: contractors, architect, and clients alike.
GET IN TOUCH
Is a loft renovation in New York in your future? We’re experts in renovating New York homes, from apartment combinations in managed buildings to kitchens and bathrooms in co-ops and condos to gut renovations of historic spaces and landmark renovations.
Contact us to learn more about our approach as a design-and-build firm, where all aspects of your project are handled under the same roof. In addition to construction management, you’ll get our in-house architect in-house and the added renovation benefits of experts in design, material selection, and paperwork.
 Windy City Painters
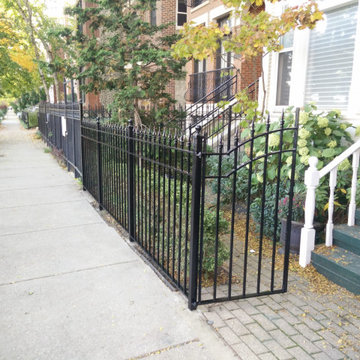
Iron Fence Painting Wicker Park Homeowners Can Trust: A Windy City Painters Case Study
Wicker Park is full of architectural character — ornate 1890s greystone two-flats, vintage brick facades, and wrought iron fencing that has framed these streets for well over a century. However, what iron fence painting Wicker Park properties require is not a simple weekend job. Winters here are brutal on metal, and consequently Windy City Painters has spent years perfecting the restoration process that keeps these fences standing strong. In particular, this case study walks through a recent project completed for a classic Wicker Park property.
Project Overview
The property featured a full wrought iron perimeter fence that had suffered years of freeze-thaw cycling and road salt exposure. Paint had failed across most of the pickets, and oxidation had progressed into active rust at several base rails. Consequently, the homeowners needed more than a fresh coat of paint. They needed a genuine metal restoration, and that is precisely what Windy City Painters delivered.
Materials Used
Windy City Painters selected products specifically rated for Chicago's climate extremes:
Rust-Oleum Professional Rust Inhibitor Primer
Sherwin-Williams DTM Acrylic Enamel (two finish coats)
3M rust converter gel for active oxidation zones
Wire brushes, angle grinders, and detail brushes for precision work
The Process: How Windy City Painters Restores Rusted Iron
Every iron fence painting Wicker Park project follows a disciplined, multi-stage process:
Preparation. Wire brushing and angle grinding remove all loose, flaking, and compromised material. Rust converter gel is applied directly to active oxidation zones, chemically stabilizing the metal underneath.
Repairs. Pitted sections and structurally weak joints are addressed before any coating touches the surface. Notably, skipping this step is the most common reason fence paint fails prematurely.
Priming. A full rust-inhibiting primer coat seals every bare metal surface, preventing moisture from reaching the iron beneath.
Application. Two finish coats of direct-to-metal enamel are applied by hand for even coverage across pickets, finials, and rail joints.
Finishing. A final inspection confirms full coverage, sharp lines, and a smooth, uniform sheen from every angle.
Furthermore, this same process protects the ornate details so common on Wicker Park fencing — decorative finials, scrollwork, and gate hardware — without losing the historic character that makes these properties special.
Advice for Wicker Park Homeowners
Before starting a similar project, homeowners in this neighborhood should keep a few things in mind:
Never paint over active rust. Untreated oxidation will continue spreading beneath the new coating, and the paint will fail within a season or two.
Always prime bare metal before applying a finish coat. Skipping primer is the single fastest path to peeling.
Choose coatings rated for temperature extremes, since Chicago's freeze-thaw cycles are harder on metal than most climates.
Inspect ground-contact areas each spring, as base rails typically rust fastest due to snow melt and road salt runoff.
Budget for prep time. In fact, most of the labor in a quality iron fence painting Wicker Park project happens before a single coat of paint is applied.
Similarly, ask whether the contractor uses rust converter on active oxidation, since skipping this step often shortens the life of the finish considerably.
Moreover, historic greystone properties often have decorative ironwork that requires extra care during grinding and priming so the original detailing is preserved rather than sanded away.
What to Expect: Timeline and Investment
Homeowners often ask how long an iron fence painting Wicker Park project takes from start to finish. In general, prep work — wire brushing, grinding, rust conversion, and repairs — takes up the largest share of the schedule, while primer and enamel application move relatively quickly once the surface is properly stabilized. Cure time between coats also affects the overall timeline, since rushing this stage undermines durability. Consequently, Windy City Painters builds a realistic schedule around weather conditions rather than forcing the job into a tight window. In addition, investment varies based on fence length, the amount of active rust present, and whether ornate detailing requires extra hand-finishing. Homeowners considering this project should request a full on-site walkthrough rather than a rough phone estimate, since rust severity is difficult to judge accurately without seeing the fence in person.
Why Wicker Park Homeowners Choose Windy City Painters
Windy City Painters has become the trusted painting contractor for Chicago's North Side and Near West Side, and iron fence painting Wicker Park residents request most often reflects that reputation directly. In contrast to quick-fix contractors who paint straight over rust, Windy City Painters treats every project as a full restoration. As a result, clients get a finish that holds up through multiple Chicago winters rather than one.
In addition, for related projects, Windy City Painters also offers interior painting, cabinet painting, drywall and plaster repair, and full metal refinishing services for fences, gates, and porches throughout the neighborhood. Ultimately, that range of services is what makes us a true one-stop contractor for Wicker Park homeowners.
See more of our work and request a free estimate at www.windypainters.com.
Ready to transform your Wicker Park home? Contact Windy City Painters for a free estimate — visit www.windypainters.com today. Proudly serving Wicker Park, West Town, Lincoln Park, Roscoe Village, Lakeview, Ukrainian Village, River North, and all of Chicago.
 ALL Renovation & Design LLC
Could a dreadful dishwasher leak be a blessing in disguise?
The Redding kitchen was very odd. The house was a beautiful brick house from the early 1900’s, but the kitchen had been renovated since then with an impractical layout. It worked, but, for as much time as Mr. and Mrs. spend in the kitchen, it left much to be desired. Because they enjoy cooking so much, they dreamed of having a functional kitchen that added to the character of the home and respected the history of it.
So that’s why Mr. and Mrs. went to a Lancaster Home Show where they meet ALL Renovation & Design. They were impressed with our process which guides clients through the design phase in a unique way that guarantees a customized remodel, tailored to their dreams. We really hit it off, but, since they were still in the idea stage, the years passed quickly.
Then one morning they discovered a puddle under the dishwasher. And, as is often the case, the damage had already spread to the surrounding cabinets and a large area of the floor. And upon further inspection, it was discovered that part of the floor was made with asbestos – which would require expert remediation. This was turning into a major rehab project.
That’s when they were faced with a tough call: do they patch it up now and rip it out in a few years when they remodel the entire kitchen, or, do they remodel now? They called ALL Renovation & Design.
First we worked with the insurance company to raise the damage claim to what it would have actually cost to repair the damage done by the leak… several thousand dollars higher than what they had initially appraised it.
Then we guided Mr. and Mrs. through the design process that carefully articulated the goals and vision for the new kitchen. Functionality and complementing the home’s character were top priority. They were extremely pleased with the help we provided in guiding them through the cabinet choices, layout, and color selections.
Communication was key. Especially when we got into the demolition and construction work. One thing you can be sure of when working with older homes is that there are almost always surprises between the walls. For the Redding kitchen it took the form of a steel support beam that we discovered on the second day of demolition. Because it prevented us from opening up the doorway, we had to pivot and adjust the cabinet spacing. Electrical access was also a serious problem that required added creativity to be sure the new space would include all the functionality of a modern kitchen. But all the challenges were overcome through creativity and almost constant communication.
At last, it was complete. Together we transformed the space into a beautiful transitional kitchen that is a joy to work in.
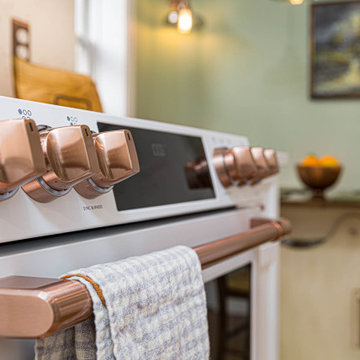
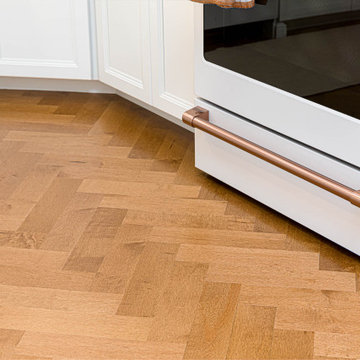
The maple cabinets with full-overlay doors were painted in matte white with copper hardware. The countertop and backsplash were Hanstone Quartz in the Strato color. It included a 30” single-basin sink in 14-gauge hammered copper. For the floor they chose Lauzan Maple Hardwood in the Sahara finish, installed in the herringbone pattern. And to really set off the kitchen, the old appliances were replaced with new GE Café appliances in their classy matte white with brushed copper accents.

 Envision Web
Stuart Wade, Envision Virtual Tours
Mountain Reflections on Lake Burton
Recently renovated both inside and out, this 5 bedroom, 5.5 bath home with sweeping views of Lake Burton is fit for entertaining large crowds. The open floor plan features a spacious great room with a 2-story stacked stone fireplace, abundant natural ligthing, dining for 10+ and a large chef's kitchen with granite countertops, custom cabinets to house every utensil, exposed beams and access to a lakeside porch. Three sets of french doors open to a magnificent curved veranda accented by columns. Western sunsets make this the place to be in the cool evenings watching the sun reflect off the jewel tone water. A private master bedroom on the main floor provides access to the covered porch. The master bath features a double vanity with granite countertops, built-in storage drawers and cabinets, jetted tub and seperate shower. Spacious guest bedrooms feature private baths and lake views. Mature landscaping including an incredible array of pink and purple rhododendron, eyebrow windows, columns and curved porches highlight the newly painted exterior.
The terrace level features a second family room/rec room with a stacked stone fireplace, wet bar, and a wall of triple french doors that open to a lakeside stone terrace. Two additional guest bedrooms with full baths also have access to the terrace patio. A large laundry room and gym/art studio with outside entrance, double sink and ample storage completes the terrace level.
Lake Burton is a unique Life Style. Cherry Lane is a paved street accessed by 4 single family homes. This home features a private, gated driveway off Cherry Lane. There is not a homeowner’s association, there are no fees or dues. Over 800 lake properties are managed and leased by the Georgia Power Company.
Location is a major advantage for this property with close proximity to Clayton, the hospital, Waterfall Country Club, the Appalachian Trail, shopping, quaint restaurants and only about a 45 minute drive to Highlands, N.C. This house is located on deep water and has breathtaking lake and mountain views that will capture your heart!
General Information:
• 5 bedrooms and 5 ½ baths
• All bathrooms have new updated granite counter tops.
• 2 fireplaces ( 1 gas non vent logs and 1 wood burning with gas starter and built in wood storage)
• Both fireplaces have raised hearths.
• House has poured concrete walls with reinforced steel.
• All Floor trusses were engineered for proper application.
• During construction the house and grounds were pre-treated for termites. The house is inspected for termites annually. To date, no termites have been found. The termite bond is with American Pest control out of Toccoa, GA.
• The main entrance has double Mahogany leaded glass door. All other exterior doors and windows are deluxe Anderson thermo pane. All Anderson windows are tilt out for easy inside cleaning. Windows have Planter shutter and/or wood blinds.
• All lake side doors are 8 feet. Doors have triple locks and are adjustable for the best fit.
• All exterior walls have house wrap and heavy insulation- R-17 for walls and R 30 in the attic.
• House has 3 levels. Each level has its own Trane High Efficiency Weathertron heat pump XE 1200. The 2 units for the main and basement levels also have dual fuel, propane gas for extra heat if needed.
• Beam Central Vacuum system for all 3 levels.
• All 3 levels are wired for Stereo speakers as well as the main level outside deck.
• All ceilings are 10 ft. or higher.
• Bar sinks have granite counter tops
*Brand new (2014) roof with HD architectural shingles has transferable lifetime warranty
Entry Foyer:
-Double Mahogany lead glass doors
-2 lead glass side windows
-Marble floor, heavy moldings, tray ceiling
Great Room:
-Vaulted wood ceiling with multi light chandelier
-Doors can be adjusted in many different positions for easy operations
-Anderson Windows and doors
-All doors facing lake side are 8 ft. doors
-Planter shutters in all windows on main floor
Kitchen:
-Vaulted ceiling with beadboard and exposed beams
-Custom Gillespie cabinets with space for every utensil
-Large kitchen island with breakfast bar
-Walk-in pantry
-Granite counter tops with plenty of prep space
-Breakfast nook
-Access to lakeside porch
-Central Vac and crumb catcher
-GE Monogram Fridge
-Kitchenaid built in oven and microwave
-Jen-air 4 burner gas stove with exhaust
-Kitchenaid trash compactor
-Scotsman Ice Machine
-Over and under counter accent lighting
Master Bedroom:
-Heavy Molding, hardwood flooring,
-Plantation shutters on bedroom French doors opening to deck
-4 closets
Master Bath:
-Granite counter tops with double sinks
-Separate shower with glass door and delta shower system
-Jetted Tub
-14 drawer built-in cabinets for clothing
Upstairs level:
-Two bedrooms, each with full baths, tile floors, double vanities, granite countertops, ample closets and linen closets
Terrace Level:
-Spacious family room with stone fireplace and wet bar
-Guest bedroom with full bath
-Office with full bath
-Art studio or exercise room with double sink
-Separate tool room
-Laundry room/utility room with tile floors and cabinets
-Covered stone terrace with access to boathouse
Boat House:
-Two stall for up to 25 ft. boat
-2 electric boat lifts
-Large deck on top of boathouse with ½ covered roof
-Large storage area for boat supplies
-Swim dock
 ALL Renovation & Design LLC
Could a dreadful dishwasher leak be a blessing in disguise?
The Redding kitchen was very odd. The house was a beautiful brick house from the early 1900’s, but the kitchen had been renovated since then with an impractical layout. It worked, but, for as much time as Mr. and Mrs. spend in the kitchen, it left much to be desired. Because they enjoy cooking so much, they dreamed of having a functional kitchen that added to the character of the home and respected the history of it.
So that’s why Mr. and Mrs. went to a Lancaster Home Show where they meet ALL Renovation & Design. They were impressed with our process which guides clients through the design phase in a unique way that guarantees a customized remodel, tailored to their dreams. We really hit it off, but, since they were still in the idea stage, the years passed quickly.
Then one morning they discovered a puddle under the dishwasher. And, as is often the case, the damage had already spread to the surrounding cabinets and a large area of the floor. And upon further inspection, it was discovered that part of the floor was made with asbestos – which would require expert remediation. This was turning into a major rehab project.
That’s when they were faced with a tough call: do they patch it up now and rip it out in a few years when they remodel the entire kitchen, or, do they remodel now? They called ALL Renovation & Design.
First we worked with the insurance company to raise the damage claim to what it would have actually cost to repair the damage done by the leak… several thousand dollars higher than what they had initially appraised it.
Then we guided Mr. and Mrs. through the design process that carefully articulated the goals and vision for the new kitchen. Functionality and complementing the home’s character were top priority. They were extremely pleased with the help we provided in guiding them through the cabinet choices, layout, and color selections.
Communication was key. Especially when we got into the demolition and construction work. One thing you can be sure of when working with older homes is that there are almost always surprises between the walls. For the Redding kitchen it took the form of a steel support beam that we discovered on the second day of demolition. Because it prevented us from opening up the doorway, we had to pivot and adjust the cabinet spacing. Electrical access was also a serious problem that required added creativity to be sure the new space would include all the functionality of a modern kitchen. But all the challenges were overcome through creativity and almost constant communication.
At last, it was complete. Together we transformed the space into a beautiful transitional kitchen that is a joy to work in.
The maple cabinets with full-overlay doors were painted in matte white with copper hardware. The countertop and backsplash were Hanstone Quartz in the Strato color. It included a 30” single-basin sink in 14-gauge hammered copper. For the floor they chose Lauzan Maple Hardwood in the Sahara finish, installed in the herringbone pattern. And to really set off the kitchen, the old appliances were replaced with new GE Café appliances in their classy matte white with brushed copper accents.
 User
Model: LOOAN - Color: Trendy Gray
Shape: rectangular - trough sink-wall mount-vessel sink
Finish: honed inside and outside
US Dimensions: 47-1/4" x 18-1/5" x 5-1/5"
US Drain size: standard hole size (1.5") x 1
Holes: With
Faucet holes size: 1.38" X2 (back side of the sink is hollow)
Material: granite grade A
Weight: 202 lbs
LOOAN is a 47-1/4" x 18-1/5" x 5-1/5" rectangular natural stone Bathroom trough sink with two faucet holes made in and carved from a a genuine Deco Trendy Gray Granite Block. You will definitely not let anyone feel indifferent with this 100% natural stone unique in the US and exclusively available on Livingroc.net.
Discover the well-being provided by our piece of granite stone; Aesthetic and practical, its beautifully curved inner sides allows an easy flow and minimal maintenance. Find the real natural stone authentic qualities, in sober and sleek lines with LOOAN. All our basins are made from high quality standard grade A, pure genuine materials that will last for years to come. Granite is a material perfectly adapted to bathroom uses.
All of our vessel sinks are the creation of a combined group of talented masons dedicated to the idea of creating bathware made from natural stone material, which is environmentally friendly. Waterproofed LOOAN is ready to use, sitting on a vanity counter top. If you wish to standardize your project, you can choose among a wide range of our Trendy gray granite shower trays carved from the same material (very similar color and same honed finish) as it came from the same quarry and most often from the same block of stone. Spacium, Palaos, Quasar or Dalaos.
This vessel sink is Highly resistant to chipping and scratching, withstands hot temperatures, tolerant to very high temperature changes.
Our creation is delivered without an overflow drain and faucet (not included) - every US drains and faucets models you can find on the market will fit perfectly on Living'ROC vessel sink. This model is ready to use over the countertop.
The photos you see online have been taken with extreme care by our Founder CEO - Florent LEPVREAU to give our visitors the best idea on how it might looks like. However our creation may vary from block to block as only mother nature will decides what you may receive (each sink is unique) even if our Gray and black Granite are very stable and are super close to our porfolio photos. We also draw your attention to the fact that veining, crystallization, that may appear to be cracks, but are actually indigenous to the stone, variations of colors (more on marble and onyx) and various stone features make all the charm of the stone and distinguish it from non-natural materials!. The Quality Inspection photos example shown on our portfolio are not available to choose by numbers. Our Customer service would be more than happy to share any additional photos with you if you would like... Simply Our Living'ROC Style
 Tile Doctor Ltd
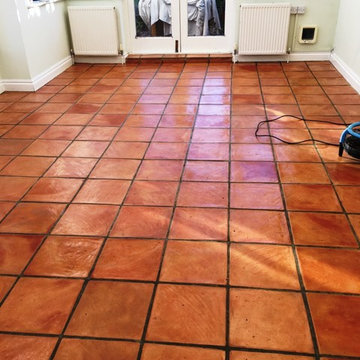
This couple, who live in the seaside resort of Brighton, had purchased their house four months before Christmas and wanted to have the fantastic Terracotta tiled floor in the kitchen and conservatory looking its best before the festive period, since they had family visiting. The floor was looking washed out and it was clear the sealer had failed in the high traffic areas and was now allowing dirt to penetrate into the pores of the tile making it difficult to clean.
We often get calls from new home owners keen to put their own stamp on a property shortly after moving in; stone floors rarely come with cleaning instructions so if you have a stone floor it makes sense to get in touch, so we can advise you on how best to maintain it.
We provided a quote which included stripping the floor of old sealers, cleaning, oiling and then sealing it again to restore cleanliness and character to the Terracotta. There was a lot to do and two areas to clean so I anticipated it would take four days to complete.
Having accepted the quote our first task upon returning to the property was to give the Terracotta tiles a deep clean and remove any remaining sealer present on the tile. This was achieved by applying a strong combination of Tile Doctor Pro-Clean and Tile Doctor NanoTech HBU to the tiles and then covering it in a plastic sheet, so it wouldn’t dry out. This method allows the products to really soak into the pores of the Terracotta and draw out the dirt. I should also mention that Pro-Clean is a very effective Tile and Grout cleaner whilst HBU enhances it by adding nano-sized cleaning particles.
The plastic blanket was left in place for a few hours before being peeled off and then the cleaning products scrubbed into the tile and grout using a black pad fitted to a rotary floor machine and hand brushes. The now soiled product was rinsed off with water which was then extracted using a wet vacuum. The floor was inspected, and stubborn marks spot treated until the floor was clean.
After thoroughly cleaning the Terracotta over two days, we left the floor to completely dry off over the weekend. The tiles would need to be sufficiently dry to receive fresh sealant, as excess moisture can cloud the sealant and prevent it from working correctly.
When we returned to the property, we proceeded to apply Tile Doctor Stone Oil to the tiles. Stone Oil is a sealer which restores the colour and texture of tiled floors, as well as mechanical strength once cured.
We applied a single coat of the Stone Oil before topping it up with multiple coats of Tile Doctor Seal and Go, a topical sealer which provides a high-quality sheen finish to help accentuate the appearance of the Terracotta tiles as well as adding protection.
You can see the results of the restoration below. The couple were so impressed that they have now agreed to have Tile Doctor visit once a year (at a fraction of the cost of the original restoration) to complete a maintenance clean. This will make sure this Terracotta is always looking at its best!
Mick Conlon
East Sussex Tile Doctor
 Green Home Systems
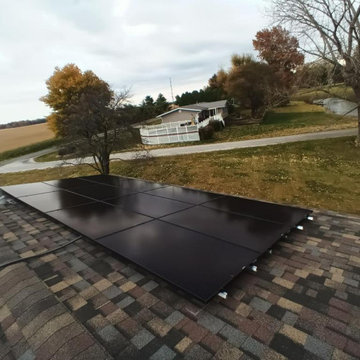
 provides reliable solar power solutions to residential and commercial customers all over the country. Recently, we had the opportunity to work with Bruce D. in Jacksonville, IL to provide a 19kW solar system for his home. We were able to complete this job quickly and efficiently, delivering a high quality product at an affordable price.
At Green Home Systems, our mission is to provide our customers with the best customer service in the industry as well as unparalleled solar solutions at the most economical price. We understand that not everyone can afford large upfront costs associated with installing solar systems and we are proud to offer competitive financing options that make it easier for our customers to go solar without breaking the bank. This was certainly true for Bruce D., who took advantage of our financing options and was able to have his new solar system installed within a couple of weeks time.
Our team worked hard to ensure everything went smoothly when installing Bruce’s new system. We began by inspecting his roof to determine if it was suitable for installation and if there were any potential problems that needed addressing before beginning work. Once we determined everything was in order we then moved on to designing and installing the system itself. Our team of experienced professionals worked diligently to ensure each component was installed properly and securely so that it would be able to withstand years of exposure to the elements without issue.
We also made sure that Bruce was aware of all the financial benefits associated with having a photovoltaic system installed on his home. He was now able to take advantage of numerous tax credits available in Illinois as well as decreased utility bills due to reduced consumption from his local electricity provider. Additionally, he will be able to increase the value of his home by having a solar power system installed which will make it more attractive should he decide he wants to sell it down the line.
In conclusion, we are proud of our work with Bruce D. in Jacksonville, IL and were happy to provide him with an efficient and cost-effective way to add renewable energy sources into his home’s power grid. Our team worked diligently throughout every stage of this project from design through installation until completion and we are thrilled with the results. We look forward to continuing our work throughout Illinois providing reliable solar solutions at competitive prices so that more people can benefit from this clean source of energy!
 Pennsylvania Landscape & Nursery Association
Terren Landscapes http://www.terrenlandscapes.com
Project Entry: Pembrooke Estate Rain Garden
2014 PLNA Awards for Landscape Excellence Winner
Category: Sustainable Landscape &60,000-$120,000
Award Level: Silver
Project Description:
The client contracted our company to solve multiple existing drainage problems. In a heavy rain event the existing French drain system would overflow, causing water to pool in the driveway. After investigating the system we found that the capacity of the French drain was undersized for the amount of storm water from the large rain events received in recent years. As a result of our findings and at the request of the homeowner, we designed a storm water management system to capture all storm water from the structures on the property and regenerate the underground aquifers for the volume of a 5.8” rainstorm. In addition to the new drain system, the homeowners wanted a rain garden to provide a backdrop for an existing formal garden, provide a habitat for wildlife, and provide screening from an adjacent neighbor.
Throughout the design process many challenges were presented, including an existing gas line, which ran directly through the area that best suited the bioswale. The existence of the gas line caused us to alter the shape and depth of the bioswale in some areas. We also inspected the existing downspouts to make sure there were no obstructions that would impede the system’s efficiency, and then conducted a test pit dig to make sure we had sufficient percolation rates for disposal of storm water.
To effectively capture the storm water runoff, the existing downspouts were piped from the main house and the large detached garage to a large catch basin located at the low point in the driveway. The driveway catch basin contains two outlet pipes at different elevations within the basin allowing water from smaller rain events to enter the bioswale and rain garden area to percolate into the soil before excess water overflows into a sediment trap which filters out any debris and is then piped to an underground StormTech® pit to slowly percolate into the ground. The other outlet pipe in the driveway catch basin is used for larger storm water events, taking the water directly to the StormTech® pit.
Accepting and slowing the velocity of the storm water, mitigation of erosion, and filtering out pollutants contained in the “first flush” of rainfall are the primary functions of the bioswale and rain garden. Planting these areas with mostly native plant species helps carry out these functions while attracting and providing shelter for wildlife.
The ‘Niobe’ weeping willow is the centerpiece of the rain garden, connecting with the axis of the existing formal garden. To screen the neighboring property we chose Chamaecyparis nootkatensis ‘Pendula’ for its graceful evergreen habit and tolerance of wet sites. ‘Ivory Halo’ dogwood and Panicum ‘Cloud Nine’ were used for screening as well as winter interest. To provide deciduous structure to the garden Taxodium distichum and Magnolia virginiana were used in conjunction with witch hazel. Mostly native wetland perennials were used due to their tolerance of wet conditions and occasional drought.
The area above the StormTech® pit provides space for the client’s family to relax. The rain garden and bioswale provide screening, storm water management, a habitat for wildlife, and plants that enhance the adjacent formal garden.
Photo Credit: Terren Landscapes
 Green Home Systems
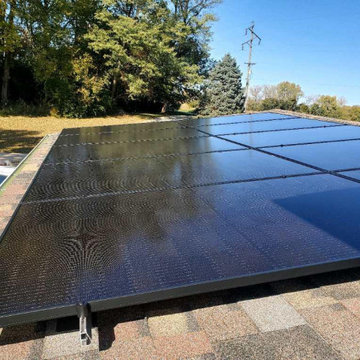
 provides reliable solar power solutions to residential and commercial customers all over the country. Recently, we had the opportunity to work with Bruce D. in Jacksonville, IL to provide a 19kW solar system for his home. We were able to complete this job quickly and efficiently, delivering a high quality product at an affordable price.
At Green Home Systems, our mission is to provide our customers with the best customer service in the industry as well as unparalleled solar solutions at the most economical price. We understand that not everyone can afford large upfront costs associated with installing solar systems and we are proud to offer competitive financing options that make it easier for our customers to go solar without breaking the bank. This was certainly true for Bruce D., who took advantage of our financing options and was able to have his new solar system installed within a couple of weeks time.
Our team worked hard to ensure everything went smoothly when installing Bruce’s new system. We began by inspecting his roof to determine if it was suitable for installation and if there were any potential problems that needed addressing before beginning work. Once we determined everything was in order we then moved on to designing and installing the system itself. Our team of experienced professionals worked diligently to ensure each component was installed properly and securely so that it would be able to withstand years of exposure to the elements without issue.
We also made sure that Bruce was aware of all the financial benefits associated with having a photovoltaic system installed on his home. He was now able to take advantage of numerous tax credits available in Illinois as well as decreased utility bills due to reduced consumption from his local electricity provider. Additionally, he will be able to increase the value of his home by having a solar power system installed which will make it more attractive should he decide he wants to sell it down the line.
In conclusion, we are proud of our work with Bruce D. in Jacksonville, IL and were happy to provide him with an efficient and cost-effective way to add renewable energy sources into his home’s power grid. Our team worked diligently throughout every stage of this project from design through installation until completion and we are thrilled with the results. We look forward to continuing our work throughout Illinois providing reliable solar solutions at competitive prices so that more people can benefit from this clean source of energy!
 Green Home Systems
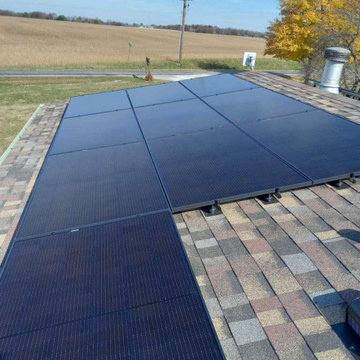
 provides reliable solar power solutions to residential and commercial customers all over the country. Recently, we had the opportunity to work with Bruce D. in Jacksonville, IL to provide a 19kW solar system for his home. We were able to complete this job quickly and efficiently, delivering a high quality product at an affordable price.
At Green Home Systems, our mission is to provide our customers with the best customer service in the industry as well as unparalleled solar solutions at the most economical price. We understand that not everyone can afford large upfront costs associated with installing solar systems and we are proud to offer competitive financing options that make it easier for our customers to go solar without breaking the bank. This was certainly true for Bruce D., who took advantage of our financing options and was able to have his new solar system installed within a couple of weeks time.
Our team worked hard to ensure everything went smoothly when installing Bruce’s new system. We began by inspecting his roof to determine if it was suitable for installation and if there were any potential problems that needed addressing before beginning work. Once we determined everything was in order we then moved on to designing and installing the system itself. Our team of experienced professionals worked diligently to ensure each component was installed properly and securely so that it would be able to withstand years of exposure to the elements without issue.
We also made sure that Bruce was aware of all the financial benefits associated with having a photovoltaic system installed on his home. He was now able to take advantage of numerous tax credits available in Illinois as well as decreased utility bills due to reduced consumption from his local electricity provider. Additionally, he will be able to increase the value of his home by having a solar power system installed which will make it more attractive should he decide he wants to sell it down the line.
In conclusion, we are proud of our work with Bruce D. in Jacksonville, IL and were happy to provide him with an efficient and cost-effective way to add renewable energy sources into his home’s power grid. Our team worked diligently throughout every stage of this project from design through installation until completion and we are thrilled with the results. We look forward to continuing our work throughout Illinois providing reliable solar solutions at competitive prices so that more people can benefit from this clean source of energy!
 Green Home Systems
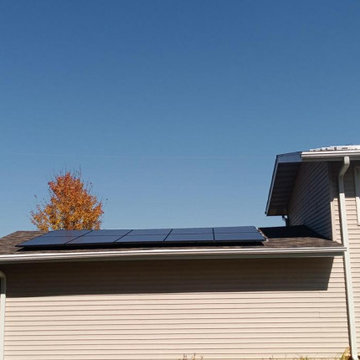
 provides reliable solar power solutions to residential and commercial customers all over the country. Recently, we had the opportunity to work with Bruce D. in Jacksonville, IL to provide a 19kW solar system for his home. We were able to complete this job quickly and efficiently, delivering a high quality product at an affordable price.
At Green Home Systems, our mission is to provide our customers with the best customer service in the industry as well as unparalleled solar solutions at the most economical price. We understand that not everyone can afford large upfront costs associated with installing solar systems and we are proud to offer competitive financing options that make it easier for our customers to go solar without breaking the bank. This was certainly true for Bruce D., who took advantage of our financing options and was able to have his new solar system installed within a couple of weeks time.
Our team worked hard to ensure everything went smoothly when installing Bruce’s new system. We began by inspecting his roof to determine if it was suitable for installation and if there were any potential problems that needed addressing before beginning work. Once we determined everything was in order we then moved on to designing and installing the system itself. Our team of experienced professionals worked diligently to ensure each component was installed properly and securely so that it would be able to withstand years of exposure to the elements without issue.
We also made sure that Bruce was aware of all the financial benefits associated with having a photovoltaic system installed on his home. He was now able to take advantage of numerous tax credits available in Illinois as well as decreased utility bills due to reduced consumption from his local electricity provider. Additionally, he will be able to increase the value of his home by having a solar power system installed which will make it more attractive should he decide he wants to sell it down the line.
In conclusion, we are proud of our work with Bruce D. in Jacksonville, IL and were happy to provide him with an efficient and cost-effective way to add renewable energy sources into his home’s power grid. Our team worked diligently throughout every stage of this project from design through installation until completion and we are thrilled with the results. We look forward to continuing our work throughout Illinois providing reliable solar solutions at competitive prices so that more people can benefit from this clean source of energy!
 Tile Doctor Ltd
This beautiful Limestone kitchen tiled floor at a property in Peel Green was only a year old and, while it wasn’t in too bad of a state, the customer told me the floor had not been sealed properly due to issues with retaining moisture. The lack of an adequate sealer had allowed the Limestone to become duller over time after exposure to dirt and muck. It also had some more obvious marks and stains in some place and needed some grouting to be done around the corners and edges of the room.
I travelled to the property in Peel Green, which is within the Greater City of Salford in Greater Manchester, to see what could be done to restore the condition of the tiles.
Upon closer inspection of the tiles, I recommended to the customer that we proceed with the process known as burnishing, which we use primarily on Limestone, Marble, and Travertine. Burnishing, which involves the application of diamond encrusted burnishing pads, breaks down old sealers, gets rid of marks, stains and ingrained dirt, and gradually builds and evens out the polish on the tiles.
I started burnishing the Limestone kitchen tiles straight away when I arrived at the property as it was a big area and would require lots of hard work to achieve the desired results within the space of a day.
Our burnishing system consists of four diamond encrusted pads: Coarse, Medium, a Fine and Very Fine. Each pad was applied to the Limestone in sequence in tandem with a small amount of water to act as lubrication, gradually smoothing and polishing the surface of the tiles. After every pad, I also used my wet vac machine to remove any dirty water left on the floor and, after the Fine pad I rinsed the floor thoroughly to remove any dirt left on floor. I then left it to dry.
When I was satisfied that the floor was completely dry, it was time to seal the Limestone tiles. However, I first went over the floor with Very Fine grit pad to provide a final polish before sealing.
My choice of sealer was the impregnating Tile Doctor Colour Grow, a product which enhances the natural colours in the stone whilst also offering robust protection against dirt and stains. Remembering that the tiles had never been properly sealed, I applied plenty of sealer and left it to dry for 10 minutes. Following this, I carefully removed any excess sealer left on the surface with a dry cotton cloth. After sealing I went over the floor once final time with the Very Fine pad, just to smoothen things down and leave an exceptionally neat finish.
When the job was finished, I gave the owner some tips and recommendations on the cleaning of the floor going forward and a complimentary bottle of neutral cleaner to get them started.
The customer was very pleased with the finish, so much so that she opted and take up the Tile Doctor Maintenance Plan to keep the floor looking good for years to come! This involves popping round every 6-12 months to top up the sealer and give the floor a quick polish.
Tony Olmet
Greater Manchester Tile Doctor
 Little Board Woodworking
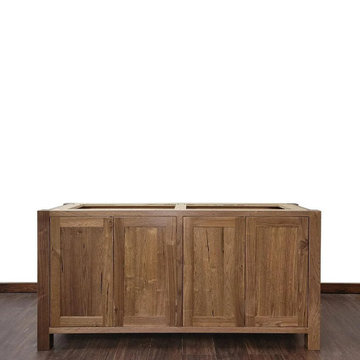
Our beautiful rustic walnut vanities bring a warm feel to your home. This spacious design offers plenty of storage for all your personal care items. The rustic walnut hardwood has plenty of character and grain that is sure to catch the eye. Our eco friendly finish helps protect the environment while offering a water resistant surface for your family. Each of our vanities are made one at a time, so you know you’re always getting something made with care.
Details:
• Wood: 3/4" Solid walnut exterior with 3/4" plywood interior
• Wood origin: Central Wisconsin
• Height: 32"
• Width: 24” (72" Wide In Photos)
• Depth: 20"
• Finish: Matte, water-resistant finish, VOC-free
• Soft Close Euro Hinges
• *Countertop Not Included*
Manufacturing Time: Our hand build furniture is ready to be shipped within 6-8 weeks. Though we do our best to stay on schedule, some variation may occur based on current workload and will be disclosed at the time your order is placed. Updates will be provided throughout the building process to keep you in the loop on your purchase.
Our Source Of Lumber: Our Hardwood is sourced locally from Central Wisconsin from various suppliers. We use a variety of character rich lumber to ensure that one of a kind look in every piece. Each one of our pieces is hand selected by one of our team members to ensure the highest quality lumber is used.
Note: Lumber is a natural product. Please allow for variation between each of our products. Knotts, grain pattern and color will vary slightly on each build.
Shipping:
Each of our items is shipped through standard freight and will require a signature at the time of delivery. Some of our larger items will come disassembled and may require some simple assembly. Our items that require some assembly will have that listed in the description as a disclosure before purchasing. Shipping dates and times can be worked out to accommodate our clients schedules.
Our Freight carriers deliver you package curbside and each package requires a recipients signature. Freight carriers do not assist with carrying the packages into your house. Getting the package inside is the buyers responsibility.
Damaged Freight: We work with each of our customers to ensure that our products get to their destination without damage. Please inspect the crate upon arrival. If anything appears to have minor damage from transit, please notate that on the delivery ticket before signing. Make a note of how/where the crate was damaged. If the crate/vanity looks to be heavily damaged past the point of being usable, please refuse the crate and DO NOT SIGN. Failure to notate damages on delivery ticket may result in additional shipping fees that the buyer will be responsible for if vanity needs to be serviced/returned. You can also contact us by phone at (815)451-5189 with further questions.
Local pickup and deliveries are available upon request.
Our shop is located at:
Lake In The Hills, IL 60156
169