
Search results for "Insured" in Home Design Ideas
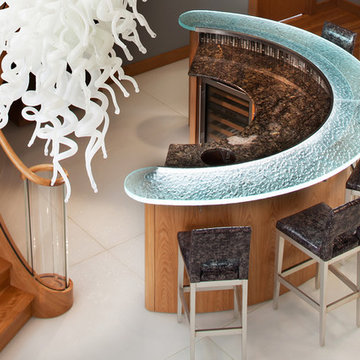
 Nathan Allan Glass Studios Inc.
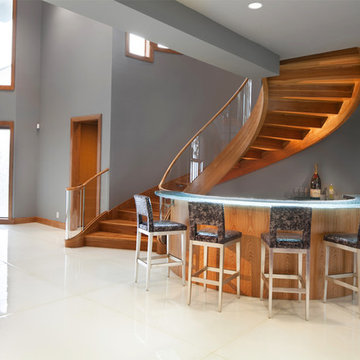
What surprises people most when entering and walking on the glowing white surface in this particular Private Residence (Williamsburg, VA) is when they find out they are walking on a sea of glass! Yes, GLASS! Not marble, not granite, but GLASS! Nathan Allan has created a very fresh, unique flooring surface, which is smooth to touch on the majority of the glass surface, yet has an almost invisible safety finish permanently embedded in the glass surface.
THE GLASS
Nathan Allan’s Glass Flooring incorporates features which are visually stunning, while also providing a safety finish which provides comfort to everyone walking on the glass. Our Sandstone texture is forged into the bottom surface of the glass, while our exclusive Glass Sandpaper safety finish is fused onto the walking surface. To enhance all features, we added a bright, sparkling, White Metallic color finish throughout each flooring panel.
SPECIFICATIONS
Each Glass Flooring panel is produced in 1/2″ (12mm) thick, Low Iron, tempered safety glass. Tempered glass provides added strength, insuring that the Glass Flooring can accept a heavy load. Panels vary in size and dimension, with most panels measured at a block size of 5’0 x 6’0 (1500mm x 1800mm). Perimeter Edge panels were carved and shaped to fit tightly against the curved walls. Glass Sandpaper, ASTM tested in labs with the highest slip-coefficient safety ratings, is fused onto the walking surface, to provide a very comfortable and effective safety feature.
Flooring Glass Details:
1/2″ (12mm) thick, Low iron tempered safety glass
Flat Polished Edges
Glass Sandpaper on walking surface
Sandstone texture on bottom surface
White Metallic color finish on bottom surface
Panels sizes up to 5’0 x 6’0
Approximately 800 square feet of glass flooring
Perimeter panels shape cut to fit
Almost overshadowed by the spectacular flooring is a 1.5” thick, Heavy Glasstop, Crescent shaped, with Nathan Allan’s Rocky Mountain texture.
DESIGN
A White Sea of Glass flooring is the finished result of combining a light Sandstone texture on the bottom glass surface, with the added touch of a sparkling White Metallic color finish. Combined with our Glass Sandpaper safety finish, and the natural and artificial light sources, our Glass Flooring shimmers within the entire entrance space.
INSTALLATION
Using very important installation techniques, Nathan Allan worked hand in hand with great team of professionals: Vicki Bristow, designer, W. M. Jordan Company, GC, and Pompei Inc, glass flooring installer. Templates were produced for all perimeter edge panels, and every shaped panel. All flooring panels are secured to the substrate with special adhesives, and joints are filled with matching color sealants.
“A beautiful project is always enhanced when working with quality, prestigious builders, and talented trade’s people. The tight organization and open communication by all the team members contributed greatly to a project proceeding seamlessly, with the incredible visual results to prove it.” Barry Allan – Director
Photo credit: Morgan Howarth

 The Masons Co and Dionysian Artificers Landscape
Fountain Repair Nashville TN
Fountain Repair MNashville TN
Fountain Repair Contractors Nashville TN
Fountain Repair and Service Nashville TN
Fountain Repair and Restoration Company Nashville TN
Custom Water Feature Company Nashville TN
Custom Water Feature Contractor Nashville TN
Fountain Designs Ideas Nashville TN
Fountain Ideas Nashville TN
Commercial Landscape Water Features Nashville TN
Commercial Water Features Nashville TN
Fountain Designs Nashville TN
Fountain Designs Services Nashville TN
Fountains and Water Features Nashville TN
the water features designs company Nashville TN
fountains installation Nashville TN
Commercial water fountains indoor Nashville TN
Commercial water fountains outdoor Nashville TN
Commercial water fountains contractor Nashville TN
Commercial water fountain company Nashville TN
Commercial fountains installation Nashville TN
Commercial landscape water features Nashville TN
Historic fountain restoration Nashville TN
Water features displays Nashville TN
Landscape Water Features Company Nashville TN
Water Features Installation Nashville TN
Water Features Contractor Nashville TN
Fountain Restoration Nashville TN
Waterfalls Installation Nashville TN
Waterfalls Contractor Nashville TN
Waterfalls Company Nashville TN
Drinking Fountain Nashville TN
Landscape Retaining Walls Nashville TN
Masonry Restoration Contractor Nashville TN
Historic Repair Restoraction Company Nashville TN
Historic Restoration Contractor Nashville TN
Historical building restoration Nashville TN
Historic restoration companies Nashville TN
Historical renovation contractors Nashville TN
Building restoration contractors Nashville TN
Historic restoration contractors Nashville TN
Fire restoration contractors Nashville TN
Deck restoration contractors Nashville TN
Insurance restoration contractors Nashville TN
American restoration contractors Nashville TN
Restoration contractors association Nashville TN
Building restoration jobs Nashville TN
Building restoration preservation Nashville TN
Historic building restoration Nashville TN
Building restoration companies Nashville TN
Building contractors Nashville TN
Building renovation Nashville TN
Nashville TN restoration Company
Nashville TN restoration contractors
Elite building restoration Nashville TN
Building restoration before and after Nashville TN
Proto type buildings restoration Nashville TN
Brick building restoration Nashville TN
American building restoration Nashville TN
Architectural building and restoration Nashville TN
Building restoration business cards Nashville TN
Restoration hardward building plans Nashville TN
Building restoration clip art Nashville TN
Building restoration project Nashville TN
Building design restoration Nashville TN
Storage buildings restoration Nashville TN
Metal buildings restoration Nashville TN
Building blocks restoration Nashville TN
Abandoned buildings restoration Nashville TN
Minecraft building ideas restoration Nashville TN
Office building restoration Nashville TN
Capitol building restoration Nashville TN
The empire state building restoration Nashville TN
Old buildings restoration Nashville TN
Building construction restoration Nashville TN
Amazing buildings restoration Nashville TN
historical building restoration Nashville TN
historic preservationist Nashville TN
preservation of historical buildings Nashville TN
Architectural preservationist Nashville TN
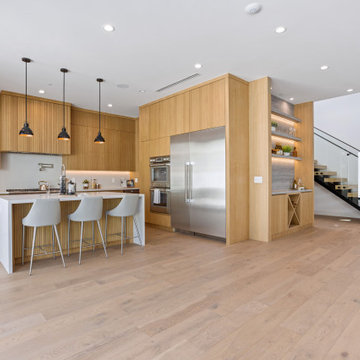
 MY Home Builders Inc.
Modernized open concept kitchen with a white granite top island, home bar, staircase, stainless steel appliances, tan wood cabinets, and recessed lighting.
Find the right local pro for your project

 Tuscanbasins
The Berkeley is designed with clean and simple styling in mind and finished in an elegant mocha stain. The Berkeley makes any living room, den or man cave really stand out.
The Berkeley TV lift cabinet was inspired by the same construction and finish of the Brookside TV lift cabinet. Taking from it's subtle lines and mocha finish it has quickly become one of our most popular units. The Berkeley features interior shelf lighting and tons of room behind the cabinet doors for your component and media storage.
The Berkeley accommodates most 60" diagonal flat panel plasma and LCD TVs, measuring 55"W x 4.5"D x 35"H. Behind the front doors is ample storage space for your DVD movie & video game boxes. The cabinet is equipped with sliding rear panels for easy access to your TV connections.
Video
Product Features:
Universal Mounting System: Simple mounting kit includes all the hardware and brackets you need to hold your flat screen TV on the Touchstone lift mechanism.
Component Storage Space: The Berkeley has 8" of vertical storage height and 50" of width horizontal space for your Satellite Box, Cable Box, Recorders, Amps, Surround Sound, and Video Games.
Personal Storage Space: The Berkeley has 4 adjustable shelves for your DVD boxes, Video Game boxes and CD cases.
RF Remote Control: Includes 1 RF remote control for raising/lowering the lift mechanism without requiring line of sight.
Backup Wired Remote Control: Each unit has a backup on/off switch and set control switch inside the cabinet.
Finishing Process: Our thorough 7 step finishing process uses a combination of hand-staining and automated application tools that insures all woods and stains are applied uniformly and precisely to produce a quality cabinet that will last a lifetime.
English Dovetail Joints: A time-honored fine cabinet-making technique, Dovetail joints become self-locking even before the glue is applied, so solid overall construction can be guaranteed.
Solid Wood Tongue and Groove Corner Blocks: Incorporates the side panels of the cabinet with the foot of the cabinet, adding structural support which enhances durability.
24 point QC audit inspection of every cabinet.
Specifications
Cabinet Wood Finish: Mocha
Unit Dimensions: 59"W x 23"D x 41.5"H
Maximum Cabinet TV Size: 55"W x 4.5"D x 35"H (TV plus component height)
Unit Weight: 321 lbs.
Unit Shipping Weight:395 lbs.
Touchstone's TV Lift System
The Berkeley is ready for entertainment action with Touchstone's quiet and smooth TV lift system for your flatscreen television. The Berkeley includes a wireless RF remote control for operation of the cabinet's lift as well as a backup controller wired into the inside of the cabinet just in case you ever lose or can’t find the wireless remote.

 BathGems
This vanity's original design will give your bathroom the aesthetics that it deserves. Made out of Grade-A solid oak wood and featuring frame type construction, this vanity exudes a sense of durability. The 12 step hand applied Antique Ocean finish prevents cracking and fading while giving the vanity a rustic country living appeal. By choosing one of Cream Marble, Carrera White Marble, Travertine, Black Granite or Tropical Brown Granite counter tops a polished sparkle will brighten up your bathroom. There are also a multitude of other wood finishes available to choose from. By mixing and matching finishes and counter tops a vanity that bests fits your style can be created. Don't forget to look at the add ons such as the mirror and linen cabinet while you are at it.
Dimensions
Vanity
36"W x 23.5"D x 34.75"H
Optional Accessories
Mirror
26"W x 3.7"D x 41.5"H
Linen Cabinet
20.5"W x 16.25"D x 65"H
Features
Quality materials are important to the longevity of your bathroom vanity. Cheap vanities made with particle board or MDF tend to sag, warp, split, discolor, and expand over time. This is especially true in humid climates, such as the environment found in a normal bathroom. Since bathroom humidity is so common, bathroom vanities need to be extremely durable. They also need to be strong enough to endure lots of usage-based wear and tear. Vanities are typically made of MDF, birch, rubberwood, or natural oak. Generally, MDF is approximately 30 % the quality of oak, birch is 50% the quality of oak, and rubberwood is typically 90% the quality of oak, where "quality" is defined as the strength, integrity, and durability of the material. Solid oak is without question the strongest, most durable, and most resilient of all vanity materials. Only the highest-quality and best made vanities are manufactured from natural oak. Premier Collection
Vanities that are marked as Premier Collection are the best vanities in the industry where no expense has been spared. These are the best vanities money can buy made from small quantities of handpicked solid hard woods that are hand finished to perfection. To be considered part of the Premium Collection the vanity must get A+++ grades in: Wood used, Interior Construction, Counter Top, and Finish.
Wood Used:
Premier Collections uses Kiln dried wood in small batches to insure proper drying to prevent cracking and warping. All wood is cared for in great detail to prevent cracking and warping so that your vanity looks as good as they day it arrived for many years.
Vanity Tops:
Premier Collections vanities that have stone tops use a thicker stone, up to 3cm (1cm more than industry average), providing a more luxurious look. All of the vanities with stone tops are sealed to prevent watermarks and minor stains.
Construction:
Premium Collection vanities use hard wood box framed construction that provides strength and durability for decades. All vanities have working drawers with able storage made with slide ball bearing drawers and or soft close mounts. Center drawers are boxed and fitted around plumbing for additional storage.
Finish:
Premium Collection vanities are all hand stained, hand painted, using up to a 15 layer sealing and finishing process to avoid future fading, cracking, or peeling.
- Grade A, Solid kiln-dried Oak
- Double-Door cabinet with antique-style handles
- Choose from Cream Marble, Black Granite, Tropical Brown Granite, Carrera White Marble, or Travertine tops
- Comes with full sized 17" porcelain sink
- 100% solid timber construction
- Frame type construction featuring Old World joinery
- Hand applied varnish in 3 layers for added durability and warping prevention
- 12-step hand glaze finish to ensure cabinet won't peal, crack, or fade
- Pre-drilled for 8" faucet spread
- **Faucets Not Included**
Quality materials are important to the longevity of your bathroom vanity. Cheap vanities made with particle board or MDF tend to sag, warp, split, discolor, and expand over time. This is especially true in humid climates, such as the environment found in a normal bathroom. Since bathroom humidity is so common, bathroom vanities need to be extremely durable. They also need to be strong enough to endure lots of usage-based wear and tear. Vanities are typically made of MDF, birch, rubberwood, or natural oak. Generally, MDF is approximately 30 % the quality of oak, birch is 50% the quality of oak, and rubberwood is typically 90% the quality of oak, where "quality" is defined as the strength, integrity, and durability of the material. Solid oak is without question the strongest, most durable, and most resilient of all vanity materials. Only the highest-quality and best made vanities are manufactured from natural oak. Premier Collection
Vanities that are marked as Premier Collection are the best vanities in the industry where no expense has been spared. These are the best vanities money can buy made from small quantities of handpicked solid hard woods that are hand finished to perfection. To be considered part of the Premium Collection the vanity must get A+++ grades in: Wood used, Interior Construction, Counter Top, and Finish.
Wood Used:
Premier Collections uses Kiln dried wood in small batches to insure proper drying to prevent cracking and warping. All wood is cared for in great detail to prevent cracking and warping so that your vanity looks as good as they day it arrived for many years.
Vanity Tops:
Premier Collections vanities that have stone tops use a thicker stone, up to 3cm (1cm more than industry average), providing a more luxurious look. All of the vanities with stone tops are sealed to prevent watermarks and minor stains.
Construction:
Premium Collection vanities use hard wood box framed construction that provides strength and durability for decades. All vanities have working drawers with able storage made with slide ball bearing drawers and or soft close mounts. Center drawers are boxed and fitted around plumbing for additional storage.
Finish:
Premium Collection vanities are all hand stained, hand painted, using up to a 15 layer sealing and finishing process to avoid future fading, cracking, or peeling.
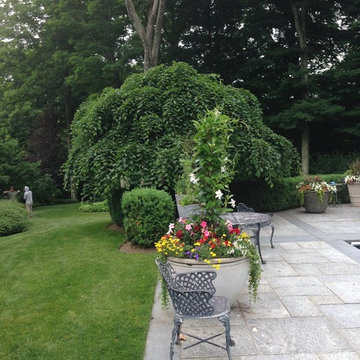
 Horticultural Solutions, LLC
This lushous tree at the corner of the pool deck is coming in nicely. We planted it a few years ago and have shaped it for artistic expression & development.
The owners of the property really enjoy to labors of our love.
Great pools and property deserve beautiful Urns at point. This helps with the flow of the traffic to and from the pool house or main house in addition to adding color when the perennial gardens haven't come in as of yet.
This property is in Bedford, New York.
Many find rejuvenation and relaxation by vacationing in lavish resorts that offer beautiful atmospheres or surroundings, imagine getting that escape in your own home. This can include walking gardens taking your imagination to places. We offer experiences in our design through accents of moss covered toad stools, crafted areas of flower blooms amongst floor greens leading to layered boulder settings to rest, or extended stone patio areas dressed in overflowing urns and the light sounds of soothing water flow which is then completed with the view from the entertaining outdoor bar of lush lawns spotted with magically shaped White Oaks. These details describe some of which inspire and our customers. Great gardens can do great things for the beholder. We create healthy and sustainable all season environments of fragrance, color and visual depth.
We are proud to be Fairfield and Westchester County’s Fine Landscaping and Landscape Maintenance Service Company by providing our clients with over 30 years of what they expect from a quality design, installation and follow-up landscaper.
We are fully insured and licensed by the State of Connecticut and the County of Westchester and specialized in servicing the landscape needs of the finest of homes in Greenwich, New Canaan, Bedford Hills, Chappaqua, Armonk and several other beautiful towns and hamlets surrounding them. We believe that some key characteristics of our business set us apart from other landscapers. The mentality built into our age and experience allows us to serve all landscaping and hardscaping projects— as large as they may get — while also being reliable and responsive. We are a locally owned business which means that each client receives individualized service based on their needs and their landscape’s growing conditions. To minimize the damage done to garden beds and hardscapes (pathways, waterfalls and pools) from other portions of the property’s maintenance, so we offer these services along with the garden servicing plan, entitled The ‘All Scapes’ Maintenance Service Agreement . Please contact us any time of the year. We are always working on something to beautify your world.
See us at our website: http://www.horticulaturalsolutionsny.com
Landscape Design: http://www.horticulaturalsolutionsny.com/gallery
Landscape Plans: http://www.horticulturalsolutionsny.com/design
Landscape Consultation: http://www.horticulturalsolutionsny.com/consultation
Tree installation: See us at our website: http://www.horticulturalsolutionsny.com/trees
Masonry: See us at our website: http://www.horticulturalsolutionsny.com/masonry
Portfolio: http://www.horticulturalsolutionsny.com/portfolio
Bedford Hills Portfolio: http://www.horticulturalsolutionsny.com/portfolio/BedfordHills
New Canaan Portfolio: http://www.horticulturalsolutionsny.com/portfolio/NewCanaan
Fairfield County Portfolio: http://www.horticulturalsolutionsny.com/portfolio/Fairfield
Westport Portfolio: http://www.horticulturalsolutionsny.com/portfolio/Westport
Greenwich Portfolio: http://www.horticuturalsolutionsny.com/portfolio/Greenwich
Katonah Portfolio: http://www.horticulturalsolutionsny.com/portfolio/Katonah
Chappaqua Portfolio: http://www.horticulturalsolutionsny.com/portfolio/Chappaqua
Armonk Portfolio: http://www.horticulturalsolutionsny.com/portfolio/Armonk
Scardale Portfolio: http://www.horticulturalsolutionsny.com/portfolio/Scardale
Pound Ridge Portfolio: http://www.horticulturalsolutionsny.com
Landscape Design: http://www.horticulturalsolutionsny.com/gallery
Landscape Plans: http://www.horticulturalsolutionsny.com/design
Landscape Consultation: http://www.horticulturalsolutionsny.com/consultation
Tree installation: See us at our website: http://www.horticulturalsolutionsny.com
Masonry: See us at our website: http://www.horticulaturalsolutionsny.com
Portfolio: http://www.horticulturalsolutionsny.com
Bedford Hills Portfolio: http://www.horticulturalsolutionsny.com
New Canaan Portfolio: http://www.horticulturalsolutionsny.com
Fairfield County Portfolio: http://www.horticulturalsolutionsny.com
Westport Portfolio: http://www.horticulturalsolutionsny.com
Greenwich Portfolio: http://www.horticulturalsolutionsny.com
Katonah Portfolio: http://www.horticulturalsolutionsny.com
Chappaqua Portfolio: http://www.horticulturalsolutionsny.com
Armonk Portfolio: http://www.horticulturalsolutionsny.com
Scardale Portfolio: http://www.horticulturalsolutionsny.com
Pound Ridge Portfolio: http://www.horticulturalsolutionsny.com
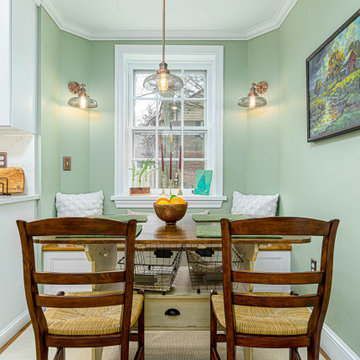
 ALL Renovation & Design LLC
Could a dreadful dishwasher leak be a blessing in disguise?
The Redding kitchen was very odd. The house was a beautiful brick house from the early 1900’s, but the kitchen had been renovated since then with an impractical layout. It worked, but, for as much time as Mr. and Mrs. spend in the kitchen, it left much to be desired. Because they enjoy cooking so much, they dreamed of having a functional kitchen that added to the character of the home and respected the history of it.
So that’s why Mr. and Mrs. went to a Lancaster Home Show where they meet ALL Renovation & Design. They were impressed with our process which guides clients through the design phase in a unique way that guarantees a customized remodel, tailored to their dreams. We really hit it off, but, since they were still in the idea stage, the years passed quickly.
Then one morning they discovered a puddle under the dishwasher. And, as is often the case, the damage had already spread to the surrounding cabinets and a large area of the floor. And upon further inspection, it was discovered that part of the floor was made with asbestos – which would require expert remediation. This was turning into a major rehab project.
That’s when they were faced with a tough call: do they patch it up now and rip it out in a few years when they remodel the entire kitchen, or, do they remodel now? They called ALL Renovation & Design.
First we worked with the insurance company to raise the damage claim to what it would have actually cost to repair the damage done by the leak… several thousand dollars higher than what they had initially appraised it.
Then we guided Mr. and Mrs. through the design process that carefully articulated the goals and vision for the new kitchen. Functionality and complementing the home’s character were top priority. They were extremely pleased with the help we provided in guiding them through the cabinet choices, layout, and color selections.
Communication was key. Especially when we got into the demolition and construction work. One thing you can be sure of when working with older homes is that there are almost always surprises between the walls. For the Redding kitchen it took the form of a steel support beam that we discovered on the second day of demolition. Because it prevented us from opening up the doorway, we had to pivot and adjust the cabinet spacing. Electrical access was also a serious problem that required added creativity to be sure the new space would include all the functionality of a modern kitchen. But all the challenges were overcome through creativity and almost constant communication.
At last, it was complete. Together we transformed the space into a beautiful transitional kitchen that is a joy to work in.
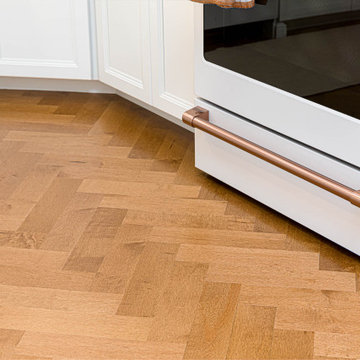
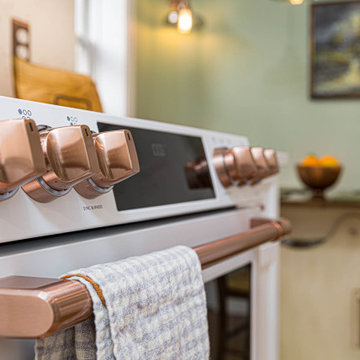
The maple cabinets with full-overlay doors were painted in matte white with copper hardware. The countertop and backsplash were Hanstone Quartz in the Strato color. It included a 30” single-basin sink in 14-gauge hammered copper. For the floor they chose Lauzan Maple Hardwood in the Sahara finish, installed in the herringbone pattern. And to really set off the kitchen, the old appliances were replaced with new GE Café appliances in their classy matte white with brushed copper accents.
 Nathan Allan Glass Studios Inc.
What surprises people most when entering and walking on the glowing white surface in this particular Private Residence (Williamsburg, VA) is when they find out they are walking on a sea of glass! Yes, GLASS! Not marble, not granite, but GLASS! Nathan Allan has created a very fresh, unique flooring surface, which is smooth to touch on the majority of the glass surface, yet has an almost invisible safety finish permanently embedded in the glass surface.
THE GLASS
Nathan Allan’s Glass Flooring incorporates features which are visually stunning, while also providing a safety finish which provides comfort to everyone walking on the glass. Our Sandstone texture is forged into the bottom surface of the glass, while our exclusive Glass Sandpaper safety finish is fused onto the walking surface. To enhance all features, we added a bright, sparkling, White Metallic color finish throughout each flooring panel.
SPECIFICATIONS
Each Glass Flooring panel is produced in 1/2″ (12mm) thick, Low Iron, tempered safety glass. Tempered glass provides added strength, insuring that the Glass Flooring can accept a heavy load. Panels vary in size and dimension, with most panels measured at a block size of 5’0 x 6’0 (1500mm x 1800mm). Perimeter Edge panels were carved and shaped to fit tightly against the curved walls. Glass Sandpaper, ASTM tested in labs with the highest slip-coefficient safety ratings, is fused onto the walking surface, to provide a very comfortable and effective safety feature.
Flooring Glass Details:
1/2″ (12mm) thick, Low iron tempered safety glass
Flat Polished Edges
Glass Sandpaper on walking surface
Sandstone texture on bottom surface
White Metallic color finish on bottom surface
Panels sizes up to 5’0 x 6’0
Approximately 800 square feet of glass flooring
Perimeter panels shape cut to fit
Almost overshadowed by the spectacular flooring is a 1.5” thick, Heavy Glasstop, Crescent shaped, with Nathan Allan’s Rocky Mountain texture.
DESIGN
A White Sea of Glass flooring is the finished result of combining a light Sandstone texture on the bottom glass surface, with the added touch of a sparkling White Metallic color finish. Combined with our Glass Sandpaper safety finish, and the natural and artificial light sources, our Glass Flooring shimmers within the entire entrance space.
INSTALLATION
Using very important installation techniques, Nathan Allan worked hand in hand with great team of professionals: Vicki Bristow, designer, W. M. Jordan Company, GC, and Pompei Inc, glass flooring installer. Templates were produced for all perimeter edge panels, and every shaped panel. All flooring panels are secured to the substrate with special adhesives, and joints are filled with matching color sealants.
“A beautiful project is always enhanced when working with quality, prestigious builders, and talented trade’s people. The tight organization and open communication by all the team members contributed greatly to a project proceeding seamlessly, with the incredible visual results to prove it.” Barry Allan – Director
Photo credit: Morgan Howarth

 ALL Renovation & Design LLC
Could a dreadful dishwasher leak be a blessing in disguise?
The Redding kitchen was very odd. The house was a beautiful brick house from the early 1900’s, but the kitchen had been renovated since then with an impractical layout. It worked, but, for as much time as Mr. and Mrs. spend in the kitchen, it left much to be desired. Because they enjoy cooking so much, they dreamed of having a functional kitchen that added to the character of the home and respected the history of it.
So that’s why Mr. and Mrs. went to a Lancaster Home Show where they meet ALL Renovation & Design. They were impressed with our process which guides clients through the design phase in a unique way that guarantees a customized remodel, tailored to their dreams. We really hit it off, but, since they were still in the idea stage, the years passed quickly.
Then one morning they discovered a puddle under the dishwasher. And, as is often the case, the damage had already spread to the surrounding cabinets and a large area of the floor. And upon further inspection, it was discovered that part of the floor was made with asbestos – which would require expert remediation. This was turning into a major rehab project.
That’s when they were faced with a tough call: do they patch it up now and rip it out in a few years when they remodel the entire kitchen, or, do they remodel now? They called ALL Renovation & Design.
First we worked with the insurance company to raise the damage claim to what it would have actually cost to repair the damage done by the leak… several thousand dollars higher than what they had initially appraised it.
Then we guided Mr. and Mrs. through the design process that carefully articulated the goals and vision for the new kitchen. Functionality and complementing the home’s character were top priority. They were extremely pleased with the help we provided in guiding them through the cabinet choices, layout, and color selections.
Communication was key. Especially when we got into the demolition and construction work. One thing you can be sure of when working with older homes is that there are almost always surprises between the walls. For the Redding kitchen it took the form of a steel support beam that we discovered on the second day of demolition. Because it prevented us from opening up the doorway, we had to pivot and adjust the cabinet spacing. Electrical access was also a serious problem that required added creativity to be sure the new space would include all the functionality of a modern kitchen. But all the challenges were overcome through creativity and almost constant communication.
At last, it was complete. Together we transformed the space into a beautiful transitional kitchen that is a joy to work in.
The maple cabinets with full-overlay doors were painted in matte white with copper hardware. The countertop and backsplash were Hanstone Quartz in the Strato color. It included a 30” single-basin sink in 14-gauge hammered copper. For the floor they chose Lauzan Maple Hardwood in the Sahara finish, installed in the herringbone pattern. And to really set off the kitchen, the old appliances were replaced with new GE Café appliances in their classy matte white with brushed copper accents.
 ALL Renovation & Design LLC
Could a dreadful dishwasher leak be a blessing in disguise?
The Redding kitchen was very odd. The house was a beautiful brick house from the early 1900’s, but the kitchen had been renovated since then with an impractical layout. It worked, but, for as much time as Mr. and Mrs. spend in the kitchen, it left much to be desired. Because they enjoy cooking so much, they dreamed of having a functional kitchen that added to the character of the home and respected the history of it.
So that’s why Mr. and Mrs. went to a Lancaster Home Show where they meet ALL Renovation & Design. They were impressed with our process which guides clients through the design phase in a unique way that guarantees a customized remodel, tailored to their dreams. We really hit it off, but, since they were still in the idea stage, the years passed quickly.
Then one morning they discovered a puddle under the dishwasher. And, as is often the case, the damage had already spread to the surrounding cabinets and a large area of the floor. And upon further inspection, it was discovered that part of the floor was made with asbestos – which would require expert remediation. This was turning into a major rehab project.
That’s when they were faced with a tough call: do they patch it up now and rip it out in a few years when they remodel the entire kitchen, or, do they remodel now? They called ALL Renovation & Design.
First we worked with the insurance company to raise the damage claim to what it would have actually cost to repair the damage done by the leak… several thousand dollars higher than what they had initially appraised it.
Then we guided Mr. and Mrs. through the design process that carefully articulated the goals and vision for the new kitchen. Functionality and complementing the home’s character were top priority. They were extremely pleased with the help we provided in guiding them through the cabinet choices, layout, and color selections.
Communication was key. Especially when we got into the demolition and construction work. One thing you can be sure of when working with older homes is that there are almost always surprises between the walls. For the Redding kitchen it took the form of a steel support beam that we discovered on the second day of demolition. Because it prevented us from opening up the doorway, we had to pivot and adjust the cabinet spacing. Electrical access was also a serious problem that required added creativity to be sure the new space would include all the functionality of a modern kitchen. But all the challenges were overcome through creativity and almost constant communication.
At last, it was complete. Together we transformed the space into a beautiful transitional kitchen that is a joy to work in.
The maple cabinets with full-overlay doors were painted in matte white with copper hardware. The countertop and backsplash were Hanstone Quartz in the Strato color. It included a 30” single-basin sink in 14-gauge hammered copper. For the floor they chose Lauzan Maple Hardwood in the Sahara finish, installed in the herringbone pattern. And to really set off the kitchen, the old appliances were replaced with new GE Café appliances in their classy matte white with brushed copper accents.
 Beacon Rock Custom Builders
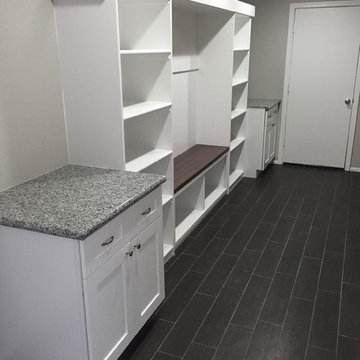
The homeowners wanted a locker or mudroom area where their kids could drop all of there school gear, shoes and coats. Since this area doubled as a laundry room, we added cabinetry on either side to increase the storage space as well as provide a "mail-drop" area. We installed wood-look tile so that the homeowner could have the warm appearance of wood, but the durability and water-resistance of tile.

 Kari P
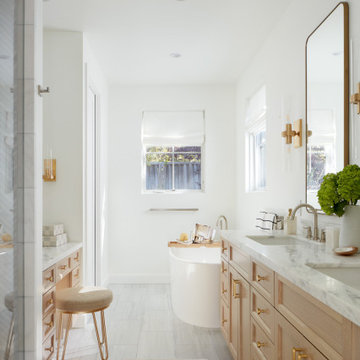
When I bought my house in May 2014, there was one thing I really didn’t like about it – the 1950s bathroom complete with pink tile and mismatched gaudy fixtures was absolutely hideous. I knew redoing the bathroom would be a big, expensive project, so I vowed to just live with it while I fixed up parts of the house that were easier to update, such as putting a fresh coat of paint on the walls and updating the curtains (which I still haven’t done, by the way). Well my first winter in the new house turned out to be a bad one, and in February 2015, I noticed water stains on the walls and ceiling of the second bedroom that only got worse and worse each day. The water damage quickly spread to other rooms, and when contractors came to the house to access and fix the damage, they discovered moisture behind the pink tiled walls of my bathroom. And so started the bathroom remodel.
Start to finish, this project took close to six months, due to going back and forth with insurance and difficulty finding a contractor I liked. I lived without a shower for at least four of those months, showering at the gym where I worked or in a pop-up tent in my backyard once it was warm enough out. My friend Eric and I demoed the bathroom and for the remodel, I picked out all of the design components and had a local contractor, Fred Haas do the work. I kept the original layout – as my bathroom was small to begin with and it was both impractical and expensive to start moving things around – but just about everything else about the bathroom is new, except for maybe the window and door. New tub, sink, and toilet, new tile floor and shower surround, new walls and ceiling, fresh paint, new fixtures and mirror, updated lighting, and a better ventilation system were all added.
Tub – Sterling Vikrell
Toilet – Kohler Wellworth® two-piece round-front dual-flush toilet
Sink – Kohler Veer™ 21" pedestal bathroom sink
Fixtures – Kohler Alteo® line
Tile floor and shower surround – American Olean Laurel Heights ceramic tile in Summit Gray
Lighting – I don't remember... will have to see if I can find it
Ventilation system – NuTone
Mirror – Ikea
Paint – Behr
Shower Curtain – eBay
Here are photos of my project from start to finish. As you can see, I probably still need a thing or two (a toilet paper holder, mini storage shelf, and some art wouldn’t hurt, nor would replacing the door or painting it white), but overall I’m really happy with how my new bathroom came out. I LOVE it, which is the exact opposite of how I felt about the original bathroom.
Photos © Kari Post
 Kari P
When I bought my house in May 2014, there was one thing I really didn’t like about it – the 1950s bathroom complete with pink tile and mismatched gaudy fixtures was absolutely hideous. I knew redoing the bathroom would be a big, expensive project, so I vowed to just live with it while I fixed up parts of the house that were easier to update, such as putting a fresh coat of paint on the walls and updating the curtains (which I still haven’t done, by the way). Well my first winter in the new house turned out to be a bad one, and in February 2015, I noticed water stains on the walls and ceiling of the second bedroom that only got worse and worse each day. The water damage quickly spread to other rooms, and when contractors came to the house to access and fix the damage, they discovered moisture behind the pink tiled walls of my bathroom. And so started the bathroom remodel.
Start to finish, this project took close to six months, due to going back and forth with insurance and difficulty finding a contractor I liked. I lived without a shower for at least four of those months, showering at the gym where I worked or in a pop-up tent in my backyard once it was warm enough out. My friend Eric and I demoed the bathroom and for the remodel, I picked out all of the design components and had a local contractor, Fred Haas do the work. I kept the original layout – as my bathroom was small to begin with and it was both impractical and expensive to start moving things around – but just about everything else about the bathroom is new, except for maybe the window and door. New tub, sink, and toilet, new tile floor and shower surround, new walls and ceiling, fresh paint, new fixtures and mirror, updated lighting, and a better ventilation system were all added.
Tub – Sterling Vikrell
Toilet – Kohler Wellworth® two-piece round-front dual-flush toilet
Sink – Kohler Veer™ 21" pedestal bathroom sink
Fixtures – Kohler Alteo® line
Tile floor and shower surround – American Olean Laurel Heights ceramic tile in Summit Gray
Lighting – I don't remember... will have to see if I can find it
Ventilation system – NuTone
Mirror – Ikea
Paint – Behr
Shower Curtain – eBay
Here are photos of my project from start to finish. As you can see, I probably still need a thing or two (a toilet paper holder, mini storage shelf, and some art wouldn’t hurt, nor would replacing the door or painting it white), but overall I’m really happy with how my new bathroom came out. I LOVE it, which is the exact opposite of how I felt about the original bathroom.
Photos © Kari Post

 River Valley Landscapes
This project presented unique opportunities that are not often found in residential landscaping. The homeowners were not only restoring their 1840's era farmhouse, a piece of their family’s history, but also enlarging and updating the home for modern living. The landscape designers continued this idea by creating a space that is a modern day interpretation of an 1840s era farm rather then a strict recreation. The resulting design combines elements of farm living from that time, as well as acknowledging the property’s history as a horse farm, with staples of 21st century landscapes such as space for outdoor living, lighting, and newer plant varieties.
Guests approach from the main driveway which winds through the property and ends at the main barn. There is secondary gated driveway just for the homeowners. Connected to this main driveway is a narrower gravel lane which leads directly to the residence. The lane passes near fruit trees planted in broken rows to give the illusion that they are the remains of an orchard that once existed on the site. The lane widens at the entrance to the gardens where there is a hitching post built into the fence that surrounds the gardens and a watering trough. The widened section is intended as a place to park a golf cart or, in a nod to the home’s past, tie up horses before entering. The gravel lane passes between two stone pillars and then ends at a square gravel court edged in cobblestones. The gravel court transitions into a wide flagstone walk bordered with yew hedges and lavender leading to the front door.
Directly to the right, upon entering the gravel court, is located a gravel and cobblestone edged walk leading to a secondary entrance into the residence. The walk is gated where it connects with the gravel court to close it off so as not to confuse visitors and guests to the main residence and to emphasize the primary entrance. An area for a bench is provided along this walk to encourage stopping to view and enjoy the gardens.
On either side of the front door, gravel and cobblestone walks branch off into the garden spaces. The one on the right leads to a flagstone with cobblestone border patio space. Since the home has no designated backyard like most modern suburban homes the outdoor living space had to be placed in what would traditionally be thought of as the front of the house. The patio is separated from the entrance walk by the yew hedge and further enclosed by three Amelanchiers and a variety of plantings including modern cultivars of old fashioned plants such as Itea and Hydrangea. A third entrance, the original front door to the 1840’s era section, connects to the patio from the home’s kitchen, making the space ideal for outdoor dining.
The gravel and cobblestone walk branching off to the left of the front door leads to the vegetable and perennial gardens. The idea for the vegetable garden was to recreate the tradition of a kitchen garden which would have been planted close to the residence for easy access. The vegetable garden is surrounded by mixed perennial beds along the inside of the wood picket fence which surrounds the entire garden space. Another area designated for a bench is provided here to encourage stopping and viewing. The home’s original smokehouse, completely restored and used as a garden shed, provides a strong architectural focal point to the vegetable garden. Behind the smokehouse is planted lilacs and other plants to give mass and balance to the corner and help screen the garden from the neighboring subdivision. At the rear corner of the garden a wood arbor was constructed to provide a structure on which to grow grapes or other vines should the homeowners choose to.
The landscape and gardens for this restored farmhouse and property are a thoughtfully designed and planned recreation of a historic landscape reinterpreted for modern living. The idea was to give a sense of timelessness when walking through the gardens as if they had been there for years but had possibly been updated and rejuvenated as lifestyles changed. The attention to materials and craftsmanship blend seamlessly with the residence and insure the gardens and landscape remain an integral part of the property. The farm has been in the homeowner’s family for many years and they are thrilled at the results and happy to see respect given to the home’s history and to its meticulous restoration.

 MIDWEST CONSTRUCTION & SUPPLY INC
Paul Despenas: Homeowners in Belmond, Iowa choose Everlast Polymeric Plank Siding over James Hardie Fiber Cement for one simple reason, The Warranty
Everlast Polymeric Plank Siding has a lifetime Non-Fade Protection! It holds its color! No more painting and the fiber cement siding warranty did not make that guarantee.
Here is a before and after photo from our customers and their comments!
First photo taken last summer, and the second was last week right after MWC. Crew got finished.
Much thanks to Chino, and his right hand man.
We love it! Thanks again, Bill & Kathy W.
Belmond, Ia.
Why Choose Everlast:
Everlast Advanced Composite Siding is unlike any other siding you’ve considered, and the moment you see it, you’ll know why. Solid construction means the planks don’t bend or bow, and align perfectly against the outer walls of your home. Everlast offers two trim collections – Premium Everlast Color-Matched Trim which is available in all 14 deep, rich colors and white cellular PVC trim* which cuts and installs just like wood.
Unlike other solid siding products, Everlast is lightweight and stackable for easy installation, yet durable enough to withstand fierce wind, scorching summer temperatures and subzero winter temperatures.
Finally, ease of care comes naturally with Everlast products. Easy-to-clean warm, low-gloss surface returns to original luster with a simple hose-down; stains like crayon, paint, and oil are removed easily with standard household cleaners (see warranty for complete cleaning instructions)
Whether you choose Everlast for its beauty, strength or ease of care, it’s a choice you can make with confidence.
Guaranteed to last, Period!
We’re proud of our product and stand behind it for life. Everlast Advanced Composite Siding is backed by a transferrable, Limited Lifetime Warranty*. In addition, Everlast is warranted against hail damage where your homeowner’s insurance may not cover.
The look of fresh-cut cedar comes from our CedarTouch® texture, and 14 beautiful colors are protected with our UV-stable acrylic polymer and backed by a Limited Lifetime Warranty*. Everlast Advanced Composite Siding will never peel; chip or blister, and it will never need to be scraped, sanded and painted.
*see warranty for details
We've been providing comprehensive exterior remodeling solutions since 1958, offering "Quality Products & Quality Installation" just like our motto implies...
Whether you're in the market for:
Windows
Doors
Siding
Sun rooms
Gutters
...the pros at Midwest can deliver on-time and on-budget service.
Call us today for your free consultation and no-obligation quote!
To ensure we're providing safe service that is up-to-code, we have all of our production managers get VSI-certified – not to mention that all of our team members are factory trained!
For a more in-depth at our offering, visit our showroom right here in Mason City. It features full-size sun rooms and fully functional window displays.
If you decide on us, we'll be sure to walk you through the entire process – from beginning to end – and our team members will be there throughout to ensure a smooth and streamlined process.
 LA Home Contractor
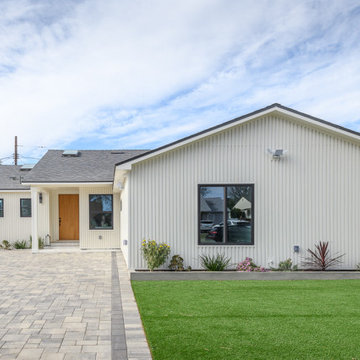
FULL HOUSE REMODEL – COMPLETE SCOPE OF WORK
1. Pre-Construction Phase
• Initial site inspection and measurements
• Architectural design and layout planning (if required)
• Structural engineering (if load-bearing walls are modified)
• Preparation of plans for city approval
• Permit application and plan check
• Obtain required building permits
• Scheduling of inspections
• Homeowner responsible for permit fees unless otherwise stated.
2. Site Preparation & Protection
• Protect flooring and non-work areas
• Install plastic dust barriers with zipper access
• Cover windows and furniture as needed
• Temporary utility setup if required
• Daily job site cleanup
• Final professional cleaning upon completion
3. Demolition
• Remove existing flooring (tile, wood, carpet, etc.)
• Remove cabinets, countertops, vanities
• Remove interior walls per plans
• Remove drywall where required
• Remove plumbing fixtures
• Remove electrical fixtures
• Haul away all debris
4. Structural & Framing
• Install structural beams if required
• Reframe modified walls
• Install new partitions per approved plans
• Repair or replace damaged framing
• Subfloor repair or replacement as needed
• Install blocking for cabinets and accessories
5. Plumbing (Up to Code)
• Replace old water supply lines (Copper Type L or PEX)
• Replace or modify drain lines (ABS)
• Relocate plumbing fixtures as needed
• Install new shut-off valves and cleanouts
• Water heater replacement if included
• Call for rough and final plumbing inspections
6. Electrical (Up to Code)
• Upgrade electrical panel if required
• Rewire entire house as needed
• Install new outlets and switches
• Install GFCI/AFCI protection per code
• Install recessed lighting and fixtures
• Install smoke and carbon monoxide detectors
• Dedicated circuits for appliances
• Call for rough and final electrical inspections
7. HVAC
• Replace or upgrade HVAC system if included
• Install new ducting and registers
• Install thermostat or mini-split system if applicable
8. Insulation
• Install wall insulation per code requirements
• Install ceiling insulation per code requirements
9. Drywall & Plaster
• Install new drywall
• Tape and mud (Level 4 or 5 finish)
• Texture to match existing or smooth finish
• Patch all affected areas
10. Flooring
• Install tile flooring
• Install engineered wood / hardwood / laminate / vinyl
• Install baseboards
• Floor leveling if required
11. Kitchen Remodel
• Install new cabinets
• Install countertops
• Install backsplash
• Install sink and faucet
• Install appliances (owner supplied unless specified)
12. Bathroom Remodel(s)
• Install new tub or shower system
• Waterproofing system installation
• Install tile on floors and walls
• Install vanity and toilet
• Install shower valve and fixtures
• Install shower glass if included
13. Doors & Windows
• Replace interior and entry doors
• Replace windows if included
• Install hardware
14. Interior & Exterior Paint
• Surface preparation
• Prime and paint walls, ceilings, and trim
• Exterior painting if included
15. Exterior Work (If Included)
• Stucco repair
• Roofing repair or replacement
• Concrete work or pavers
• Drainage improvements
16. Final Phase
• Final inspections
• Punch list completion
• Final cleaning
• Final walk-through with homeowner
Standard California Contract Terms (Summary)
• All work performed in compliance with California Building Code.
• Change orders must be approved in writing.
• Unforeseen conditions may require additional cost.
• One-year labor warranty unless otherwise stated.
• Progress payments per agreed payment schedule.
• Contractor is licensed and insured.
 MIDWEST CONSTRUCTION & SUPPLY INC
Paul Despenas: Homeowners in Belmond, Iowa choose Everlast Polymeric Plank Siding over James Hardie Fiber Cement for one simple reason, The Warranty
Everlast Polymeric Plank Siding has a lifetime Non-Fade Protection! It holds its color! No more painting and the fiber cement siding warranty did not make that guarantee.
Here is a before and after photo from our customers and their comments!
First photo taken last summer, and the second was last week right after MWC. Crew got finished.
Much thanks to Chino, and his right hand man.
We love it! Thanks again, Bill & Kathy W.
Belmond, Ia.
Why Choose Everlast:
Everlast Advanced Composite Siding is unlike any other siding you’ve considered, and the moment you see it, you’ll know why. Solid construction means the planks don’t bend or bow, and align perfectly against the outer walls of your home. Everlast offers two trim collections – Premium Everlast Color-Matched Trim which is available in all 14 deep, rich colors and white cellular PVC trim* which cuts and installs just like wood.
Unlike other solid siding products, Everlast is lightweight and stackable for easy installation, yet durable enough to withstand fierce wind, scorching summer temperatures and subzero winter temperatures.
Finally, ease of care comes naturally with Everlast products. Easy-to-clean warm, low-gloss surface returns to original luster with a simple hose-down; stains like crayon, paint, and oil are removed easily with standard household cleaners (see warranty for complete cleaning instructions)
Whether you choose Everlast for its beauty, strength or ease of care, it’s a choice you can make with confidence.
Guaranteed to last, Period!
We’re proud of our product and stand behind it for life. Everlast Advanced Composite Siding is backed by a transferrable, Limited Lifetime Warranty*. In addition, Everlast is warranted against hail damage where your homeowner’s insurance may not cover.
The look of fresh-cut cedar comes from our CedarTouch® texture, and 14 beautiful colors are protected with our UV-stable acrylic polymer and backed by a Limited Lifetime Warranty*. Everlast Advanced Composite Siding will never peel; chip or blister, and it will never need to be scraped, sanded and painted.
*see warranty for details
We've been providing comprehensive exterior remodeling solutions since 1958, offering "Quality Products & Quality Installation" just like our motto implies...
Whether you're in the market for:
Windows
Doors
Siding
Sun rooms
Gutters
...the pros at Midwest can deliver on-time and on-budget service.
Call us today for your free consultation and no-obligation quote!
To ensure we're providing safe service that is up-to-code, we have all of our production managers get VSI-certified – not to mention that all of our team members are factory trained!
For a more in-depth at our offering, visit our showroom right here in Mason City. It features full-size sun rooms and fully functional window displays.
If you decide on us, we'll be sure to walk you through the entire process – from beginning to end – and our team members will be there throughout to ensure a smooth and streamlined process.
 LA Home Contractor
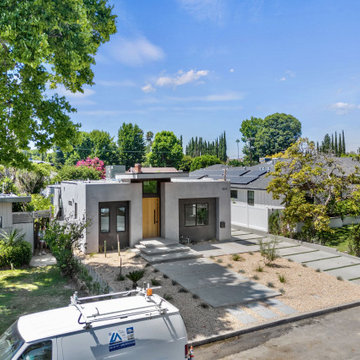
FULL HOUSE REMODEL – COMPLETE SCOPE OF WORK
1. Pre-Construction Phase
• Initial site inspection and measurements
• Architectural design and layout planning (if required)
• Structural engineering (if load-bearing walls are modified)
• Preparation of plans for city approval
• Permit application and plan check
• Obtain required building permits
• Scheduling of inspections
• Homeowner responsible for permit fees unless otherwise stated.
2. Site Preparation & Protection
• Protect flooring and non-work areas
• Install plastic dust barriers with zipper access
• Cover windows and furniture as needed
• Temporary utility setup if required
• Daily job site cleanup
• Final professional cleaning upon completion
3. Demolition
• Remove existing flooring (tile, wood, carpet, etc.)
• Remove cabinets, countertops, vanities
• Remove interior walls per plans
• Remove drywall where required
• Remove plumbing fixtures
• Remove electrical fixtures
• Haul away all debris
4. Structural & Framing
• Install structural beams if required
• Reframe modified walls
• Install new partitions per approved plans
• Repair or replace damaged framing
• Subfloor repair or replacement as needed
• Install blocking for cabinets and accessories
5. Plumbing (Up to Code)
• Replace old water supply lines (Copper Type L or PEX)
• Replace or modify drain lines (ABS)
• Relocate plumbing fixtures as needed
• Install new shut-off valves and cleanouts
• Water heater replacement if included
• Call for rough and final plumbing inspections
6. Electrical (Up to Code)
• Upgrade electrical panel if required
• Rewire entire house as needed
• Install new outlets and switches
• Install GFCI/AFCI protection per code
• Install recessed lighting and fixtures
• Install smoke and carbon monoxide detectors
• Dedicated circuits for appliances
• Call for rough and final electrical inspections
7. HVAC
• Replace or upgrade HVAC system if included
• Install new ducting and registers
• Install thermostat or mini-split system if applicable
8. Insulation
• Install wall insulation per code requirements
• Install ceiling insulation per code requirements
9. Drywall & Plaster
• Install new drywall
• Tape and mud (Level 4 or 5 finish)
• Texture to match existing or smooth finish
• Patch all affected areas
10. Flooring
• Install tile flooring
• Install engineered wood / hardwood / laminate / vinyl
• Install baseboards
• Floor leveling if required
11. Kitchen Remodel
• Install new cabinets
• Install countertops
• Install backsplash
• Install sink and faucet
• Install appliances (owner supplied unless specified)
12. Bathroom Remodel(s)
• Install new tub or shower system
• Waterproofing system installation
• Install tile on floors and walls
• Install vanity and toilet
• Install shower valve and fixtures
• Install shower glass if included
13. Doors & Windows
• Replace interior and entry doors
• Replace windows if included
• Install hardware
14. Interior & Exterior Paint
• Surface preparation
• Prime and paint walls, ceilings, and trim
• Exterior painting if included
15. Exterior Work (If Included)
• Stucco repair
• Roofing repair or replacement
• Concrete work or pavers
• Drainage improvements
16. Final Phase
• Final inspections
• Punch list completion
• Final cleaning
• Final walk-through with homeowner
Standard California Contract Terms (Summary)
• All work performed in compliance with California Building Code.
• Change orders must be approved in writing.
• Unforeseen conditions may require additional cost.
• One-year labor warranty unless otherwise stated.
• Progress payments per agreed payment schedule.
• Contractor is licensed and insured.
 Five Star Tree Care
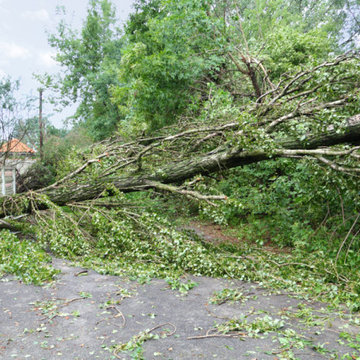
Storms are nature’s way of cleaning out the atmosphere and showing off her awesome power. As essential as this process may be, it can also cause tree damage. If your trees suffer damage during a storm, there are a few things you should do to set things back to their proper order, such as hire a tree removal service. Before you start cleaning up the mess, however, take a look at our suggestions to ensure you are doing what’s best for your trees and your property.
Check the Damage
Before you do anything, you should take the time to check the damage on your property and to the trees themselves. Sometimes broken branches and fallen leaves can hide serious damage that may require special attention. Check to ensure that there is no damage to your property, home, cars, and electrical lines. Next, after you confirm that there is no immediate danger, you can start assessing the tree itself. If you find serious damage to your trees such as splitting, leaning, or even burns from a lightning strike, it is best to call in professionals for help. If the tree is leaning on your home or vehicle, it is also a good idea to have a professional tree care service move forward with the cleanup.
Clean Up Minor Damage and Debris
After the storm has calmed down, and you have assessed the fallout, you can start your yard cleanup. Stick to cleaning up small branches and twigs in addition to leaves and other debris. Avoid large branches, any trees that may be leaning or heavily damaged. Even if your tree is upright, but showing signs of damage you should steer clear until the professionals can assess the situation. Pay close attention to any branches or trees that may be leaning near overhead power lines and also avoid damaged trees that are planted near underground utilities such as gas or power mains.
Call the Professionals at Five Star Tree Services
Anytime a storm damages your landscape, plants, or trees, a professional team of arborists can help. Not only are they trained in the proper methods of cleaning up storm debris in a safe manner, but they can also help decide the best course of action to save or remove your damaged trees. As tree care professionals, every team from Five Star Tree Services will arrive with the proper equipment needed to get the job done safely.
Five Star is fully certified and will also work with your insurance company to assess the damage and coordinate extended cleanup services if needed. For trees that are damaged but still have a chance of surviving, our experienced arborists will create a customized treatment plant and pruning plant to give your tree the best chance of survival. If other treatments are needed, we will also support your tree during its recovery until it is back to its healthy state. For more information regarding our storm tree services in Richmond Hill or our regular tree care services, give us a call at (416) 990-3355 today.
187