
Search results for "Interference prone settings" in Home Design Ideas
 Drury Design
THE SETUP
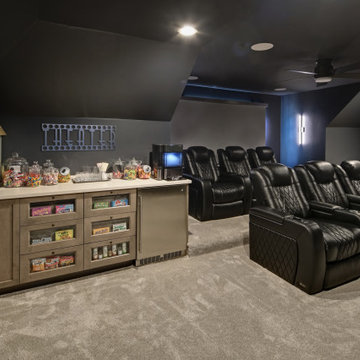
This remodeling project transformed a catchall room into a cinema-style theater designed for family entertainment and relaxation. The original space, which housed a small TV, older furniture, and various children’s toys, was reimagined to create a sophisticated, adult-friendly home theater with ample seating and modern amenities.
Design Objectives:
Create a Dark Theater Space: Ensure the room mimics a traditional movie theater environment.
Provide Comfortable Theater Seating: Include enough seating for the family and guests.
Integrate a Dry Bar Area: Include a space for snacks and drinks.
Optimize Space Utilization: Maintain an open area for additional activities.
Design Challenges:
Natural light: The room was too bright for a theater setting.
Seating: Accommodating six theater seats without obstructing views.
Lighting: Ensuring the lighting does not interfere with the viewing experience.
AV: Finding a clutter-free solution for AV equipment.
Dry Bar: Incorporating a dry bar area without overcrowding the space.
Viewing: Ensuring the TV placement allows for comfortable, optimized viewing.
THE RENEWED SPACE
Design Solutions:
Natural Light Control: Installed blackout remote shades on the back window and painted the walls dark charcoal to reduce natural light infiltration.
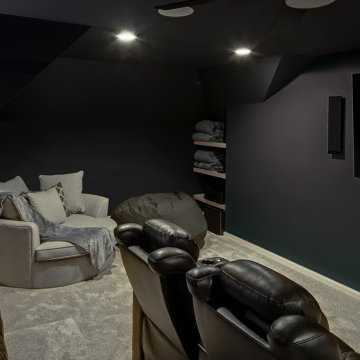
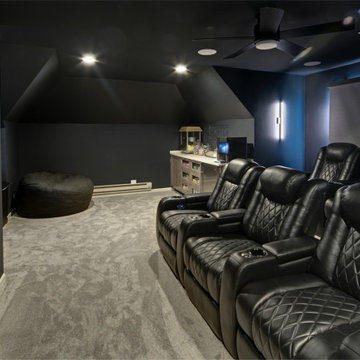
Seating Arrangement: Built a second level for the back row of seating to ensure unobstructed views for all movie watchers.
Lighting Design: Installed sconces on either side of the window that shine from the sides (to avoid interfering with the viewing experience).
AV Equipment Storage: Utilized existing recess areas with custom shelves matching the cabinetry and concealed cables using a PVC pipe system.
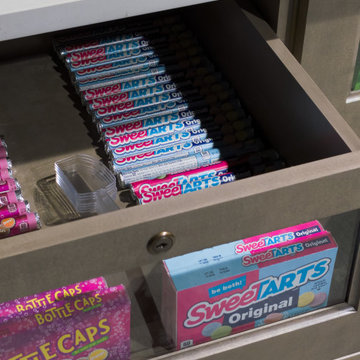
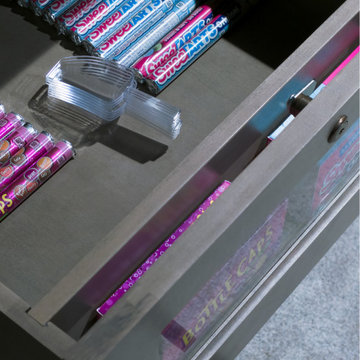
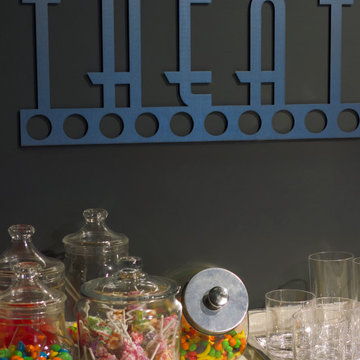
Dry Bar Integration: Created a dry bar area on the back wall with a refrigerator, candy storage, and a small counter space for a popcorn machine and ice maker, with locked drawers to prevent unsupervised access.
Optimal Viewing Distance: Evaluated multiple floor plans and placed the TV on the most suitable wall to ensure optimal viewing and comfortable reclined seating.
Final Thoughts:
The completed home theater has been a resounding success, providing a versatile space for the entire family. The thoughtful design and meticulous attention to detail have created a functional and enjoyable home theater that meets diverse needs, from watching movies and playing video games to relaxing and reading. The areas to the sides of the theater seats can accommodate spillover seating or activity zones. The area housing the AV equipment also includes extra shelves for storing snuggle-grade movie viewing blankets. This theater space has become a favorite hangout spot, offering comfort and entertainment for everyone.
This view shows the dual level theater seating, bean bags, open AV shelving on the right to tuck the cables which our installers ran behind the TV with PVC piping.

 Leicht Westchester-Greenwich
Example of a minimalist u-shaped concrete floor home design design in New York with an integrated sink, flat-panel cabinets, dark wood cabinets, quartzite countertops, stainless steel appliances and an island
 Drury Design
THE SETUP
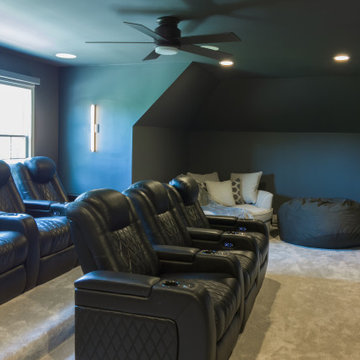
This remodeling project transformed a catchall room into a cinema-style theater designed for family entertainment and relaxation. The original space, which housed a small TV, older furniture, and various children’s toys, was reimagined to create a sophisticated, adult-friendly home theater with ample seating and modern amenities.
Design Objectives:
Create a Dark Theater Space: Ensure the room mimics a traditional movie theater environment.
Provide Comfortable Theater Seating: Include enough seating for the family and guests.
Integrate a Dry Bar Area: Include a space for snacks and drinks.
Optimize Space Utilization: Maintain an open area for additional activities.
Design Challenges:
Natural light: The room was too bright for a theater setting.
Seating: Accommodating six theater seats without obstructing views.
Lighting: Ensuring the lighting does not interfere with the viewing experience.
AV: Finding a clutter-free solution for AV equipment.
Dry Bar: Incorporating a dry bar area without overcrowding the space.
Viewing: Ensuring the TV placement allows for comfortable, optimized viewing.
THE RENEWED SPACE
Design Solutions:
Natural Light Control: Installed blackout remote shades on the back window and painted the walls dark charcoal to reduce natural light infiltration.
Seating Arrangement: Built a second level for the back row of seating to ensure unobstructed views for all movie watchers.
Lighting Design: Installed sconces on either side of the window that shine from the sides (to avoid interfering with the viewing experience).
AV Equipment Storage: Utilized existing recess areas with custom shelves matching the cabinetry and concealed cables using a PVC pipe system.
Dry Bar Integration: Created a dry bar area on the back wall with a refrigerator, candy storage, and a small counter space for a popcorn machine and ice maker, with locked drawers to prevent unsupervised access.
Optimal Viewing Distance: Evaluated multiple floor plans and placed the TV on the most suitable wall to ensure optimal viewing and comfortable reclined seating.
Final Thoughts:
The completed home theater has been a resounding success, providing a versatile space for the entire family. The thoughtful design and meticulous attention to detail have created a functional and enjoyable home theater that meets diverse needs, from watching movies and playing video games to relaxing and reading. The areas to the sides of the theater seats can accommodate spillover seating or activity zones. The area housing the AV equipment also includes extra shelves for storing snuggle-grade movie viewing blankets. This theater space has become a favorite hangout spot, offering comfort and entertainment for everyone.
This view shows the dual level theater seating, bean bags, open AV shelving on the right to tuck the cables which our installers ran behind the TV with PVC piping.
Find the right local pro for your project
 Drury Design
THE SETUP
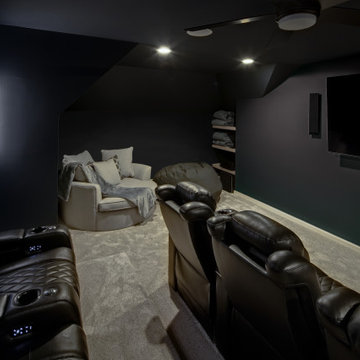
This remodeling project transformed a catchall room into a cinema-style theater designed for family entertainment and relaxation. The original space, which housed a small TV, older furniture, and various children’s toys, was reimagined to create a sophisticated, adult-friendly home theater with ample seating and modern amenities.
Design Objectives:
Create a Dark Theater Space: Ensure the room mimics a traditional movie theater environment.
Provide Comfortable Theater Seating: Include enough seating for the family and guests.
Integrate a Dry Bar Area: Include a space for snacks and drinks.
Optimize Space Utilization: Maintain an open area for additional activities.
Design Challenges:
Natural light: The room was too bright for a theater setting.
Seating: Accommodating six theater seats without obstructing views.
Lighting: Ensuring the lighting does not interfere with the viewing experience.
AV: Finding a clutter-free solution for AV equipment.
Dry Bar: Incorporating a dry bar area without overcrowding the space.
Viewing: Ensuring the TV placement allows for comfortable, optimized viewing.
THE RENEWED SPACE
Design Solutions:
Natural Light Control: Installed blackout remote shades on the back window and painted the walls dark charcoal to reduce natural light infiltration.
Seating Arrangement: Built a second level for the back row of seating to ensure unobstructed views for all movie watchers.
Lighting Design: Installed sconces on either side of the window that shine from the sides (to avoid interfering with the viewing experience).
AV Equipment Storage: Utilized existing recess areas with custom shelves matching the cabinetry and concealed cables using a PVC pipe system.
Dry Bar Integration: Created a dry bar area on the back wall with a refrigerator, candy storage, and a small counter space for a popcorn machine and ice maker, with locked drawers to prevent unsupervised access.
Optimal Viewing Distance: Evaluated multiple floor plans and placed the TV on the most suitable wall to ensure optimal viewing and comfortable reclined seating.
Final Thoughts:
The completed home theater has been a resounding success, providing a versatile space for the entire family. The thoughtful design and meticulous attention to detail have created a functional and enjoyable home theater that meets diverse needs, from watching movies and playing video games to relaxing and reading. The areas to the sides of the theater seats can accommodate spillover seating or activity zones. The area housing the AV equipment also includes extra shelves for storing snuggle-grade movie viewing blankets. This theater space has become a favorite hangout spot, offering comfort and entertainment for everyone.
This view shows the dual level theater seating, bean bags, open AV shelving on the right to tuck the cables which our installers ran behind the TV with PVC piping.
 Drury Design
THE SETUP
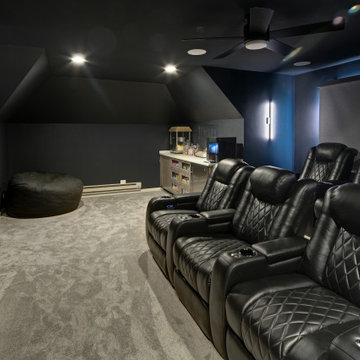
This remodeling project transformed a catchall room into a cinema-style theater designed for family entertainment and relaxation. The original space, which housed a small TV, older furniture, and various children’s toys, was reimagined to create a sophisticated, adult-friendly home theater with ample seating and modern amenities.
Design Objectives:
Create a Dark Theater Space: Ensure the room mimics a traditional movie theater environment.
Provide Comfortable Theater Seating: Include enough seating for the family and guests.
Integrate a Dry Bar Area: Include a space for snacks and drinks.
Optimize Space Utilization: Maintain an open area for additional activities.
Design Challenges:
Natural light: The room was too bright for a theater setting.
Seating: Accommodating six theater seats without obstructing views.
Lighting: Ensuring the lighting does not interfere with the viewing experience.
AV: Finding a clutter-free solution for AV equipment.
Dry Bar: Incorporating a dry bar area without overcrowding the space.
Viewing: Ensuring the TV placement allows for comfortable, optimized viewing.
THE RENEWED SPACE
Design Solutions:
Natural Light Control: Installed blackout remote shades on the back window and painted the walls dark charcoal to reduce natural light infiltration.
Seating Arrangement: Built a second level for the back row of seating to ensure unobstructed views for all movie watchers.
Lighting Design: Installed sconces on either side of the window that shine from the sides (to avoid interfering with the viewing experience).
AV Equipment Storage: Utilized existing recess areas with custom shelves matching the cabinetry and concealed cables using a PVC pipe system.
Dry Bar Integration: Created a dry bar area on the back wall with a refrigerator, candy storage, and a small counter space for a popcorn machine and ice maker, with locked drawers to prevent unsupervised access.
Optimal Viewing Distance: Evaluated multiple floor plans and placed the TV on the most suitable wall to ensure optimal viewing and comfortable reclined seating.
Final Thoughts:
The completed home theater has been a resounding success, providing a versatile space for the entire family. The thoughtful design and meticulous attention to detail have created a functional and enjoyable home theater that meets diverse needs, from watching movies and playing video games to relaxing and reading. The areas to the sides of the theater seats can accommodate spillover seating or activity zones. The area housing the AV equipment also includes extra shelves for storing snuggle-grade movie viewing blankets. This theater space has become a favorite hangout spot, offering comfort and entertainment for everyone.
This view shows the dual level theater seating, bean bags, open AV shelving on the right to tuck the cables which our installers ran behind the TV with PVC piping.
 Drury Design
THE SETUP
This remodeling project transformed a catchall room into a cinema-style theater designed for family entertainment and relaxation. The original space, which housed a small TV, older furniture, and various children’s toys, was reimagined to create a sophisticated, adult-friendly home theater with ample seating and modern amenities.
Design Objectives:
Create a Dark Theater Space: Ensure the room mimics a traditional movie theater environment.
Provide Comfortable Theater Seating: Include enough seating for the family and guests.
Integrate a Dry Bar Area: Include a space for snacks and drinks.
Optimize Space Utilization: Maintain an open area for additional activities.
Design Challenges:
Natural light: The room was too bright for a theater setting.
Seating: Accommodating six theater seats without obstructing views.
Lighting: Ensuring the lighting does not interfere with the viewing experience.
AV: Finding a clutter-free solution for AV equipment.
Dry Bar: Incorporating a dry bar area without overcrowding the space.
Viewing: Ensuring the TV placement allows for comfortable, optimized viewing.
THE RENEWED SPACE
Design Solutions:
Natural Light Control: Installed blackout remote shades on the back window and painted the walls dark charcoal to reduce natural light infiltration.
Seating Arrangement: Built a second level for the back row of seating to ensure unobstructed views for all movie watchers.
Lighting Design: Installed sconces on either side of the window that shine from the sides (to avoid interfering with the viewing experience).
AV Equipment Storage: Utilized existing recess areas with custom shelves matching the cabinetry and concealed cables using a PVC pipe system.
Dry Bar Integration: Created a dry bar area on the back wall with a refrigerator, candy storage, and a small counter space for a popcorn machine and ice maker, with locked drawers to prevent unsupervised access.
Optimal Viewing Distance: Evaluated multiple floor plans and placed the TV on the most suitable wall to ensure optimal viewing and comfortable reclined seating.
Final Thoughts:
The completed home theater has been a resounding success, providing a versatile space for the entire family. The thoughtful design and meticulous attention to detail have created a functional and enjoyable home theater that meets diverse needs, from watching movies and playing video games to relaxing and reading. The areas to the sides of the theater seats can accommodate spillover seating or activity zones. The area housing the AV equipment also includes extra shelves for storing snuggle-grade movie viewing blankets. This theater space has become a favorite hangout spot, offering comfort and entertainment for everyone.
This view shows the dual level theater seating, bean bags, open AV shelving on the right to tuck the cables which our installers ran behind the TV with PVC piping.
 Drury Design
THE SETUP
This remodeling project transformed a catchall room into a cinema-style theater designed for family entertainment and relaxation. The original space, which housed a small TV, older furniture, and various children’s toys, was reimagined to create a sophisticated, adult-friendly home theater with ample seating and modern amenities.
Design Objectives:
Create a Dark Theater Space: Ensure the room mimics a traditional movie theater environment.
Provide Comfortable Theater Seating: Include enough seating for the family and guests.
Integrate a Dry Bar Area: Include a space for snacks and drinks.
Optimize Space Utilization: Maintain an open area for additional activities.
Design Challenges:
Natural light: The room was too bright for a theater setting.
Seating: Accommodating six theater seats without obstructing views.
Lighting: Ensuring the lighting does not interfere with the viewing experience.
AV: Finding a clutter-free solution for AV equipment.
Dry Bar: Incorporating a dry bar area without overcrowding the space.
Viewing: Ensuring the TV placement allows for comfortable, optimized viewing.
THE RENEWED SPACE
Design Solutions:
Natural Light Control: Installed blackout remote shades on the back window and painted the walls dark charcoal to reduce natural light infiltration.
Seating Arrangement: Built a second level for the back row of seating to ensure unobstructed views for all movie watchers.
Lighting Design: Installed sconces on either side of the window that shine from the sides (to avoid interfering with the viewing experience).
AV Equipment Storage: Utilized existing recess areas with custom shelves matching the cabinetry and concealed cables using a PVC pipe system.
Dry Bar Integration: Created a dry bar area on the back wall with a refrigerator, candy storage, and a small counter space for a popcorn machine and ice maker, with locked drawers to prevent unsupervised access.
Optimal Viewing Distance: Evaluated multiple floor plans and placed the TV on the most suitable wall to ensure optimal viewing and comfortable reclined seating.
Final Thoughts:
The completed home theater has been a resounding success, providing a versatile space for the entire family. The thoughtful design and meticulous attention to detail have created a functional and enjoyable home theater that meets diverse needs, from watching movies and playing video games to relaxing and reading. The areas to the sides of the theater seats can accommodate spillover seating or activity zones. The area housing the AV equipment also includes extra shelves for storing snuggle-grade movie viewing blankets. This theater space has become a favorite hangout spot, offering comfort and entertainment for everyone.
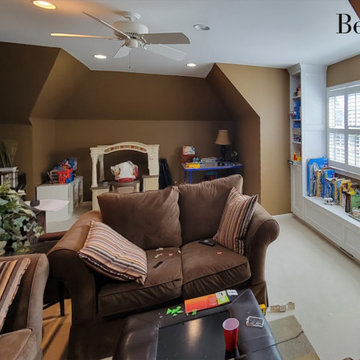
This before shows the dramatic transformation from kid friendly to entirely family friendly with a moody sophisticated space perfect for the boys or mom and dad.
Sponsored
Columbus, OH
Free consultation for landscape design!

Peabody Landscape Group
Franklin County's Reliable Landscape Design & Contracting
 Drury Design
THE SETUP
This remodeling project transformed a catchall room into a cinema-style theater designed for family entertainment and relaxation. The original space, which housed a small TV, older furniture, and various children’s toys, was reimagined to create a sophisticated, adult-friendly home theater with ample seating and modern amenities.
Design Objectives:
Create a Dark Theater Space: Ensure the room mimics a traditional movie theater environment.
Provide Comfortable Theater Seating: Include enough seating for the family and guests.
Integrate a Dry Bar Area: Include a space for snacks and drinks.
Optimize Space Utilization: Maintain an open area for additional activities.
Design Challenges:
Natural light: The room was too bright for a theater setting.
Seating: Accommodating six theater seats without obstructing views.
Lighting: Ensuring the lighting does not interfere with the viewing experience.
AV: Finding a clutter-free solution for AV equipment.
Dry Bar: Incorporating a dry bar area without overcrowding the space.
Viewing: Ensuring the TV placement allows for comfortable, optimized viewing.
THE RENEWED SPACE
Design Solutions:
Natural Light Control: Installed blackout remote shades on the back window and painted the walls dark charcoal to reduce natural light infiltration.
Seating Arrangement: Built a second level for the back row of seating to ensure unobstructed views for all movie watchers.
Lighting Design: Installed sconces on either side of the window that shine from the sides (to avoid interfering with the viewing experience).
AV Equipment Storage: Utilized existing recess areas with custom shelves matching the cabinetry and concealed cables using a PVC pipe system.
Dry Bar Integration: Created a dry bar area on the back wall with a refrigerator, candy storage, and a small counter space for a popcorn machine and ice maker, with locked drawers to prevent unsupervised access.
Optimal Viewing Distance: Evaluated multiple floor plans and placed the TV on the most suitable wall to ensure optimal viewing and comfortable reclined seating.
Final Thoughts:
The completed home theater has been a resounding success, providing a versatile space for the entire family. The thoughtful design and meticulous attention to detail have created a functional and enjoyable home theater that meets diverse needs, from watching movies and playing video games to relaxing and reading. The areas to the sides of the theater seats can accommodate spillover seating or activity zones. The area housing the AV equipment also includes extra shelves for storing snuggle-grade movie viewing blankets. This theater space has become a favorite hangout spot, offering comfort and entertainment for everyone.
This view shows the dual level theater seating, bean bags, open AV shelving on the right to tuck the cables which our installers ran behind the TV with PVC piping.
 Drury Design
THE SETUP
This remodeling project transformed a catchall room into a cinema-style theater designed for family entertainment and relaxation. The original space, which housed a small TV, older furniture, and various children’s toys, was reimagined to create a sophisticated, adult-friendly home theater with ample seating and modern amenities.
Design Objectives:
Create a Dark Theater Space: Ensure the room mimics a traditional movie theater environment.
Provide Comfortable Theater Seating: Include enough seating for the family and guests.
Integrate a Dry Bar Area: Include a space for snacks and drinks.
Optimize Space Utilization: Maintain an open area for additional activities.
Design Challenges:
Natural light: The room was too bright for a theater setting.
Seating: Accommodating six theater seats without obstructing views.
Lighting: Ensuring the lighting does not interfere with the viewing experience.
AV: Finding a clutter-free solution for AV equipment.
Dry Bar: Incorporating a dry bar area without overcrowding the space.
Viewing: Ensuring the TV placement allows for comfortable, optimized viewing.
THE RENEWED SPACE
Design Solutions:
Natural Light Control: Installed blackout remote shades on the back window and painted the walls dark charcoal to reduce natural light infiltration.
Seating Arrangement: Built a second level for the back row of seating to ensure unobstructed views for all movie watchers.
Lighting Design: Installed sconces on either side of the window that shine from the sides (to avoid interfering with the viewing experience).
AV Equipment Storage: Utilized existing recess areas with custom shelves matching the cabinetry and concealed cables using a PVC pipe system.
Dry Bar Integration: Created a dry bar area on the back wall with a refrigerator, candy storage, and a small counter space for a popcorn machine and ice maker, with locked drawers to prevent unsupervised access.
Optimal Viewing Distance: Evaluated multiple floor plans and placed the TV on the most suitable wall to ensure optimal viewing and comfortable reclined seating.
Final Thoughts:
The completed home theater has been a resounding success, providing a versatile space for the entire family. The thoughtful design and meticulous attention to detail have created a functional and enjoyable home theater that meets diverse needs, from watching movies and playing video games to relaxing and reading. The areas to the sides of the theater seats can accommodate spillover seating or activity zones. The area housing the AV equipment also includes extra shelves for storing snuggle-grade movie viewing blankets. This theater space has become a favorite hangout spot, offering comfort and entertainment for everyone.
This view shows the dual level theater seating, bean bags, open AV shelving on the right to tuck the cables which our installers ran behind the TV with PVC piping.
 Drury Design
THE SETUP
This remodeling project transformed a catchall room into a cinema-style theater designed for family entertainment and relaxation. The original space, which housed a small TV, older furniture, and various children’s toys, was reimagined to create a sophisticated, adult-friendly home theater with ample seating and modern amenities.
Design Objectives:
Create a Dark Theater Space: Ensure the room mimics a traditional movie theater environment.
Provide Comfortable Theater Seating: Include enough seating for the family and guests.
Integrate a Dry Bar Area: Include a space for snacks and drinks.
Optimize Space Utilization: Maintain an open area for additional activities.
Design Challenges:
Natural light: The room was too bright for a theater setting.
Seating: Accommodating six theater seats without obstructing views.
Lighting: Ensuring the lighting does not interfere with the viewing experience.
AV: Finding a clutter-free solution for AV equipment.
Dry Bar: Incorporating a dry bar area without overcrowding the space.
Viewing: Ensuring the TV placement allows for comfortable, optimized viewing.
THE RENEWED SPACE
Design Solutions:
Natural Light Control: Installed blackout remote shades on the back window and painted the walls dark charcoal to reduce natural light infiltration.
Seating Arrangement: Built a second level for the back row of seating to ensure unobstructed views for all movie watchers.
Lighting Design: Installed sconces on either side of the window that shine from the sides (to avoid interfering with the viewing experience).
AV Equipment Storage: Utilized existing recess areas with custom shelves matching the cabinetry and concealed cables using a PVC pipe system.
Dry Bar Integration: Created a dry bar area on the back wall with a refrigerator, candy storage, and a small counter space for a popcorn machine and ice maker, with locked drawers to prevent unsupervised access.
Optimal Viewing Distance: Evaluated multiple floor plans and placed the TV on the most suitable wall to ensure optimal viewing and comfortable reclined seating.
Final Thoughts:
The completed home theater has been a resounding success, providing a versatile space for the entire family. The thoughtful design and meticulous attention to detail have created a functional and enjoyable home theater that meets diverse needs, from watching movies and playing video games to relaxing and reading. The areas to the sides of the theater seats can accommodate spillover seating or activity zones. The area housing the AV equipment also includes extra shelves for storing snuggle-grade movie viewing blankets. This theater space has become a favorite hangout spot, offering comfort and entertainment for everyone.
This view shows the dual level theater seating, bean bags, open AV shelving on the right to tuck the cables which our installers ran behind the TV with PVC piping.
 Drury Design
THE SETUP
This remodeling project transformed a catchall room into a cinema-style theater designed for family entertainment and relaxation. The original space, which housed a small TV, older furniture, and various children’s toys, was reimagined to create a sophisticated, adult-friendly home theater with ample seating and modern amenities.
Design Objectives:
Create a Dark Theater Space: Ensure the room mimics a traditional movie theater environment.
Provide Comfortable Theater Seating: Include enough seating for the family and guests.
Integrate a Dry Bar Area: Include a space for snacks and drinks.
Optimize Space Utilization: Maintain an open area for additional activities.
Design Challenges:
Natural light: The room was too bright for a theater setting.
Seating: Accommodating six theater seats without obstructing views.
Lighting: Ensuring the lighting does not interfere with the viewing experience.
AV: Finding a clutter-free solution for AV equipment.
Dry Bar: Incorporating a dry bar area without overcrowding the space.
Viewing: Ensuring the TV placement allows for comfortable, optimized viewing.
THE RENEWED SPACE
Design Solutions:
Natural Light Control: Installed blackout remote shades on the back window and painted the walls dark charcoal to reduce natural light infiltration.
Seating Arrangement: Built a second level for the back row of seating to ensure unobstructed views for all movie watchers.
Lighting Design: Installed sconces on either side of the window that shine from the sides (to avoid interfering with the viewing experience).
AV Equipment Storage: Utilized existing recess areas with custom shelves matching the cabinetry and concealed cables using a PVC pipe system.
Dry Bar Integration: Created a dry bar area on the back wall with a refrigerator, candy storage, and a small counter space for a popcorn machine and ice maker, with locked drawers to prevent unsupervised access.
Optimal Viewing Distance: Evaluated multiple floor plans and placed the TV on the most suitable wall to ensure optimal viewing and comfortable reclined seating.
Final Thoughts:
The completed home theater has been a resounding success, providing a versatile space for the entire family. The thoughtful design and meticulous attention to detail have created a functional and enjoyable home theater that meets diverse needs, from watching movies and playing video games to relaxing and reading. The areas to the sides of the theater seats can accommodate spillover seating or activity zones. The area housing the AV equipment also includes extra shelves for storing snuggle-grade movie viewing blankets. This theater space has become a favorite hangout spot, offering comfort and entertainment for everyone.
This view shows the dual level theater seating, bean bags, open AV shelving on the right to tuck the cables which our installers ran behind the TV with PVC piping.
 TKS Design Group
Download our free ebook, Creating the Ideal Kitchen. DOWNLOAD NOW
Lakefront property in the northwest suburbs of Chicago is hard to come by, so when we were hired by this young family with exactly that, we were immediately inspired by not just the unusually large footprint of this 1950’s colonial revival but also the lovely views of the manmade lake it was sited on. The large 5-bedroom home was solidly stuck in the 1980’s, but we saw tons of potential. We started out by updating the existing staircase with a fresh coat of paint and adding new herringbone slate to the entry hall.
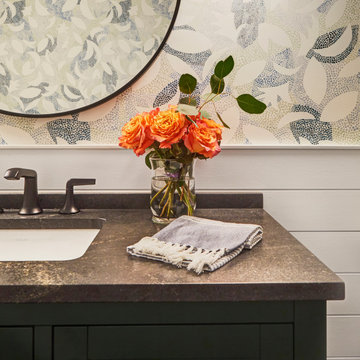
The powder room off the entryway also got a refresh - new flooring, new cabinets and fixtures. We ran the new slate right through into this space for some consistency. A fun wallpaper and shiplap trim add a welcoming feel and set the tone for the home.
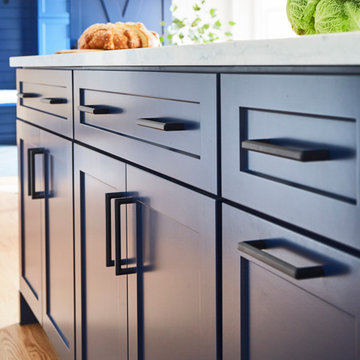
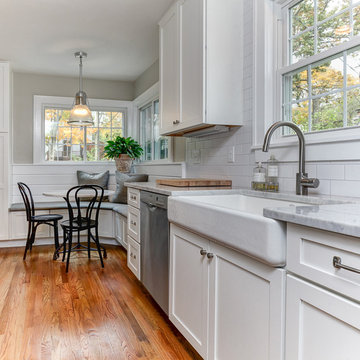
Next, we tackled the kitchen. Located away from the rest of the first floor, the kitchen felt a little isolated, so we immediately began planning for how to better connect it to the rest of the first floor. We landed on removing the wall between the kitchen and dining room and designed a modified galley style space with separate cooking and clean up zones. The cooking zone consists of the refrigerator, prep sink and cooktop, along with a nice long run of prep space at the island. The cleanup side of the kitchen consists of the main sink and dishwasher. Both areas are situated so that the user can view the lake during prep work and cleanup!
One of the home’s main puzzles was how to incorporate the mudroom and area in front of the patio doors at the back of the house. We already had a breakfast table area, so the space by the patio doors was a bit of a no man’s land. We decided to separate the kitchen proper from what became the new mudroom with a large set of barn doors. That way you can quickly hide any mudroom messes but have easy access to the light coming in through the patio doors as well as the outdoor grilling station. We also love the impact the barn doors add to the overall space.
The homeowners’ first words to us were “it’s time to ditch the brown,” so we did! We chose a lovely blue pallet that reflects the home’s location on the lake which is also vibrant yet easy on the eye. Countertops are white quartz, and the natural oak floor works well with the other honey accents. The breakfast table was given a refresh with new chairs, chandelier and window treatments that frame the gorgeous views of the lake out the back.
We coordinated the slate mudroom flooring with that used in the home’s main entrance for a consistent feel. The storage area consists of open and closed storage to allow for some clutter control as needed.
Next on our “to do” list was revamping the dated brown bar area in the neighboring dining room. We eliminated the clutter by adding some closed cabinets and did some easy updates to help the space feel more current. One snag we ran into here was the discovery of a beam above the existing open shelving that had to be modified with a smaller structural beam to allow for our new design to work. This was an unexpected surprise, but in the end we think it was well worth it!
We kept the colors here a bit more muted to blend with the homeowner’s existing furnishings. Open shelving and polished nickel hardware add some simple detail to the new entertainment zone which also looks out onto the lake!
Next we tackled the upstairs starting with the homeowner’s son’s bath. The bath originally had both a tub shower and a separate shower, so we decided to swap out the shower for a new laundry area. This freed up some space downstairs in what used to be the mudroom/laundry room and is much more convenient for daily laundry needs.
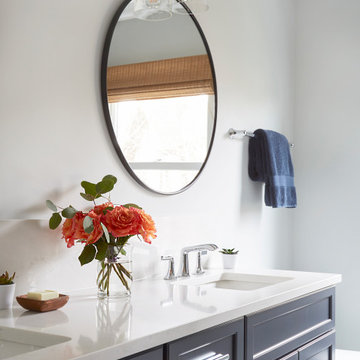
We continued the blue palette here with navy cabinetry and the navy tile in the shower. Porcelain floor tile and chrome fixtures keep maintenance to a minimum while matte black mirrors and lighting add some depth the design. A low maintenance runner adds some warmth underfoot and ties the whole space together.
We added a pocket door to the bathroom to minimize interference with the door swings. The left door of the laundry closet is on a 180 degree hinge to allow for easy full access to the machines. Next we tackled the master bath which is an en suite arrangement. The original was typical of the 1980’s with the vanity outside of the bathroom, situated near the master closet. And the brown theme continued here with multiple shades of brown.
Our first move was to segment off the bath and the closet from the master bedroom. We created a short hall from the bedroom to the bathroom with his and hers walk-in closets on the left and right as well as a separate toilet closet outside of the main bathroom for privacy and flexibility.
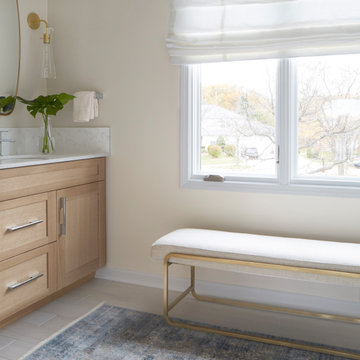
The original bathroom had a giant soaking tub with steps (dangerous!) as well as a small shower that did not work well for our homeowner who is 6’3”. With other bathtubs in the home, they decided to eliminate the tub and create an oversized shower which takes up the space where the old tub was located. The double vanity is on the opposite wall and a bench is located under the window for morning conversations and a place to set a couple of towels.
The pallet in here is light and airy with a mix of blond wood, creamy porcelain and marble tile, and brass accents. A simple roman shade adds some texture and it’s top-down mechanism allows for light and privacy.
This large whole house remodel gave our homeowners not only the ability to maximize the potential of their home but also created a lovely new frame from which to view their fabulous lake views.
Designed by: Susan Klimala, CKD, CBD
Photography by: Michael Kaskel
For more information on kitchen and bath design ideas go to: www.kitchenstudio-ge.com
 TKS Design Group
Download our free ebook, Creating the Ideal Kitchen. DOWNLOAD NOW
Lakefront property in the northwest suburbs of Chicago is hard to come by, so when we were hired by this young family with exactly that, we were immediately inspired by not just the unusually large footprint of this 1950’s colonial revival but also the lovely views of the manmade lake it was sited on. The large 5-bedroom home was solidly stuck in the 1980’s, but we saw tons of potential. We started out by updating the existing staircase with a fresh coat of paint and adding new herringbone slate to the entry hall.
The powder room off the entryway also got a refresh - new flooring, new cabinets and fixtures. We ran the new slate right through into this space for some consistency. A fun wallpaper and shiplap trim add a welcoming feel and set the tone for the home.
Next, we tackled the kitchen. Located away from the rest of the first floor, the kitchen felt a little isolated, so we immediately began planning for how to better connect it to the rest of the first floor. We landed on removing the wall between the kitchen and dining room and designed a modified galley style space with separate cooking and clean up zones. The cooking zone consists of the refrigerator, prep sink and cooktop, along with a nice long run of prep space at the island. The cleanup side of the kitchen consists of the main sink and dishwasher. Both areas are situated so that the user can view the lake during prep work and cleanup!
One of the home’s main puzzles was how to incorporate the mudroom and area in front of the patio doors at the back of the house. We already had a breakfast table area, so the space by the patio doors was a bit of a no man’s land. We decided to separate the kitchen proper from what became the new mudroom with a large set of barn doors. That way you can quickly hide any mudroom messes but have easy access to the light coming in through the patio doors as well as the outdoor grilling station. We also love the impact the barn doors add to the overall space.
The homeowners’ first words to us were “it’s time to ditch the brown,” so we did! We chose a lovely blue pallet that reflects the home’s location on the lake which is also vibrant yet easy on the eye. Countertops are white quartz, and the natural oak floor works well with the other honey accents. The breakfast table was given a refresh with new chairs, chandelier and window treatments that frame the gorgeous views of the lake out the back.
We coordinated the slate mudroom flooring with that used in the home’s main entrance for a consistent feel. The storage area consists of open and closed storage to allow for some clutter control as needed.
Next on our “to do” list was revamping the dated brown bar area in the neighboring dining room. We eliminated the clutter by adding some closed cabinets and did some easy updates to help the space feel more current. One snag we ran into here was the discovery of a beam above the existing open shelving that had to be modified with a smaller structural beam to allow for our new design to work. This was an unexpected surprise, but in the end we think it was well worth it!
We kept the colors here a bit more muted to blend with the homeowner’s existing furnishings. Open shelving and polished nickel hardware add some simple detail to the new entertainment zone which also looks out onto the lake!
Next we tackled the upstairs starting with the homeowner’s son’s bath. The bath originally had both a tub shower and a separate shower, so we decided to swap out the shower for a new laundry area. This freed up some space downstairs in what used to be the mudroom/laundry room and is much more convenient for daily laundry needs.
We continued the blue palette here with navy cabinetry and the navy tile in the shower. Porcelain floor tile and chrome fixtures keep maintenance to a minimum while matte black mirrors and lighting add some depth the design. A low maintenance runner adds some warmth underfoot and ties the whole space together.
We added a pocket door to the bathroom to minimize interference with the door swings. The left door of the laundry closet is on a 180 degree hinge to allow for easy full access to the machines. Next we tackled the master bath which is an en suite arrangement. The original was typical of the 1980’s with the vanity outside of the bathroom, situated near the master closet. And the brown theme continued here with multiple shades of brown.
Our first move was to segment off the bath and the closet from the master bedroom. We created a short hall from the bedroom to the bathroom with his and hers walk-in closets on the left and right as well as a separate toilet closet outside of the main bathroom for privacy and flexibility.
The original bathroom had a giant soaking tub with steps (dangerous!) as well as a small shower that did not work well for our homeowner who is 6’3”. With other bathtubs in the home, they decided to eliminate the tub and create an oversized shower which takes up the space where the old tub was located. The double vanity is on the opposite wall and a bench is located under the window for morning conversations and a place to set a couple of towels.
The pallet in here is light and airy with a mix of blond wood, creamy porcelain and marble tile, and brass accents. A simple roman shade adds some texture and it’s top-down mechanism allows for light and privacy.
This large whole house remodel gave our homeowners not only the ability to maximize the potential of their home but also created a lovely new frame from which to view their fabulous lake views.
Designed by: Susan Klimala, CKD, CBD
Photography by: Michael Kaskel
For more information on kitchen and bath design ideas go to: www.kitchenstudio-ge.com
Sponsored
Columbus, OH

Hope Restoration & General Contracting
Columbus Design-Build, Kitchen & Bath Remodeling, Historic Renovations

 McCullough's Flooring
Gorgeous master bath finished with Dal-Tile's Fabrique porcelain tile in the color Noir Linen polished. Tile size is 12"x24" installed in a brick joint pattern. The floor boasts underfloor heating on a timed thermostat.

 Advance Design Studio, Ltd.
Willie & Leslie of Barrington Hills loved the location of their home. Its breathtaking views overlooked a wooded backyard and a captivating lake. They didn’t want to move, but they needed more space. But the house was missing that big family room where everyone could gather, relax and converse, and the house was completely cut off visually from the beautiful outdoor view right outside!
They knew what they wanted meant building an addition to their home. They began searching the internet and came across Advance Design Studio, and after browsing through project after project and reading one outstanding client review after another, they were sold on Advance Design. Additionally, they loved Advance Design’s “Common Sense Remodeling” process and felt confident that it would allow the Design/Build company to easily coordinate the multiple projects they wanted to complete all at one time. Willie and Leslie immediately set up a meeting with Owner Todd Jurs and Project Designer Claudia Pop. When the meeting ended, they were sure that Advance Design were the right people and the right approach for their project.
"Establishing a direction and a budget is always key in project of this size," Todd said. "This house was screaming for a family room and it didn't have one. Ultimately, it's about working together towards the same goal of a beautiful functional addition."
The project consisted of a significant family room addition with an extraordinary vaulted ceiling and floor to ceiling fireplace, a guest suite renovation with a luxury bath, a garage addition, and an adjoining outdoor patio renovation complete with a fantastic built in grilling station. The main goal was to add comfort and space to the existing home that would last their lifetime, and finally allow them to capture the amazing view of the backyard and lake that they never could really enjoy previously.
Willie, Leslie and Claudia paid special attention to designing the space to make sure that the footprint of the room did not interfere with the views. Floor to ceiling Pella windows were incorporated into a spectacular window wall to provide plenty of natural light.
Vaulted ceilings gave the room a bigger feel and the stunning floor to ceiling masonry fireplace was designed giving the room a rustic, comfortable feel of a Colorado Lodge. Barnwood doors and exposed wooden beams accentuate the crackling fireplace and family gathering space. An oversized statement chandelier bathes the space in soft light once the sun sets and compliments the exposed wood and fireplace perfectly.
“It simple elegant and beautiful,” Designer Claudia Pop said. “It is a great family room that captures the views perfectly. They love the fireplace, the barndoors and the openness of the space we designed for the whole family now to enjoy.”
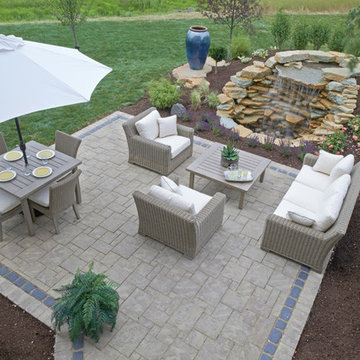
And when warm weather beckons, the outdoor patio is a terrific place to spend an evening. The family now enjoys fall nights in front of their outdoor fireplace overlooking the quiet lake. Dekton Trillium Quartz counters tops adorn an amazing grilling bar. Nearly indestructible, they are the only manufactured stone product designed exclusively to withstand high heat in summer and extreme cold temperatures in winter.
The guest bath renovation makes Willie and Leslie’s friends and family feel like they are staying at a 5-star hotel. Carlisle colored Maple cabinets from Medallion make a roomy dual vanity more than adequate with plenty of space to get ready for the day after a peaceful night’s sleep. Cambria Quartz countertops are durable and elegant, while contrasting the neutral cabinets flawlessly. Heated flooring from Warmly Yours is the cherry on top for this cozy guest bath.
All the projects turned out better than they even imagined. Willie and Leslie now have a spacious family room with even better views of the lake and woods, a much larger garage, a fantastic relaxing outdoor patio, and a guest bath that makes it almost impossible to get the guest to leave after their stay.
Are you thinking about a remodeling project? Talk to the experts at Advance Design about the renovation of your dreams. Now is the perfect time to renovate. Check out other amazing projects here. With “Common Sense Remodeling”, the process of renovating your home has never been easier. Contact us today at 847-836-2600 or schedule an appointment to talk with us about your kitchen remodeling project, or any other home renovation you are planning. Our talented team can help you design and build the new space you’ve been dreaming about.
 TKS Design Group
Download our free ebook, Creating the Ideal Kitchen. DOWNLOAD NOW
Lakefront property in the northwest suburbs of Chicago is hard to come by, so when we were hired by this young family with exactly that, we were immediately inspired by not just the unusually large footprint of this 1950’s colonial revival but also the lovely views of the manmade lake it was sited on. The large 5-bedroom home was solidly stuck in the 1980’s, but we saw tons of potential. We started out by updating the existing staircase with a fresh coat of paint and adding new herringbone slate to the entry hall.
The powder room off the entryway also got a refresh - new flooring, new cabinets and fixtures. We ran the new slate right through into this space for some consistency. A fun wallpaper and shiplap trim add a welcoming feel and set the tone for the home.
Next, we tackled the kitchen. Located away from the rest of the first floor, the kitchen felt a little isolated, so we immediately began planning for how to better connect it to the rest of the first floor. We landed on removing the wall between the kitchen and dining room and designed a modified galley style space with separate cooking and clean up zones. The cooking zone consists of the refrigerator, prep sink and cooktop, along with a nice long run of prep space at the island. The cleanup side of the kitchen consists of the main sink and dishwasher. Both areas are situated so that the user can view the lake during prep work and cleanup!
One of the home’s main puzzles was how to incorporate the mudroom and area in front of the patio doors at the back of the house. We already had a breakfast table area, so the space by the patio doors was a bit of a no man’s land. We decided to separate the kitchen proper from what became the new mudroom with a large set of barn doors. That way you can quickly hide any mudroom messes but have easy access to the light coming in through the patio doors as well as the outdoor grilling station. We also love the impact the barn doors add to the overall space.
The homeowners’ first words to us were “it’s time to ditch the brown,” so we did! We chose a lovely blue pallet that reflects the home’s location on the lake which is also vibrant yet easy on the eye. Countertops are white quartz, and the natural oak floor works well with the other honey accents. The breakfast table was given a refresh with new chairs, chandelier and window treatments that frame the gorgeous views of the lake out the back.
We coordinated the slate mudroom flooring with that used in the home’s main entrance for a consistent feel. The storage area consists of open and closed storage to allow for some clutter control as needed.
Next on our “to do” list was revamping the dated brown bar area in the neighboring dining room. We eliminated the clutter by adding some closed cabinets and did some easy updates to help the space feel more current. One snag we ran into here was the discovery of a beam above the existing open shelving that had to be modified with a smaller structural beam to allow for our new design to work. This was an unexpected surprise, but in the end we think it was well worth it!
We kept the colors here a bit more muted to blend with the homeowner’s existing furnishings. Open shelving and polished nickel hardware add some simple detail to the new entertainment zone which also looks out onto the lake!
Next we tackled the upstairs starting with the homeowner’s son’s bath. The bath originally had both a tub shower and a separate shower, so we decided to swap out the shower for a new laundry area. This freed up some space downstairs in what used to be the mudroom/laundry room and is much more convenient for daily laundry needs.
We continued the blue palette here with navy cabinetry and the navy tile in the shower. Porcelain floor tile and chrome fixtures keep maintenance to a minimum while matte black mirrors and lighting add some depth the design. A low maintenance runner adds some warmth underfoot and ties the whole space together.
We added a pocket door to the bathroom to minimize interference with the door swings. The left door of the laundry closet is on a 180 degree hinge to allow for easy full access to the machines. Next we tackled the master bath which is an en suite arrangement. The original was typical of the 1980’s with the vanity outside of the bathroom, situated near the master closet. And the brown theme continued here with multiple shades of brown.
Our first move was to segment off the bath and the closet from the master bedroom. We created a short hall from the bedroom to the bathroom with his and hers walk-in closets on the left and right as well as a separate toilet closet outside of the main bathroom for privacy and flexibility.
The original bathroom had a giant soaking tub with steps (dangerous!) as well as a small shower that did not work well for our homeowner who is 6’3”. With other bathtubs in the home, they decided to eliminate the tub and create an oversized shower which takes up the space where the old tub was located. The double vanity is on the opposite wall and a bench is located under the window for morning conversations and a place to set a couple of towels.
The pallet in here is light and airy with a mix of blond wood, creamy porcelain and marble tile, and brass accents. A simple roman shade adds some texture and it’s top-down mechanism allows for light and privacy.
This large whole house remodel gave our homeowners not only the ability to maximize the potential of their home but also created a lovely new frame from which to view their fabulous lake views.
Designed by: Susan Klimala, CKD, CBD
Photography by: Michael Kaskel
For more information on kitchen and bath design ideas go to: www.kitchenstudio-ge.com

 CairnsCraft Design & Remodel
Great spacious bathroom with lot of amenities.
Photographer: Jon Upson
Large elegant master beige tile and porcelain tile drop-in bathtub photo in San Diego with an undermount sink, raised-panel cabinets, medium tone wood cabinets, granite countertops, beige walls and a two-piece toilet
Large elegant master beige tile and porcelain tile drop-in bathtub photo in San Diego with an undermount sink, raised-panel cabinets, medium tone wood cabinets, granite countertops, beige walls and a two-piece toilet

 TKS Design Group
Download our free ebook, Creating the Ideal Kitchen. DOWNLOAD NOW
Lakefront property in the northwest suburbs of Chicago is hard to come by, so when we were hired by this young family with exactly that, we were immediately inspired by not just the unusually large footprint of this 1950’s colonial revival but also the lovely views of the manmade lake it was sited on. The large 5-bedroom home was solidly stuck in the 1980’s, but we saw tons of potential. We started out by updating the existing staircase with a fresh coat of paint and adding new herringbone slate to the entry hall.
The powder room off the entryway also got a refresh - new flooring, new cabinets and fixtures. We ran the new slate right through into this space for some consistency. A fun wallpaper and shiplap trim add a welcoming feel and set the tone for the home.
Next, we tackled the kitchen. Located away from the rest of the first floor, the kitchen felt a little isolated, so we immediately began planning for how to better connect it to the rest of the first floor. We landed on removing the wall between the kitchen and dining room and designed a modified galley style space with separate cooking and clean up zones. The cooking zone consists of the refrigerator, prep sink and cooktop, along with a nice long run of prep space at the island. The cleanup side of the kitchen consists of the main sink and dishwasher. Both areas are situated so that the user can view the lake during prep work and cleanup!
One of the home’s main puzzles was how to incorporate the mudroom and area in front of the patio doors at the back of the house. We already had a breakfast table area, so the space by the patio doors was a bit of a no man’s land. We decided to separate the kitchen proper from what became the new mudroom with a large set of barn doors. That way you can quickly hide any mudroom messes but have easy access to the light coming in through the patio doors as well as the outdoor grilling station. We also love the impact the barn doors add to the overall space.
The homeowners’ first words to us were “it’s time to ditch the brown,” so we did! We chose a lovely blue pallet that reflects the home’s location on the lake which is also vibrant yet easy on the eye. Countertops are white quartz, and the natural oak floor works well with the other honey accents. The breakfast table was given a refresh with new chairs, chandelier and window treatments that frame the gorgeous views of the lake out the back.
We coordinated the slate mudroom flooring with that used in the home’s main entrance for a consistent feel. The storage area consists of open and closed storage to allow for some clutter control as needed.
Next on our “to do” list was revamping the dated brown bar area in the neighboring dining room. We eliminated the clutter by adding some closed cabinets and did some easy updates to help the space feel more current. One snag we ran into here was the discovery of a beam above the existing open shelving that had to be modified with a smaller structural beam to allow for our new design to work. This was an unexpected surprise, but in the end we think it was well worth it!
We kept the colors here a bit more muted to blend with the homeowner’s existing furnishings. Open shelving and polished nickel hardware add some simple detail to the new entertainment zone which also looks out onto the lake!
Next we tackled the upstairs starting with the homeowner’s son’s bath. The bath originally had both a tub shower and a separate shower, so we decided to swap out the shower for a new laundry area. This freed up some space downstairs in what used to be the mudroom/laundry room and is much more convenient for daily laundry needs.
We continued the blue palette here with navy cabinetry and the navy tile in the shower. Porcelain floor tile and chrome fixtures keep maintenance to a minimum while matte black mirrors and lighting add some depth the design. A low maintenance runner adds some warmth underfoot and ties the whole space together.
We added a pocket door to the bathroom to minimize interference with the door swings. The left door of the laundry closet is on a 180 degree hinge to allow for easy full access to the machines. Next we tackled the master bath which is an en suite arrangement. The original was typical of the 1980’s with the vanity outside of the bathroom, situated near the master closet. And the brown theme continued here with multiple shades of brown.
Our first move was to segment off the bath and the closet from the master bedroom. We created a short hall from the bedroom to the bathroom with his and hers walk-in closets on the left and right as well as a separate toilet closet outside of the main bathroom for privacy and flexibility.
The original bathroom had a giant soaking tub with steps (dangerous!) as well as a small shower that did not work well for our homeowner who is 6’3”. With other bathtubs in the home, they decided to eliminate the tub and create an oversized shower which takes up the space where the old tub was located. The double vanity is on the opposite wall and a bench is located under the window for morning conversations and a place to set a couple of towels.
The pallet in here is light and airy with a mix of blond wood, creamy porcelain and marble tile, and brass accents. A simple roman shade adds some texture and it’s top-down mechanism allows for light and privacy.
This large whole house remodel gave our homeowners not only the ability to maximize the potential of their home but also created a lovely new frame from which to view their fabulous lake views.
Designed by: Susan Klimala, CKD, CBD
Photography by: Michael Kaskel
For more information on kitchen and bath design ideas go to: www.kitchenstudio-ge.com
 Advance Design Studio, Ltd.
Willie & Leslie of Barrington Hills loved the location of their home. Its breathtaking views overlooked a wooded backyard and a captivating lake. They didn’t want to move, but they needed more space. But the house was missing that big family room where everyone could gather, relax and converse, and the house was completely cut off visually from the beautiful outdoor view right outside!
They knew what they wanted meant building an addition to their home. They began searching the internet and came across Advance Design Studio, and after browsing through project after project and reading one outstanding client review after another, they were sold on Advance Design. Additionally, they loved Advance Design’s “Common Sense Remodeling” process and felt confident that it would allow the Design/Build company to easily coordinate the multiple projects they wanted to complete all at one time. Willie and Leslie immediately set up a meeting with Owner Todd Jurs and Project Designer Claudia Pop. When the meeting ended, they were sure that Advance Design were the right people and the right approach for their project.
"Establishing a direction and a budget is always key in project of this size," Todd said. "This house was screaming for a family room and it didn't have one. Ultimately, it's about working together towards the same goal of a beautiful functional addition."
The project consisted of a significant family room addition with an extraordinary vaulted ceiling and floor to ceiling fireplace, a guest suite renovation with a luxury bath, a garage addition, and an adjoining outdoor patio renovation complete with a fantastic built in grilling station. The main goal was to add comfort and space to the existing home that would last their lifetime, and finally allow them to capture the amazing view of the backyard and lake that they never could really enjoy previously.
Willie, Leslie and Claudia paid special attention to designing the space to make sure that the footprint of the room did not interfere with the views. Floor to ceiling Pella windows were incorporated into a spectacular window wall to provide plenty of natural light.
Vaulted ceilings gave the room a bigger feel and the stunning floor to ceiling masonry fireplace was designed giving the room a rustic, comfortable feel of a Colorado Lodge. Barnwood doors and exposed wooden beams accentuate the crackling fireplace and family gathering space. An oversized statement chandelier bathes the space in soft light once the sun sets and compliments the exposed wood and fireplace perfectly.
“It simple elegant and beautiful,” Designer Claudia Pop said. “It is a great family room that captures the views perfectly. They love the fireplace, the barndoors and the openness of the space we designed for the whole family now to enjoy.”
And when warm weather beckons, the outdoor patio is a terrific place to spend an evening. The family now enjoys fall nights in front of their outdoor fireplace overlooking the quiet lake. Dekton Trillium Quartz counters tops adorn an amazing grilling bar. Nearly indestructible, they are the only manufactured stone product designed exclusively to withstand high heat in summer and extreme cold temperatures in winter.
The guest bath renovation makes Willie and Leslie’s friends and family feel like they are staying at a 5-star hotel. Carlisle colored Maple cabinets from Medallion make a roomy dual vanity more than adequate with plenty of space to get ready for the day after a peaceful night’s sleep. Cambria Quartz countertops are durable and elegant, while contrasting the neutral cabinets flawlessly. Heated flooring from Warmly Yours is the cherry on top for this cozy guest bath.
All the projects turned out better than they even imagined. Willie and Leslie now have a spacious family room with even better views of the lake and woods, a much larger garage, a fantastic relaxing outdoor patio, and a guest bath that makes it almost impossible to get the guest to leave after their stay.
Are you thinking about a remodeling project? Talk to the experts at Advance Design about the renovation of your dreams. Now is the perfect time to renovate. Check out other amazing projects here. With “Common Sense Remodeling”, the process of renovating your home has never been easier. Contact us today at 847-836-2600 or schedule an appointment to talk with us about your kitchen remodeling project, or any other home renovation you are planning. Our talented team can help you design and build the new space you’ve been dreaming about.
 Advance Design Studio, Ltd.
Willie & Leslie of Barrington Hills loved the location of their home. Its breathtaking views overlooked a wooded backyard and a captivating lake. They didn’t want to move, but they needed more space. But the house was missing that big family room where everyone could gather, relax and converse, and the house was completely cut off visually from the beautiful outdoor view right outside!
They knew what they wanted meant building an addition to their home. They began searching the internet and came across Advance Design Studio, and after browsing through project after project and reading one outstanding client review after another, they were sold on Advance Design. Additionally, they loved Advance Design’s “Common Sense Remodeling” process and felt confident that it would allow the Design/Build company to easily coordinate the multiple projects they wanted to complete all at one time. Willie and Leslie immediately set up a meeting with Owner Todd Jurs and Project Designer Claudia Pop. When the meeting ended, they were sure that Advance Design were the right people and the right approach for their project.
"Establishing a direction and a budget is always key in project of this size," Todd said. "This house was screaming for a family room and it didn't have one. Ultimately, it's about working together towards the same goal of a beautiful functional addition."
The project consisted of a significant family room addition with an extraordinary vaulted ceiling and floor to ceiling fireplace, a guest suite renovation with a luxury bath, a garage addition, and an adjoining outdoor patio renovation complete with a fantastic built in grilling station. The main goal was to add comfort and space to the existing home that would last their lifetime, and finally allow them to capture the amazing view of the backyard and lake that they never could really enjoy previously.
Willie, Leslie and Claudia paid special attention to designing the space to make sure that the footprint of the room did not interfere with the views. Floor to ceiling Pella windows were incorporated into a spectacular window wall to provide plenty of natural light.
Vaulted ceilings gave the room a bigger feel and the stunning floor to ceiling masonry fireplace was designed giving the room a rustic, comfortable feel of a Colorado Lodge. Barnwood doors and exposed wooden beams accentuate the crackling fireplace and family gathering space. An oversized statement chandelier bathes the space in soft light once the sun sets and compliments the exposed wood and fireplace perfectly.
“It simple elegant and beautiful,” Designer Claudia Pop said. “It is a great family room that captures the views perfectly. They love the fireplace, the barndoors and the openness of the space we designed for the whole family now to enjoy.”
And when warm weather beckons, the outdoor patio is a terrific place to spend an evening. The family now enjoys fall nights in front of their outdoor fireplace overlooking the quiet lake. Dekton Trillium Quartz counters tops adorn an amazing grilling bar. Nearly indestructible, they are the only manufactured stone product designed exclusively to withstand high heat in summer and extreme cold temperatures in winter.
The guest bath renovation makes Willie and Leslie’s friends and family feel like they are staying at a 5-star hotel. Carlisle colored Maple cabinets from Medallion make a roomy dual vanity more than adequate with plenty of space to get ready for the day after a peaceful night’s sleep. Cambria Quartz countertops are durable and elegant, while contrasting the neutral cabinets flawlessly. Heated flooring from Warmly Yours is the cherry on top for this cozy guest bath.
All the projects turned out better than they even imagined. Willie and Leslie now have a spacious family room with even better views of the lake and woods, a much larger garage, a fantastic relaxing outdoor patio, and a guest bath that makes it almost impossible to get the guest to leave after their stay.
Are you thinking about a remodeling project? Talk to the experts at Advance Design about the renovation of your dreams. Now is the perfect time to renovate. Check out other amazing projects here. With “Common Sense Remodeling”, the process of renovating your home has never been easier. Contact us today at 847-836-2600 or schedule an appointment to talk with us about your kitchen remodeling project, or any other home renovation you are planning. Our talented team can help you design and build the new space you’ve been dreaming about.
16