
Search results for "Issuing" in Home Design Ideas

 Laura of Pembroke
Home office - transitional freestanding desk dark wood floor and brown floor home office idea in Cleveland with beige walls

 Magleby Construction
David Agnello
Example of a mid-sized cottage dark wood floor and brown floor pivot front door design in Salt Lake City with beige walls and a dark wood front door
Example of a mid-sized cottage dark wood floor and brown floor pivot front door design in Salt Lake City with beige walls and a dark wood front door

 Wilson Kelsey Design
WKD’s experience in historic preservation and antique curation restored this gentleman’s farm into a casual, comfortable, livable home for the next chapter in this couple’s lives.
The project included a new family entrance and mud room, new powder room, and opening up some of the rooms for better circulation. While WKD curated the client’s existing collection of art and antiques, refurbishing where necessary, new furnishings were also added to give the home a new lease on life.
Working with older homes, and historic homes, is one of Wilson Kelsey Design’s specialties.
This project was featured on the cover of Design New England's September/October 2013 issue. Read the full article at: http://wilsonkelseydesign.com/wp-content/uploads/2014/12/Heritage-Restored1.pdf
It was also featured in the Sept. issue of Old House Journal, 2016 - article is at http://wilsonkelseydesign.com/wp-content/uploads/2016/08/2016-09-OHJ.pdf
Photo by Michael Lee
Find the right local pro for your project

Inspiration for a cottage dark wood floor living room remodel in Los Angeles with white walls, a standard fireplace and a wall-mounted tv


 Archetype Interior Design Studio
Ellis Creek Photography
Example of a tuscan light wood floor and beige floor kitchen design in Charleston with an undermount sink, shaker cabinets, gray cabinets and white backsplash
Example of a tuscan light wood floor and beige floor kitchen design in Charleston with an undermount sink, shaker cabinets, gray cabinets and white backsplash

 Gather and Spruce Design Remodel
Example of a classic u-shaped gray floor enclosed kitchen design in Denver with an undermount sink, shaker cabinets, blue cabinets, white backsplash, subway tile backsplash, stainless steel appliances and an island

 Monique Varsames Design, LLC
Interior finishes and selections by Monique Varsames Photos by Rich Borzak
Staging by Stage to Show (Lisa Hynes)
Mudroom - small transitional gray floor mudroom idea in New York with white walls
Mudroom - small transitional gray floor mudroom idea in New York with white walls

 Rachlin Partners
Tom Bonner Photography
Bedroom - large transitional bedroom idea in Los Angeles with white walls
Bedroom - large transitional bedroom idea in Los Angeles with white walls

 Calvin Florian
Interior photo of our living room. We love the openness of this space and how it interconnects with the other levels.
Old Fourth Ward, Atlanta, Ga.
Architecture by bldgs.org
Photos by maibri.com

 Leo Parrella Design Group
Small minimalist gray tile and stone tile limestone floor powder room photo in Boston with a wall-mount sink, flat-panel cabinets, dark wood cabinets, a one-piece toilet and gray walls

 BZ Interiors
Large trendy u-shaped light wood floor and brown floor enclosed kitchen photo in Toronto with a double-bowl sink, flat-panel cabinets, light wood cabinets, marble countertops, white backsplash, marble backsplash, stainless steel appliances and a peninsula
 PAGODA RED
Michael Del Piero Good Design
Inspiration for a contemporary home design remodel in Chicago
Inspiration for a contemporary home design remodel in Chicago

 Cory Connor Designs
KazArts Photography
Inspiration for a small timeless ceramic tile laundry room remodel in New York with gray walls
Inspiration for a small timeless ceramic tile laundry room remodel in New York with gray walls
 Leslie Williams Interior Design
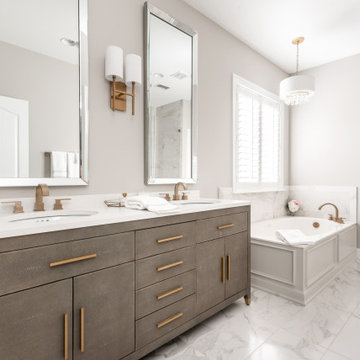
12 x 24 white and gray tile with veining in matte finish. Gold hardware and gold plumbing fixtures. Shagreen gray cabinet.
Example of a mid-sized transitional master white tile and porcelain tile porcelain tile, white floor and double-sink drop-in bathtub design in Charlotte with gray cabinets, gray walls, an undermount sink, quartz countertops, white countertops, a freestanding vanity and flat-panel cabinets
Example of a mid-sized transitional master white tile and porcelain tile porcelain tile, white floor and double-sink drop-in bathtub design in Charlotte with gray cabinets, gray walls, an undermount sink, quartz countertops, white countertops, a freestanding vanity and flat-panel cabinets

 Flavin Architects
Mid-Century Remodel on Tabor Hill
This sensitively sited house was designed by Robert Coolidge, a renowned architect and grandson of President Calvin Coolidge. The house features a symmetrical gable roof and beautiful floor to ceiling glass facing due south, smartly oriented for passive solar heating. Situated on a steep lot, the house is primarily a single story that steps down to a family room. This lower level opens to a New England exterior. Our goals for this project were to maintain the integrity of the original design while creating more modern spaces. Our design team worked to envision what Coolidge himself might have designed if he'd had access to modern materials and fixtures.
With the aim of creating a signature space that ties together the living, dining, and kitchen areas, we designed a variation on the 1950's "floating kitchen." In this inviting assembly, the kitchen is located away from exterior walls, which allows views from the floor-to-ceiling glass to remain uninterrupted by cabinetry.
We updated rooms throughout the house; installing modern features that pay homage to the fine, sleek lines of the original design. Finally, we opened the family room to a terrace featuring a fire pit. Since a hallmark of our design is the diminishment of the hard line between interior and exterior, we were especially pleased for the opportunity to update this classic work.

 Mauricio Nava Design, LLC
Chuck Williams
Large minimalist l-shaped dark wood floor eat-in kitchen photo in Houston with an undermount sink, flat-panel cabinets, dark wood cabinets, quartz countertops, gray backsplash, glass tile backsplash, stainless steel appliances and an island
Large minimalist l-shaped dark wood floor eat-in kitchen photo in Houston with an undermount sink, flat-panel cabinets, dark wood cabinets, quartz countertops, gray backsplash, glass tile backsplash, stainless steel appliances and an island

 Vernon Wentz
This is a wonderful lap pool that has a taste of modern with the clean lines and cement cabana that also has a flair of the rustic with wood beams and a hill country stone bench. It also has a simple grass lawn that has very large planters as signature statements to once again give it a modern feel. Photography by Vernon Wentz of Ad Imagery


23