
Search results for "Master determine" in Home Design Ideas
 Charles Rose Architects Inc.
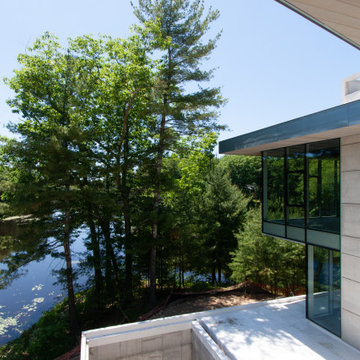
We were given the challenge of designing a house overlooking a pond on a site constrained by wetlands. Our client had an interest in permanence and solidity and a desire to work with architectural concrete. Additionally, the client desired interiors that would showcase their substantial art collection. Our design approach began with the footprint of an L-shaped courtyard house, which in part, was determined by the limited buildable area. The house is sited on a natural rise in the land, allowing the first floor elevation to rise 15 ft above the pond’s surface; this height provides dynamic views through the trees that separate the house from the pond. Ultimately, our design leverages the inherent capabilities of architectural concrete i.e. its structural capacity; the material allows for bold cantilevers and expanses of glass, creating greater transparency between interior and exterior environments.
The interior palette is comprised of rift sawn oak with 16-inch wide oak plank flooring, oak casework and millwork, a stainless steel and glass main staircase, and minimalist concrete details throughout. On the upper level, the plan accommodates a master bedroom suite, three children’s bedrooms, and a family room. The first floor includes a guest bedroom, living room, kitchen, dining room, office, and family room. The ground level has a recreational room, a mudroom, and office/studio. The site plan employs native plantings and includes a small resistance pool in the courtyard.
Concrete will be utilized for all of the house’s structural and insulation components. This method modulates the fluctuation of interior temperature, creating both an energy-efficient envelope and enough concrete mass to keep temperatures moderate and consistent throughout a 24-hour day. The employment of triple-glazed windows and a triple-glazed aluminum curtain wall further increases the project’s energy efficiency and allows the house to have abundant glass. Natural light permeates the interior and affords spectacular view in all directions of both Todd Pond and the neighboring woodlands.

 The Bodily Works
Example of a mid-sized transitional enclosed carpeted and beige floor home theater design in Salt Lake City with gray walls and a wall-mounted tv
 Charles Rose Architects Inc.
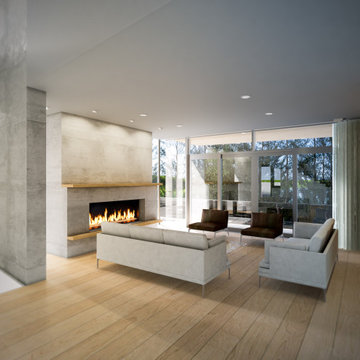
We were given the challenge of designing a house overlooking a pond on a site constrained by wetlands. Our client had an interest in permanence and solidity and a desire to work with architectural concrete. Additionally, the client desired interiors that would showcase their substantial art collection. Our design approach began with the footprint of an L-shaped courtyard house, which in part, was determined by the limited buildable area. The house is sited on a natural rise in the land, allowing the first floor elevation to rise 15 ft above the pond’s surface; this height provides dynamic views through the trees that separate the house from the pond. Ultimately, our design leverages the inherent capabilities of architectural concrete i.e. its structural capacity; the material allows for bold cantilevers and expanses of glass, creating greater transparency between interior and exterior environments.
The interior palette is comprised of rift sawn oak with 16-inch wide oak plank flooring, oak casework and millwork, a stainless steel and glass main staircase, and minimalist concrete details throughout. On the upper level, the plan accommodates a master bedroom suite, three children’s bedrooms, and a family room. The first floor includes a guest bedroom, living room, kitchen, dining room, office, and family room. The ground level has a recreational room, a mudroom, and office/studio. The site plan employs native plantings and includes a small resistance pool in the courtyard.
Concrete will be utilized for all of the house’s structural and insulation components. This method modulates the fluctuation of interior temperature, creating both an energy-efficient envelope and enough concrete mass to keep temperatures moderate and consistent throughout a 24-hour day. The employment of triple-glazed windows and a triple-glazed aluminum curtain wall further increases the project’s energy efficiency and allows the house to have abundant glass. Natural light permeates the interior and affords spectacular view in all directions of both Todd Pond and the neighboring woodlands.
Find the right local pro for your project
 Charles Rose Architects Inc.
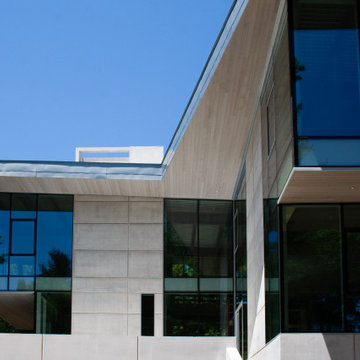
We were given the challenge of designing a house overlooking a pond on a site constrained by wetlands. Our client had an interest in permanence and solidity and a desire to work with architectural concrete. Additionally, the client desired interiors that would showcase their substantial art collection. Our design approach began with the footprint of an L-shaped courtyard house, which in part, was determined by the limited buildable area. The house is sited on a natural rise in the land, allowing the first floor elevation to rise 15 ft above the pond’s surface; this height provides dynamic views through the trees that separate the house from the pond. Ultimately, our design leverages the inherent capabilities of architectural concrete i.e. its structural capacity; the material allows for bold cantilevers and expanses of glass, creating greater transparency between interior and exterior environments.
The interior palette is comprised of rift sawn oak with 16-inch wide oak plank flooring, oak casework and millwork, a stainless steel and glass main staircase, and minimalist concrete details throughout. On the upper level, the plan accommodates a master bedroom suite, three children’s bedrooms, and a family room. The first floor includes a guest bedroom, living room, kitchen, dining room, office, and family room. The ground level has a recreational room, a mudroom, and office/studio. The site plan employs native plantings and includes a small resistance pool in the courtyard.
Concrete will be utilized for all of the house’s structural and insulation components. This method modulates the fluctuation of interior temperature, creating both an energy-efficient envelope and enough concrete mass to keep temperatures moderate and consistent throughout a 24-hour day. The employment of triple-glazed windows and a triple-glazed aluminum curtain wall further increases the project’s energy efficiency and allows the house to have abundant glass. Natural light permeates the interior and affords spectacular view in all directions of both Todd Pond and the neighboring woodlands.
 Charles Rose Architects Inc.
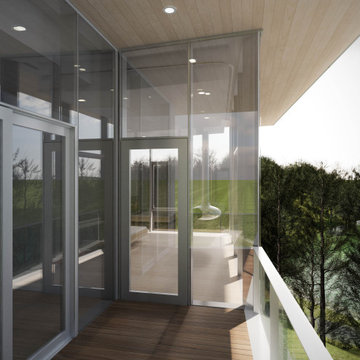
We were given the challenge of designing a house overlooking a pond on a site constrained by wetlands. Our client had an interest in permanence and solidity and a desire to work with architectural concrete. Additionally, the client desired interiors that would showcase their substantial art collection. Our design approach began with the footprint of an L-shaped courtyard house, which in part, was determined by the limited buildable area. The house is sited on a natural rise in the land, allowing the first floor elevation to rise 15 ft above the pond’s surface; this height provides dynamic views through the trees that separate the house from the pond. Ultimately, our design leverages the inherent capabilities of architectural concrete i.e. its structural capacity; the material allows for bold cantilevers and expanses of glass, creating greater transparency between interior and exterior environments.
The interior palette is comprised of rift sawn oak with 16-inch wide oak plank flooring, oak casework and millwork, a stainless steel and glass main staircase, and minimalist concrete details throughout. On the upper level, the plan accommodates a master bedroom suite, three children’s bedrooms, and a family room. The first floor includes a guest bedroom, living room, kitchen, dining room, office, and family room. The ground level has a recreational room, a mudroom, and office/studio. The site plan employs native plantings and includes a small resistance pool in the courtyard.
Concrete will be utilized for all of the house’s structural and insulation components. This method modulates the fluctuation of interior temperature, creating both an energy-efficient envelope and enough concrete mass to keep temperatures moderate and consistent throughout a 24-hour day. The employment of triple-glazed windows and a triple-glazed aluminum curtain wall further increases the project’s energy efficiency and allows the house to have abundant glass. Natural light permeates the interior and affords spectacular view in all directions of both Todd Pond and the neighboring woodlands.
 Sledgehammer Construction
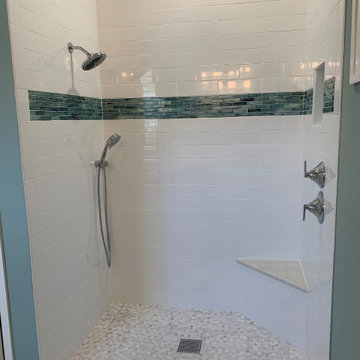
Completion of all the shower wall and floor tile. Shower fixtures have been trimmed out, with a separate handheld for shower use and cleaning. Includes separate shower valve and diverter. Artisan subway tile makes the wall tile appear to be installed unevenly, but that is the intended look the homeowner wanted. Trimmed out the shower bench with a piece of the countertop material. The curb-less shower was installed for the homeowners to be able to "age in place" and access the shower if one becomes disabled. The new vinyl floor plank was married to the hexagonal shower floor tile so a threshold wasn't needed. Just waiting on the shower glass to be installed to complete the shower.
 Charles Rose Architects Inc.
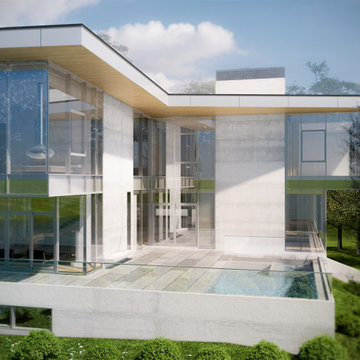
We were given the challenge of designing a house overlooking a pond on a site constrained by wetlands. Our client had an interest in permanence and solidity and a desire to work with architectural concrete. Additionally, the client desired interiors that would showcase their substantial art collection. Our design approach began with the footprint of an L-shaped courtyard house, which in part, was determined by the limited buildable area. The house is sited on a natural rise in the land, allowing the first floor elevation to rise 15 ft above the pond’s surface; this height provides dynamic views through the trees that separate the house from the pond. Ultimately, our design leverages the inherent capabilities of architectural concrete i.e. its structural capacity; the material allows for bold cantilevers and expanses of glass, creating greater transparency between interior and exterior environments.
The interior palette is comprised of rift sawn oak with 16-inch wide oak plank flooring, oak casework and millwork, a stainless steel and glass main staircase, and minimalist concrete details throughout. On the upper level, the plan accommodates a master bedroom suite, three children’s bedrooms, and a family room. The first floor includes a guest bedroom, living room, kitchen, dining room, office, and family room. The ground level has a recreational room, a mudroom, and office/studio. The site plan employs native plantings and includes a small resistance pool in the courtyard.
Concrete will be utilized for all of the house’s structural and insulation components. This method modulates the fluctuation of interior temperature, creating both an energy-efficient envelope and enough concrete mass to keep temperatures moderate and consistent throughout a 24-hour day. The employment of triple-glazed windows and a triple-glazed aluminum curtain wall further increases the project’s energy efficiency and allows the house to have abundant glass. Natural light permeates the interior and affords spectacular view in all directions of both Todd Pond and the neighboring woodlands.
Sponsored
Delaware, OH

Buckeye Basements, Inc.
Central Ohio's Basement Finishing ExpertsBest Of Houzz '13-'21
 Charles Rose Architects Inc.
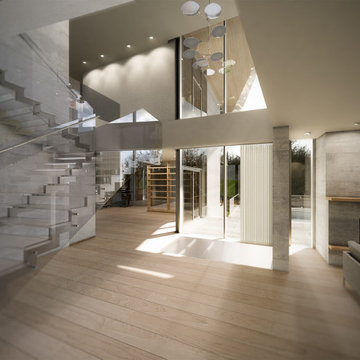
We were given the challenge of designing a house overlooking a pond on a site constrained by wetlands. Our client had an interest in permanence and solidity and a desire to work with architectural concrete. Additionally, the client desired interiors that would showcase their substantial art collection. Our design approach began with the footprint of an L-shaped courtyard house, which in part, was determined by the limited buildable area. The house is sited on a natural rise in the land, allowing the first floor elevation to rise 15 ft above the pond’s surface; this height provides dynamic views through the trees that separate the house from the pond. Ultimately, our design leverages the inherent capabilities of architectural concrete i.e. its structural capacity; the material allows for bold cantilevers and expanses of glass, creating greater transparency between interior and exterior environments.
The interior palette is comprised of rift sawn oak with 16-inch wide oak plank flooring, oak casework and millwork, a stainless steel and glass main staircase, and minimalist concrete details throughout. On the upper level, the plan accommodates a master bedroom suite, three children’s bedrooms, and a family room. The first floor includes a guest bedroom, living room, kitchen, dining room, office, and family room. The ground level has a recreational room, a mudroom, and office/studio. The site plan employs native plantings and includes a small resistance pool in the courtyard.
Concrete will be utilized for all of the house’s structural and insulation components. This method modulates the fluctuation of interior temperature, creating both an energy-efficient envelope and enough concrete mass to keep temperatures moderate and consistent throughout a 24-hour day. The employment of triple-glazed windows and a triple-glazed aluminum curtain wall further increases the project’s energy efficiency and allows the house to have abundant glass. Natural light permeates the interior and affords spectacular view in all directions of both Todd Pond and the neighboring woodlands.
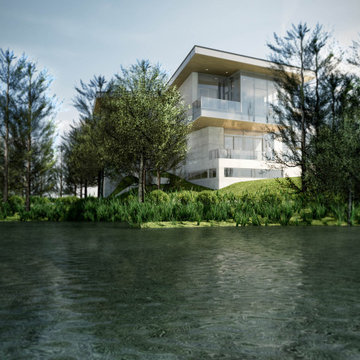 Charles Rose Architects Inc.
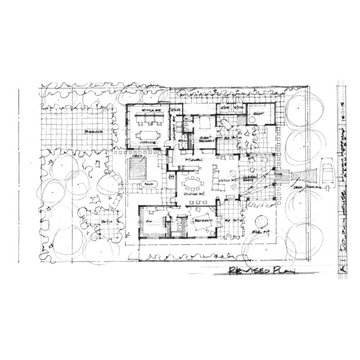
We were given the challenge of designing a house overlooking a pond on a site constrained by wetlands. Our client had an interest in permanence and solidity and a desire to work with architectural concrete. Additionally, the client desired interiors that would showcase their substantial art collection. Our design approach began with the footprint of an L-shaped courtyard house, which in part, was determined by the limited buildable area. The house is sited on a natural rise in the land, allowing the first floor elevation to rise 15 ft above the pond’s surface; this height provides dynamic views through the trees that separate the house from the pond. Ultimately, our design leverages the inherent capabilities of architectural concrete i.e. its structural capacity; the material allows for bold cantilevers and expanses of glass, creating greater transparency between interior and exterior environments.
The interior palette is comprised of rift sawn oak with 16-inch wide oak plank flooring, oak casework and millwork, a stainless steel and glass main staircase, and minimalist concrete details throughout. On the upper level, the plan accommodates a master bedroom suite, three children’s bedrooms, and a family room. The first floor includes a guest bedroom, living room, kitchen, dining room, office, and family room. The ground level has a recreational room, a mudroom, and office/studio. The site plan employs native plantings and includes a small resistance pool in the courtyard.
Concrete will be utilized for all of the house’s structural and insulation components. This method modulates the fluctuation of interior temperature, creating both an energy-efficient envelope and enough concrete mass to keep temperatures moderate and consistent throughout a 24-hour day. The employment of triple-glazed windows and a triple-glazed aluminum curtain wall further increases the project’s energy efficiency and allows the house to have abundant glass. Natural light permeates the interior and affords spectacular view in all directions of both Todd Pond and the neighboring woodlands.

 Fenstermann LLC
This is the ultimate master bathroom - it is like relaxing in a bathtub right in nature. But including your needed privacy. Windows, doors, skylights - nothing is impossible with our bottom up top down operating pleated blinds...
 William Hoffman Architect
4 Steps to Achieving a Rewarding Cost Effective Home Renovation
1 Home Renovation an Introduction
A home renovation due to changes in family needs and space requirements can be a challenging, but also a rewarding experience. As a homeowner, gathering and coordinating resources and possibly help from professional consultants are required. Once the construction phase has started, patience, endurance and commitment to follow through are necessary. Despite the challenges, the rewards of a well-planned and successfully completed project are meaningful, adding aesthetic and economic value, also providing the opportunity to personalize a home, encompassing the function, comfort and aesthetics to accommodate individual taste and lifestyle.
A renovation of an existing home is a viable alternative to moving or building a new home, assuming that a home is structurally sound, the expenditure to enlarge or improve can be a cost effective alternative. A home possessing charm, style, historical significance, established landscaping or an exceptional location could be a significant motivation to consider purchasing another home with the intent to renovate.
The complexity of a project could be relatively simple, changing the use of a room, consolidating two rooms into one, or opening up a room to the outdoors. It could also be a more involved task requiring planning, design and construction documents to build a second floor addition, the addition of a new wing or completely gutting the interior. Some projects could be completed in a weekend’s work or more complex projects, using a “Master Plan”, a plan which provides overall guidance; a renovation can be accomplished all at once or divided into manageable projects over a period of time. With the home evolving gradually allowing the renovation to be planned, timed and tailored to meet individual needs and circumstances.
The due diligence phase should precede the decision to renovate whether it’s an existing home or a home that is purchased with the intent to renovate. The due diligence phase will reveal the factors affecting the nature and scope of the project or if a renovation makes sense.
Every renovation project is unique relative to personal requirements, architectural style & construction type. This guide will be helpful in developing an understanding of the preliminary groundwork required to realize a successful project. If properly planned, a home renovation project can be a positive and rewarding experience resulting in a comfortable, practical and an attractive living environment.
The first step of the planning process is documenting the goals and long-range plans referred to as the “Project Program”. This will dictate the nature, scope and feasibility of the project. Providing a guide to achieving defined goals, the timing or phasing of the project and budget required to achieve the desired end result.
2 Documenting Existing Conditions
Once the “Project Program”, has been established, the next step is to determine what there is to work with. This requires documenting the home’s floor plan and site elements which includes drawing an “as built” floor & site plan consisting of the existing exterior walls, interior rooms, doors, windows, etc. and surrounding site elements, landscape and other significant exterior features. Additionally understanding and noting on the “as built” plan, the structural, mechanical and electrical systems as necessary. Gathering the “existing condition” information defines what there is to work with, creating the framework from which to facilitate and organize the decision making process and develop effective “project program” solutions.
3 Evaluating Existing Conditions
The goals and long-range plans have been established, and the existing floor plan and site elements have been documented. Before developing design solutions, the next step is to evaluate existing conditions. The evaluation includes: a detailed analysis of the structural, mechanical and electrical systems, determining the condition of the house, noting functional and aesthetic deficiencies. At the same time recognizing the home’s strengths, assets and evaluating its relationship to its site. The remaining parameters will be defined by the local jurisdiction’s zoning regulations, these regulations will define the “envelope”, within which the proposed project will be required to fit:
•required front, side & rear yard setbacks
•maximum allowable lot coverage & height
The previous three steps have provided the necessary foundation to start the design phase. The goals and long range plans have been established, existing conditions have been documented and the evaluation of what there is to work with are now in place. This will provide the framework from which to facilitate and organize design solutions. The consolidation of this information is manifested in the development of the “Master Plan” which will become the road map by which sound decision-making can be made as a home renovation evolves. Keeping the project, on a linear path, avoiding redundancies and back tracking, on time, within budget, concluding with a well crafted finished product. After all the “up front” research and documentation has been completed, the design phase of the project can now precede, with the creation of diagrammatic design drawings. Organizing interior spaces, taking into account the external elements, prevailing breezes, solar orientation, view, existing outdoor features, etc. Through the development of schematic sketches themes will emerge followed by design development drawings. Wise planning and renovation decisions can save money and time at the same time provide a well crafted finished project. The “Master Plan” provides a strategic path in the planning and decision making process leading to a successful and rewarding home renovation, which will add value and considerable enjoyment, for many years, living in a newly renovated home.
By virtue of having gone through these steps, frustrations sometimes encountered during a home renovation will be minimized, allowing the renovation to be a gratifying and rewarding experience. Being aware of the process allows one to become an “Educated Client,” which is worth quite a bit more than one might realize. The uneducated client may not realize the benefit of going through the planning, evaluation and documentation groundwork. He will only realize its benefits after having completed a prior renovation project. This rational approach keeps the design process on a direct path to achieving prescribed goals.
4 Exploring Design Solutions & Developing a Master Plan
The previous three steps have provided the necessary foundation to start the design phase. The goals and long range plans have been established, existing conditions have been documented and the evaluation of what there is to work with are now in place. This will provide the framework from which to facilitate and organize design solutions. The consolidation of this information is manifested in the development of the “Master Plan” which will become the road map by which sound decision-making can be made as a home renovation evolves. Keeping the project, on a linear path, avoiding redundancies and back tracking, on time, within budget, concluding with a well crafted finished product.
By virtue of having gone through these steps, frustrations sometimes encountered during a home renovation will be minimized, allowing the renovation to be a gratifying and rewarding experience. Being aware of the process allows one to become an “Educated Client,” which is worth quite a bit more than one might realize. The uneducated client may not realize the benefit of going through the planning, evaluation and documentation groundwork. He will only realize its benefits after having completed a prior renovation project. This rational approach keeps the design process on a direct path to achieving prescribed goals.
After all the “up front” research and documentation has been completed, the design phase of the project can now precede, with the creation of diagrammatic design drawings. Organizing interior spaces, taking into account the external elements, prevailing breezes, solar orientation, view, existing outdoor features, etc. Through the development of schematic sketches themes will emerge followed by design development drawings. Wise planning and renovation decisions can save money and time at the same time provide a well crafted finished project. The “Master Plan” provides a strategic path in the planning and decision making process leading to a successful and rewarding home renovation, which will add value and considerable enjoyment, for many years, living in a newly renovated home.
 Connecticut Stone
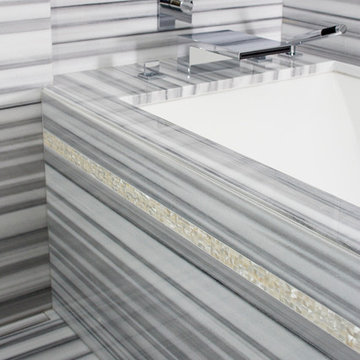
The owners wanted a unique bathroom that would complement their beautiful, one of a kind, modern residence. Olympic Grey marble from Turkey was selected. This was a renovation so we were particularly careful in handling and installation.
There were many challenges to the project. First, the material is quite specific in its veining so we needed to make a mock up to determine how to cut the slabs in a way that would allow the vein to follow around the room (in and out of niches). We were working with a finite amount of material, 14 slabs, so we needed to design and engineer the project accordingly. In addition, the client wanted to maximize efficiency for cost control so we designed the seam placement to fall strategically (behind the toilet, for example) so that he would not need to purchase additional material. The bathroom is actually quite small so there were significant constraints in trying to fit and maneuver the large panels in tight spaces.
The vanity countertop was made in Pental Quartz Thassos Polished 1-1/4”. We carved channels in the vanity top to insert Troca Mother of Pearl Flat Liners. We followed this same detail at the Tub Apron.
Identification & Stone Information
Stone Supplier: Connecticut Stone/ Tyra Dellacroce
Stone Fabricator: Connecticut Stone/ Tyra Dellacroce
Stone Installer: Martany Tile/ Anthony Collins
General Contractor: DPD Builders/ Dan Divitto
Designer: Juan Montoya Design
Material: Olympic Grey Polished
Thickness: ¾”
Finish: Polished
Quantity: Approx. 250 SF
Stone Dimensions: Custom cut to size panels
Neil Landino

 TBS Construction Inc.
Los Gatos powder room in style of Art Nouveau! With the great products and creativity we get amazing projects and happy, satisfied clients.
Caesarstone Classico / Piatra Grey countertop, Crystal cabinets, fully custom, cherry wood with nutmeg stain, inset with beaded detail. Mirror by Hubbardton Forge. Sink by Kohler Devonshire in Cashmere color. Knobs by Berenson Decorative Hardware, Art Nouveau collection. Tile by Crossville porcelain field and tile, Virtue series — in Los Gatos, California.
Dean J Birinyi
Sponsored
Columbus, OH
Free consultation for landscape design!

Peabody Landscape Group
Columbus' Reliable Landscape Design & Contracting
 Roeser Home Remodeling
This Mid-Century home had been updated except for the kitchen and master bath. After a few years of being empty nesters, and with the neighborhood turning over drastically to infill property in the millions, this couple decided the time was right to update the last remaining rooms.
Starting in the Kitchen
Taking a dark, u-shaped kitchen out of the past and updating it for the future, was a dream come true for this family. They knew what they wanted in order to entertain their large extended family, which included their three kids; plus, his family, consisting of nine children, spouses, and now grandchildren. Requirements of an open space to hang out and help out, a banquet for food presentation without obstruction, bright and clean, easy storage, a place for her mother’s china decanters, and an instant hot for tea were all part of the “must haves” for this kitchen. We also needed to work around the homeowners’ existing appliances since many of them were practically new.
Vaulted ceilings, lots of high windows, and large openings to other spaces in the house, were challenges that only a galley style kitchen could address. Blending and lacing the hardwood floor with new flooring required both the new and existing to be sanded down and refinished. This provided a coherent look to the entire first floor of this home. Matching casings, baseboards and base shoe helped to make the updates look fresh, but original to the house.
In the kitchen, choosing the sandstone slate finish on our Wellborn Maple select series cabinets kept the space soft; but really opened it, making the space lighter and brighter. The Harmony style door choice blended with the décor in the rest of the house, while also giving straight clean lines the homeowner desired. Grounding the row of cabinets with their refrigerator and a pantry cabinet, gave symmetry to this side of the kitchen.
On the opposite side, a built-in pantry cabinet mirrors the refrigerator. A row of drawer cabinets expanded the storage and banquet space, to lay out food for entertaining. Also added were some much-needed wall cabinets with glass inserts to mirror the windows and keep the space open. This also allowed the taller canister to be displayed and admired. A few smaller shelves were added above the window space, to house the smaller canisters so loved by the homeowner.
An artist by trade, this homeowner added two narrow cabinets to the side of the pantry and the side of the refrigerator panel to house and create easy access to the various spices her husband loves to use while cooking. She painted them to blend with Wellborn’s Sandstone finish. The Caesarstone countertop with a 3cm eased edge in London Gray has a small pattern that is subtle and interesting. Cutting down the Caesarstone to 2 cm and carrying the same London Gray pattern up the backsplash area, lended to the clean lines and easy cleaning this homeowner requested.
Choosing chrome plumbing fixtures from Moen’s Brantford line is timeless choice. Chrome is always popular and yet in today’s market, also very trendy. The Brantford faucet has a pull-down spray and one side handle, leaving space for the all-important request of a Transcape hot water dispenser, also in chrome.
Scraping away the past included smoothing out the popcorn ceiling. Adding LED slope cans to the vaulted ceilings provided the necessary task lighting to elevate these homeowners’ joy of cooking. Removing the dated “popcorn look” enhanced the clean and spacious feel created by the architecture of the ceiling. Adding Top Knob chrome hardware was the final element that tied the kitchen all together.
Master Bathroom
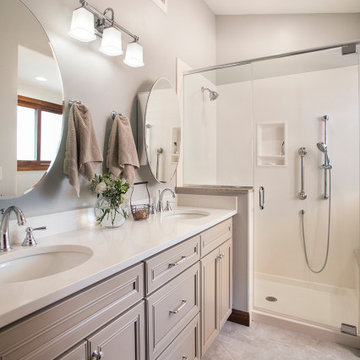
The original dated Master Bathroom had dark cabinets, a huge Jacuzzi tub and a small shower stall that provided barely enough room for even a child to shower. Removing the Jacuzzi tub that was never used, opened this floor plan to a grand shower that is comfortable and spacious. For easy cleaning, these homeowners opted for a panel system in their shower. Onyx shower walls with a shower seat and recess wide shower caddy were installed in place of the old Jacuzzi style tub.
The large panels were quite a challenge for our team, with an eight foot door and vaulted ceilings; but they were determined not to have a seam. These seamless panels are beautiful and very easy to clean. Keeping with the original floor plan, a double sink vanity from Wellborn’s select line with the Harmony door style in a pebble finish was installed. New Kohler Caxton under mount sinks were installed, along with the Moen Kinsley 8” wide spread faucets in chrome. Matching Kingsley 18” grab bars were added to the shower area, along with the Kohler Brantford fixed shower head and handheld slide bar.
The countertop was a beautiful Caesarstone in Frosty Carrina with an eased edge and 4” back and side splash. Matching Kinsley towel hooks were added, along with mirrors the homeowner purchased and we installed for her. Top Knobs chrome cabinet hardware finished the look along with a beautiful tile floor AO Mira 1224-S Silver Maple laid in a broken joint pattern. Matching marble sills were added on top of the knee walls and threshold in the doorway. A 3/8” frameless custom shower door with fixed panels surrounded the shower creating an open airy feel to the space.
Not shown: Kohler’s Wellworth highline toilet with a slow-close seat replaces the original toilet. The original shower stall became a space used to house a stackable washer and dryer, a top a safety pan and drain to slop sink in the basement. There was even enough room for small shelving to provide storage for laundry essentials. Adding a louver door keeps the laundry area behind the scene and opens the master area to multiple tasks needed.
Master Bedroom Fireplace
This homeowner really missed a bedroom fireplace they had in a previous home. Since we were going to be working on their master bathroom anyway; was there a way to create a fireplace without making it feel too odd in their large bedroom area? They had purchased a ventless gas fireplace and they had their original television as well.
Challenged by windows, a vaulted ceiling and the natural light streaming from the back window; this divided wall was created, keeping the lighting from the other side of the room and providing a dressing area opposite the fireplace. This was a perfect idea since the closets are now in the dressing area and the creative wall houses the fireplace and TV for cold winter nights of snuggling to a movie. Better yet, the fireplace and TV are all on remote control!

 Betty Wasserman Art & Interiors
Modern luxury meets warm farmhouse in this Southampton home! Scandinavian inspired furnishings and light fixtures create a clean and tailored look, while the natural materials found in accent walls, casegoods, the staircase, and home decor hone in on a homey feel. An open-concept interior that proves less can be more is how we’d explain this interior. By accentuating the “negative space,” we’ve allowed the carefully chosen furnishings and artwork to steal the show, while the crisp whites and abundance of natural light create a rejuvenated and refreshed interior.
This sprawling 5,000 square foot home includes a salon, ballet room, two media rooms, a conference room, multifunctional study, and, lastly, a guest house (which is a mini version of the main house).
 highland
Renovating a bathroom is one of the most rewarding home improvement projects you can undertake. It adds immediate value to your property and elevates your daily routine. However, designing the perfect space requires balancing aesthetics with practical utility. At the heart of this balance is the vanity — it is the functional hub where you get ready each morning, a vital storage unit, and the visual centerpiece of the room.
To ensure you make the right investment, here is an in-depth look at choosing a bathroom vanity that blends style, longevity, and everyday functionality.
1. Assessing the Layout and Space Constraints
Before you fall in love with a specific design or finish, you must determine what your bathroom can physically handle. Scale is everything. A vanity that is too large disrupts traffic flow, while one that is too small gets lost visually and lacks adequate storage.
The next major step is determining the scale of your plumbing fixtures. Understanding how to choose a bathroom sink and vanity setup comes down to a simple choice: single or double sinks. Your choice will depend on who uses the bathroom and the overall footprint of the space.
Single Sink Vanities
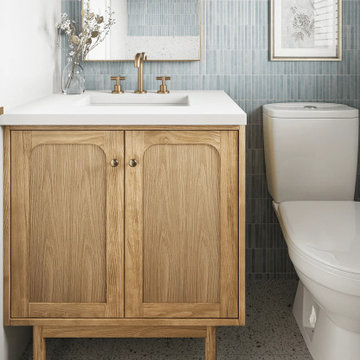
Typically ranging from 20 to 48 inches (50–120 cm) in width, single vanities are the ideal choice for powder rooms, guest bathrooms, or small master suites. For very compact spaces, you can find narrower options starting around 16 inches (40 cm). The major advantage of a single-sink layout is that it provides more usable countertop space for cosmetics, toiletries, and decorative items. If you want to skip the guesswork and invest in a premium, beautifully handcrafted fixture, explore the luxury collections at Willow Bath and Vanity. From elegant single vanities to spacious double setups, their masterfully built furniture combines solid wood construction with elite styling to transform any bathroom into a spa-like retreat.
Double Sink Vanities
Usually starting at 48 inches (120 cm) and extending up to 72 inches (180 cm) or more, double vanities are a lifesaver for shared master bathrooms. They allow two people to get ready simultaneously without fighting for sink space. Keep in mind that a double vanity naturally reduces both cabinet storage space and countertop real estate since a second sink basin and plumbing lines take up substantial interior room.
Sink Types to Consider
The countertop is the workhorse of the bathroom. It regularly comes into contact with running water, toothpaste, soapy residue, and high-heat styling tools. Knowing how to choose a bathroom vanity top requires evaluating how much maintenance you are willing to perform against the look you want to achieve. Material Pros Cons Maintenance Level Quartz Highly durable, non-porous, stain and scratch-resistant. Offers the look of stone without the hassle. Premium pricing; can show seams on very large custom layouts. Low (No sealing required) Marble Timeless, elegant, and luxurious. Every slab features a completely unique veining pattern. Porous; prone to scratching, etching from acids, and water stains. Requires careful daily use. High (Requires regular sealing) Granite Naturally strong, heat-resistant, and chemically stable. Unique earthy patterns. Porous; can chip if subjected to heavy impacts. Medium (Requires occasional sealing) When coordinating your countertop, ensure it complements your bathroom’s floor tiles, shower surround, and plumbing hardware to maintain visual harmony.
4. Selecting the Core Vanity Style and Finish
Once the functional components are locked in, you can focus on the architectural style of the vanity base. The base dictates the design theme of the entire room.
Conclusion
Choosing the perfect vanity is a step-by-step process that combines precise measurements with your personal design taste. By taking careful measurements, choosing between a single- or double-sink setup, and picking a durable counter material like quartz or granite, you can transform your bathroom into a beautiful, organized retreat. Prioritize high-quality materials and smart craftsmanship, and your new vanity will look spectacular and serve your household reliably for years to come.
1. Assessing the Layout and Space Constraints
Before you fall in love with a specific design or finish, you must determine what your bathroom can physically handle. Scale is everything. A vanity that is too large disrupts traffic flow, while one that is too small gets lost visually and lacks adequate storage.
- Take Precise Measurements: measure the available width, depth, and height. Remember to account for surrounding fixtures.
- Check Clearance Zones: ensure there is enough clearance for the bathroom door to swing open, for shower glass doors to clear the vanity, and for drawers and cabinet doors to extend fully without hitting the toilet or walls.
-
Locate Existing Plumbing: moving pipes can significantly increase renovation costs. If you want a seamless installation, look for a vanity configuration that aligns easily with your current plumbing setup.
The next major step is determining the scale of your plumbing fixtures. Understanding how to choose a bathroom sink and vanity setup comes down to a simple choice: single or double sinks. Your choice will depend on who uses the bathroom and the overall footprint of the space.
Single Sink Vanities
Typically ranging from 20 to 48 inches (50–120 cm) in width, single vanities are the ideal choice for powder rooms, guest bathrooms, or small master suites. For very compact spaces, you can find narrower options starting around 16 inches (40 cm). The major advantage of a single-sink layout is that it provides more usable countertop space for cosmetics, toiletries, and decorative items. If you want to skip the guesswork and invest in a premium, beautifully handcrafted fixture, explore the luxury collections at Willow Bath and Vanity. From elegant single vanities to spacious double setups, their masterfully built furniture combines solid wood construction with elite styling to transform any bathroom into a spa-like retreat.
Double Sink Vanities
Usually starting at 48 inches (120 cm) and extending up to 72 inches (180 cm) or more, double vanities are a lifesaver for shared master bathrooms. They allow two people to get ready simultaneously without fighting for sink space. Keep in mind that a double vanity naturally reduces both cabinet storage space and countertop real estate since a second sink basin and plumbing lines take up substantial interior room.
Sink Types to Consider
- Undermount: installed beneath the counter for a smooth, seamless surface that is incredibly easy to wipe down.
- Vessel: sits atop the counter like a decorative bowl. It makes a bold style statement but raises the overall height of the counter surface.
- Drop-In: features a lip that rests on the counter cutout. It is easier to install, but its edges can catch dirt.
-
The countertop is the workhorse of the bathroom. It regularly comes into contact with running water, toothpaste, soapy residue, and high-heat styling tools. Knowing how to choose a bathroom vanity top requires evaluating how much maintenance you are willing to perform against the look you want to achieve. Material Pros Cons Maintenance Level Quartz Highly durable, non-porous, stain and scratch-resistant. Offers the look of stone without the hassle. Premium pricing; can show seams on very large custom layouts. Low (No sealing required) Marble Timeless, elegant, and luxurious. Every slab features a completely unique veining pattern. Porous; prone to scratching, etching from acids, and water stains. Requires careful daily use. High (Requires regular sealing) Granite Naturally strong, heat-resistant, and chemically stable. Unique earthy patterns. Porous; can chip if subjected to heavy impacts. Medium (Requires occasional sealing) When coordinating your countertop, ensure it complements your bathroom’s floor tiles, shower surround, and plumbing hardware to maintain visual harmony.
4. Selecting the Core Vanity Style and Finish
Once the functional components are locked in, you can focus on the architectural style of the vanity base. The base dictates the design theme of the entire room.
- Freestanding vanities: sit directly on the floor, supported by legs or a solid kickboard base. This is a traditional, stable configuration that offers the maximum hidden cabinet and drawer storage space.
- Wall-Mounted (Floating) vanities: anchored directly onto the wall studs, leaving the floor underneath completely clear. Floating vanities are staples of modern, minimalist design. They create an illusion of space, making small rooms look larger, and make cleaning the bathroom floor incredibly easy.
- Console vanities: feature an open shelving design supported by a metal or wood frame. It offers a light, airy look reminiscent of a boutique hotel, though it sacrifices hidden storage.
Conclusion
Choosing the perfect vanity is a step-by-step process that combines precise measurements with your personal design taste. By taking careful measurements, choosing between a single- or double-sink setup, and picking a durable counter material like quartz or granite, you can transform your bathroom into a beautiful, organized retreat. Prioritize high-quality materials and smart craftsmanship, and your new vanity will look spectacular and serve your household reliably for years to come.


Sponsored
Sunbury, OH

J.Holderby - Renovations
Franklin County's Leading General Contractors - 2X Best of Houzz!

 Suzanne MacCrone Rogers
Renovation of a master bath suite, dressing room and laundry room in a log cabin farm house.
The laundry room has a fabulous white enamel and iron trough sink with double goose neck faucets - ideal for scrubbing dirty farmer's clothing. The cabinet and shelving were custom made using the reclaimed wood from the farm. A quartz counter for folding laundry is set above the washer and dryer. A ribbed glass panel was installed in the door to the laundry room, which was retrieved from a wood pile, so that the light from the room's window would flow through to the dressing room and vestibule, while still providing privacy between the spaces.
Interior Design & Photo ©Suzanne MacCrone Rogers
Architectural Design - Robert C. Beeland, AIA, NCARB

 Trimlite
Inspiration for a mid-sized contemporary porcelain tile and multicolored floor hallway remodel in Vancouver with beige walls

 MJS Designers Group
Whole house remodel by GAM Construction
Example of a small trendy gray one-story concrete exterior home design in Orlando
Example of a small trendy gray one-story concrete exterior home design in Orlando
27