
Search results for "Master proper" in Home Design Ideas
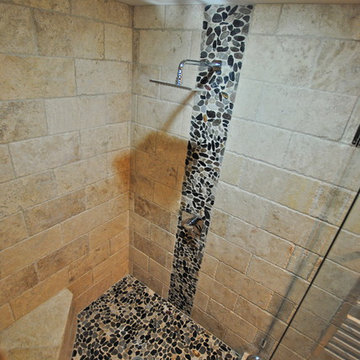
 Berry Design Build
At Berry Design Build, we're not always overly destructive tearing down an existing home to build another from the ground up, and boy are we glad! Each home carries so much unique history and this 1959 cozy one story is one of them. With just a few minor tweaks to the floor plan - we enlarged the kitchen, gave the dining room proper placement, updated the flooring, and furnished each room with modern finishes to bring each space new life!
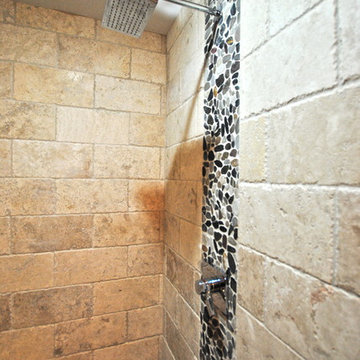 Berry Design Build
At Berry Design Build, we're not always overly destructive tearing down an existing home to build another from the ground up, and boy are we glad! Each home carries so much unique history and this 1959 cozy one story is one of them. With just a few minor tweaks to the floor plan - we enlarged the kitchen, gave the dining room proper placement, updated the flooring, and furnished each room with modern finishes to bring each space new life!

 Balestri Architects
This project provides a new two-story addition to an historic converted stable barn that was once associated with the 60-acre Hamilton Estate in Irvington, New York. The new design continues the unique language of the converted brick stable and Second Empire slate mansard roof.
The addition provides a proper kitchen to the ground floor. Large single-pane glass windows continue the existing architecture to maximize interior natural light and provide panoramic views of the adjacent Hudson River. The kitchen features reclaimed cherry custom cabinets, white marble countertops and new oak hardwood flooring.
On the second floor, the addition expands the master bedroom to include an ensuite bathroom and changing room. The second floor features reclaimed pine floors, and white Turkish marble bathroom tiles.
Find the right local pro for your project

 Masters of Design
This project was completed for a client who recently moved from a California mansion to a Georgia penthouse in order to be closer to family. It was a huge down size so it was important for our design team to help obtain that same grand appeal that the client was accustomed to, within a significantly smaller home. We created an open space plan that would allow for entertaining many guests at once. With proper scale in consideration, we chose to use large furniture that would make up the living room and dining space to reinforce that grand effect. Lending to this concept we hung drapery higher than the window frames and a bold ceiling fixture in order to compliment the height of the ceiling. Along with these accommodations we utilized the clients existing collection of eclectic wall art to fill the bare walls. In the end we were able to create a space that did not feel foreign to our client, but rather like home.

 Master Solution
Here are a few pictures from our job in Burnaby that we finished yesterday. The custom fences and four foot gate are now built. The ground level deck has been completed and looks terrific. For their existing upper deck, we have removed and re-installed the pavers and retaining wall "properly". The crew did a terrific job and we had fun doing it! If you have a project in mind, please give us a call at 778-389-3172 or visit our website https://mastersolution.ca to request a quote.
 G. Christianson Construction, Inc.
Our Master Cabinet Maker, Ron gave this soon-to-be woodshop owner a tour of our Cabinet Shop on Circle Blvd, explaining the dust collection system our Cabinet Shop uses and gave advice on how to set up a new dust collection system specific to this homeowner’s woodshop needs. Our Designer then helped the homeowner with space planning his equipment using our Design Software, to ensure he had enough room to maneuver around his equipment to use it properly. The result is an intentionally design system that allows this homeowner to work in record-time!

 CRES Builders Corp.
The Smith’s hired us to do several home improvement projects to the exterior of their house, which were inspired by two other homes in the neighborhood. To start, they were looking to add a front porch with a more prominent entrance, as well as a garage eyebrow. In addition, since they were also not happy with the color of their home’s stucco or brick, we were asked to design a new color palette which would utilize the new window color, while also reducing the focus of the stucco.
With that, since the homeowners were concerned about efficiency and making sure the house was properly maintained, they requested new windows, as well as new gutters, downspouts, and covers. Their siding was also an issue since a large portion of it had started to rot and since the rear sunroom and deck had sunk 4+ inches, structural issues were also a problem.
Our Process: In an effort to create the pleasing exterior that was requested, we reached out to an architectural team member who helped us envision a four color paint palette. We installed a rustic cedar porch post, craftsman-style shutters, and metal roof details for a very pleasing result.
As requested, we also installed all-new windows throughout the home and replaced their gutters, downspouts, and covers, as well as the siding that had rotted away.
Since their deck was improperly installed, we removed the old sun room and deck footings, and poured new ones. However, I was not comfortable fixing the issue without knowing the cause, so upon closer inspection, we discovered that water from the neighbor’s house, the driveway, and the Smith’s roof was causing drainage issues. To fix the problem, we installed two main underground drainage lines which would divert water away from the home. From there, we were able to bring both structures to level heights where they could be properly secured and as a finishing touch, we added new tile to the sunroom to give it a more rustic feel.
As a result of the drainage issues, a large section of the driveway had sunk as well, so we removed the concrete and poured it with proper underlayment, rebar, stronger concrete, and a proper pitch.
Extras: While working at the home, the owners asked us to install a new wood-burning fireplace, as well as a new front door and an exhaust fan in the master bathroom. In addition, since we overheard the homeowner say that they wanted to be able to park their car in the garage, we made a point to organize it for them so there was adequate space for a vehicle.
Result: The Smith’s had originally found us on Houzz.com and were incredibly pleased with our quality of work, as well as our ability to stay within their budget and stick to a set timeline. Not only did they give us an excellent review, but hugs were given upon our final goodbye as well. It was a great day.
Sponsored
Sunbury, OH

J.Holderby - Renovations
Franklin County's Leading General Contractors - 2X Best of Houzz!
 Become Interiors Ltd
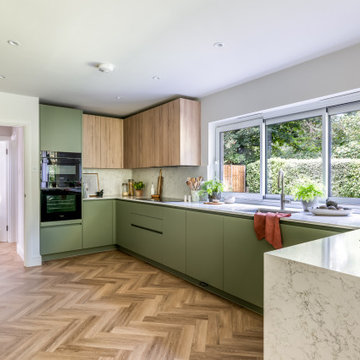
Here, I reworked the kitchen layout to improve flow, plus I moved the peninsula to create better sightlines and a distinct division between the kitchen and dining area. Every measurement, junction and finish was considered to ensure the layout worked or my clients and that using it felt effortless.
The result? A beautiful, nature inspired kitchen, with a home for everything - from the daily coffee station to integrated storage that hides the clutter. When a kitchen is designed properly, you don’t notice the planning – you just notice how easy life feels within it!

 Four Elements Construction
Clients were wanting to expand their 50's era semi-bungalow to a full two storey so they could add one more bedroom and bathroom to their second level. Part of the plan was to create an actual master suite with proper ensuite bathroom and walk-in closet space. Phase one took the project to drywall stage, but later we added phase two where we finished the rest of the second level to finish stage along with a complete refresh of the main level with new finishings including flooring and counter-tops. The exterior of the home was also re-done including new windows, doors, and siding plus roof shingles of course. The result was a great and expanded character bungalow in a very desirable area located close to downtown.

 Irene Designs
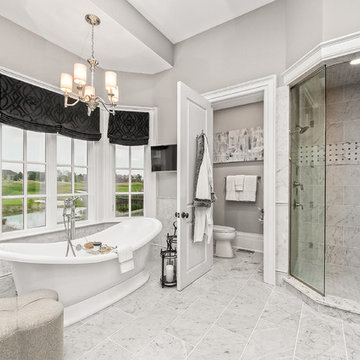
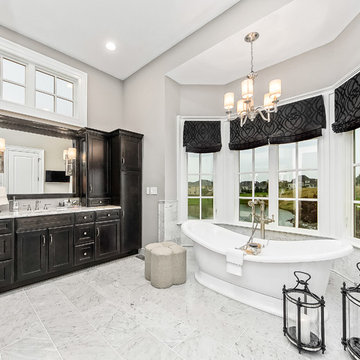
This dream bathroom has everything one can wish for an ideal bathroom escape. It doesn’t just look fabulous – it works well and it is built to stand the test of time.
This bathroom was designed as a private oasis, a place to relax and unwind. Spa-like environment is created by expansive double-sink custom vanity, an elegant free standing tub, and a spacious two-person barrier-free shower with a floating bench. Toilet is concealed within a separate nook behind a pocket door.
Main bathroom area is outlined by a tray ceiling perimeter. The room looks open, airy and spacious. Nothing interferes with the ceiling design and overall space configuration. It hasn’t always been that way. Former layout had serious pitfalls that made the room look much smaller. The shower concealed behind solid walls protruded into the main area clashing with the tray ceiling geometry. Massive shower stall took up significant amount of the room leaving no continuous wall space for a double sink vanity. There were two separate vanities with a dead corner space between them. At the same time, the toilet room was quite spacious with just one fixture in the far end.
New layout not only looks better, it allows for a better functionality and fully reveals the space potential. The toilet was relocated to occupy the former linen closet space slightly expanded into adjacent walk-in closet. Shower was moved into the bigger alcove, away from the tray ceiling area. It opened up the room while giving space for a gorgeous wall-to-wall vanity. Having a full glass wall, the shower extends the space even further. Sparkling glass creates no barrier to the eyesight. The room feels clean, breezy and extra spacious. Gorgeous frameless shower enclosure with glass-to-glass clamps and hinges shows off premium tile designs of the accent shower wall.
Free standing tub remained in its original place in front of the window. With no solid shower walls nearby, it became a focal point adorned with the new crystal chandelier above it. This two-tier gorgeous chandelier makes the bathroom feel incredibly grand. A touch of luxury is showing up in timeless polished chrome faucet finish selections as well.
New expansive custom vanity has his and her full height linen towers, his and her sink cabinets with two individual banks of drawers on the sides and one shared drawer cabinet in the middle containing a charging station in the upper drawer.
Vanity counter tops and floating shower seat top are made of high-end quartz.
Vessel sinks resemble the shape and style of the free-standing tub.
To make the room feel even more spacious and to showcase the shower area in the reflection, a full size mirror is installed over the vanity. Crystal sconces are installed directly into the mirror.
Crisp classic white tile gives the room a timeless sense of polish and luxury. Walls around the perimeter of the entire bathroom are tiled half way. Three rows of 12”x 24” porcelain tile resembling white marble are crowned with a thin row of intricate glass tiles with marble accents, and a chair rail tile.
Tile design flows into a spacious barrier-free two-person walk-in shower. Two more tile patterns of the same tile collection are brought into play. Rear wall is adorned with a picture frame made out of 12”x12” tiles laid at 45 degree angle within the same chair rail and glass tile border. Shower floor is made of small hexagon tiles for proper drainage.
Shower area has two hidden from plain sight niches to contain shampoo bottles and toiletries. The rear side of the niches is made of glass mosaics for a waterfall effect.
To showcase the picture frame inside the shower, the accent shower wall is washed with cascading light from a discrete LED strip tucked in a cove behind “floating” shower ceiling platform.
Multiple shower heads (two ceiling-mount rain heads, one multi-functional wall mount shower head, and a handheld shower) are able to provide a fully customizable shower experience.
Despite of many hard surfaces and shiny finishes, which can sometimes lead to a cold impersonal feeling, this bathroom is cozy and truly welcoming. This sense of warms is maintained by exclusive multi-functional layered lighting. Carefully designed groups of lights (all having a dimmer control) can be used simultaneously, in various combinations, or separately to create numerous different effects and perfect atmosphere for every mood and occasion. Some lights have smart controls and can be operated remotely.
Amazing effect can be achieved by dimmable toe kick perimeter lighting. With the ceiling lights turned off, the vanity looks as if it is floating in the air. Multifaceted crystal fixtures produce cascades of sparkling rainbow reflections dancing around the room and creating an illusion of a starry sky.
Programmable radiant heating floor offers additional warmth and comfort to the room.
This bathroom is well suited for either a quick morning shower or a night in for ultimate relaxation with a champagne toast and a long soak in the freestanding tub.
 Sissela Malmstrom Architect
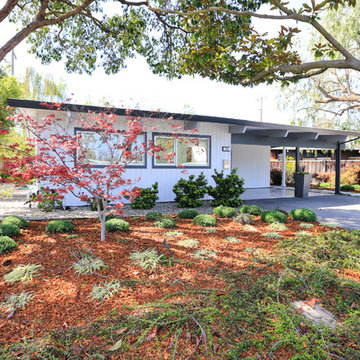
View of front of house
Home design - modern home design idea in San Francisco
Home design - modern home design idea in San Francisco

 Made To Last Custom Homes Ltd.
The Made to Last team kept much of the existing footprint and original feel of the cabin while implementing the new elements these clients wanted. To expand the outdoor space, they installed a composite wrap-around deck with picture frame installation, built to last a lifetime. Inside, no opportunity was lost to add additional storage space, including a pantry and hidden shelving throughout.
Finally, by adding a two-story addition on the back of the existing A-frame, they were able to create a better kitchen layout, a welcoming entranceway with a proper porch, and larger windows to provide plenty of natural light and views of the ocean and rugged Thetis Island scenery. There is a guest room and bathroom towards the back of the A-frame. The master suite of this home is located in the upper loft and includes an ensuite and additional upstairs living space.
 Made To Last Custom Homes Ltd.
The Made to Last team kept much of the existing footprint and original feel of the cabin while implementing the new elements these clients wanted. To expand the outdoor space, they installed a composite wrap-around deck with picture frame installation, built to last a lifetime. Inside, no opportunity was lost to add additional storage space, including a pantry and hidden shelving throughout.
Finally, by adding a two-story addition on the back of the existing A-frame, they were able to create a better kitchen layout, a welcoming entranceway with a proper porch, and larger windows to provide plenty of natural light and views of the ocean and rugged Thetis Island scenery. There is a guest room and bathroom towards the back of the A-frame. The master suite of this home is located in the upper loft and includes an ensuite and additional upstairs living space.
Sponsored
Sunbury, OH
J.Holderby - Renovations
Franklin County's Leading General Contractors - 2X Best of Houzz!
 Made To Last Custom Homes Ltd.
The Made to Last team kept much of the existing footprint and original feel of the cabin while implementing the new elements these clients wanted. To expand the outdoor space, they installed a composite wrap-around deck with picture frame installation, built to last a lifetime. Inside, no opportunity was lost to add additional storage space, including a pantry and hidden shelving throughout.
Finally, by adding a two-story addition on the back of the existing A-frame, they were able to create a better kitchen layout, a welcoming entranceway with a proper porch, and larger windows to provide plenty of natural light and views of the ocean and rugged Thetis Island scenery. There is a guest room and bathroom towards the back of the A-frame. The master suite of this home is located in the upper loft and includes an ensuite and additional upstairs living space.
 Made To Last Custom Homes Ltd.
The Made to Last team kept much of the existing footprint and original feel of the cabin while implementing the new elements these clients wanted. To expand the outdoor space, they installed a composite wrap-around deck with picture frame installation, built to last a lifetime. Inside, no opportunity was lost to add additional storage space, including a pantry and hidden shelving throughout.
Finally, by adding a two-story addition on the back of the existing A-frame, they were able to create a better kitchen layout, a welcoming entranceway with a proper porch, and larger windows to provide plenty of natural light and views of the ocean and rugged Thetis Island scenery. There is a guest room and bathroom towards the back of the A-frame. The master suite of this home is located in the upper loft and includes an ensuite and additional upstairs living space.

 TOC design & construction inc.
DESIGNED BY TOC design
CONSTRUCTION BY TOC design & Construction inc.
PHOTOS BY : Tania Scardellato
I was fortunate to have a young family approach me in desperate need to renovate there only 3 piece bathroom. This space was In dire need of a remodel, with old brown wall to wall tiles and a dated bulky yellow brown single sink vanity.
Storage was a must, lighting a necessity, and proper accessibility to the shower bath area.
We had a tight budget to respect, but a full gut of this bathroom was required. And a good thing too, once we started doing the demolition we noticed that mildew and rotting floors and walls had accumulated throughout the years. Doing it right the first time is no joke when dealing with water and electrical issues.
We discarded all reminisce of old and built from scratch, new walls, new plumbing, new electrical ,new insulation and a new window, a new fan that actually exhausted outside ( I say this laughing as you would be amazed at how many fans are installed but don’t exhaust outside, and you the client would never know unless you go inside the attic space.
Once all the hard stuff was done, the rest is just a matter of smart design. If you have a small bathroom here are some tips to guide you.
10 tips for making a small bathroom feel larger
Is your tiny bathroom cramping your functionality and style, leaving you longing for the enormous bathrooms gracing the pages of design magazines? Even if your bathroom is a fraction of the size, all it takes is some design savvy to make the most of the space you have. Consider these 10 smart tips that will help your bathroom look, feel and function like those larger contenders.
1-Get creative with corners
Space is at a premium in small bathrooms, so it's important to maximize every inch. Corners, for example, provide extra space for shelving, storage units and even hooks. Get creative and install unique design solutions that are not only functional, but also eye-catching. If you love the airiness of floating cabinets, add baskets or decorative boxes under for extra storage. If you are installing floating cabinets insure that they are installed securely to studs or plywood at wall.
2- Let solid colors shine
Busy patterns have a shrinking effect and make small bathrooms seem even smaller. Conversely, light natural hues make a space feel more open. If you're itching to get creative with design, experiment with textures but keep overpowering patterns to a minimum. Tone on tone is the best to achieve this.
3 - Maximize your bathtub
A bathtub takes up a significant portion of the room, but modern, compact options with curved basins, can make the tub feel larger when in use, all while conserving space.
4 - Select a smaller faucet
A faucet is jewelry for the bathroom. And just as accessories can overpower an outfit, a big bulky faucet isn't flattering in a small bath. Single-handle designs conserve counter space, while a wall-mount installation frees it up all together and can create quite the wow-factor, if the budget can accommodate the required changes to plumbing behind the wall.
5 - Make vanity storage simple
If you're in a storage war with your small bathroom, you're not alone in the battle. Toiletries and personal supplies without a place to call home only add clutter and chaos. Store smart with a space-saving vanity, the dual sink vanity shown here, looks quite simple, but in reality it has 4 sets of full extension drawers, and the vanity tower adds extra storage without overpowering the use of space.
6 - Show off the shower
Shower curtains may be pretty, but they interrupt the visual flow of a bathing space and make it feel significantly smaller. In bathrooms with small footprints, opt for a clear glass sliding shower door that doesn't require the clearance of one with a hinged design. Or as shown in this design and for fraction less expensive a half hinged panel installed on a fixed tempered glass panel. If you're embarking on a big remodel, create the illusion of more space by using same tile in the shower that's used throughout; instead of seeing them as two separate zones, the eye will read them as one.
7 - Discover the treasure of hidden storage
Work with a contractor, and you just might find some serious storage potential hidden behind your walls. Whether it's utilizing space between the studs for shallow shelving or a creating a small linen closet by annexing space from an adjacent room, even small additions can make a big difference.
8 - Focal Point
Tile is a beautiful, durable addition to any bathroom. For dainty spaces, consider installing tile at a diagonal to accentuate the focal point or as in this bathroom I used an oversized textured pattern to bring depth to the space at the window wall.
9 - Choose the right lights
Strategically install light to reflect and brighten a small bathroom to make it appear larger. Recessed lighting is an affordable solution for tiny rooms, offering ample light while taking up little space. Wall sconces alongside a mirror also reflect off the walls and make a room feel bright and airy. I always recommend going with LED lighting at 2800 to 3000K.
10 – Accessorize
This is your time to shine in your decorating skills, have fun with your towels, you can change the color scheme daily just by adding pops of color in your accessories, make sure to get items that serve a dual purpose, like baskets, boxes they can always be used as hampers, storing of towels and even a nice display for your guest.

 Quail Homes
Photo Credit to RE-Pdx Photography of Portland Oregon
Walk-in shower - large craftsman master walk-in shower idea in Portland with beige walls
Walk-in shower - large craftsman master walk-in shower idea in Portland with beige walls

 Made To Last Custom Homes Ltd.
The Made to Last team kept much of the existing footprint and original feel of the cabin while implementing the new elements these clients wanted. To expand the outdoor space, they installed a composite wrap-around deck with picture frame installation, built to last a lifetime. Inside, no opportunity was lost to add additional storage space, including a pantry and hidden shelving throughout.
Finally, by adding a two-story addition on the back of the existing A-frame, they were able to create a better kitchen layout, a welcoming entranceway with a proper porch, and larger windows to provide plenty of natural light and views of the ocean and rugged Thetis Island scenery. There is a guest room and bathroom towards the back of the A-frame. The master suite of this home is located in the upper loft and includes an ensuite and additional upstairs living space.
 Four Elements Construction
Clients were wanting to expand their 50's era semi-bungalow to a full two storey so they could add one more bedroom and bathroom to their second level. Part of the plan was to create an actual master suite with proper ensuite bathroom and walk-in closet space. Phase one took the project to drywall stage, but later we added phase two where we finished the rest of the second level to finish stage along with a complete refresh of the main level with new finishings including flooring and counter-tops. The exterior of the home was also re-done including new windows, doors, and siding plus roof shingles of course. The result was a great and expanded character bungalow in a very desirable area located close to downtown.
 Four Elements Construction
Clients were wanting to expand their 50's era semi-bungalow to a full two storey so they could add one more bedroom and bathroom to their second level. Part of the plan was to create an actual master suite with proper ensuite bathroom and walk-in closet space. Phase one took the project to drywall stage, but later we added phase two where we finished the rest of the second level to finish stage along with a complete refresh of the main level with new finishings including flooring and counter-tops. The exterior of the home was also re-done including new windows, doors, and siding plus roof shingles of course. The result was a great and expanded character bungalow in a very desirable area located close to downtown.
37