
Search results for "Meet require" in Home Design Ideas
 Think Outside Gardens
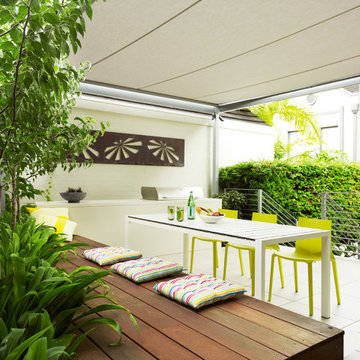
This inner-city garden was designed to meet the needs of a young family who like to entertain but still required solutions for storage and off street parking. Key to the design was connecting the two different areas of the lower courtyard with the upper carstand area. A solution was obtained through constructing an intermediate landing with built in seating and a new gas BBQ. An open style steel balustrade allows for safety between the two areas and visually takes full advantage of the depth of the property. All-weather protection provided by retractable awnings to both upper and lower areas ensures year round enjoyment. Sliding doors in the garage help the generous storage recede into the design.
Spotted gum hardwood timber decking extends the internal areas outside and the wrap around steps further connect the spaces by providing an inviting entry to the BBQ area. A large floating timber bench seat is both practical and breaks up the large retaining wall to the upper carport.
A grey and white colour palette provides a sophisticated look whilst highlighting punctuations of playful colour and contemporary styling to link the children’s play areas with the home.
 Vintage Cellars & Saunas
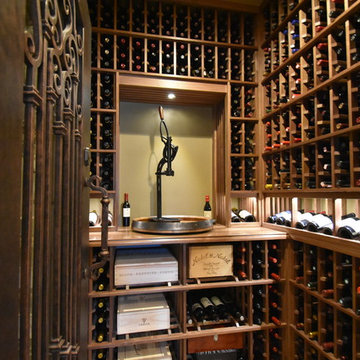
This homeowner had extensive collections of both high end wines and bourbon. Wine and bourbon require completely different storage solutions, so naturally, two unique and completely separate rooms were created to showcase them both. The homeowners were fantastic in meeting with our team to collaborate on a bourbon room and wine cellar design that worked within their special spaces and budget.
The House itself has a rustic, yet refined and modern farmhouse feel throughout. The modern, elegant, yet vintage style look of the small wine cellar, especially, fit seamlessly with the interior design.
The Bourbon cellar is not cooled, but resides in a shaded interior section within the house as to maintain a constant temperature. Additionally, with close proximity to the Pacific Ocean, sunny Ladera Ranch, a community in Orange County, California never really sees average temperatures above 80 Degrees.
The Bourbon Room showcases a custom wrought iron door, and upon entering features a modular style show cabinet with multiple levels. Custom wine cellar doors, and custom wrought iron doors truly add that special feeling and look to your walk in wine room. A door used for a wine room would be fitted with dual pane glass as to better maintain temperature and humidity within. A room such as this could also double as craft beer storage. Beer storage, requires bottles to stand straight up as to not rust the cap, as well as compress any remaining yeast residues at the bottom of the bottle instead of mixed throughout. Craft beer as a whole has become an incredibly burgeoning industry, especially in places like San Diego, Orange County, Los Angeles, and San Francisco in California, and Portland in Oregon.
The small wine cellar / wine closet / wine room is located right off the kitchen, allowing easy access for social gatherings or just to bring out that special wine with dinner. This small walk in wine cellar incorporates a custom wrought iron door as well, fitted with glass as discussed prior.
The wine room has one solid wall of individual bottle storage, leading into the showcase wall with room for case storage and more individual bottle storage above the countertop and decanting area. The homeowner also shows a rogar wine bottle opener - a rustic, yet timeless contemporary style that's here to stay in wine rooms, wine closets, and large custom wine cellars throughout the US.
Vintage Cellars has built gorgeous custom wine cellars and wine storage rooms across the United States and World for over 25 years. We are your go-to business for anything wine cellar and wine storage related! Whether you're interested in a wine closet, wine racking, custom wine racks, a custom wine cellar door, or a cooling system for your existing space, Vintage Cellars has you covered!
We carry all kinds of wine cellar cooling and refrigeration systems, incuding: Breezaire, CellarCool, WhisperKool, Wine Guardian, CellarPro and Commercial systems.
We also carry many types of Wine Refrigerators, Wine Cabinets, and wine racking types, including La Cache, Marvel, N'Finity, Transtherm, Vinotheque, Vintage Series, Credenza, Walk in wine rooms, Climadiff, Riedel, Fontenay, and VintageView.
Vintage Cellars also does work in many styles, including Contemporary and Modern, Rustic, Farmhouse, Traditional, Craftsman, Industrial, Mediterranean, Mid-Century, Industrial and Eclectic.
Some locations we cover often include: San Diego, Rancho Santa Fe, Corona Del Mar, Del Mar, La Jolla, Newport Beach, Newport Coast, Huntington Beach, Del Mar, Solana Beach, Carlsbad, Orange County, Beverly Hills, Malibu, Pacific Palisades, Santa Monica, Bel Air, Los Angeles, Encinitas, Cardiff, Coronado, Manhattan Beach, Palos Verdes, San Marino, Ladera Heights, Santa Monica, Brentwood, Westwood, Hancock Park, Laguna Beach, Crystal Cove, Laguna Niguel, Torrey Pines, Thousand Oaks, Coto De Caza, Coronado Island, San Francisco, Danville, Walnut Creek, Marin, Tiburon, Hillsborough, Berkeley, Oakland, Napa, Sonoma, Agoura Hills, Hollywood Hills, Laurel Canyon, Sausalito, Mill Valley, San Rafael, Piedmont, Paso Robles, Carmel, Pebble Beach
Contact Vintage Cellars today with any of your Wine Cellar needs!
(800) 876-8789
Vintage Cellars
904 Rancheros Drive
San Marcos, California 92069
(800) 876-8789
 Jackson Design Build
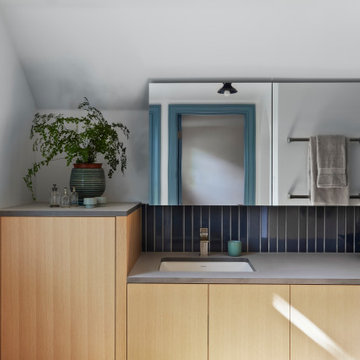
Inspiration for a master light wood floor and single-sink bathroom remodel in Seattle with flat-panel cabinets, light wood cabinets, gray countertops and a floating vanity
Find the right local pro for your project
 Astria Fireplaces
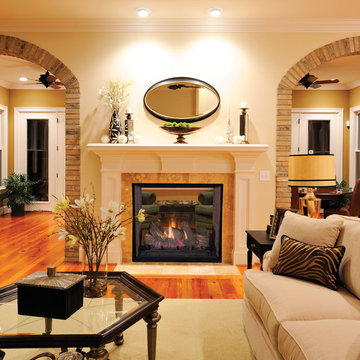
With its expansive two-sided opening and stunningly realistic fire presentation, the Montebello See-Through provides a harmonious flow from one space to another, inside or outside the home. The Montebello See-Through is available in a 40" size, and comes standard with high-definition logs, ceramic ember bed burner, log grate, wire mesh pull screens and the Total Comfort Control™System.
Aesthetics
Smooth-faced design features ceramic glass for optimum heat transfer.
Dramatic louverless construction gives the fireplace a clean, traditional masonry look and provides the ability to finish right up to the opening.
Tall ceramic-glass opening provides an exceptional view of the logs and flame.
The high-definition charred split-oak log set is cast from real wood for an authentic look.
Platinum embers enhance the glow of the fire.
Light- and dark-tinted outdoor kits trimmed in stainless steel are available for indoor/outdoor application. The dark-tinted version provides enhanced ambiance from inside the room by creating an infinity effect while reducing glare from the outside environment.
Comfort
Exclusive Secure Vent™ chimney system provides efficient venting.
Rated 68% in annual fuel utilization efficiency (AFUE).
Ease of Operation
Total Comfort Control™ features a full-function remote control with thermostatic function, six flame settings, standard pilot override capability and smart mode which modulates flame to maintain desired room temperature.
Gas controls are conveniently located to the side of the fireplace opening for easy installation and operation.
An adjustable air shutter is included in the burner which allows you to raise or lower flame height to desired levels.
Design Versatility
A required choice of six liners available in Architectural Stone, Venetian Tile, Buff Rustic, Buff Herringbone, Black Rustic, and Black Porcelain.
Optional andirons evoke the look of a traditional hearth, in Mission and Classic styles.
Decorative freestanding screens in a variety of designs are available.
Available in power-vented versions which can vent up to 110 ft.
Can be installed as an indoor/indoor unit or as an indoor/outdoor unit with the addition of an outdoor kit.
This fireplace meets all 2015 ANSI barrier requirements.
 OMNIA Group Architects
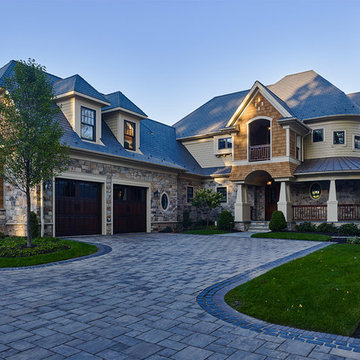
Perched above the beautiful Delaware River in the historic village of New Hope, Bucks County, Pennsylvania sits this magnificent custom home designed by OMNIA Group Architects. According to Partner, Brian Mann,"This riverside property required a nuanced approach so that it could at once be both a part of this eclectic village streetscape and take advantage of the spectacular waterfront setting." Further complicating the study, the lot was narrow, it resides in the floodplain and the program required the Master Suite to be on the main level. To meet these demands, OMNIA dispensed with conventional historicist styles and created an open plan blended with traditional forms punctuated by vast rows of glass windows and doors to bring in the panoramic views of Lambertville, the bridge, the wooded opposite bank and the river. Mann adds, "Because I too live along the river, I have a special respect for its ever changing beauty - and I appreciate that riverfront structures have a responsibility to enhance the views from those on the water." Hence the riverside facade is as beautiful as the street facade. A sweeping front porch integrates the entry with the vibrant pedestrian streetscape. Low garden walls enclose a beautifully landscaped courtyard defining private space without turning its back on the street. Once inside, the natural setting explodes into view across the back of each of the main living spaces. For a home with so few walls, spaces feel surprisingly intimate and well defined. The foyer is elegant and features a free flowing curved stair that rises in a turret like enclosure dotted with windows that follow the ascending stairs like a sculpture. "Using changes in ceiling height, finish materials and lighting, we were able to define spaces without boxing spaces in" says Mann adding, "the dynamic horizontality of the river is echoed along the axis of the living space; the natural movement from kitchen to dining to living rooms following the current of the river." Service elements are concentrated along the front to create a visual and noise barrier from the street and buttress a calm hall that leads to the Master Suite. The master bedroom shares the views of the river, while the bath and closet program are set up for pure luxuriating. The second floor features a common loft area with a large balcony overlooking the water. Two children's suites flank the loft - each with their own exquisitely crafted baths and closets. Continuing the balance between street and river, an open air bell-tower sits above the entry porch to bring life and light to the street. Outdoor living was part of the program from the start. A covered porch with outdoor kitchen and dining and lounge area and a fireplace brings 3-season living to the river. And a lovely curved patio lounge surrounded by grand landscaping by LDG finishes the experience. OMNIA was able to bring their design talents to the finish materials too including cabinetry, lighting, fixtures, colors and furniture.
 Metropolis Drafting and Construction Inc
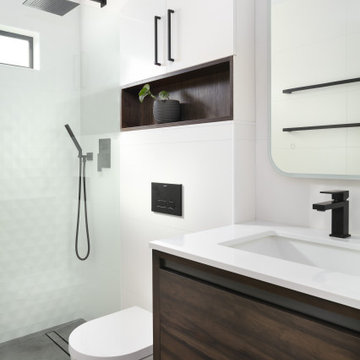
A European modern interpretation to a standard 8'x5' bathroom with a touch of mid-century color scheme for warmth.
large format porcelain tile (72x30) was used both for the walls and for the floor.
A 3D tile was used for the center wall for accent / focal point.
Wall mounted toilet were used to save space.
The in-wall toilet system framing enclosure was extruded out 6" allowing a wonderful opportunity to build a custom-made cabinet and an open square shelf.
The shower is curb less, so the entire bathroom floor was waterproofed.
Large format tile shower floor required a custom cut to allow correct water sloping.
 The Legacy Paver Group
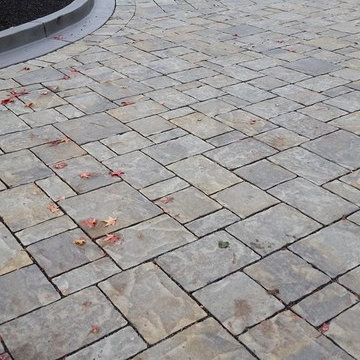
To meet City requirements, we installed pavers over a permeable base
Installation by The Legacy Paver Group
Design by Michele Badal and Hayley Johnson, LPG
Sponsored
Sunbury, OH

J.Holderby - Renovations
Franklin County's Leading General Contractors - 2X Best of Houzz!
 Rick O's Construction and Remodeling
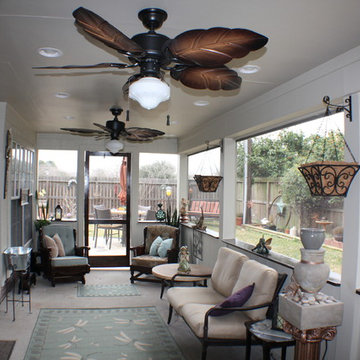
Sunroom - mid-sized traditional concrete floor sunroom idea in Houston with a standard ceiling
 Amazing Spaces
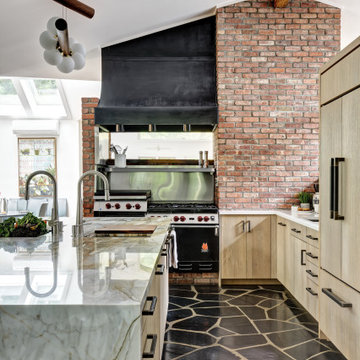
This is a great house. Perched high on a private, heavily wooded site, it has a rustic contemporary aesthetic. Vaulted ceilings, sky lights, large windows and natural materials punctuate the main spaces. The existing large format mosaic slate floor grabs your attention upon entering the home extending throughout the foyer, kitchen, and family room.
Specific requirements included a larger island with workspace for each of the homeowners featuring a homemade pasta station which requires small appliances on lift-up mechanisms as well as a custom-designed pasta drying rack. Both chefs wanted their own prep sink on the island complete with a garbage “shoot” which we concealed below sliding cutting boards. A second and overwhelming requirement was storage for a large collection of dishes, serving platters, specialty utensils, cooking equipment and such. To meet those needs we took the opportunity to get creative with storage: sliding doors were designed for a coffee station adjacent to the main sink; hid the steam oven, microwave and toaster oven within a stainless steel niche hidden behind pantry doors; added a narrow base cabinet adjacent to the range for their large spice collection; concealed a small broom closet behind the refrigerator; and filled the only available wall with full-height storage complete with a small niche for charging phones and organizing mail. We added 48” high base cabinets behind the main sink to function as a bar/buffet counter as well as overflow for kitchen items.
The client’s existing vintage commercial grade Wolf stove and hood commands attention with a tall backdrop of exposed brick from the fireplace in the adjacent living room. We loved the rustic appeal of the brick along with the existing wood beams, and complimented those elements with wired brushed white oak cabinets. The grayish stain ties in the floor color while the slab door style brings a modern element to the space. We lightened the color scheme with a mix of white marble and quartz countertops. The waterfall countertop adjacent to the dining table shows off the amazing veining of the marble while adding contrast to the floor. Special materials are used throughout, featured on the textured leather-wrapped pantry doors, patina zinc bar countertop, and hand-stitched leather cabinet hardware. We took advantage of the tall ceilings by adding two walnut linear pendants over the island that create a sculptural effect and coordinated them with the new dining pendant and three wall sconces on the beam over the main sink.
 Allen Ross Architecture, LLC
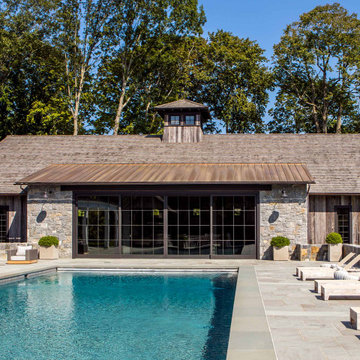
Allen Ross Architecture was hired to design a new retreat center that includes a multi-purpose Party Barn with a 3/4 basketball court, guest house, pool, sports field, tennis court, adventure course, outdoor kitchen, and changing cabana. Careful thought was given to the component relationships and how one moves through the site. Elements were configured to address function, aesthetics, security, and safety. Code mandated pool enclosure requirements were met without blocking views and without enclosure fencing.
Adjacent wetlands, storm water management requirements, and multiple zoning limitations necessitated thoughtful permitting applications. Zoning Board of Appeals and Planning Board approvals were required. Extensive infrastructure improvements and property grading were needed to meet the regulatory and client program requirements.
The design intent was a crisp transitional style that is sympathetic with the Georgian buildings located elsewhere on the site. Timber trusses support the guest house roof and steel moment frames support the barn roof.
 Better Builders
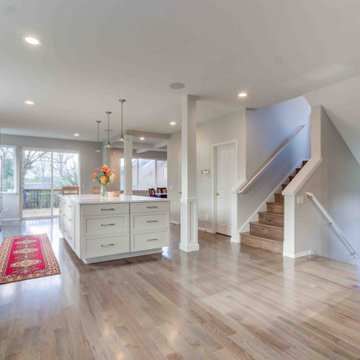
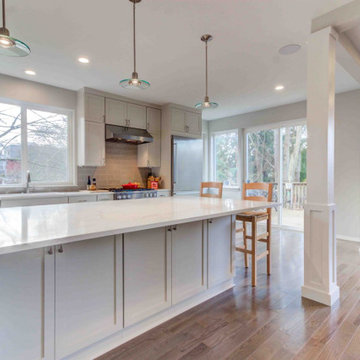
These clients enjoy cooking and entertaining, so their vision was to open and connect three separate rooms—the kitchen, sitting, and formal dining rooms—to create a single open and modern space where everyone could engage and participate in the activities.
Opening these spaces required complex structural engineering. The wall removals required supporting the loads from the second floor and meeting the engineering requirements for shear wall and lateral support. These beams and their connections to the posts they sit on were a challenge to install because of the complex nature of the home's original framed. All these loads had to be carried through the finished basement below and rest on new footings below the basement floor.
The center kitchen island was expansive, with a single slab countertop that would provide both workspace and counter seating. This slab, at 64x120 and 789 lbs., required careful planning for on-site labor, transfer routing, and precision installation. Natural daylight now floods the space from all directions. Recessed can lighting runs throughout the space, all on dimmers for maximum control of ambiance.
The Better Builders design team guided the selection of hardwoods, staircase details, cabinetry, countertops, tile, and color. The muted palette and clean lines work well with our couple’s eclectic furnishings and artworks. Now, traffic and activities flow better, and every inch of the previously divided space is utilized and enjoyed. The outcome is exactly as our homeowners envisioned…and as we intended.
 Better Builders
These clients enjoy cooking and entertaining, so their vision was to open and connect three separate rooms—the kitchen, sitting, and formal dining rooms—to create a single open and modern space where everyone could engage and participate in the activities.
Opening these spaces required complex structural engineering. The wall removals required supporting the loads from the second floor and meeting the engineering requirements for shear wall and lateral support. These beams and their connections to the posts they sit on were a challenge to install because of the complex nature of the home's original framed. All these loads had to be carried through the finished basement below and rest on new footings below the basement floor.
The center kitchen island was expansive, with a single slab countertop that would provide both workspace and counter seating. This slab, at 64x120 and 789 lbs., required careful planning for on-site labor, transfer routing, and precision installation. Natural daylight now floods the space from all directions. Recessed can lighting runs throughout the space, all on dimmers for maximum control of ambiance.
The Better Builders design team guided the selection of hardwoods, staircase details, cabinetry, countertops, tile, and color. The muted palette and clean lines work well with our couple’s eclectic furnishings and artworks. Now, traffic and activities flow better, and every inch of the previously divided space is utilized and enjoyed. The outcome is exactly as our homeowners envisioned…and as we intended.
 Allen Ross Architecture, LLC
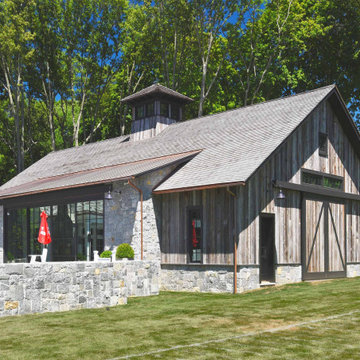
Allen Ross Architecture was hired to design a new retreat center that includes a multi-purpose Party Barn with a 3/4 basketball court, guest house, pool, sports field, tennis court, adventure course, outdoor kitchen, and changing cabana. Careful thought was given to the component relationships and how one moves through the site. Elements were configured to address function, aesthetics, security, and safety. Code mandated pool enclosure requirements were met without blocking views and without enclosure fencing.
Adjacent wetlands, storm water management requirements, and multiple zoning limitations necessitated thoughtful permitting applications. Zoning Board of Appeals and Planning Board approvals were required. Extensive infrastructure improvements and property grading were needed to meet the regulatory and client program requirements.
The design intent was a crisp transitional style that is sympathetic with the Georgian buildings located elsewhere on the site. Timber trusses support the guest house roof and steel moment frames support the barn roof.
Sponsored
Sunbury, OH
J.Holderby - Renovations
Franklin County's Leading General Contractors - 2X Best of Houzz!
 Better Builders
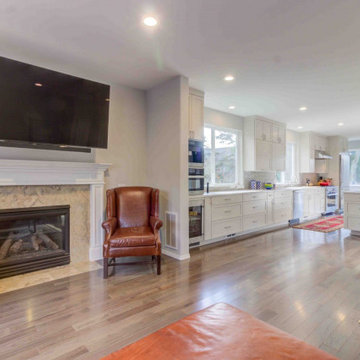
These clients enjoy cooking and entertaining, so their vision was to open and connect three separate rooms—the kitchen, sitting, and formal dining rooms—to create a single open and modern space where everyone could engage and participate in the activities.
Opening these spaces required complex structural engineering. The wall removals required supporting the loads from the second floor and meeting the engineering requirements for shear wall and lateral support. These beams and their connections to the posts they sit on were a challenge to install because of the complex nature of the home's original framed. All these loads had to be carried through the finished basement below and rest on new footings below the basement floor.
The center kitchen island was expansive, with a single slab countertop that would provide both workspace and counter seating. This slab, at 64x120 and 789 lbs., required careful planning for on-site labor, transfer routing, and precision installation. Natural daylight now floods the space from all directions. Recessed can lighting runs throughout the space, all on dimmers for maximum control of ambiance.
The Better Builders design team guided the selection of hardwoods, staircase details, cabinetry, countertops, tile, and color. The muted palette and clean lines work well with our couple’s eclectic furnishings and artworks. Now, traffic and activities flow better, and every inch of the previously divided space is utilized and enjoyed. The outcome is exactly as our homeowners envisioned…and as we intended.

 Talon Construction Inc.
Designing and building a kitchen addition is a complex process that involves multiple steps and considerations. Here is a general outline to help you get started on your kitchen addition project:
Define Your Goals and Budget:
• Determine the purpose of the kitchen addition. Is it for more cooking space, a dining area, or a combination of both?
• Establish a realistic budget for your project. Consider all costs, including construction, permits, materials, and furnishings.
Hire a Design Professional:
• Seek the services of a design build company who specializes in kitchen additions.
• Discuss your vision, needs, and budget with the design professional to create a design concept.
Site Evaluation:
• Assess the existing space and structural condition of your home to ensure it can support the addition.
• Consider factors like zoning regulations, setbacks, and building codes.
Design Development:
• Collaborate with your design professional to refine the concept, including the layout, size, and architectural style.
• Choose materials, finishes, and fixtures that fit your design and budget.
Obtain Permits:
• Consult with your local design build contractor to determine the necessary permits and approvals.
• Prepare and submit all required documents, including architectural drawings and engineering plans.
Create Construction Documents:
• Work with your design build professional to develop detailed construction drawings and specifications.
• These documents will serve as a guide for contractors during construction.
Hire a design build contractor:
• Check references, credentials, and licenses before selecting a contractor.
• Sign a detailed contract that outlines the scope of work, timeline, and payment schedule.
Construction Phase:
• Demolition: If needed, remove any existing structures or walls.
• Foundation: Construct the foundation for the addition.
• Framing: Build the structural framework of the addition.
• Plumbing, Electrical, and HVAC: Install or update utilities as required.
• Insulation: Ensure proper insulation for energy efficiency.
• Drywall and Finish Work: Complete the walls and ceilings.
• Flooring and Cabinetry: Install flooring and kitchen cabinets.
• Appliances and Fixtures: Add appliances, plumbing fixtures, and lighting.
• Paint and Finish: Apply paint and finishes to achieve the desired look.
• Final Inspection: Schedule inspections to ensure compliance with building codes.
Final Inspections and Approvals:
• Arrange for final inspections to ensure the addition meets all safety and code requirements.
• Obtain any necessary certificates of occupancy or compliance.
Move In and Enjoy:
• Once all inspections and approvals are received, you can move into your new kitchen addition and start enjoying it.
Remember that every kitchen addition project is unique, so adapt this outline to your specific needs and circumstances. Consulting with professionals and obtaining the required permits and inspections is crucial to a successful and safe project.
 Talon Construction Inc.
Designing and building a kitchen addition is a complex process that involves multiple steps and considerations. Here is a general outline to help you get started on your kitchen addition project:
Define Your Goals and Budget:
• Determine the purpose of the kitchen addition. Is it for more cooking space, a dining area, or a combination of both?
• Establish a realistic budget for your project. Consider all costs, including construction, permits, materials, and furnishings.
Hire a Design Professional:
• Seek the services of a design build company who specializes in kitchen additions.
• Discuss your vision, needs, and budget with the design professional to create a design concept.
Site Evaluation:
• Assess the existing space and structural condition of your home to ensure it can support the addition.
• Consider factors like zoning regulations, setbacks, and building codes.
Design Development:
• Collaborate with your design professional to refine the concept, including the layout, size, and architectural style.
• Choose materials, finishes, and fixtures that fit your design and budget.
Obtain Permits:
• Consult with your local design build contractor to determine the necessary permits and approvals.
• Prepare and submit all required documents, including architectural drawings and engineering plans.
Create Construction Documents:
• Work with your design build professional to develop detailed construction drawings and specifications.
• These documents will serve as a guide for contractors during construction.
Hire a design build contractor:
• Check references, credentials, and licenses before selecting a contractor.
• Sign a detailed contract that outlines the scope of work, timeline, and payment schedule.
Construction Phase:
• Demolition: If needed, remove any existing structures or walls.
• Foundation: Construct the foundation for the addition.
• Framing: Build the structural framework of the addition.
• Plumbing, Electrical, and HVAC: Install or update utilities as required.
• Insulation: Ensure proper insulation for energy efficiency.
• Drywall and Finish Work: Complete the walls and ceilings.
• Flooring and Cabinetry: Install flooring and kitchen cabinets.
• Appliances and Fixtures: Add appliances, plumbing fixtures, and lighting.
• Paint and Finish: Apply paint and finishes to achieve the desired look.
• Final Inspection: Schedule inspections to ensure compliance with building codes.
Final Inspections and Approvals:
• Arrange for final inspections to ensure the addition meets all safety and code requirements.
• Obtain any necessary certificates of occupancy or compliance.
Move In and Enjoy:
• Once all inspections and approvals are received, you can move into your new kitchen addition and start enjoying it.
Remember that every kitchen addition project is unique, so adapt this outline to your specific needs and circumstances. Consulting with professionals and obtaining the required permits and inspections is crucial to a successful and safe project.
 Talon Construction Inc.
Designing and building a kitchen addition is a complex process that involves multiple steps and considerations. Here is a general outline to help you get started on your kitchen addition project:
Define Your Goals and Budget:
• Determine the purpose of the kitchen addition. Is it for more cooking space, a dining area, or a combination of both?
• Establish a realistic budget for your project. Consider all costs, including construction, permits, materials, and furnishings.
Hire a Design Professional:
• Seek the services of a design build company who specializes in kitchen additions.
• Discuss your vision, needs, and budget with the design professional to create a design concept.
Site Evaluation:
• Assess the existing space and structural condition of your home to ensure it can support the addition.
• Consider factors like zoning regulations, setbacks, and building codes.
Design Development:
• Collaborate with your design professional to refine the concept, including the layout, size, and architectural style.
• Choose materials, finishes, and fixtures that fit your design and budget.
Obtain Permits:
• Consult with your local design build contractor to determine the necessary permits and approvals.
• Prepare and submit all required documents, including architectural drawings and engineering plans.
Create Construction Documents:
• Work with your design build professional to develop detailed construction drawings and specifications.
• These documents will serve as a guide for contractors during construction.
Hire a design build contractor:
• Check references, credentials, and licenses before selecting a contractor.
• Sign a detailed contract that outlines the scope of work, timeline, and payment schedule.
Construction Phase:
• Demolition: If needed, remove any existing structures or walls.
• Foundation: Construct the foundation for the addition.
• Framing: Build the structural framework of the addition.
• Plumbing, Electrical, and HVAC: Install or update utilities as required.
• Insulation: Ensure proper insulation for energy efficiency.
• Drywall and Finish Work: Complete the walls and ceilings.
• Flooring and Cabinetry: Install flooring and kitchen cabinets.
• Appliances and Fixtures: Add appliances, plumbing fixtures, and lighting.
• Paint and Finish: Apply paint and finishes to achieve the desired look.
• Final Inspection: Schedule inspections to ensure compliance with building codes.
Final Inspections and Approvals:
• Arrange for final inspections to ensure the addition meets all safety and code requirements.
• Obtain any necessary certificates of occupancy or compliance.
Move In and Enjoy:
• Once all inspections and approvals are received, you can move into your new kitchen addition and start enjoying it.
Remember that every kitchen addition project is unique, so adapt this outline to your specific needs and circumstances. Consulting with professionals and obtaining the required permits and inspections is crucial to a successful and safe project.
Sponsored
Columbus, OH

Trish Takacs Design
Award Winning & Highly Skilled Kitchen & Bath Designer in Columbus
 Talon Construction Inc.
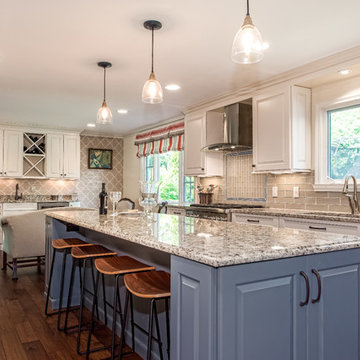
Designing and building a kitchen addition is a complex process that involves multiple steps and considerations. Here is a general outline to help you get started on your kitchen addition project:
Define Your Goals and Budget:
• Determine the purpose of the kitchen addition. Is it for more cooking space, a dining area, or a combination of both?
• Establish a realistic budget for your project. Consider all costs, including construction, permits, materials, and furnishings.
Hire a Design Professional:
• Seek the services of a design build company who specializes in kitchen additions.
• Discuss your vision, needs, and budget with the design professional to create a design concept.
Site Evaluation:
• Assess the existing space and structural condition of your home to ensure it can support the addition.
• Consider factors like zoning regulations, setbacks, and building codes.
Design Development:
• Collaborate with your design professional to refine the concept, including the layout, size, and architectural style.
• Choose materials, finishes, and fixtures that fit your design and budget.
Obtain Permits:
• Consult with your local design build contractor to determine the necessary permits and approvals.
• Prepare and submit all required documents, including architectural drawings and engineering plans.
Create Construction Documents:
• Work with your design build professional to develop detailed construction drawings and specifications.
• These documents will serve as a guide for contractors during construction.
Hire a design build contractor:
• Check references, credentials, and licenses before selecting a contractor.
• Sign a detailed contract that outlines the scope of work, timeline, and payment schedule.
Construction Phase:
• Demolition: If needed, remove any existing structures or walls.
• Foundation: Construct the foundation for the addition.
• Framing: Build the structural framework of the addition.
• Plumbing, Electrical, and HVAC: Install or update utilities as required.
• Insulation: Ensure proper insulation for energy efficiency.
• Drywall and Finish Work: Complete the walls and ceilings.
• Flooring and Cabinetry: Install flooring and kitchen cabinets.
• Appliances and Fixtures: Add appliances, plumbing fixtures, and lighting.
• Paint and Finish: Apply paint and finishes to achieve the desired look.
• Final Inspection: Schedule inspections to ensure compliance with building codes.
Final Inspections and Approvals:
• Arrange for final inspections to ensure the addition meets all safety and code requirements.
• Obtain any necessary certificates of occupancy or compliance.
Move In and Enjoy:
• Once all inspections and approvals are received, you can move into your new kitchen addition and start enjoying it.
Remember that every kitchen addition project is unique, so adapt this outline to your specific needs and circumstances. Consulting with professionals and obtaining the required permits and inspections is crucial to a successful and safe project.
 Talon Construction Inc.
Designing and building a kitchen addition is a complex process that involves multiple steps and considerations. Here is a general outline to help you get started on your kitchen addition project:
Define Your Goals and Budget:
• Determine the purpose of the kitchen addition. Is it for more cooking space, a dining area, or a combination of both?
• Establish a realistic budget for your project. Consider all costs, including construction, permits, materials, and furnishings.
Hire a Design Professional:
• Seek the services of a design build company who specializes in kitchen additions.
• Discuss your vision, needs, and budget with the design professional to create a design concept.
Site Evaluation:
• Assess the existing space and structural condition of your home to ensure it can support the addition.
• Consider factors like zoning regulations, setbacks, and building codes.
Design Development:
• Collaborate with your design professional to refine the concept, including the layout, size, and architectural style.
• Choose materials, finishes, and fixtures that fit your design and budget.
Obtain Permits:
• Consult with your local design build contractor to determine the necessary permits and approvals.
• Prepare and submit all required documents, including architectural drawings and engineering plans.
Create Construction Documents:
• Work with your design build professional to develop detailed construction drawings and specifications.
• These documents will serve as a guide for contractors during construction.
Hire a design build contractor:
• Check references, credentials, and licenses before selecting a contractor.
• Sign a detailed contract that outlines the scope of work, timeline, and payment schedule.
Construction Phase:
• Demolition: If needed, remove any existing structures or walls.
• Foundation: Construct the foundation for the addition.
• Framing: Build the structural framework of the addition.
• Plumbing, Electrical, and HVAC: Install or update utilities as required.
• Insulation: Ensure proper insulation for energy efficiency.
• Drywall and Finish Work: Complete the walls and ceilings.
• Flooring and Cabinetry: Install flooring and kitchen cabinets.
• Appliances and Fixtures: Add appliances, plumbing fixtures, and lighting.
• Paint and Finish: Apply paint and finishes to achieve the desired look.
• Final Inspection: Schedule inspections to ensure compliance with building codes.
Final Inspections and Approvals:
• Arrange for final inspections to ensure the addition meets all safety and code requirements.
• Obtain any necessary certificates of occupancy or compliance.
Move In and Enjoy:
• Once all inspections and approvals are received, you can move into your new kitchen addition and start enjoying it.
Remember that every kitchen addition project is unique, so adapt this outline to your specific needs and circumstances. Consulting with professionals and obtaining the required permits and inspections is crucial to a successful and safe project.
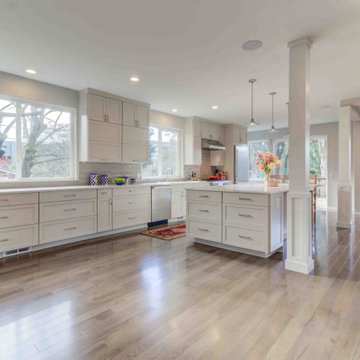 Better Builders
These clients enjoy cooking and entertaining, so their vision was to open and connect three separate rooms—the kitchen, sitting, and formal dining rooms—to create a single open and modern space where everyone could engage and participate in the activities.
Opening these spaces required complex structural engineering. The wall removals required supporting the loads from the second floor and meeting the engineering requirements for shear wall and lateral support. These beams and their connections to the posts they sit on were a challenge to install because of the complex nature of the home's original framed. All these loads had to be carried through the finished basement below and rest on new footings below the basement floor.
The center kitchen island was expansive, with a single slab countertop that would provide both workspace and counter seating. This slab, at 64x120 and 789 lbs., required careful planning for on-site labor, transfer routing, and precision installation. Natural daylight now floods the space from all directions. Recessed can lighting runs throughout the space, all on dimmers for maximum control of ambiance.
The Better Builders design team guided the selection of hardwoods, staircase details, cabinetry, countertops, tile, and color. The muted palette and clean lines work well with our couple’s eclectic furnishings and artworks. Now, traffic and activities flow better, and every inch of the previously divided space is utilized and enjoyed. The outcome is exactly as our homeowners envisioned…and as we intended.
27