
Search results for "Meet require" in Home Design Ideas
 Allen Ross Architecture, LLC
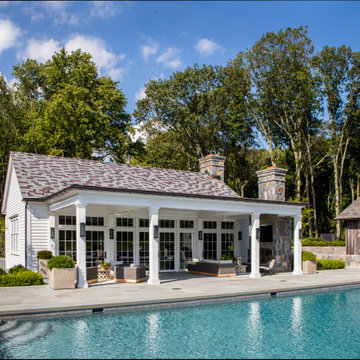
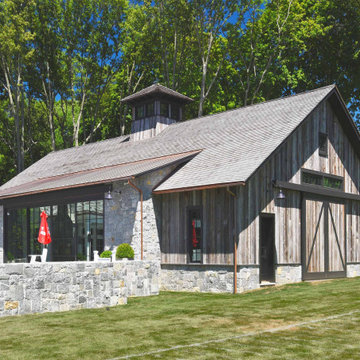
Allen Ross Architecture was hired to design a new retreat center that includes a multi-purpose Party Barn with a 3/4 basketball court, guest house, pool, sports field, tennis court, adventure course, outdoor kitchen, and changing cabana. Careful thought was given to the component relationships and how one moves through the site. Elements were configured to address function, aesthetics, security, and safety. Code mandated pool enclosure requirements were met without blocking views and without enclosure fencing.
Adjacent wetlands, storm water management requirements, and multiple zoning limitations necessitated thoughtful permitting applications. Zoning Board of Appeals and Planning Board approvals were required. Extensive infrastructure improvements and property grading were needed to meet the regulatory and client program requirements.
The design intent was a crisp transitional style that is sympathetic with the Georgian buildings located elsewhere on the site. Timber trusses support the guest house roof and steel moment frames support the barn roof.
 Allen Ross Architecture, LLC
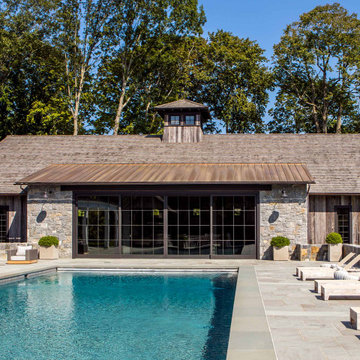
Allen Ross Architecture was hired to design a new retreat center that includes a multi-purpose Party Barn with a 3/4 basketball court, guest house, pool, sports field, tennis court, adventure course, outdoor kitchen, and changing cabana. Careful thought was given to the component relationships and how one moves through the site. Elements were configured to address function, aesthetics, security, and safety. Code mandated pool enclosure requirements were met without blocking views and without enclosure fencing.
Adjacent wetlands, storm water management requirements, and multiple zoning limitations necessitated thoughtful permitting applications. Zoning Board of Appeals and Planning Board approvals were required. Extensive infrastructure improvements and property grading were needed to meet the regulatory and client program requirements.
The design intent was a crisp transitional style that is sympathetic with the Georgian buildings located elsewhere on the site. Timber trusses support the guest house roof and steel moment frames support the barn roof.
 Better Builders
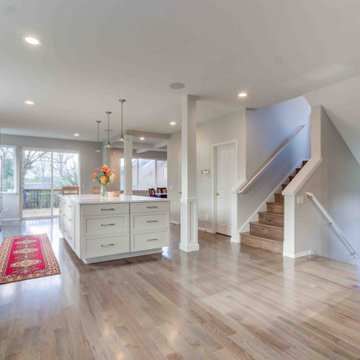
These clients enjoy cooking and entertaining, so their vision was to open and connect three separate rooms—the kitchen, sitting, and formal dining rooms—to create a single open and modern space where everyone could engage and participate in the activities.
Opening these spaces required complex structural engineering. The wall removals required supporting the loads from the second floor and meeting the engineering requirements for shear wall and lateral support. These beams and their connections to the posts they sit on were a challenge to install because of the complex nature of the home's original framed. All these loads had to be carried through the finished basement below and rest on new footings below the basement floor.
The center kitchen island was expansive, with a single slab countertop that would provide both workspace and counter seating. This slab, at 64x120 and 789 lbs., required careful planning for on-site labor, transfer routing, and precision installation. Natural daylight now floods the space from all directions. Recessed can lighting runs throughout the space, all on dimmers for maximum control of ambiance.
The Better Builders design team guided the selection of hardwoods, staircase details, cabinetry, countertops, tile, and color. The muted palette and clean lines work well with our couple’s eclectic furnishings and artworks. Now, traffic and activities flow better, and every inch of the previously divided space is utilized and enjoyed. The outcome is exactly as our homeowners envisioned…and as we intended.
Find the right local pro for your project
 Better Builders
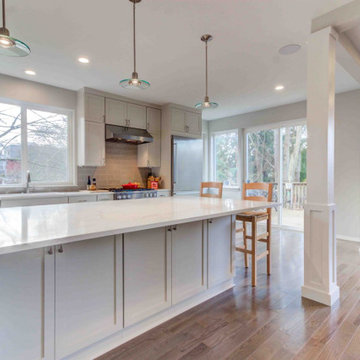
These clients enjoy cooking and entertaining, so their vision was to open and connect three separate rooms—the kitchen, sitting, and formal dining rooms—to create a single open and modern space where everyone could engage and participate in the activities.
Opening these spaces required complex structural engineering. The wall removals required supporting the loads from the second floor and meeting the engineering requirements for shear wall and lateral support. These beams and their connections to the posts they sit on were a challenge to install because of the complex nature of the home's original framed. All these loads had to be carried through the finished basement below and rest on new footings below the basement floor.
The center kitchen island was expansive, with a single slab countertop that would provide both workspace and counter seating. This slab, at 64x120 and 789 lbs., required careful planning for on-site labor, transfer routing, and precision installation. Natural daylight now floods the space from all directions. Recessed can lighting runs throughout the space, all on dimmers for maximum control of ambiance.
The Better Builders design team guided the selection of hardwoods, staircase details, cabinetry, countertops, tile, and color. The muted palette and clean lines work well with our couple’s eclectic furnishings and artworks. Now, traffic and activities flow better, and every inch of the previously divided space is utilized and enjoyed. The outcome is exactly as our homeowners envisioned…and as we intended.
 Allen Ross Architecture, LLC
Allen Ross Architecture was hired to design a new retreat center that includes a multi-purpose Party Barn with a 3/4 basketball court, guest house, pool, sports field, tennis court, adventure course, outdoor kitchen, and changing cabana. Careful thought was given to the component relationships and how one moves through the site. Elements were configured to address function, aesthetics, security, and safety. Code mandated pool enclosure requirements were met without blocking views and without enclosure fencing.
Adjacent wetlands, storm water management requirements, and multiple zoning limitations necessitated thoughtful permitting applications. Zoning Board of Appeals and Planning Board approvals were required. Extensive infrastructure improvements and property grading were needed to meet the regulatory and client program requirements.
The design intent was a crisp transitional style that is sympathetic with the Georgian buildings located elsewhere on the site. Timber trusses support the guest house roof and steel moment frames support the barn roof.
 Better Builders
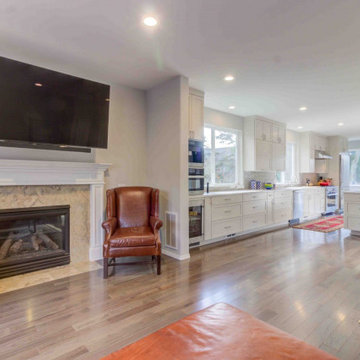
These clients enjoy cooking and entertaining, so their vision was to open and connect three separate rooms—the kitchen, sitting, and formal dining rooms—to create a single open and modern space where everyone could engage and participate in the activities.
Opening these spaces required complex structural engineering. The wall removals required supporting the loads from the second floor and meeting the engineering requirements for shear wall and lateral support. These beams and their connections to the posts they sit on were a challenge to install because of the complex nature of the home's original framed. All these loads had to be carried through the finished basement below and rest on new footings below the basement floor.
The center kitchen island was expansive, with a single slab countertop that would provide both workspace and counter seating. This slab, at 64x120 and 789 lbs., required careful planning for on-site labor, transfer routing, and precision installation. Natural daylight now floods the space from all directions. Recessed can lighting runs throughout the space, all on dimmers for maximum control of ambiance.
The Better Builders design team guided the selection of hardwoods, staircase details, cabinetry, countertops, tile, and color. The muted palette and clean lines work well with our couple’s eclectic furnishings and artworks. Now, traffic and activities flow better, and every inch of the previously divided space is utilized and enjoyed. The outcome is exactly as our homeowners envisioned…and as we intended.

 Talon Construction Inc.
Designing and building a kitchen addition is a complex process that involves multiple steps and considerations. Here is a general outline to help you get started on your kitchen addition project:
Define Your Goals and Budget:
• Determine the purpose of the kitchen addition. Is it for more cooking space, a dining area, or a combination of both?
• Establish a realistic budget for your project. Consider all costs, including construction, permits, materials, and furnishings.
Hire a Design Professional:
• Seek the services of a design build company who specializes in kitchen additions.
• Discuss your vision, needs, and budget with the design professional to create a design concept.
Site Evaluation:
• Assess the existing space and structural condition of your home to ensure it can support the addition.
• Consider factors like zoning regulations, setbacks, and building codes.
Design Development:
• Collaborate with your design professional to refine the concept, including the layout, size, and architectural style.
• Choose materials, finishes, and fixtures that fit your design and budget.
Obtain Permits:
• Consult with your local design build contractor to determine the necessary permits and approvals.
• Prepare and submit all required documents, including architectural drawings and engineering plans.
Create Construction Documents:
• Work with your design build professional to develop detailed construction drawings and specifications.
• These documents will serve as a guide for contractors during construction.
Hire a design build contractor:
• Check references, credentials, and licenses before selecting a contractor.
• Sign a detailed contract that outlines the scope of work, timeline, and payment schedule.
Construction Phase:
• Demolition: If needed, remove any existing structures or walls.
• Foundation: Construct the foundation for the addition.
• Framing: Build the structural framework of the addition.
• Plumbing, Electrical, and HVAC: Install or update utilities as required.
• Insulation: Ensure proper insulation for energy efficiency.
• Drywall and Finish Work: Complete the walls and ceilings.
• Flooring and Cabinetry: Install flooring and kitchen cabinets.
• Appliances and Fixtures: Add appliances, plumbing fixtures, and lighting.
• Paint and Finish: Apply paint and finishes to achieve the desired look.
• Final Inspection: Schedule inspections to ensure compliance with building codes.
Final Inspections and Approvals:
• Arrange for final inspections to ensure the addition meets all safety and code requirements.
• Obtain any necessary certificates of occupancy or compliance.
Move In and Enjoy:
• Once all inspections and approvals are received, you can move into your new kitchen addition and start enjoying it.
Remember that every kitchen addition project is unique, so adapt this outline to your specific needs and circumstances. Consulting with professionals and obtaining the required permits and inspections is crucial to a successful and safe project.
Sponsored
Sunbury, OH

J.Holderby - Renovations
Franklin County's Leading General Contractors - 2X Best of Houzz!
 Talon Construction Inc.
Designing and building a kitchen addition is a complex process that involves multiple steps and considerations. Here is a general outline to help you get started on your kitchen addition project:
Define Your Goals and Budget:
• Determine the purpose of the kitchen addition. Is it for more cooking space, a dining area, or a combination of both?
• Establish a realistic budget for your project. Consider all costs, including construction, permits, materials, and furnishings.
Hire a Design Professional:
• Seek the services of a design build company who specializes in kitchen additions.
• Discuss your vision, needs, and budget with the design professional to create a design concept.
Site Evaluation:
• Assess the existing space and structural condition of your home to ensure it can support the addition.
• Consider factors like zoning regulations, setbacks, and building codes.
Design Development:
• Collaborate with your design professional to refine the concept, including the layout, size, and architectural style.
• Choose materials, finishes, and fixtures that fit your design and budget.
Obtain Permits:
• Consult with your local design build contractor to determine the necessary permits and approvals.
• Prepare and submit all required documents, including architectural drawings and engineering plans.
Create Construction Documents:
• Work with your design build professional to develop detailed construction drawings and specifications.
• These documents will serve as a guide for contractors during construction.
Hire a design build contractor:
• Check references, credentials, and licenses before selecting a contractor.
• Sign a detailed contract that outlines the scope of work, timeline, and payment schedule.
Construction Phase:
• Demolition: If needed, remove any existing structures or walls.
• Foundation: Construct the foundation for the addition.
• Framing: Build the structural framework of the addition.
• Plumbing, Electrical, and HVAC: Install or update utilities as required.
• Insulation: Ensure proper insulation for energy efficiency.
• Drywall and Finish Work: Complete the walls and ceilings.
• Flooring and Cabinetry: Install flooring and kitchen cabinets.
• Appliances and Fixtures: Add appliances, plumbing fixtures, and lighting.
• Paint and Finish: Apply paint and finishes to achieve the desired look.
• Final Inspection: Schedule inspections to ensure compliance with building codes.
Final Inspections and Approvals:
• Arrange for final inspections to ensure the addition meets all safety and code requirements.
• Obtain any necessary certificates of occupancy or compliance.
Move In and Enjoy:
• Once all inspections and approvals are received, you can move into your new kitchen addition and start enjoying it.
Remember that every kitchen addition project is unique, so adapt this outline to your specific needs and circumstances. Consulting with professionals and obtaining the required permits and inspections is crucial to a successful and safe project.
 Talon Construction Inc.
Designing and building a kitchen addition is a complex process that involves multiple steps and considerations. Here is a general outline to help you get started on your kitchen addition project:
Define Your Goals and Budget:
• Determine the purpose of the kitchen addition. Is it for more cooking space, a dining area, or a combination of both?
• Establish a realistic budget for your project. Consider all costs, including construction, permits, materials, and furnishings.
Hire a Design Professional:
• Seek the services of a design build company who specializes in kitchen additions.
• Discuss your vision, needs, and budget with the design professional to create a design concept.
Site Evaluation:
• Assess the existing space and structural condition of your home to ensure it can support the addition.
• Consider factors like zoning regulations, setbacks, and building codes.
Design Development:
• Collaborate with your design professional to refine the concept, including the layout, size, and architectural style.
• Choose materials, finishes, and fixtures that fit your design and budget.
Obtain Permits:
• Consult with your local design build contractor to determine the necessary permits and approvals.
• Prepare and submit all required documents, including architectural drawings and engineering plans.
Create Construction Documents:
• Work with your design build professional to develop detailed construction drawings and specifications.
• These documents will serve as a guide for contractors during construction.
Hire a design build contractor:
• Check references, credentials, and licenses before selecting a contractor.
• Sign a detailed contract that outlines the scope of work, timeline, and payment schedule.
Construction Phase:
• Demolition: If needed, remove any existing structures or walls.
• Foundation: Construct the foundation for the addition.
• Framing: Build the structural framework of the addition.
• Plumbing, Electrical, and HVAC: Install or update utilities as required.
• Insulation: Ensure proper insulation for energy efficiency.
• Drywall and Finish Work: Complete the walls and ceilings.
• Flooring and Cabinetry: Install flooring and kitchen cabinets.
• Appliances and Fixtures: Add appliances, plumbing fixtures, and lighting.
• Paint and Finish: Apply paint and finishes to achieve the desired look.
• Final Inspection: Schedule inspections to ensure compliance with building codes.
Final Inspections and Approvals:
• Arrange for final inspections to ensure the addition meets all safety and code requirements.
• Obtain any necessary certificates of occupancy or compliance.
Move In and Enjoy:
• Once all inspections and approvals are received, you can move into your new kitchen addition and start enjoying it.
Remember that every kitchen addition project is unique, so adapt this outline to your specific needs and circumstances. Consulting with professionals and obtaining the required permits and inspections is crucial to a successful and safe project.
 Talon Construction Inc.
Designing and building a kitchen addition is a complex process that involves multiple steps and considerations. Here is a general outline to help you get started on your kitchen addition project:
Define Your Goals and Budget:
• Determine the purpose of the kitchen addition. Is it for more cooking space, a dining area, or a combination of both?
• Establish a realistic budget for your project. Consider all costs, including construction, permits, materials, and furnishings.
Hire a Design Professional:
• Seek the services of a design build company who specializes in kitchen additions.
• Discuss your vision, needs, and budget with the design professional to create a design concept.
Site Evaluation:
• Assess the existing space and structural condition of your home to ensure it can support the addition.
• Consider factors like zoning regulations, setbacks, and building codes.
Design Development:
• Collaborate with your design professional to refine the concept, including the layout, size, and architectural style.
• Choose materials, finishes, and fixtures that fit your design and budget.
Obtain Permits:
• Consult with your local design build contractor to determine the necessary permits and approvals.
• Prepare and submit all required documents, including architectural drawings and engineering plans.
Create Construction Documents:
• Work with your design build professional to develop detailed construction drawings and specifications.
• These documents will serve as a guide for contractors during construction.
Hire a design build contractor:
• Check references, credentials, and licenses before selecting a contractor.
• Sign a detailed contract that outlines the scope of work, timeline, and payment schedule.
Construction Phase:
• Demolition: If needed, remove any existing structures or walls.
• Foundation: Construct the foundation for the addition.
• Framing: Build the structural framework of the addition.
• Plumbing, Electrical, and HVAC: Install or update utilities as required.
• Insulation: Ensure proper insulation for energy efficiency.
• Drywall and Finish Work: Complete the walls and ceilings.
• Flooring and Cabinetry: Install flooring and kitchen cabinets.
• Appliances and Fixtures: Add appliances, plumbing fixtures, and lighting.
• Paint and Finish: Apply paint and finishes to achieve the desired look.
• Final Inspection: Schedule inspections to ensure compliance with building codes.
Final Inspections and Approvals:
• Arrange for final inspections to ensure the addition meets all safety and code requirements.
• Obtain any necessary certificates of occupancy or compliance.
Move In and Enjoy:
• Once all inspections and approvals are received, you can move into your new kitchen addition and start enjoying it.
Remember that every kitchen addition project is unique, so adapt this outline to your specific needs and circumstances. Consulting with professionals and obtaining the required permits and inspections is crucial to a successful and safe project.
 Talon Construction Inc.
Designing and building a kitchen addition is a complex process that involves multiple steps and considerations. Here is a general outline to help you get started on your kitchen addition project:
Define Your Goals and Budget:
• Determine the purpose of the kitchen addition. Is it for more cooking space, a dining area, or a combination of both?
• Establish a realistic budget for your project. Consider all costs, including construction, permits, materials, and furnishings.
Hire a Design Professional:
• Seek the services of a design build company who specializes in kitchen additions.
• Discuss your vision, needs, and budget with the design professional to create a design concept.
Site Evaluation:
• Assess the existing space and structural condition of your home to ensure it can support the addition.
• Consider factors like zoning regulations, setbacks, and building codes.
Design Development:
• Collaborate with your design professional to refine the concept, including the layout, size, and architectural style.
• Choose materials, finishes, and fixtures that fit your design and budget.
Obtain Permits:
• Consult with your local design build contractor to determine the necessary permits and approvals.
• Prepare and submit all required documents, including architectural drawings and engineering plans.
Create Construction Documents:
• Work with your design build professional to develop detailed construction drawings and specifications.
• These documents will serve as a guide for contractors during construction.
Hire a design build contractor:
• Check references, credentials, and licenses before selecting a contractor.
• Sign a detailed contract that outlines the scope of work, timeline, and payment schedule.
Construction Phase:
• Demolition: If needed, remove any existing structures or walls.
• Foundation: Construct the foundation for the addition.
• Framing: Build the structural framework of the addition.
• Plumbing, Electrical, and HVAC: Install or update utilities as required.
• Insulation: Ensure proper insulation for energy efficiency.
• Drywall and Finish Work: Complete the walls and ceilings.
• Flooring and Cabinetry: Install flooring and kitchen cabinets.
• Appliances and Fixtures: Add appliances, plumbing fixtures, and lighting.
• Paint and Finish: Apply paint and finishes to achieve the desired look.
• Final Inspection: Schedule inspections to ensure compliance with building codes.
Final Inspections and Approvals:
• Arrange for final inspections to ensure the addition meets all safety and code requirements.
• Obtain any necessary certificates of occupancy or compliance.
Move In and Enjoy:
• Once all inspections and approvals are received, you can move into your new kitchen addition and start enjoying it.
Remember that every kitchen addition project is unique, so adapt this outline to your specific needs and circumstances. Consulting with professionals and obtaining the required permits and inspections is crucial to a successful and safe project.
 Better Builders
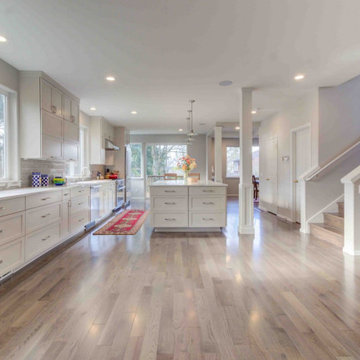
These clients enjoy cooking and entertaining, so their vision was to open and connect three separate rooms—the kitchen, sitting, and formal dining rooms—to create a single open and modern space where everyone could engage and participate in the activities.
Opening these spaces required complex structural engineering. The wall removals required supporting the loads from the second floor and meeting the engineering requirements for shear wall and lateral support. These beams and their connections to the posts they sit on were a challenge to install because of the complex nature of the home's original framed. All these loads had to be carried through the finished basement below and rest on new footings below the basement floor.
The center kitchen island was expansive, with a single slab countertop that would provide both workspace and counter seating. This slab, at 64x120 and 789 lbs., required careful planning for on-site labor, transfer routing, and precision installation. Natural daylight now floods the space from all directions. Recessed can lighting runs throughout the space, all on dimmers for maximum control of ambiance.
The Better Builders design team guided the selection of hardwoods, staircase details, cabinetry, countertops, tile, and color. The muted palette and clean lines work well with our couple’s eclectic furnishings and artworks. Now, traffic and activities flow better, and every inch of the previously divided space is utilized and enjoyed. The outcome is exactly as our homeowners envisioned…and as we intended.
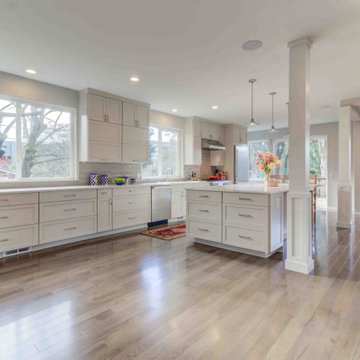 Better Builders
These clients enjoy cooking and entertaining, so their vision was to open and connect three separate rooms—the kitchen, sitting, and formal dining rooms—to create a single open and modern space where everyone could engage and participate in the activities.
Opening these spaces required complex structural engineering. The wall removals required supporting the loads from the second floor and meeting the engineering requirements for shear wall and lateral support. These beams and their connections to the posts they sit on were a challenge to install because of the complex nature of the home's original framed. All these loads had to be carried through the finished basement below and rest on new footings below the basement floor.
The center kitchen island was expansive, with a single slab countertop that would provide both workspace and counter seating. This slab, at 64x120 and 789 lbs., required careful planning for on-site labor, transfer routing, and precision installation. Natural daylight now floods the space from all directions. Recessed can lighting runs throughout the space, all on dimmers for maximum control of ambiance.
The Better Builders design team guided the selection of hardwoods, staircase details, cabinetry, countertops, tile, and color. The muted palette and clean lines work well with our couple’s eclectic furnishings and artworks. Now, traffic and activities flow better, and every inch of the previously divided space is utilized and enjoyed. The outcome is exactly as our homeowners envisioned…and as we intended.
Sponsored
Sunbury, OH
J.Holderby - Renovations
Franklin County's Leading General Contractors - 2X Best of Houzz!
 SV Design
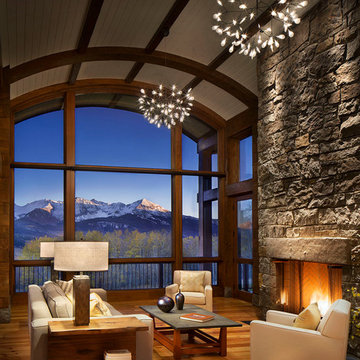
When full-time Massachusetts residents contemplate building a second home in Telluride, Colorado the question immediately arises; does it make most sense to hire a regionally based Rocky Mountain architect or a sea level architect conveniently located for all of the rigorous collaboration required for successful bespoke home design. Determined to prove the latter true, Siemasko + Verbridge accompanied the potential client as they scoured the undulating Telluride landscape in search of the perfect house site.
The selected site’s harmonious balance of untouched meadow rising up to meet the edge of an aspen grove and the opposing 180 degree view of Wilson’s Range spoke to everyone. A plateau just beyond a fork in the meadow provided a natural flatland, requiring little excavation and yet the right amount of upland slope to capture the views. The intrinsic character of the site was only enriched by an elk trail and snake-rail fence.
Establishing the expanse of Wilson’s range would be best served by rejecting the notion of selected views, the central sweeping curve of the roof inverts a small saddle in the range with which it is perfectly aligned. The soaring wave of custom windows and the open floor plan make the relatively modest house feel sizable despite its footprint of just under 2,000 square feet. Officially a two bedroom home, the bunk room and loft allow the home to comfortably sleep ten, encouraging large gatherings of family and friends. The home is completely off the grid in response to the unique and fragile qualities of the landscape. Great care was taken to respect the regions vernacular through the use of mostly native materials and a palette derived from the terrain found at 9,820 feet above sea level.
Photographer: Gibeon Photography
 OMNIA Group Architects
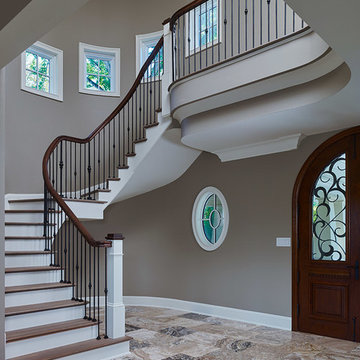
Perched above the beautiful Delaware River in the historic village of New Hope, Bucks County, Pennsylvania sits this magnificent custom home designed by OMNIA Group Architects. According to Partner, Brian Mann,"This riverside property required a nuanced approach so that it could at once be both a part of this eclectic village streetscape and take advantage of the spectacular waterfront setting." Further complicating the study, the lot was narrow, it resides in the floodplain and the program required the Master Suite to be on the main level. To meet these demands, OMNIA dispensed with conventional historicist styles and created an open plan blended with traditional forms punctuated by vast rows of glass windows and doors to bring in the panoramic views of Lambertville, the bridge, the wooded opposite bank and the river. Mann adds, "Because I too live along the river, I have a special respect for its ever changing beauty - and I appreciate that riverfront structures have a responsibility to enhance the views from those on the water." Hence the riverside facade is as beautiful as the street facade. A sweeping front porch integrates the entry with the vibrant pedestrian streetscape. Low garden walls enclose a beautifully landscaped courtyard defining private space without turning its back on the street. Once inside, the natural setting explodes into view across the back of each of the main living spaces. For a home with so few walls, spaces feel surprisingly intimate and well defined. The foyer is elegant and features a free flowing curved stair that rises in a turret like enclosure dotted with windows that follow the ascending stairs like a sculpture. "Using changes in ceiling height, finish materials and lighting, we were able to define spaces without boxing spaces in" says Mann adding, "the dynamic horizontality of the river is echoed along the axis of the living space; the natural movement from kitchen to dining to living rooms following the current of the river." Service elements are concentrated along the front to create a visual and noise barrier from the street and buttress a calm hall that leads to the Master Suite. The master bedroom shares the views of the river, while the bath and closet program are set up for pure luxuriating. The second floor features a common loft area with a large balcony overlooking the water. Two children's suites flank the loft - each with their own exquisitely crafted baths and closets. Continuing the balance between street and river, an open air bell-tower sits above the entry porch to bring life and light to the street. Outdoor living was part of the program from the start. A covered porch with outdoor kitchen and dining and lounge area and a fireplace brings 3-season living to the river. And a lovely curved patio lounge surrounded by grand landscaping by LDG finishes the experience. OMNIA was able to bring their design talents to the finish materials too including cabinetry, lighting, fixtures, colors and furniture
 Advance Design Studio, Ltd.
Mike and Michelle of Lake Barrington knew they needed extra space. Their home was becoming too crowded for their family with blossoming teenagers, so a basement renovation offered the perfect solution for more space for the kids and more room to entertain for the adults.
“Our project consisted of expanding our laundry room, putting in a first floor wet bar so we had adult space upstairs, while also renovating our basement for a family-friendly and teen-functional area as well,” Michelle says.
They found Advance Design Studio through a neighbor who gave a glowing recommendation, giving Michelle and Mike the confidence they needed to move forward with a major home renovation. They felt like they knew Advance Design before they even worked together. When they met with the owner Todd Jurs and designer Nicole Ryan, Mike and Michelle knew they were getting a trustworthy, dependable team that could create the project they had been dreaming about for 7 years.
Having virtually no natural light to work with, one of the biggest design challenges was creating a basement that did not feel dark and depressing. The Advance team got to work creating architectural archways and custom detailed dry-stack stone columns artfully designed into the space, adding a dramatic element that made the space feel less like a basement or more like a relaxing family room. Color 3D renderings were created to portray what the space would look like so Mike and Michelle could visualize the space in advance.
Detailed trim and crown moldings grace the built in buffet and wet bar making for an amazingly functional space that lacks nothing in style and visual interest. Cherry wood cabinetry by Dura Supreme is featured in the space with a “Cocoa Brown” finish and includes beautiful mirrored glass doors embellished with unique elliptical mullion details. A built-in microwave, dishwasher and mini fridge add practicality to the ample entertainment mecca. An under mounted sink finishes the space joined with a intricate mosaic tile backsplash and “Ventisca Polished” quartz countertops.
The basement is absolutely perfect for hosting friends and family with expertly designed key areas such as a game space for the kids, a movie area for the family, an ample workout room with luxurious full bath, and even built in wine storage. The family absolutely loves the new basement living space, and has already enjoyed numerous family movie nights and sleep-overs with friends.
While custom cabinets made by Dura Supreme were used to create unique spaces that lived up to Mike and Michelle’s expectations., heated flooring under the 16”x16” “Mongolian Spring” tile was installed giving all tiled areas of the basement a much cozier feel, eliminating that cold hard surface most of us hate in our basements!
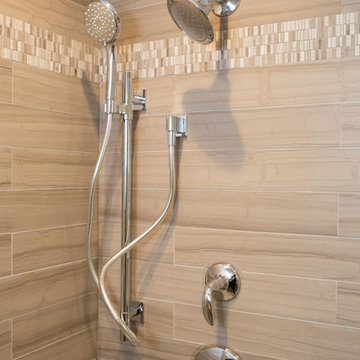
The new basement must-have requirement list included a new bath space, which was incorporated adjacent to the work out room. The sleek shower door and cabinets in the new bathroom make guests and family feel like they are in an elegant hotel. The new guest bath features 4”x36” “Silver Screen” honed marble tile in a brick pattern on the shower walls and 2”x2” “Chenille” limestone tile in a hexagon mosaic pattern on the shower floor.
“I came in with very specific requirements for our three project areas,” Michelle says. “There was not one time that I felt like I was asking for something that was not going to turn out how I anticipated.”
Tying in multiple rooms during a renovation if you have can do it makes a lot of sense and saves money in the long run. A fully functional laundry room as well was a must on this family’s wish list. Michelle wanted to add space to the existing cramped and awkward laundry room, and Mike wanted to make sure they could still park a car in the garage. Reconfiguring interior walls required borrowing unused space cleverly from the garage in order to enlarge the laundry room space.
Drawers under the stairs added beautiful hidden storage created almost magically out of dead space. White painted Dura Supreme cabinets bring additional light into the small space; while the 16”x16” cleft slate tile flooring provides excellent contrast and the naturally earthy feel Michelle wanted. Quartz countertops with a 3”x12” “Debut Dew” subway tile backsplash add elegance to the now upliftingly bright laundry room.
The extra space makes doing laundry much more pleasurable and the added storage is a great for all those little things like winter hats and gloves, umbrellas and the like. “The Advance Design project team was phenomenal to work with,” Michelle says. “They came in, shared the plans with us and walked us through the expectations. We always knew what was coming next.”
Converting an existing closet space, the wet bar upstairs was challenging because they wanted a functional area that didn’t look or feel like cabinets just sticking out of a closet. So the Advance team transformed this ordinary closet space into a stunning wet bar that architecturally appears as if it’s always been there. Traditional, elegant hand carved custom molding matching the adjacent fireplace ties the new entertainment bar area in nicely with the existing family room and kitchen area.
Featuring a built in wine refrigerator, Dura Supreme cabinetry in deep cherry wood elegantly displays wine bottles and etched glass mullion doors that fill with soft light in the evening hours. Cambria “Windermere” quartz countertops with a sophisticated hammered copper sink and a glimmering backsplash round out the stunning wet bar. Hosting parties and family functions has become much more enjoyable now that they have a dedicated beverage serving area large enough to include hors devours.
All three projects were designed and constructed together at the same time, making for a cohesive project that was administered smoothly and easily both for the design team and for the family. Disruption to the home was minimal as each phase was completed in each project conclusively, and design and meeting time for the homeowner was efficient and organized making for an enjoyable process.
“Advance Design was great to work with,” Michelle says. “I would highly recommend them to anyone considering a home improvement project. They took the time at the beginning to understand our needs, our budget, and our vision for our home. The field team was great, attentive, on time, cleaned up each day and made the overall experience very positive. We couldn't be happier with the finished product.”
With the help of our talented, award winning design team you can create the basement, laundry room, or any other home renovation that you have been dreaming of. With our “Common Sense Remodeling” approach, the process of renovating you home has never been easier. Contact us today at 847-836-2600 or schedule an appointment to talk with us about that kitchen remodeling project.
Joe Nowak

Sponsored
Columbus, OH

Trish Takacs Design
Award Winning & Highly Skilled Kitchen & Bath Designer in Columbus
 Amazing Spaces
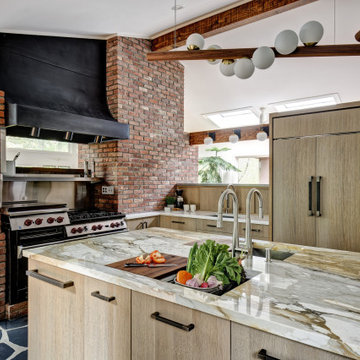
This is a great house. Perched high on a private, heavily wooded site, it has a rustic contemporary aesthetic. Vaulted ceilings, sky lights, large windows and natural materials punctuate the main spaces. The existing large format mosaic slate floor grabs your attention upon entering the home extending throughout the foyer, kitchen, and family room.
Specific requirements included a larger island with workspace for each of the homeowners featuring a homemade pasta station which requires small appliances on lift-up mechanisms as well as a custom-designed pasta drying rack. Both chefs wanted their own prep sink on the island complete with a garbage “shoot” which we concealed below sliding cutting boards. A second and overwhelming requirement was storage for a large collection of dishes, serving platters, specialty utensils, cooking equipment and such. To meet those needs we took the opportunity to get creative with storage: sliding doors were designed for a coffee station adjacent to the main sink; hid the steam oven, microwave and toaster oven within a stainless steel niche hidden behind pantry doors; added a narrow base cabinet adjacent to the range for their large spice collection; concealed a small broom closet behind the refrigerator; and filled the only available wall with full-height storage complete with a small niche for charging phones and organizing mail. We added 48” high base cabinets behind the main sink to function as a bar/buffet counter as well as overflow for kitchen items.
The client’s existing vintage commercial grade Wolf stove and hood commands attention with a tall backdrop of exposed brick from the fireplace in the adjacent living room. We loved the rustic appeal of the brick along with the existing wood beams, and complimented those elements with wired brushed white oak cabinets. The grayish stain ties in the floor color while the slab door style brings a modern element to the space. We lightened the color scheme with a mix of white marble and quartz countertops. The waterfall countertop adjacent to the dining table shows off the amazing veining of the marble while adding contrast to the floor. Special materials are used throughout, featured on the textured leather-wrapped pantry doors, patina zinc bar countertop, and hand-stitched leather cabinet hardware. We took advantage of the tall ceilings by adding two walnut linear pendants over the island that create a sculptural effect and coordinated them with the new dining pendant and three wall sconces on the beam over the main sink.
 Simply Simpatico, Inc.
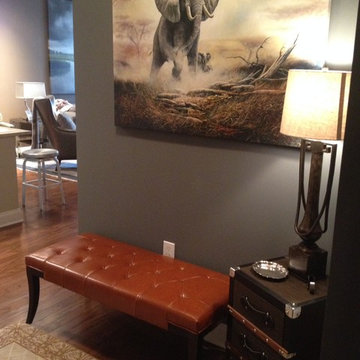
"The well traveled man" was the theme for this foyer. I infused character into what could be an otherwise boring space. Instead of the expected 'hall table', I provided a place for slipping shoes on/off, for dropping keys, that lights your 'welcome home'. It became an interesting space to greet guests, in addition to meeting functional requirements of a foyer.
 Robert M. Cain, Architect
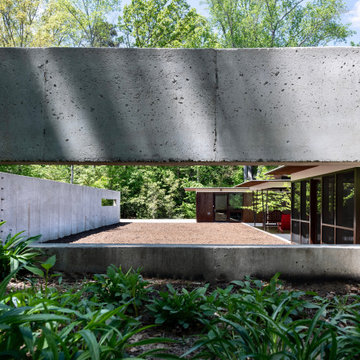
Holly Hill, a retirement home, whose owner's hobbies are gardening and restoration of classic cars, is nestled into the site contours to maximize views of the lake and minimize impact on the site.
Holly Hill is comprised of three wings joined by bridges: A wing facing a master garden to the east, another wing with workshop and a central activity, living, dining wing. Similar to a radiator the design increases the amount of exterior wall maximizing opportunities for natural ventilation during temperate months.
Other passive solar design features will include extensive eaves, sheltering porches and high-albedo roofs, as strategies for considerably reducing solar heat gain.
Daylighting with clerestories and solar tubes reduce daytime lighting requirements. Ground source geothermal heat pumps and superior to code insulation ensure minimal space conditioning costs. Corten steel siding and concrete foundation walls satisfy client requirements for low maintenance and durability. All light fixtures are LEDs.
Open and screened porches are strategically located to allow pleasant outdoor use at any time of day, particular season or, if necessary, insect challenge. Dramatic cantilevers allow the porches to project into the site’s beautiful mixed hardwood tree canopy without damaging root systems.
Guest arrive by vehicle with glimpses of the house and grounds through penetrations in the concrete wall enclosing the garden. One parked they are led through a garden composed of pavers, a fountain, benches, sculpture and plants. Views of the lake can be seen through and below the bridges.
Primary client goals were a sustainable low-maintenance house, primarily single floor living, orientation to views, natural light to interiors, maximization of individual privacy, creation of a formal outdoor space for gardening, incorporation of a full workshop for cars, generous indoor and outdoor social space for guests and parties.
28