
Search results for "Neutralize acids" in Home Design Ideas
Find the right local pro for your project
 Tile Doctor Ltd
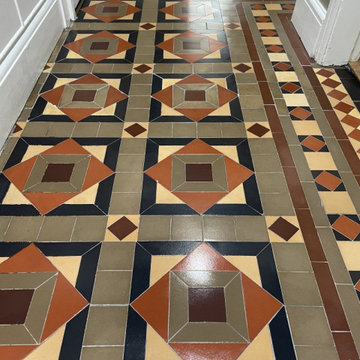
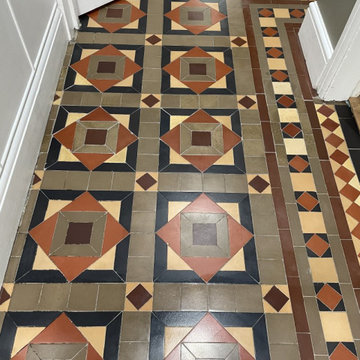
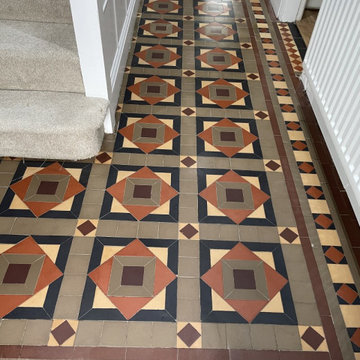
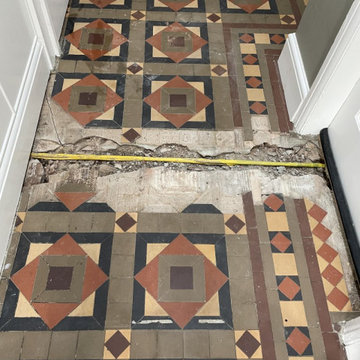
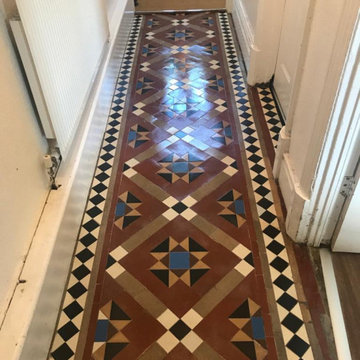
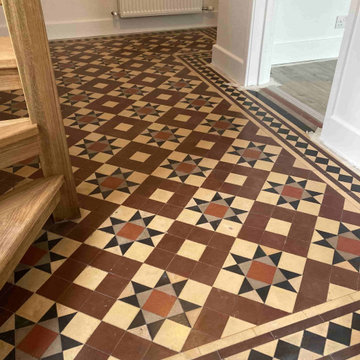
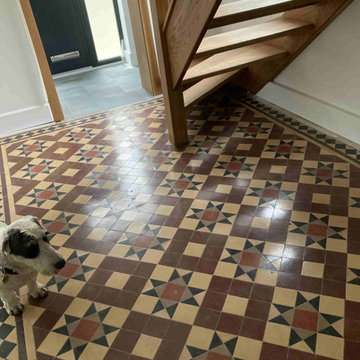
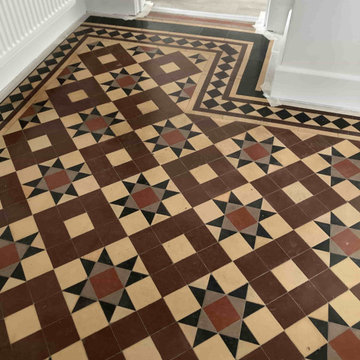
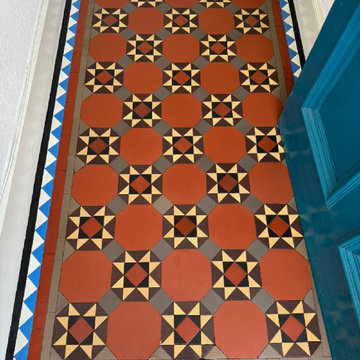
I recently worked on the restoration of a Victorian tiled hallway in Cwmbran Wales which is six miles North of Newport. As you can see from the photographs the floor was in quite a neglected dirty state and many of the the black and white border tiles needed removing and replacing. The worst part was the area by the front door where most of the tiles had been removed and then backfilled with concrete. I can only assume at some point in the past it was deemed to difficult or expensive to restore the floor, so they simply covered it up.
After visiting to survey the floor I did offer to source replacements for the concreted section and restore that as part of the work however my client’s budget would not stretch to that at the time. My quote was therefore focused on the main section of flooring and included replacing border tiles, deep cleaning the whole floor and then sealing the tiles to add protection. Although I did need to check that I could indeed source the replacement tiles before being able to provide the quote which as it turned out would not be an issue.
They were happy to go ahead and we arranged a suitable time to carry out the work which would enable me to work in the property whilst minimising contact with the owners due to the Covid-19 situation.
I spend the first day sorting out the black and white border tiles which needed to be gently prised out of position without upsetting the main part of the floor. The exposed subfloor was then cleaned up to remove old adhesive and replacements were fitted where required and secured into place. The floor would need to be solid before cleaning so that was left for day two so the new adhesive could go off overnight.
On day two I gave the floor an initial clean using a combination of Tile Doctor Pro-Clean and Remove and Go diluted with water. This produces a strong cleaner/stripper that will tackle dirt and remove coatings such as previous sealers. The old tiles had accumulated years of ingrained dirt, so I needed this extra power to remove the years of dirt and contaminates from the tile. It was sprayed onto the tiles and then left to soak in for ten minutes before being actively scrubbed into the tile using a rotary machine fitted with a black scrubbing pad. The soil was then rinsed off with water and extracted with a wet vacuum. The floor was inspected, and the process repeated on the tough stains until I was satisfied all the dirt had been removed.
Next the floor was treated to an acid wash using Tile Doctor Acid Gel using a similar method as before. This is an important treatment for these old Victorian floors that have no damp proof course as it neutralises efflorescent salts trapped in the tile which can appear as white salt deposits later. Once I was happy with the condition of the floor it was given a final rinse and left to dry off. I use a wet vacuum to remove liquids from the floor and on this last extraction I spent extra time to remove as much moisture from the tiles as possible.
I came back a few days later and after checking the tiles were dry using a damp meter, I started the application of the sealer. For this floor I applied seven coats of Tile Doctor Seal and Go for a satin finish. Tile Doctor Seal and Go is a specially formulated water-based sealer that provides both stain resistance and a durable low-sheen finish. It is perfect on a floor of this age where it leaves a lovely finish and will remain durable in what is a essentially a high traffic area.
Although we didn’t manage to sort out the area by the front door the client managed to fit a made to measure coir door mat along with carpet bar which was quite practical and looked fine so they were able to resolve that problem without blowing their budget.
The client was over the moon with results, the floor had a lovely pattern and the colours now shone through. I suggested the use of Tile Doctor Neutral Tile Cleaner to keep the floor clean and in good condition. It is neutral in pH so will ensure that the newly applied sealer stays in place and will ensure maintenance is nice and easy for them.
Paul Wales
Monmouthshire Tile Doctor

 Synergy Design & Construction
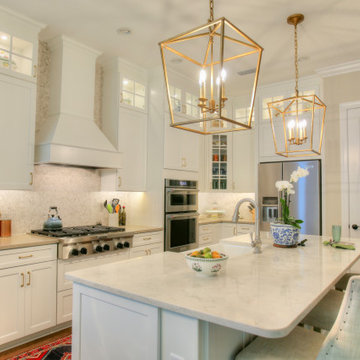
Frameless, bright white Shaker cabinets reflect tons of light into this transitional-modern kitchen. The solid taupe quartz countertops provide a clean, neutral surface that lets the multi-toned, marble backsplash capture the attention.

 FRAME design co.
This master suite is a study in balance—girly without veering too close to “man repeller” sweet. The depth of the acid-green floral Elitis “Opulence” wallpaper requires that the rest of the room be steeped in calm with solid fabrics and layered neutrals. A dusty pink herringbone wool daybed keeps the room from floating away on pastels, fluffy pillows, and dainty furniture. Photographer: Carrie Patterson
Sponsored
Columbus, OH

Snider & Metcalf Interior Design, LTD
Leading Interior Designers in Columbus, Ohio & Ponte Vedra, Florida

 Quality Concrete Floor Leveling Inc.
This is a concrete topping with acid stain and sealer.
Inspiration for a modern concrete floor hallway remodel in Los Angeles
Inspiration for a modern concrete floor hallway remodel in Los Angeles
 Tile Doctor Ltd
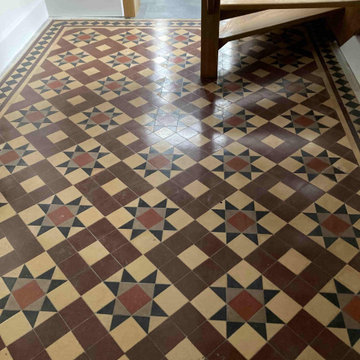
During an inspection for alteration work, this customer from Cheshunt discovered what appeared to be an original encaustic tiled floor under the hallway carpet. Keen to work out what it was, and have it restored, I was asked to pop round and look.
I went over as requested to survey the hallway floor and confirm their suspicions. The carpet had been secured with gripper rods glued onto the floor and that came away easily enough. Underneath, the tiles had been covered with self-levelling cement which had to be carefully scraped away to reveal the tiles.
I ran a test to see if the cement leveller could be easily removed and using a combination of a scraper with Tile Doctor Pro-Clean, I was able to confirm the tiled floor was indeed salvageable. The house was Edwardian, and the tiles had been laid in a classic black and white geometric pattern typical of the period so I suspect the floor was indeed original.
I worked out a quote to restore the whole floor including the removal of the cement, deep cleaning and then sealing the tiles. Without removing all the cement, it would be difficult to price for replacing broken tiles, but I suspected there may be a few as its quite usual for a floor of this age. Keen to have the floor restored we were given the go-ahead and a date scheduled for the work to start.
The first step was to remove all the carpet and gripper rod so we could see the full extent of the self-levelling screed. Once done it was a case of carefully chipping and scraping away to break up the cement until the tiled floor had been fully revealed. Its slow and detailed work but quite rewarding when the tiled floor is finally revealed. The tiles had survived well under the carpet and cement but as suspected a few repairs and replacement would be needed.
With all the cement brushed away work moved onto cleaning which started with a strong dilution of Tile Doctor Pro-Clean applied to the floor and left to soak in for fifteen minutes the scrubbed in with a rotary machine fitted with a Black pad. A lot of soiling is generated from this which is rinsed off with water and extracted with a wet vacuum. The floor was then inspected and the process repeated where required.
The next step was to treat the tiles to an acid wash using Tile Doctor Grout Clean-up. This is applied as before and has several benefits including dissolving the remaining cement residue and neutralising the pH of the floor after the use of Tile Doctor Pro-Clean which is a strong alkaline.
The floor was then inspected and the broken tiles carefully removed so they could be replaced. This is delicate work as lifting a tile can sometimes upset its neighbour and before you know it the size of the work has tripled. Replacement tiles were then cut to fit the existing geometric pattern and secured into place with a rapid set adhesive and grouted in.
Once the replacement tile and grout had set, the floor was given a light clean using Tile Doctor Neutral Tile Cleaner and then left to dry out overnight.
The next day the tiles were sealed using a single coat of Tile Doctor Colour Grow and the followed up with give coats of Tile Doctor Seal & Go. Colour Grow is an impregnator that soaks into the pores of the tile protecting it from within and improving colour, where as Seal and Go adds a nice subtle sheen to the tiles. Both products are breathable which is an important feature with old floors that don’t have a damp proof membrane.
For aftercare I recommended Neutral Tile Cleaner which is a gentle but effective tile cleaning product that won’t damage the sealer.
Robert Voyce
Hertfordshire TIle Doctor

 Gervis Design Studio
Example of a mid-sized transitional open concept and formal marble floor living room design in Miami with beige walls, a standard fireplace, a stone fireplace and no tv

 Pennville Custom Cabinetry
Karen Swanson of New England Design Works Designed this Pennville Kitchen for her own home, and it won not only the regional Sub-Zero award, but also the National Kitchen & Bath Association's medium kitchen of the year. Karen is located in Manchester, MA and can be reached at nedesignworks@gmail.com or 978.500.1096.

 Concrete Armour
This basement turned out amazing! The homeowners were going for the "rustic" look. I think it's safe to say we nailed it!
Basement - mid-sized rustic walk-out brown floor basement idea in Omaha with white walls
Basement - mid-sized rustic walk-out brown floor basement idea in Omaha with white walls


 2e Architects
Vince Lupo
Large trendy open concept concrete floor and gray floor family room photo in Baltimore with white walls, a ribbon fireplace, a tile fireplace and a wall-mounted tv
Large trendy open concept concrete floor and gray floor family room photo in Baltimore with white walls, a ribbon fireplace, a tile fireplace and a wall-mounted tv


 Home Carpet One
Large scale patterned carpets have made a big comeback. This piece from Milliken adds personality to the room.
Inspiration for a contemporary living room remodel in Chicago
Inspiration for a contemporary living room remodel in Chicago


2