
Search results for "Neutralize acids" in Home Design Ideas
 Tile Doctor Ltd
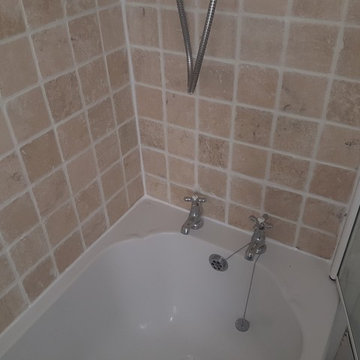
Here’s a quick example of an interesting tiled shower cubicle at a property in Edinburgh that was well overdue for a refresh, including deep cleaning and recolouring do the grout lines that had become stained and mouldy. This is a problem that the majority of property owners experience due to the simple fact that shower cubicles come into contact with damaging acid-based shampoos and soaps on a daily basis.
The short-term solution for this is to wash the shower cubicle down with water after each use, however busy people do not always remember to do so! The prognosis is bad discolouration, mould growth and staining if the problem if proper care isn’t taken. In this case, the problem had worsened to the point that the property owner decided to contact Tile a Doctor to provide a thorough refresh of the tiles.
Our process for refreshing shower cubicles in a similar state to this one is simple, but highly effective. I started by mixing a strong solution of our high alkaline cleaner, known as Tile Doctor Pro Clean (diluted to an appropriate level with water), before applying it directly to the tile and grout.
Next, I worked it in using specialised handheld grout brushes , with the alkaline in the Pro Clean neutralising the acidic staining and mould growth had leaving the area clean and fresh. Pro Clean is suitable for use on all kinds of natural stone, and on both verticals and horizontal surfaces. Once satisfied the grout had been cleaned to the best of my abilities, I quickly dried the entire area using a heat gun.
To restore the appearance of the installation back to it’s optimal appearance I chose to recolour the grout lines with our Light Grey grout colourant, which matched in very nicely. This is just one of ten different colours of grout colourant we offer. The colourant was left to dry for a short period before I cleaned off any excess. The final stage of the refresh involved stripping off the old discoloured silicone from around the bath and replacing it with fresh silicone.
The customer was very impressed by the speed and efficiency of the refresh. With the work completed to a high standard in just a few hours, she now has one less problem to worry about – and a very smart looking shower cubicle! Another satisfied customer.
Thomas Wilson
Edinburgh Tile Doctor

 User
To maximize the space of the master bedroom, we installed a queen size bed and furniture that matched in scale and proportion to the room. Soft, muted, neutral colored linens provide a backdrops for the acid green bedside table lamps that add a pop of color to the neutral room. The dark hardwood floors were carried into the master bedroom to provide continuity throughout the home. Keeping the furnishings sparse, allows for the future homeowner to envision how their furniture might look in their new master bedroom oasis. We kept the white paint color consistent through the home, so that there was continuity as you move from room to room.

 Elizabeth Herrmann architecture + design
Jim Westphalen
Mid-sized trendy open concept and formal concrete floor and gray floor living room photo in Burlington with white walls, a wood stove and no tv
Mid-sized trendy open concept and formal concrete floor and gray floor living room photo in Burlington with white walls, a wood stove and no tv
Find the right local pro for your project

 Pinnacle Mountain Homes
Darren Edwards, Pinnacle Mountain Homes, Collective Design + Furnishings
Example of a mountain style concrete floor and gray floor seated home bar design in Denver with flat-panel cabinets, dark wood cabinets and gray countertops
Example of a mountain style concrete floor and gray floor seated home bar design in Denver with flat-panel cabinets, dark wood cabinets and gray countertops
 Tile Doctor Ltd
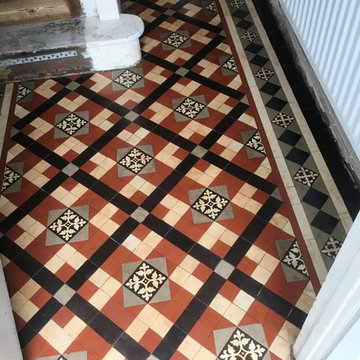
The owner of this house in Chaplefields near Coventry had bought this property as an investment and was keen to improve its appearance. As part of this work he had lifted the vinyl tiles in the hallway and discovered a lovely Edwardian tiled floor. Unfortunately, whoever had laid the Vinyl tiles had decided to use Tar as an adhesive and this had left a black mess all over the floor.
Realising the potential value an original feature such as this could add to the property he was keen to restore the tiles but not so keen to deal with the Tar, so we were asked to deal with the problem and restore the floor as close to its original condition as possible.
To get the tiles clean and remove the horrible tar I applied a strong dilution of Tile Doctor Remove and Go, which as its name suggest is great for removing coverings from tiles. I applied the Remove and Go with a mop, left it to soak in for a few minutes and then worked it in using a rotary machine fitted with a black scrubbing pad. The soil was extracted off the floor using a wet and dry vacuum and then the process repeated until I was happy all the tar was gone.
I then gave the tiles an acid wash using Tile Doctor Acid Gel; this serves to break down alkaline mineral deposits such as cement and grout smears, it also counters any efflorescence problems which can be an issue with these old floors where no damp proof membrane has been installed.
Finally, the floor was given a rinse with clean water and a steam clean to remove any trace of cleaning products and to neutralise the tiles in preparation for sealing.
I left the floor to dry off overnight and returned to the property to seal the tiles the next day. To seal the tiles, I used three coats of Tile Doctor Seal and Go which is a water based sealer that leaves a subtle sheen finish and being water based doesn’t leave a smell as it dries. The sealer will provide durable protection going forward preventing dirt from becoming ingrained into the pores of the tile and ensuring it remains easy to clean and keeping its appearance for some time to come.
The floor now looks fantastic and gives a great impression when you come into the property which is exactly what the owner wanted.
Mick Gayton
Warwickshire Tile Doctor

 Decorative Concrete Resurfacing
Commercial Concrete Staining job at a Photography Studio in St. Louis, Missouri. This type of concrete staining is done with a water-based stain which makes it easier to control the consistency of color as opposed to an acid stain. It is also echo friendly! Give Us a Call Today for a FREE Estimate & Design Consultation!
Decorative Concrete Resurfacing
715 Debula Dr
Ballwin, MO 63021
636-256-6733
http://www.DecorativeConcreteResurfacing.com
 Tile Doctor Ltd
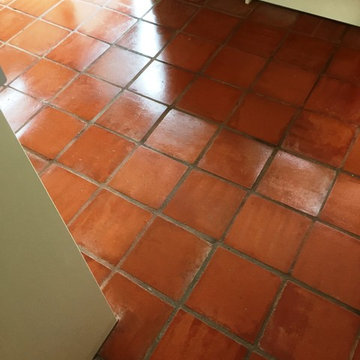
Newly built properties are not without their problems and often take a while to resolve all the snagging which occasionally extends to resolving problems with newly laid tiled floors. At this new property in the village of Malvern, and overlooked by the Malvern hills, the builders had left the Terracotta tiled kitchen floor covered in grout smears (also known as Grout Haze) following installation. They had also neglected to seal the tiles, which was actually quite fortunate in this case as they would have sealed in the grout haze, making it more difficult to remove.
Naturally, the property owner wanted the problem to be resolved as soon as possible, and for me to make the tiles easy to keep clean in future, which can be achieved by sealing the tile.
Before starting work, I made sure to fully protect any exposed woodwork with a plastic sheet covering to protect them from potential damage. I then proceeded to give the floor a thorough clean, using Tile Doctor Remove and Go to clean the floor and eradicate some stains that had been left behind as a result of the building work.
Next, I paid special attention to the grout, where the very visible problem of grout haze had arisen. To neutralise these smears I used Tile Doctor Grout Clean Up, a concentrated phosphoric acid cleaner that can also remove alkaline mineral deposits and efflorescence. Grout Clean Up is only to be used on acid resistant stone, as sensitive stone can suffer from irreparable etching if it comes into contact with the product.
Once completely clean and free of grout smears the floor was thoroughly rinsed with water to remove any trace of product and then dried as much as possible with a wet vacuum, afterwards an air mover was installed to speed up the drying process.
Later that afternoon the floor was dry and I was able to apply a sealer. To do this I opted to use several coats of Tile Doctor Seal and Go Extra, a topical, fully breathable sealer that works really well on Terracotta.
The sealer builds up a layer of protection on the surface of the tiles, protecting against ingrained dirt and stains. Seal and Go Extra also provides a high quality sheen finish which really did well to enhance the look of the Terracotta.
The property owner was exceptionally pleased with the results, and to have this problem dealt with quickly and efficiently, additionally the sealer will ensure the Kitchen floor is easy to keep clean in the future.
Sponsored
Columbus, OH

Wannemacher Interiors
Customized Award-Winning Interior Design Solutions in Franklin Cnty OH
 Tile Doctor Ltd
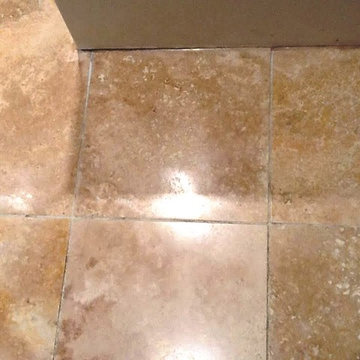
Earlier this month I was in the town of Northampton, to see a client who had reported a problem with her Travertine kitchen tiles. Basically the grout between the tiles was badly stained, to the point of appearing almost black.
The Travertine tiles were also in need of some maintenance, and so I was commissioned to provide a clean, polish and a fresh seal. Travertine is a popular choice for kitchen flooring due to its relatively high durability and distinct features. My task was to get this floor back to looking its best.
My priority was to address the badly stained grout so I cleaned the grout lines by hand using a combination of hand brushes and Tile Doctor Grout Clean-Up. The surface was pre-wet with water, before a solution of Grout-Clean Up and clean water was applied to the surface. The brushes were then used to agitate the solution. Grout Clean-Up contains a mix of concentrated phosphoric acid and cleaner designed to penetrate below the surface of the grout to remove grout stains, smears and mineral deposits.
As you can see from the photos, Grout Clean-Up made an immediate difference to the appearance of the tiles. This product is suitable for use on masonry and acid resistant surfaces. After completing the clean, I gave the floor a thorough rinse to neutralise the floor after cleaning and removed as much of the water as possible using a wet vacuum.
Following this, I paid attention to the tiles themselves, cleaning them to achieve a polished effect by using a system of burnishing pads. Tile Doctor burnishing pads comprise a set of four pads varying in grit type, from Coarse and Medium to Fine and Very Fine. I applied all four pads in turn to the floor, stopping to rinse the floor in between each. The result was a high quality polished finish.
I then left the floor to dry completely overnight, before commencing the seal the next day. My choice of sealing product was Tile Doctor Colour Grow which is a colour intensifying sealer that both enhances the natural appearance of the stone and provides a durable surface seal.
My client was very pleased with the finished product, and left the following comment on the Tile Doctor feedback system: “efficiently done”, yielding “good results”.
Phil Vissian
Northamptonshire Tile Doctor

 Gabberts Design Studio
Living Gallery designed by Lori Berg, Allied ASID
Photographed by Jill Greer
Inspiration for a transitional hallway remodel in Minneapolis
Inspiration for a transitional hallway remodel in Minneapolis
 User
To maximize the space of the guest bedroom, we installed a queen size bed and furniture that matched in scale and proportion to the room. Soft, muted, neutral colored linens provide a backdrops for the acid green bedside table lamps that add a pop of color to the neutral room. The dark hardwood floors were carried into the master bedroom to provide continuity throughout the home. Keeping the furnishings sparse, allows for the future homeowner to envision how their furniture might look in their guest bedroom or child's bedroom. We kept the white paint color consistent through the home, so that there was continuity as you move from room to room.

 Bon Brise Design, Inc.
The stools are Minotti and are a great acid green accent color to the more neutral kitchen.
Photo Credit: Rolfe Hokanson Photography
Example of a large trendy l-shaped porcelain tile eat-in kitchen design in Chicago with flat-panel cabinets, dark wood cabinets, an island, an undermount sink, concrete countertops and stainless steel appliances
Example of a large trendy l-shaped porcelain tile eat-in kitchen design in Chicago with flat-panel cabinets, dark wood cabinets, an island, an undermount sink, concrete countertops and stainless steel appliances
 User
Seamus Payne Photography
Example of an eclectic enclosed medium tone wood floor and brown floor living room design in Tampa with black walls
Example of an eclectic enclosed medium tone wood floor and brown floor living room design in Tampa with black walls

 OSMOND DESIGNS
Example of a large transitional master dark wood floor and brown floor bedroom design in Salt Lake City with gray walls, a standard fireplace and a stone fireplace
Sponsored
Westerville, OH

Inspired Closets Columbus
Innovative & Creative Custom Closet Designer Servicing Franklin County


 Golden Touch Construction, Inc.
Inset cabinet doors, white cabinetry, walnut island.
Inspiration for a mid-sized timeless u-shaped medium tone wood floor open concept kitchen remodel in Los Angeles with a farmhouse sink, shaker cabinets, white cabinets, granite countertops, white backsplash, ceramic backsplash, paneled appliances and an island
Inspiration for a mid-sized timeless u-shaped medium tone wood floor open concept kitchen remodel in Los Angeles with a farmhouse sink, shaker cabinets, white cabinets, granite countertops, white backsplash, ceramic backsplash, paneled appliances and an island

 Incredible Home
Beautiful custom walk in closet to envy. LED lighting behind translucent glass creates soft reflection. LED lit rods light up when you ope the doors. Custom step crown. Keyless locks on jewelry drawers.
 Gabberts Design Studio
Living Gallery designed by Lori Berg, Allied ASID
Photographed by Jill Greer
Inspiration for a transitional living room remodel in Minneapolis
Inspiration for a transitional living room remodel in Minneapolis
Sponsored
Sunbury, OH

J.Holderby - Renovations
Franklin County's Leading General Contractors - 2X Best of Houzz!
 Gabberts Design Studio
Living Gallery designed by Lori Berg, Allied ASID
Photographed by Jill Greer
Transitional living room photo in Minneapolis
Transitional living room photo in Minneapolis
 Gabberts Design Studio
Living Gallery designed by Lori Berg, Allied ASID
Photographed by Jill Greer
Living room - transitional living room idea in Minneapolis
Living room - transitional living room idea in Minneapolis

 Debra Geller Interior Design
Alcove shower - large shabby-chic style 3/4 beige tile, white tile and porcelain tile porcelain tile alcove shower idea in New York with an undermount sink, open cabinets, light wood cabinets, white walls and granite countertops
6