
Search results for "Outline" in Home Design Ideas

 Studio Build
Bob Greenspan
Eat-in kitchen - mid-sized 1960s u-shaped light wood floor eat-in kitchen idea in Kansas City with an undermount sink, flat-panel cabinets, blue cabinets, quartz countertops, white backsplash, ceramic backsplash, stainless steel appliances and a peninsula
Eat-in kitchen - mid-sized 1960s u-shaped light wood floor eat-in kitchen idea in Kansas City with an undermount sink, flat-panel cabinets, blue cabinets, quartz countertops, white backsplash, ceramic backsplash, stainless steel appliances and a peninsula

 Dale Gruber Construction
We remodeled this particular deck with Trex Transcends maintenance free decking material. Three Trex Transcends colors were used on the deck:
Tree House is featured in the main area of the deck.
Vintage Lantern outlines the deck's perimeter as well as the bottom and top railing system.
White posts perfectly accent the entire deck space.
The deck posts also have Trex LED light caps, so the entire deck can illuminate once the sun has set.

 Liepold Design Group LLC
Inviting Entrance Hall; Cowtan & Tout Wallpaper Zara 3057-01 Craie & Zara Beads 3060-02 Perle; Liepold Design Group LLC
Transitional home design photo in New York
Transitional home design photo in New York
Find the right local pro for your project





 Talon Construction Inc.
Designing and building a kitchen addition is a complex process that involves multiple steps and considerations. Here is a general outline to help you get started on your kitchen addition project:
Define Your Goals and Budget:
• Determine the purpose of the kitchen addition. Is it for more cooking space, a dining area, or a combination of both?
• Establish a realistic budget for your project. Consider all costs, including construction, permits, materials, and furnishings.
Hire a Design Professional:
• Seek the services of a design build company who specializes in kitchen additions.
• Discuss your vision, needs, and budget with the design professional to create a design concept.
Site Evaluation:
• Assess the existing space and structural condition of your home to ensure it can support the addition.
• Consider factors like zoning regulations, setbacks, and building codes.
Design Development:
• Collaborate with your design professional to refine the concept, including the layout, size, and architectural style.
• Choose materials, finishes, and fixtures that fit your design and budget.
Obtain Permits:
• Consult with your local design build contractor to determine the necessary permits and approvals.
• Prepare and submit all required documents, including architectural drawings and engineering plans.
Create Construction Documents:
• Work with your design build professional to develop detailed construction drawings and specifications.
• These documents will serve as a guide for contractors during construction.
Hire a design build contractor:
• Check references, credentials, and licenses before selecting a contractor.
• Sign a detailed contract that outlines the scope of work, timeline, and payment schedule.
Construction Phase:
• Demolition: If needed, remove any existing structures or walls.
• Foundation: Construct the foundation for the addition.
• Framing: Build the structural framework of the addition.
• Plumbing, Electrical, and HVAC: Install or update utilities as required.
• Insulation: Ensure proper insulation for energy efficiency.
• Drywall and Finish Work: Complete the walls and ceilings.
• Flooring and Cabinetry: Install flooring and kitchen cabinets.
• Appliances and Fixtures: Add appliances, plumbing fixtures, and lighting.
• Paint and Finish: Apply paint and finishes to achieve the desired look.
• Final Inspection: Schedule inspections to ensure compliance with building codes.
Final Inspections and Approvals:
• Arrange for final inspections to ensure the addition meets all safety and code requirements.
• Obtain any necessary certificates of occupancy or compliance.
Move In and Enjoy:
• Once all inspections and approvals are received, you can move into your new kitchen addition and start enjoying it.
Remember that every kitchen addition project is unique, so adapt this outline to your specific needs and circumstances. Consulting with professionals and obtaining the required permits and inspections is crucial to a successful and safe project.
 Talon Construction Inc.
Designing and building a kitchen addition is a complex process that involves multiple steps and considerations. Here is a general outline to help you get started on your kitchen addition project:
Define Your Goals and Budget:
• Determine the purpose of the kitchen addition. Is it for more cooking space, a dining area, or a combination of both?
• Establish a realistic budget for your project. Consider all costs, including construction, permits, materials, and furnishings.
Hire a Design Professional:
• Seek the services of a design build company who specializes in kitchen additions.
• Discuss your vision, needs, and budget with the design professional to create a design concept.
Site Evaluation:
• Assess the existing space and structural condition of your home to ensure it can support the addition.
• Consider factors like zoning regulations, setbacks, and building codes.
Design Development:
• Collaborate with your design professional to refine the concept, including the layout, size, and architectural style.
• Choose materials, finishes, and fixtures that fit your design and budget.
Obtain Permits:
• Consult with your local design build contractor to determine the necessary permits and approvals.
• Prepare and submit all required documents, including architectural drawings and engineering plans.
Create Construction Documents:
• Work with your design build professional to develop detailed construction drawings and specifications.
• These documents will serve as a guide for contractors during construction.
Hire a design build contractor:
• Check references, credentials, and licenses before selecting a contractor.
• Sign a detailed contract that outlines the scope of work, timeline, and payment schedule.
Construction Phase:
• Demolition: If needed, remove any existing structures or walls.
• Foundation: Construct the foundation for the addition.
• Framing: Build the structural framework of the addition.
• Plumbing, Electrical, and HVAC: Install or update utilities as required.
• Insulation: Ensure proper insulation for energy efficiency.
• Drywall and Finish Work: Complete the walls and ceilings.
• Flooring and Cabinetry: Install flooring and kitchen cabinets.
• Appliances and Fixtures: Add appliances, plumbing fixtures, and lighting.
• Paint and Finish: Apply paint and finishes to achieve the desired look.
• Final Inspection: Schedule inspections to ensure compliance with building codes.
Final Inspections and Approvals:
• Arrange for final inspections to ensure the addition meets all safety and code requirements.
• Obtain any necessary certificates of occupancy or compliance.
Move In and Enjoy:
• Once all inspections and approvals are received, you can move into your new kitchen addition and start enjoying it.
Remember that every kitchen addition project is unique, so adapt this outline to your specific needs and circumstances. Consulting with professionals and obtaining the required permits and inspections is crucial to a successful and safe project.

 Hummels Landscape
A poolside cedar cabana sits overhead the patio - a fine example of what the outdoor living trend is all about. Built for the purpose of adding another "room" to the home, this area was designed for fireside lounging after a nice dip in the swimming pool. The brick-faced outdoor fireplace features the linear flame design that is becoming so popular in our projects as of late. The intimacy of the space is enhanced by the intricate paver rug in the center of the room, featuring Unilock Copthorne pavers. The entire space is outlined with a seating wall to allow for more guests without taking up additional patio space.

 Sanctuary Staging and Styling, LLC
Photo by Karli Moore Photography
Inspiration for a transitional home office remodel in Columbus
Inspiration for a transitional home office remodel in Columbus

 Donovan Lord Design
Edict Inc. Photos by Michael Hunter
Mid-sized minimalist master beige tile and stone tile marble floor freestanding bathtub photo in Dallas with a wall-mount sink, flat-panel cabinets, medium tone wood cabinets, quartz countertops, a wall-mount toilet and beige walls
Mid-sized minimalist master beige tile and stone tile marble floor freestanding bathtub photo in Dallas with a wall-mount sink, flat-panel cabinets, medium tone wood cabinets, quartz countertops, a wall-mount toilet and beige walls

 L.A. Carpet & Tile Inc.
Home Builder Havana Homes
Inspiration for a mid-sized country carpeted l-shaped mixed material railing staircase remodel in Edmonton with carpeted risers
Inspiration for a mid-sized country carpeted l-shaped mixed material railing staircase remodel in Edmonton with carpeted risers


 Carolyn Woods Design Inc.
Inspiration for a mediterranean green tile and subway tile terra-cotta tile alcove shower remodel in San Francisco with an undermount sink, flat-panel cabinets, medium tone wood cabinets, quartzite countertops and beige walls
 DLB Custom Homes, Inc
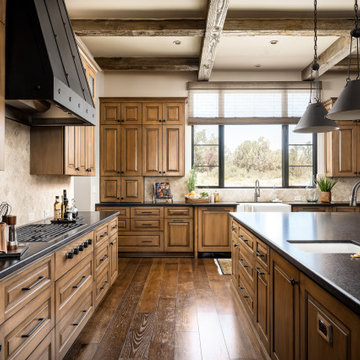
Southwest u-shaped dark wood floor, brown floor and exposed beam kitchen photo in Phoenix with a farmhouse sink, raised-panel cabinets, medium tone wood cabinets, beige backsplash, paneled appliances, an island and black countertops

 Stebnitz Builders, Inc.
The homeowners wish-list when searching for properties in the Geneva Lake area included: low-maintenance, incredible lake views, a pier but also a house that needed a lot of work because they were searching for a true project. After months of designing and planning, a bright and open design of the great room was created to maximize the room’s incredible view of Geneva Lake. Nautical touches can be found throughout the home, including the rope detailing on the overhead light fixture, in the coffee table accessories and the child-sized replica wooden boat. The crisp, clean kitchen has thoughtful design details, like the vintage look faucet and a mosaic outline of Geneva Lake in the back splash.
This project was featured in the Summer 2019 issue of Lakeshore Living
 Nancy Finneson | DeMane Design
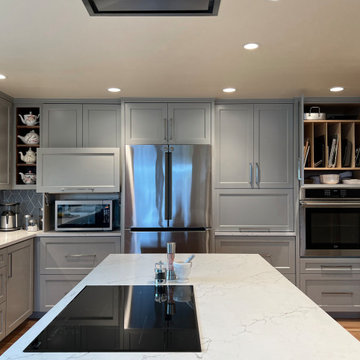
An abundance of storage, Hide the MW, tray storage by the oven.
The remodel had significant changes. The revised design delivers enhanced workflow, expanded storage, added seating, and greater counterspace for cooking activities.
The renovation involved removing a wall, an outdated garden window, and a peninsula. Finishes feature blue-gray and walnut tones, with hexagon tiles outlining the room.
 Seaside Casual Furniture
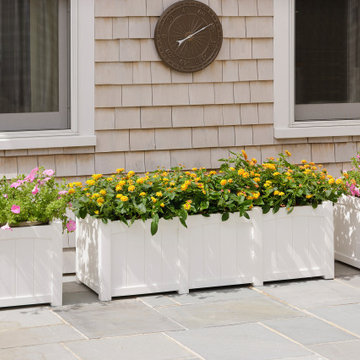
This colorful arrangement of flowers features our Wickford Residential Planters and Planter Extensions configured to create a clean, elevated patio. Crafted with White #EnviroWood, our signature HDPE material is made primarily from recycled milk jugs and plastic bottles. These planters are designed to be durable and eco-friendly.
Whether enhancing a home entrance, outlining a patio, or building a larger landscape design, the modular Wickford Planter system offers flexibility, durability, and sustainability.
Thoughtful design doesn’t just elevate outdoor spaces—it enhances the entire gardening experience.
240