
Search results for "Overlaps" in Home Design Ideas

 Mackin Architects
A bright and open breakfast area with banquette seating overlooking the porch and grounds.
Huge elegant medium tone wood floor kitchen/dining room combo photo in New York with white walls and no fireplace
Huge elegant medium tone wood floor kitchen/dining room combo photo in New York with white walls and no fireplace

 Studio 76 Kitchens and Baths
A new modern farmhouse included an open kitchen with views to all the first level rooms, including dining area, family room area, back mudroom and front hall entries. Rustic-styled beams provide support between first floor and loft upstairs. A 10-foot island was designed to fit between rustic support posts. The rustic alder dark stained island complements the L-shape perimeter cabinets of lighter knotty alder. Two full-sized undercounter ovens by Wolf split into single spacing, under an electric cooktop, and in the large island are useful for this busy family. Hardwood hickory floors and a vintage armoire add to the rustic decor.

 Davis Home Pros
Inspiration for a mid-sized 1960s 3/4 blue tile and subway tile home design remodel in San Francisco with shaker cabinets, medium tone wood cabinets, a two-piece toilet, white walls, an undermount sink and quartz countertops
Find the right local pro for your project

 Deco Design
Wooden organizers in these drawers help hold small utensils and keep everything from sliding around as the drawers are used.
We custom made all of the kitchen cabinetry and shelving. The kitchen was a small area so maximizing usable space with function and design was crucial.
The island was our biggest challenge. It needed to house several appliances of different size, a farmhouse sink and be able to have function from all 4 sides and still have room for seating space on the backside. The sink side has the farmhouse sink centered with storage drawers to the right that feature wood organizers and a double middle drawer to help hold all the small utensils and still maintain the 3 drawer look from the front view that matches the integrated dishwasher to the left. The right side contains both the integrated soft close trash unit and an icemaker with a third false panel door to maintain the size balance for all three. The left side houses the Sub Zero undercounter freezer. I wanted the face to look like six equal sized drawers, which left the integrated drawer fronts for the freezer overlapping the side panel for the dishwasher. The back of the island has storage tucked up under the seating space. The quartz countertop meets up against the maple butcher block to create a stunning island top.
All in all the end result of this kitchen is a beautiful space with wonderful function.
Photos: Kimball Ungerman
 highland
Skylight blackout blinds have to be held against the frame rather than hung below it, and that one difference is why a loft stays bright when the same fabric works downstairs. A blind on a sloped window sags away from the glass and daylight spills round all four edges. The fabric is rarely the problem.
Key Takeaways
On a vertical window, weight pulls the blind flat to the glass and the only leaks are two narrow strips an overlap will cover. Tilt the same window to forty degrees and the physics invert. That weight now drags the fabric away from the frame, opening a wedge of daylight along the bottom rail and a thinner one at the head. Flat roof skylight blinds have it worst, with no angle at all for the fabric to rest against.
If you have already bought a roller and taped the edges, you know this. Choosing blackout blinds for a skylight is a decision about the fixing.
Why Skylight Blackout Blinds Have to Be Captured at the Edges
The fix is a channel down each side of the reveal with the fabric running inside it. The lip overlaps the fabric edge, so no straight sightline runs from glass to room.
Tension matters as much as the track. A limp fabric bellies between two channels on a shallow pitch, which is why cell structures hold their shape better than a flat roller. The 1ClickBlinds honeycomb panel works that way. The head needs its own answer: a channel stops where the frame stops, so without a cassette a strip of glass glows above the roller. Skylight blackout blinds are only as good as their weakest edge.
Measuring, and the Velux Question
Most roof windows carry a code on a plate at the top of the sash, visible when you swing it open. Skylight blackout blinds sold as Velux blackout blinds are sized to those codes, so read the plate before ordering. Velux blackout blinds will not always sit in another brand's frame, and blinds for Velux windows cut to a generic width rarely capture in the channels.
Heat is worth a thought too. Roof glass takes the sun almost square on at midday, so skylight blackout blinds block heat and light in one action. On flat roof skylight blinds a reflective fabric beats a black one, and the full range is here if you want to compare.
Frequently asked questions
How do you fit a blackout blind to a Velux roof window?
Find the frame code on the plate at the top of the sash and order against it, then fix the two channels before the blind goes in. They must be parallel within a couple of millimetres or the fabric binds. Blinds for Velux windows clip to the frame, so nothing goes into the ceiling.
How do you measure for skylight blinds?
Use the frame code where the window has one, since it gives the exact size without a tape. Without a code, measure the inner frame width and drop at three points each and take the smallest. Note which way the window opens, as that sets where the controls go.
What are skylight blinds?
Blinds made for roof windows rather than wall windows, held along both edges so they stay against the glass at an angle. Blinds for skylight windows come in blackout, reflective and electric forms. The defining feature is the fixing, not the fabric.
Key Takeaways
- Gravity works against you. On a sloping window a hanging blind pulls away from the frame.
- Four edges leak, not two. A roof blind leaks at the sides, head and foot.
- Channels do the real work. A track down both edges keeps the fabric flat to the glass.
- Order by frame code. Blinds for skylight windows are sized from the plate on the sash, not a tape.
-
Darkness and heat are one job. The pane that wakes you at half four in June is the hottest surface by noon.
On a vertical window, weight pulls the blind flat to the glass and the only leaks are two narrow strips an overlap will cover. Tilt the same window to forty degrees and the physics invert. That weight now drags the fabric away from the frame, opening a wedge of daylight along the bottom rail and a thinner one at the head. Flat roof skylight blinds have it worst, with no angle at all for the fabric to rest against.
If you have already bought a roller and taped the edges, you know this. Choosing blackout blinds for a skylight is a decision about the fixing.
Why Skylight Blackout Blinds Have to Be Captured at the Edges
The fix is a channel down each side of the reveal with the fabric running inside it. The lip overlaps the fabric edge, so no straight sightline runs from glass to room.
Tension matters as much as the track. A limp fabric bellies between two channels on a shallow pitch, which is why cell structures hold their shape better than a flat roller. The 1ClickBlinds honeycomb panel works that way. The head needs its own answer: a channel stops where the frame stops, so without a cassette a strip of glass glows above the roller. Skylight blackout blinds are only as good as their weakest edge.
Measuring, and the Velux Question
Most roof windows carry a code on a plate at the top of the sash, visible when you swing it open. Skylight blackout blinds sold as Velux blackout blinds are sized to those codes, so read the plate before ordering. Velux blackout blinds will not always sit in another brand's frame, and blinds for Velux windows cut to a generic width rarely capture in the channels.
Heat is worth a thought too. Roof glass takes the sun almost square on at midday, so skylight blackout blinds block heat and light in one action. On flat roof skylight blinds a reflective fabric beats a black one, and the full range is here if you want to compare.
Frequently asked questions
How do you fit a blackout blind to a Velux roof window?
Find the frame code on the plate at the top of the sash and order against it, then fix the two channels before the blind goes in. They must be parallel within a couple of millimetres or the fabric binds. Blinds for Velux windows clip to the frame, so nothing goes into the ceiling.
How do you measure for skylight blinds?
Use the frame code where the window has one, since it gives the exact size without a tape. Without a code, measure the inner frame width and drop at three points each and take the smallest. Note which way the window opens, as that sets where the controls go.
What are skylight blinds?
Blinds made for roof windows rather than wall windows, held along both edges so they stay against the glass at an angle. Blinds for skylight windows come in blackout, reflective and electric forms. The defining feature is the fixing, not the fabric.


 ADLA Studio
A custom blackened steel pedestrian gate in a steel fence on board-formed concrete walls at Autohaus, by Matt Fajkus Architecture, Austin. Landscape architecture by ADLA Studio.
Sponsored
Columbus, OH

Wannemacher Interiors
Customized Award-Winning Interior Design Solutions in Franklin Cnty OH


 Interior Changes home design & consulting
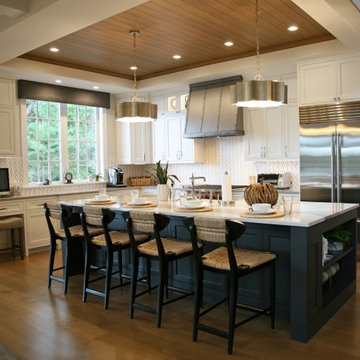
The stained wood ceiling in the recessed tray does a great job of creating a room within a room in the open concept space. This is something that warms up all the white and keeps a good balance of fresh and earthy at the same time.

 Everything Home
Our Indianapolis studio designed this new construction home for empty nesters. We completed the interior and exterior design for the 4,500 sq ft home. It flaunts an abundance of natural light and elegant finishes.
---
Project completed by Wendy Langston's Everything Home interior design firm, which serves Carmel, Zionsville, Fishers, Westfield, Noblesville, and Indianapolis.
For more about Everything Home, click here: https://everythinghomedesigns.com/
To learn more about this project, click here: https://everythinghomedesigns.com/portfolio/sun-drenched-elegance/

 Saikley Architects
This house was a very small mid-century bungalow with previous additions that resulted in a large but chaotic layout. The owners wanted to convert the house to a super-efficient, and charming Craftsman-style, 6 bedroom home for their large family and work at home.
We achieved the space needs by moving a few walls for a more efficient, organized layout, setting up spaces for overlapping uses, and making a small upstairs addition. Every bit of square footage was optimized to meet the goals of the project without making the house huge or adding unnecessary cost.
Much thought was given to the entry sequence near the front door. A large flow-through mudroom with storage for each family member, and adjacent laundry, make it easy for children to be taught to keep their things organized and to contribute to household chores. A mail station and central home admin area at the mudroom help keep clutter down at other areas and minimize home management tasks. A garage door near the kitchen gives quick access to bulk items.
The existing house had too much view to the street from the living room through large corner windows, and too little entry transition, to the extent that the family did not feel comfortable using the living room much without shades drawn. We raised the window sills and brought the new windows in from the corner of the house, allowing plenty of light while protecting privacy and a sense of enclosure in the living room. We enlarged the front porch to create a more graceful transition from the public to private space. We located the front door so that the circulation from entry into the house would allow for furnishing the living room with a sitting circle that is not intruded upon by people walking through the room.
Sight lines through the living spaces were an important consideration in the design. The owners wanted discreet spaces for living room, kitchen, dining and family room, but also wanted the living spaces to feel connected and to be able to easily watch their children. Being able to see the children playing in the yard while getting things done inside the house was also important. While largely working with the existing structure, we opened walls and rearranged the use of spaces to make a series of connected living spaces with long views through them.
The character of the remodeled house is a contemporary Craftsman with classic materials and cool, consistent colors. A few arches echo through the house to frame spaces and soften the feeling of the rooms.
Photography: Kurt Manley
https://saikleyarchitects.com/portfolio/bungalow-expansion/

 Architessa
Designer: Jennifer Gilmer Kitchen & Bath, http://www.gilmerkitchens.com/
Photographer: Bob Narod
Tile: Architectural Ceramics, http://www.architecturalceramics.com/
Tiles Used:
6x36 Crag Castle White Sugar Natural Porcelain Field Tile: http://www.architecturalceramics.com/products/crag-castle
Perfect Pebble Black and Tan Blend Natural Square Interlocking
Pebble Mosaic (11.75x11.75 - 0.97 SF Sheet): http://www.architecturalceramics.com/products/perfect-pebble
2x11.5 Crescent Sutra Black Honed VTile Field Tile: http://www.architecturalceramics.com/products/vtile


 Weninger Construction & Design Ltd
Master Ensuite with spa shower. This luxurious spa shower features 2 benches, 2 rainhead showerheads, 2 wall showerheads, 8 body sprayers, steam shower, and custom silver quartzite flagstone inlaid with a cascade of pebbles for a sublime apres ski relaxation experience.
Grabbing a toasty towel from the towel warmer after stepping out of the custom shower provides comfort for guests enjoying this perfect winter getaway.


 Shakuff
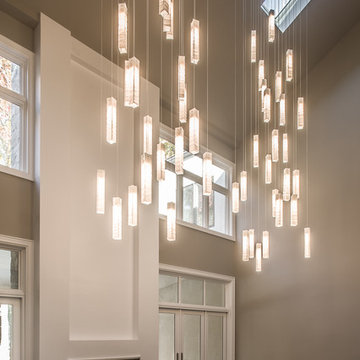
Two symmetrical, cascading, white glass chandeliers custom made to go between skylights on a vaulted ceiling.
Photo Credit: Sean Litchfield Photography

 Moxie Design Studio, LLC
Interior designer: Moxie Design Studio, LLC
Photographer: Carlos Gervasio
Inspiration for a contemporary bathroom remodel in Phoenix
Inspiration for a contemporary bathroom remodel in Phoenix

 Quality Edge
Vesta Plank siding by Quality Edge, in Coal and Sea Glass. Designed to echo the veins and tones of natural wood, six unique and intricate hand-drawn panels make up every Vesta woodgrain color. All six planks are drawn to complement each other. Panels are distinct enough to create an impactful, signature look that is as beautiful up close as it is far away. Our tri-color paint application creates a multi-dimensional and naturally accurate look that’s engineered to stay vibrant.

 Andover Landscape Design & Construction
Modernist architect Marcel Breuer is known for his innovative Wassily chair, a pared back seat made up of tubular steel frame and strips of canvas. Even if that’s your only point of reference, you’ll see plenty of overlap in this Andover residence he designed. It is highly functional, with clean lines and plenty of open space. We had the honor to design an updated landscape to complement this home designed by Marcel Breuer, right here in Andover. As the landscape was originally designed by renowned landscape architect, Dan Kiley, we wanted to maintain his original design intent while also updating its functionality to suit the homeowner's needs. Ultimately, it was important to respect the architectural design intent of the property while creating a safe and inviting entry.
The simplicity of the design was created with a restricted palette that compliments the materials and color tones of the house. Orthogonal lines pull from the architecture out into the landscape, unifying the two. A metal runnel with stacked stone visually connects the front entry to the primary bedroom garden, while further highlighting a unique feature in Breuer’s architecture.
Moving to a space formed for privacy and respite, the zen garden off the primary bedroom offers an outdoor shower, water feature, and minimalistic planting. Arranged boulders, undulating moss plant beds, bluestone and gravel are mediums in which we used to paint a calming atmosphere extending from this unique home. To highlight the tranquil nature of the site, a boulder was hand carved to create a recirculating water feature that can be enjoyed from both the garden and primary bedroom. A wall of glass separates the bedroom from the spa-like garden, blurring the lines of architecture and landscape.

 Walker Woodworking
WW Photography
Inspiration for a large transitional medium tone wood floor eat-in kitchen remodel in Charlotte with a farmhouse sink, raised-panel cabinets, white cabinets, quartzite countertops, white backsplash, brick backsplash, stainless steel appliances and two islands
Inspiration for a large transitional medium tone wood floor eat-in kitchen remodel in Charlotte with a farmhouse sink, raised-panel cabinets, white cabinets, quartzite countertops, white backsplash, brick backsplash, stainless steel appliances and two islands
115