
Search results for "Powerful visual" in Home Design Ideas
 StoneUnlimited Kitchen and Bath Remodeling
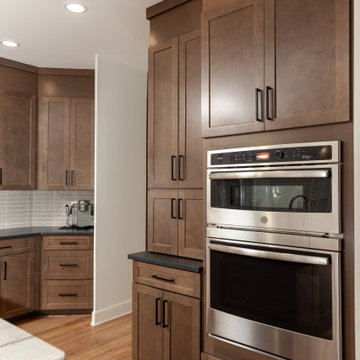
Sip into Style: Maple Latte Remodel
Kitchens are often the centerpiece of our homes, a place where culinary creativity meets family gatherings. Yet, many kitchens fall victim to outdated designs and worn-out finishes. If you’re feeling uninspired by your current space, it’s time to consider a remodel that can elevate your kitchen from drab to fab.
Let’s explore how we transformed this client’s kitchen into a posh, stylish retreat that featured a combination of stunning materials and thoughtful design choices that truly elevated the space.
Creating an Open Concept
One of the most significant changes anyone can make in a home remodel is to modify or remove walls. Even though there were two points of entry into this client’s kitchen, the space was closed off. Opening up the wall instantly created a more open and inviting layout that allowed for the installation of a large island. Eliminating the barrier between the kitchen and the adjacent living area, provides a seamless flow that is perfect for entertaining guests or simply keeping an eye on the kids while cooking dinner.
A Showstopping Island
At the heart of this kitchen remodel is an expansive 9 ft. island, designed to be both functional and aesthetically pleasing. The island features a stunning White Pearl natural quartzite countertop that radiates elegance. With its unique veining and shimmering finish, this stone serves as a beautiful focal point and adds a touch of luxury to the space. A beverage cooler and dishwasher are tucked underneath, concealed from the view of the living area. Three 12” deep and 36” wide cabinets line the front of the island providing additional hidden storage. This multifunctional design makes the island an essential part of daily life in the kitchen, making it a cozy spot for casual dining or morning coffee.
Complementary Perimeter Countertops
To enhance the overall look, the perimeter countertops are topped with Silestone Eternal Charcoal. This material offers a striking contrast to the lighter island, featuring rich, dark hues that ground the space and create depth. The durability and easy maintenance of Silestone make it an ideal choice for busy kitchens, ensuring that the surfaces remain beautiful and functional for years to come.
Beautiful Cabinetry
The cabinetry in this remodel plays a pivotal role in both style and storage. We opted for Waypoint Cabinetry in a Maple Latte finish, which adds warmth and sophistication to the kitchen. The soft, neutral tones of the cabinetry complement the countertops beautifully and create a cohesive look throughout the space. The cabinets are thoughtfully designed to provide ample storage, with pull-out shelves and organizers that maximize accessibility.
Finishing Touches
No remodel is complete without the right finishing touches. We chose sleek, modern matte black Top Knobs hardware that enhances the cabinetry's clean lines while adding a touch of contemporary flair. The 2 ½” x 10” San Marcos Tortora stylish backsplash tile, a striking black hood with brushed gold accents and brushed gold large pendant lighting tie together the colors and textures of the room, adding visual interest.
The Result: A Dream Kitchen
The result of this kitchen remodel is nothing short of spectacular. The combination of the open layout, stunning island, and thoughtful materials creates a space that is both functional and beautiful.
Whether you’re considering a full kitchen remodel or simply looking for inspiration, this project highlights the transformative power of thoughtful design and quality materials. If you’re ready to create your dream kitchen, don’t hesitate to contact us so that we can help bring your vision to life. Happy remodeling!
Cabinetry: Waypoint Living Spaces: Maple Latte Stain Finish
Countertops: Stone Showcase - Atlanta Natural Quartzite White Pearl &
Engineered Quart Silestone by Cosentino Eternal Charcoal
Tile: San Marcos Tortora B&F Ceramics Design Showroom Inc.
Faucets: Delta Faucet
 Futuro Futuro Kitchen Range Hoods
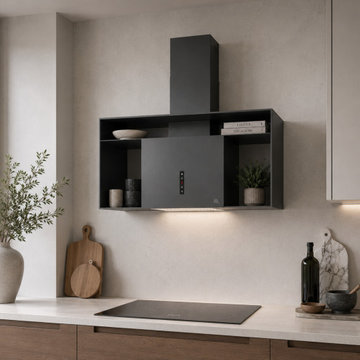
The 36-inch Knox Black Wall Range Hood by Futuro Futuro was selected as a statement piece to anchor this contemporary kitchen design. Its sculptural gunmetal-black finish introduces a refined architectural element, complementing the clean lines, sophisticated materials, and modern aesthetic of the space.
Beyond its visual impact, the Knox delivers exceptional performance with powerful, quiet ventilation designed for everyday living. Integrated features such as touch-sensitive controls, LED lighting, and a thoughtfully designed display shelf add both functionality and personalization, allowing the hood to serve as more than an appliance—it becomes a defining design feature.
Crafted in Italy with meticulous attention to detail, this range hood reflects the balance of form and function that guided the overall kitchen design: timeless elegance, innovative technology, and a luxurious yet welcoming atmosphere. https://futurofuturo.com/36-inch-knox-black-wall-range-hood/
 Sarah Hassaan Interiors
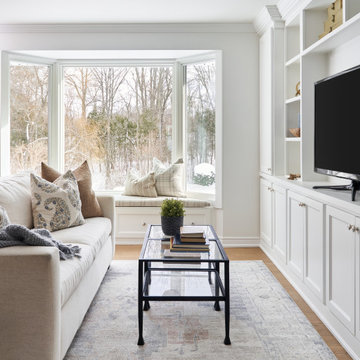
Project Summerhayes is a thoughtfully curated transformation of the heart of the home, the kitchen and family room. These spaces were designed to support daily living while feeling warm, welcoming, and deeply personal.
From the outset, our approach focused on intentional design choices that balance visual impact with comfort and functionality. Each element was carefully selected to enhance the flow of the space while creating an atmosphere that feels both refined and inviting.
Every layer, detail, and finish was chosen with purpose, resulting in interiors that feel lived-in, loved, and uniquely reflective of the family who calls this house home. The transformation highlights the power of considered design where beauty and function work together seamlessly.
We’re delighted to share Project Summerhayes with you.
Find the right local pro for your project
 Tile Merchant
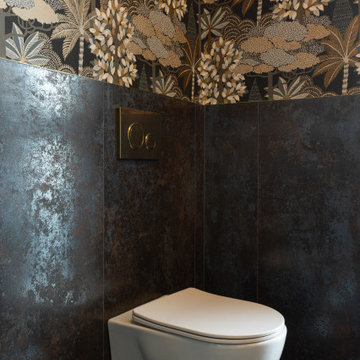
Bathroom Inspiration: Milkyway Metallic-Finish Porcelain Tiles for a Dramatic, Modern & Textured Design Statement
Looking to elevate your bathroom with a bold and contemporary touch? The Milkyway Travertine-Effect Matt Porcelain Tile delivers a striking metallic finish combined with a textured matt surface — perfect for homeowners and designers seeking a dramatic, design-led look.
This wow-factor collection features three expressive colours, each bringing its own personality to the space:
• Silver – soft metallic elegance with a modern twist
• Azul – rich blue tones that add depth and artistic flair
• Anthracite – deep, moody sophistication for a truly bold statement
Whether your vision is minimalist luxury or moody contemporary, the Milkyway range offers a powerful way to transform any bathroom into a visually captivating, spa-inspired retreat.
 Wiles Design Group
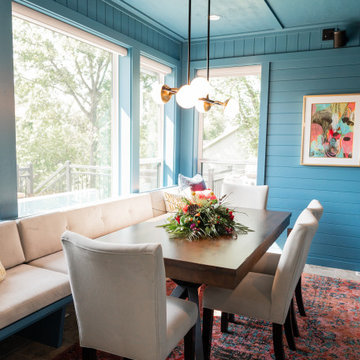
This home was redesigned to reflect the homeowners' personalities through intentional and bold design choices, resulting in a visually appealing and powerfully expressive environment.
This captivating dining room design features a striking bold blue palette that mingles with elegant furniture while statement lights dangle gracefully above. The rust-toned carpet adds a warm contrast, completing a sophisticated and inviting ambience.

 Industrial Projects
Creating a comfortable outdoor living space is a priority for many homeowners and DIY enthusiasts. With rising summer temperatures, installing a shade tarp in your backyard offers an affordable and effective solution for sun protection. We’ve developed this detailed, step-by-step guide to help you confidently install a shade tarp that not only shields you from the sun but also adds aesthetic appeal to your outdoor area.
Benefits of Installing a Backyard Shade Tarp
Before diving into the installation process, let’s explore the key benefits of having a backyard shade tarp:
Provides UV Protection: Keeps your family and guests safe from harmful sun exposure.
Reduces Outdoor Temperatures: Creates a cooler, more enjoyable outdoor space.
Protects Outdoor Furniture: Extends the life of patio furniture by reducing sun damage.
Enhances Outdoor Aesthetics: Adds a modern, stylish look to your yard.
Budget-Friendly: More affordable compared to permanent structures like pergolas.
Materials and Tools You’ll Need
To begin your DIY backyard shade project, gather the following materials and tools:
Materials:
Shade tarp (UV-resistant and breathable)
Sturdy posts or existing structures (trees, fences, walls)
Mounting hardware (eye bolts, D-rings, turnbuckles, snap hooks)
Nylon or polyester rope, or stainless-steel wire
Concrete (if installing new posts)
Tools:
Power drill
Measuring tape
Level
Ladder
Wrench or adjustable spanner
Post hole digger (if installing new posts)
Step 1: Plan Your Shade Tarp Layout
The first step in installing your backyard shade tarp is careful planning. Take time to assess your outdoor area and answer these key questions:
Where is the sun’s path throughout the day?
What size and shape of tarp best suits your space?
Will you anchor the tarp to existing structures or install new posts?
What height do you want the tarp to sit at for maximum shade and airflow?
Pro Tip: Use string or garden hoses to visualize the tarp layout on the ground before making permanent decisions.
Step 2: Measure and Mark Anchor Points
Once you’ve determined the tarp’s location and orientation:
Measure the tarp dimensions.
Mark the exact points where each corner of the tarp will be anchored.
Ensure that the anchor points are at least 5–10% longer than the tarp size to allow for tensioning and slight adjustments.
Consider slope angles for water runoff. Aim for at least a 20-degree angle to prevent water pooling on the tarp.
Step 3: Install Support Posts (If Necessary)
If your backyard lacks existing anchor points like trees or fences, you’ll need to install sturdy support posts:
Dig post holes at least 24 inches deep and 8-12 inches wide for stability.
Set posts in concrete, making sure they remain plumb and level.
Allow the concrete to cure for at least 24–48 hours before applying tension from the tarp.
We recommend using pressure-treated wood, galvanized steel poles, or aluminum posts for longevity and strength.
Step 4: Install Mounting Hardware
With your anchor points ready, it’s time to install the necessary hardware:
Attach eye bolts or pad eyes securely into walls, posts, or other fixed structures.
For added flexibility and adjustability, install turnbuckles or tensioners to fine-tune the tarp’s tightness.
Connect snap hooks, D-rings, or carabiners to make assembly and disassembly easier.
Make sure all hardware is rated for outdoor use to prevent rust and corrosion.
Step 5: Attach and Tension the Shade Tarp
Now it’s time for the most satisfying part—mounting the shade tarp:
Begin by attaching one corner of the tarp to an anchor point.
Gradually attach the remaining corners, moving diagonally for even tension.
Adjust each connection point using your turnbuckles, ropes, or cables.
Pull the tarp tight enough to avoid sagging, but not so tight that it risks tearing.
Check that the tarp maintains the desired slope for rainwater runoff and adjust tension as needed.
Step 6: Final Adjustments and Safety Check
Before enjoying your new shaded area:
Inspect all anchor points and hardware for stability.
Test the tarp’s tension and make adjustments for even distribution.
Ensure that no sharp edges or loose connections remain that could damage the tarp or pose a safety hazard.
Confirm that the tarp is secure in windy conditions by giving it a gentle tug.
If you live in an area with frequent high winds, consider removing the tarp during storms to prevent damage.
Step 7: Enjoy Your Shaded Backyard Oasis
Once installed, your backyard shade tarp provides a comfortable and protective space for outdoor gatherings, relaxation, or family activities. You can decorate underneath with outdoor furniture, string lights, or potted plants to create a personalized outdoor retreat.
Maintenance Tips for Long-Lasting Shade Tarp Performance
To extend the life of your shade tarp, follow these maintenance guidelines:
Regularly check for wear and tear, especially around anchor points and seams.
Clean the tarp periodically with mild soap and water to prevent mildew buildup.
Store the tarp indoors during harsh weather seasons if it's not designed for year-round use.
Tighten hardware as needed to maintain proper tension and avoid sagging.
By following these simple care steps, your shade tarp will continue to deliver years of sun protection and outdoor comfort.
Conclusion: Upgrade Your Outdoor Space with a DIY Shade Tarp
Installing a shade tarp in your backyard is a cost-effective and rewarding DIY project. With careful planning, quality materials, and proper installation techniques, you’ll enjoy cool, shaded outdoor living all season long. This step-by-step guide ensures your project goes smoothly from start to finish.
 Wiles Design Group
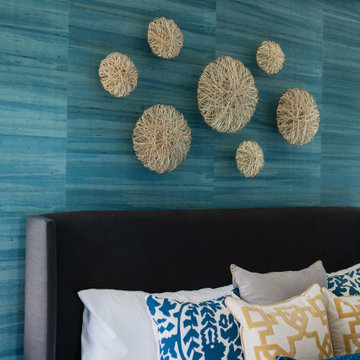
This home was redesigned to reflect the homeowners' personalities through intentional and bold design choices, resulting in a visually appealing and powerfully expressive environment.
In this meticulously designed bedroom, the bold blue palette infuses a sense of tranquility, perfectly complementing the luxurious bedding. An eye-catching art installation above the bed adds a touch of elegance, while hints of greenery bring in a refreshing natural element.

 Miro Kitchen Design
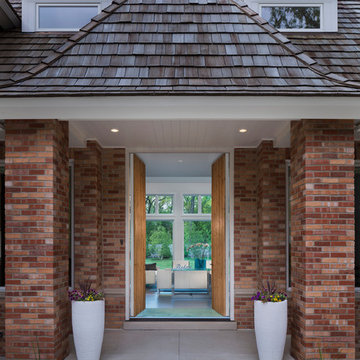
On the exterior, the desire was to weave the home into the fabric of the community, all while paying special attention to meld the footprint of the house into a workable clean, open, and spacious interior free of clutter and saturated in natural light to meet the owner’s simple but yet tasteful lifestyle. The utilization of natural light all while bringing nature’s canvas into the spaces provides a sense of harmony.
Light, shadow and texture bathe each space creating atmosphere, always changing, and blurring the boundaries between the indoor and outdoor space. Color abounds as nature paints the walls. Though they are all white hues of the spectrum, the natural light saturates and glows, all while being reflected off of the beautiful forms and surfaces. Total emersion of the senses engulf the user, greeting them with an ever changing environment.
Style gives way to natural beauty and the home is neither of the past or future, rather it lives in the moment. Stable, grounded and unpretentious the home is understated yet powerful. The environment encourages exploration and an awakening of inner being dispelling convention and accepted norms.
The home encourages mediation embracing principals associated with silent illumination.
If there was one factor above all that guided the design it would be found in a word, truth.
Experience the delight of the creator and enjoy these photos.
 RL Design and Build
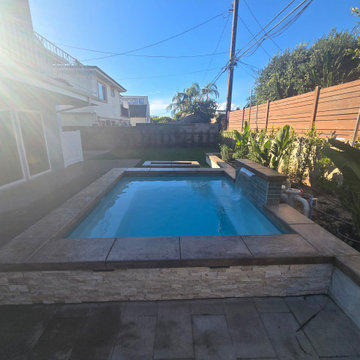
This backyard was completely reimagined into a modern, fully automated outdoor living space designed for relaxation, entertaining, and year-round enjoyment.
At the center of the design is a fully automated 11’ x 9’ inground spa, equipped with a dedicated pump for powerful swimming jets and a sleek sheer descent water feature. The spa is finished with pour-in-place coping, stack stone on the spa facing, and low-voltage LED lighting to enhance both functionality and nighttime ambiance.
Adjacent to the spa is a custom rectangular fire pit, featuring pour-in-place coping, stack stone veneer, and integrated low-voltage lighting, creating a warm and inviting focal point for evening gatherings.
For entertaining, we built a custom BBQ island topped with a concrete countertop, and fully equipped with an ice chest, refrigerator, trash pull-out, and ample storage space, offering both durability and a clean, modern aesthetic.
The hardscape includes 24” x 12” decking pavers installed throughout the yard and continued along the side of the house, all designed with proper drainage for long-term performance and durability.
A raised planter system adds structure and greenery to the space, finished with pour-in-place coping, smooth stucco planter faces, and low-voltage lighting both on and within the planters. An irrigation drip system was integrated into all planters to ensure efficient watering and healthy plant growth with minimal maintenance.
To soften the design, artificial grass with stepping stones was installed, creating a low-maintenance, lush look while improving flow through the yard.
For evening atmosphere, three metal posts were installed for string lighting, complemented by low-voltage lighting throughout all flat and raised planters to deliver layered, resort-style ambiance after dark.
Finally, white vinyl gates and fencing were added to enclose and conceal the spa and pool equipment, topped with a privacy extension to keep the space visually clean and private.
The result is a cohesive, modern outdoor retreat that balances design, comfort, and functionality. Perfect for both entertaining and everyday enjoyment.
 Wiles Design Group
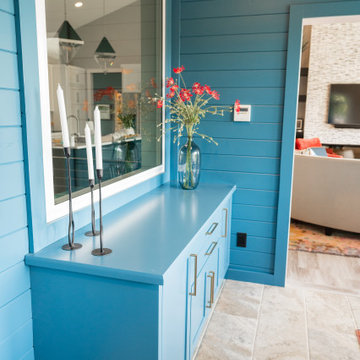
This home was redesigned to reflect the homeowners' personalities through intentional and bold design choices, resulting in a visually appealing and powerfully expressive environment.
This captivating dining room design features a striking bold blue palette that mingles with elegant furniture while statement lights dangle gracefully above. The rust-toned carpet adds a warm contrast, completing a sophisticated and inviting ambience.
 StoneUnlimited Kitchen and Bath Remodeling
Sip into Style: Maple Latte Remodel
Kitchens are often the centerpiece of our homes, a place where culinary creativity meets family gatherings. Yet, many kitchens fall victim to outdated designs and worn-out finishes. If you’re feeling uninspired by your current space, it’s time to consider a remodel that can elevate your kitchen from drab to fab.
Let’s explore how we transformed this client’s kitchen into a posh, stylish retreat that featured a combination of stunning materials and thoughtful design choices that truly elevated the space.
Creating an Open Concept
One of the most significant changes anyone can make in a home remodel is to modify or remove walls. Even though there were two points of entry into this client’s kitchen, the space was closed off. Opening up the wall instantly created a more open and inviting layout that allowed for the installation of a large island. Eliminating the barrier between the kitchen and the adjacent living area, provides a seamless flow that is perfect for entertaining guests or simply keeping an eye on the kids while cooking dinner.
A Showstopping Island
At the heart of this kitchen remodel is an expansive 9 ft. island, designed to be both functional and aesthetically pleasing. The island features a stunning White Pearl natural quartzite countertop that radiates elegance. With its unique veining and shimmering finish, this stone serves as a beautiful focal point and adds a touch of luxury to the space. A beverage cooler and dishwasher are tucked underneath, concealed from the view of the living area. Three 12” deep and 36” wide cabinets line the front of the island providing additional hidden storage. This multifunctional design makes the island an essential part of daily life in the kitchen, making it a cozy spot for casual dining or morning coffee.
Complementary Perimeter Countertops
To enhance the overall look, the perimeter countertops are topped with Silestone Eternal Charcoal. This material offers a striking contrast to the lighter island, featuring rich, dark hues that ground the space and create depth. The durability and easy maintenance of Silestone make it an ideal choice for busy kitchens, ensuring that the surfaces remain beautiful and functional for years to come.
Beautiful Cabinetry
The cabinetry in this remodel plays a pivotal role in both style and storage. We opted for Waypoint Cabinetry in a Maple Latte finish, which adds warmth and sophistication to the kitchen. The soft, neutral tones of the cabinetry complement the countertops beautifully and create a cohesive look throughout the space. The cabinets are thoughtfully designed to provide ample storage, with pull-out shelves and organizers that maximize accessibility.
Finishing Touches
No remodel is complete without the right finishing touches. We chose sleek, modern matte black Top Knobs hardware that enhances the cabinetry's clean lines while adding a touch of contemporary flair. The 2 ½” x 10” San Marcos Tortora stylish backsplash tile, a striking black hood with brushed gold accents and brushed gold large pendant lighting tie together the colors and textures of the room, adding visual interest.
The Result: A Dream Kitchen
The result of this kitchen remodel is nothing short of spectacular. The combination of the open layout, stunning island, and thoughtful materials creates a space that is both functional and beautiful.
Whether you’re considering a full kitchen remodel or simply looking for inspiration, this project highlights the transformative power of thoughtful design and quality materials. If you’re ready to create your dream kitchen, don’t hesitate to contact us so that we can help bring your vision to life. Happy remodeling!
Cabinetry: Waypoint Living Spaces: Maple Latte Stain Finish
Countertops: Stone Showcase - Atlanta Natural Quartzite White Pearl &
Engineered Quart Silestone by Cosentino Eternal Charcoal
Tile: San Marcos Tortora B&F Ceramics Design Showroom Inc.
Faucets: Delta Faucet
 Lang's Kitchen & Bath
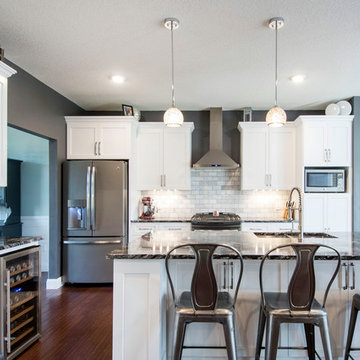
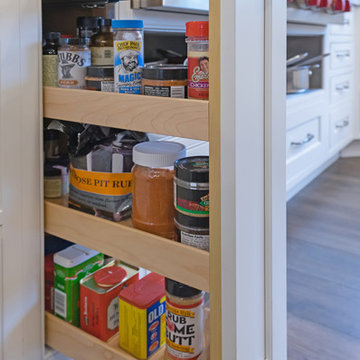
This transitional style kitchen remodel is the heart and soul of this Yardley, PA home, with the perfect marriage of form and function. The combination of white and gray finish DuraSupreme kitchen cabinets, accented by Top Knobs hardware and granite countertops, create a stunning visual effect. Each cabinet houses well-planned specialized storage, including glass front cabinetry and a beverage bar with pull outs. A walk-in pantry provides ample room to store all your cooking essentials. Custom features like the Jay Rambo hood, stainless insert under the range, and Walker Zanger decorative tile feature set this kitchen design apart. The main sink by Julien includes a drain board, colander, and drying rack with a Grohe pull-down faucet, and the secondary sink from Elkay is a hammered stainless sculpted metal sink. The kitchen features top of the line appliances including Subzero refrigerators, a Sharp microwave drawer, Wolf cooking appliances, a Bosch dishwasher, and Kitchenaid ice maker. Task Lighting angled power strips offer space to plug in appliances and charge devices. The Eco Timber engineered wood floor gives the entire space a warm, inviting appearance.
 Livita Ltd | Interior Design Company
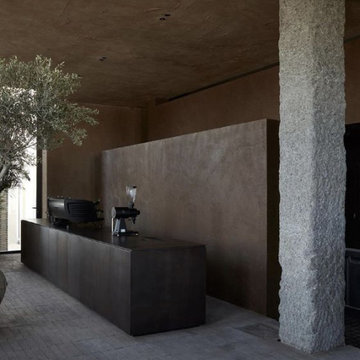
The top interior design is all about creating meaningful, powerful, and sensual experiences for ourselves and our clients. It is more than creating luxury interiors of residences or choosing the right cushion color for your living room. It is about creating experiences that address, protect, and respond to the need of humans.

 JandB Kitchen Designs
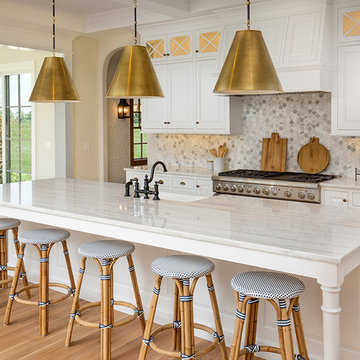
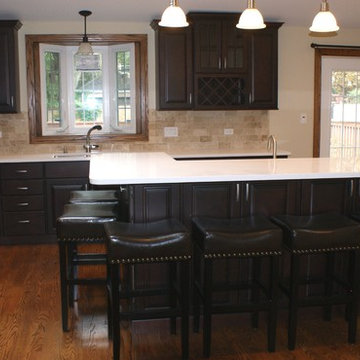
VIEW FROM D/R THROUGH FRENCH DOORS.....ISLAND VISUAL IS STRIKING.....CABINETS AROUND RAISED "L" ARE ALL FUNCTIONAL.....OBVIOUSLY HAVE TO BE FULL-HEIGHT DOORS DUE TO OVERHANG.....USED STOCK 39" WALL CABS.....POWERFUL EFFECT WITH ALL THE ELEMENTS FROM THIS POSITION.
 Altair
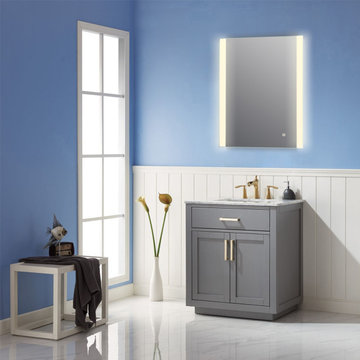
It's minimalist design adds timeless style to any bathroom space. Cosenza with its two frosted bars, emit an eye-pleasing light, perfect for your styling and grooming requirements. Due to the modern rectangular design not only is the mirror visually striking, but also versatile because it can easily be installed vertically or horizontally, depending on your needs. With style and grace, Cosenza is sure to be the mirror you are looking for.
Touch Sensor On/Off Button
5mm copper-free silver mirror with frost band
Outer border back Frame with acrylic and Inner border back frame made of aluminum material
2835 LED lighting strip 120beans/M
Stepless light color change from 3000K/4000K/6000K, dimmable by holding touch sensor
Hang landscape and portrait
Frameless modern design
110V , IP44 rated
Power Source: Hardwired
UL-approved LED driver, with ETL certificate
Shape: Rectangle
Orientation : Both vertical or horizontal hanging
Easy assembly required. Installation instructions, hardware and mounting bracket included
 Highland Construction & Remodeling, Inc.
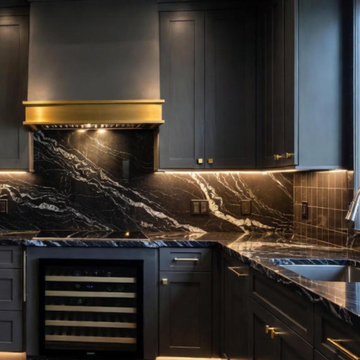
This striking Beverly Hills kitchen remodel embodies bold sophistication and modern luxury. Deep matte black cabinetry sets a dramatic foundation, creating a refined and moody aesthetic that feels both powerful and elegant. The design is elevated by a stunning black natural stone backsplash and countertop, where dynamic white veining introduces movement, depth, and visual artistry.
Warm brass accents — from the sleek hardware to the custom hood detail and faucet — provide a rich contrast against the dark palette, adding warmth and a touch of timeless glamour. Integrated lighting, including under-cabinet illumination, enhances the textures of the stone while casting a soft ambient glow throughout the space.
Thoughtfully designed for both function and statement, the kitchen features integrated appliances and a built-in wine cooler, seamlessly blending practicality with high-end living. The result is a space that reflects the essence of Beverly Hills design: bold, luxurious, and impeccably curated.
 Sarah Hassaan Interiors
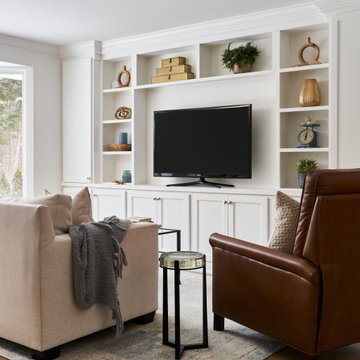
Project Summerhayes is a thoughtfully curated transformation of the heart of the home, the kitchen and family room. These spaces were designed to support daily living while feeling warm, welcoming, and deeply personal.
From the outset, our approach focused on intentional design choices that balance visual impact with comfort and functionality. Each element was carefully selected to enhance the flow of the space while creating an atmosphere that feels both refined and inviting.
Every layer, detail, and finish was chosen with purpose, resulting in interiors that feel lived-in, loved, and uniquely reflective of the family who calls this house home. The transformation highlights the power of considered design where beauty and function work together seamlessly.
We’re delighted to share Project Summerhayes with you.
Sponsored
Columbus, OH

Snider & Metcalf Interior Design, LTD
Leading Interior Designers in Columbus, Ohio & Ponte Vedra, Florida
 Boyenga Team / Compass
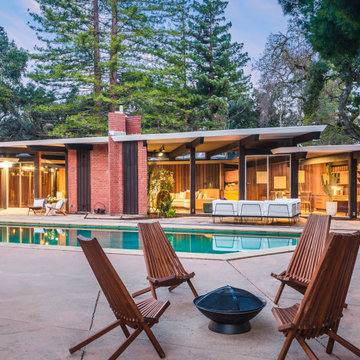
At 19 Irving Avenue, the pool reads less like an afterthought and more like a quiet declaration of Joseph Eichler’s design philosophy. From the moment you step into the backyard, it becomes clear that this isn’t a traditional rectangular basin—it’s a geometric composition, shaped in a polygonal form that mirrors the home’s angular, forward-thinking architecture.
5
The lines of the pool echo the home’s V-shaped layout and parallelogram motifs, creating a visual rhythm that feels intentional from every vantage point. Rather than being set apart, the pool is pulled into the architecture itself—surrounded by walls of glass and adjacent living spaces that dissolve the boundary between inside and out. Reflections of sky, structure, and surrounding greenery constantly shift across its surface, making it feel alive within the composition.
There’s a certain restraint to it, too. It doesn’t try to overpower the setting or compete with the architecture. Instead, it acts as a calm, sculptural centerpiece, anchoring the outdoor terrace while reinforcing the home’s modernist language. It’s easy to imagine Eichler himself using this space not just for leisure, but as part of a larger experiment—testing how geometry, light, and water could come together to shape a new way of living.
In that sense, the pool isn’t just a feature—it’s part of the origin story. A subtle but powerful expression of the indoor-outdoor lifestyle that would go on to define Eichler communities across California.
 InnovationLand
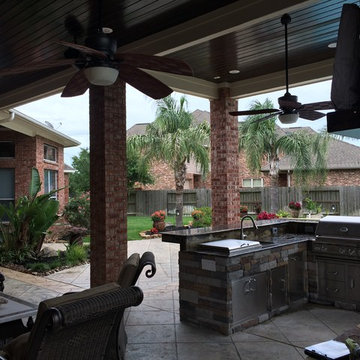
As you can see, a beautiful, dark-stained patio ceiling rises high over this patio addition design. Here's the "before" shot of the white Hardie panel ceiling before we replaced it with the dark tongue and groove boards:
Atop this wood patio ceiling is a 210-square-foot hipped roof extension off the existing house, with red brick, white trim and grey composite shutters matching the existing house. Underneath the patio ceiling sits a new outdoor kitchen and a fireplace with a seating area.
The outdoor kitchen island includes a raised countertop with bar seating for six and the following Renaissance Cooking Systems (RCS) stainless steel appliances: drop-in cooler, horizontal door, sink , single access door, trash door, 30-inch Cutlass Pro grill, double drawer/door and lowered power burner.
The gas-burning fireplace features a mounted flat-screen TV, a wooden mantel and a flagstone hearth that matches the pool coping. The family's existing wicker patio furniture was placed in the new seating area around the fireplace.
We really love the finishing materials in this patio addition design. The fireplace and exterior walls of the kitchen island are dry-stacked Chardonnay ledgestone. The countertop is Spectrus granite.
As this 3D graphic rendering shows, the new stamped concrete patio features a Versailles pattern with a contrasting border. The 645-square-foot patio under the roof addition is a lighter tan and the 1,580-square-foot patio around the pool and firepit is a darker tan, visual distinction between the two areas.
 Sergey Amiryan
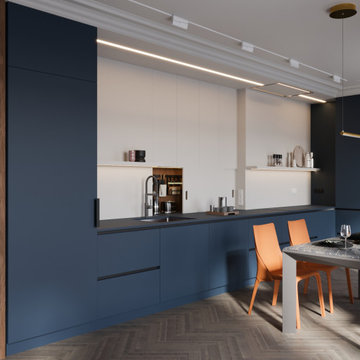
Today I present you a new project - a cozy and stylish kitchen-living room, created for a couple who loves electronic music and parties in their home.
The clients' dream was a special table space with a DJ console and powerful acoustics and I made their dreams come true. Now the parties in their home will be unforgettable! ??
The main character of this apartment is the light beige walls and exquisite finishing panels made of MDF with walnut veneer. This material adds warmth and elegance to the interior. The cabinet furniture also uses elements with walnut veneer, creating a harmonious combination of textures and shades.
The main accent is the blue color, which gives the interior a marine harmony. The kitchen is completely made of "Fenix" material of "blu shaba" color, and in the living room you can cozy up on the blue sofa, which will accommodate all the guests. ??
A dark wood parquet is chosen for the floor, which gives the interior additional depth and warmth.
In creating this interior I tried to reflect not only the unique style of my clients but also their common vision of coziness and comfort.
I am sure that every corner of this kitchen-living room will remind them of how important it is to make their home their own and unique.
50