
Search results for "Preventive steps" in Home Design Ideas
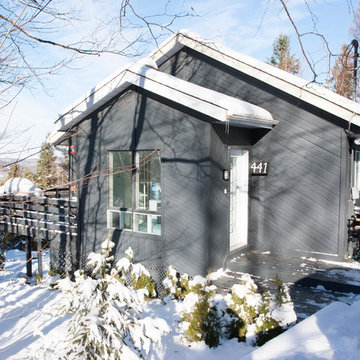

 Westbrook Carpentry & Millwork
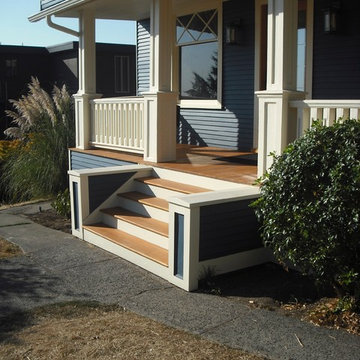
This historic front porch stairs were built new by Westbrook Restorations in Seattle. These front porch stairs are made of pressure treated wood back framing, solid fir treads, fir risers, vertical grain cedar siding, custom made fir box tops. All stair wood transitional seams are fully glued and screwed, and sloped away from riser to prevent moisture penetration. As Master carpenters we use a mix of old and new techniques to ensure longevity of product.
 Cast Glass Images Inc.
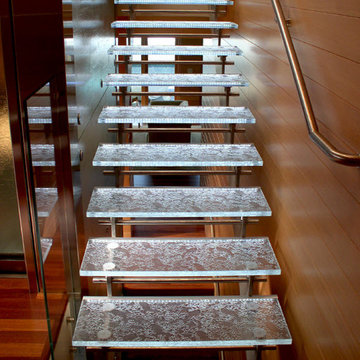
Glass stairs are incomparable to any other stairs. Whether textured or clear, cast glass images provides stunning glass stair treads that will accentuate your home. Custom glass guardrails or glass handrails also add sophistication to your space. Featured texture is "CGI Coating" which is part of the slip prevention glass type exclusive to Cast Glass Images. (Slip Prevention glass is a custom permanent glass surface application that increases the amount of friction on a glass surface.) Glass color is low iron.
Find the right local pro for your project
 Signature Stamped Concrete, LLC
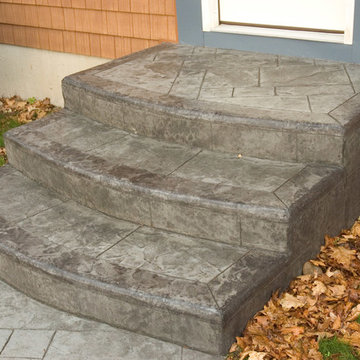
The old brick steps were crumbling apart. We made the new landing wider, and extended it farther from the house, with the steps larger as well. The steps are pinned to the house with rebar dowels to prevent settling and movement. We used about 1.5 yards of concrete, colored inegrally with Solomon Slate color, and a Brickform Light Gray Release agent.
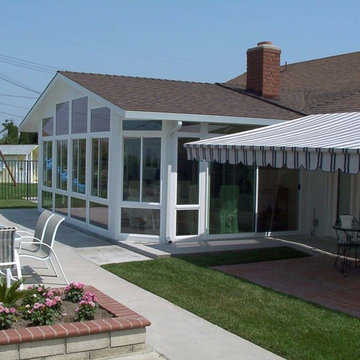
 Value Builders
Have you ever wondered about the installation Process of a C-Thru Sunroom? Take a look at the Video Below to see the process from start to finish. Contact us for more information on a C-Thru Sunroom.
1- The first step in any sunroom build is pre-construction and demo. Here you can see our builders are setting forms for the foundation. A nice level foundation will ensure a water tight seal to last and last and prevent against perimeter leaks.
3 - In this particular sunroom the client wanted a higher roof so we built her what is called a roof saddle
4 - The benefits of a roof saddle include, extra height, better drainage, more light with upper glass transoms and even an option to match your existing roof
5- We have the safest delivery methods for your materials they will arrive in customized prepackaging.
6 - We carefully unload and stage materials in your backyard.
7- Here, our certified C Thru Installers are anchoring perimeter channels that holds the walls in place.
8 - These channels are specially designed with an anti-moisture system to prevent perimeter leaks Guaranteeing a moisture free environment.
9- Our installers are putting up the walls - carefully leveling and plumbing each section to the house, we can achieve a custom fit to any house wall with modifications as needed.
10- all though our roof systems are water tight as is, we offer composition roofing to match your existing roof and add to the over all aesthetics of the structure. Flooring, Heating and cooling, fans, lights, and many other custom interior and exterior aesthetic options are available.
While other sunroom additions are only available in stock sizes, or rely on panels and miscellaneous parts to be mixed and matched to fit your home as best they can, C-Thru sunrooms are individually designed and engineered according to the exact specifications of your home. Each and every piece of our sunrooms is fabricated with total precision in our innovative manufacturing facility using industry-leading Computer Aided Design technology. This means that every single sunroom we build is engineered with efficiency, perfect sizing, and optimal visual appeal in mind.
Custom Sunroom Additions for Every Home
When it comes to custom sunroom additions, C-Thru offers a multitude of options to fit your exact preferences and the specific needs of your home. And thanks to our efficient, precision manufacturing technology, a sunroom addition installation with us can be finished in a matter of days—not weeks. When you work with us, you’ll have access to a variety of energy efficient elements to choose from, including Roof Styles: Window Styles: Interior/Exterior Styles:
Make your sunroom truly your own, with options to personalize every feature to your preference. From heated flooring to cable-ready installation, we can make sure your sunroom is ready for its intended purpose.
Thank you for watching, for an estimate please do not hesitate to contact us! We are happy to help with your patio cover or sunroom project.
Contact us today for an estimate!
P: 1-650-339-1477
E: marco.truvaluebuilders@gmail.com
cthrusunroomsnocal.com
patiocoversgalore.com
https://www.youtube.com/watch?v=OoFZ3vZ_yfk&t=71s
#GabledSunrooms #PatioCovers #PatioEnclosures #ScreenRooms #StudioSunrooms #ThreeSeasonRooms #FourSeasonRooms #Enclosures #Solarium #Awning #Retractable #Awning #BayArea #SF #SanJose #SantaClara #Hayward #SanMateo #Burligame #EastBay #Concord #Penninsula #California #NorCal #NorthBayArea #sunroom #patioenclosure #pergola #patiocovering #shed #greenhouse #Solarium #sunroom
At C-Thru Sunrooms we have bi-parting windows and doors! Easy to operate door panels allow for quick opening and closing allowing for lots of ventilation and easy of movement in and out. These doors are great for entertaining a large croud or family event!
We are also one of the first sunroom manufactures to offer a solution to all your lighting needs. Our recessed lighting and fans are sure to illuminate your night!
Contact us today for an estimate!
P: 1-650-339-1477
E: marco.truvaluebuilders@gmail.com
cthrusunroomsnocal.com
patiocoversgalore.com
link to video
https://www.youtube.com/watch?v=esXIo3IA1uQ&t=56s
#GabledSunrooms #PatioCovers #PatioEnclosures #ScreenRooms #StudioSunrooms #ThreeSeasonRooms #FourSeasonRooms #Enclosures #Solarium #Awning #Retractable #Awning #BayArea #SF #SanJose #SantaClara #Hayward #SanMateo #Burligame #EastBay #Concord #Penninsula #California #NorCal #NorthBayArea #sunroom #patioenclosure #pergola #patiocovering #shed #greenhouse #Solarium #sunroom
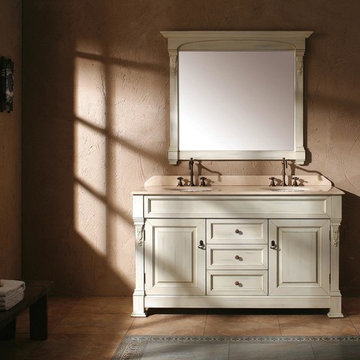
 BathGems
The crisp Antique White finish of the Peruga Double Bath Vanity offers a light, airy feel to your bathroom. Featuring antique-style handles for each of the cabinet doors and 3 central drawers, this vanity screams Old World class in every direction. You'll love how sophisticated it will look in your home, especially when paired with any of the 5 beautiful top options to choose from. Add the beautiful matching linen cabinet to your bedroom decor and you'll never complain about not having enough space again. Made from the same top quality solid oak, this linen cabinet boasts a glass paneled top cabinet with frosted glass on each side, a middle drawer, and a lower cabinet with a gorgeous frame-like design. Each door is equipped with soft-close European hinges and the finish is made to match your vanity with a 12-step hand glazed finishing process.
Please note: the triple panel mirror in the main image is no longer available. Instead, a matching 47.25" Single panel mirror (see detailed images) is available from the drop-down menus.
Dimensions
Vanity
60"W x 23.5"D x 35.5"H
Optional Accessories
Large Mirror
47.25"W x 3.7"D x 41.5"H
Linen Cabinet
20.5"W x 16.25"D x 65"H
Features
Quality materials are important to the longevity of your bathroom vanity. Cheap vanities made with particle board or MDF tend to sag, warp, split, discolor, and expand over time. This is especially true in humid climates, such as the environment found in a normal bathroom. Since bathroom humidity is so common, bathroom vanities need to be extremely durable. They also need to be strong enough to endure lots of usage-based wear and tear. Vanities are typically made of MDF, birch, rubberwood, or natural oak. Generally, MDF is approximately 30 % the quality of oak, birch is 50% the quality of oak, and rubberwood is typically 90% the quality of oak, where "quality" is defined as the strength, integrity, and durability of the material. Solid oak is without question the strongest, most durable, and most resilient of all vanity materials. Only the highest-quality and best made vanities are manufactured from natural oak. Premier Collection
Vanities that are marked as Premier Collection are the best vanities in the industry where no expense has been spared. These are the best vanities money can buy made from small quantities of handpicked solid hard woods that are hand finished to perfection. To be considered part of the Premium Collection the vanity must get A+++ grades in: Wood used, Interior Construction, Counter Top, and Finish.
Wood Used:
Premier Collections uses Kiln dried wood in small batches to insure proper drying to prevent cracking and warping. All wood is cared for in great detail to prevent cracking and warping so that your vanity looks as good as they day it arrived for many years.
Vanity Tops:
Premier Collections vanities that have stone tops use a thicker stone, up to 3cm (1cm more than industry average), providing a more luxurious look. All of the vanities with stone tops are sealed to prevent watermarks and minor stains.
Construction:
Premium Collection vanities use hard wood box framed construction that provides strength and durability for decades. All vanities have working drawers with able storage made with slide ball bearing drawers and or soft close mounts. Center drawers are boxed and fitted around plumbing for additional storage.
Finish:
Premium Collection vanities are all hand stained, hand painted, using up to a 15 layer sealing and finishing process to avoid future fading, cracking, or peeling.
- 100% handmade and finished
- Grade A, solid kiln-dried oak construction
- Single-door cabinet on each side with antique-style handles
- Frame type construction with an Old World style joinery
- Full extension drawers with ball-bearing glides
- Hand-applied varnish in 3 layers to prevent warping
- Multi-layered hand glazed finish for a cabinet that is resistant to peeling, cracking and fading
- 5 Beautiful finishes to choose from!
- Choose from Cream Marble, Black Granite, Tropical Brown Granite, Carrera White Marble, or Travertine tops
- Pre-drilled for 8" faucet spread
- **Faucets Not Included**
Quality materials are important to the longevity of your bathroom vanity. Cheap vanities made with particle board or MDF tend to sag, warp, split, discolor, and expand over time. This is especially true in humid climates, such as the environment found in a normal bathroom. Since bathroom humidity is so common, bathroom vanities need to be extremely durable. They also need to be strong enough to endure lots of usage-based wear and tear. Vanities are typically made of MDF, birch, rubberwood, or natural oak. Generally, MDF is approximately 30 % the quality of oak, birch is 50% the quality of oak, and rubberwood is typically 90% the quality of oak, where "quality" is defined as the strength, integrity, and durability of the material. Solid oak is without question the strongest, most durable, and most resilient of all vanity materials. Only the highest-quality and best made vanities are manufactured from natural oak. Premier Collection
Vanities that are marked as Premier Collection are the best vanities in the industry where no expense has been spared. These are the best vanities money can buy made from small quantities of handpicked solid hard woods that are hand finished to perfection. To be considered part of the Premium Collection the vanity must get A+++ grades in: Wood used, Interior Construction, Counter Top, and Finish.
Wood Used:
Premier Collections uses Kiln dried wood in small batches to insure proper drying to prevent cracking and warping. All wood is cared for in great detail to prevent cracking and warping so that your vanity looks as good as they day it arrived for many years.
Vanity Tops:
Premier Collections vanities that have stone tops use a thicker stone, up to 3cm (1cm more than industry average), providing a more luxurious look. All of the vanities with stone tops are sealed to prevent watermarks and minor stains.
Construction:
Premium Collection vanities use hard wood box framed construction that provides strength and durability for decades. All vanities have working drawers with able storage made with slide ball bearing drawers and or soft close mounts. Center drawers are boxed and fitted around plumbing for additional storage.
Finish:
Premium Collection vanities are all hand stained, hand painted, using up to a 15 layer sealing and finishing process to avoid future fading, cracking, or peeling.
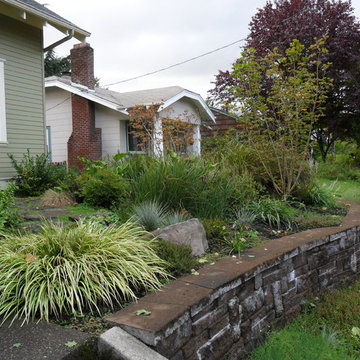
 Plan-it Earth Design
This rain garden for the disconnected downspout celebrates the bounty of winter water. Photo by Amy Whitworth Installation by Creative Touch Landscaping
Sponsored
Westerville, OH

Custom Home Works
Franklin County's Award-Winning Design, Build and Remodeling Expert
 Lynch Landscape and Tree Service, Inc.
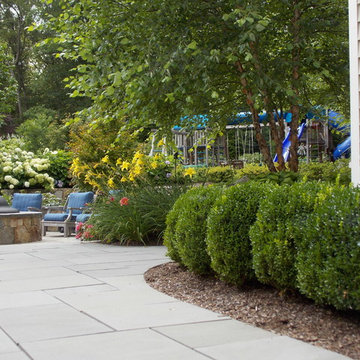
View coming out of walkout basement to outdoor living space
This is an example of a traditional landscaping in Boston.
This is an example of a traditional landscaping in Boston.
 Thinkterior LLC
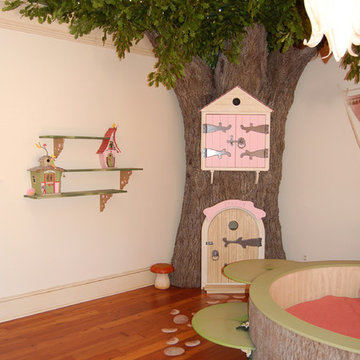
THEME Every element of this room
evokes images from the Enchanted
Forest. Tiny lights twinkle like fireflies;
curtains swing from real tree limbs and
sticker stones lay a pathway to the bed.
Ceramic mushrooms and birdhouses
are scattered throughout the room,
creating perfect hiding spots for fairies,
pixies and other magical friends. The
dominant color of both bedroom and
bathroom — a soft, feminine pink
— creates a soothing, yet wondrous
atmosphere. In the corner sits a large
tree with a child-size door at the base,
promising a child-size adventure on the
other side.
FOCUS Illuminated by two beautiful
flower-shaped lamps, the six-footdiameter
circular bed becomes the
centerpiece of the room. Imitation bark
on the bed’s exterior augments the
room’s theme and makes it easy for
a child to believe they have stepped
out of the suburbs and into the forest.
Three lily pads extending from tree
bark serve as both steps to the bed
and stools to sit on. Ready-made for
princess parties and sleepovers, the
bed easily accommodates two to three
small children or an adult. Twelvefoot
ceilings enhance the sense of
openness, while soft lighting and comfy
pillows make this a cozy reading and
resting spot.
STORAGE The shelves on the rear of
the bed and the two compartments in
the tree — one covered by a doubledoor,
the other by a miniature door —
supplement the storage capacity of the
room’s giant closet without interrupting
the theme.
GROWTH The bed meets standard
specifications for a baby crib, and
can accommodate both children and
adults. The railing is easily removed
when baby girl becomes a “big girl,”
and eventually,
a teenager.
SAFETY Rounded edges on all of the
room’s furnishings help prevent nasty
bumps, and lamps are positioned
well out-of-reach of small children.
The mattress is designed to fit snugly
to meet current crib safety standards,
while a 26-inch railing allows this bed
to act as a safe, comfortable and fun
play area.
 Leger Wanaselja Architecture
Leger Wanaselja Architecture
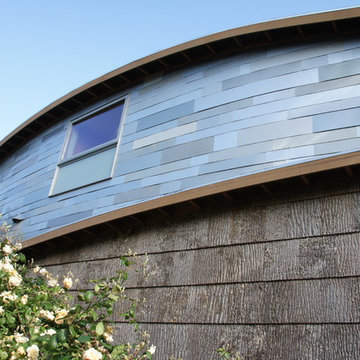
Inspiration for an eclectic home design remodel in San Francisco
Inspiration for an eclectic home design remodel in San Francisco
 Mayflower Construction Group
How Planning Leads to Successful Construction
Construction projects, whether small residential jobs or large commercial builds, require more than just skilled labor and high-quality materials. The foundation of a successful project lies in effective planning. Proper planning ensures efficiency, minimizes risks, and keeps the project within budget and on schedule. Here’s how thorough planning leads to successful construction:
1. Clear Project Scope and Objectives
Defining the project scope early on helps prevent scope creep and miscommunication. Establishing clear goals, deliverables, and timelines ensures that everyone involved understands the expectations. This prevents delays and unnecessary changes during construction.
2. Accurate Budgeting and Cost Control
A well-planned project includes a detailed cost estimation. This accounts for labor, materials, permits, and unexpected contingencies. Without proper budgeting, costs can spiral out of control, leading to financial strain and potential project failure.
3. Efficient Resource Management
Proper planning helps allocate resources effectively, including manpower, equipment, and materials. Scheduling workers and ordering materials at the right time avoids delays caused by shortages or logistical issues.
4. Risk Identification and Mitigation
Every construction project comes with risks—weather delays, supply chain issues, safety hazards, or regulatory compliance concerns. Planning ahead allows for risk assessment and the implementation of strategies to mitigate potential problems before they occur.
5. Compliance with Regulations and Permits
Failing to secure the necessary permits or adhere to building codes can halt a project indefinitely. Planning ensures that all legal requirements are met in advance, avoiding costly fines and legal complications.
6. Seamless Communication and Coordination
A structured plan includes clear communication protocols between contractors, architects, engineers, and clients. When everyone is on the same page, mistakes are reduced, and the workflow remains smooth.
7. Improved Project Scheduling
A construction schedule outlines each phase of the project, from site preparation to finishing touches. A well-planned schedule helps keep tasks on track, prevents unnecessary delays, and ensures timely project completion.
8. Higher Quality Workmanship
Planning allows for a structured approach to quality control. By setting benchmarks, conducting inspections, and using the right materials, projects meet industry standards and client expectations.
9. Better Client Satisfaction
When a project is completed on time, within budget, and meets quality expectations, client satisfaction increases. A satisfied client is more likely to recommend your services and return for future projects.
Conclusion
In construction, planning isn’t just a step—it’s the backbone of success. From budgeting and resource management to compliance and scheduling, thorough planning prevents costly errors, improves efficiency, and ensures a high-quality outcome. Whether you're working on a small driveway installation or a large-scale commercial project, investing time in planning will always pay off in the long run.
Do you need expert concrete construction services that prioritize planning and quality? Contact us today!

 kmjee
kmjeePepper plants are a delightful addition to any garden, offering a vibrant burst of color and spice to your culinary creations. However, even experienced gardeners can encounter challenges when growing pepper plants. In this blog, we'll explore some common issues you might face and provide practical solutions to help your pepper plants thrive.
1. Slow or Stunted Growth
Issue: Slow or stunted growth in pepper plants can be discouraging, but there are specific steps you can take to address this issue effectively.
Solution:
a. Soil Health:
- Well-Draining Soil: Ensure your pepper plants are in well-draining soil to prevent waterlogged roots, which can inhibit growth.
- Organic Matter: Incorporate plenty of organic matter, such as compost or well-rotted manure, into the soil to improve its texture and nutrient content.
- pH Level: Test the soil pH and adjust it to the ideal range between 6.0 and 6.8 using lime or sulfur as needed.
b. Fertilization:
- Balanced Fertilizer: Use a balanced, slow-release fertilizer designed for vegetables to provide essential nutrients steadily throughout the growing season.
- Compost: Amend the soil with compost to enhance nutrient availability and soil structure. This can promote healthier growth.
c. Watering:
- Consistent Moisture: Maintain consistent soil moisture levels by watering your pepper plants regularly but avoid waterlogging. Aim for 1-2 inches of water per week, adjusting based on your local climate and weather conditions.
- Mulching: Apply mulch around the base of the plants to retain soil moisture and regulate temperature.
2. Yellowing Leaves
Issue: Yellowing leaves can be a sign of various underlying problems, but addressing them promptly can restore the vibrancy of your pepper plants.
Solution:
a. Nutrient Deficiencies:
- Balanced Fertilization: Use a well-balanced fertilizer that includes micronutrients to address nutrient deficiencies.
- Specific Nutrients: If you suspect a particular deficiency, such as magnesium, iron, or nitrogen, apply the appropriate nutrient supplement following package instructions.
b. Pest and Disease Control:
- Pest Inspection: Regularly inspect the leaves and stems for common pests like aphids and mites. Remove affected leaves and treat with organic pesticides if necessary.
- Disease Management: Look out for signs of diseases like bacterial leaf spot or fungal issues. Apply organic fungicides or bactericides as recommended.
3. Blossom Drop
Issue: When pepper plants drop their blossoms prematurely, it can hinder fruit development and lead to disappointment.
Solution:
a. Temperature Control:
- Stable Temperatures: Ensure your pepper plants are exposed to consistent temperatures between 70°F and 80°F (21°C to 27°C) during flowering. Avoid sudden temperature fluctuations by providing shelter or using row covers.
b. Pollination:
- Assist with Pollination: If growing peppers indoors or in a greenhouse, help with pollination by gently shaking the plants or using a small brush to transfer pollen between flowers. Outdoor pepper plants are usually pollinated by insects.
4. Wilting Plants
Issue: Wilting or drooping pepper plants can be a sign of various problems, but proper care can revive them.
Solution:
a. Watering:
- Consistent Moisture: Adjust your watering routine to keep the soil consistently moist but not waterlogged. Water early in the day to prevent fungal issues.
- Drainage: Ensure proper soil drainage by amending the soil or using raised beds to prevent waterlogged roots.
b. Pest Control:
- Pest Inspection: Examine the undersides of leaves for signs of pests like aphids, spider mites, or whiteflies. Treat infestations promptly with biological insecticides.
5. Curling Leaves
Issue: Curling or misshapen leaves indicate stress in pepper plants, which can be caused by various factors.
Solution:
a. Environmental Stress:
- Stable Conditions: Ensure your pepper plants are in an environment with stable humidity, temperature, and adequate air circulation. Avoid sudden changes in conditions.
- Proper Ventilation: Adequate air circulation can reduce humidity and prevent fungal issues.
b. Pest and Disease Management:
- Pest Inspection: Regularly inspect your plants for pests and diseases, addressing them promptly with organic remedies as needed.
6. Sunscald
Issue: Sunscald can lead to discolored, leathery patches on pepper fruits when exposed to intense sunlight.
Solution:
a. Shade Cloth:
- Sun Protection: Shield your pepper plants from harsh sunlight during the hottest part of the day using shade cloth or by planting them where they receive some filtered sunlight.
b. Pruning:
- Fruit Shading: Prune excess foliage to allow better fruit shading, reducing the risk of sunscald. Ensure that there's a balance between foliage and fruit.
7. Pepper Plant Pests and Diseases
Issue: Aphids, mites, whiteflies, and various diseases can affect pepper plants, but you can manage them effectively.
Solution:
a. Regular Inspection:
- Vigilant Monitoring: Regularly inspect your pepper plants for signs of pests or diseases, paying close attention to the undersides of leaves and stems.
b. Organic Remedies:
- Pest Control: Use organic remedies like neem oil, insecticidal soap, or diatomaceous earth for pest control.
- Disease Management: Apply organic fungicides or bactericides as recommended to manage diseases like powdery mildew or bacterial spot.
While growing pepper plants can present various challenges, these common issues are manageable with the right knowledge and care. Regular monitoring, proper soil preparation, and timely intervention can help you enjoy a bountiful harvest of vibrant, spicy peppers. Remember that gardening is a learning experience, and each challenge you face is an opportunity to improve your skills and enjoy the rewards of homegrown peppers in your favorite dishes.
 Windy City Painters
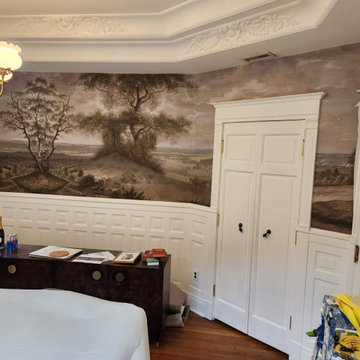
Professional wallpaper installation Old Town requires expertise that honors the neighborhood's historic character while delivering modern durability and beauty.
Project Overview and Architecture
This Old Town wallpaper installation showcased our ability to work with the area's distinctive architecture, from classic greystones to renovated vintage condos that define this prestigious neighborhood.
Materials and Products
We selected premium wallpaper materials specifically designed for Chicago's climate conditions, using high-quality adhesives and primers that ensure long-lasting adhesion on various surface types.
Installation Process
Step 1: Surface preparation including cleaning, smoothing, and addressing imperfections common in older buildings
Step 2: Professional repairs to walls ensuring perfect foundation for wallpaper application
Step 3: Quality primer application designed specifically for wallpaper adhesion and longevity
Step 4: Expert wallpaper installation with precise pattern matching and seamless application techniques
Chicago-Specific Challenges
Old Town homes present unique challenges including weather exposure, aging building materials, potential lead paint considerations, and vintage surfaces requiring specialized preparation techniques.
Results Achieved
Windy City Painters delivered flawless wallpaper installation that enhanced the room's aesthetic while respecting the architectural integrity of this historic Old Town property.
Professional Tips
Homeowners should always hire experienced professionals for wallpaper installation, especially in historic properties where surface preparation and material selection significantly impact long-term success and beauty.
See more work and request free estimate at windypainters.com.
FAQs
Q: Why hire professionals for wallpaper installation Old Town homes? / A: Expert installation prevents costly mistakes, ensures proper adhesion, and preserves historic property values through quality craftsmanship.
Q: What wallpaper materials work best in Chicago climate? / A: High-quality papers with proper backing designed for humidity fluctuations and temperature changes typical in Chicago homes.
Q: How do you prepare Old Town walls for wallpaper? / A: Thorough cleaning, surface smoothing, repairs, and specialized primers ensure optimal wallpaper installation adhesion and longevity.
Q: Can wallpaper be installed over existing paint? / A: Sometimes, but professional assessment determines if surface preparation or primer application is needed for successful wallpaper installation.
Q: How long does professional wallpaper installation take? / A: Most rooms completed within one day, depending on size, pattern complexity, and surface preparation requirements.
Q: What about removing old wallpaper first? / A: We safely remove existing wallpaper using proper techniques that protect walls and prepare surfaces for new installation.
Q: Do you offer design consultation for wallpaper selection? / A: Yes, we help choose patterns and materials that complement Old Town architectural character and personal style preferences.
Q: How do you handle pattern matching across walls? / A: Precise measurements and expert techniques ensure seamless wallpaper installation with perfect pattern alignment throughout rooms.
Q: What's your wallpaper installation warranty coverage? / A: Comprehensive warranties cover both materials and workmanship, giving you confidence in your wallpaper installation investment.
Q: Can you work around furniture and schedules? / A: Absolutely! We coordinate timing and setup to minimize disruption during your professional wallpaper installation project.
Sponsored
Columbus, OH
Free consultation for landscape design!

Peabody Landscape Group
Franklin County's Reliable Landscape Design & Contracting

 Allreno
In What Order Should You Renovate a Kitchen? Revolutionizing Kitchen and Bath Renovation with Allreno's Design AI
Renovating a kitchen can be one of the most exciting and rewarding home improvement projects. However, with so many decisions to make, it can also be overwhelming. From selecting kitchen cabinets to choosing countertops and appliances, the process often involves careful planning and organization. So, how do you ensure the renovation goes smoothly? One important factor is knowing the right order in which to tackle the project.
The Right Order for Kitchen Renovation
Renovating a kitchen involves multiple steps, and knowing the proper order of operations is crucial for both time efficiency and cost savings. Here’s a general guideline for how to approach your kitchen renovation:
1. Planning and Design: The first step in any renovation is planning. This includes deciding on the layout, design, and features you want in your kitchen. At this stage, you’ll also need to think about your budget and timeline. It’s essential to finalize these details before moving forward with the actual work.
2. Demolition: Once the design is set, it’s time to remove old fixtures, cabinets, appliances, and flooring. Demolition can be a messy process, but it’s necessary for starting fresh. Having a professional handle this phase is often a smart move to ensure everything is safely removed.
3. Structural Work: If you plan on altering the layout of the kitchen by knocking down walls or adding new plumbing or electrical work, now is the time to do it. Structural changes can be complicated and costly, so it’s important to ensure these are completed before installing any new elements.
4. Plumbing and Electrical Work: With the structure in place, you can begin installing plumbing and electrical systems. This might include adding new water lines, sinks, or electrical outlets for appliances. It’s best to bring in licensed professionals for this stage, as electrical and plumbing work requires expert knowledge.
5. Cabinet Installation: Once the plumbing and electrical work are in place, you can install the kitchen cabinets. Cabinets are one of the most important elements of the kitchen, and the Allreno design AI can make this process easier. Allreno's AI-driven platform allows you to visualize how different kitchen cabinets will fit into your space, ensuring you make the best choice based on your preferences and layout.
6. Countertops: After the cabinets are installed, it’s time to add countertops. Whether you choose granite, quartz, or a more budget-friendly option, countertops are a focal point of the kitchen, and they should complement the cabinets and other design elements.
7. Flooring: Now that the major structural elements are in place, it’s time to install your flooring. Whether you opt for tile, hardwood, or vinyl, flooring should be installed after the cabinets and countertops to prevent any damage during the installation process.
8. Appliances and Fixtures: With the foundation in place, you can now add your appliances (oven, refrigerator, dishwasher, etc.) and fixtures (sink, faucets, lighting). Allreno’s AI can also help here by offering kitchen design recommendations based on available appliances and space dimensions.
9. Final Touches: The last step is adding the finishing touches to your kitchen. This includes painting the walls, adding backsplash tiles, and installing accessories like handles and knobs on your cabinets. This is also the stage where you can implement any stylistic choices to make the space uniquely yours.
How Allreno's AI Transforms the Renovation Process
One of the biggest challenges of a kitchen renovation is visualizing how everything will come together. Allreno’s design AI changes that by offering an intuitive platform that brings your ideas to life. Here’s how:
• Personalized Design Recommendations: Allreno’s AI suggests design elements based on your preferences, style, and space dimensions. Whether it’s selecting the perfect kitchen cabinets or countertop finishes, the AI ensures everything works together cohesively.
• 3D Visualization: With Allreno’s AI-driven design tools, you can visualize your kitchen layout in 3D before any work begins. This allows you to see how different elements will fit into your space and make adjustments as needed.
• Efficient Project Management: Allreno helps you streamline the entire renovation process by generating accurate material lists, estimates, and timelines. This means you can avoid costly errors and keep your renovation on track.
Conclusion
Renovating a kitchen is an exciting project, but it requires careful planning and organization to ensure it’s done right. By following a strategic order of operations and leveraging cutting-edge technology like Allreno’s design AI, homeowners can streamline the process, save time and money, and bring their dream kitchen to life with ease. Allreno not only simplifies the design process but also provides innovative solutions that make kitchen and bath renovations faster and more efficient than ever before.
Ready to get started with your kitchen renovation? Allreno's AI-powered design platform is here to help you every step of the way.
 West Winds Nursery LLC
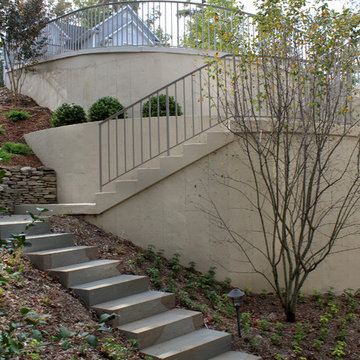
A series of steps and retaining walls make walking this steep slope possible. Thick slabs of Pennsylvania bluestone were used to create a set of steps to reach the steps included with the concrete retaining wall. A drystack stone wall and groundcover plantings helps hold the slope and prevent erosion.
 Stepstone, LLC
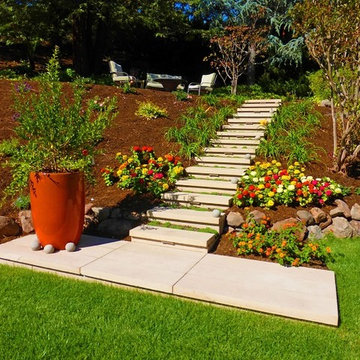
Beautiful backyard residence in the East Bay Area. Used Almond color Stepstone Large Scale Narrow Modular Pavers as Garden steps and patio area.
Photo of a mid-sized contemporary full sun backyard concrete paver landscaping in San Francisco for summer.
Photo of a mid-sized contemporary full sun backyard concrete paver landscaping in San Francisco for summer.
 Fiano Landscapes
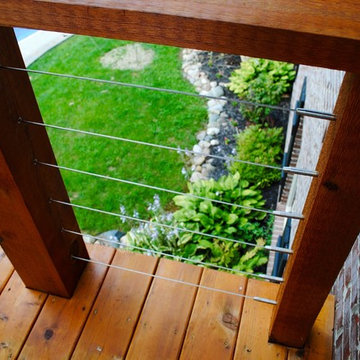
Not everyone has the backyard that suits a hardscape patio. Those situations sometimes call for a different approach....especially in this case! We built a second-level deck and pergola for this family outside of Greenfield. Cedar all around! They also wanted to retain their beautiful views. So we used a cable railing system that is safe and effective at preventing falls, but also perfect for maximizing those views. I think it turned out well, don't you? Sun-Dried tomatoes anyone?
Sponsored
Columbus, OH
Free consultation for landscape design!
Peabody Landscape Group
Franklin County's Reliable Landscape Design & Contracting
 Specialty Air Inc
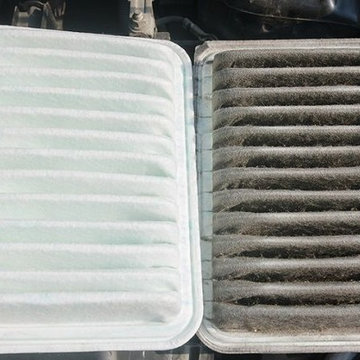
Always make sure that the air ducts for your air conditioner are checked periodically to clean out the dirt that builds up as the dirty vents can strain the HVAC system and affect the indoor air quality. Read the blog for detailed information.
 Gappsi
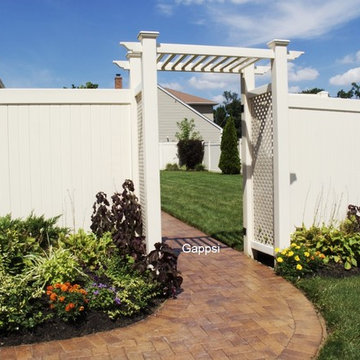
Patio, walkway, and front steps were built by Gappsi in Wyandanch Long Island, NY in Suffolk County. The stone used is over-sized ridge brick and ridge circle pavers in a golden brown blend. The pavers are mixed randomly in square and rectangular sizes. This stone has a textured riven surface and slightly chamfered edges. The sealing process begins with pressure washing the entire patio, removing all dirt and debris from the stone surface and in between the joints. Next, Nexgel Techniseal synthetic sand is applied in between the pavers joints and vibrated with a mechanical plate compactor. The plate compactor has rubber rollers to prevent the stones from cracking or scratching. This vibrating process allows the sand to fall in between the joints to densify. Then, we clean the pavers with brooms and landscape blowers, to clean the excess sand from the pavers surface and to evenly spread the sand in between the pavers joints. The next step is to wash the pavers by misting water to penetrate the synthetic sand into the paver joints all the way down below the pavers. The sand and water activate a chemical reaction of the pollen that's in the sand to cause the sand to harden. Finally, the application of the sealer. A two parts components urethane dealer, specially formulated for Gappsi, is applied to the pavers surface and the sand joints to prevent stones from staining, extend their life cycle and further enhance their texture, color, and surface.
https://www.youtube.com/watch?v=Z2t3swbuYXo
 Southern Dreamscapes LLC
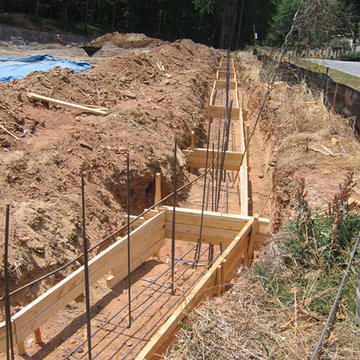
After sighting the elevations (surveying) and flagging the entire wall, the step- down footings are dug, Then, the vertical / horizontal rebar is set & tied together and finally the forms are built and connected all the way down... next is pouring the concrete into the footings with the pump truck!
Notice the black silt fence running along the entire wall area. It's designed to prevent any runoff to the street (erosion control) and preventing any silting into any water sources
10