
Search results for "Problem" in Home Design Ideas
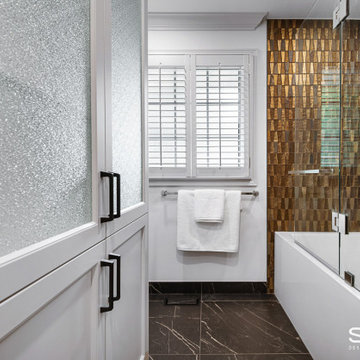
 Sosna Inc
ouble the bathroom trouble in this 1990’s home … solved with this Sosna renovation!
Our clients, empty-nesters desiring the peace and ease of retirement, were instead frustrated and exhausted with leaky bathroom plumbing from a previous renovation that would just not go away.
Their Shared Bathroom, renovated by their friend years ago, was not done correctly, causing repetitive leaking with damage to their Kitchen ceiling below. They had had enough of trying to fix it themselves. To say this couple was leery of hiring another renovator was an understatement.
But they also knew it was time to fix this problem and decided to update their Master Bathroom while they were at it.
Our initial plan included minimal demolition by re-organizing the walls between the 2 Bathrooms and keeping the existing plumbing rough-ins in place, while updating the fixtures.
However, unwelcome surprises are sometimes inevitable in renovations. Even though we conducted a thorough investigation during the planning stage, we were faced with plumbing in the Shared Bathroom that was not done correctly and may even have been illegal.
Because of this, relocating the rough-ins in the Shared Bathroom were necessary after all, which then meant re-planning the walls in between the 2 Bathrooms.
These are exactly the kinds of problems we love to solve. Why? Because we know that we’re not just fixing the physical problems that can be seen; we know we are also restoring this family’s faith in quality craftsmanship and good service, and that it’s possible to enjoy the renovation process.
This is why we don’t vary from our tried and true Renovating the Sosna Way™ process.
Because it works. For everyone.
For the Masons, we ended up renovating two bathrooms and completing a number of smaller projects that were causing them great pain to find a renovator for.
At the end of the day, we have another happy client. The Masons have two new bathrooms that better fit their life stage and style, and the “Honey-Do” list is empty!
When you and your home are ready for an upgrade, we're the Renovator You Can Count On™. It's our promise. Contact us to get started!
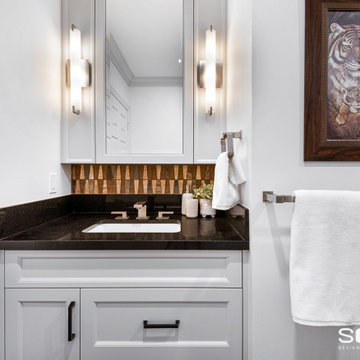 Sosna Inc
ouble the bathroom trouble in this 1990’s home … solved with this Sosna renovation!
Our clients, empty-nesters desiring the peace and ease of retirement, were instead frustrated and exhausted with leaky bathroom plumbing from a previous renovation that would just not go away.
Their Shared Bathroom, renovated by their friend years ago, was not done correctly, causing repetitive leaking with damage to their Kitchen ceiling below. They had had enough of trying to fix it themselves. To say this couple was leery of hiring another renovator was an understatement.
But they also knew it was time to fix this problem and decided to update their Master Bathroom while they were at it.
Our initial plan included minimal demolition by re-organizing the walls between the 2 Bathrooms and keeping the existing plumbing rough-ins in place, while updating the fixtures.
However, unwelcome surprises are sometimes inevitable in renovations. Even though we conducted a thorough investigation during the planning stage, we were faced with plumbing in the Shared Bathroom that was not done correctly and may even have been illegal.
Because of this, relocating the rough-ins in the Shared Bathroom were necessary after all, which then meant re-planning the walls in between the 2 Bathrooms.
These are exactly the kinds of problems we love to solve. Why? Because we know that we’re not just fixing the physical problems that can be seen; we know we are also restoring this family’s faith in quality craftsmanship and good service, and that it’s possible to enjoy the renovation process.
This is why we don’t vary from our tried and true Renovating the Sosna Way™ process.
Because it works. For everyone.
For the Masons, we ended up renovating two bathrooms and completing a number of smaller projects that were causing them great pain to find a renovator for.
At the end of the day, we have another happy client. The Masons have two new bathrooms that better fit their life stage and style, and the “Honey-Do” list is empty!
When you and your home are ready for an upgrade, we're the Renovator You Can Count On™. It's our promise. Contact us to get started!

 Coventry Homes Inc
RPK Photography
Example of a large transitional carpeted home bar design in Edmonton
Example of a large transitional carpeted home bar design in Edmonton
Find the right local pro for your project
 HaylieRead Design LLC
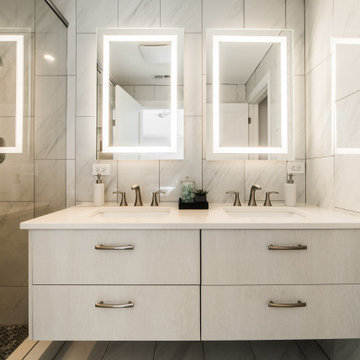
Haylieread was asked to take these two bathrooms stuck in the 1980s and transform them into a spa-like experience. HaylieRead said no problem! The use of neutral tiles with pops of texture added depth and created the tranquil vibe. All plumbing fixtures were updated with beautiful warm metals with customizable sprays. To finish it off HaylieRead used statement pieces throughout to create moments of interest and ease function.
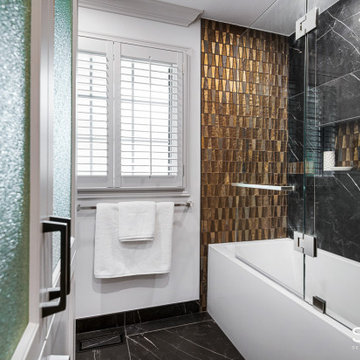 Sosna Inc
ouble the bathroom trouble in this 1990’s home … solved with this Sosna renovation!
Our clients, empty-nesters desiring the peace and ease of retirement, were instead frustrated and exhausted with leaky bathroom plumbing from a previous renovation that would just not go away.
Their Shared Bathroom, renovated by their friend years ago, was not done correctly, causing repetitive leaking with damage to their Kitchen ceiling below. They had had enough of trying to fix it themselves. To say this couple was leery of hiring another renovator was an understatement.
But they also knew it was time to fix this problem and decided to update their Master Bathroom while they were at it.
Our initial plan included minimal demolition by re-organizing the walls between the 2 Bathrooms and keeping the existing plumbing rough-ins in place, while updating the fixtures.
However, unwelcome surprises are sometimes inevitable in renovations. Even though we conducted a thorough investigation during the planning stage, we were faced with plumbing in the Shared Bathroom that was not done correctly and may even have been illegal.
Because of this, relocating the rough-ins in the Shared Bathroom were necessary after all, which then meant re-planning the walls in between the 2 Bathrooms.
These are exactly the kinds of problems we love to solve. Why? Because we know that we’re not just fixing the physical problems that can be seen; we know we are also restoring this family’s faith in quality craftsmanship and good service, and that it’s possible to enjoy the renovation process.
This is why we don’t vary from our tried and true Renovating the Sosna Way™ process.
Because it works. For everyone.
For the Masons, we ended up renovating two bathrooms and completing a number of smaller projects that were causing them great pain to find a renovator for.
At the end of the day, we have another happy client. The Masons have two new bathrooms that better fit their life stage and style, and the “Honey-Do” list is empty!
When you and your home are ready for an upgrade, we're the Renovator You Can Count On™. It's our promise. Contact us to get started!
 Texan Landscape Group LLC
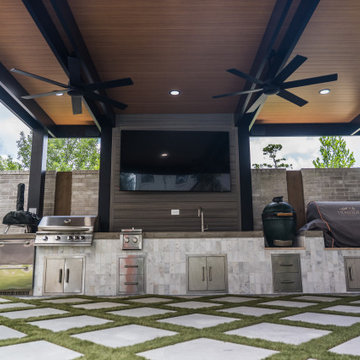
Set in a backyard with a beautiful pool but little shade, this Houston project was designed to solve two key problems. Problem number 1 was sun exposure and the second problem was a poorly laid-out outdoor kitchen. The homeowners reached out to our team looking for a modern, functional solution.
At the heart of this transformation is a 16×32 cantilevered aluminum pergola, one of the longest we can build without front posts. This design creates uninterrupted open space beneath the structure, offering full visibility and maximum flexibility for layout and movement. The pergola features insulated roof panels (IRP) in a striking sandalwood finish that mimics tongue-and-groove wood. The structure’s frame and roof are all aircraft-grade aluminum, making it both stylish and durable—ideal for Houston’s heat and humidity.
Six recessed can lights and dual ceiling fans were installed to ensure the area stays cool and usable day or night. All electrical runs were cleanly concealed within the IRP, keeping the minimalist design intact.
Beneath the pergola, we installed 2×2 pearl white alpine smooth cast pavers in a diamond pattern. These pavers blend seamlessly with the existing turf, bringing brightness and texture to the space while maintaining a soft, luxurious feel underfoot.
The old L-shaped kitchen was removed and replaced with a full-length custom build across the back of the patio. It’s outfitted with everything a backyard chef could want: a built-in grill, burners, sink, Big Green Egg, Traeger smoker, and a slide-out fridge. The kitchen was carefully designed to maximize the available space while meeting city code, with all components permitted and engineered.
To complete the entertainment zone, we built a custom CMU TV wall, finished with Trex paneling for warmth and texture. It includes a wall-mounted flat-screen, Sonos speakers, and a discreetly hidden mini amplifier for seamless AV integration. All wiring is cleanly tucked away, keeping the look sleek and modern.
 Texan Landscape Group LLC
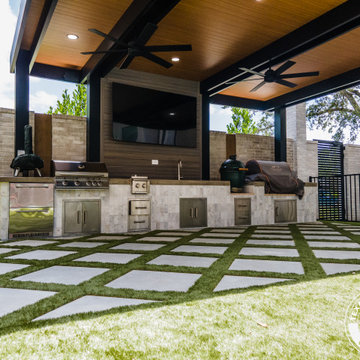
Set in a backyard with a beautiful pool but little shade, this Houston project was designed to solve two key problems. Problem number 1 was sun exposure and the second problem was a poorly laid-out outdoor kitchen. The homeowners reached out to our team looking for a modern, functional solution.
At the heart of this transformation is a 16×32 cantilevered aluminum pergola, one of the longest we can build without front posts. This design creates uninterrupted open space beneath the structure, offering full visibility and maximum flexibility for layout and movement. The pergola features insulated roof panels (IRP) in a striking sandalwood finish that mimics tongue-and-groove wood. The structure’s frame and roof are all aircraft-grade aluminum, making it both stylish and durable—ideal for Houston’s heat and humidity.
Six recessed can lights and dual ceiling fans were installed to ensure the area stays cool and usable day or night. All electrical runs were cleanly concealed within the IRP, keeping the minimalist design intact.
Beneath the pergola, we installed 2×2 pearl white alpine smooth cast pavers in a diamond pattern. These pavers blend seamlessly with the existing turf, bringing brightness and texture to the space while maintaining a soft, luxurious feel underfoot.
The old L-shaped kitchen was removed and replaced with a full-length custom build across the back of the patio. It’s outfitted with everything a backyard chef could want: a built-in grill, burners, sink, Big Green Egg, Traeger smoker, and a slide-out fridge. The kitchen was carefully designed to maximize the available space while meeting city code, with all components permitted and engineered.
To complete the entertainment zone, we built a custom CMU TV wall, finished with Trex paneling for warmth and texture. It includes a wall-mounted flat-screen, Sonos speakers, and a discreetly hidden mini amplifier for seamless AV integration. All wiring is cleanly tucked away, keeping the look sleek and modern.

 Kathleen Jennison
An Arts & Crafts Bungalow is one of my favorite styles of homes. We have quite a few of them in our Stockton Mid-Town area. And when C&L called us to help them remodel their 1923 American Bungalow, I was beyond thrilled.
As per usual, when we get a new inquiry, we quickly Google the project location while we are talking to you on the phone. My excitement escalated when I saw the Google Earth Image of the sweet Sage Green bungalow in Mid-Town Stockton. "Yes, we would be interested in working with you," I said trying to keep my cool.
But what made it even better was meeting C&L and touring their home, because they are the nicest young couple, eager to make their home period perfect. Unfortunately, it had been slightly molested by some bad house-flippers, and we needed to bring the bathroom back to it "roots."
We knew we had to banish the hideous brown tile and cheap vanity quickly. But C&L complained about the condensation problems and the constant fight with mold. This immediately told me that improper remodeling had occurred and we needed to remedy that right away.
The Before: Frustrations with a Botched Remodel
The bathroom needed to be brought back to period appropriate design with all the functionality of a modern bathroom. We thought of things like marble countertop, white mosaic floor tiles, white subway tile, board and batten molding, and of course a fabulous wallpaper.
This small (and only) bathroom on a tight budget required a little bit of design sleuthing to figure out how we could get the proper look and feel. Our goal was to determine where to splurge and where to economize and how to complete the remodel as quickly as possible because C&L would have to move out while construction was going on.
The Process: Hard Work to Remedy Design and Function
During our initial design study, (which included 2 hours in the owners’ home), we noticed framed images of William Morris Arts and Crafts textile patterns and knew this would be our design inspiration. We presented C&L with three options and they quickly selected the Pimpernel Design Concept.
We had originally selected the Black and Olive colors with a black vanity, mirror, and black and white floor tile. C&L liked it but weren’t quite sure about the black, We went back to the drawing board and decided the William & Co Pimpernel Wallpaper in Bayleaf and Manilla color with a softer gray painted vanity and mirror and white floor tile was more to their liking.
After the Design Concept was approved, we went to work securing the building permit, procuring all the elements, and scheduling our trusted tradesmen to perform the work.
We did uncover some shoddy work by the flippers such as live electrical wires hidden behind the wall, plumbing venting cut-off and buried in the walls (hence the constant dampness), the tub barely balancing on two fence boards across the floor joist, and no insulation on the exterior wall.
All of the previous blunders were fixed and the bathroom put back to its previous glory. We could feel the house thanking us for making it pretty again.
The After Reveal: Cohesive Design Decisions
We selected a simple white subway tile for the tub/shower. This is always classic and in keeping with the style of the house.
We selected a pre-fab vanity and mirror, but they look rich with the quartz countertop. There is much more storage in this small vanity than you would think.
The Transformation: A Period Perfect Refresh
We began the remodel just as the pandemic reared and stay-in-place orders went into effect. As C&L were already moved out and living with relatives, we got the go-ahead from city officials to get the work done (after all, how can you shelter in place without a bathroom?).
All our tradesmen were scheduled to work so that only one crew was on the job site at a time. We stayed on the original schedule with only a one week delay.
The end result is the sweetest little bathroom I've ever seen (and I can't wait to start work on C&L's kitchen next).
Thank you for joining me in this project transformation. I hope this inspired you to think about being creative with your design projects, determining what works best in keeping with the architecture of your space, and carefully assessing how you can have the best life in your home.

 Selah Pools & Spas
Mating the concrete salt deck to the natural stone style of this big beauty was no problem for our expert construction team. Every free form curve mates perfectly for a seamless and durable result.

 A Direct Cabinet Distributor Corp
Another beautiful kitchen renovation completed by HOMEREDI. This job was in Muttontown, NY. The homeowner needed better use and function of the space. They also wanted seating included in the room as well as an updated style. Ted, our kitchen designer, used his expertise to deliver solutions to each of these problems. The cabinets are from Kemper. To spice it up, the customer choice to pick the Cambria Brandsaw color for the main part of the kitchen, and use the Laneshaw for the island. A Direct also supplied the Dawn DSU3118 sink system and the goose neck Dawn pull out faucet.
Renovation done by: HOMEREDI


 A Finished Space
A small bathroom in a compact home, the position of the old tub was where the double bowl vanity is now. Headroom was an obvious problem due to the roof line, so the plumbing and tub shifted to the window wall.

 Passacantando Architects AIA
Photographer: Kevin Colquhoun
Open concept kitchen - large contemporary l-shaped light wood floor open concept kitchen idea in New York with an undermount sink, shaker cabinets, light wood cabinets, granite countertops, gray backsplash, glass tile backsplash, stainless steel appliances and an island
Open concept kitchen - large contemporary l-shaped light wood floor open concept kitchen idea in New York with an undermount sink, shaker cabinets, light wood cabinets, granite countertops, gray backsplash, glass tile backsplash, stainless steel appliances and an island


 Michelsohn and Daughter
Example of a large classic u-shaped open concept kitchen design with an undermount sink, shaker cabinets, white cabinets, marble countertops, beige backsplash and an island

 VBM Home
Example of a large trendy light wood floor kitchen design in Los Angeles with flat-panel cabinets, white cabinets, white backsplash, stainless steel appliances, an island and white countertops

 First State Building & Design
We expanded an existing deck with new stairs, railing, decking, deck board design, lighting, complete with all post and beam wraps. All decking you see is Zuri decking with Timbertech Rail Systems. We installed riser lights up the stairs with post caps on top of all posts.


 New Outlooks Construction
Why pay for a vacation when you have a backyard that looks like this? You don't need to leave the comfort of your own home when you have a backyard like this one. The deck was beautifully designed to comfort all who visit this home. Want to stay out of the sun for a little while? No problem! Step into the covered patio to relax outdoors without having to be burdened by direct sunlight.
Photos by: Robert Woolley , Wolf
215