
Search results for "Proceed" in Home Design Ideas
 Simply Home Decorating
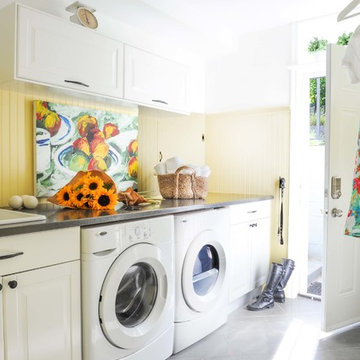
Before we redesigned the basement of this charming but compact 1950's North Vancouver home, this space was an unfinished utility room that housed nothing more than an outdated furnace and hot water tank. Since space was at a premium we recommended replacing the furnace with a high efficiency model and converting the hot water tank to an on-demand system, both of which could be housed in the adjacent crawl space. That left room for a generous laundry room conveniently located at the back entrance of the house where family members returning from a mountain bike ride can undress, drop muddy clothes into the washing machine and proceed to shower in the bathroom just across the hall. Interior Design by Lori Steeves of Simply Home Decorating. Photos by Tracey Ayton Photography.
 Rotem Guy Interior designer
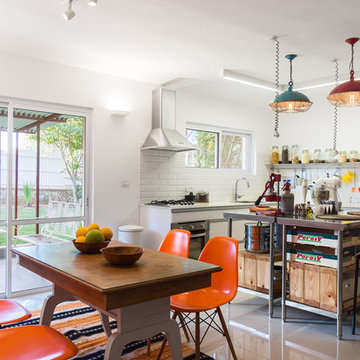
The original house was built in 1951 for a Jewish immigrant family from Libya. At first it was a tiny unit, typical of the houses built by the Jewish Agency in those years. Through the years, as the family grew, the house was enlarged.
In the renovation process I preserved its central elements which represented it along the years and were an integral part of its form and content. Into those I weaved new content to accommodate it for its new lodgers – a cook and a designer.
As the walls and the ceiling were exposed, a unique visual form was created which led to a clear deliberation as to the proceedings of building the house. The oldest part, which belonged to the first unit, contains the kitchen, dining area and bedroom. The room at the entrance, which was a later addition, is now singled out by a "carpet" of grey floor tiles. On the other end of the house which contains the living room, wooden roof beams belonging to the original house had been exposed and preserved, as well as the old book-shelves, which were an important core of the original house.
Peled studios // Yoav Peled
 Simply Home Decorating
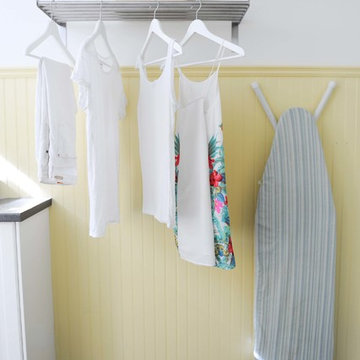
Before we redesigned the basement of this charming but compact 1950's North Vancouver home, this space was an unfinished utility room that housed nothing more than an outdated furnace and hot water tank. Since space was at a premium we recommended replacing the furnace with a high efficiency model and converting the hot water tank to an on-demand system, both of which could be housed in the adjacent crawl space. That left room for a generous laundry room conveniently located at the back entrance of the house where family members returning from a mountain bike ride can undress, drop muddy clothes into the washing machine and proceed to shower in the bathroom just across the hall. Interior Design by Lori Steeves of Simply Home Decorating. Photos by Tracey Ayton Photography.
Find the right local pro for your project
 Simply Home Decorating
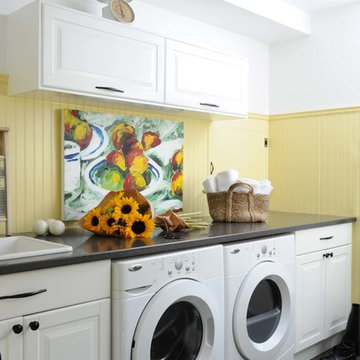
Before we redesigned the basement of this charming but compact 1950's North Vancouver home, this space was an unfinished utility room that housed nothing more than an outdated furnace and hot water tank. Since space was at a premium we recommended replacing the furnace with a high efficiency model and converting the hot water tank to an on-demand system, both of which could be housed in the adjacent crawl space. That left room for a generous laundry room conveniently located at the back entrance of the house where family members returning from a mountain bike ride can undress, drop muddy clothes into the washing machine and proceed to shower in the bathroom just across the hall. Interior Design by Lori Steeves of Simply Home Decorating. Photos by Tracey Ayton Photography.

 Appliances Connection
Whirlpool does more than help you run your house more easily, cleanly, and efficiently; Whirlpool is dedicated to developing more environmentally friendly appliances for your home. As we proceed into the twenty first century, and Whirlpool proceeds into its second, they've only expanded their initiatives toward cleaner technology, embracing the Energy Star efficiency banner and exceeding government requirements to ensure eco-friendly operation for all your home appliances. Whirlpool is dedicated to helping the home -- whether it's your home, or the home we all share

 Trickle Creek Designer Homes
Our take on the Modern Farmhouse!
Example of a large cottage white two-story concrete fiberboard exterior home design in Calgary
Example of a large cottage white two-story concrete fiberboard exterior home design in Calgary
 Barkman Concrete Ltd.
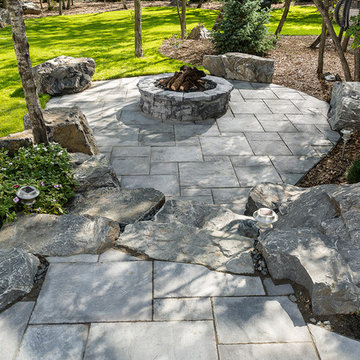
Dimensional Flagstone is the perfect choice for graceful walkways and elegant patios that require consistent dimensions and a more formal, sophisticated look than the free-flowing Grand Flagstone collection. Dimensional Flagstone's uniform thickness and accurate dimensions allow for fast installation and a beautiful end result. Photo: Barkman Concrete Ltd.
 Premiere Luminaire
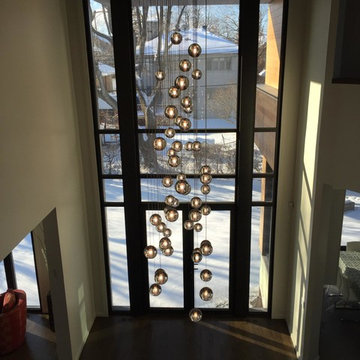
Custom made RBPL54 - LED
L64" x W20" with a Mat black Finish.
Hanging from 28' to a max length of 14'
Staggering was done from H60" - 154"
Great alternative to bocci fixture at the much less cost.
 Tile Doctor Ltd
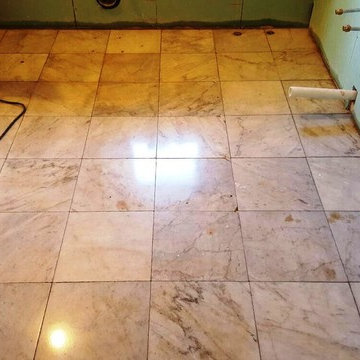
Windlestraw is a picturesque Edwardian manor hotel overlooking the Tweed Valley, near Walkerburn in the Scottish Borders area of Scotland. One of the bathrooms in the manor was in the process of being refurbished when two layers of floor tiles were removed, unveiling an original Marble tiled floor dating back to the 1920s.
After the top layers of tile had been removed the Marble was still covered in old adhesive and cement and although Marble is known for its quality and durability the hotel owner didn’t want the building contractor to proceed any further in case they damaged it. The owner was keen to restore the Marble floor as an original feature so we were called in to set the situation right.
To restore the floor I used two processes known as milling and burnishing. Milling literally involves grinding down uneven or rough surfaces using very coarse, diamond encrusted pads. The pads are usually used to resolve lippage issues on natural stone but in this case we needed to use the very coarse abrasive pads to grind off the adhesive and cement. I used a set of three coarse milling pads rinsing with water between each pad and starting with a 50 grit pad, before moving on to 100 and 200 grit pads. This process was very effective and ground off the cement and adhesive, while also removing any lippage in the tiles to leave a completely flat surface.
Milling leaves the surface of the Marble tiles clean but in a rough condition and this is where the second process Burnishing comes in. Similar to milling, burnishing focuses on achieving a polished finish with the application of ever finer grades of polishing pads and is often used to bring back the polish on Limestone and Travertine as well as Marble. Moving on to the burnishing, I worked my way through the four diamond encrusted pad system lubricating with a little water and again rinsing between each pad to remove the slurry. The grits go from Coarse (400 grit), Medium (800 grit), Fine (1500 grit) and then eventually Very Fine (3000 grit) and come in a 17” pad for use on a rotary floor machine and were applied twice in sequence to achieve a fantastic polished shine.
The floor was given a final rinse and then dried with a wet-vacuum before we proceeded to seal the floor using Tile Doctor Shine Powder which is a crystallizing powder that is applied directly to the floor and worked in using a buffing pad fitted to a rotary machine.
Shine Powder provides a very high shine (as you can see from the photos), along with a tough durable finish. On top of this, it is suitable for sealing all natural stone, including, of course, Marble, along with Limestone, Granite, Slate and Travertine.
The customer was absolutely delighted with the results as were we although it’s now up to them to ensure the bathroom fitters take appropriate care when completing the room which I’m sure will look absolutely fantastic when complete and no doubt add to the allure of this magnificent hotel in the Scottish Borders.
Thomas Wilson
Edinburgh Tile Doctor
 Tile Doctor Ltd
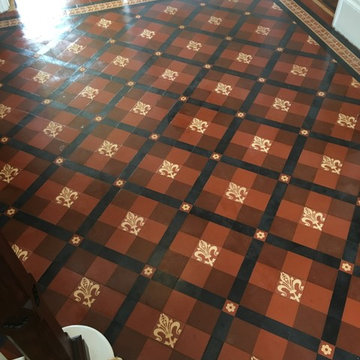
It’s always a great surprise to find old tiled flooring hidden underneath carpet or linoleum which appears especially common with 19th century properties where it’s not unusual for the owners to uncover fantastically patterned, original Victorian tiled floors and, naturally, they want to restore them to their former glory. If you have a property of this type you might want to look under the carpets.
The majority of the time, however, these tiles have been covered up for decades, allowing for thick layers of muck to build-up and are invariably damaged carpet grippers, surface glue and adhesive tape.
This was pretty much the case with this customer who lives in the town of Warminster and was keen to have her own newly discovered Victorian hallway brought back to life, and called me down to see what could be done. Upon arrival at the property, I determined that the tiles would definitely require a very deep clean, including the remove of numerous glue stains, followed by the application of a new seal.
Before I could begin the deep cleaning process, I needed to remove the carpet grippers and surface glue, attempting to remove as much as possible by hand using a scraper.
For the particularly stubborn areas, I applied Tile Doctor Remove & Go, a powerful stripper specially designed to break down adhesives and solvents, and left it to dwell for 20 minutes to eat through the glue deposits. I then attached a black pad to a rotary machine and scrubbed the area thoroughly to clean the affected areas, before removing the resulting slurry using a wet vacuum and rinsed with clean water.
Once I was satisfied that all of the glue had been removed, I proceeded to soak the floor using a solution of the high alkaline cleaner known as Tile Doctor Pro Clean. This is a versatile product that can be used on a wide range of natural stone floors to deal with heavy soil build-up.
I left the Pro-Clean to dwell for ten minutes, and then scrubbed it into the tiles to remove the ingrained dirt and also to break down any old and ineffectual seals. The floor was then once again rinsed thoroughly with clean water which was then extracted using a wet vacuum before being left to dry for a couple of days.
Upon our return to the property I immediately tested the floor for damp using a damp meter. This is an extremely important test to carry out before sealing any kind of tiled flooring, due to the fact that excess moisture left over from cleaning can cloud the sealer and damage its ability to protect against dirt and stains.
Thankfully, the damp test revealed no excess moisture, and I was able to proceed with sealing the tiles. My choice of sealer was Tile Doctor Seal and Go, a water-based topical sealer that simultaneously provides both a stain resistant surface seal and a durable and aesthetically pleasing low sheen finish, also being water based it doesn’t give off a smell as it dries.
This is a very cost effective product that is highly suitable for use on Victorian and Quarry tiles, I applied five costs to achieve the desired finish.
The customer was very pleased with the final results. It’s always satisfying to restore original Victorian tiled floors to looking their best once again – and this one was no exception.
Stuart Ford
Wiltshire Tile Doctor
 Tile Doctor Ltd
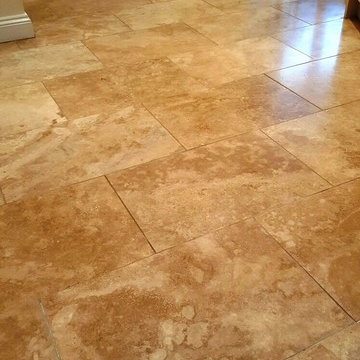
This fantastic Travertine tiled kitchen floor was in a bad way. Not only had it not been treated to a proper clean and seal in a long while, but it has also suffered from natural pitting, leaving lots of little holes that damaged the overall appearance of the floor. Travertine is very aesthetic, but suffers from the drawback of being quite soft compared to other types of stone (typically it sits between 3-4 on the Moh’s scale of mineral hardness).
The customer, who lives in the town of Sleaford a small Lincolnshire market town, was keen to have the situation remedied through a complete restoration. This would need to include small repairs, along with a deep clean and a fresh seal.
My first job was to deep clean the whole area, which I did using a solution of Tile Doctor Pro Clean and clean water. Pro Clean is a strong alkaline product which has a long history of producing reliable results of a wide range of natural stone floors, including Travertine, Granite, Limestone, and Slate. I applied the solution to both the tiles and the grout lines, and proceeded to scrub it in using a scrubbing pad fitted to a rotary floor machine.
This left the floor fresh and clean, but I would also need to restore the polish to the Travertine to really take its appearance to the next level. To do this I used the process known as burnishing, which essentially involves the consecutive application of different gritted pads to achieve a high quality polish on tiles. Our burnishing system, which consists of four pads, achieves fantastic results on high-end polished stone like Limestone, Marble and, of course, Travertine. I started by applying the Coarse grit burnishing pad, before gradually working my way through to the Medium, Fine, and finally Very Fine pads to achieve a brilliant shine and light reflection finish.
To round off the first day of the restoration, I used a flexible matching filler to fill up any pitted holes present on the surface of the tiles. Following this, I installed a turbo dryer to make sure the floor would dry fully overnight, and be ready to seal the following day.
The next day I returned to the property and proceeded to seal the Travertine tiles using several costs of Tile Doctor Colour Grow sealer to protect the tiles and also really enhance the natural colours in the stone. As an impregnating sealer, Colour Grow penetrates into the stone and fills its pores to safeguard it against ingrained dirt and stains from within.
As you can see from the photographs, the combination of a deep clean, high quality polish and fresh seal really transformed the appearance of the floor from dull and lifeless to a really asset to the kitchen. The customer was absolutely delighted with the results, leaving the following feedback: “Very good job – delighted! Thank you Phil!”
Phil Barrs
Lincolnshire Tile Doctor
 Tile Doctor Ltd
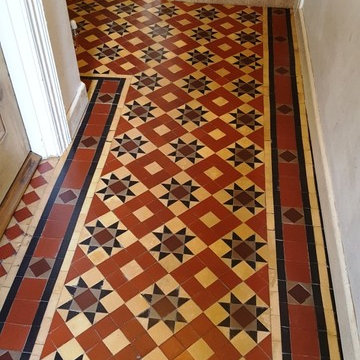
Pontcanna is a popular residential area in the western district of Cardiff, in South East Wales. Known for its rather large houses and spectacular foliage, interestingly enough roughly a quarter of the population are English folk.
I was called down to a property in the area to take a look at a Victorian tiled floor which was in quite poor condition. Along with the typical amount of dirt and muck seen on poorly maintained tiles, there were a number of missing tiles and a fair bit of cement caked on the surface of the floor.
It would require a robust clean, fresh seal, and several repairs to get this floor back into optimum condition.
To begin, I checked for excess moisture problems using a damp meter in various places of the hallway floor and, thankfully, it was showing dry results. Any dampness could have potentially caused problems later on in the restoration process, so it was s good idea to run tests before starting.
Next, I manually scraped as much of the dry paint and cement off the tiles as possible, with no lubrication necessary. I then proceeded to clean the floor with a solution I mixed early, consisting of equal parts Tile Doctor NanoTech HBU and Tile Doctor Pro Clean, rinsing as I went. Both products are designed to tackle heavy soil build-up, with the former uniquely using nano-sized particles (as the product name suggests) to penetrate deep into difficult to reach areas in the tiles in order to lift out ingrained muck.
Following the initial clean, I removed all of the loose tiles and those heavily affected by cement, before retiling as necessary with fresh Victorian tiles, and grouting the whole floor. Of course, these replacement tiles were carefully sourced to ensure consistency, as far as possible, with the original pattern of the floor.
The next day, I went over the whole floor with an application of the acid-based Tile Doctor Grout Clean Up, diluted with a little alkaline Pro Clean to form a cleaning solution. I then used a black pad to scrub the cleaner into the tiles, similarly to the previous day’s cleaning. This was followed by a through rinse with water to neutralise the floor.
It was at this point that I noticed some stubborn cement stains remained so I set about breaking them down using a 60 grade hand held diamond polishing block, and this technique proved successful.
After completing the clean, I left the floor to dry out for roughly 24 hours. Upon my return to the property to seal the tiles, I tested again for moisture. It is recommended to run damp tests before sealing, as excess moisture can cloud the sealer, affecting its performance in the long run.
Fortunately, no dampness was detected and I was proceeded to seal the floor with seven coats of Tile Doctor Seal & Go, which enhances the natural colours in the stone and provides a nice satin gloss appearance, as requested by the customer.
I was extremely pleased with the results of this restoration, as was the customer. The extent of the soil build up and damage was such before the restoration that, after completion, the floor looked like it had been newly laid!
Julian Iancono
South East Wales Tile Doctor




 Charlie Luxton Design
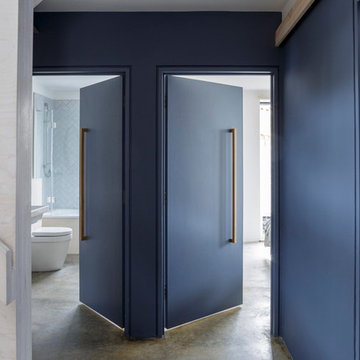
Doors off the landing to bedrooms and bathroom. Doors and handles are bespoke, made by a local joiner.
Photo credit: Mark Bolton Photography
Hallway - mid-sized contemporary concrete floor hallway idea in Gloucestershire with blue walls
Hallway - mid-sized contemporary concrete floor hallway idea in Gloucestershire with blue walls


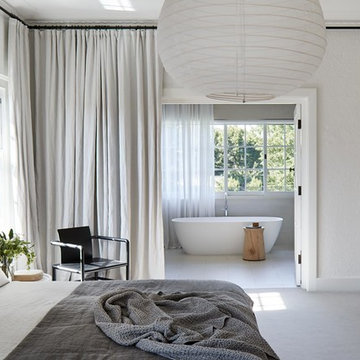
 Mirabuild
Bedroom - contemporary master gray floor bedroom idea in Melbourne with white walls and no fireplace

 Taylor Knights
Peter Clarke
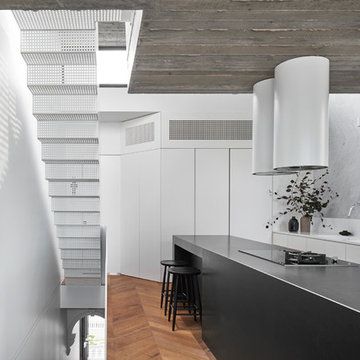
Small trendy galley medium tone wood floor and brown floor open concept kitchen photo in Melbourne with an undermount sink, flat-panel cabinets, white cabinets, granite countertops, gray backsplash, marble backsplash, black appliances, an island and black countertops
Small trendy galley medium tone wood floor and brown floor open concept kitchen photo in Melbourne with an undermount sink, flat-panel cabinets, white cabinets, granite countertops, gray backsplash, marble backsplash, black appliances, an island and black countertops
9