
Search results for "Process specific options" in Home Design Ideas
 French Creek Designs Kitchen & Bath Design Center
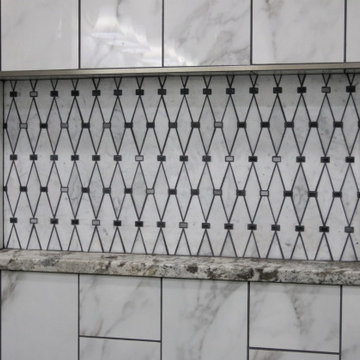
Marble Mosaic Tile shower remodel is designed with elegance in mind. From the marble diamond shaped marble mosaic tiles intricately placed in shower niche as well as elaborately displayed behind the shower fixtures. In addition, to the 8×24 marble-look porcelain tiles running up the shower walls surround the porcelain hexagon shower floor tiles. Finalized with Granite pony wall top, granite niche, and threshold surrounding the glass door. This master bath remodel is luxurious and will be enjoyed for years to come. Marble Mosaic tile accents in addition to Marble-look tiles complete in Client Project Shower Remodel Project ~ Thank you for sharing! Planning and designing shower remodels with mosaic tiles adds striking features to any shower or tub remodel. Choosing to add a stylish mosaic tile to a shower niche or the addition of surrounding the shower fixtures as shown are two elements that are not only striking, but elegant in design. In addition, choose to run a mosaic accent tile down the full length of the shower wall for a waterfall effect drawing the eye. Choose to run a traditional horizontal line across the walls is a beautiful addition. Furthermore, choosing from a traditional threshold shower design shown to a curbless or zero-entry shower for aging in place and simpler cleaning. Purchasing Schluter Shower-systems makes designing a shower simple, easy, and waterproof. In addition, to shelves, grates and tile edge profiles available. Remember to add granite or quartz for shelves, niches, benches, and threshold or pony wall tops. With so many options stop in to ask an expert bathroom designer regarding your next bathroom remodel or renovation design options. Large selection of samples available in marble mosaics and accent tiles. In addition, to marble-look tiles located at our showroom. Stop in and check out samples today. Find your locally owned Home Improvement Store, French Creek Designs, on MeWe or Facebook, and follow us! Read more about our process and read regular updates on client projects and updated materials selections and choices at FCD News a reliable source of information and current trends.

 MSI
Reminiscent of the linear pattern of natural wood grain, stunning Zebrino Black Polished offers a truly timeless look in refined black-hued marble. Bring a bit of chic to your space with Zebrino Black Polished.


Find the right local pro for your project





 Talon Construction Inc.
Designing and building a kitchen addition is a complex process that involves multiple steps and considerations. Here is a general outline to help you get started on your kitchen addition project:
Define Your Goals and Budget:
• Determine the purpose of the kitchen addition. Is it for more cooking space, a dining area, or a combination of both?
• Establish a realistic budget for your project. Consider all costs, including construction, permits, materials, and furnishings.
Hire a Design Professional:
• Seek the services of a design build company who specializes in kitchen additions.
• Discuss your vision, needs, and budget with the design professional to create a design concept.
Site Evaluation:
• Assess the existing space and structural condition of your home to ensure it can support the addition.
• Consider factors like zoning regulations, setbacks, and building codes.
Design Development:
• Collaborate with your design professional to refine the concept, including the layout, size, and architectural style.
• Choose materials, finishes, and fixtures that fit your design and budget.
Obtain Permits:
• Consult with your local design build contractor to determine the necessary permits and approvals.
• Prepare and submit all required documents, including architectural drawings and engineering plans.
Create Construction Documents:
• Work with your design build professional to develop detailed construction drawings and specifications.
• These documents will serve as a guide for contractors during construction.
Hire a design build contractor:
• Check references, credentials, and licenses before selecting a contractor.
• Sign a detailed contract that outlines the scope of work, timeline, and payment schedule.
Construction Phase:
• Demolition: If needed, remove any existing structures or walls.
• Foundation: Construct the foundation for the addition.
• Framing: Build the structural framework of the addition.
• Plumbing, Electrical, and HVAC: Install or update utilities as required.
• Insulation: Ensure proper insulation for energy efficiency.
• Drywall and Finish Work: Complete the walls and ceilings.
• Flooring and Cabinetry: Install flooring and kitchen cabinets.
• Appliances and Fixtures: Add appliances, plumbing fixtures, and lighting.
• Paint and Finish: Apply paint and finishes to achieve the desired look.
• Final Inspection: Schedule inspections to ensure compliance with building codes.
Final Inspections and Approvals:
• Arrange for final inspections to ensure the addition meets all safety and code requirements.
• Obtain any necessary certificates of occupancy or compliance.
Move In and Enjoy:
• Once all inspections and approvals are received, you can move into your new kitchen addition and start enjoying it.
Remember that every kitchen addition project is unique, so adapt this outline to your specific needs and circumstances. Consulting with professionals and obtaining the required permits and inspections is crucial to a successful and safe project.
 Talon Construction Inc.
Designing and building a kitchen addition is a complex process that involves multiple steps and considerations. Here is a general outline to help you get started on your kitchen addition project:
Define Your Goals and Budget:
• Determine the purpose of the kitchen addition. Is it for more cooking space, a dining area, or a combination of both?
• Establish a realistic budget for your project. Consider all costs, including construction, permits, materials, and furnishings.
Hire a Design Professional:
• Seek the services of a design build company who specializes in kitchen additions.
• Discuss your vision, needs, and budget with the design professional to create a design concept.
Site Evaluation:
• Assess the existing space and structural condition of your home to ensure it can support the addition.
• Consider factors like zoning regulations, setbacks, and building codes.
Design Development:
• Collaborate with your design professional to refine the concept, including the layout, size, and architectural style.
• Choose materials, finishes, and fixtures that fit your design and budget.
Obtain Permits:
• Consult with your local design build contractor to determine the necessary permits and approvals.
• Prepare and submit all required documents, including architectural drawings and engineering plans.
Create Construction Documents:
• Work with your design build professional to develop detailed construction drawings and specifications.
• These documents will serve as a guide for contractors during construction.
Hire a design build contractor:
• Check references, credentials, and licenses before selecting a contractor.
• Sign a detailed contract that outlines the scope of work, timeline, and payment schedule.
Construction Phase:
• Demolition: If needed, remove any existing structures or walls.
• Foundation: Construct the foundation for the addition.
• Framing: Build the structural framework of the addition.
• Plumbing, Electrical, and HVAC: Install or update utilities as required.
• Insulation: Ensure proper insulation for energy efficiency.
• Drywall and Finish Work: Complete the walls and ceilings.
• Flooring and Cabinetry: Install flooring and kitchen cabinets.
• Appliances and Fixtures: Add appliances, plumbing fixtures, and lighting.
• Paint and Finish: Apply paint and finishes to achieve the desired look.
• Final Inspection: Schedule inspections to ensure compliance with building codes.
Final Inspections and Approvals:
• Arrange for final inspections to ensure the addition meets all safety and code requirements.
• Obtain any necessary certificates of occupancy or compliance.
Move In and Enjoy:
• Once all inspections and approvals are received, you can move into your new kitchen addition and start enjoying it.
Remember that every kitchen addition project is unique, so adapt this outline to your specific needs and circumstances. Consulting with professionals and obtaining the required permits and inspections is crucial to a successful and safe project.

 Wine Cellar Specialists
Our wine cellar builders utilized the space under the table for additional wine storage.
The result was a Dallas wine cellar design that is both aesthetically appealing and highly functional.
Specifically, case storage was placed beneath the tabletop.
Wine Cellar Specialists
1134 Commerce Drive
Richardson
(972)454-0480
75081
https://winecellarspec.com/

 User
Craftsman Corners fit well with Pac Trim's Pioneer Series PIO190
Entryway - entryway idea in Sacramento
Entryway - entryway idea in Sacramento

 Durham Designs & Consulting, LLC
Photo by Michael LoBiondo
Eat-in kitchen - mid-sized traditional galley dark wood floor eat-in kitchen idea in Charlotte with an island, a drop-in sink, raised-panel cabinets, yellow cabinets, granite countertops, beige backsplash, stone tile backsplash and stainless steel appliances
Eat-in kitchen - mid-sized traditional galley dark wood floor eat-in kitchen idea in Charlotte with an island, a drop-in sink, raised-panel cabinets, yellow cabinets, granite countertops, beige backsplash, stone tile backsplash and stainless steel appliances


Sponsored
Columbus, OH

Hope Restoration & General Contracting
Columbus Design-Build, Kitchen & Bath Remodeling, Historic Renovations

 Home Carpet One
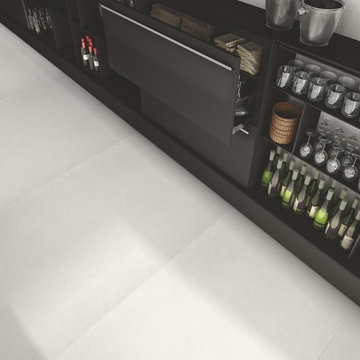
Cemento flooring is featured in "bianco" giving this modern bar extra flair. Cheers!
Inspiration for a modern home design remodel in Chicago
Inspiration for a modern home design remodel in Chicago



Sponsored
Westerville, OH

Custom Home Works
Franklin County's Award-Winning Design, Build and Remodeling Expert
 MIG Furniture Design, Inc.
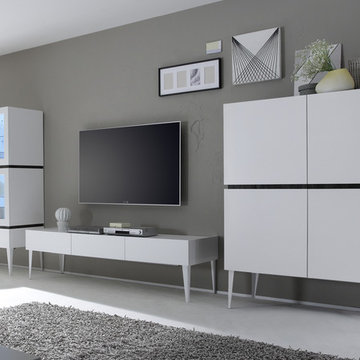
The Rex by LC Mobili is an ultra modern Italian Dining & Living room furniture collection. This unique line consists of a selection of modular units that can be arranged in a limitless amount of variations creating your individual furniture: sideboards, highboards, glass vitrines, TV Stands - all possible storage cabinets according to your specific requirements. All the units are available in either White or Anthracite Matt colors and can stand on plinth or lacquered metal legs.
The Rex Wall Unit Composition 01, shown in the main picture, features: 3-Drawer TV Stand, 4-Door Highboard and 4-Door & 2-Drawer Glass Vitrine. This wall unit provides everything need for a modern home - lots of hidden and exposed storage space and a TV stand for placing all your electronic devices.
Click Here to Browse entire collection of Rex storage cabinets.
Contact our office to get a quote for a customization of any of this wall unit composition or any other modular unit from Rex Collection!
MATERIAL/CONSTRUCTION:
E1-Class ecological panels, which are produced exclusively through a wood recycling production process
The structures and the fronts in lacquered finishes are made of chipboard
Soft-closing drawer glides and door hinges
Requires assembly (only drawer units come assembled)
The starting price is for the Wall Unit Rex 01 as shown in the main picture. Lights are not included in the price!
Dimensions:
Wall Unit: W169.3" x D20" x H68.5" (on legs) or H59" (on plinth)
Individual Units:
TV Stand: W72.5" x D20" x H19" (on legs) or H10" (on plinth)
Highboard: W48.4" x D20" x H59.5" (on legs) or H50" (on plinth)
Glass Vitrine: W48.4" x D20" x H68.5" (on legs) or H59" (on plinth)

 Whatadrain.com - Linear Shower Drains
BenjaminDavidPhotography.com
Example of a trendy bathroom design in Detroit
Example of a trendy bathroom design in Detroit

 LiveWell Outdoors
AFTER 2013 - close up of paver detail; great product from Outdoor Living by Belgard
Transitional front yard concrete paver patio photo in DC Metro
Transitional front yard concrete paver patio photo in DC Metro
242