
Search results for "Producing considerable" in Home Design Ideas

 VERMONT WOODS STUDIOS
Copeland's craftsman style Mansfield bedroom furniture is handmade in Vermont of solid cherry wood. Mansfield's solid cherry platform bed is low and sleek, designed for a mattress only. Matching case pieces include chests, dressers, night stands, a 3 drawer chest with organizer options for home entertainment equipment and a laptop desk that creates a trim, functional workspace.
Craftsman Style Meets Modern Design
Taking inspiration from arts & crafts style furniture as well as modern designs, Mansfield features a striking combination of the familiar and the unconventional. The artistic craftsman style design variation features 45 degree mitered corners “sawhorse” frames supporting the cases from the exterior. Forty-five Degree Miter construction refers to the angle in which solid wood tops and solid wood sides are joined to create a perfectly seamless perimeter. Stylistically, these cases are highly refined and visually Modern. The technique to produce this style of case requires extreme precision and is only attainable through exacting detail. The leading edge of each case is beveled to present a thin delicate, line that belies their considerable heft. This collection’s solid cherry wood construction and black bronze ring pulls make complex facets that create visual interest and highlight the superior precision craftsmanship.
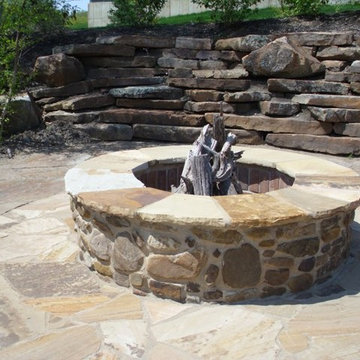
 The Masons Co and Dionysian Artificers Landscape
Kansas City Brick & Masonry is the craft of shaping rough pieces of rock into accurate geometrical shapes, at times simple, but some of considerable complexity, and then arranging the resulting stones, often together with mortar, to form structures.
Quarrymen split veins, or sheets of rock, and extract the resulting blocks of stone from the ground.
Sawyers cut these rough blocks into cuboids, to required size with diamond-tipped saws. The resulting block if ordered for a specific component is known as sawn six sides (SSS).
Banker masons are workshop based, and specialize in working the stones into the shapes required by a building's design, this set out on templets and a bed mould. They can produce anything from stones with simple chamfers to tracery windows, detailed mouldings and the more classical architectural building masonry. When working a stone from a sawn block, the mason ensures that the stone is bedded in the right way, so the finished work sits in the building in the same orientation as it was formed on the ground. Occasionally though some stones need to be orientated correctly for the application; this includes voussoirs, jambs, coping sand cornice.
The basic tools, methods and skills of the banker mason have existed as a trade for thousands of years.
Carvers cross the line from craft to art, and use their artistic ability to carve stone into foliage, figures, animals or abstract designs.
Fixer masons specialize in the fixing of stones onto buildings, using lifting tackle, and traditional lime mortars and grouts. Sometimes modern cements, mastics and epoxy resins are used, usually on specialist applications such as stone cladding. Metal fixings, from simple dowels and cramps to specialised single application fixings, are also used. The precise tolerances necessary make this a highly skilled job.
Memorial masons or monumental masons carve gravestones and inscriptions.
The modern stonemason undergoes comprehensive training, both in the classroom and in the working environment. Hands-on skill is complemented by intimate knowledge of each stone type, its application and best uses, and how to work and fix each stone in place. The mason may be skilled and competent to carry out one or all of the various branches of stonemasonry. In some areas the trend is towards specialization, in other areas towards adaptability.
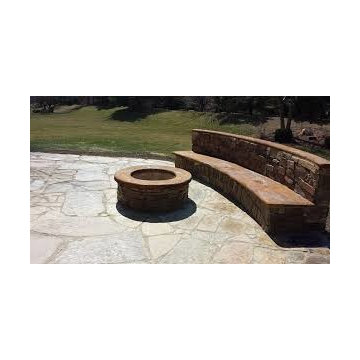 The Masons Co and Dionysian Artificers Landscape
Kansas City Brick & Masonry is the craft of shaping rough pieces of rock into accurate geometrical shapes, at times simple, but some of considerable complexity, and then arranging the resulting stones, often together with mortar, to form structures.
Quarrymen split veins, or sheets of rock, and extract the resulting blocks of stone from the ground.
Sawyers cut these rough blocks into cuboids, to required size with diamond-tipped saws. The resulting block if ordered for a specific component is known as sawn six sides (SSS).
Banker masons are workshop based, and specialize in working the stones into the shapes required by a building's design, this set out on templets and a bed mould. They can produce anything from stones with simple chamfers to tracery windows, detailed mouldings and the more classical architectural building masonry. When working a stone from a sawn block, the mason ensures that the stone is bedded in the right way, so the finished work sits in the building in the same orientation as it was formed on the ground. Occasionally though some stones need to be orientated correctly for the application; this includes voussoirs, jambs, coping sand cornice.
The basic tools, methods and skills of the banker mason have existed as a trade for thousands of years.
Carvers cross the line from craft to art, and use their artistic ability to carve stone into foliage, figures, animals or abstract designs.
Fixer masons specialize in the fixing of stones onto buildings, using lifting tackle, and traditional lime mortars and grouts. Sometimes modern cements, mastics and epoxy resins are used, usually on specialist applications such as stone cladding. Metal fixings, from simple dowels and cramps to specialised single application fixings, are also used. The precise tolerances necessary make this a highly skilled job.
Memorial masons or monumental masons carve gravestones and inscriptions.
The modern stonemason undergoes comprehensive training, both in the classroom and in the working environment. Hands-on skill is complemented by intimate knowledge of each stone type, its application and best uses, and how to work and fix each stone in place. The mason may be skilled and competent to carry out one or all of the various branches of stonemasonry. In some areas the trend is towards specialization, in other areas towards adaptability.
Find the right local pro for your project

 threshold interiors
Location: New York, NY, United States
This Loft was tastefully renovated back in the '90s, but was due for an update and an expansion of the kitchen and dining areas to accommodate the client's cooking skills and entertaining needs. EnlargIing the island and adding cabinetry to delineate the office, bar and dining areas was a priority. The bathroom was updated to feel like a tranquil spa with beautiful new tile, plumbing fixtures and cabinets. Our biggest challenge was coordinating the entire renovation while our client was out of town for the Summer!
Photographed by: James Salomon


 Home Improvement
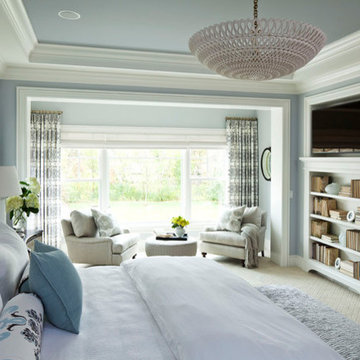
West or east, home is the best. Happy, warm, harmonious home is the dream and target of people. How to decorate our home is very important. We have the experience that the bedding we saw in emporium is beautiful, but the effect does not good when we bring it home. This is because we do not choose bedding according to the color collocation of our dream bedrooms. Here are some classic color collocation methods for you:
Color collocation of light with dark: when the main color of your dream bedroom is light, such as white, light color bedding will make your bedroom feel pale, ordinary and have no sense of color. On the contrary, dark or bright color bedding such as chocolate, purple, green, yellow will make your space full of vitality. The collocation of light and dark color gives people strong visual impact. So when your dream bedroom have dark color as its main tone, light or bright color like white, pink, red and yellow goes well with it. The space will feel depressing if you use dark color bedding.
Color collocation method of similar color: it means choose bedding with similar color to the main color of bedroom. For example, when the main color of your dream bedroom is purple, white bedding with few purple decoration patterns is good choice. There would be no layering if you use bedding in large area purple.
Collocation method of matching complex with simple: if the decoration style of bedroom is complex, concise and elegant bedding goes well with it, or the space will be disorderly and unsystematic.
The intensity of lighting: light intensity is the factor that people often neglect. Avoid using dark color bedding in bedroom with dark light.
The relationship of whole and part: the main color of bedroom is whole, bedding color is part. A guest cannot usurp the host's role. So does the bedding. There should be primary and secondary in bedroom color collocation. Bedding color only plays the role of embellishing.
Take all the elements in bedroom into consideration: all the elements in dream bedroom – wall, furniture, floor, and bedding – should be considered. They should be in consistent.
We all know that color has the function of mood adjustment. We should choose color according to our actually needs.
Green and purple is good to soothe the nerves and relax people. Patient with phobia and schizophrenia can choose the two colors.
Light saffron yellow, blue and pink can make people exciting, happy and full of hope. Depression and anxiety disorder patient can choose them.
Cyan is good to produce sleepiness. It suit for those insomniac.
Besides, warm color bedding with thicker fabric suit to use in winter and autumn for the decrease of temperature.
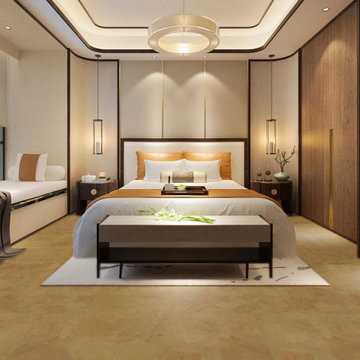
 iCork Floor
Fusion Cork flooring is clean, durable as stone, and warm to walk on, and is fabulous for people suffering from allergies and asthma

 Jean Brooks Landscapes
This garden takes advantage of the chimney tops and attics spaces of the urban landscape of the Back Bay- we refer to it as "Mary-Poppinsville". Split in to two areas- seating and dinning/cooking. shrubs, perennials, annuals, and edibles including: herbs, tomatoes, The client is a gourmet chef and uses the foods in his cooking. With limited space, the most popular edible plants that clients ask for are tomatoes and herbs because the herbs can be used in daily cooking and theres nothing to compare to the homegrown tomato. Where space is generous, we also plant blueberries strawberries, raspberries, lettuces, peppers.
 Brett Hardy Landscapes Ltd
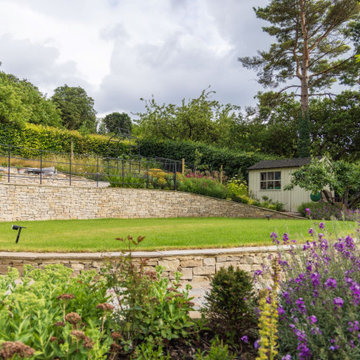
Our clients came to us looking for a complete country-style garden design and landscape build.
Their existing garden was an open space dominated by a sloping lawn, a feature summerhouse in the top corner and a shed for storage. There were two raised beds for growing home produce and some small trees in the existing garden.
They wanted design inspiration to create a feature path to the summerhouse. It must be easy to mow the lawns and have considered planting in the beds. They didn’t want anything high maintenance to look after.
Our clients wanted a crisp and clean formal feel to the country-style garden design, and we knew they enjoyed their Yew Topiary balls. Our other consideration for the brief was that they wanted some privacy from neighbours.
Our garden designer took up the challenge and worked with the client to create their garden. Before we started, we surveyed the space in detail as we do before we start any project.
After discussing their needs and desires, we knew they needed to create a feature landscaped pathway to the destination summerhouse with an adjoined gorgeous seating area.
Among this, it was essential to create a level lawn area that was flat and trouble-free and fill the planting areas with perennials and shrubs in the customer’s preferred colours of white, blue and purple.
Brett came along and presented me with a very professional and beautiful design to turn my unloved outdoor space into something to be proud of. I had to wait for the transformation, but once it was underway, it soon became clear that it had been worth it. The lads were hard-working and polite and left me with a lovely new feature.
A flat oval lawn on the mid-level was integral to the design and surrounded by a sweeping curved pathway leading to the summerhouse. The sett cobbled path takes you up and around to the top seating area.
landscape country style garden design
A GARDEN PARADISE
To the back of the oval lawn is a spectacular feature stone retaining topped wall finished with country-style estate-style fencing for safety and effect.
On the highest level by the summerhouse, there is a spacious seating terrace to relax.
Head through the arch of black galvanised steel, where you will find several raised beds for vegetables and fruit crops. This added to their established apple tree collection. Then we planted some espalier fruit tree screens to define the garden’s zones. This abundant growing area is surrounded by wildflower meadow planting to attract wildlife and pollinators.
For privacy, there are trees strategically planted on the boundaries to provide effective green screening.
Descending from the lawn, you will find stepping stones to take you down to the shed. Here you will find a delightfully secluded seating spot.
The area closest to the house has stepped levels of planted banks. They are filled with easy-to-care-for shrubs and perennial planting that will return year after year. The roses and lavender fill the air with a glorious scent as you pass them.
We are proud to have been involved in this thrilling country-style garden project from start to finish.
 Tile Doctor Ltd
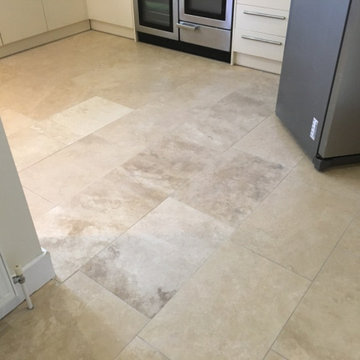
This client from Cobham contacted me in despair, she was quite concerned about her Travertine tiled floor which was cracking. She had the Kitchen and Dining room tiled with Travertine six years ago and recently several cracks had begun to appear in a long line crossing five tiles.
Several holes had also begun to appear and across the threshold to the kitchen from the dining area a serious lip had formed where a tile had risen above its neighbour causing a trip hazard.
After removing a tile from an unobtrusive area, I began to see where the issues lay. The tiler had dabbed the adhesive. This mean that instead of spreading the adhesive equally across the tile and floor they had splurged four lumps in each corner then set the tile down. This is poor working practice that will sooner or later become apparent. It means the areas were no adhesive was applied are eventually compromised resulting in cracking. This could take years or weeks to surface.
After some discussion we decided that I would remove and replace six tiles in total. The client was happy for me to go ahead and agreed a cost for the works to be done.
Returning the following week, firstly I had to remove the grout. This was done with a handheld Fein tool fitted with an oscillating blade. I thought this would be good experience from my son during the holidays, so I took him along and whilst I was working on the grout, he was able to gather the dust in a vacuum cleaner.
Next, I started to remove the cracked tiles with a chisel, starting from the cracks where the tiles would be weakest. This was noisy and messy work which required ear defenders and safety goggles. The process took several hours with the help of my son on general assistance duties. Once the tiles were removed this just left the remaining adhesive attached to the floor to get removed. This was the hardest part of the job, a lot of hammer and chisel work with as much dust gathered as possible to try and contain the mess. I had warned the customer that a considerable amount of mess would be produced and request that she should remove as much items as possible and to tape up her cupboards. Finally, I filled several holes in the sub floor so I would have a flat surface to lay the new tiles on. I left it there for the night to solidify.
Returning the next day, I began laying the replacement tiles down. Colour matching replacement tiles is a difficult task as Travertine is a natural product and colours vary greatly so these were a pretty good match.
Once the adhesive had set, I grouted in the newly laid tiles and once that was dry set about applying a sealer. For this I used two coats of Tile Doctor Ultra Seal which is an impregnating sealer that doesn’t alter the colour of the stone. This would ensure they were nicely protected and hopefully the client will not experience any further issues.
She was very happy with the result and was pleased the floor no long looked unsightly or posed a tripping hazard.
Rupert Mcleod
West Surrey Tile Doctor

 Dianne Davant and Associates
Master Bedroom with Red Bed Frame and custom drapery and bedding.
Bedroom - traditional master light wood floor bedroom idea in Charlotte
Bedroom - traditional master light wood floor bedroom idea in Charlotte

 Northern Roof Tiles
Architect: Andre Tchelistcheff Architects New York. NY
Builder: Xhema of Greenwich CT
Installer: TRM Enterprises Bridgehampton NY
Back story.
Northern has worked with both Xhema and TRM many tiles. We have worked with Andre before he branched out on his own.
Originally Xhema’s contact was to replace the roof and repair the garage, which as some point had been made into an indoor swimming pool without adequate ventilation. The budget was about $8m and there were 20 drawings.
By the time the job was 6 months old the scope of work has expanded to over $30m and over 200 drawings had been produced.
Northern was contacted to visit the site and evaluate the existing roof. Although the house had been added to over the years the same tile was used but due to the location of the house the color of the tile varied considerably from the front to the back.
Northern identified a large number of custom details which would require us to:
1) Match the existing Field tile in size, thickness (it was actually thicker at the butt and reduced to ½” where the tile is overlapped) , surface texture and the color.
2) Make tiles that are curved in their length to suit the curved rafter on the gabled dormers.
3) Make the curved tiles to suit the low slope octagonal tower.
4) Make the curved tiles and Arris style hips to suit the hipped dormers with the curved rafters.
5) Make the segmented tiles to suit the round turret.
6) Make the custom arris style hip tiles for the octagonal tower.
7) Make the custom Arris style hip to suit the different roof pitches as well as the varying splays at the eaves.
8) Make the custom pieces to suit the swept valleys
Simon broke down each section of the roof. He indented all items for each section and agreed the measure etc with the installers. This ‘Project Bible’ became an invaluable tool for the installer, our tile makers and us.
We shipped some samples from the original roof to Sahtas who replicated tall the details. I was visiting factory and delayed my return to the Saturday so that the tiles coming out of the kiln late Friday night could be wrapped and packed into newly purchase suit cases. I arrived home late Saturday evening and Simon picked me up Sunday afternoon and drove us down to Greenwich for an 8 am meeting with the clients. When we unpacked the tiles they were still warm and Hilfiger signed off on the color, although his wife suggested we make them a bit darker a ‘as he has a dreadful sense of color!’
We took Vincent Liot, owner of TRM to the factory twice so that he could oversee the prototyping of all the myriad custom pieces. This was an invaluable move as he pre-approved all the pieces before they were shipped.
The installation was completed and everyone was very pleased with the final outcome.
The Hilfiger’s estate manager told me that a group of friends who were staying the weekend after all the work was completed were heard to ask Mr. Hilfiger ‘I thought you were having a new roof’…to which he responded ‘we did but you can’t tell, which as the plan” …perfect!
In refection this is probably the most complicated roof Northern has ever had the pleasure to supply. We learned a lot of very valuable lessons but in future when we are asked how did we do it we will answer ‘that is for us to know and for you to pay for!’
 Northern Roof Tiles
Architect: Andre Tchelistcheff Architects New York. NY
Builder: Xhema of Greenwich CT
Installer: TRM Enterprises Bridgehampton NY
Back story.
Northern has worked with both Xhema and TRM many tiles. We have worked with Andre before he branched out on his own.
Originally Xhema’s contact was to replace the roof and repair the garage, which as some point had been made into an indoor swimming pool without adequate ventilation. The budget was about $8m and there were 20 drawings.
By the time the job was 6 months old the scope of work has expanded to over $30m and over 200 drawings had been produced.
Northern was contacted to visit the site and evaluate the existing roof. Although the house had been added to over the years the same tile was used but due to the location of the house the color of the tile varied considerably from the front to the back.
Northern identified a large number of custom details which would require us to:
1) Match the existing Field tile in size, thickness (it was actually thicker at the butt and reduced to ½” where the tile is overlapped) , surface texture and the color.
2) Make tiles that are curved in their length to suit the curved rafter on the gabled dormers.
3) Make the curved tiles to suit the low slope octagonal tower.
4) Make the curved tiles and Arris style hips to suit the hipped dormers with the curved rafters.
5) Make the segmented tiles to suit the round turret.
6) Make the custom arris style hip tiles for the octagonal tower.
7) Make the custom Arris style hip to suit the different roof pitches as well as the varying splays at the eaves.
8) Make the custom pieces to suit the swept valleys
Simon broke down each section of the roof. He indented all items for each section and agreed the measure etc with the installers. This ‘Project Bible’ became an invaluable tool for the installer, our tile makers and us.
We shipped some samples from the original roof to Sahtas who replicated tall the details. I was visiting factory and delayed my return to the Saturday so that the tiles coming out of the kiln late Friday night could be wrapped and packed into newly purchase suit cases. I arrived home late Saturday evening and Simon picked me up Sunday afternoon and drove us down to Greenwich for an 8 am meeting with the clients. When we unpacked the tiles they were still warm and Hilfiger signed off on the color, although his wife suggested we make them a bit darker a ‘as he has a dreadful sense of color!’
We took Vincent Liot, owner of TRM to the factory twice so that he could oversee the prototyping of all the myriad custom pieces. This was an invaluable move as he pre-approved all the pieces before they were shipped.
The installation was completed and everyone was very pleased with the final outcome.
The Hilfiger’s estate manager told me that a group of friends who were staying the weekend after all the work was completed were heard to ask Mr. Hilfiger ‘I thought you were having a new roof’…to which he responded ‘we did but you can’t tell, which as the plan” …perfect!
In refection this is probably the most complicated roof Northern has ever had the pleasure to supply. We learned a lot of very valuable lessons but in future when we are asked how did we do it we will answer ‘that is for us to know and for you to pay for!’
 Northern Roof Tiles
Architect: Andre Tchelistcheff Architects New York. NY
Builder: Xhema of Greenwich CT
Installer: TRM Enterprises Bridgehampton NY
Back story.
Northern has worked with both Xhema and TRM many tiles. We have worked with Andre before he branched out on his own.
Originally Xhema’s contact was to replace the roof and repair the garage, which as some point had been made into an indoor swimming pool without adequate ventilation. The budget was about $8m and there were 20 drawings.
By the time the job was 6 months old the scope of work has expanded to over $30m and over 200 drawings had been produced.
Northern was contacted to visit the site and evaluate the existing roof. Although the house had been added to over the years the same tile was used but due to the location of the house the color of the tile varied considerably from the front to the back.
Northern identified a large number of custom details which would require us to:
1) Match the existing Field tile in size, thickness (it was actually thicker at the butt and reduced to ½” where the tile is overlapped) , surface texture and the color.
2) Make tiles that are curved in their length to suit the curved rafter on the gabled dormers.
3) Make the curved tiles to suit the low slope octagonal tower.
4) Make the curved tiles and Arris style hips to suit the hipped dormers with the curved rafters.
5) Make the segmented tiles to suit the round turret.
6) Make the custom arris style hip tiles for the octagonal tower.
7) Make the custom Arris style hip to suit the different roof pitches as well as the varying splays at the eaves.
8) Make the custom pieces to suit the swept valleys
Simon broke down each section of the roof. He indented all items for each section and agreed the measure etc with the installers. This ‘Project Bible’ became an invaluable tool for the installer, our tile makers and us.
We shipped some samples from the original roof to Sahtas who replicated tall the details. I was visiting factory and delayed my return to the Saturday so that the tiles coming out of the kiln late Friday night could be wrapped and packed into newly purchase suit cases. I arrived home late Saturday evening and Simon picked me up Sunday afternoon and drove us down to Greenwich for an 8 am meeting with the clients. When we unpacked the tiles they were still warm and Hilfiger signed off on the color, although his wife suggested we make them a bit darker a ‘as he has a dreadful sense of color!’
We took Vincent Liot, owner of TRM to the factory twice so that he could oversee the prototyping of all the myriad custom pieces. This was an invaluable move as he pre-approved all the pieces before they were shipped.
The installation was completed and everyone was very pleased with the final outcome.
The Hilfiger’s estate manager told me that a group of friends who were staying the weekend after all the work was completed were heard to ask Mr. Hilfiger ‘I thought you were having a new roof’…to which he responded ‘we did but you can’t tell, which as the plan” …perfect!
In refection this is probably the most complicated roof Northern has ever had the pleasure to supply. We learned a lot of very valuable lessons but in future when we are asked how did we do it we will answer ‘that is for us to know and for you to pay for!’
 Northern Roof Tiles
Architect: Andre Tchelistcheff Architects New York. NY
Builder: Xhema of Greenwich CT
Installer: TRM Enterprises Bridgehampton NY
Back story.
Northern has worked with both Xhema and TRM many tiles. We have worked with Andre before he branched out on his own.
Originally Xhema’s contact was to replace the roof and repair the garage, which as some point had been made into an indoor swimming pool without adequate ventilation. The budget was about $8m and there were 20 drawings.
By the time the job was 6 months old the scope of work has expanded to over $30m and over 200 drawings had been produced.
Northern was contacted to visit the site and evaluate the existing roof. Although the house had been added to over the years the same tile was used but due to the location of the house the color of the tile varied considerably from the front to the back.
Northern identified a large number of custom details which would require us to:
1) Match the existing Field tile in size, thickness (it was actually thicker at the butt and reduced to ½” where the tile is overlapped) , surface texture and the color.
2) Make tiles that are curved in their length to suit the curved rafter on the gabled dormers.
3) Make the curved tiles to suit the low slope octagonal tower.
4) Make the curved tiles and Arris style hips to suit the hipped dormers with the curved rafters.
5) Make the segmented tiles to suit the round turret.
6) Make the custom arris style hip tiles for the octagonal tower.
7) Make the custom Arris style hip to suit the different roof pitches as well as the varying splays at the eaves.
8) Make the custom pieces to suit the swept valleys
Simon broke down each section of the roof. He indented all items for each section and agreed the measure etc with the installers. This ‘Project Bible’ became an invaluable tool for the installer, our tile makers and us.
We shipped some samples from the original roof to Sahtas who replicated tall the details. I was visiting factory and delayed my return to the Saturday so that the tiles coming out of the kiln late Friday night could be wrapped and packed into newly purchase suit cases. I arrived home late Saturday evening and Simon picked me up Sunday afternoon and drove us down to Greenwich for an 8 am meeting with the clients. When we unpacked the tiles they were still warm and Hilfiger signed off on the color, although his wife suggested we make them a bit darker a ‘as he has a dreadful sense of color!’
We took Vincent Liot, owner of TRM to the factory twice so that he could oversee the prototyping of all the myriad custom pieces. This was an invaluable move as he pre-approved all the pieces before they were shipped.
The installation was completed and everyone was very pleased with the final outcome.
The Hilfiger’s estate manager told me that a group of friends who were staying the weekend after all the work was completed were heard to ask Mr. Hilfiger ‘I thought you were having a new roof’…to which he responded ‘we did but you can’t tell, which as the plan” …perfect!
In refection this is probably the most complicated roof Northern has ever had the pleasure to supply. We learned a lot of very valuable lessons but in future when we are asked how did we do it we will answer ‘that is for us to know and for you to pay for!’
 Northern Roof Tiles
Architect: Andre Tchelistcheff Architects New York. NY
Builder: Xhema of Greenwich CT
Installer: TRM Enterprises Bridgehampton NY
Back story.
Northern has worked with both Xhema and TRM many tiles. We have worked with Andre before he branched out on his own.
Originally Xhema’s contact was to replace the roof and repair the garage, which as some point had been made into an indoor swimming pool without adequate ventilation. The budget was about $8m and there were 20 drawings.
By the time the job was 6 months old the scope of work has expanded to over $30m and over 200 drawings had been produced.
Northern was contacted to visit the site and evaluate the existing roof. Although the house had been added to over the years the same tile was used but due to the location of the house the color of the tile varied considerably from the front to the back.
Northern identified a large number of custom details which would require us to:
1) Match the existing Field tile in size, thickness (it was actually thicker at the butt and reduced to ½” where the tile is overlapped) , surface texture and the color.
2) Make tiles that are curved in their length to suit the curved rafter on the gabled dormers.
3) Make the curved tiles to suit the low slope octagonal tower.
4) Make the curved tiles and Arris style hips to suit the hipped dormers with the curved rafters.
5) Make the segmented tiles to suit the round turret.
6) Make the custom arris style hip tiles for the octagonal tower.
7) Make the custom Arris style hip to suit the different roof pitches as well as the varying splays at the eaves.
8) Make the custom pieces to suit the swept valleys
Simon broke down each section of the roof. He indented all items for each section and agreed the measure etc with the installers. This ‘Project Bible’ became an invaluable tool for the installer, our tile makers and us.
We shipped some samples from the original roof to Sahtas who replicated tall the details. I was visiting factory and delayed my return to the Saturday so that the tiles coming out of the kiln late Friday night could be wrapped and packed into newly purchase suit cases. I arrived home late Saturday evening and Simon picked me up Sunday afternoon and drove us down to Greenwich for an 8 am meeting with the clients. When we unpacked the tiles they were still warm and Hilfiger signed off on the color, although his wife suggested we make them a bit darker a ‘as he has a dreadful sense of color!’
We took Vincent Liot, owner of TRM to the factory twice so that he could oversee the prototyping of all the myriad custom pieces. This was an invaluable move as he pre-approved all the pieces before they were shipped.
The installation was completed and everyone was very pleased with the final outcome.
The Hilfiger’s estate manager told me that a group of friends who were staying the weekend after all the work was completed were heard to ask Mr. Hilfiger ‘I thought you were having a new roof’…to which he responded ‘we did but you can’t tell, which as the plan” …perfect!
In refection this is probably the most complicated roof Northern has ever had the pleasure to supply. We learned a lot of very valuable lessons but in future when we are asked how did we do it we will answer ‘that is for us to know and for you to pay for!’
 BSF NEWSWIRE
Discovering the Charm: Exploring Jerusalem Properties Beyond History
In the core of the Center East, where antiquated history slams into advancement, lies the immortal city of Jerusalem. Known for its rich strict importance, social legacy, and dynamic air, Jerusalem offers something other than a brief look into the past — it's a no nonsense demonstration of the strength and variety of human development. In the midst of its tangled roads and celebrated milestones, lies a mother lode of properties ready to be found and loved.
Unveiling the Tapestry of Jerusalem Properties
Jerusalem's land scene is essentially as different as its populace, offering a kaleidoscope of choices to suit each taste and inclination. From noteworthy homes settled inside the Old City's walls to contemporary condos with clearing perspectives on the horizon, the city brags a heap of properties that take care of different ways of life and spending plans.
1. Old City Charms: Step back in time by living inside the antiquated walls of the Old City. Jerusalem Properties here radiate an unmatched feeling of history, with winding cobblestone roads, exceptionally old engineering, and closeness to hallowed locales like the Western Wall and the Congregation of the Sacred Mausoleum. Living in an Old City property resembles having a fantastic view to Jerusalem's renowned past.
2. Present day Polish: For those looking for a more contemporary living experience, Jerusalem offers a variety of smooth and up-to-date properties outfitted with best in class conveniences. Whether it's an extravagant penthouse sitting above the city or a stylish loft in a clamoring area like Mamilla or Rehavia, innovation meets solace in these metropolitan sanctuaries.
3. Rural Serenity: Past the hurrying around of the downtown area lie quiet rural areas that offer a tranquil retreat from the metropolitan uproar. Regions like Beit Hakerem, Ein Karem, and Abu Peak brag extensive properties encompassed by rich vegetation, ideal for families or anybody hoping to get away from the frantic speed of city life.
Beyond Brick and Mortar: Embracing Jerusalem's Essence
While the actual properties are without a doubt tempting, the substance of Jerusalem Properties genuinely separates them. Every area, road, and building conveys with it an interesting story, mirroring the city's multi-layered personality and getting through soul.
1. Social Mixture: Jerusalem is a mosaic of societies, religions, and customs, and its properties mirror this variety. Whether it's the varied design of the German Settlement, the lively road specialty of Nahlaot, or the serene feeling of the Armenian Quarter, each edge of the city offers a brief look into its vivid embroidery.
2. Otherworldliness and Comfort: Past its actual charm, Jerusalem Properties radiates an unmistakable feeling of otherworldliness and comfort. Living in the midst of its holy destinations and old landmarks can permeate a feeling of stunningness and worship, cultivating thoughtfulness and consideration in the midst of the mayhem of day to day existence.
3. Local area Associations: One of the most astounding parts of Jerusalem's properties is the feeling of local area they encourage. Whether it's neighbors gathering for Shabbat suppers, kids playing in shared parks, or occupants meeting up to commend occasions and celebrations, the bonds produced inside Jerusalem's areas are however persevering as they seem to be enhancing.
Conclusion: Writing Your Jerusalem Story
In the domain of land, Jerusalem is something beyond a city — it's a living material whereupon endless stories unfurl. From the cobblestone rear entryways of the Old City to the smooth roads of the cutting edge city, every property offers an interesting vantage point from which to encounter the enchantment of Jerusalem. So whether you're attracted to its memorable appeal, social dynamic quality, or otherworldly charm, there's a property in Jerusalem standing by to turn into your very own piece remarkable story. Investigate, find, and compose your Jerusalem story today.


 Øesch Environmental Design
Energy Efficiency:
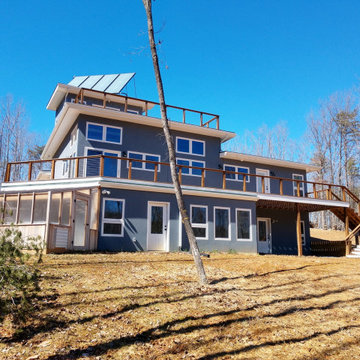
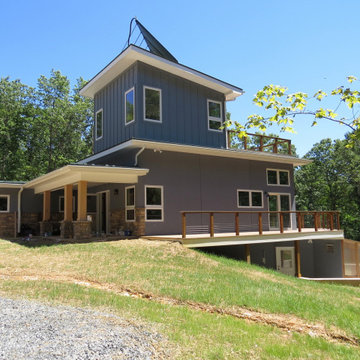
Every effort has been utilized to reduce and minimize energy use through an effective strategy of both passive heating and cooling, as well as state-of-the-art active solar thermal and photovoltaic on site off-grid energy production. Optimal solar orientation with an attached thermal mass food production greenhouse on the Lower Floor enables hot air to be introduced into the house during the winter, and rise via. a thermal chimney “stack effect” and distributed throughout the house. In the summer the same thermal chimney is used to channel hot air to rise up to the Upper Loft vegetated Roof Terrace, where it is exhausted. This condition provides a positive air pressure in the Winter, and a negative pressure in the summer, drawing in cooler outside air from every open window. In addition carefully proportioned roof eave overhangs provide deep passive solar gain and additional day lighting in the winter, and cooling shade in the summer.
Active mechanical systems include solar thermal which produces domestic hot water and is integrated into hydronic radiant heated floors. This is supplemented with a multi-split heatpump, on demand backup hot water, and an ERV, which collectively provide active heating, cooling, dehumidification, and healthful indoor air quality. The entire house and detached Barn are off-grid with a 14.4 kW solar array, whole-house batteries, and backup generator. Further, the home is super insulated and extremely tight with high energy performing windows and doors and LED lighting throughout, and even a high efficiency woodstove.
Integrated Design:
From the beginning and throughout construction, this home demonstrates a close collaboration between the Architect, Contractor, and Owners. Healthful materials and finishes standards, autonomy and energy efficiency, and environmental impact and sustainability were primary goals and stressed throughout. Careful attention was paid to finishes which will require minimal long term maintenance such as the galvalume metal roof (which also provides for rainwater harvesting) and fiber cement siding for longevity.
Resource Efficiency / Conservation:
Resource conservation began with Schematic Design which utilizes a 2 ft. grid of modular components, thereby optimizing construction efficiency and minimizing on site waste. The site was cleared with the trees stockpiled for future lumber harvesting and firewood. The foundation walls are “Ideal Walls” which use less than half the concrete of a conventional poured wall or block, and do not require extensive concrete footings, exterior insulation, or waterproofing. These panels are prefabricated off site and set in only a few days, which further reduces on site impact and construction lead time.
Resiliency:
Respect for climate change and mitigating its impact were primary considerations in the design and selection of materials and systems. The home is sited high on a south facing slope as protection from high water or flood and to optimize both passive and active solar opportunity. With remarkably tight construction and super insulation the interior is buffered from both outdoor heat and cold extremes. The metal roof and fiber cement siding are fireproof and resistant to the impact of high winds. And these materials are specified for minimal maintenance and longevity. Further, the attached Greenhouse and Upper Roof Terrace is landscaped and suitable for a vegetable garden with abundant sunshine, easy to water, and with no need for fencing to keep deer at bay. All this being a notable case study for Regenerative Design.
Innovation:
This home exemplifies Biophilic Design principles to facilitate symbiotic living in harmony with Nature. This incorporates careful attention to natural day lighting, indoor air quality, rainwater catchment and wastewater reclamation, garden food production with vegetated roofs, the home hearth and fire, and connected interaction with the weather and the surrounding natural ecosystems.
Community Impact:
This EcoHome project has already been presented at several Sustainable Building lectures as a model case study for “Green Building”, including USGBC at Brock Environmental Center in Virginia Beach, VA. Plans are underway for an Open House tour for area Architects and students.
 Øesch Environmental Design
Energy Efficiency:
Every effort has been utilized to reduce and minimize energy use through an effective strategy of both passive heating and cooling, as well as state-of-the-art active solar thermal and photovoltaic on site off-grid energy production. Optimal solar orientation with an attached thermal mass food production greenhouse on the Lower Floor enables hot air to be introduced into the house during the winter, and rise via. a thermal chimney “stack effect” and distributed throughout the house. In the summer the same thermal chimney is used to channel hot air to rise up to the Upper Loft vegetated Roof Terrace, where it is exhausted. This condition provides a positive air pressure in the Winter, and a negative pressure in the summer, drawing in cooler outside air from every open window. In addition carefully proportioned roof eave overhangs provide deep passive solar gain and additional day lighting in the winter, and cooling shade in the summer.
Active mechanical systems include solar thermal which produces domestic hot water and is integrated into hydronic radiant heated floors. This is supplemented with a multi-split heatpump, on demand backup hot water, and an ERV, which collectively provide active heating, cooling, dehumidification, and healthful indoor air quality. The entire house and detached Barn are off-grid with a 14.4 kW solar array, whole-house batteries, and backup generator. Further, the home is super insulated and extremely tight with high energy performing windows and doors and LED lighting throughout, and even a high efficiency woodstove.
Integrated Design:
From the beginning and throughout construction, this home demonstrates a close collaboration between the Architect, Contractor, and Owners. Healthful materials and finishes standards, autonomy and energy efficiency, and environmental impact and sustainability were primary goals and stressed throughout. Careful attention was paid to finishes which will require minimal long term maintenance such as the galvalume metal roof (which also provides for rainwater harvesting) and fiber cement siding for longevity.
Resource Efficiency / Conservation:
Resource conservation began with Schematic Design which utilizes a 2 ft. grid of modular components, thereby optimizing construction efficiency and minimizing on site waste. The site was cleared with the trees stockpiled for future lumber harvesting and firewood. The foundation walls are “Ideal Walls” which use less than half the concrete of a conventional poured wall or block, and do not require extensive concrete footings, exterior insulation, or waterproofing. These panels are prefabricated off site and set in only a few days, which further reduces on site impact and construction lead time.
Resiliency:
Respect for climate change and mitigating its impact were primary considerations in the design and selection of materials and systems. The home is sited high on a south facing slope as protection from high water or flood and to optimize both passive and active solar opportunity. With remarkably tight construction and super insulation the interior is buffered from both outdoor heat and cold extremes. The metal roof and fiber cement siding are fireproof and resistant to the impact of high winds. And these materials are specified for minimal maintenance and longevity. Further, the attached Greenhouse and Upper Roof Terrace is landscaped and suitable for a vegetable garden with abundant sunshine, easy to water, and with no need for fencing to keep deer at bay. All this being a notable case study for Regenerative Design.
Innovation:
This home exemplifies Biophilic Design principles to facilitate symbiotic living in harmony with Nature. This incorporates careful attention to natural day lighting, indoor air quality, rainwater catchment and wastewater reclamation, garden food production with vegetated roofs, the home hearth and fire, and connected interaction with the weather and the surrounding natural ecosystems.
Community Impact:
This EcoHome project has already been presented at several Sustainable Building lectures as a model case study for “Green Building”, including USGBC at Brock Environmental Center in Virginia Beach, VA. Plans are underway for an Open House tour for area Architects and students.
7