
Search results for "Property damage" in Home Design Ideas

 Barbara Wilson Landscape Architect, LLC
Custom colored Luna Fountain (urn) with matching bench set on granite pavers with gravel mulch. Photo taken by Barbara Wilson, RLA
A small residential, seaside property located on Saugatuck Island in Wesport was rebuilt after devastating damage by a hurricane. All that remained from the original property was the pool and pool terrace. The house was raised approximately 5 feet to meet new FEMA codes and rebuilt under the design team of the owner, a well-known interior designer. Barbara was part of the landscape architectural team that helped create a sense of place for the new house. The landscape design included the addition of new walls and steps to the front door, new custom fencing surrounding the pool, an outdoor shower, landscape lighting, a custom fountain in the back yard, a sandbox (used as a relief area for the dog) and all new plantings. She coordinating obtaining bids and then supervised installation of the project.
 Tile Doctor Ltd
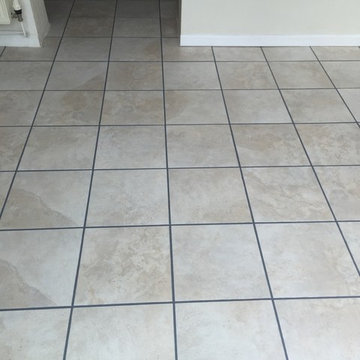
The task of keeping these white Ceramic Kitchen and Conservatory tiles clean was proving very challenging for this customer, who lives in the town of Somerton in Somerset. Somerton is known for its bustling market, which has supposedly been run on a weekly basis since the Middle Ages, and its famous ‘Market Cross’ at the centre of the beautiful marketplace is a popular tourist attraction for visitors to the West Country.
It probably comes as no surprise to anyone that white tiles are often more difficult to keep clean than others. However, in this case, rather than being badly marked or damaged, these Ceramic tiles had become dirty due to the surface being pitted rather than smooth which trapped ground in marks from spills and dirty footprints etc. The pitted rough surface is very characteristic and provides better grip however they do trap dirt are therefore more difficult to keep clean.
The grout had also suffered over the years, losing a lot of its colour in the process so as well as cleaning the tiles we agreed to give the grout a really deep clean and also to colour the grout to make it more uniform.
To clean the tiles, I firstly created a strong diluted of Tile Doctor Pro Clean and applied it liberally across the entire floor, leaving it to dwell and soak into the tile for a short period in order to soften the ingrained dirt. I then used my heavy weight rotary machine fitted with a black scrubbing pad to agitate the solution and break down the muck.
Once satisfied with the condition of the tiles I turned my attention to the grout lines, cleaning them carefully by hand using a stiff tile cleaning brush and the same solution of Pro Clean and water. This provided a deep, penetrating that clean that left the grout lines clean and free from the dirt and grease that had dulled their appearance for so long.
With some great results achieved through the cleaning, I rinsed the whole floor to wash away any leftover Pro-Clean and left it to dry fully overnight.
I returned to the property the next day to check on the floor and after ensuring the floor was completely dry, proceeded to recolour the grout lines using Tile Doctor’s Grout Colourant. Our Grout Colourants are a waterborne epoxy that recolours, seals and rejuvenates existing grout joints and is available in ten different colours ranging from white to dark greys. The scrubbing with Pro-Clean the day before would also ensure the surface of the grout was clean and would make a good surface for the colourant to bond with.
Since in the past the grout lines had undergone a number of repairs, the existing colour was a mix of different greys. It made most sense then that they picked our ‘Natural Grey’ Grout Colourant for me to use. I painted the Colourant on carefully and waited for 30 minutes before removing any excess, leaving the grout lines perfectly covered in a uniform colour.
The difference was really noticeable and the property owner was really happy with the results. As you can see from the photos, the new grey Colourant really made the grout lines stand out against the clean white Ceramic tiles. Another satisfied customer.
Dave Hurst
Somerset Tile Doctor
 Barbara Wilson Landscape Architect, LLC
Photos taken by Barbara Wilson, RLA
A small residential, seaside property located on Saugatuck Island in Wesport was rebuilt after devastating damage by a hurricane. All that remained from the original property was the pool and pool terrace. The house was raised approximately 5 feet to meet new FEMA codes and rebuilt under the design team of the owner, a well-known interior designer. Barbara was part of the landscape architectural team that helped create a sense of place for the new house. The landscape design included the addition of new walls and steps to the front door, new custom fencing surrounding the pool, an outdoor shower, landscape lighting, a custom fountain in the back yard, a sandbox (used as a relief area for the dog) and all new plantings. She coordinating obtaining bids and then supervised installation of the project.
Find the right local pro for your project
 Tile Doctor Ltd
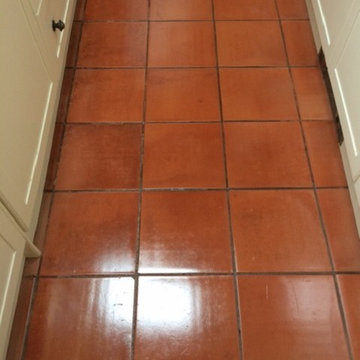
Terracotta is an interesting type of stone manufactured using a variety of techniques dependant on the country of origin which leads to a number of differences such as Spanish Terracotta being less porous than its Mexican counterpart: the former is semi-hand made and finished in a factory kiln, while the latter is completely handmade. Spanish Terracotta is therefore a lot less than porous and ultimately, of a higher quality.
But despite the Spanish Terracotta being less porous, and therefore being less prone to ingrained dirt, it still, like any other stone, needs regular maintenance to keep it looking smart. In the tiling trade, we quite often refer to this as a good old fashioned ‘Clean and Seal’ and this is exactly what was requested by this property owner in Halifax, for their Spanish Terracotta tiled floors in the kitchen and adjacent hallway.
I cleaned both sets of Terracotta tiles using the same process, which involved the application of our reliable alkaline cleaner known as Tile a Doctor Pro Clean, diluted with five parts of warm water. Once the solution had been left to dwell for a short period, it was scrubbed into the tiles to remove all dust, dirt, and general muck. This created a slurry of cleaning residue, which I promptly soaked up using a wet vac. A wet vac machine is an essential tool when it comes to cleaning porous tiles since, unlike a traditional mop and bucket, it sucks the excess trapped dirt out of the clay and thus provides a superior clean.
Following this, I applied a small amount of our heavy duty remover, known as Tile Doctor Remove & Go, to deal with some of the more stubborn stains and paint splashes, before rinsing with clean water and wet vaxing in a similar fashion to before.
Once the clean had been completed I left the tiles to dry completely. This can take 12 to 24 hours depending on numerous factors including whether a Damp proof Membrane and underfloor heating has been installed which can really help reduce drying times. Letting the tiles dry completely before sealing is paramount as moisture can cloud the sealer and affect its performance.
Upon my return to the property I ran some quick damp tests, which revealed the tiles were ready to be sealed. I then applied several coats of Tile Doctor Seal and Go, our topical sealer which provides a satin finish and accentuates colour. A new coat of this product is recommended every six months on Terracotta to ensure the continuous protection of the tiles’ soft clay particles.
My customer was extremely pleased with her refreshed Terracotta tiles. It goes to show what a big difference a bit of regular maintenance can make. I advised the customer that an everyday cleaner called Tile Doctor pH Neutral cleaner can also be used regularly to keep the tiles looking great without damaging the sealer.
Nigel Stoker
North West Yorkshire Tile Doctor
 Tracstar Tree Experts
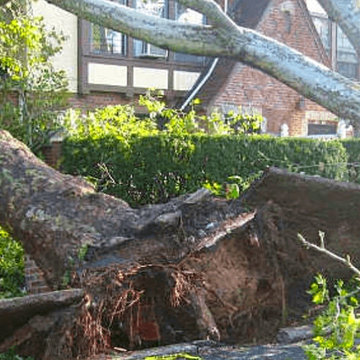
24/7 EMERGENCY STORM DAMAGE VIRGINIA BEACH
When you do you’ll be connected with the most highly skilled and promptly responsive arborists on the market today who are available 24/7 to provide emergency tree services in Virginia Beach, such as emergency tree removal in Virginia Beach. Experts quickly, affordably, and safely for all the people and property in the affected area.
Here at Tracstar Tree Experts, our tree service Virginia Beach professionals are serious about making your trees and your home safe no matter what emergency situations arise. It’s why our professionals are trained in quick responses and quick solutions to reduce the damage which can be inflicted by a diseased, fallen, or otherwise severely compromised tree and get you back to a state of safety and satisfaction with your home. If you find yourself with a sudden need for emergency tree services in Virginia Beach then you should absolutely not hesitate to contact the reliable and knowledgeable tree care Virginia Beach specialists at Tracstar Tree Experts. Call (757) 515-6933 as soon as you have a need for emergency tree services in Virginia Beach to receive a free estimate and the Virginia Beach tree care solutions you need to return to your life.
 CPP Home Builders & Remodeling on Cape Cod
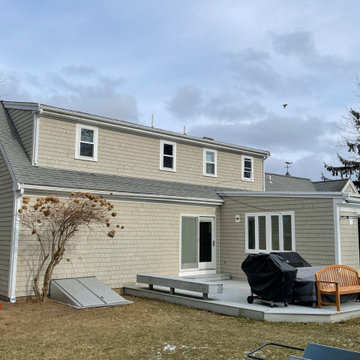
It doesn’t matter how beautiful your home is, if the siding is damaged or outdated, your home is not as attractive or efficient—as it could be. Whatever your priorities are: style, efficiency, low-maintenance, affordability - or all the above, Cape Property Pros is the siding company for you! Serving Cape Cod and the surrounding areas. https://bit.ly/3pG4XyB
•
•
•
•
•
Take a look at our recently completed Siding Replacement and Installation Project in Centerville, MA. Featuring double-dipped Cape Cod Gray Cedar Shingles.
Reach out today and we’ll be happy to answer any question you have and schedule your siding consultation! 508-292-1562
#siding #sidinginstaller #sidinginstallation #sidingreplacement #sidingcontractor #CapePropertyPros #capecodliving #capecod
 Tile Doctor Ltd
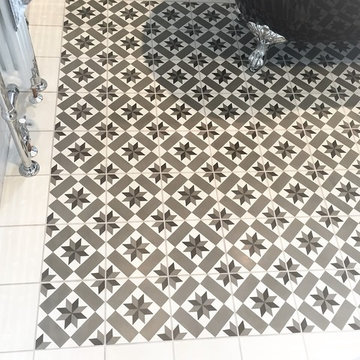
I’m often asked if you should seal a tile before grouting and the answer is a definite yes, and this Encaustic Cement tiled bathroom floor installation in Stockport is a great example as to why. The tiles had not been sealed before grouting and then, once the tiler went to grout the newly installed tiles with a grey grout, the colour ran into the tiles, staining them and leaving them looking grubby and dirty. Had the tiles been sealed it would of made the process of removing the grout from the surface of the tile much easier.
If you haven’t come across them before Encaustic cement tiles are often hand painted and are available in a range of beautifully artistic patterns, so it was a real shame that these tiles were allowed to be spoilt by an avoidable mistake. As you can imagine, the property owner was keen to have the tiles professionally restored, and she contacted me to get the job done. I took some photographs but I’m not sure that they do justice to the problem.
Rather than use a liquid cleaning product, I opted to use diamond encrusted handheld burnishing pads to remove the grout stains. Our burnishing system comprises four pads of varying grits. I started with the Coarse grit burnishing pads applying to the tiles it with a small amount of water as lubricant to grind down the grubby marks. Following this I worked my way through the system, applying Medium, Fine and Very Fine pads to gradually restore the appearance of the floor. Once the burnishing process has been completed I rinsed the tiles and then accelerated the drying process using a heat gun to prepare them to be sealed.
Removing any excess moisture before sealing is essential as even a small amount can cloud the sealer and prevent it from properly protecting the tiles from dirt and stains. Once satisfied that the floor was dry, I proceeded to seal it using Tile Doctor Colour Grow. As an impregnating sealer Colour Grow penetrates deep into the pores of the stone to fill them and thus prevent dirt from becoming ingrained. Colour Grow’s colour intensifying properties also really accentuated the patterns of the Encaustic Cement tiles.
Now that these fantastic tiles have been properly sealed it will be far easier for the customer to keep them clean in future. Needless to say, she was very happy with the result. We recommend topping up your sealer on a regular basis to ensure problems like those which occurred here do not damage the appearance of your tiles.
Steve Keary
Greater Manchester Tile Doctor
 Tile Doctor Ltd
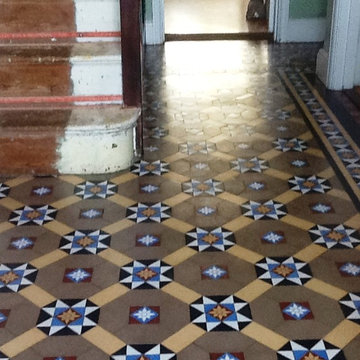
I was recently called down to a client’s house in the market town of Wellingborough, situated approximately 11 miles from Northampton. My client’s situation was an interesting one, as she had an old gas pipe sticking out of her Victorian tiled floor, very close to a doorway. Not only was this a bit of an eyesore, it was also significant trip hazard. The floor had been previously covered by carpet, so it is understandable that my client would have been initially unaware of the obstructive gas pipe.
Rather than risking an accident in the future, she asked me to see what I could do to rectify the issue. At the same time, I was commissioned to give the floor a much needed clean and re-seal.
My first priority was, of course, to deal with the exposed gas pipe. I was unsure whether the pipe was live or not, so I carefully removed the surrounding tiles, allowing a certified engineer access to it. He ensured that the pipe was capped below the tile line, allowing me to safely proceed with my repairs.
I returned a few days later, rescreened the area, and began to refit the tiles, carefully hand painting some of the black tiles to hide the damage and cracks. I also applied new grout to fix all of the replaced tiles into position, and this was left to set overnight.
Returning to the house the next day, I set about treating the floor to a normal strip, clean and re-seal of the entire floor. There was very little old sealer still remaining on the tiles, so I mixed a solution of Tile Doctor Pro Clean and water, before applying this to the floor. Pro Clean is a strong alkaline cleaner which also contains stripping properties, allowing it to both clean and break down any old sealer. The solution was worked into the tiles using a black scrubbing pad, and any excess residue was quickly absorbed using a wet-vac machine.
With older floors you never can tell if a damp proof membrane was installed and it can be troublesome applying a sealant to a damp floor so I left the whole floor to dry for seven days, giving it more than sufficient time to dry completely before the re-seal. To seal the tiles I used five coats of Tile Doctor Seal & Go Extra, which provides both a robust surface seal and the pleasing sheen finish requested by my client; Seal and Go Extra is especially suitable for exterior applications or damp floors due to its increased breathability.
My client was very glad to see the back of the gas pipe and pleased with the overall results of the clean and seal, as it had given this Victorian tiled floor – once hidden under carpet – new life and character. Additionally I’m sure that restoring such an original feature for the property has increased its value.
Phil Vissian
Northamptonshire Tile Doctor
 CPP Home Builders & Remodeling on Cape Cod
It doesn’t matter how beautiful your home is, if the siding is damaged or outdated, your home is not as attractive or efficient—as it could be. Whatever your priorities are: style, efficiency, low-maintenance, affordability - or all the above, Cape Property Pros is the siding company for you! Serving Cape Cod and the surrounding areas. https://bit.ly/3pG4XyB
•
•
•
•
•
Take a look at our recently completed Siding Replacement and Installation Project in Centerville, MA. Featuring double-dipped Cape Cod Gray Cedar Shingles.
Reach out today and we’ll be happy to answer any question you have and schedule your siding consultation! 508-292-1562
#siding #sidinginstaller #sidinginstallation #sidingreplacement #sidingcontractor #CapePropertyPros #capecodliving #capecod
 Tile Doctor Ltd
It’s not often that we get called abroad for a job, but when we do, it’s always a fantastic experience. We have done a few jobs abroad in the past, including the restoration of Terracotta tiled restaurant floor at a hotel in Addis Ababa, Ethiopia. This job was closer to home at a chateau in the town of Arcis-le-Ponsart near Reims, located in the Champagne-Ardenne region of North Eastern France. As its name suggests, the Champagne-Ardenne region is famous for its champagne.
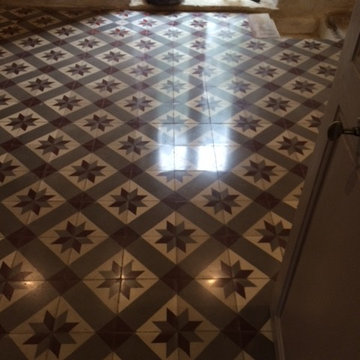
The owner of the chateau was, in fact, an English property developer. He asked us to work on two floors: a Terracotta tiled hallway, and a French Victorian tiled floor. The French style of Victorian tiles are actually made of encaustic cement rather than clay, so we were excited to have the chance to work on something a bit out of the ordinary.
It was going to be a long trip, so after packing the van with the necessary equipment and Tile Doctor products Heidi and I set off to France via the Channel Tunnel. Fortunately, we avoided any disruptions both on the way there and the way back!
On arrival at the chateau, we immediately spent two hours running tests on the two floors to determine the most effective processes. We had four days in which to complete the job, so it was essential to make sure our methods were correct before beginning to avoid any unwelcome surprises later on!
After running the tests, we set about cleaning the Victorian tiles using a combination of clean water and diamond burnishing pads. No damage was done to the tiles, and they polished up well. Following the cleaning process, we began sealing the floor using Tile Doctor Colour Grow, a sealer which helps to bring out the colour in the stone while also providing durable surface protection. We were only able to apply one coat of sealer, however, as the second coat kept smearing, preventing the shine from settling in – this was despite testing the process earlier. Nonetheless, we resolved to polish off the one coat we could apply with a fine burnishing pad. Thankfully, the results were still very good.
The Terracotta tiled hallway had no sealer, and so it had, over time, become very dirty. We cleaned the tiles using a solution of one part Tile Doctor Pro Clean to five parts clean water, in combination with a couple of black burnishing pads.
As you can see from the pictures, the combination really helped to lift out the ingrained dirt, leaving the tiles looking at their best again. The floor took three days to dry completely before we could begin the sealing process. Once the floor was dry enough to seal, we applied eight coats of Tile Doctor Seal & Go, which is suitable for use on a variety of internal, unsealed porous surfaces.
It was a long and exhausting week but the client was delighted with the results on both floors and left the following comments, he also mentioned using Tile Doctor in the future to work on the other properties he is developing.
“Thanks for yours and Heidi’s work in renovating our floors. It was also great to meet you guys and I hope you have enjoyed your visit to champagne and will come back some time. “
 Colorado Native General Contracting
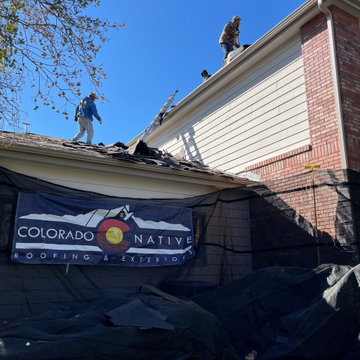
Keeping your home free of damage is important to us! We set up a net prior to production to ensure we aren't destroying your property or home.
Mid-sized traditional two-story house exterior idea in Denver with a shingle roof and a gray roof
Mid-sized traditional two-story house exterior idea in Denver with a shingle roof and a gray roof
 Microworks Handyman
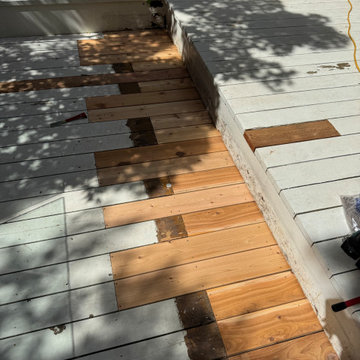
Deck Plank Replacement & Your Entire To-Do List Done! ??️
Start by fixing those rotting, splintered, or warped deck boards that make your outdoor space look tired and unsafe, and let us take care of the rest in one seamless visit. With our Ultimate Handyman Block, your professional will kick off the day with a quick property walkthrough to prioritize your exact needs. We will dive straight into carefully removing the damaged decking, inspecting the joists beneath, and seamlessly securing fresh, durable planks so your outdoor living space is safe, solid, and ready for entertaining. Once your deck surface is perfectly restored, we will use the rest of your reserved session to tackle whatever else is weighing on your mind—from mounting heavy TVs and patching drywall to upgrading door hardware and repairing fences. Professional-grade consumables are fully included in the service, and if your project requires specialty composite boards, hidden fastening systems, or specific pressure-treated lumber, we source them for you and pass the items on with zero markup. It is the ultimate, stress-free way to finally catch up on those nagging repairs and get your property back to 100% in a single day.
 Stairworks
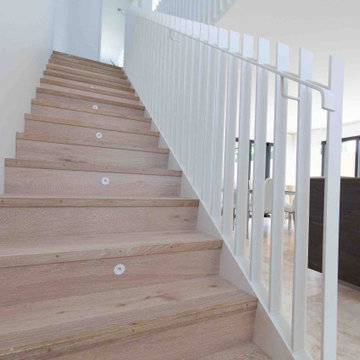
This project is a great example of how the addition of a well-designed and considered balustrade can vastly improve an existing staircase and landing, without the need to replace or damage any of the already in-situ finishes.
The clients already had a firm idea of the aesthetic they wanted and engaged us to come up with a method to achieve it without creating any disruption to an already finished and painted staircase.
After a detailed survey and studying the structural plans of the building, we were able to fully manufacture and powder-coat everything off-site, and simply bolt on to the existing staircase and landing structure in a single visit. This managed to leave no damage or disruption to the property, meaning no remedial work for our clients after we had finished.
The balustrade itself was manufactured from a mild steel flat bar and welded to a steel channel, which we bolted to the staircase, and a steel angle bracket, which we fixed to the landing. It was all tied together with a continuous thin round steel bar that was drilled through the top of each upright for rigidity, as well as a flat steel handrail to match the uprights. It was then powder-coated matte white to help it blend in with the walls and ceilings.
 Tile Doctor Ltd
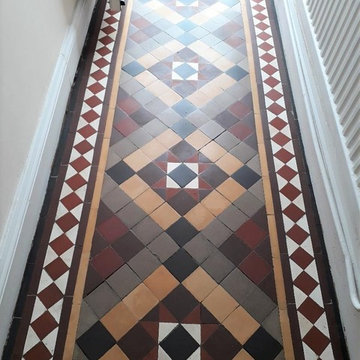
As is often the case in years past and for whatever reason many homeowners covered their decorative Victorian hallway tiles in a variety of products from carpet to laminate flooring. These days the trend has reversed and quite rightly many homeowners now realise the value a tiled floor can bring to a property and look to us to have it restored.
Our client had purchased a property in Norfolk seaport of Kings Lynn and, on lifting the dirty old carpet and decaying underlay in the hallway, discovered a beautiful tiled entrance hall. It was obvious that a previous owner had decided to lay carpet over the tiles as an easy way of hiding the result of careless renovation and decorating which had resulted in a thick coating of plaster, paint, carpet tape glue and various other contaminants which had become firmly stuck to the surface. There were also two small rectangular black and brown tiles missing behind the front door which had been damaged during the removal of some old lead pipes.
This was clearly a job which would need somewhat more than a scrubbing brush and a bottle of Flash!
Our first job was to remove as much of the solid contaminants as possible by hand with floor scrapers and a steamer which softened the more stubborn lumps. We then applied Tile Doctor Remove & Go which is a powerful alkaline stripper to the whole area, left it to dwell on the surface for twenty minutes and then scrubbed it in using a rotary machine fitted with a black scrubbing pad. The resulting slurry was then power rinsed and extracted away using our Ninja machine which is a high-power industrial vacuum. Any remaining patches where the carpet tape had been stuck down were spot treated using Tile Doctor Nanotech HBU which made short work of the hardened glue.
The result was a clean floor, but the surface still felt slightly rough and pitted, a problem which we resolved using the rotary machine fitted with a 200-grit diamond burnishing pad followed by a 400-grit pad with a little 400 grit honing powder which left the surface smooth, silky and ready for the application of a sealer.
Finally, we acid washed the whole area using Tile Doctor Acid Gel, a slow release product which would neutralise any remaining chemicals, improve new sealer adhesion and inhibit the future production of any efflorescence salts. We had used a fair amount of water during the cleaning process, so we left the floor to dry off thoroughly overnight with assistance from our commercial dehumidifier.
On our return the following day, we discussed the sealer options with the client and recommended using microporous Tile Doctor Colour Grow which is an impregnating sealer that seeps into the pores of the stone protecting it from within. It will provide an excellent fluid resistant seal whilst enhancing the natural colours in the stone, additionally it’s fully breathable thereby enabling any moisture trapped under the floor to rise through the floor and evaporate. This is important on old floors like this where no damp-proof membrane was installed. The sealer was applied with a paint pad in tow coats and allowed to dry for an hour before buffing the floor with a hog’s hair pad to give a rich natural-look sheen finish.
The Victorian tiles responded well to the treatments which were completed in two consecutive days. My client was extremely pleased with the results and left the following comment:
“My floor was in poor condition after being buried under carpet as well as many, many years of paint and muck. I enjoyed the time they spent at my home and wouldn’t hesitate to use (or recommend) the Tile Doctor service in the future.”
Nick White
Norfolk Tile Doctor
 Tracstar Tree Experts
24/7 EMERGENCY STORM DAMAGE VIRGINIA BEACH
When you do you’ll be connected with the most highly skilled and promptly responsive arborists on the market today who are available 24/7 to provide emergency tree services in Virginia Beach, such as emergency tree removal in Virginia Beach. Experts quickly, affordably, and safely for all the people and property in the affected area.
Here at Tracstar Tree Experts, our tree service Virginia Beach professionals are serious about making your trees and your home safe no matter what emergency situations arise. It’s why our professionals are trained in quick responses and quick solutions to reduce the damage which can be inflicted by a diseased, fallen, or otherwise severely compromised tree and get you back to a state of safety and satisfaction with your home. If you find yourself with a sudden need for emergency tree services in Virginia Beach then you should absolutely not hesitate to contact the reliable and knowledgeable tree care Virginia Beach specialists at Tracstar Tree Experts. Call (757) 515-6933 as soon as you have a need for emergency tree services in Virginia Beach to receive a free estimate and the Virginia Beach tree care solutions you need to return to your life.
 Homeowner Services of Michigan LLC
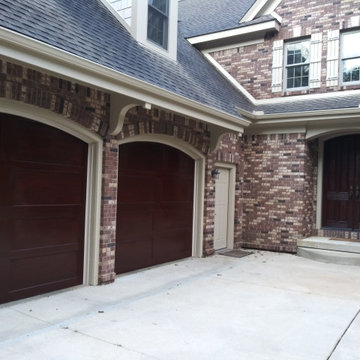
Our client-centered approach ensures each project is tailored to meet your specific needs, large or small. Recently, we completed a comprehensive exterior and interior renovation that demonstrates our commitment to quality and attention to detail.
For the exterior, we began by thoroughly cleaning the roofing of the house, garage, and barn, removing moss, mildew, and algae to restore the surfaces to their original condition. We then meticulously prepped and painted the exteriors, ensuring a fresh and appealing look. The installation of new entry doors with custom hardware added both functionality and aesthetic value.
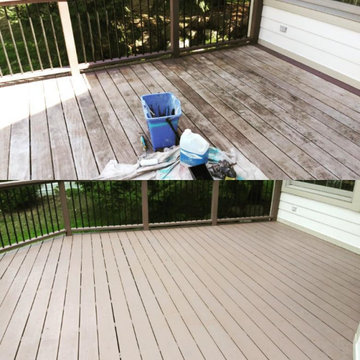
Attention was given to replacing exterior trim lumber and deck steps, addressing all discussed and required areas. The deck and steps leading to the lake were power washed and sealed, providing durability and a polished finish. We extended this care to the gazebo, cleaning, sealing, and rescreening it as needed, ensuring it remained a welcoming outdoor space.
To enhance the property's maintenance, we cleaned rust stains from the house and installed a Gutter Rx Gutter Guard System on the house, garage, and barn, preventing future debris build-up and water damage. Additionally, we trimmed and pruned the trees surrounding the deck, stairs, gazebo, and rear roof, maintaining both the health of the trees and the beauty of the property.
This project exemplifies our dedication to client satisfaction, ensuring every detail is managed with precision and care. At Homeowner Services of Michigan, we are passionate about transforming your home, inside and out, to create spaces that are both functional and beautiful.
 Homeowner Services of Michigan LLC
Our client-centered approach ensures each project is tailored to meet your specific needs, large or small. Recently, we completed a comprehensive exterior and interior renovation that demonstrates our commitment to quality and attention to detail.
For the exterior, we began by thoroughly cleaning the roofing of the house, garage, and barn, removing moss, mildew, and algae to restore the surfaces to their original condition. We then meticulously prepped and painted the exteriors, ensuring a fresh and appealing look. The installation of new entry doors with custom hardware added both functionality and aesthetic value.
Attention was given to replacing exterior trim lumber and deck steps, addressing all discussed and required areas. The deck and steps leading to the lake were power washed and sealed, providing durability and a polished finish. We extended this care to the gazebo, cleaning, sealing, and rescreening it as needed, ensuring it remained a welcoming outdoor space.
To enhance the property's maintenance, we cleaned rust stains from the house and installed a Gutter Rx Gutter Guard System on the house, garage, and barn, preventing future debris build-up and water damage. Additionally, we trimmed and pruned the trees surrounding the deck, stairs, gazebo, and rear roof, maintaining both the health of the trees and the beauty of the property.
This project exemplifies our dedication to client satisfaction, ensuring every detail is managed with precision and care. At Homeowner Services of Michigan, we are passionate about transforming your home, inside and out, to create spaces that are both functional and beautiful.
 Microworks Handyman
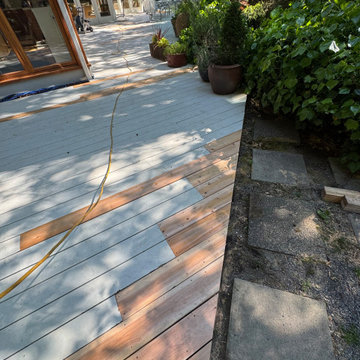
Deck Plank Replacement & Your Entire To-Do List Done! ??️
Start by fixing those rotting, splintered, or warped deck boards that make your outdoor space look tired and unsafe, and let us take care of the rest in one seamless visit. With our Ultimate Handyman Block, your professional will kick off the day with a quick property walkthrough to prioritize your exact needs. We will dive straight into carefully removing the damaged decking, inspecting the joists beneath, and seamlessly securing fresh, durable planks so your outdoor living space is safe, solid, and ready for entertaining. Once your deck surface is perfectly restored, we will use the rest of your reserved session to tackle whatever else is weighing on your mind—from mounting heavy TVs and patching drywall to upgrading door hardware and repairing fences. Professional-grade consumables are fully included in the service, and if your project requires specialty composite boards, hidden fastening systems, or specific pressure-treated lumber, we source them for you and pass the items on with zero markup. It is the ultimate, stress-free way to finally catch up on those nagging repairs and get your property back to 100% in a single day.
 Windy City Painters
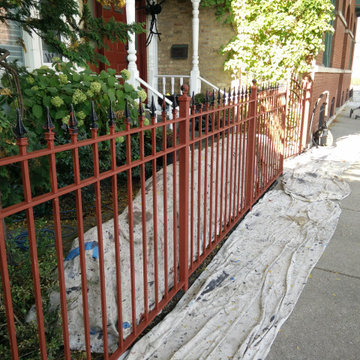
Iron Fence Painting in Wicker Park: A Windy City Painters Case Study
Iron fence painting in Wicker Park is one of the most requested exterior services Windy City Painters performs each season, and this recent project shows exactly why. Set behind an ornate 1890s greystone two-flat, the client's wrought iron fence had endured years of Chicago winters without professional attention. Rust had spread across the pickets, the original black enamel was flaking away in sheets, and the fence's structural hardware had begun to loosen at several joints.
As the trusted local expert for Chicago's North Side and Near West Side, Windy City Painters approached this project the same way we approach every iron fence painting job in Wicker Park: with a methodical, multi-step process designed to outlast Midwest weather rather than simply mask the damage.
The Process, Step by Step
Step 1 — Rust Removal and Surface Preparation. Our crew wire-brushed and mechanically ground every rusted section down to clean, stable metal. For pitted or heavily corroded areas, we applied a chemical rust converter to neutralize corrosion at the molecular level before any coating touched the surface. Furthermore, because this greystone was built well before 1978, Windy City Painters tested the existing paint layers for lead and followed strict containment protocols throughout the removal process.
Step 2 — Spot Repairs. Loose pickets were re-secured, small pits were filled, and hardware at the gate hinges was tightened. In contrast to a quick spray-paint refresh, this stage ensures the fence is structurally sound before a single drop of primer goes on.
Step 3 — Priming. A full coat of rust-inhibiting primer, engineered specifically for ferrous metal, was applied by brush to every surface — with particular attention to welds and joints where moisture tends to collect and restart the corrosion cycle.
Step 4 — Topcoat Application. Two finish coats of industrial-grade, direct-to-metal enamel were applied by brush and roller. This built a durable, uniform barrier in classic gloss black, the most popular finish among Wicker Park's historic properties. Finally, our team inspected every inch of the fence for thin spots or missed sections before calling the job complete.
Project Specs
Surface: Ornamental wrought iron fence, posts, and gate hardware
Products used: Rust-inhibiting DTM primer, chemical rust converter, industrial-grade direct-to-metal enamel
Coats applied: 1 primer coat, 2 finish coats
Finish: Gloss black
Timeline: Completed in under two days
Advice for Wicker Park Homeowners
Before starting a similar iron fence painting project in Wicker Park, homeowners should keep a few things in mind. Notably, never paint directly over active rust — trapped moisture underneath will cause the new coat to fail within a season. Additionally, always ask whether a contractor tests for lead paint on pre-1978 homes, since many Wicker Park greystones fall into that category. Meanwhile, hand brushwork matters: the intricate scrollwork common on Wicker Park ironwork requires careful, detailed application that spray equipment simply cannot replicate. Therefore, hiring a crew experienced specifically in historic Chicago ironwork, like Windy City Painters, makes a measurable difference in the finished result.
Windy City Painters also handles related exterior and interior work for Wicker Park properties, including interior painting, drywall and plaster repair, and additional metal refinishing for porches and railings.
Iron fence painting in Wicker Park protects one of the neighborhood's most defining architectural features while restoring curb appeal instantly. As a result, this greystone now has a fence that matches the quality of the home behind it — and will hold up through many more Chicago winters.
See more of our work and request a free estimate at www.windypainters.com.
Ready to transform your Wicker Park home? Contact Windy City Painters for a free estimate — visit www.windypainters.com today. Proudly serving Wicker Park, West Town, Lincoln Park, Roscoe Village, Lakeview, Ukrainian Village, River North, and all of Chicago.
 Five Star Tree Care
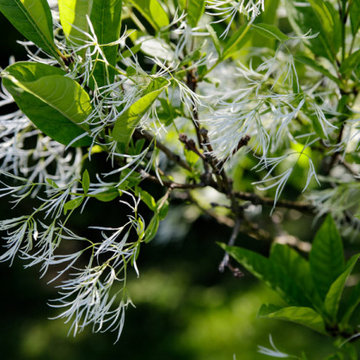
Are you looking for the perfect late spring and early summer wispy, white, fragrant flowering tree? If so, the fringe tree is what you are looking for! Not only do these trees create a beautiful addition to any yard, they can also make it look like it snowed when their petals fall. These trees don’t grow as tall as some other flowering trees, making them perfect for planting close to your patio, in small yards, under power lines, or as a shrub border. Our team at Five Star Tree Services has come up with some tips on how to care for these delightful trees and the different varieties they come in.
Fringe Tree Appearance
The average height of a fringe tree is about 10-20 feet tall. This makes it easy for it to fit into any garden nicely. The most prominent thing about this beautiful tree is its white fragrant flowers which bloom in May and early June. These flowers are grouped together in thin, fleecy hanging bands that are 6-8 inches long. These flowers appear all over the tree just before all the leaves start to sprout. After the flowers have fallen, you can enjoy the oval-shaped, dark green leaves for the summer and then the delightful yellow leaves during the fall.
The female trees can produce a blackish-blue fruit after the flowers fall, this is a great way to attract your local birds.
The bark on the tree is scaly and has red furrows with dark brown ridges. It does best in full sun with well drained but moist soil. It can also tolerate drought and is good with air pollution. With its strong branches but delicate flowers, in order to maximize your enjoyment of the flowers, make sure to plant this tree somewhere that is sheltered from the wind.
The Facts
Fringe trees are actually related to the olive family and are native to easters North America. They naturally grow on streambanks and hillsides in moist woods. Due to the tassel-like flowers, another name for this tree is Old Man’s Beard.
As a remedy for gallbladder inflammation, previously, the bark from the fringe tree has been used in herbal medicine. It has also historically been used as a way to treat wounds.
Varieties of Popular Fringe Trees
There are 2 popular fringe trees:
Chionanthus Retusus- this is a Chinese fringe tree. It is tall with lush branches and beautiful leaves. Other varieties under this are:
-Pizazz
-Carolina Moonlight
-Rubrum
-Emerald Snow
-Burgundy
-Snowdance
Chionanthus Virginicus- this is the native easters North American fringe tree we have been focusing on.
Care Instructions
Luckily, these trees are easy to care for. To have a happy tree and many blooms, follow these tree care tips.
Growth Zones- 3-9
Plant- in moist soil that has good drainage.
Height- 12-20 feet when mature. The growth rate is about 6-10 inches a year.
Sun Exposure- full sun
Flowers- May to early June. The blossoms usually last about 2 weeks.
Prune- Do not prune during dormant times. Once the tree is older, it won’t require much pruning. Simply cut out damaged, weak, or dead branches.
Deer Resistance- deer rarely damage these trees.
Threats
With this easy to care for tree, you don’t have to worry about much. However, there are a few pests to look out for.
In order to fight off pests like spider mites and scales, proper planting, watering, and fertilizing will keep it healthy and pest free.
If a tree gets stressed, borers will take this opportunity to tunnel inside the tree and eat the bark. To keep these trees safe, avoid injuring them. These trees can also act as a secondary host for the emerald ash borer. Avoid planting a fringe tree in known areas where these invasive insects like to live.
How Five Star Tree Services Can Help
If you have been looking for the perfect flowering tree to plant in your yard, the fringe tree might be the best one for you! If you have any questions about what trees are best for your property, make sure to give us a call at (416) 990-3355! Here at Five Star Tree Services, we can offer different options and also offer you our Richmond Hill Tree Planting Services!
17