
Search results for "Property damage" in Home Design Ideas

 Tile Doctor Ltd
This very old Encaustic tiled flooring was uncovered at a property in Chester when the present owners started to undertake renovation. They removed the carpets and vinyl tiles from the hallway, revealing the Encaustic tiles to find that they were in truly horrific condition. This included being covered by heavy dirt, dust and, in some parts, by a sticky black bitumen.
Encaustic tiles are made out of compressed cement, and were commonly used in properties built during the Edwardian and Victorian period. This gives us a good idea of just how old these tiles are – but the owners were keen to see what Tile Doctor could do to restore their condition.
The black bitumen was my main concern when it came to cleaning the tiles. To remove this, along with all the other dirt and dust, our powerful cleaner for heavy soil buildup, known as Tile Doctor Remove and Go, was applied.
The product, which is also effective for removing adhesive and paint stains, was worked into the tiles then left to dwell for thirty minutes, before being scrubbed with a black pad fitted to a rotary machine. The resulting cleaning residue was soaked up with a wet vac machine. This cleaning process was repeated once more over to get the tiles as clean as possible, before leaving them to dry overnight.
The next day, damp readings were taken to make sure the floor was dry enough to seal. It’s essential to take damp readings before sealing – especially with old tiled floors that may not have a damp proof membrane installed – as even the slightest amount of excess moisture can damage the performance of the sealer.
Two types of sealer were used in this situation. First to be applied was a single coat of Tile Doctor Colour Grow, an impregnating, colour intensifying sealer which enhances the best shades in the tiles. Following this, four coats of Tile Doctor Seal and Go were applied. This is a topical sealer, which means it builds a layer of protection on the surface of the floor, while also providing an aesthetically pleasing low-sheen finish.
The customer was over the moon at the end result. At first the floor looked to be with a lost cause, but with the right cleaning methods and products it has been a restored to a standard where it almost appears new. Another satisfied customer!
Alastair Robb
West Cheshire Tile Doctor

 Design Vision Studio
Erik Grammer Photography -
I recently came across a post on Facebook with a photo of an elderly couple with a quote saying "We were born in a time when if something was broken we would fix it, not throw it away..." This quote resonated with me. I found myself thinking of it while working on the same house - for the fourth time. I affectionately call this beautiful Southern California beach house the Humpty Dumpty home.
I started a wonderful business relationship with one of my favorite clients back in 2003. Initially, I was called in to "fix" and finish what another designer started. Once completed and with everything just so, the couple unfortunately divorced and amicably divided the art, rugs and furnishings. I was hired for a second time to recreate each room as close as possible to replace all items that were missing.
The house was happily restored back to the original design and all was well for a few years. My client relocated to the East Coast for a temporary job assignment and the house was rented to a person (whose name I can't say) from a famous all-girl band. During this time there was a problem with the upstairs laundry room and water damage occurred. I was hired for the third time to help repair and update (ever so slightly) some areas in the house. My client requested to keep the design and feeling of the house intact because he loved it so much.
A few years passed before a pipe broke in the master bathroom while the new renter was out of town on vacation. Unfortunately, things like this do happen - and if not attended to quickly, major damage can occur. In this case, nearly the entire house was flooded requiring it to be completely gutted and stripped down to the floorboards and studs. In January of this year, I was hired to help the client, the insurance company, and the contractor put the house back together again. But unlike the Humpty Dumpty story, this house has actually been put back together again - several times over.
Although, this house and client have experienced some challenges, I say this is a perfect example of design success. My client has had many opportunities to change and create something new in his environment with every mis-adventure. Instead, he realizes his home is exactly the way he likes it. It has been such an honor to work with this man who is definitive, trusting, and confident enough to create (or re-create) the perfect home that "fits" his personality and lifestyle.
Although this Humpty Dumpty home has been good for my business, I hope the next project with this client is to decorate another property - perhaps a New York City Apartment!
 Tile Doctor Ltd
When used to clean natural stone, supermarket products can often cause more harm than good as this recent customer of mine discovered this the hard way!
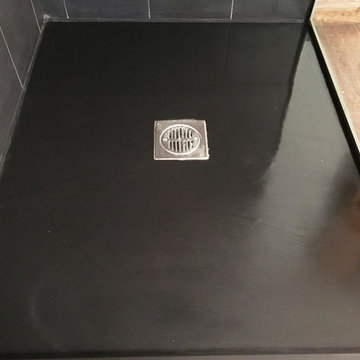
Originally from South Africa, she had lived in a flat in Clapham for a couple of years, but had to suddenly return home earlier than expected. However, part of her flat rental agreement required her to leave the property clean and as she found it, including the fantastic Slate shower cubicle.
In a rush, the customer had attempted to clean the Slate using a popular supermarket bathroom cleaner. She left the product to sit on the base of the shower before scrubbing it in with an abrasive pan scourer.
This was a big mistake – and the customer called me in a panic after discovering that her attempts had left the Slate severely stained. I traveled to the property to see what could be done to set the situation straight.
Upon observing the damage in person, I decided that the best course of action would be to use a process known as burnishing to grind away the stains. I tested a small area of the cubicle with one of our handheld diamond encrusted burnishing blocks.
Happy with the results of the test Clean, I started to burnish the whole cubicle using our system of four burnishing blocks, starting with the coarsest first and working my way down to the finest. A small amount of water was used as lubrication for each pad.
Through the burnishing process, the white stains started to disappear, exposing the lighter grey coloured Slate shower base.
After drying the area completely with a heat gun, I was able to seal the stone with two coats of Tile Doctor Colour Grow.
This impregnating sealer not only protects the stone but also importantly it restores the natural dark shades in the Slate, enhancing its overall appearance. As an impregnating sealer, Colour Grow penetrates the pores in the stone to fill them and prevent trapped dirt.
To say the customer was very relieved would be a complete understatement! By hiring in professional assistance, the customer was able to resolve the situation quickly and painlessly – and more importantly hold onto her £3,000 deposit!
Rupert Mcleod
West Surrey Tile Doctor
Find the right local pro for your project
 Design Vision Studio
Erik Grammer Photography -
I recently came across a post on Facebook with a photo of an elderly couple with a quote saying "We were born in a time when if something was broken we would fix it, not throw it away..." This quote resonated with me. I found myself thinking of it while working on the same house - for the fourth time. I affectionately call this beautiful Southern California beach house the Humpty Dumpty home.
I started a wonderful business relationship with one of my favorite clients back in 2003. Initially, I was called in to "fix" and finish what another designer started. Once completed and with everything just so, the couple unfortunately divorced and amicably divided the art, rugs and furnishings. I was hired for a second time to recreate each room as close as possible to replace all items that were missing.
The house was happily restored back to the original design and all was well for a few years. My client relocated to the East Coast for a temporary job assignment and the house was rented to a person (whose name I can't say) from a famous all-girl band. During this time there was a problem with the upstairs laundry room and water damage occurred. I was hired for the third time to help repair and update (ever so slightly) some areas in the house. My client requested to keep the design and feeling of the house intact because he loved it so much.
A few years passed before a pipe broke in the master bathroom while the new renter was out of town on vacation. Unfortunately, things like this do happen - and if not attended to quickly, major damage can occur. In this case, nearly the entire house was flooded requiring it to be completely gutted and stripped down to the floorboards and studs. In January of this year, I was hired to help the client, the insurance company, and the contractor put the house back together again. But unlike the Humpty Dumpty story, this house has actually been put back together again - several times over.
Although, this house and client have experienced some challenges, I say this is a perfect example of design success. My client has had many opportunities to change and create something new in his environment with every mis-adventure. Instead, he realizes his home is exactly the way he likes it. It has been such an honor to work with this man who is definitive, trusting, and confident enough to create (or re-create) the perfect home that "fits" his personality and lifestyle.
Although this Humpty Dumpty home has been good for my business, I hope the next project with this client is to decorate another property - perhaps a New York City Apartment!

 Contemporary Exteriors Inc.
As expected, no roofing system is perfect. They have their fair share of downsides that you have to be privy of. As for the 3-tab shingle, they have the tendency to sustain damages from exposure to extremely harsh weather. It can also retain moisture causing rot and mold proliferation. Three-tab shingles require proper attic ventilation. In terms of a property’s resale value, it comes behind the more expensive options.

 Driftwood Builders Roofing
Another successful full roof replacement completed in Circle C Ranch! ?
Our team removed the aging roofing system and installed a brand-new, high-performance roof built to withstand Austin’s intense heat, hail, and storm conditions. This project included upgraded underlayment, improved ventilation, new flashing components, and premium architectural shingles designed for long-term durability and curb appeal.
From the initial inspection through final cleanup, we focused on quality workmanship, clear communication, and protecting the homeowner’s property every step of the way.
If your roof in Circle C is showing signs of age, storm damage, leaks, or missing shingles, now is a great time to schedule a professional inspection before the next storm season arrives.
? Circle C Ranch | Austin, TX
? Full Roof Replacement
✅ Premium Materials
✅ Storm-Ready Installation
✅ Clean & Professional Workmanship
 Tile Doctor Ltd
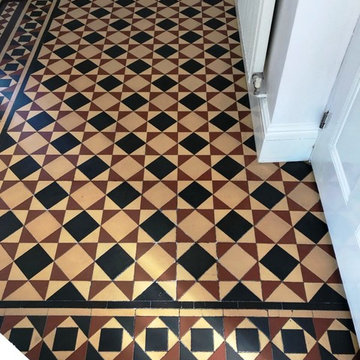
I was recently contacted by the owner of this Minton Victorian tiled floor in Kidderminster. The tiles had been covered over with carpet which I suspect was due to some the tiles being missing. Now uncovered it was stained with glue and carpet underlay was still stuck to the tiles in places. The owner was keen to have the floor fully restored including replacing damaged and missing tiles. We can replace missing or damaged tiles however the problem with old Victorian floors is finding matching replacements due to the unique patterns that many have. Fortunately, due to the popularity of Victorian tiles there are several suppliers who sell reproductions and occasionally you can find originals on ebay.
I went over to survey the floor an could see the tiles were certainly in need of some love and care. As part of the visit I carried out a test clean on a patch of the floor and the results were very satisfactory, so the owner asked me to go ahead.
On the day of arrival my first job was to spray the floor with neat Tile Doctor Remove and Go, this is a powerful cleaner/stripper which set to work on removing the glue and carpet underlay, this product will also remove any old sealer. I then left the solution to dwell and worked the chemical in with my buffer and a black pad removing the slurry with a wet and dry vacuum.
The tiles were then treated to an acid wash using Tile Doctor Acid Gel to further clean them and counter any potential efflorescence problem which is a problem with floors of this age that were installed without a damp-proof membrane. The product was scrubbed into the tile and grout, rinsed off with water and then extracted with the wet vacuum.
Once the floor was clean, I checked the colour of the tiles so I could cut and replace the missing section. I had managed to source some tiles that were a close match and set about cutting all the tiles to size and then fitted them using a flexible rapid set adhesive. The newly laid tiles needed to set, and the floor needed to dry out before we could apply the sealer.
The floor was left to dry overnight, on my return in the morning I tested the floor with a damp meter to check the moisture levels and ensure it was dry enough for sealing. I was satisfied it was dry so was able to proceed and seal the floor. Five coats of Tile Doctor Seal and Go Extra were applied which takes a lot of time as you need to wait for the previous coat to dry before applying the next. This product is a semi-gloss breathable sealer which gives a nice sheen to the tiles and fully protects them. It really allowed the colours and detail of the pattern to shine through and being breathable it will cope with any moisture rising though the floor.
The client was very happy with the overall finish and was really pleased that the Victorian tiles were now restored to their original appearance. It a fact that original features like these are in demand and add a lot of value to a property.
Mark Conway
Worcestershire Tile Doctor

 Progressive Design Build
This Bonita Springs home, nestled in the golf course community of Bonita Bay, had never been renovated and lacked sufficient space to accommodate these homeowners’ needs. Working initially with preliminary drawings provided by their daughter who is a licensed architect, Progressive Design Build helped the homeowners establish a preliminary budget and set a construction schedule. Once the couple knew what they wanted and had a design brief in hand, they set about creating a new, traditional and functional room addition. Progressive Design Build teamed up with the architect to produce a final set of working drawings.
The house addition consisted of a new master bedroom and master bathroom with vaulted ceilings, built-in cabinetry, and porcelain tile floors. To improve indoor/outdoor flow, Progressive Deign Build also renovated the homeowner’s pool deck.
Upon project completion, this project received top honors for remodeling excellence from the National Association of the Remodeling Industry (NARI), receiving a Contractor of the Year (CotY) award.
One of the major challenges, other than a very limited lot size, was the threat of a massive hurricane during construction. Construction had to cease for over a week to ensure that there was no damage to the home, property or adjacent properties. Due to the inclement weather situations, the project went two weeks over the estimated time frame.
Since completion, Progressive Design Build designed and built two other remodeling projects for this southwest Florida homeowner.
 Design Vision Studio
Erik Grammer Photography -
I recently came across a post on Facebook with a photo of an elderly couple with a quote saying "We were born in a time when if something was broken we would fix it, not throw it away..." This quote resonated with me. I found myself thinking of it while working on the same house - for the fourth time. I affectionately call this beautiful Southern California beach house the Humpty Dumpty home.
I started a wonderful business relationship with one of my favorite clients back in 2003. Initially, I was called in to "fix" and finish what another designer started. Once completed and with everything just so, the couple unfortunately divorced and amicably divided the art, rugs and furnishings. I was hired for a second time to recreate each room as close as possible to replace all items that were missing.
The house was happily restored back to the original design and all was well for a few years. My client relocated to the East Coast for a temporary job assignment and the house was rented to a person (whose name I can't say) from a famous all-girl band. During this time there was a problem with the upstairs laundry room and water damage occurred. I was hired for the third time to help repair and update (ever so slightly) some areas in the house. My client requested to keep the design and feeling of the house intact because he loved it so much.
A few years passed before a pipe broke in the master bathroom while the new renter was out of town on vacation. Unfortunately, things like this do happen - and if not attended to quickly, major damage can occur. In this case, nearly the entire house was flooded requiring it to be completely gutted and stripped down to the floorboards and studs. In January of this year, I was hired to help the client, the insurance company, and the contractor put the house back together again. But unlike the Humpty Dumpty story, this house has actually been put back together again - several times over.
Although, this house and client have experienced some challenges, I say this is a perfect example of design success. My client has had many opportunities to change and create something new in his environment with every mis-adventure. Instead, he realizes his home is exactly the way he likes it. It has been such an honor to work with this man who is definitive, trusting, and confident enough to create (or re-create) the perfect home that "fits" his personality and lifestyle.
Although this Humpty Dumpty home has been good for my business, I hope the next project with this client is to decorate another property - perhaps a New York City Apartment!

 Five Star Tree Care
A tree has many parts, all of which contribute to its overall health. Just like the human body, each part of the tree works together to ensure the tree’s survival. There are a few important elements that trees and other plants need to live; these include carbon dioxide, water, sunlight, and food. A tree that has been planted in a nourishing environment and that has quality soil for its roots will grow tall, strong, and healthy. Trees that are planted in an urban environment such as on someone’s personal property need regular maintenance to thrive.
The arborists here at Five Star Tree Services are happy to provide residential and commercial tree care services, including pruning and removal. We help trees stay healthy by getting rid of dead branches, trimming overgrown leaves to prevent them from infringing on power lines and much more. Aside from regular care, homeowners should pay particular attention to the roots of the tree, and here’s why.
Why Trees Have Roots
The roots are what hold the tree in place as well as used to absorb essential nutrients from the surrounding soil. Furthermore, water is also absorbed by the roots, which is critical for the tree’s survival. The majority of the roots of a tree are located between six inches and one foot underground. While they may be shallow going down, they extend very far horizontally, even surpassing the canopy of the tree. If a tree didn’t have roots, then it would not be able to stand or withstand harsh weather.
Allow The Roots to Breathe
The roots of your tree need to be protected, but they also need plenty of oxygen in order for your tree to thrive. Drying out the soil under your tree will allow oxygen to reach the area. Instead of watering your tree on a daily basis, choose a schedule that keeps the tree hydrated but allows the soil to rest. Packing the soil around the tree too tight will also limit the airflow which may suffocate surface roots.
Watering
Trees constantly require water regardless of their age. Trees need to be watered on a regular schedule, especially during dry seasons or drought. Ample watering will boost tree growth and maintain tree health.
Don’t Cut Them
Cutting the roots of a tree not only limits its ability to nourish itself, but it can also leave it open to attacks. Bacteria, insects, and viruses are more prone to strike a tree with a weak root system than one with a sturdy one. Cutting will also place stress on the tree which may stunt its growth for several years. Depending on the severity of the cut, severed roots may even cause the death of your tree.
Invest in Mulch
Mulch is a material placed around the bottom of a tree. It is fully organic and is intended to give the roots extra protection while also providing nutrients for your tree. Mulch should be placed around the base of a tree in the spring in order to promote new growth. An additional layer should be added in the winter to provide a buffer from the cold.
Tree Care by Five Star Tree Services
If you are worried about the health of your tree Five Star Tree Services is here to help. We offer Toronto Tree Care Services, storm damage, regular maintenance, affordable tree removal, pruning and planting services all over the metro area. If you are interested in boosting the aesthetic value of your property, or just maintaining your tree’s health, give us a call at (416) 990-3355 today.
 Five Star Tree Care
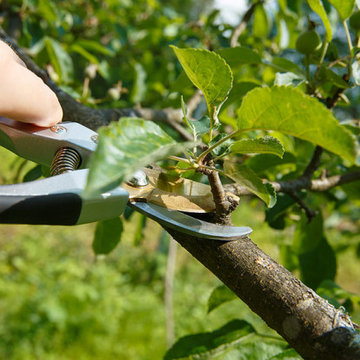
There are a few reasons why it is critical that your trees have a regular schedule for pruning and maintenance. Pruning helps trees to maintain a tree’s health as well as form it to a pleasing aesthetic shape. Furthermore, pests and diseases are also controlled by regular pruning and care. When pruning is properly performed, your trees will be healthy and attractive all year long. Five Star Tree Services has put together a list of seven things you should keep in mind regarding your tree pruning.
Tree Inspection
Before any tree pruning job, the tree should be properly inspected. This will allow you or our tree care service team to determine which branches should be cut. It will also allow any diseases or pests to be identified and dealt with.
Remove Dead, Weak & Crossed Branches
Dead and weak branches are a hazard to your property and those who happen to walk or lounge under the tree. They also suck vital nutrients away from healthy branches and the tree trunk. Removing them will prevent accidents and allow your tree to thrive. Crossed branches can also cause problems later down the line. They affect the airflow to the crown and can also prevent sunlight from passing through the tree.
Pay Attention to Spacing
It’s important to pay attention to branch spacing when pruning your tree. Lateral branches should be spaced evenly, especially when pruning trees that have yet to mature.
Follow the Basic Pruning Rules
It’s important that the 1/4th and 1/3rd rules of pruning are followed. This means that you should never cut more than a third of the total height of the tree. This length is measured from the bottom up. You should also only cut 1/4th or less of a tree’s crown when you prune at any one time.
Get Your Tools Ready
The tools you use to prune should be ready well before you make the first cut. You should start your project equipped with a pole pruner, pruning saws, hedge shears, loppers, and pruning shears. They also need to be properly sharpened before you start your pruning project. Each of these tools will allow you to reach different parts of the tree and prune them in a safe manner. If your tools are dull, they can damage the tree or even cause accidents when you attempt to cut.
Prune on Schedule
There are schedules for pruning that should be followed according to the type of tree you are caring for. Summer blooming trees should be pruned in early spring while evergreens and hedges should be taken care of in the early part of summer. Fruit-bearing trees should be pruned late in winter ahead of the frost. If there is damage to your tree, it doesn’t matter what time of year it may be, correct the problem as soon as possible.
Avoid Protecting Post-Pruning
Pruning leaves behind wounds, but they will heal. Though they may be unsightly for a while, the marks will heal and return back to its natural beauty. Don’t paint the pruning wounds to protect the tree, it actually has no effect on decay prevention. Painting may even trigger diseases or encourage pests to take up residence.
How We Can Help
Tree pruning is a complication job, but with our tips, you can do it right. It is always a good idea to leave the job to the professionals here at Five Star Tree Services instead. Our Toronto tree care experts have the tools, experience, and skills to get the job done right the first time. Get in touch with us at (416) 990-3355 today for more information.

 Native Edge Landscape
For this project we were given the pleasure of working with one of our repeat clients—and quite the project it was. Situated in one of Austin’s most premiere locations, before we got our hands on it the landscape for this house was left in significant disrepair. There were broken water features, limbs damaging the sides of the house, overgrown grass and weeds, and overgrown vines. The homeowners trusted us to come up with new ways to enhance and cleanup the space on this beautiful property, while also keeping it dog friendly and adding some new raised planters for a vegetable garden. Two living walls and a custom water feature made this property unique from others like it, and native plants were chosen to frame the house, rather than distract from it, giving it our Native Edge touch. After several months of install, plus one outdoor shower and kitchen later, the finished product turned out to be well worth the effort.

 Barbara Wilson Landscape Architect, LLC
Custom colored Luna Fountain (urn) with matching bench set on granite pavers with gravel mulch. Photo taken by Barbara Wilson, RLA
A small residential, seaside property located on Saugatuck Island in Wesport was rebuilt after devastating damage by a hurricane. All that remained from the original property was the pool and pool terrace. The house was raised approximately 5 feet to meet new FEMA codes and rebuilt under the design team of the owner, a well-known interior designer. Barbara was part of the landscape architectural team that helped create a sense of place for the new house. The landscape design included the addition of new walls and steps to the front door, new custom fencing surrounding the pool, an outdoor shower, landscape lighting, a custom fountain in the back yard, a sandbox (used as a relief area for the dog) and all new plantings. She coordinating obtaining bids and then supervised installation of the project.
 Barbara Wilson Landscape Architect, LLC
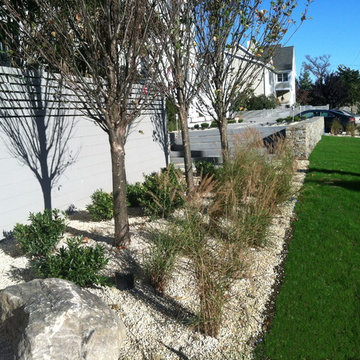
Salt tolerant plantings with minimal lawn in the front yard. Photo taken by Barbara Wilson, RLA
A small residential, seaside property located on Saugatuck Island in Wesport was rebuilt after devastating damage by a hurricane. All that remained from the original property was the pool and pool terrace. The house was raised approximately 5 feet to meet new FEMA codes and rebuilt under the design team of the owner, a well-known interior designer. Barbara was part of the landscape architectural team that helped create a sense of place for the new house. The landscape design included the addition of new walls and steps to the front door, new custom fencing surrounding the pool, an outdoor shower, landscape lighting, a custom fountain in the back yard, a sandbox (used as a relief area for the dog) and all new plantings. She coordinating obtaining bids and then supervised installation of the project.

 Connor Tree Service, LLC
A hurricane is a powerful and destructive force of nature. It can cause a lot of damage to trees, homes, and other property. If you live in an area that is prone to hurricanes, it is important to take steps to protect your property ahead of time.
 Progressive Design Build
This Bonita Springs home, nestled in the golf course community of Bonita Bay, had never been renovated and lacked sufficient space to accommodate these homeowners’ needs. Working initially with preliminary drawings provided by their daughter who is a licensed architect, Progressive Design Build helped the homeowners establish a preliminary budget and set a construction schedule. Once the couple knew what they wanted and had a design brief in hand, they set about creating a new, traditional and functional room addition. Progressive Design Build teamed up with the architect to produce a final set of working drawings.
The house addition consisted of a new master bedroom and master bathroom with vaulted ceilings, built-in cabinetry, and porcelain tile floors. To improve indoor/outdoor flow, Progressive Deign Build also renovated the homeowner’s pool deck.
Upon project completion, this project received top honors for remodeling excellence from the National Association of the Remodeling Industry (NARI), receiving a Contractor of the Year (CotY) award.
One of the major challenges, other than a very limited lot size, was the threat of a massive hurricane during construction. Construction had to cease for over a week to ensure that there was no damage to the home, property or adjacent properties. Due to the inclement weather situations, the project went two weeks over the estimated time frame.
Since completion, Progressive Design Build designed and built two other remodeling projects for this southwest Florida homeowner.
 Barbara Wilson Landscape Architect, LLC
Custom granite walk and circular pattern for the landing to the front door. Gravel mulch used between the stones and as mulch for the adjacent planting beds. Photo taken by Barbara Wilson, RLA
A small residential, seaside property located on Saugatuck Island in Wesport was rebuilt after devastating damage by a hurricane. All that remained from the original property was the pool and pool terrace. The house was raised approximately 5 feet to meet new FEMA codes and rebuilt under the design team of the owner, a well-known interior designer. Barbara was part of the landscape architectural team that helped create a sense of place for the new house. The landscape design included the addition of new walls and steps to the front door, new custom fencing surrounding the pool, an outdoor shower, landscape lighting, a custom fountain in the back yard, a sandbox (used as a relief area for the dog) and all new plantings. She coordinating obtaining bids and then supervised installation of the project.
 Barbara Wilson Landscape Architect, LLC
Photos taken by Barbara Wilson, RLA
A small residential, seaside property located on Saugatuck Island in Wesport was rebuilt after devastating damage by a hurricane. All that remained from the original property was the pool and pool terrace. The house was raised approximately 5 feet to meet new FEMA codes and rebuilt under the design team of the owner, a well-known interior designer. Barbara was part of the landscape architectural team that helped create a sense of place for the new house. The landscape design included the addition of new walls and steps to the front door, new custom fencing surrounding the pool, an outdoor shower, landscape lighting, a custom fountain in the back yard, a sandbox (used as a relief area for the dog) and all new plantings. She coordinating obtaining bids and then supervised installation of the project.
 SUPERIOR CHIMNEY SERVICES CORPORATION
As the temperatures continue to climb, and we finally get a chance to enjoy some warm weather, we start to walk around the neighborhood, or even our own homes, to find that lots of work needs to be done. Whether it be weed picking or changing bulbs in the light fixtures there’s always something that needs to be done. However, there’s one thing that can’t wait for your attention and that’s chimney tuckpointing. Why is it so important? Let’s take a look.
Weather and Tuckpointing, Not a Good Match
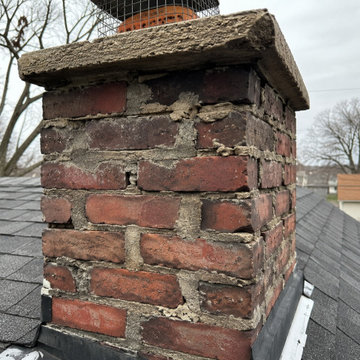
You might have guessed that Chicago and Chicagoland’s weather is brutal on masonry. The city and suburbs average around 35 freeze-thaw cycles every single winter. Every time the cycle occurs, it takes a toll on the chimney's mortar joints. When water gets in and temperatures drop, the water freezes & expands as ice with enough force to crack brick and stone. When Spring comes around, what once was a hairline crack, now gets bigger and allows rain to enter into your home.
This is why the yearly chimney inspection is not optional, according to the CSIA (Chimney Safety Institute of America).
A Little Chicago History
Most homes in neighborhoods like Beverly, Oak Park, Evanston and across the North Shore were built between the 1890s and 1950s. The mortar used in that era had a lifespan of roughly 25–30 years under normal conditions. Under Chicago and Chicagoland conditions? It is reduced. Homeowners buying older properties frequently inherit chimneys that haven't been maintained in a very long time.
When the chimney along with the flashing, bricks, chimney cap and chimney crown are not checked and maintained, loss of structural integrity begins. Water working its way through deteriorated joints reaches the interior of the chimney. This is where it can cause damage to the fire liner while it finds its way into the home. In some situations, compromised masonry near the fireplace can create fire safety concerns.
Getting a Chimney Inspection Early Makes All the Difference
The good news is that chimney tuckpointing, diagnosed early, is simply a repair. The bad news is that homeowners who wait too long can turn the issue into a partial rebuild, or a full chimney rebuild. By the time mortar is visibly crumbling from the street, the damage has already progressed deeper into the chimney structure.
A professional inspection every year is the most cost-effective way to keep the chimney and home heathy. It's often the difference between a few hundred dollars and several thousand.
Not All Tuckpointing Is Equal
One thing worth understanding is that proper tuckpointing requires removing the old mortar to a depth of approximately three-quarters of an inch before new mortar can be applied. Anything less and the new mortar won't bond with longevity / correctly. DIY or companies that just smear new mortar over old joints are doing what's sometimes called "skim coating," and it's essentially cosmetic work that won't hold up.
The type of mortar mix matters too. More modern cement mortars are actually harder than historic brick, which causes the brick itself to absorb, stress and crack rather than the mortar joint. A knowledgeable mason from Superior Chimney will match mortar composition to the brick, only something a real expert can get right.
Contact Superior Chimney today to get a chimney inspection which includes inspecting the exterior chimney today at 877-244-6349.
 Tile Doctor Ltd
Here’s a job I completed just before Christmas last year, at a house in Northampton which has a rich history and mix of architectural styles. The run up to Christmas is always popular as people try to get their household projects finished off in time for celebrating the festive season with family so this is always a busy time for Tile Doctor.
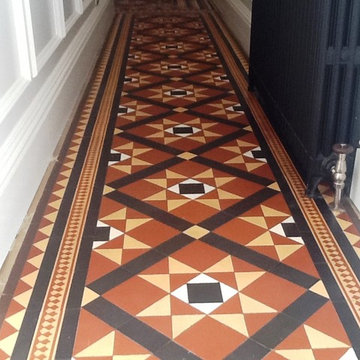
The photos below show a neglected Victorian Quarry tiled floor in need of repair, with cracked tiles along the edges. These were caused by somebody in the past using brute force to remove carpet gripper rods which had been glued to the tiles. These cracks were present around the edges of the entire hallway, however; this particular type of tile is very hard to get hold of. Furthermore, it is a costly process to replace the tiles as the skirting boards would have had to have been removed.
As well as the physical issues the floor had a dull appearance due to the build-up of builder’s dust and the general wearing down of the paintwork over time. I agreed with the client that the best course of action would be to fill the tiles, and paint the damaged tiles using a colour that matched as close as possible. Many of my Tile Doctor colleagues would disagree with this approach opting to source the correct tile and rebuild the damaged section however unfortunately in this case we didn’t have the time or the budget.
My first action was to use a brush and vacuum to remove as much loose debris and dust as possible. I followed this by agitating the tiles with a dilution of Tile Doctor Pro Clean which is a strong alkaline product and safe to use on tile and stone. I use a combination of a coarse burnishing pad fitted to a rotary machine and hand held brushes, in order to get the floor clean. The resulting slurry was then rinsed and removed using a wet vacuum. This process was repeated twice followed by a thorough rinse to ensure any trace of cleaning agent had been removed and the floor neutralised.
As this was such an old property, I then used a steamer to heat up the tiles in order to draw out any contaminants and assist with the drying process. I installed a fan to dry the floor before starting repairs, mixing up some coloured grout and filling all holes and cracks along the edges, including the doormat area.
I allowed the coloured grout to dry overnight, before hand painting the black and Terracotta tiles. These were then given time to dry (about a couple of hours). Following this, I carefully painted in the other colours: brown and cream. The overall effect was quite convincing and you had to look very closely to notice.
Due to the fact that there were other tradesmen working in the house at the time, the floors were sheeted up to protect from additional dust and muck. I then left the house for a week, allowing the floor ample time to dry completely in preparation for sealing.
Upon my return, I took damp meter readings, and once satisfied with the dryness of the tiles, I began the sealing process with the impregnating, colour-enhancing sealer Tile Doctor Colour Grow. The sealer provides both durable surface protection and an aesthetically pleasing matte finish.
The below photos show how the product has enriched the colours with the two coats applied.
The process of restoring this wonderful Victorian Quarry tiled floor was certainly time consuming, but very rewarding. I am exceptionally pleased with the results myself, and my client couldn’t have been happier and I’m sure the newly revitalised hallway will have been a talking point for all their visitors during the Christmas break.
Phil Vissian
Northamptonshire Tile Doctor
18