
Search results for "Property damage" in Home Design Ideas

 Tile Doctor Ltd
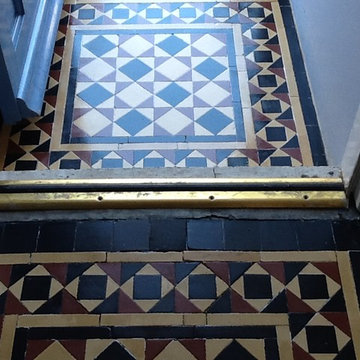
We received a request to renovate Victorian tiled hallway floor at a house in the London borough of Harlesden NW10. My client had modernised the heating system and this unfortunately required a section of the tiled flooring to be dug up so new pipework could be laid.
After speaking on the phone, I arranged an initial visit to the property so I could properly assess the work required and provide a price for restoring the floor. During my visit I could see there was another section of missing tiles at one of the door thresholds which would need attention. Except for the missing sections of floor I could see that the tiles themselves were in good condition for their age and would respond well to a deep clean and fresh seal.
I was confident on being able to source matching replacements for the missing tiles and reassured my client that we would be able not only repair the floor but also renovate it to a good standard. I gave them a price to do the restoration which they were happy to accept, and the work was booked.
After some research I managed to source replacement tiles from the Vintage Floor Tile Company in Kent; Victorian tiles are still popular so there a few companies that keep stock so we can usually find a match.
With the replacements in hand, work started by removing the cement and loose material from the missing sections of flooring and backfilling with self-levelling compound to bring the exposed base up to the right level for tiling.
The tiles were then cut to shape as required to match the existing patten and fixed into place with a quick setting adhesive and then grouted.
The floor was left to overnight to allow the adhesive to harden fully, and I returned the next day to deep clean the whole floor. To give the tiles are deep clean a strong dilution of Tile Doctor Remove and Go was sprayed onto the floor and left to soak in for ten minutes. It was then scrubbed into the floor using a rotary machine fitted with a with a black pad. This action lifted the dirt out of the tiles and the resulting slurry was removed with the wet vacuum.
It turned out that the pores of the tiles were holding a lot of dirt, so the process was repeated until I was satisfied. Due to the age of the property, there was no damp-proof membrane installed so I do try to minimise the amount of water I use in this process as there is always a chance of exacerbating any latent efflorescence issues.
Efflorescence occurs where moisture rises through the tile bringing with it salts from underneath the floor as it evaporates on the surface. This can lead to unsightly white marks appearing on the tile. To counteract this potential problem the cleaning was followed by an acid wash using Tile Doctor Acid Gel applied with a 100 then 200-grit pad, before finishing on a 400-grit burnishing pad. The floor was again rinsed with water after the application of each pad to remove the slurry and extracted with a wet vacuum.
Once I was satisfied the floor was as clean as possible, we left site and the area was left to dry over the weekend ready for application of a new sealer.
I returned on the Monday and started by taking a few moisture readings to check the floor was dry. The floor was in an acceptable range, so I applied the first of 4 coats of sealer. For this floor I chose Tile Doctor Seal and Go Extra which is specially formulated product that provides stain resistance with a hard wearing low-sheen finish.
This product is also breathable which is an important feature for old floors, anything that blocks moisture from rising through the tile will cause it to become trapped underneath where it will pool and eventually reach out to the walls and result in rising damp.
Once complete the floor looked brand new and I’m pleased to say with the deep clean and a fresh sealer applied it was impossible to tell the difference between the original and repaired sections of flooring.
For the aftercare of sealed Victorian tiled floors, I recommend Tile Doctor Neutral Cleaner, it’s a mild day to day cleaner with a neutral pH that won’t damage the sealer. Many of the tile cleaning products you find in supermarkets are simply too strong.
Andrew Newstead
North London Tile Doctor
 Bloomin Blinds of North Charlotte
Discover how premium light-filtering materials and smart-home automation can secure street-level entryway glass without losing natural daylight.
Choosing the right window treatments for a home's front entrance is one of the most challenging design decisions a homeowner can face. The front door is the focal point of a home's curb appeal, often featuring expansive glass panels or side-by-side double doors designed to make a grand architectural statement.
During the day, these large glass features are an asset, flooding entryways and foyers with beautiful natural daylight. However, for homes situated on busy local roads or highly trafficked street-level lots, the dynamic completely changes once the sun goes down.
The moment interior lights are switched on in the evening, a stark contrast is created with the dark outdoors. This creates a severe privacy issue, leaving the entire foyer completely exposed to passing traffic and pedestrians. Finding a solution that delivers absolute evening privacy without permanently plunging the front entrance into darkness during the day requires understanding how modern window treatment materials and operating systems interact.
Light-Filtering vs. Blackout Fabrics
The first step in solving street-level privacy is selecting the correct fabric type. Many homeowners mistakenly assume they need heavy, opaque blackout shades to secure their home from outside eyes at night. While blackout fabrics certainly block 100% of the view, they also block 100% of the natural daylight during the day, forcing you to constantly raise and lower the shades just to see inside your own foyer.
A more effective approach for entryways utilizes premium light-filtering materials. These specialized fabrics are engineered with a precise, tight weave that operates on the principles of directional light and optical density.
Daytime Functionality: When the sun is shining outside, the exterior light levels are significantly higher than the interior light levels. The light-filtering fabric diffuses the intense, direct sunlight into a soft, ambient glow throughout the entryway. This keeps the home bright, eliminates harsh glares, and protects interior hardwood flooring, paint, and trim from damaging UV rays.
Night-Time Functionality: At night, the lighting dynamic reverses. The interior foyer lights make the inside bright, while the outside is dark. Because of the specialized tight weave, the fabric blocks the transmission of clear shapes and details. To a person standing out on the street or driving by on a busy road, the view inside is completely obstructed, delivering total privacy when the family is home for the evening.
Challenges of Front Door Installations
Securing privacy for a double wide front entrance introduces unique structural hurdles that standard windows do not face. Traditional blinds with hanging cords or manual pull chains are poorly suited for front doors. They disrupt the clean architectural lines of a grand foyer, create a safety hazard, and can easily get tangled or damaged when the doors are opened and closed.
The window treatments must be mounted high and wide enough above the door trim to ensure that the front doors can swing open and close freely without ever catching on the fabric or the lower hem bar.
How We Applied These Principles in Sherrills Ford, NC
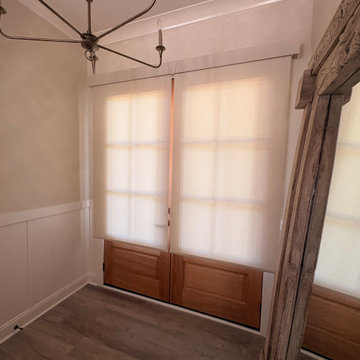
Applying these exact educational principles to real-world homes is what Cole and I do every day at Bloomin' Blinds of North Charlotte. We recently worked with a homeowner in Sherrills Ford whose beautiful new construction property sat on a highly trafficked road. They loved their double wide front door entrance but felt entirely too exposed to the street at night.
We brought our mobile showroom directly to their driveway. This allowed us to hold up premium light-filtering fabric samples directly against their entryway glass, matching the materials perfectly to their home's natural lighting, interior paint, and trim before making a single cut.
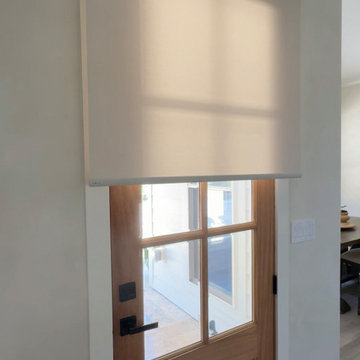
To solve their street-level privacy issue, we custom-built and installed two matching light-filtering roller shades, mounting them flawlessly side-by-side above the front door frame. To keep the home’s interior design completely cohesive, we carried the exact same style to the back of the house, installing a matching single roller shade on the rear door.
Smart Home Window Automation at Your Fingertips
Because entryway windows can be tall and awkward to reach manually, our family team integrated advanced smart-home motorization into this Sherrills Ford project.
Beyond the convenience of a handheld remote control, these automated roller shades feature seamless Wi-Fi integration. The homeowners can control their privacy through a dedicated smartphone app or link the system directly to their existing voice-activated smart home networks, including Amazon Alexa, Google Assistant, and Apple HomeKit.
This allows for complete hands-free window automation. The clients can program custom daily routines—such as setting the front entry shades to automatically lower exactly at sunset—or simply use a voice command to secure the foyer instantly from the comfort of the couch.
 Tile Doctor Ltd
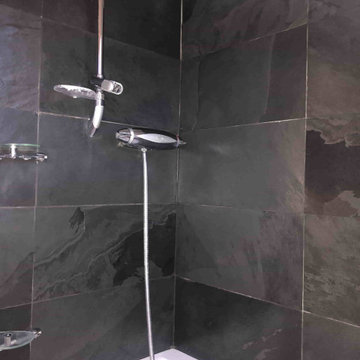
The photographs below are from a bathroom in Maida Vale W9 which had a lovely Slate tiled wall over a bath with shower. Unfortunately, the Slate tiles had been ruined by the use of harsh cleaning chemicals in an attempt to remove the limescale caused by hard water. The slate had now lost all its natural colour and looked completely washed out. The property had recently changed hands and the new owner was keen to have it renovated.
I went over to take a look and work out a solution, this in itself is a lot trickier these days with all the COVID precautions we need to take when working in someone’s house. It was clear that a strong acidic limescale remover had been used on the slate and this had etched the stone, leached all the natural oils away and generally ruined its appearance.
Fortunately, we have a solution for this (see below) and after conducting a small test I was able to confirm the problem could be resolved and gave them a quote which included a day’s labour, abrasive pads, stone oil and sealer. Our quote was gratefully accepted, and we booked a time in to carry out the work.
I returned to the property and I set about burnishing the slate wall tiles using a very coarse 200-grit six-inch burnishing pad fitted to a handheld buffing machine. This process resurfaces the stone slightly to remove the etching caused by the limescale remover. I used a medium dilution of Tile Doctor Grout Clean-up to lubricate the process and to remove the remaining limescale. Once done the slurry that is generated is rinsed off with more water. In a bathroom, it is easy the slurry can just be drained away. In other areas we would use a wet vacuum.
After the 200-grit pad the surface of the Slate was further refined using a 400-grit pad and then an 800-grit pad, this time only using water and giving the stone a thorough rinse after each pad to remove the soil.
The slate was then left to dry off over lunch and given more encouragement with a heat gun afterwards so I could move onto the next step. This involved applying a coat of Tile Doctor Stone Oil which puts back the natural oils back into the stone improving its appearance.
Once the Stone Oil had fully dried, I moved onto sealing for which I applied two coats of Tile Doctor Ultra-Seal; this is penetrating sealer that soaks into the stone to provide maximum stain protection without changing the colour of the stone. It is also an excellent grout sealer which is a bonus.
Before leaving I talked the client about how best to maintain the Slate and left them a complimentary bottle of Tile Doctor Aqua Pro tile cleaner which will help keep the limescale at bay. It is gentle enough to use every day but will help prevent the previous build-up and unlike the previous products used will not damage the newly applied sealer.
Jackson Davis
Central London Tile Cleaning
Find the right local pro for your project
 Homeowner Services of Michigan LLC
Our client-centered approach ensures each project is tailored to meet your specific needs, large or small. Recently, we completed a comprehensive exterior and interior renovation that demonstrates our commitment to quality and attention to detail.
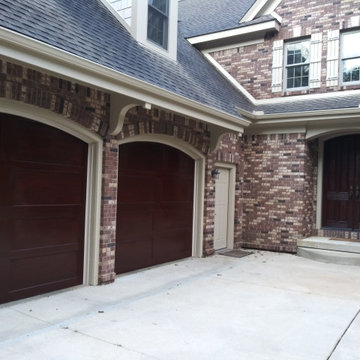
For the exterior, we began by thoroughly cleaning the roofing of the house, garage, and barn, removing moss, mildew, and algae to restore the surfaces to their original condition. We then meticulously prepped and painted the exteriors, ensuring a fresh and appealing look. The installation of new entry doors with custom hardware added both functionality and aesthetic value.
Attention was given to replacing exterior trim lumber and deck steps, addressing all discussed and required areas. The deck and steps leading to the lake were power washed and sealed, providing durability and a polished finish. We extended this care to the gazebo, cleaning, sealing, and rescreening it as needed, ensuring it remained a welcoming outdoor space.
To enhance the property's maintenance, we cleaned rust stains from the house and installed a Gutter Rx Gutter Guard System on the house, garage, and barn, preventing future debris build-up and water damage. Additionally, we trimmed and pruned the trees surrounding the deck, stairs, gazebo, and rear roof, maintaining both the health of the trees and the beauty of the property.
This project exemplifies our dedication to client satisfaction, ensuring every detail is managed with precision and care. At Homeowner Services of Michigan, we are passionate about transforming your home, inside and out, to create spaces that are both functional and beautiful.
 Homeowner Services of Michigan LLC
Our client-centered approach ensures each project is tailored to meet your specific needs, large or small. Recently, we completed a comprehensive exterior and interior renovation that demonstrates our commitment to quality and attention to detail.
For the exterior, we began by thoroughly cleaning the roofing of the house, garage, and barn, removing moss, mildew, and algae to restore the surfaces to their original condition. We then meticulously prepped and painted the exteriors, ensuring a fresh and appealing look. The installation of new entry doors with custom hardware added both functionality and aesthetic value.
Attention was given to replacing exterior trim lumber and deck steps, addressing all discussed and required areas. The deck and steps leading to the lake were power washed and sealed, providing durability and a polished finish. We extended this care to the gazebo, cleaning, sealing, and rescreening it as needed, ensuring it remained a welcoming outdoor space.
To enhance the property's maintenance, we cleaned rust stains from the house and installed a Gutter Rx Gutter Guard System on the house, garage, and barn, preventing future debris build-up and water damage. Additionally, we trimmed and pruned the trees surrounding the deck, stairs, gazebo, and rear roof, maintaining both the health of the trees and the beauty of the property.
This project exemplifies our dedication to client satisfaction, ensuring every detail is managed with precision and care. At Homeowner Services of Michigan, we are passionate about transforming your home, inside and out, to create spaces that are both functional and beautiful.
 Bloomin Blinds of North Charlotte
Discover how premium light-filtering materials and smart-home automation can secure street-level entryway glass without losing natural daylight.
Choosing the right window treatments for a home's front entrance is one of the most challenging design decisions a homeowner can face. The front door is the focal point of a home's curb appeal, often featuring expansive glass panels or side-by-side double doors designed to make a grand architectural statement.
During the day, these large glass features are an asset, flooding entryways and foyers with beautiful natural daylight. However, for homes situated on busy local roads or highly trafficked street-level lots, the dynamic completely changes once the sun goes down.
The moment interior lights are switched on in the evening, a stark contrast is created with the dark outdoors. This creates a severe privacy issue, leaving the entire foyer completely exposed to passing traffic and pedestrians. Finding a solution that delivers absolute evening privacy without permanently plunging the front entrance into darkness during the day requires understanding how modern window treatment materials and operating systems interact.
Light-Filtering vs. Blackout Fabrics
The first step in solving street-level privacy is selecting the correct fabric type. Many homeowners mistakenly assume they need heavy, opaque blackout shades to secure their home from outside eyes at night. While blackout fabrics certainly block 100% of the view, they also block 100% of the natural daylight during the day, forcing you to constantly raise and lower the shades just to see inside your own foyer.
A more effective approach for entryways utilizes premium light-filtering materials. These specialized fabrics are engineered with a precise, tight weave that operates on the principles of directional light and optical density.
Daytime Functionality: When the sun is shining outside, the exterior light levels are significantly higher than the interior light levels. The light-filtering fabric diffuses the intense, direct sunlight into a soft, ambient glow throughout the entryway. This keeps the home bright, eliminates harsh glares, and protects interior hardwood flooring, paint, and trim from damaging UV rays.
Night-Time Functionality: At night, the lighting dynamic reverses. The interior foyer lights make the inside bright, while the outside is dark. Because of the specialized tight weave, the fabric blocks the transmission of clear shapes and details. To a person standing out on the street or driving by on a busy road, the view inside is completely obstructed, delivering total privacy when the family is home for the evening.
Challenges of Front Door Installations
Securing privacy for a double wide front entrance introduces unique structural hurdles that standard windows do not face. Traditional blinds with hanging cords or manual pull chains are poorly suited for front doors. They disrupt the clean architectural lines of a grand foyer, create a safety hazard, and can easily get tangled or damaged when the doors are opened and closed.
The window treatments must be mounted high and wide enough above the door trim to ensure that the front doors can swing open and close freely without ever catching on the fabric or the lower hem bar.
How We Applied These Principles in Sherrills Ford, NC
Applying these exact educational principles to real-world homes is what Cole and I do every day at Bloomin' Blinds of North Charlotte. We recently worked with a homeowner in Sherrills Ford whose beautiful new construction property sat on a highly trafficked road. They loved their double wide front door entrance but felt entirely too exposed to the street at night.
We brought our mobile showroom directly to their driveway. This allowed us to hold up premium light-filtering fabric samples directly against their entryway glass, matching the materials perfectly to their home's natural lighting, interior paint, and trim before making a single cut.
To solve their street-level privacy issue, we custom-built and installed two matching light-filtering roller shades, mounting them flawlessly side-by-side above the front door frame. To keep the home’s interior design completely cohesive, we carried the exact same style to the back of the house, installing a matching single roller shade on the rear door.
Smart Home Window Automation at Your Fingertips
Because entryway windows can be tall and awkward to reach manually, our family team integrated advanced smart-home motorization into this Sherrills Ford project.
Beyond the convenience of a handheld remote control, these automated roller shades feature seamless Wi-Fi integration. The homeowners can control their privacy through a dedicated smartphone app or link the system directly to their existing voice-activated smart home networks, including Amazon Alexa, Google Assistant, and Apple HomeKit.
This allows for complete hands-free window automation. The clients can program custom daily routines—such as setting the front entry shades to automatically lower exactly at sunset—or simply use a voice command to secure the foyer instantly from the comfort of the couch.

 Tracstar Tree Experts
24/7 EMERGENCY STORM DAMAGE VIRGINIA BEACH
When you do you’ll be connected with the most highly skilled and promptly responsive arborists on the market today who are available 24/7 to provide emergency tree services in Virginia Beach, such as emergency tree removal in Virginia Beach. Experts quickly, affordably, and safely for all the people and property in the affected area.
Here at Tracstar Tree Experts, our tree service Virginia Beach professionals are serious about making your trees and your home safe no matter what emergency situations arise. It’s why our professionals are trained in quick responses and quick solutions to reduce the damage which can be inflicted by a diseased, fallen, or otherwise severely compromised tree and get you back to a state of safety and satisfaction with your home. If you find yourself with a sudden need for emergency tree services in Virginia Beach then you should absolutely not hesitate to contact the reliable and knowledgeable tree care Virginia Beach specialists at Tracstar Tree Experts. Call (757) 515-6933 as soon as you have a need for emergency tree services in Virginia Beach to receive a free estimate and the Virginia Beach tree care solutions you need to return to your life.
 Barbara Wilson Landscape Architect, LLC
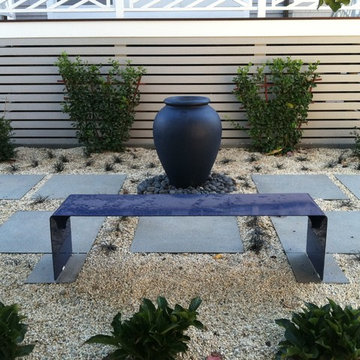
Custom colored Luna Fountain (urn) with matching bench set on granite pavers with gravel mulch. Photo taken by Barbara Wilson, RLA
A small residential, seaside property located on Saugatuck Island in Wesport was rebuilt after devastating damage by a hurricane. All that remained from the original property was the pool and pool terrace. The house was raised approximately 5 feet to meet new FEMA codes and rebuilt under the design team of the owner, a well-known interior designer. Barbara was part of the landscape architectural team that helped create a sense of place for the new house. The landscape design included the addition of new walls and steps to the front door, new custom fencing surrounding the pool, an outdoor shower, landscape lighting, a custom fountain in the back yard, a sandbox (used as a relief area for the dog) and all new plantings. She coordinating obtaining bids and then supervised installation of the project.

 Native Edge Landscape
For this project we were given the pleasure of working with one of our repeat clients—and quite the project it was. Situated in one of Austin’s most premiere locations, before we got our hands on it the landscape for this house was left in significant disrepair. There were broken water features, limbs damaging the sides of the house, overgrown grass and weeds, and overgrown vines. The homeowners trusted us to come up with new ways to enhance and cleanup the space on this beautiful property, while also keeping it dog friendly and adding some new raised planters for a vegetable garden. Two living walls and a custom water feature made this property unique from others like it, and native plants were chosen to frame the house, rather than distract from it, giving it our Native Edge touch. After several months of install, plus one outdoor shower and kitchen later, the finished product turned out to be well worth the effort.
 Windy City Painters
Iron Fence Painting in Wicker Park: A Windy City Painters Case Study
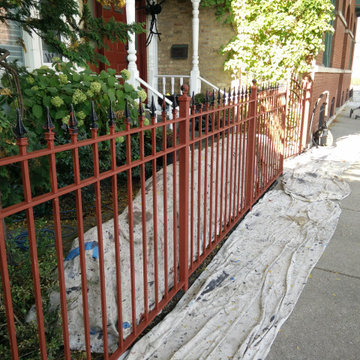
Iron fence painting in Wicker Park is one of the most requested exterior services Windy City Painters performs each season, and this recent project shows exactly why. Set behind an ornate 1890s greystone two-flat, the client's wrought iron fence had endured years of Chicago winters without professional attention. Rust had spread across the pickets, the original black enamel was flaking away in sheets, and the fence's structural hardware had begun to loosen at several joints.
As the trusted local expert for Chicago's North Side and Near West Side, Windy City Painters approached this project the same way we approach every iron fence painting job in Wicker Park: with a methodical, multi-step process designed to outlast Midwest weather rather than simply mask the damage.
The Process, Step by Step
Step 1 — Rust Removal and Surface Preparation. Our crew wire-brushed and mechanically ground every rusted section down to clean, stable metal. For pitted or heavily corroded areas, we applied a chemical rust converter to neutralize corrosion at the molecular level before any coating touched the surface. Furthermore, because this greystone was built well before 1978, Windy City Painters tested the existing paint layers for lead and followed strict containment protocols throughout the removal process.
Step 2 — Spot Repairs. Loose pickets were re-secured, small pits were filled, and hardware at the gate hinges was tightened. In contrast to a quick spray-paint refresh, this stage ensures the fence is structurally sound before a single drop of primer goes on.
Step 3 — Priming. A full coat of rust-inhibiting primer, engineered specifically for ferrous metal, was applied by brush to every surface — with particular attention to welds and joints where moisture tends to collect and restart the corrosion cycle.
Step 4 — Topcoat Application. Two finish coats of industrial-grade, direct-to-metal enamel were applied by brush and roller. This built a durable, uniform barrier in classic gloss black, the most popular finish among Wicker Park's historic properties. Finally, our team inspected every inch of the fence for thin spots or missed sections before calling the job complete.
Project Specs
Surface: Ornamental wrought iron fence, posts, and gate hardware
Products used: Rust-inhibiting DTM primer, chemical rust converter, industrial-grade direct-to-metal enamel
Coats applied: 1 primer coat, 2 finish coats
Finish: Gloss black
Timeline: Completed in under two days
Advice for Wicker Park Homeowners
Before starting a similar iron fence painting project in Wicker Park, homeowners should keep a few things in mind. Notably, never paint directly over active rust — trapped moisture underneath will cause the new coat to fail within a season. Additionally, always ask whether a contractor tests for lead paint on pre-1978 homes, since many Wicker Park greystones fall into that category. Meanwhile, hand brushwork matters: the intricate scrollwork common on Wicker Park ironwork requires careful, detailed application that spray equipment simply cannot replicate. Therefore, hiring a crew experienced specifically in historic Chicago ironwork, like Windy City Painters, makes a measurable difference in the finished result.
Windy City Painters also handles related exterior and interior work for Wicker Park properties, including interior painting, drywall and plaster repair, and additional metal refinishing for porches and railings.
Iron fence painting in Wicker Park protects one of the neighborhood's most defining architectural features while restoring curb appeal instantly. As a result, this greystone now has a fence that matches the quality of the home behind it — and will hold up through many more Chicago winters.
See more of our work and request a free estimate at www.windypainters.com.
Ready to transform your Wicker Park home? Contact Windy City Painters for a free estimate — visit www.windypainters.com today. Proudly serving Wicker Park, West Town, Lincoln Park, Roscoe Village, Lakeview, Ukrainian Village, River North, and all of Chicago.
 Stairworks
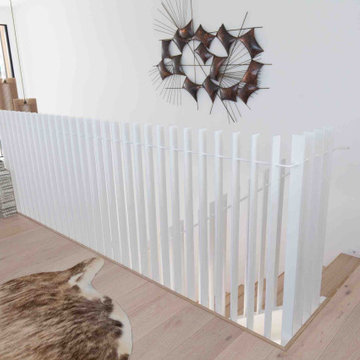
This project is a great example of how the addition of a well-designed and considered balustrade can vastly improve an existing staircase and landing, without the need to replace or damage any of the already in-situ finishes.
The clients already had a firm idea of the aesthetic they wanted and engaged us to come up with a method to achieve it without creating any disruption to an already finished and painted staircase.
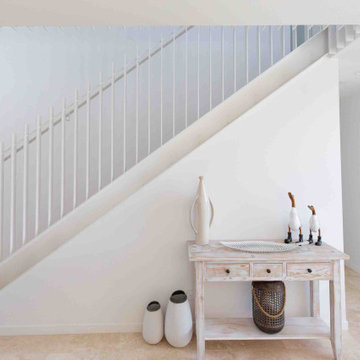
After a detailed survey and studying the structural plans of the building, we were able to fully manufacture and powder-coat everything off-site, and simply bolt on to the existing staircase and landing structure in a single visit. This managed to leave no damage or disruption to the property, meaning no remedial work for our clients after we had finished.
The balustrade itself was manufactured from a mild steel flat bar and welded to a steel channel, which we bolted to the staircase, and a steel angle bracket, which we fixed to the landing. It was all tied together with a continuous thin round steel bar that was drilled through the top of each upright for rigidity, as well as a flat steel handrail to match the uprights. It was then powder-coated matte white to help it blend in with the walls and ceilings.
 Stairworks
This project is a great example of how the addition of a well-designed and considered balustrade can vastly improve an existing staircase and landing, without the need to replace or damage any of the already in-situ finishes.
The clients already had a firm idea of the aesthetic they wanted and engaged us to come up with a method to achieve it without creating any disruption to an already finished and painted staircase.
After a detailed survey and studying the structural plans of the building, we were able to fully manufacture and powder-coat everything off-site, and simply bolt on to the existing staircase and landing structure in a single visit. This managed to leave no damage or disruption to the property, meaning no remedial work for our clients after we had finished.
The balustrade itself was manufactured from a mild steel flat bar and welded to a steel channel, which we bolted to the staircase, and a steel angle bracket, which we fixed to the landing. It was all tied together with a continuous thin round steel bar that was drilled through the top of each upright for rigidity, as well as a flat steel handrail to match the uprights. It was then powder-coated matte white to help it blend in with the walls and ceilings.
 Tile Doctor Ltd
When you discover an old Victorian tiled floor underneath carpet, the first question that will probably pop into your mind is: can it be restored?
The answer, in the majority of cases, is yes. In fact, Tile Doctor has completed hundreds of Victorian tiled floor restorations. Victorian tiles have a timeless quality about them and are still popular for residential use even in the twenty first century.
What you can usually expect upon lifting your carpet is for the tiles to be covered in carpet adhesives and grippers, as was the case with this particular example of a Victorian Tiles hallway floor at a property in Bedford. Sometimes you might also find paint splashes or other staining left over from decoration work. And, of course, the tiles will be dirty and in much need of a deep clean. These issues spoil the original appearance of the tiles, but with the right methods and products, a complete restoration can be achieved quickly and cost-effectively.
My first task upon arriving at the proper was to carry out a site survey to address the condition of the tiles, before running a quick test clean on a small area of the floor. The result was good and so I was confident that I could achieve a high-quality restoration for the client.
A quote was issued and accepted, and the work was booked in at a date that was convenient for the customer.
Returning to the property, my first course of action was to mix a strong dilution of Tile Doctor Pro Clean, which is a powerful alkaline cleaner safe to use on natural stone, with hot water. This cleaning solution was sprayed along all edges of the floor loosen the glue securing the carpet grippers. I then successfully removed the adhesive carefully using handheld tools to avoid damaging any tiles.
Once this was done, I applied Tile Doctor Remove and Go, scrubbing it into the tiles with a rotary machine. This product is designed to remove heavy soiling, paint splashes and old waxes and sealers. The soiled solution was then extracted using a wet vacuum and stubborn areas re-treated until I was satisfied the floor was clean.
The entire floor was then given a thorough rinse with water to remove any trace of cleaning products and extracted using a wet vax machine.
The floor was allowed to dry for several days before I was able to return to seal the tiles. It’s always important to leave significant time for the floor to dry because any moisture left over can impact the performance of the sealer.
The choice of sealer was Tile Doctor Seal and Go Extra, which provides robust protection against dirt and stains, with a light sheen finish. I chose this sealer not only because the customer wanted a light sheen finish, but also because this particular sealer is fully breathable. Dampness can sometimes be an issue with old Victorian and Quarry tiles which were installed before damp proof membranes became standard.
The transformation achieved within the space of a week was quite incredible and the colours in the tile have really come through.
Another satisfied customer!
David Vissian
Bedfordshire Tile Doctor
 Tracstar Tree Experts
24/7 EMERGENCY STORM DAMAGE VIRGINIA BEACH
When you do you’ll be connected with the most highly skilled and promptly responsive arborists on the market today who are available 24/7 to provide emergency tree services in Virginia Beach, such as emergency tree removal in Virginia Beach. Experts quickly, affordably, and safely for all the people and property in the affected area.
Here at Tracstar Tree Experts, our tree service Virginia Beach professionals are serious about making your trees and your home safe no matter what emergency situations arise. It’s why our professionals are trained in quick responses and quick solutions to reduce the damage which can be inflicted by a diseased, fallen, or otherwise severely compromised tree and get you back to a state of safety and satisfaction with your home. If you find yourself with a sudden need for emergency tree services in Virginia Beach then you should absolutely not hesitate to contact the reliable and knowledgeable tree care Virginia Beach specialists at Tracstar Tree Experts. Call (757) 515-6933 as soon as you have a need for emergency tree services in Virginia Beach to receive a free estimate and the Virginia Beach tree care solutions you need to return to your life.
 Barbara Wilson Landscape Architect, LLC
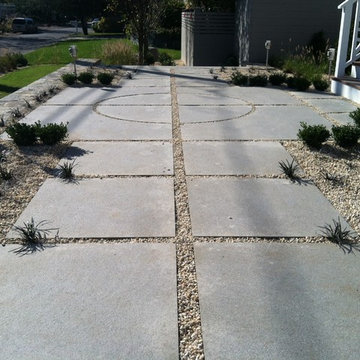
Custom granite walk and circular pattern for the landing to the front door. Gravel mulch used between the stones and as mulch for the adjacent planting beds. Photo taken by Barbara Wilson, RLA
A small residential, seaside property located on Saugatuck Island in Wesport was rebuilt after devastating damage by a hurricane. All that remained from the original property was the pool and pool terrace. The house was raised approximately 5 feet to meet new FEMA codes and rebuilt under the design team of the owner, a well-known interior designer. Barbara was part of the landscape architectural team that helped create a sense of place for the new house. The landscape design included the addition of new walls and steps to the front door, new custom fencing surrounding the pool, an outdoor shower, landscape lighting, a custom fountain in the back yard, a sandbox (used as a relief area for the dog) and all new plantings. She coordinating obtaining bids and then supervised installation of the project.
 Progressive Design Build
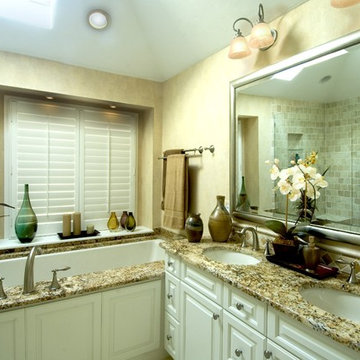
This Bonita Springs home, nestled in the golf course community of Bonita Bay, had never been renovated and lacked sufficient space to accommodate these homeowners’ needs. Working initially with preliminary drawings provided by their daughter who is a licensed architect, Progressive Design Build helped the homeowners establish a preliminary budget and set a construction schedule. Once the couple knew what they wanted and had a design brief in hand, they set about creating a new, traditional and functional room addition. Progressive Design Build teamed up with the architect to produce a final set of working drawings.
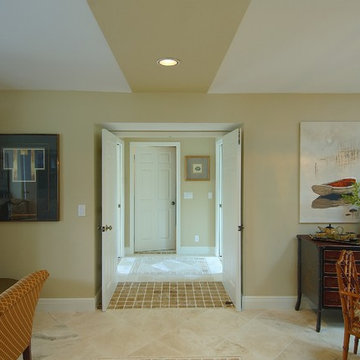
The house addition consisted of a new master bedroom and master bathroom with vaulted ceilings, built-in cabinetry, and porcelain tile floors. To improve indoor/outdoor flow, Progressive Deign Build also renovated the homeowner’s pool deck.
Upon project completion, this project received top honors for remodeling excellence from the National Association of the Remodeling Industry (NARI), receiving a Contractor of the Year (CotY) award.
One of the major challenges, other than a very limited lot size, was the threat of a massive hurricane during construction. Construction had to cease for over a week to ensure that there was no damage to the home, property or adjacent properties. Due to the inclement weather situations, the project went two weeks over the estimated time frame.
Since completion, Progressive Design Build designed and built two other remodeling projects for this southwest Florida homeowner.
 Progressive Design Build
This Bonita Springs home, nestled in the golf course community of Bonita Bay, had never been renovated and lacked sufficient space to accommodate these homeowners’ needs. Working initially with preliminary drawings provided by their daughter who is a licensed architect, Progressive Design Build helped the homeowners establish a preliminary budget and set a construction schedule. Once the couple knew what they wanted and had a design brief in hand, they set about creating a new, traditional and functional room addition. Progressive Design Build teamed up with the architect to produce a final set of working drawings.
The house addition consisted of a new master bedroom and master bathroom with vaulted ceilings, built-in cabinetry, and porcelain tile floors. To improve indoor/outdoor flow, Progressive Deign Build also renovated the homeowner’s pool deck.
Upon project completion, this project received top honors for remodeling excellence from the National Association of the Remodeling Industry (NARI), receiving a Contractor of the Year (CotY) award.
One of the major challenges, other than a very limited lot size, was the threat of a massive hurricane during construction. Construction had to cease for over a week to ensure that there was no damage to the home, property or adjacent properties. Due to the inclement weather situations, the project went two weeks over the estimated time frame.
Since completion, Progressive Design Build designed and built two other remodeling projects for this southwest Florida homeowner.
 Connor Tree Service, LLC
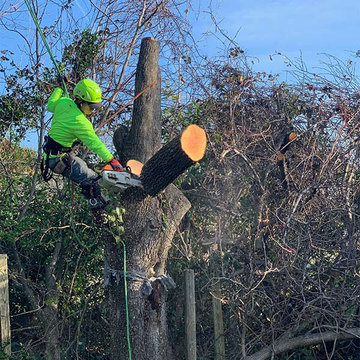
A hurricane is a powerful and destructive force of nature. It can cause a lot of damage to trees, homes, and other property. If you live in an area that is prone to hurricanes, it is important to take steps to protect your property ahead of time.
 Barbara Wilson Landscape Architect, LLC
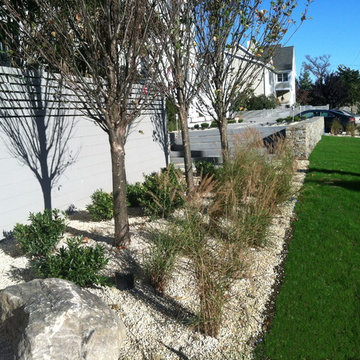
Salt tolerant plantings with minimal lawn in the front yard. Photo taken by Barbara Wilson, RLA
A small residential, seaside property located on Saugatuck Island in Wesport was rebuilt after devastating damage by a hurricane. All that remained from the original property was the pool and pool terrace. The house was raised approximately 5 feet to meet new FEMA codes and rebuilt under the design team of the owner, a well-known interior designer. Barbara was part of the landscape architectural team that helped create a sense of place for the new house. The landscape design included the addition of new walls and steps to the front door, new custom fencing surrounding the pool, an outdoor shower, landscape lighting, a custom fountain in the back yard, a sandbox (used as a relief area for the dog) and all new plantings. She coordinating obtaining bids and then supervised installation of the project.
 Tile Doctor Ltd
When used to clean natural stone, supermarket products can often cause more harm than good as this recent customer of mine discovered this the hard way!
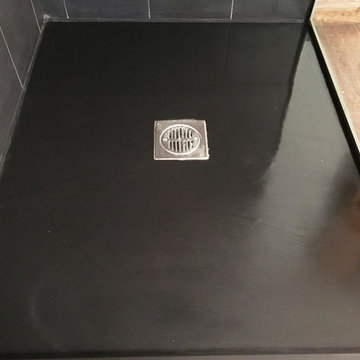
Originally from South Africa, she had lived in a flat in Clapham for a couple of years, but had to suddenly return home earlier than expected. However, part of her flat rental agreement required her to leave the property clean and as she found it, including the fantastic Slate shower cubicle.
In a rush, the customer had attempted to clean the Slate using a popular supermarket bathroom cleaner. She left the product to sit on the base of the shower before scrubbing it in with an abrasive pan scourer.
This was a big mistake – and the customer called me in a panic after discovering that her attempts had left the Slate severely stained. I traveled to the property to see what could be done to set the situation straight.
Upon observing the damage in person, I decided that the best course of action would be to use a process known as burnishing to grind away the stains. I tested a small area of the cubicle with one of our handheld diamond encrusted burnishing blocks.
Happy with the results of the test Clean, I started to burnish the whole cubicle using our system of four burnishing blocks, starting with the coarsest first and working my way down to the finest. A small amount of water was used as lubrication for each pad.
Through the burnishing process, the white stains started to disappear, exposing the lighter grey coloured Slate shower base.
After drying the area completely with a heat gun, I was able to seal the stone with two coats of Tile Doctor Colour Grow.
This impregnating sealer not only protects the stone but also importantly it restores the natural dark shades in the Slate, enhancing its overall appearance. As an impregnating sealer, Colour Grow penetrates the pores in the stone to fill them and prevent trapped dirt.
To say the customer was very relieved would be a complete understatement! By hiring in professional assistance, the customer was able to resolve the situation quickly and painlessly – and more importantly hold onto her £3,000 deposit!
Rupert Mcleod
West Surrey Tile Doctor
16