
Search results for "Property discussion" in Home Design Ideas
 Griffith Indoor & Outdoor Living
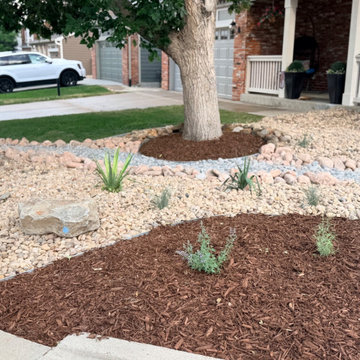
This Highlands Ranch xeriscape transformation replaced struggling front-yard sod with a water-wise landscape designed for the property’s challenging Colorado conditions. Located on a highly exposed corner lot near open space, the yard faced intense sun, strong winds and recurring bare areas where traditional turf was difficult to maintain. Griffith Designs created a more resilient solution that improves curb appeal while reducing dependence on water-intensive grass.
The mature ash tree was carefully preserved and incorporated as an established focal point. After removing the failing sod, new landscape edging was installed to define the redesigned beds. A decorative dry stream built with specialty rock, a defined stone border and large landscape boulders adds natural structure, visual movement and year-round interest.
Native and drought-tolerant shrubs, perennials and ornamental grasses provide seasonal color, texture and movement, while architectural yucca gives the landscape a distinctive Colorado character. The irrigation system was adjusted to support the new water-wise plantings and protect the long-term health of the existing ash tree.
Griffith Designs also prepared the landscape design and HOA submittal package, helping guide the project through review and approval. Although the expanded scope exceeded the original target budget, the options and costs were discussed in advance and approved by the homeowner. The completed front-yard renovation delivers a polished, HOA-compliant xeriscape that is better suited to the site and easier to maintain.
 Tile Doctor Ltd
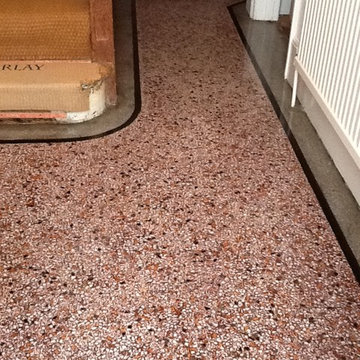
This Terrazzo tiled hallway at a property in Northampton was in a really bad state. It was heavily soiled and suffered from glue marks where the original carpet covering it had been removed. Additionally, there was some damage to the edges of the doorway, and a large crack in the floor running across the width of the hallway.
Terrazzo is an interesting material, originally produced in Italy, that consists mainly of concrete with segments of marble and other stone interspersed and held together with a resin. Since Terrazzo is formed in this way, I explained to the customer that I would fill the crack along the floor and the small holes around the edges with concrete, before then using tile paint to match in the colours as best as possible. This would be the most cost-effective solution, which was ideal since the customer had a limited budget for the repairs.
Before beginning the restoration, I tested a small area using a diamond encrusted burnishing pad, thereby giving the customer an indication of the type of results that could be achieved. With the customer pleased by the results, the job was booked in for the following week.
To begin, Tile Doctor Remove & Go was applied to the floor and was left to dwell for ten minutes to soften the carpet glue and break down any old sealer. This was then scrubbed in to the tiles with a pad fitted to a rotary machine. To remove the remaining residue and marks in the particularly stubborn areas, I used a manual hand scraper. The entire floor was then wet vaxed to soak up the soiled cleaner and leave the area clean for burnishing.
This was followed by the use of Tile Doctor diamond encrusted burnishing pads to polish the tiles, starting with a coarse grit pad, followed by wet vaxing and repeating the process with a medium grit pad and finally the fine grit pad to achieve the desired effect. I then installed a turbo dryer to dry the floor.
I returned to the property once the floor was dry and carried out the repairs which had been discussed earlier with the customer (filling the holes and cracks in the floor with concrete), cleaning off any concrete residue before I finished for the day.
Upon my return to the property the next day, I refined the polish on the floor even further by applying the extra fine grit burnishing pad.
To finish off the three day restoration, I sealed the Terrazzo tiles using two coats of Tile Doctor Colour Grow sealer. As an impregnating sealer, Colour Grow soaks into the pores of the stone, protecting it from ingrained dirt. Colour Grow also contains colour intensifying properties, allowing it to enhance the naturally occurring shades in the stone, and therefore stopping it from appearing dull.
This floor certainly was in a bad state, with damage as well as dirt to deal with, but I’m pleased to say that the work went a long way in transforming its appearance, leaving a very happy customer.
Phil Vissian
Northamptonshire Tile Doctor


Find the right local pro for your project

 Byggmeister Inc
Photo by Mike Casey
Cramped, uncomfortable, and out of date: when the owners of this home approached us about renovating their kitchen and adjoining sunroom, these were high on their list of complaints.
OPENING UP THE KITCHEN
Our plan kept the kitchen in the same location but took down the walls between both the dining room and the sunroom to create an expansive multi-purpose space with spectacular views to conservation land along the back of the property. We removed the powder room and in its place created a window-lined hallway to the living room—opening up direct access between these two previously disconnected spaces. We then built a new half bath between these two rooms, with a door along the back hallway. The result is a more private powder room that is easier to access than before.
Significantly improved cabinetry provides ample storage for both human and canine needs. An island countertop is functional and pleasant, enabling the owners to prep for and clean up from dinner all while enjoying the view of the woods behind their house.
CREATING COMFORT
We also completely rebuilt the sunroom, thickening the framing to allow for extra insulation and raising the roof to accommodate a higher ceiling and tall windows that let in as much natural light as the skylights they replaced, but much less of the solar gain that had made the room so intolerable in the summer.
We improved visual connections between spaces and admitted more natural light by converting the framing of the main stairway from full to half walls. We also insulated the attic and replaced an aging, inefficient central air conditioning system with ductless minisplit heat pumps, which can also be used as supplemental heat.
All in all, this was our kind of project: we made the home more attractive, more comfortable, and more energy-efficient—all over the course of a single, well-integrated project.

 Michael Nash Design, Build & Homes
2013 NARI CAPITAL COTY, MERIT AWARD WINNER, RESIDENTIAL EXTERIOR
A family of five living in a Chantilly, Virginia, neighborhood with a lot of improvement going on decided to do a project of their own. An active family, they decided their old deck was ragged, beat up and needed revamping.
After discussing their needs, the design team at Michael Nash Design, Build & Homes developed a plan for a covered porch and a wrap-around upscale deck. Traffic flow and multiple entrances were important, as was a place for the kids to leave their muddy shoes.
A double staircase leading the deck into the large backyard provides a panoramic view of the parkland behind the property. A side staircase lets the kids come into the covered porch and mudroom prior to entering the main house.
The covered porch touts large colonial style columns, a beaded cedar (stained) ceiling, recess lighting, ceiling fans and a large television with outdoor surround sound.
The deck touts synthetic railing and stained grade decking and offers extended living space just outside of the kitchen and family room, as well as a grill space and outdoor patio seating.
This new outdoor facility has become the jewel of their neighborhood and now the family can enjoy their backyard activities more than ever.
 Michael Nash Design, Build & Homes
2013 NARI CAPITAL COTY, MERIT AWARD WINNER, RESIDENTIAL EXTERIOR
A family of five living in a Chantilly, Virginia, neighborhood with a lot of improvement going on decided to do a project of their own. An active family, they decided their old deck was ragged, beat up and needed revamping.
After discussing their needs, the design team at Michael Nash Design, Build & Homes developed a plan for a covered porch and a wrap-around upscale deck. Traffic flow and multiple entrances were important, as was a place for the kids to leave their muddy shoes.
A double staircase leading the deck into the large backyard provides a panoramic view of the parkland behind the property. A side staircase lets the kids come into the covered porch and mudroom prior to entering the main house.
The covered porch touts large colonial style columns, a beaded cedar (stained) ceiling, recess lighting, ceiling fans and a large television with outdoor surround sound.
The deck touts synthetic railing and stained grade decking and offers extended living space just outside of the kitchen and family room, as well as a grill space and an outdoor patio seating.
This new outdoor facility has become the jewel of their neighborhood and now the family can enjoy their backyard activities more than ever.
 Michael Nash Design, Build & Homes
2013 NARI CAPITAL COTY, MERIT AWARD WINNER, RESIDENTIAL EXTERIOR
A family of five living in a Chantilly, Virginia, neighborhood with a lot of improvement going on decided to do a project of their own. An active family, they decided their old deck was ragged, beat up and needed revamping.
After discussing their needs, the design team at Michael Nash Design, Build & Homes developed a plan for a covered porch and a wrap-around upscale deck. Traffic flow and multiple entrances were important, as was a place for the kids to leave their muddy shoes.
A double staircase leading the deck into the large backyard provides a panoramic view of the parkland behind the property. A side staircase lets the kids come into the covered porch and mudroom prior to entering the main house.
The covered porch touts large colonial style columns, a beaded cedar (stained) ceiling, recess lighting, ceiling fans and a large television with outdoor surround sound.
The deck touts synthetic railing and stained grade decking and offers extended living space just outside of the kitchen and family room, as well as a grill space and outdoor patio seating.
This new outdoor facility has become the jewel of their neighborhood and now the family can enjoy their backyard activities more than ever.
Sponsored
Delaware, OH

Buckeye Basements, Inc.
Central Ohio's Basement Finishing ExpertsBest Of Houzz '13-'21

 NatureRails LLC
Traditional landscape and sea life designs, local to Turks and Caicos Islands, create the railing design sections (up to 13 feet in length) for areas used in between planters around the property of this lovely home.
Durable, heavy gauge aluminum railing sections, as well as several pedestrian gates, were fabricated with sea & bird life of the local area.
All to 4" code, aluminum materials provide a long lasting and durable product that puts spindles to shame. Finally--a railing that compliments the natural landscape, rather than deterring from it. Railing and gates shown with primer and penny vein powder coat finish.
The exterior railings are dipped in an acid wash bath with a rust inhibitor, powder coated with a layer of primer, and powder coated again with the customer's choice of powder coat colors. This gate is very low maintenance and will always look amazing. No painting ever!
What can we design for you? Call 888-743-2325 or visit our website and fill out our contact form to get a free quote or discuss your project. www.NatureRails.com
 Narofsky Architecture + ways2design
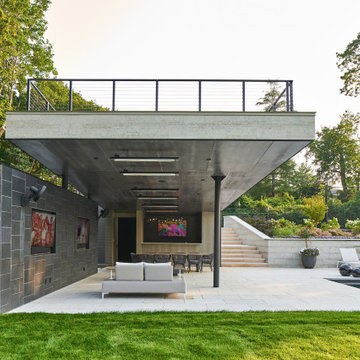
The client for this project called upon us to design a Pagoda” style cabana in their rear yard that
would coordinate with a landscape design (pool, patios, tennis court) prepared by a contractor.
During that meeting we discussed the idea of a cohesive design approach to integrate the various
elements of the backyard.
The plan that we arrived at takes advantage of the client's large backyard space and elevated
topography to weave together the pool/hot tub, cabana space, and tennis court. While walking the
higher terrain we discovered there was a view towards the Long Island Sound, this influenced the
sectional design of the building which now incorporated a walk on (from the elevated tennis court)
green roof, sitting area, and fire pit.
The inside portion of the cabana has a lounge tv area, bath/changing room and a bar that services
the covered outdoor seating. Along with this, there is also a storage room for all the pool accessories
and in the winter, the outdoor furniture.
The covered portion is framed by a free-floating wall which houses outdoor tv’s and serves to block
the view to a neighboring property, and therefore, creates secluded setting. Heaters are set in the
ceiling to extend the use of the space beyond the summer season.
The pool area level was created through a retaining waterfall wall, which is clad with all stones
matching that of the patio.
An allée of trees is aligned with the cabana orientation to emphasis and frame the water view. Other
landscape areas were kept low and filled with mass planting to integrate with the angular geometry
of the overall composition.

 User
Home Outside offers garden design services ranging from a half-hour consultation to a detailed planting plan with illustrative 3D renderings.
Perhaps you need suggestions for plants for a specific area of your garden where nothing has thrived. Or you want to add native plantings to help pollinators and wildlife. Or you need help creating beautiful arrangements in your planting containers. Get a 30- or 60-minute Garden Design Session with a friendly and skilled Home Outside designer who has experience in your planting zone, and get those questions answered!
Or maybe you want a detailed planting plan for your front yard, backyard, or entire property. You'd start with a Garden Design Session to share photos of your space and discuss your goals with a Home Outside designer. We'll give you suggestions, then follow up with a quote for the plans, images, and renderings that will give you the result you want for your budget.
Whether you're an experienced gardener who wants some fresh ideas, or you want a low-maintenance planting design that lets you and your family enjoy your outdoor space without too much fuss, Home Outside can help. Book your Garden Design Session to get started, and feel free to email hello@homeoutside.com with any questions.

 RBL Architects
The owners were downsizing from a large ornate property down the street and were seeking a number of goals. Single story living, modern and open floor plan, comfortable working kitchen, spaces to house their collection of artwork, low maintenance and a strong connection between the interior and the landscape. Working with a long narrow lot adjacent to conservation land, the main living space (16 foot ceiling height at its peak) opens with folding glass doors to a large screen porch that looks out on a courtyard and the adjacent wooded landscape. This gives the home the perception that it is on a much larger lot and provides a great deal of privacy. The transition from the entry to the core of the home provides a natural gallery in which to display artwork and sculpture. Artificial light almost never needs to be turned on during daytime hours and the substantial peaked roof over the main living space is oriented to allow for solar panels not visible from the street or yard.
 Tile Doctor Ltd
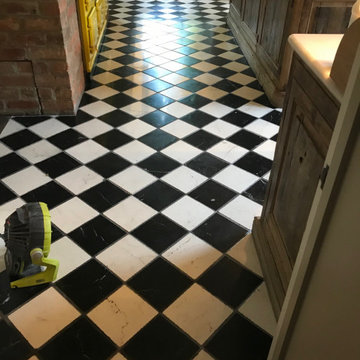
The tiles shown in the photographs below are classic distressed Black and White Italian Marble installed in the kitchen of a property in Bamber Bridge which is South of Preston. Some of the tiles had an issue with loose grout which I suspect was due to the suspended wooden floor and a small amount of movement had resulted in the grout cracking.
Ideally more support would be needed under the floor to prevent this, in the meantime however I recommended removing the grout and replacing with a flexible grout product that could cope with the movement. The tiles also needed a clean, polish and reseal so it made sense to address the issue with the grout as part of the work.
Working as a two-man team we started by cleaning the floor with a set of diamond burnishing pads starting with a coarse 400-grit, followed by 800 and 1500 grit. Water was used to lubricate the process and the floor was rinsed with water between pads with the fine slurry generated by the process extracted using a wet vacuum. These pads remove ingrained dirt and then slowly refine the appearance of the Marble building up its polished appearance in the process.
The next step was to rake out all the grout which as discussed was compromised and needed replacing. We had to be very careful when removing the grout due to the electric heating mat under the floor, any damage to that would require ripping the floor up. With the old grout removed and the floor cleaned the floor was then grouted using Mapei Ultra-colour which is a flexible and fully waterproof grout more than suitable for this situation.
Between us we managed to pack a lot into day one which was tough, however with the hardest tasks out of the way day two should be a lot easier.
Day two started with an initial clean making sure to remove any excess grout smeared on the surface that can affect the look of the tile if not removed. This was followed by the application of the last of the set of burnishing pads which is a 3,000-grit pad that really brings up the polish on the marble. You only need a small amount of water sprayed onto the floor when applying this last pad so by late morning the floor was dry and ready for sealing. The customer wanted a better sheen appearance than they previously had, fortunately we find the Diamond burnishing pads do this well, they also tighten up the pores of the stone as well which means less sealer is needed.
The floor was then sealed with Tile Doctor Colour Grow which is an impregnating sealer that improves colour and soaks into the stone occupying the pores and thereby preventing dirt from becoming ingrained. Once complete the floor looked great and the client was very happy.
Sealers and Polish do wear down with use over time so before leaving I discussed our annual maintenance plan option which will ensure the appearance of the Marble floor always looks good. The plan involves returning once a year to further polish the floor with a high-grade burnishing pad and to add more sealer if required. We also discussed the use of Tile Doctor Stone Soap for regular cleaning, it is a pH neutral cleaner which is ideal for stone floors like Marble which are acid sensitive.
Russell Taylor
Lancashire Tile Doctor
 User
Project Spotlight: Hillside Stone Steps
January 25, 2015
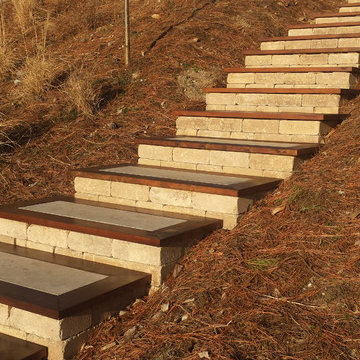
Affordable Hardscapes of Virginia - (Virginia Beach, VA) Our client had recently constructed a new custom waterfront home in Virginia Beach, VA. The homes main property is elevated almost 30' above the water, boat lift and dock. The natural hillside leading from backyard is steep, experiencing erosion, and difficult to trek up and down. To access the main property from the dock you would need to climb the steep embankment and to get to the dock below it was a definite test of will. After meeting the client to discuss options it was clear to us that a innovative blend of science and art would be needed to achieve their goals and expectations.
Affordable Hardscapes of Virginia submitted an initial design utilizing Eagle Bay's Dublin wall stone as the primary material to construct the 18 individual steps necessary. At the clients request to utilize material left over from the homes construction (2" thick limestone) and incorporate wood to match homes elements the final design was approved. Planning for the project included submittals and approvals by way of a Joint Permit Application administered by the Virginia Marine Resources Commission (VMRC).
Do to access limitations and the desire to have minimal environmental impact all excavation and installation was done using only hand tools. Each of the (18) steps was individually built in place on solid footings with subsurface drainage. The steps risers are built with 12" x 8" x 4" (tall) Eagle Bay Dublin Freestanding Wall block in Tan. The limestone step treads are from recycled material left over from the construction of the new home. The wood used to frame around the limestone treads is clear Spanish Cedar cut and planned to 2" x 6".
Sponsored
Fredericksburg, OH

High Point Cabinets
Columbus' Experienced Custom Cabinet Builder | 4x Best of Houzz Winner
 Michael Nash Design, Build & Homes
2013 NARI CAPITAL COTY, MERIT AWARD WINNER, RESIDENTIAL EXTERIOR
A family of five living in a Chantilly, Virginia, neighborhood with a lot of improvement going on decided to do a project of their own. An active family, they decided their old deck was ragged, beat up and needed revamping.
After discussing their needs, the design team at Michael Nash Design, Build & Homes developed a plan for a covered porch and a wrap-around upscale deck. Traffic flow and multiple entrances were important, as was a place for the kids to leave their muddy shoes.
A double staircase leading the deck into the large backyard provides a panoramic view of the parkland behind the property. A side staircase lets the kids come into the covered porch and mudroom prior to entering the main house.
The covered porch touts large colonial style columns, a beaded cedar (stained) ceiling, recess lighting, ceiling fans and a large television with outdoor surround sound.
The deck touts synthetic railing and stained grade decking and offers extended living space just outside of the kitchen and family room, as well as a grill space and outdoor patio seating.
This new outdoor facility has become the jewel of their neighborhood and now the family can enjoy their backyard activities more than ever.

 Klopf Architecture
, Arterra Landscape Architects and Henry Calvert of Calvert Ventures Designed and built a new warm, modern, Eichler-inspired, open, indoor-outdoor home on a deeper-than-usual San Mateo Highlands property where an original Eichler house had burned to the ground.
The owners wanted multi-generational living and larger spaces than the original home offered, but all parties agreed that the house should respect the neighborhood and blend in stylistically with the other Eichlers. At first the Klopf team considered re-using what little was left of the original home and expanding on it. But after discussions with the owner and builder, all parties agreed that the last few remaining elements of the house were not practical to re-use, so Klopf Architecture designed a new home that pushes the Eichler approach in new directions.
One disadvantage of Eichler production homes is that the house designs were not optimized for each specific lot. A new custom home offered the team a chance to start over. In this case, a longer house that opens up sideways to the south fit the lot better than the original square-ish house that used to open to the rear (west). Accordingly, the Klopf team designed an L-shaped “bar” house with a large glass wall with large sliding glass doors that faces sideways instead of to the rear like a typical Eichler. This glass wall opens to a pool and landscaped yard designed by Arterra Landscape Architects.
Driving by the house, one might assume at first glance it is an Eichler because of the horizontality, the overhanging flat roof eaves, the dark gray vertical siding, and orange solid panel front door, but the house is designed for the 21st Century and is not meant to be a “Likeler.” You won't see any posts and beams in this home. Instead, the ceiling decking is a western red cedar that covers over all the beams. Like Eichlers, this cedar runs continuously from inside to out, enhancing the indoor / outdoor feeling of the house, but unlike Eichlers it conceals a cavity for lighting, wiring, and insulation. Ceilings are higher, rooms are larger and more open, the master bathroom is light-filled and more generous, with a separate tub and shower and a separate toilet compartment, and there is plenty of storage. The garage even easily fits two of today's vehicles with room to spare.
A massive 49-foot by 12-foot wall of glass and the continuity of materials from inside to outside enhance the inside-outside living concept, so the owners and their guests can flow freely from house to pool deck to BBQ to pool and back.
During construction in the rough framing stage, Klopf thought the front of the house appeared too tall even though the house had looked right in the design renderings (probably because the house is uphill from the street). So Klopf Architecture paid the framer to change the roofline from how we had designed it to be lower along the front, allowing the home to blend in better with the neighborhood. One project goal was for people driving up the street to pass the home without immediately noticing there is an "imposter" on this lot, and making that change was essential to achieve that goal.
This 2,606 square foot, 3 bedroom, 3 bathroom Eichler-inspired new house is located in San Mateo in the heart of the Silicon Valley.
Klopf Architecture Project Team: John Klopf, AIA, Klara Kevane
Landscape Architect: Arterra Landscape Architects
Contractor: Henry Calvert of Calvert Ventures
Photography ©2016 Mariko Reed
Location: San Mateo, CA
Year completed: 2016
 Michael Nash Design, Build & Homes
2013 NARI CAPITAL COTY, MERIT AWARD WINNER, RESIDENTIAL EXTERIOR
A family of five living in a Chantilly, Virginia, neighborhood with a lot of improvement going on decided to do a project of their own. An active family, they decided their old deck was ragged, beat up and needed revamping.
After discussing their needs, the design team at Michael Nash Design, Build & Homes developed a plan for a covered porch and a wrap-around upscale deck. Traffic flow and multiple entrances were important, as was a place for the kids to leave their muddy shoes.
A double staircase leading the deck into the large backyard provides a panoramic view of the parkland behind the property. A side staircase lets the kids come into the covered porch and mudroom prior to entering the main house.
The covered porch touts large colonial style columns, a beaded cedar (stained) ceiling, recess lighting, ceiling fans and a large television with outdoor surround sound.
The deck touts synthetic railing and stained grade decking and offers extended living space just outside of the kitchen and family room, as well as a grill space and outdoor patio seating.
This new outdoor facility has become the jewel of their neighborhood and now the family can enjoy their backyard activities more than ever.
 User
Affordable Hardscapes of Virginia - (Virginia Beach, VA) Our client had recently constructed a new custom waterfront home in Virginia Beach, VA. The homes main property is elevated almost 30' above the water, boat lift and dock. The natural hillside leading from backyard is steep, experiencing erosion, and difficult to trek up and down. To access the main property from the dock you would need to climb the steep embankment and to get to the dock below it was a definite test of will. After meeting the client to discuss options it was clear to us that a innovative blend of science and art would be needed to achieve their goals and expectations.
Affordable Hardscapes of Virginia submitted an initial design utilizing Eagle Bay's Dublin wall stone as the primary material to construct the 18 individual steps necessary. At the clients request to utilize material left over from the homes construction (2" thick limestone) and incorporate wood to match homes elements the final design was approved. Planning for the project included submittals and approvals by way of a Joint Permit Application administered by the Virginia Marine Resources Commission (VMRC).
Do to access limitations and the desire to have minimal environmental impact all excavation and installation was done using only hand tools. Each of the (18) steps was individually built in place on solid footings with subsurface drainage. The steps risers are built with 12" x 8" x 4" (tall) Eagle Bay Dublin Freestanding Wall block in Tan. The limestone step treads are from recycled material left over from the construction of the new home. The wood used to frame around the limestone treads is clear Spanish Cedar cut and planned to 2" x 6". Click Hillside Stone Steps to view additional project photos.
 Klopf Architecture
, Arterra Landscape Architects and Henry Calvert of Calvert Ventures Designed and built a new warm, modern, Eichler-inspired, open, indoor-outdoor home on a deeper-than-usual San Mateo Highlands property where an original Eichler house had burned to the ground.
The owners wanted multi-generational living and larger spaces than the original home offered, but all parties agreed that the house should respect the neighborhood and blend in stylistically with the other Eichlers. At first the Klopf team considered re-using what little was left of the original home and expanding on it. But after discussions with the owner and builder, all parties agreed that the last few remaining elements of the house were not practical to re-use, so Klopf Architecture designed a new home that pushes the Eichler approach in new directions.
One disadvantage of Eichler production homes is that the house designs were not optimized for each specific lot. A new custom home offered the team a chance to start over. In this case, a longer house that opens up sideways to the south fit the lot better than the original square-ish house that used to open to the rear (west). Accordingly, the Klopf team designed an L-shaped “bar” house with a large glass wall with large sliding glass doors that faces sideways instead of to the rear like a typical Eichler. This glass wall opens to a pool and landscaped yard designed by Arterra Landscape Architects.
Driving by the house, one might assume at first glance it is an Eichler because of the horizontality, the overhanging flat roof eaves, the dark gray vertical siding, and orange solid panel front door, but the house is designed for the 21st Century and is not meant to be a “Likeler.” You won't see any posts and beams in this home. Instead, the ceiling decking is a western red cedar that covers over all the beams. Like Eichlers, this cedar runs continuously from inside to out, enhancing the indoor / outdoor feeling of the house, but unlike Eichlers it conceals a cavity for lighting, wiring, and insulation. Ceilings are higher, rooms are larger and more open, the master bathroom is light-filled and more generous, with a separate tub and shower and a separate toilet compartment, and there is plenty of storage. The garage even easily fits two of today's vehicles with room to spare.
A massive 49-foot by 12-foot wall of glass and the continuity of materials from inside to outside enhance the inside-outside living concept, so the owners and their guests can flow freely from house to pool deck to BBQ to pool and back.
During construction in the rough framing stage, Klopf thought the front of the house appeared too tall even though the house had looked right in the design renderings (probably because the house is uphill from the street). So Klopf Architecture paid the framer to change the roofline from how we had designed it to be lower along the front, allowing the home to blend in better with the neighborhood. One project goal was for people driving up the street to pass the home without immediately noticing there is an "imposter" on this lot, and making that change was essential to achieve that goal.
This 2,606 square foot, 3 bedroom, 3 bathroom Eichler-inspired new house is located in San Mateo in the heart of the Silicon Valley.
Klopf Architecture Project Team: John Klopf, AIA, Klara Kevane
Landscape Architect: Arterra Landscape Architects
Contractor: Henry Calvert of Calvert Ventures
Photography ©2016 Mariko Reed
Location: San Mateo, CA
Year completed: 2016

 Equine Facility Design
On a challenging sloped 10 acre property, Equine Facility Design provided building and site design for a private stable. The stable consists of four stalls with runs, wash/groom stall, office/feed room, and attached two bay garage. A raised center aisle and double sided glazed clerestory provide natural light and ventilation to the building. Located just steps away from the existing residence, views of the horses looking out their stalls and in their runs can be seen from many of family’s rooms.
 Tile Doctor Ltd
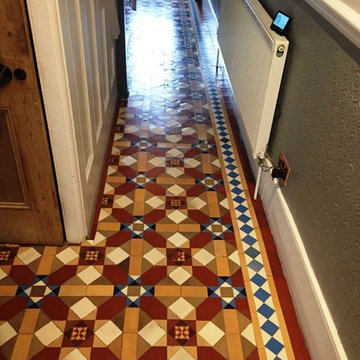
This detailed Victorian tiled hallway at a property in Camden was overdue some much-needed repair and maintenance. The owners of the property appreciated that original period features like this add a lot of value to a property and asked me to visit the property to quote for renovating it. The property was in a terrace of similar properties most of which appeared to have retained their Victorian character.
I inspected the floor and found there were a couple of loose, cracked, worn and broken tiles that needed to be replaced. In addition, the floor tiles needed a deep clean and then seal to bring back the wow factor. I was confident we could renovate the floor but at that point unsure if we would be able to find exact match replacements for the damaged tiles. Fortunately, Victorian tiles are still in demand and I knew of several companies I could check with so I was confident they could be found.
We discussed how long the work would take and assuming I could source the replacements agreed a price for the full restoration of the floor. After doing some research I managed to find suitable replacements with a company called Original Style and the work was scheduled for the following month.
Firstly, we prepared all areas with protective tapes to threshold edges and skirting.
This was followed by spaying the tiles with a strong dilution of Tile Doctor Remove & Go which is product designed to remove old sealers and coatings. After about ten minutes the tiles were scrubbed with black scrubbing pads and scrubbing brushes. Fresh water was used to rinse the floor and the slurry was extracted using a wet vacuum.
The floor was inspected and then a second clean carried out, this time using Tile Doctor Pro-Clean which is a Tile and Grout cleaning agent. The same process of application was used and after rinsing and extracting the dirt the tiles were given a steam clean. This ensured all the dirt was lifted out of the pores of the tile and the floor was now as clean as it possible could be.
The next step was the remove the loose and cracked tiles using the reclaimed tiles we had sourced earlier. Some cuts were necessary to get the replacements to match the originals but overall the plan worked. A quick drying adhesive was used to secure the tiles so we could apply the grout shortly after. The whole floor was then re-grouted and cleaned off to ensure a good match. The floor was left to dry off overnight, and you could already see it was now looking considerably improved.
Returning the next morning we checked the floor was dry using a moisture meter, this is important as to apply a sealer to damp tiles will lead to a patchy experience. All was well so we were ready to apply the sealer.
To start a single base coat of Tile Doctor Colour Grow sealer was applied to the floor and left to dry. This sealer is an impregnator that protects from within by occupying the pores in the clay tile improving colour in the process. This sealer does leave a matt finish however and the client wanted a subtle shine so one dry it was followed by four coats of Tile Doctor Seal & Go. The combination of the two sealers works really well to add long lasting protection to the tiles and provide the desired finish to the floor.
The floor was much improved, and the client was delighted. The detailed pattern and colours were now much more prominent, and the hallway looked much more inviting for both the owner and their guests. For the aftercare of Victorian tiles, I recommended the use of Tile Doctor Neutral Cleaner which is pH neutral and won’t prematurely erode the life of the sealer.
Nigel Voyce
North London Tile Doctor
17