
Search results for "Property discussion" in Home Design Ideas
 Tile Doctor Ltd
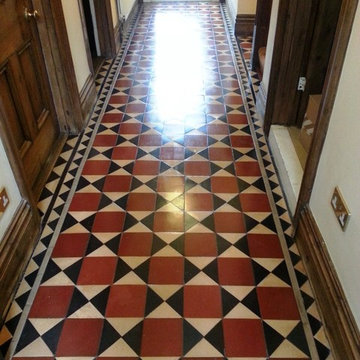
Recently I was contacted by a man in the town of Bedford who was worried that he had damaged his Victorian tiled hallway as a result of dragging a piano across the floor. I went round to the property to get a better look at the problem and, on closer inspection, realised that the tiles were actually fine; however, the piano had torn through the old surface seal.
The 150-year old tiles, dating back – as the name suggests – to the reign of Queen Victoria, had been poorly sealed and additionally had not been maintained correctly with the appropriate cleaning products. I was commissioned to remove the old sealer, clean and re-seal in order to restore this fantastic floor to its former glory.
My first task was to mix a solution of Tile Doctor Pro-Clean and water, which was then spread across the floor. Pro-Clean is a high alkaline cleaner which also contains stripping properties and this helped to break down the old, damaged sealer. The solution was left to dwell for approximately 20 minutes, giving it time to seep into the stone to get underneath, and lift out, any ingrained dirt. Pro-Clean was worked into the tiles using a heavy low speed rotary machine fitted with a black pad.
Once cleaned and stripped, we rinsed the floor using plain, clean water to neutralise the high alkaline Pro-Clean and the removed the resulting slurry using a wet-vac machine.
At this point I noticed that the white/magnolia tiles were particularly well worn and still very dirty and in need of further cleaning. Around this time Tile Doctor had also been discussing the successful use of Burnishing Pads (normally used on polished stone) on Victorian Tiles so I hand burnished the most stained tiles with a small 6 inch diamond encrusted burnishing pad with a little water to help lubricate the process. Following this, I rinsed the entire floor once again.
After leaving the floor to dry for four days, I returned to the house to seal the tiles opting to apply a single coat of Tile Doctor Colour Grow impregnating sealer first followed up with four coats of Tile Doctor Seal & Go. This combination of sealers provides a durable internal and surface stain protection whilst lifting the colours and adding a nice subtle sheen finish.
Once dried and cured, the floor was buffed using micro-fibre clothes to further enhance the appearance of the tiles further. My client was very pleased with the results, and couldn’t believe it was possible to get a floor that was so old appear brand new! The floor will dull with wear so I advised my client on the benefits of a regular maintenance plan going forward to ensure this great flooring feature remains in top condition.
Andrew Evans
Bedfordshire Tile Doctor

 Moderne Builders
Gorgeous master bath with dramatic retro "wave" tile. Peak Photography
Example of a 1950s bathroom design in Los Angeles
Example of a 1950s bathroom design in Los Angeles
 Qudsia Fatima
Putting up a sign in the yard and waiting for the right buyer to come along isn't always the easiest way to sell a house. The traditional process of selling your home can be slow, expensive and frustrating for many Springfield, OH homeowners. You may have to fix the house up, clean it out, show it, negotiate with buyers, wait for inspections, and hope the buyer's financing doesn't fall through. That can be a lot to manage, especially if you need to move quickly or work with a property that is no longer working for your situation.
That’s why many homeowners now look for a faster option. If you want to sell your house fast for cash in Springfield, OH, then working with a local cash home buyer like Sell House Now Columbus can be a practical solution. The company works with homeowners in Columbus, Springfield and other parts of Ohio, providing a direct cash-buying process that helps sellers avoid repairs, agent commissions, closing delays and unnecessary stress. They buy houses as-is, and offer a simple selling process and possibly help with closing costs, according to the company’s website.
Why Springfield, OH Homeowners Choose to Sell for Cash
Every homeowner has their own reason for desiring a quick sale. Some are relocating for jobs and don’t have months to wait for a buyer.” Others may have inherited a property they don’t want to keep up. Some houses need a lot of work and the owner may not have the time, money or energy to do it all before listing. There are also situations of divorce, concerns about foreclosure, bad tenants, unpaid taxes, or simply a desire to move on without the hassle of a traditional sale.
It makes sense to do a cash sale because it takes away a lot of the common roadblocks. Rather than waiting for mortgage approvals, appraisals, repair requests and lengthy negotiations, homeowners can receive a direct offer from a buyer who is ready, willing and able to purchase the property. At Sell House Now Columbus, sellers can request a fair cash offer and pick a closing timeline that suits them. The firm says homeowners can sell without agents, fees, repairs or cleaning, which can be a huge relief for anyone going through a stressful property situation.
Selling as is No repairs or cleaning
One of the biggest advantages of selling to a cash home buyer is the fact that you can sell the property as-is. This is good news because you don’t have to spend thousands of dollars on fixing the roof, replacing flooring, repainting walls, updating the kitchen, repairing plumbing or improving kerb appeal to attract buyers. Buyers expect the home to look clean, updated and move-in ready in traditional sales. Issues discovered during the inspection can force the seller to lower the price or pay for repairs prior to closing.
An as-is cash sale is a different process. The purchaser is taking the property “as is” and is offering based on the current condition. Sell House Now, Columbus, states that sellers are spared the hassle of repairs, daily showings and cleaning. They also say that unwanted items can be left behind and dealt with after purchase. This can save time and money for Springfield homeowners confronted with an older house, damaged property, rental cleanup or inherited home full of belongings.
No Real Estate Agent Fees or Hidden Commissions
When you sell your home, conventional real estate agents eat up a huge portion of your final proceeds through commission fees. You might have closing costs, staging costs, repair costs, inspection-related costs, photography fees and other costs that eat into what you actually walk away with. After deducting all expenses the final number is much lower than expected for some sellers.
A direct cash sale makes the numbers simple. “Sell House Now, Columbus says they don’t charge commissions and their process is designed to help homeowners avoid listing fees and agent-related expenses.” This provides sellers more clarity up front. Instead of guessing what the final payout might be after months of negotiations and deductions, you can review a cash offer and decide if it meets your needs.
Faster Closing Timeline for Springfield Homeowners
When you need to sell fast, time is of the essence. A traditional home sale can take weeks or even months, depending on market conditions, buyer financing, inspections, appraisals and negotiations. Once you’ve accepted an offer, there is always the risk that the buyer’s loan may be delayed or denied. Delays can add additional pressure to a homeowner who needs cash fast, who needs to stop paying taxes or utilities, or who needs to relocate soon.
Cash buyers are often faster than traditional buyers because they don’t rely on bank financing. Sell House Now Columbus says their process offers a competitive cash offer, a simple experience and Sellers can pick their closing day. That flexibility can be helpful if you need to close quickly or if you need extra time to make your next move. You don’t have to follow someone else’s schedule but can choose a plan that works better for your circumstances.
Who Can Use Selling For Cash?
Is your property stressing you out? Is it costing you money every month? If so then selling your House for cash in Springfield OH may be a good option. It can help homeowners who are behind on payments, tired of being landlords, dealing with code violations, handling probate property, in need of costly repairs, or just ready for a clean break. It can also be a benefit to those who do not live near the property and do not want to travel back and forth to manage repairs, contractors, cleaning and showings.
And the best part is you don’t need to have a perfect house. Cash buyers often see the property as an investment and are willing to do repairs after the sale. This makes it easier for sellers who are stuck with a dated, vacant, damaged, or otherwise hard-to-list property.
How it works
Generally, the process begins with a call to discuss the property in general terms. After reviewing those details, Sell House Now Columbus can assess the home and make a cash offer. If the offer interests you, you can pick a closing date that suits you. You don’t have to accept and the offer can help you explore your options before making a final decision.
This approach gives control to homeowners. You don’t have to go through months of listings, open houses, questionable buyers or last-minute repair demands. You can look at the cash offer and see if it solves your problem.
Summary
If you need to Sell your House fast for cash in Springfield, OH then a direct cash sale might be the easiest path forward. It gives homeowners a way to avoid repairs, agent commissions, delays and stress. Whether you’re looking to sell an inherited property, a damaged home, a rental you no longer want, or a life change that requires a quick sale, Sell House Now Columbus provides a simple option for homeowners that want speed and convenience.
Selling a house should be no more difficult than dragging a heavy box up hill. A good cash buyer can make the process a lot lighter, faster and easier to manage. If you are a homeowner in Springfield and want to get a fair cash offer and an easy solution, Sell House Now Columbus can make the next step a lot easier.
Find the right local pro for your project

 MainStreet Design Build
Originally built in the early twentieth century, this Orchard Lake cottage was purchased almost 10 years ago by a wonderful couple—empty nesters with an appreciation for stunning views, modern amenities and quality craftsmanship. They hired MainStreet Design Build to design and remodel their home to fit their needs exactly.
Upon initial inspection, it was apparent that the original home had been modified over the years, sustaining multiple room additions. Consequently, this mid-size cottage home had little character or cohesiveness. Even more concerning, after conducting a thorough inspection, it became apparent that the structure was inadequate to sustain major modifications. As a result, a plan was formulated to take the existing structure down to its original floor deck.
The clients’ needs that fueled the design plan included:
-Preserving and capitalizing on the lake view
-A large, welcoming entry from the street
-A warm, inviting space for entertaining guests and family
-A large, open kitchen with room for multiple cooks
-Built-ins for the homeowner’s book collection
-An in-law suite for the couple’s aging parents
The space was redesigned with the clients needs in mind. Building a completely new structure gave us the opportunity to create a large, welcoming main entrance. The dining and kitchen areas are now open and spacious for large family gatherings. A custom Grabill kitchen was designed with professional grade Wolf and Thermador appliances for an enjoyable cooking and dining experience. The homeowners loved the Grabill cabinetry so much that they decided to use it throughout the home in the powder room, (2) guest suite bathrooms and the laundry room, complete with dog wash. Most breathtaking; however, might be the luxury master bathroom which included extensive use of marble, a 2-person Maax whirlpool tub, an oversized walk-in-shower with steam and bench seating for two, and gorgeous custom-built inset cherry cabinetry.
The new wide plank oak flooring continues throughout the entire first and second floors with a lovely open staircase lit by a chandelier, skylights and flush in-wall step lighting. Plenty of custom built-ins were added on walls and seating areas to accommodate the client’s sizeable book collection. Fitting right in to the gorgeous lakefront lot, the home’s exterior is reminiscent of East Coast “beachy” shingle-style that includes an attached, oversized garage with Mahogany carriage style garage doors that leads directly into a mud room and first floor laundry.
These Orchard Lake property homeowners love their new home, with a combined first and second floor living space totaling 4,429 sq. ft. To further add to the amenities of this home, MainStreet Design Build is currently under design contract for another major lower-level / basement renovation in the fall of 2017.
Kate Benjamin Photography
 Tile Doctor Ltd
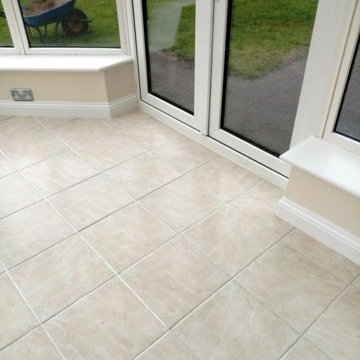
This customer from Stroud was soon to be re-letting her house but the Ceramic tiled floor and especially the grout had been left in a poor and dirty condition by the previous tenant. The ceramic tiled floor was installed throughout the Kitchen and through into the adjacent conservatory. Conscious this would affect future lettings she contacted Tile Doctor to see if we could help.
I paid a visit to the property to survey the floor and discuss how we would restore the Ceramic tiles and get them looking clean again. She was happy to hear we could help and agreed to my quote and we booked the work in for the following week. It would only take a day which suited her perfectly as she was keen to get the property back on the market.
Stroud is a lovely market town and in the centre of Gloucestershire. It is the main town in Stroud District and forms the centre for numerous surrounding market towns.
The Cotswold Area of Outstanding Natural Beauty surrounds the town, and the Cotswold Way path passes by it to the west, so it really is a desirable place to live with lots of lovely walks.
The first job was to protect all the walls and units to ensure they did not get splashed by the products we would be using. I then sprayed Tile Doctor Remove and Go all over the floor and the grout lines, this was left for a short time to dwell and get to work breaking down the dirt. The floor was then scrubbed using a black buffing pad fitted to a buffing machine finishing off by scrubbing the grout lines with a stiff brush. The soil released from the floor was then rinsed off with water and extracted with a wet vacuum. Once I was happy with the result the floors were speed dried with a blow heater. The alternative was to leave the floor overnight, but as time was of the essence speed drying was the best option.
Later that day the floor was dry, and I was able to seal the grout lines with Tile Doctor Ultra Seal. I used a pipette to apply the sealer directly to the grout to ensure maximum coverage. The tiles themselves did not require any sealant as ceramic tiles are sealed at the factory when they are produced. Grout being cementitious however does attract dirt and so sealing it will keep it looking fresh for some time to come and make it easier to clean.
The client was very pleased with the results and relieved she could re-let the house again. Now the floor was clean and much more attractive it would ensure she could achieve the best rental value.
I suggested she left a bottle of Tile Doctor Neutral Tile Cleaner for the new tenants as this would be the best product to keep the floor clean moving forward, you only need a small amount to dilute and it has a pleasant fresh fragrance. At least if the product is on site the tenant is more likely to keep the floor looking good and not resort to everyday household cleaners which eventually break down the grout and its’ seal. She thought this was a great idea.
Malcolm Crowther
Gloucester Tile Doctor
 Tile Doctor Ltd
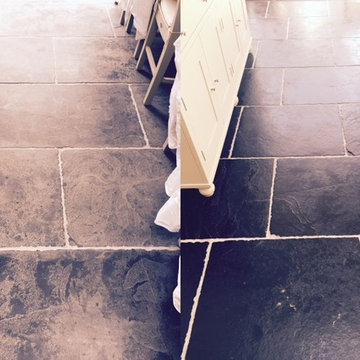
I was recently asked to this property in Wimbledon in to see if there was anything we could do to resolve the problem with a recently laid Black Limestone tiled floor. The builders that had laid the Limestone did not cover or clean the tiles prior to sealing with an impregnating seal thereby trapping in all the dirt from the building works. They then grouted the tiles but didn’t clean the grout off the surface before putting on another two coats of sealer all of which resulted in a very poor finish.
Naturally the customer was not happy so called them back to rectify the problem and so they came back and tried to strip the sealer off with cloths and a chemical stripper. Then without rinsing the stone to remove the chemicals they added another two coats of sealer; in desperation the lady gave up with them and called me in.
To resolve I tried all the sealant strippers available to me but couldn’t budge the mess effectively. The only other option available was to diamond grind the surface so I discussed this with the customer and she agreed to this and left me to carry on.
Initially I started with a coarse 400 grit diamond pad but even that wasn’t having much effect so in the end I had to cut back the surface using a 100 grit pad moving up to 200 grit, then 400 before finally stopping at 800. To lubricate the process you need to use a little water and then rinse away the resultant soil after each pad. If this was a polished stone surface I would have continued with finer and finer grits to restore the surface polish however these tiles were rough limestone and I needed to leave it as near to how it should be.
Once all the Limestone had been stripped back the stone turned an uninviting grey colour, so to bring it back to black I applied two coats of Tile Doctor Stone Oil which enhanced the colour.
I left the floor overnight to allow the Stone Oil to dry out and then returned to seal the Limestone using two coats of Tile Doctor Colour Grow which is an impregnating sealer that enhances the colour in the stone and will protect it from staining going forward.
When the customer saw the final result she was overwhelmed and said she felt like crying with relief, because the floor now looked how she had imagined it to be. It was a great feeling for me to know that I had solved the problems for her.

 Triumph Roofing
When Millie Cuizon approached us, she needed a cost-effective roofing solution for her home in Charlotte. Her existing roof had aged significantly, with curling shingles and several leaks causing concern. Millie sought a reliable roofing team that could restore her home’s protection while staying within her budget.
After discussing her needs and assessing the roof, we recommended a 3 Tab Shingles Roof Installation. Known for their affordability, clean appearance, and weather-resistant properties, these shingles perfectly aligned with Millie’s priorities. She appreciated the clarity of our estimate, the straightforward process, and our commitment to quality.
A Seamless Installation Process
On installation day, our team arrived early, ready to get to work. We began by carefully removing the old, damaged shingles, ensuring the roof deck was clean and structurally sound. After laying down a high-quality underlayment for added protection, we installed the new 3 Tab shingles with precision.
The team worked efficiently to complete the project in a single day, minimizing any disruption to Millie’s routine. Throughout the process, we kept her informed of each step, answering her questions and ensuring she felt confident in her new roof.
The Transformation
By the end of the day, Millie’s home had a fresh new look. The 3 Tab shingles not only restored the roof’s integrity but also enhanced the home’s curb appeal with their sleek, uniform design. These shingles offer Millie long-lasting protection against Charlotte’s variable weather, giving her peace of mind for years to come.
Millie’s Feedback
"I couldn’t be happier with my new roof! The team was professional, efficient, and worked within my budget. My house looks amazing, and I feel so much safer now. Highly recommend them!"
This project demonstrates our dedication to delivering high-quality roofing solutions that balance affordability, durability, and style. For homeowners like Millie, a 3 Tab Shingles Roof Installation is a smart choice for transforming and protecting their homes.

Sponsored
Fredericksburg, OH

High Point Cabinets
Columbus' Experienced Custom Cabinet Builder | 4x Best of Houzz Winner

 Native Edge Landscape
Another fun Crestview project! This young couple wanted a back yard that reflected their bohemian-eclectic style and could add additional privacy from the ever climbing construction around them. A place for “hanging out and drinking coffee or beer in the backyard.” But what was most exciting, was the air stream they had just purchased and were in the process of restoring. With the end goal of using it as a guest home for family and friends, we were challenged with creating a space that was cohesive and connected this new living space with the rest of the yard.
In the front we had another quark to fix. The sidewalk from their front door to the street suddenly stopped 5 feet from the curb, making a less than inviting entry for guests. So, creating a new usable entryway with additional curb appeal was a top priority.
We managed the entertainment space by using modern poured concrete pad’s as a focal. A poured concrete wall serves as a bench as well as creates a visual anchor for the patio area. To soften the hard materials, small plantings of succulents and ground cover were planted in the spaces between the pads. For a backdrop, a custom Cedar Plank wall and trellis combined to soften the vertical space and add plenty of privacy. The trellis is anchored by a Coral Vine to add interest. Cafe style lighting was strung across the area create a sense of intimacy.
We also completed the fence transition, and eliminated the grass areas that were not being utilized to reduce the amount of water waste in the landscape, and replaced these areas with beneficial plantings for the wildlife.
Overall, this landscape was completed with a cohesive Austin-friendly design in mind for these busy young professionals!
Caleb Kerr - http://www.calebkerr.com
 Tile Doctor Ltd
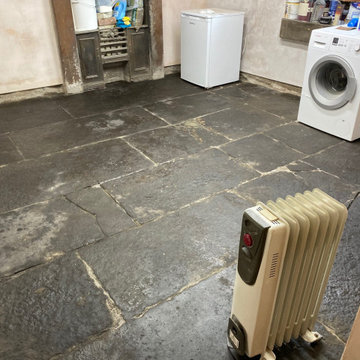
I was contacted by a client in Kendal to see if I could help with their Black Flagstone basement floor. As you can see from the photographs it was in a bit of a state and the stone looked mostly White rather than Black.
I carried out a site visit, to survey the floor and work out the best approach to restore its appearance. After testing a few different products and techniques I worked out an effective restoration plan and discussed this with the owner. Happy with my plan and costing’s we agreed a date to start the work. Being in the basement of the property had its challenges but it would mean we could work socially distanced from the owner.
To restore the floors appearance, I started with a set of coarse wire (60 and 120 grit) brushes lubricated with Tile Doctor Remove and Go which is a strong coatings remover. I had considered using milling pads on the tiles to reveal a new surface underneath but that does involve the use of an expensive set of coarse pads and given it was a basement the owners didn’t feel the extra expense would be justified.
The wire grits work well on rough stone floors when attached to a weighted buffing machine and we add some Tile Doctor Remove and Go to the mix. Once clean the floor was rinsed with water and the slurry extracted using an industrial wet vacuum. After cleaning the floor, it looked transformed, some pointing was required so we carried this out after the main clean.
The stone was left to dry out for a few days before returning to apply a sealer. For this floor I felt Tile Doctor X-Tra seal would be the best product and applied two coats. I chose X-Tra seal for this job as it ticks a lot of boxes, it’s a breathable oil-based resin sealer which being breathable will allow moisture to rise through the floor. Old floors like this don’t have a damp proof membrane so it is important to choose a sealer that can allow the floor to breath and not let damp build up under the floor where it can reach out to the walls and cause rising damp.
I also chose X-Tra Seal as it has a great ability to bring out the colour of the darker stone due to its high oil content, the oil will deter salts from forming if efflorescence is an issue. This is a unique property of this sealer as we never know if efflorescent salts are going to form or not so having this in place as a sealer is a great plus for a Tile Doctor, it is new to the market and is already proving popular on floors like this and for protecting external stone.
If the tiles are smooth Tile Doctor X-Tra Seal adds a bit of a sheen to the appearance of the stone however this stone was very rough, so we didn’t manage a shine, but the customer was happy with the matt finish and the slightly honed effect.
The floor looked great and much more appealing making the space more attractive and likely to be used. For aftercare I recommended Tile Doctor Neutral Tile Cleaner which will clean the floor without impacting the sealer which can be a problem with many of the stronger products you find in supermarkets.
Heidi Taylor
South Cumbria Tile Doctor

 Green Home Systems
It’s not easy to find a solar energy provider that can deliver top quality craftsmanship and competitive prices. But when Johny Y. from Booneville, Arkansas began shopping for a solar panel system installation, he was pleasantly surprised to find Green Home Systems as an option.
Green Home Systems is a leader in the solar energy industry with unparalleled experience in solar solutions at the most economical price. Additionally, their customer service is second to none and they have a proven track record of success throughout the United States. After researching Green Home Systems and seeing their excellent reviews, Johny decided to move forward with them for his 10 kW grid tie-in solar panel system installation.
Johny had three main reasons for going solar: reduce his utility bills, take advantage of government incentives and increase the value of his home. After meeting with Green Home Systems and discussing his goals, they set out to design and install a customized solar panel system using only premium components like LG's high efficiency modules.
Green Home Systems worked quickly and efficiently, ensuring that all safety protocols were followed during the installation process. The project was completed in less than a month and the results were very impressive! Not only did Johny see an immediate reduction in his utility bills but he also saw an increase in his property value due to the high quality LG solar panel system installed by Green Home Systems professionals.
When it comes to choosing a reliable solar energy provider you can trust, look no further than Green Home Systems. Their reputation for quality products and dependable craftsmanship are unmatched in the industry, making them one of the best choices for your next solar project. They offer competitive pricing and exceptional customer service which makes them stand out from other providers in Booneville, AR and beyond!
Johny Y. couldn’t be happier with his decision to go with Green Home Systems for his LG Solar Panel Install in Booneville, AR. If you’re looking for top quality craftsmanship at competitive pricing for your next solar project—look no further than Green Home Systems!
 Tile Doctor Ltd
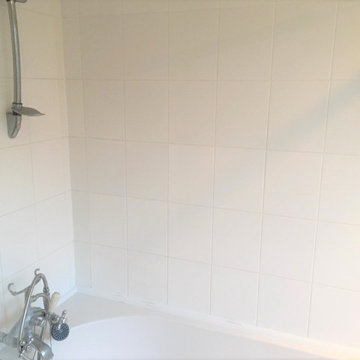
I was called to this property in Bow East London, because the grout around the shower had become dirty and had gone a yellowy/orange colour over time. This is quite a common problem with shower tiles due to the dyes you find in most shampoo and shower gel products. There was also some mould that needed removing. The ceramic tiles themselves were glazed ceramic which are very easy to clean but as usual the grout was bringing the appearance of the bathroom down.
The client was keen to see if the grout could be restored and had considered removing the grout and replacing it, but this takes time and I felt it would not be necessary. There are a number of Tile Doctor grout cleaning products I could have used to remedy these issues. I discussed the options with the client, and we agreed a price to complete the work.
Given the appearance of mould I decided to go with Tile Doctor Duo Clean which is designed for cleaning bathroom tiles and grout.
Bow is an area in the London Borough of Tower Hamlets in East End of London. It is mostly a residential area which is around 5 miles east of Charing Cross. It became part of the County of London following the passing of the Local Government Act 1888. “Bow” is an abbreviation of the medieval name Stratford-at-Bow, in which “Bow” refers to the bowed bridge built here in the early 12th century.
Working in small sections from top to bottom the method I used to renovate the tile and grout was to spray the tiles and especially the grout with Tile Doctor Duo Clean. This product is designed for bathroom tile cleaning and comes with a spray head attachment, so it is ready to use. I then left the product to soak in for about ten minutes before scrubbing it in with a brush and then rinsed it off with water. It is always easier to clean tiles in this situation as the water can just drain away. In other areas we would need to use the wet vacuum to remove the soiled waste.
After repeating this process for the whole of the shower wall I then retreated any areas which needed more work until I was happy all the staining and mould was gone.
The area was then dried and the only job remaining was the seal the grout which will prevent the grout staining going forward. To do this I spayed on Tile Doctor Wall Grout Sealer which comes in an aerosol and is very easy to apply.
The client was very happy with the work, the bathroom was restored and looked much more appealing.
Jackson Davis
East London Tile Doctor

 KC Architects, Inc
KC Architects, led by licensed architect Katarzyna Cimoch, provides exceptional residential architectural services throughout Chicago and surrounding communities. As a Polish architect Chicago residents trust, we specialize in custom home design, additions, renovations, and new construction projects. Our comprehensive approach includes initial consultation, design development, permitting assistance, and construction supervision. We understand Chicago's unique architectural landscape and building requirements, ensuring every project meets both aesthetic and regulatory standards. Our team combines European design sensibilities with local expertise to create spaces that reflect your lifestyle and preferences. From modern additions to historic renovations, we handle projects of all scales with meticulous attention to detail. As an experienced Polish architect Chicago homeowners recommend, Katarzyna brings bilingual communication and cultural understanding to every project. We pride ourselves on transparent communication, realistic timelines, and innovative solutions that maximize your property's potential while respecting your budget.
FAQs:
1. What architectural services do you provide? We offer residential design, additions, renovations, and new construction.
2. Are you licensed in Illinois? Yes, Katarzyna Cimoch is licensed in both Illinois and Florida.
3. Do you handle permits? Yes, we assist with all permitting and approval processes.
4. What's your design process? We follow a five-step process from consultation to final walkthrough.
5. Do you supervise construction? Yes, we provide construction supervision services.
6. What areas do you serve? We serve Chicago and surrounding communities.
7. Do you work on historic homes? Yes, we have experience with historic renovations.
8. What's included in consultation? Initial consultation covers project scope, timeline, and budget discussion.
9. Do you provide 3D renderings? Yes, we create detailed visualizations during design development.
10. How long does design take? Timeline varies by project complexity and scope.
 Green Home Systems
It’s not easy to find a solar energy provider that can deliver top quality craftsmanship and competitive prices. But when Johny Y. from Booneville, Arkansas began shopping for a solar panel system installation, he was pleasantly surprised to find Green Home Systems as an option.
Green Home Systems is a leader in the solar energy industry with unparalleled experience in solar solutions at the most economical price. Additionally, their customer service is second to none and they have a proven track record of success throughout the United States. After researching Green Home Systems and seeing their excellent reviews, Johny decided to move forward with them for his 10 kW grid tie-in solar panel system installation.
Johny had three main reasons for going solar: reduce his utility bills, take advantage of government incentives and increase the value of his home. After meeting with Green Home Systems and discussing his goals, they set out to design and install a customized solar panel system using only premium components like LG's high efficiency modules.
Green Home Systems worked quickly and efficiently, ensuring that all safety protocols were followed during the installation process. The project was completed in less than a month and the results were very impressive! Not only did Johny see an immediate reduction in his utility bills but he also saw an increase in his property value due to the high quality LG solar panel system installed by Green Home Systems professionals.
When it comes to choosing a reliable solar energy provider you can trust, look no further than Green Home Systems. Their reputation for quality products and dependable craftsmanship are unmatched in the industry, making them one of the best choices for your next solar project. They offer competitive pricing and exceptional customer service which makes them stand out from other providers in Booneville, AR and beyond!
Johny Y. couldn’t be happier with his decision to go with Green Home Systems for his LG Solar Panel Install in Booneville, AR. If you’re looking for top quality craftsmanship at competitive pricing for your next solar project—look no further than Green Home Systems!
Sponsored
Delaware, OH

Buckeye Basements, Inc.
Central Ohio's Basement Finishing ExpertsBest Of Houzz '13-'21
 AG Construction & Remodeling
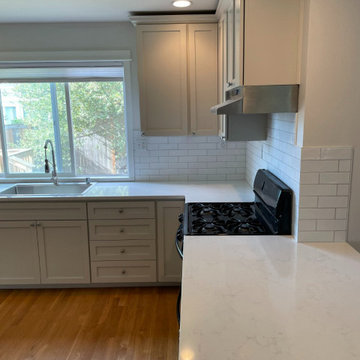
Kitchen Remodeling Project
Transform your kitchen into a stylish, functional, and inviting space with our professional kitchen remodeling services. We specialize in designing custom kitchens that maximize space, enhance functionality, and elevate the overall look of your home. Whether you’re looking for a modern upgrade or a complete kitchen renovation, we’re here to make your vision a reality.
Why Choose Our Kitchen Remodeling Services?
Personalized Designs: We customize every kitchen remodel to fit your unique needs and design preferences.
High-Quality Materials: We use premium, durable materials that ensure your kitchen remains beautiful and functional for years to come.
Skilled Craftsmanship: Our experienced team pays attention to every detail, ensuring exceptional results.
Our Kitchen Remodeling Process
Initial Consultation and Design: We start by discussing your ideas, lifestyle requirements, and budget. Our design team then creates a custom kitchen plan tailored to your needs.
Planning and Approvals: We take care of all necessary permits and develop a detailed project timeline.
Demolition and Installation: Our team carefully removes the existing kitchen and expertly installs new elements, including cabinets, countertops, flooring, and appliances.
Final Touches: We complete the remodel with finishing details such as modern backsplashes, stylish lighting, and elegant hardware.
Popular Kitchen Remodeling Features
Custom Cabinets and Innovative Storage Solutions
Durable Quartz, Granite, or Marble Countertops
Energy-Efficient and High-Performance Appliances
Contemporary Backsplashes and Ambient Lighting
Open-Concept Layouts for a Spacious, Airy Feel
Benefits of Kitchen Remodeling
Investing in a kitchen remodel enhances both the functionality and appearance of your home. It also boosts property value and makes your kitchen a more enjoyable space for cooking, entertaining, and spending time with family. Whether you’re upgrading an outdated kitchen or creating a brand-new space, our team can turn your dream kitchen into a reality.
Get Started Today!
Ready to begin your kitchen remodeling journey? Contact us today for a free consultation! Let us help you design and create the kitchen you’ve always wanted.

 Warm Timber Saunas & Wine Cellars
This previously unused attic space is now a sauna/yoga room. The left sauna wall follows the attic rafters down diagonally to allow a wider space for leg room on the twin sauna benches.
 Tile Doctor Ltd
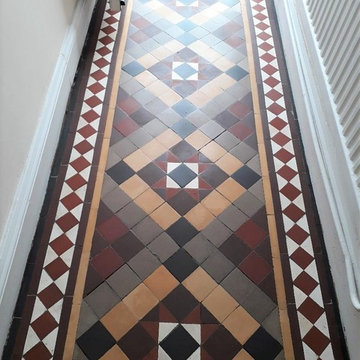
As is often the case in years past and for whatever reason many homeowners covered their decorative Victorian hallway tiles in a variety of products from carpet to laminate flooring. These days the trend has reversed and quite rightly many homeowners now realise the value a tiled floor can bring to a property and look to us to have it restored.
Our client had purchased a property in Norfolk seaport of Kings Lynn and, on lifting the dirty old carpet and decaying underlay in the hallway, discovered a beautiful tiled entrance hall. It was obvious that a previous owner had decided to lay carpet over the tiles as an easy way of hiding the result of careless renovation and decorating which had resulted in a thick coating of plaster, paint, carpet tape glue and various other contaminants which had become firmly stuck to the surface. There were also two small rectangular black and brown tiles missing behind the front door which had been damaged during the removal of some old lead pipes.
This was clearly a job which would need somewhat more than a scrubbing brush and a bottle of Flash!
Our first job was to remove as much of the solid contaminants as possible by hand with floor scrapers and a steamer which softened the more stubborn lumps. We then applied Tile Doctor Remove & Go which is a powerful alkaline stripper to the whole area, left it to dwell on the surface for twenty minutes and then scrubbed it in using a rotary machine fitted with a black scrubbing pad. The resulting slurry was then power rinsed and extracted away using our Ninja machine which is a high-power industrial vacuum. Any remaining patches where the carpet tape had been stuck down were spot treated using Tile Doctor Nanotech HBU which made short work of the hardened glue.
The result was a clean floor, but the surface still felt slightly rough and pitted, a problem which we resolved using the rotary machine fitted with a 200-grit diamond burnishing pad followed by a 400-grit pad with a little 400 grit honing powder which left the surface smooth, silky and ready for the application of a sealer.
Finally, we acid washed the whole area using Tile Doctor Acid Gel, a slow release product which would neutralise any remaining chemicals, improve new sealer adhesion and inhibit the future production of any efflorescence salts. We had used a fair amount of water during the cleaning process, so we left the floor to dry off thoroughly overnight with assistance from our commercial dehumidifier.
On our return the following day, we discussed the sealer options with the client and recommended using microporous Tile Doctor Colour Grow which is an impregnating sealer that seeps into the pores of the stone protecting it from within. It will provide an excellent fluid resistant seal whilst enhancing the natural colours in the stone, additionally it’s fully breathable thereby enabling any moisture trapped under the floor to rise through the floor and evaporate. This is important on old floors like this where no damp-proof membrane was installed. The sealer was applied with a paint pad in tow coats and allowed to dry for an hour before buffing the floor with a hog’s hair pad to give a rich natural-look sheen finish.
The Victorian tiles responded well to the treatments which were completed in two consecutive days. My client was extremely pleased with the results and left the following comment:
“My floor was in poor condition after being buried under carpet as well as many, many years of paint and muck. I enjoyed the time they spent at my home and wouldn’t hesitate to use (or recommend) the Tile Doctor service in the future.”
Nick White
Norfolk Tile Doctor
 Sarah Dowlin
Photo: Sarah Dowlin © 2019 Houzz
Inspiration for an eclectic home design remodel in Cincinnati
Inspiration for an eclectic home design remodel in Cincinnati
 Tile Doctor Ltd
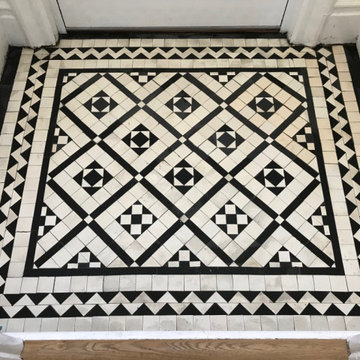
I visited this property in Lytham St Annes to survey a small Victorian tiled lobby which was in a sorry state. The client was keen to have it restored and wanted to know if it was possible. I discussed with them what we could do, and I gave them a quote for the work. Although it was only a small lobby, I could see the job could be quite involved and would be subject to the replacement tiles which I was confident we could source.
This is one of those jobs you wish you hadn’t started as there were a lot more tiles to remove than anticipated and it mushroomed into replacing half the floor. Once the area was cleaned up, I applied a self-levelling compound to bring up the height of the base.
Once the levelling compound had set, I was able relay the Victorian tiles using a combination of original tiles and replacements which had to be cut to shape. Cutting tiles to fit is quite intricate and time-consuming work especially when you consider new tiles are all metric in size and a 2mm difference becomes very telling after a foot or so! My solution was to use 150 mm tiles which are the biggest the stockist offers and then cut them down on my Rubi cutter using a template made from the original tiles. This the only way I could get it to look tight, it takes longer but it makes for a thorough job and a better finish.
I always use flexible floor adhesive when laying tiles, my preference is Keraquick Grey from Mapei. There are other brands off course but this one is quite easy to get hold of and as the term grouting is a relatively modern invention (in the past it was called pointing ) I find it looks right with this type of tile and similar to the screed cement the Victorians used in the past.
After the tiling had been completed, I left the floor to cure and fully dry and returned at a later date to give the floor an overall clean. For this I ran a coarse 200-grit diamond floor pad across the floor lubricated with water and used handheld diamond blocks for the edges where the pad can’t reach. The slurry was rinsed off with water and extracted with a wet vacuum.
With old floors like this, which don’t have a damp-proof membrane installed under the floor, efflorescence is always a concern and can lead to white salts appearing on the surface of the tile as moisture rises through the floor. To counter this, I finished cleaning the floor by scrubbing it with Tile Doctor Acid Gel. This was then rinsed off with water and the soil extracted using a wet vacuum.
The client was happy to seal the floor themselves (they wanted to save some money and it wasn’t a big area) so I supplied them with a bottle of Tile Doctor Colour Grow. I recommended this sealer as it will enhance the dark colours and being fully breathable it will cope with any moisture rising through the base. I recommended they apply two coats to start leaving time to allow the first coast to dry they could also then decide to leave it at that if they were happy with the finish.
Russell Taylor
Lancashire Tile Doctor
 Tile Doctor Ltd
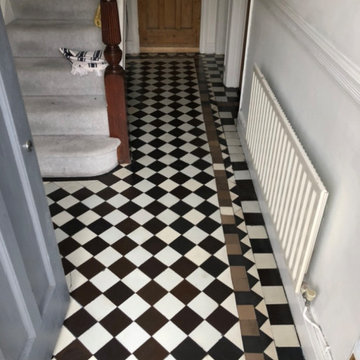
This job was carried out in a terraced property in Llanelli which had a Victorian Tiled Hallway laid in a diamond pattern that looking worse for wear and in need of some attention. The clients were a young couple who had moved in two years previously and had only recently decided they wanted the floor renovated. This was earlier in the year, so I was able to pop over to the property and take a detailed look at the floor before recommending a course of action to renovate the tiles.
Upon arrival the first thing we noticed was that the border had been laid with an inconsistent pattern, non- matching tiles had been patched in essentially filling voids as you can see in the images. The floor wasn’t terribly dirty however it wasn’t very clean either.
I discussed with the client replacing the non-matching tiles, so the floor pattern was uniform however they decided against it and were happy to just to have it cleaned and sealed. We can usually source either reclaimed original tiles or some great reproduction ones, so most floors can be restored if needed. I worked out a quote for the work and they were happy to go ahead.
If you have never been you should know that Llanelli is the largest town in the county of Carmarthenshire and famous for Rugby and the production of Tin. It is located on the Loughor Estuary, some 10 miles from Swansea and 12 miles from Carmarthen.
With no tiling to do the first job was to protect the woodwork such as skirting and staircase with tape. Once done the process of cleaning began with the application of a 400-grit burnishing pad fitted to a buffing machine. The process is lubricated with water and the pad run over the whole floor two to three times to remove dirt and refine the appearance of the tile. Even after the first application of the pad we could see a massive improvement to the appearance of the tiles. To get right into the edges of the tiled floor we use a 400-grit handheld diamond block, this proved especially useful under the stairs where our buffer machine could not reach.
During this process, the water turns into a fine slurry which is rinsed off with more water and extracted with a wet vacuum. On this occasion the floor was not dirty enough to require any chemicals, the use of water and the machine was enough to get the floor cleaned up.
This job was very straight forward, and we did not run into any problems at all. After allowing the floor to dry out for 24 hours we returned to seal the tiles checking first that the floor was sufficiently dry first using a damp meter. Fortunately, the burnishing method uses a lot less water than a chemical clean, so I was able to get straight on with sealing.
The client wanted a satin sheen finish, so I applied four coats of Tile Doctors Seal and Go which works well on Victorian tiles. The sealer really put the life back into the tiles and will protect them from staining going forward. It will also make the floor much easier to maintain and keep it looking good for much longer.
I’m pleased to say the owners were very happy with the floor and recommended us to one of their friends who we also did some work for. For aftercare I recommended the use of Tile Doctor Neutral Tile Cleaner. This is an everyday tile cleaning product that is sealer friendly and not prematurely reduce the life of the sealer which can happen with many household cleaning products which are simply too strong.
Adrian Iacono
Swansea Tile Doctor
 Tile Doctor Ltd
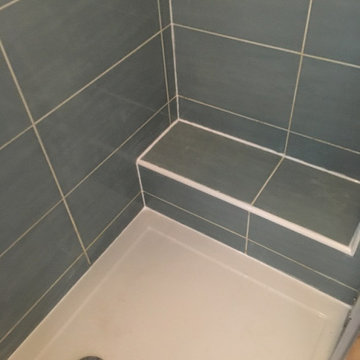
Pictured below is a very mouldy Ceramic Tiled Shower Cubicle at a property in the picturesque market town of Woodstock, which is very close to the famous Blenheim Palace and has a long history that dates to the Domesday Book and have many 17th century buildings.
As you can see mould had really got a grip on the white grout around the bottom of the shower and in most other places the grout had become discoloured. Mould and discolouration are a very common problem and is caused by a lack of ventilation in the bathroom as well as the dyes in soap and shampoos.
Most ceramic tiles have a glazed surface and so are fairly impervious to these problems, grout however is a problem due to its cementitious rough nature. I discussed with the client what could be done to restore the appearance of the shower cubicle for them, and they were pleased to hear we could do something about it. Happy with my quotation it wasn’t long before I got instructed to go ahead with the work.
To resolve the problem, I first sprayed the whole shower with Tile Doctor Duo Clean and left it to soak in. The bottle comes with a spray attachment that combines the product with air making it lighter and easier to stick to vertical surfaces. It is a fast effective cleaner which doubles up as a grout cleaner and mould remover.
Whilst the Tile Doctor Duo Clean was doing its magic I fetched the other tools I would need to complete this job. After about 30 minutes I sprayed the cubicle again and started to hand scrub the grout and tiles to remove the mould and dirt. I then rinsed with water and went over the stubborn stains again until I was happy. The walls where then dried with a clean towelling cloth. It is amazing the difference you can achieve with the right grout cleaning product and a lot of elbow grease.
The last step and “prise de la resistance” was to cut out all the original silicone sealant with a sharp knife and then replace with new white sealant which had an anti-mould formula. I am not convinced these anti-mould products work any better to be honest but with mould being such a problem it is definitely worth giving them a go.
The last step was to spray the grout with Tile Doctor Wall Tile and Grout Sealer to help protect the grout, it forms a protective barrier over the tile and the grout, so water just runs straight off the wall and into the shower tray.
For after care I recommended the use of Tile Doctor Aqua-Pro which is pH neutral cleaner designed for showers and will help the sealer last longer. Stronger supermarket products can actually strip a sealer off the tile over time so we don’t recommend their use.
I think you will agree the shower cubicle looked transformed by the time I had finished, certainly my client was very happy with the work we had carried out.
Barry Woodward
Oxfordshire Tile Doctor
20