
Search results for "Quitting process" in Home Design Ideas
 Tile Doctor Ltd
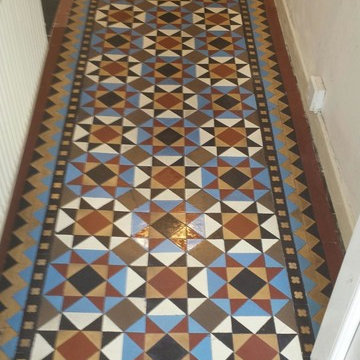
This set of photographs are from a house in the Warrington suburb of Stockton Heath where my client had discovered a Victorian Tiled floor under carpet in the hallway and was keen to have it restored back to its original condition. You can see from the photograph below that it was in quite a state with dirt and paint splashes however I was confident we could manage it.
On arrival I started to protect the skirting boards and entrance carpet to another room. Once that was done i started to strip the paint splashed and any remaining sealer from the floor using Tile Doctor Remove and Go which is an effective coatings and sealer remover that unlike some products is perfect safe to use on Victorian tiles
Working on the floor the product was diluted, scrubbed into the tile and then left to dwell for twenty minutes before being rinsed off with water which was then removed using a wet vacuum. The floor was now looking a lot cleaner, however I could see a number of stubborn areas that were going to need further treatment so I mixed the Remove and Go 50/50 with another Tile Doctor product called NanoTech HBU (Heavy Build-up Remover), which adds abrasive particles to the solution. This solution was scrubbed in and then rinsed off when i was happy with the condition of the floor. This process took much of the day and once done it was left to dry overnight ready for sealing the next day.
On my return the next morning i tested the floor in several places with a damp meter to ensure it was dry. When i was happy the floor was dry i started sealing with thin coats of Tile Doctor Seal and Go leaving thirty minutes between coats to allow it to dry; in total i gave the floor seven coats of sealer which gave the floor a nice shine which the customer was very happy with. As well as enhancing the look of the floor the sealer will provide stain protection going forward.
Alastair Robb
West Cheshire Tile Doctor

 Vetter Architects
The client’s request was quite common - a typical 2800 sf builder home with 3 bedrooms, 2 baths, living space, and den. However, their desire was for this to be “anything but common.” The result is an innovative update on the production home for the modern era, and serves as a direct counterpoint to the neighborhood and its more conventional suburban housing stock, which focus views to the backyard and seeks to nullify the unique qualities and challenges of topography and the natural environment.
The Terraced House cautiously steps down the site’s steep topography, resulting in a more nuanced approach to site development than cutting and filling that is so common in the builder homes of the area. The compact house opens up in very focused views that capture the natural wooded setting, while masking the sounds and views of the directly adjacent roadway. The main living spaces face this major roadway, effectively flipping the typical orientation of a suburban home, and the main entrance pulls visitors up to the second floor and halfway through the site, providing a sense of procession and privacy absent in the typical suburban home.
Clad in a custom rain screen that reflects the wood of the surrounding landscape - while providing a glimpse into the interior tones that are used. The stepping “wood boxes” rest on a series of concrete walls that organize the site, retain the earth, and - in conjunction with the wood veneer panels - provide a subtle organic texture to the composition.
The interior spaces wrap around an interior knuckle that houses public zones and vertical circulation - allowing more private spaces to exist at the edges of the building. The windows get larger and more frequent as they ascend the building, culminating in the upstairs bedrooms that occupy the site like a tree house - giving views in all directions.
The Terraced House imports urban qualities to the suburban neighborhood and seeks to elevate the typical approach to production home construction, while being more in tune with modern family living patterns.
Overview:
Elm Grove
Size:
2,800 sf,
3 bedrooms, 2 bathrooms
Completion Date:
September 2014
Services:
Architecture, Landscape Architecture
Interior Consultants: Amy Carman Design

 The Masons Co and Dionysian Artificers Landscape
In today’s market, a knowledgeable ''masonry restoration company kansas city'' restoration contractor or brick stone repair specialists of Kansas City, brick repair, stone repair,brick tuckpointing,masonry repair, block, contractor knows how to properly identify the problem and knows the difference between how a building was built 100 years ago compared to a building built 50 years ago. Today’s thought process in terms of restoration and the kansas city landscape brick and stone patios, masonry repair kansas city is quite different than it was even 20 years ago. The funny part is, the more we know, the more we are going to the ways of old…again.
A skilled kansas city brick restoration mason has magic touch of (alchemy) ,or so it seems. He, or she, can bring an old, worn-out building and make it look as good, if not better, than it did when it was new. Though masonry is probably the second oldest profession there is, the methods being used in this trade are not all that different from the masons’ of the Roman Empire. The major change is how much more easily the materials get to the job site, and the method and techniques by which the masons get to the wall. Not long after the first kansas city area masonry structures were built, masonry restoration began.
Whether you need a unique concept or some expert guidance to take your vision fluidly to reality, Kansas City Brick & Masonry Repair maintains an experienced and fully licensed design team that is poised to assist you with any project of any size.
From small renovations to multi-million dollar masonry repair kansas city new construction and high end kansas city fountains we handle commercial, industrial and institutional work for clients seeking a masonry partner they can trust. Our final product is always beautifully constructed, fairly priced and delivered on time and on schedule.
Find the right local pro for your project

 Kathleen Jennison
An Arts & Crafts Bungalow is one of my favorite styles of homes. We have quite a few of them in our Stockton Mid-Town area. And when C&L called us to help them remodel their 1923 American Bungalow, I was beyond thrilled.
As per usual, when we get a new inquiry, we quickly Google the project location while we are talking to you on the phone. My excitement escalated when I saw the Google Earth Image of the sweet Sage Green bungalow in Mid-Town Stockton. "Yes, we would be interested in working with you," I said trying to keep my cool.
But what made it even better was meeting C&L and touring their home, because they are the nicest young couple, eager to make their home period perfect. Unfortunately, it had been slightly molested by some bad house-flippers, and we needed to bring the bathroom back to it "roots."
We knew we had to banish the hideous brown tile and cheap vanity quickly. But C&L complained about the condensation problems and the constant fight with mold. This immediately told me that improper remodeling had occurred and we needed to remedy that right away.
The Before: Frustrations with a Botched Remodel
The bathroom needed to be brought back to period appropriate design with all the functionality of a modern bathroom. We thought of things like marble countertop, white mosaic floor tiles, white subway tile, board and batten molding, and of course a fabulous wallpaper.
This small (and only) bathroom on a tight budget required a little bit of design sleuthing to figure out how we could get the proper look and feel. Our goal was to determine where to splurge and where to economize and how to complete the remodel as quickly as possible because C&L would have to move out while construction was going on.
The Process: Hard Work to Remedy Design and Function
During our initial design study, (which included 2 hours in the owners’ home), we noticed framed images of William Morris Arts and Crafts textile patterns and knew this would be our design inspiration. We presented C&L with three options and they quickly selected the Pimpernel Design Concept.
We had originally selected the Black and Olive colors with a black vanity, mirror, and black and white floor tile. C&L liked it but weren’t quite sure about the black, We went back to the drawing board and decided the William & Co Pimpernel Wallpaper in Bayleaf and Manilla color with a softer gray painted vanity and mirror and white floor tile was more to their liking.
After the Design Concept was approved, we went to work securing the building permit, procuring all the elements, and scheduling our trusted tradesmen to perform the work.
We did uncover some shoddy work by the flippers such as live electrical wires hidden behind the wall, plumbing venting cut-off and buried in the walls (hence the constant dampness), the tub barely balancing on two fence boards across the floor joist, and no insulation on the exterior wall.
All of the previous blunders were fixed and the bathroom put back to its previous glory. We could feel the house thanking us for making it pretty again.
The After Reveal: Cohesive Design Decisions
We selected a simple white subway tile for the tub/shower. This is always classic and in keeping with the style of the house.
We selected a pre-fab vanity and mirror, but they look rich with the quartz countertop. There is much more storage in this small vanity than you would think.
The Transformation: A Period Perfect Refresh
We began the remodel just as the pandemic reared and stay-in-place orders went into effect. As C&L were already moved out and living with relatives, we got the go-ahead from city officials to get the work done (after all, how can you shelter in place without a bathroom?).
All our tradesmen were scheduled to work so that only one crew was on the job site at a time. We stayed on the original schedule with only a one week delay.
The end result is the sweetest little bathroom I've ever seen (and I can't wait to start work on C&L's kitchen next).
Thank you for joining me in this project transformation. I hope this inspired you to think about being creative with your design projects, determining what works best in keeping with the architecture of your space, and carefully assessing how you can have the best life in your home.
 Tile Doctor Ltd
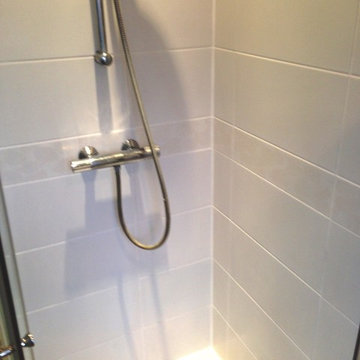
Shower cubicles can be the most difficult of tiled features to keep clean. Most are exposed to various acid-based soaps and shampoos on a daily basis, allowing mould and general muck to quickly build up along the grout lines and silicone. This leaves the entire area looking quite unappealing. In some cases, the grout lines become stained beyond a point where they can be restored to their original condition, so property owners will typically request to have the grout cut out and replaced however a faster and cheaper method is to have the grout completely recoloured.
Such was the case with this Ceramic tiled shower cubicle at a house in Wigan. It would take a lot to get the cubicle looking great again, having not been cleaned properly for a long time. The property owner decided to contact me for a professional refresh, including cleaning, new silicone sealer and recolouring of the grout.
I started the refresh by applying Tile Doctor Mould Away spray to the tiles and grout, and leaving it to dwell for an hour. As the name of the product suggests, Mould Away is a fast and effective cleaner for the removal of mould from silicone and grout, making it ideal for use on shower cubicles similar to this one. I then rinsed the entire area down with water before scrubbing the grout lines and tiles with a stiff grout brush to remove any remaining mould and lime scale, leaving them looking a lot cleaner.
The cleaning process made a big improvement however the grout was still too stained so after removing the silicone strip from around the base of the shower I proceeded to recolour with our white Grout Colourant. The colourant is painted onto the grout and any excess is wiped of the tile before it dries which both improves the appearance of the grout and seals it in to protect it from further staining. The last step was to apply fresh white silicone along the base of the shower.
The customer was very pleased with the refreshed appearance of their shower and you must admit it looks much more inviting now.
Steve Keary
Greater Manchester Tile Doctor

 Ginkgo Leaf Studio
We designed a new front walk with more stone steps to eliminate the odd pitch of the existing front walk. Lannon stone medallions mimic the tri-window detail above on the home.
Renn Kuhnen Photography

 e4 Interior Design, LLC
e4 Interior Design
This farmhouse was purchased by the clients in the end of 2015. The timeframe for the renovation was tight, as the home is a hot summer rental in the historic district of Kennebunkport. This antique colonial home had been expanded over the years. The intention behind the renovation was quite simple; to remove wall paper, apply fresh paint, change out some light fixtures and renovate the kitchen. A somewhat small project turned into a massive renovation, with the renovation of 3 bathrooms and a powder room, a kitchen, adding a staircase, plumbing, floors, changing windows, not to mention furnishing the entire house afterwords. The finished product really speaks for itself!
The aesthetic is "coastal farmhouse". We did not want to make it too coastal (as it is not on the water, but rather in a coastal town) or too farmhouse-y (while still trying to maintain some of the character of the house.) Old floors on both the first and second levels were made plumb (reused as vertical supports), and the old wood beams were repurposed as well - both in the floors and in the architectural details. For example - in the fireplace in the kitchen and around the door openings into the dining room you can see the repurposed wood! The newel post and balusters on the mudroom stairs were also from the repurposed lot of wood, but completely refinished for a new use.
The clients were young and savvy, with a very hands on approach to the design and construction process. A very skilled bargain hunter, the client spent much of her free time when she was not working, going to estate sales and outlets to outfit the house. Their builder, as stated earlier, was very savvy in reusing wood where he could as well as salvaging things such as the original doors and door hardware while at the same time bringing the house up to date.
 e4 Interior Design, LLC
e4 Interior Design
This farmhouse was purchased by the clients in the end of 2015. The timeframe for the renovation was tight, as the home is a hot summer rental in the historic district of Kennebunkport. This antique colonial home had been expanded over the years. The intention behind the renovation was quite simple; to remove wall paper, apply fresh paint, change out some light fixtures and renovate the kitchen. A somewhat small project turned into a massive renovation, with the renovation of 3 bathrooms and a powder room, a kitchen, adding a staircase, plumbing, floors, changing windows, not to mention furnishing the entire house afterwords. The finished product really speaks for itself!
The aesthetic is "coastal farmhouse". We did not want to make it too coastal (as it is not on the water, but rather in a coastal town) or too farmhouse-y (while still trying to maintain some of the character of the house.) Old floors on both the first and second levels were made plumb (reused as vertical supports), and the old wood beams were repurposed as well - both in the floors and in the architectural details. For example - in the fireplace in the kitchen and around the door openings into the dining room you can see the repurposed wood! The newel post and balusters on the mudroom stairs were also from the repurposed lot of wood, but completely refinished for a new use.
The clients were young and savvy, with a very hands on approach to the design and construction process. A very skilled bargain hunter, the client spent much of her free time when she was not working, going to estate sales and outlets to outfit the house. Their builder, as stated earlier, was very savvy in reusing wood where he could as well as salvaging things such as the original doors and door hardware while at the same time bringing the house up to date.
 e4 Interior Design, LLC
e4 Interior Design
This farmhouse was purchased by the clients in the end of 2015. The timeframe for the renovation was tight, as the home is a hot summer rental in the historic district of Kennebunkport. This antique colonial home had been expanded over the years. The intention behind the renovation was quite simple; to remove wall paper, apply fresh paint, change out some light fixtures and renovate the kitchen. A somewhat small project turned into a massive renovation, with the renovation of 3 bathrooms and a powder room, a kitchen, adding a staircase, plumbing, floors, changing windows, not to mention furnishing the entire house afterwords. The finished product really speaks for itself!
The aesthetic is "coastal farmhouse". We did not want to make it too coastal (as it is not on the water, but rather in a coastal town) or too farmhouse-y (while still trying to maintain some of the character of the house.) Old floors on both the first and second levels were made plumb (reused as vertical supports), and the old wood beams were repurposed as well - both in the floors and in the architectural details. For example - in the fireplace in the kitchen and around the door openings into the dining room you can see the repurposed wood! The newel post and balusters on the mudroom stairs were also from the repurposed lot of wood, but completely refinished for a new use.
The clients were young and savvy, with a very hands on approach to the design and construction process. A very skilled bargain hunter, the client spent much of her free time when she was not working, going to estate sales and outlets to outfit the house. Their builder, as stated earlier, was very savvy in reusing wood where he could as well as salvaging things such as the original doors and door hardware while at the same time bringing the house up to date.
 e4 Interior Design, LLC
e4 Interior Design
This farmhouse was purchased by the clients in the end of 2015. The timeframe for the renovation was tight, as the home is a hot summer rental in the historic district of Kennebunkport. This antique colonial home had been expanded over the years. The intention behind the renovation was quite simple; to remove wall paper, apply fresh paint, change out some light fixtures and renovate the kitchen. A somewhat small project turned into a massive renovation, with the renovation of 3 bathrooms and a powder room, a kitchen, adding a staircase, plumbing, floors, changing windows, not to mention furnishing the entire house afterwords. The finished product really speaks for itself!
The aesthetic is "coastal farmhouse". We did not want to make it too coastal (as it is not on the water, but rather in a coastal town) or too farmhouse-y (while still trying to maintain some of the character of the house.) Old floors on both the first and second levels were made plumb (reused as vertical supports), and the old wood beams were repurposed as well - both in the floors and in the architectural details. For example - in the fireplace in the kitchen and around the door openings into the dining room you can see the repurposed wood! The newel post and balusters on the mudroom stairs were also from the repurposed lot of wood, but completely refinished for a new use.
The clients were young and savvy, with a very hands on approach to the design and construction process. A very skilled bargain hunter, the client spent much of her free time when she was not working, going to estate sales and outlets to outfit the house. Their builder, as stated earlier, was very savvy in reusing wood where he could as well as salvaging things such as the original doors and door hardware while at the same time bringing the house up to date.

 TVL Creative Ltd.
This project has been a labor of love for quite some time! The design ideas started flowing for this space back in 2016, and we are so excited to have recently completed the build-out process after our lengthy planning time frame. These wonderful clients completed a bathroom renovation with us last year, and we absolutely loved the charming, clean-lined farmhouse aesthetic we produced there. Wanting to carry that similar aesthetic into the kitchen, our clients hired us to transform their dated 90's builder-grade kitchen into a stunning showpiece for their home. While no major fixtures or appliances were relocated, nor were there major architectural changes, this space's transformation is a jaw-dropper. We began by removing the existing yellowed oak wood cabinets and replaced them with gorgeous custom cabinets from Tharp Cabinet Company. These cabinets are a very simple shaker style in a bright white paint color. We paired these fresh and bright cabinet with black hardware for a dramatic pop. We utilized the Blackrock pulls from Amerock and adore the playful contrast these pieces provide. On the backsplash, we used a very simple and understated white subway tile for a classic and timeless look that doesn't draw the eye away from the focal island or surrounding features. Over the range, we used a stunning mini-glass mosaic tile from TileBar that shimmers and showcases a variety of colors based on the time of day and light entry. The island is our favorite piece in this kitchen: a custom-built focal point from Tharp, painted in a gorgeous custom blue from Benjamin Moore. The island is topped with a dramatic slab of Arabescato from Pental Surfaces. On the perimeter cabinets, we've utilized the stunning White Fusion quartz, also from Pental. For final touches, we've utilized matte black wall sconces over the windows from Rejuvenation, and have a gorgeous sink faucet from Delta Faucet. Throughout the main level, we refinished the hardwood floors to bring them to a more soft, neutral brown color. New paint is carried throughout the house as well. We adore the bright simplicity of this space, and are so excited that our clients can enjoy this family friendly stunner for years to come!
 e4 Interior Design, LLC
e4 Interior Design
This farmhouse was purchased by the clients in the end of 2015. The timeframe for the renovation was tight, as the home is a hot summer rental in the historic district of Kennebunkport. This antique colonial home had been expanded over the years. The intention behind the renovation was quite simple; to remove wall paper, apply fresh paint, change out some light fixtures and renovate the kitchen. A somewhat small project turned into a massive renovation, with the renovation of 3 bathrooms and a powder room, a kitchen, adding a staircase, plumbing, floors, changing windows, not to mention furnishing the entire house afterwords. The finished product really speaks for itself!
The aesthetic is "coastal farmhouse". We did not want to make it too coastal (as it is not on the water, but rather in a coastal town) or too farmhouse-y (while still trying to maintain some of the character of the house.) Old floors on both the first and second levels were made plumb (reused as vertical supports), and the old wood beams were repurposed as well - both in the floors and in the architectural details. For example - in the fireplace in the kitchen and around the door openings into the dining room you can see the repurposed wood! The newel post and balusters on the mudroom stairs were also from the repurposed lot of wood, but completely refinished for a new use.
The clients were young and savvy, with a very hands on approach to the design and construction process. A very skilled bargain hunter, the client spent much of her free time when she was not working, going to estate sales and outlets to outfit the house. Their builder, as stated earlier, was very savvy in reusing wood where he could as well as salvaging things such as the original doors and door hardware while at the same time bringing the house up to date.
 Tile Doctor Ltd
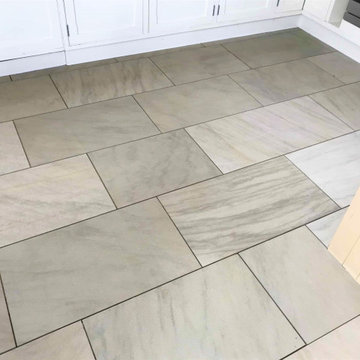
I received an enquiry from a property in Crowthorne to come and survey an unknown Flagstone Floor in a converted barn that was ready to be rented out. The owners where concerned the stone was letting the rest of the property down due to it being dirty and heavily stained, particularly around the kitchen and entrance areas. If your selling or renting out a property it really needs to look its best if you want to achieve a good price. Having spoken over the phone we agreed a date for me to pop over to complete a survey.
From further inspection I confirmed the stone was in fact a Sandstone, it was also clear that the sealer protecting the stone from ingrained dirt had worn away and was now allowing dirt and staining to ruin the appearance of the flagstones. It was a large floor so I measured up so I could work out the quantities of cleaning and sealing products needed and then walked the customer through the cleaning process. Later that day I sent over a detailed quotation which was accepted, and a date agreed for my return.
I should mention this work took place during the Covid restrictions, fortunately being a rental property, I was able to work in the property alone.
To deep clean the floor and remove the ingrained dirt and staining I used a strong dilution of Tile Doctor Pro-Clean. It is sprayed onto the floor and left to soak in for five minutes before agitating with a Black scrubbing pad fitted to a weighted buffing machine. The resultant slurry was then wet extracted away using a powerful high-pressure van mounted extracting system.
This action cleaned up most of the stone nicely however certain areas where heavily stained, particularly in the kitchen area where food and drink stains were more apparent. To tackle this, I applied a stronger cleaner/stripper product called Tile Doctor Remove and Go this time allowing ten minutes for it to soak in before scrubbing the surface with a very coarse 100-grit soft milling pad. This took quite a few attempts each time extracting the slurry away and then inspecting the floor to see if more work was needed.
Happy the stains have been removed, I then focused on renovating the surface Sandstone after the application of the coarse pad. This involves the application of several finer grit burnishing pads which close the pores and adds a subtle polish to the Sandstone. As I started with 100-grit pad it was necessary to gradually refine the surface with an incremental series of pads that included 200, 400 and finally 800-grit pads. Then to ensure a uniform finish across the floor I continued the 400 and 800 grit pads throughout the property. Water is used to lubricate the process and this turns into a fine slurry that is rinse extracted as before.
The cleaning process took up the whole of the first day and I am pleased to say the Sandstone floor looked very clean after I had finished.
The stone was then allowed dry off overnight with the aid of an industrial air mover and I returned later the next day to apply a new protective seal. In the meantime, my customer had been over to check out the floor and were over the moon with how it looked and wanted to keep the finish as natural as possible.
With this in mind, I applied Tile Doctor Ultra-Seal sealer to the Sandstone throughout, only two coats were needed. This is a premium sealer that is almost invisible and works by penetrating the stone thus preventing dirt from becoming ingrained. Once done the floor looked very clean and much brighter than before, it now had that wow factor which will help it attract a good yield in the rental market.
The trouble with rental properties of course is making sure the tenant uses the right product to maintain the floor and not a typical supermarket tile cleaner that are only designed for use on Ceramic and Porcelain tiles. In fact, these types of cleaning product can slowly strip the sealer off the floor so it’s always worth checking the label before purchasing. Fortunately Tile Doctor sells a product called Neutral Cleaner that is ideal for maintaining sealed stone floors, so I left them with a complimentary bottle and recommended they get some more to leave under the sink for the new tenant.
Dennis Buckland
Berkshire Tile Doctor
 TVL Creative Ltd.
This project has been a labor of love for quite some time! The design ideas started flowing for this space back in 2016, and we are so excited to have recently completed the build-out process after our lengthy planning time frame. These wonderful clients completed a bathroom renovation with us last year, and we absolutely loved the charming, clean-lined farmhouse aesthetic we produced there. Wanting to carry that similar aesthetic into the kitchen, our clients hired us to transform their dated 90's builder-grade kitchen into a stunning showpiece for their home. While no major fixtures or appliances were relocated, nor were there major architectural changes, this space's transformation is a jaw-dropper. We began by removing the existing yellowed oak wood cabinets and replaced them with gorgeous custom cabinets from Tharp Cabinet Company. These cabinets are a very simple shaker style in a bright white paint color. We paired these fresh and bright cabinet with black hardware for a dramatic pop. We utilized the Blackrock pulls from Amerock and adore the playful contrast these pieces provide. On the backsplash, we used a very simple and understated white subway tile for a classic and timeless look that doesn't draw the eye away from the focal island or surrounding features. Over the range, we used a stunning mini-glass mosaic tile from TileBar that shimmers and showcases a variety of colors based on the time of day and light entry. The island is our favorite piece in this kitchen: a custom-built focal point from Tharp, painted in a gorgeous custom blue from Benjamin Moore. The island is topped with a dramatic slab of Arabescato from Pental Surfaces. On the perimeter cabinets, we've utilized the stunning White Fusion quartz, also from Pental. For final touches, we've utilized matte black wall sconces over the windows from Rejuvenation, and have a gorgeous sink faucet from Delta Faucet. Throughout the main level, we refinished the hardwood floors to bring them to a more soft, neutral brown color. New paint is carried throughout the house as well. We adore the bright simplicity of this space, and are so excited that our clients can enjoy this family friendly stunner for years to come!
 Tile Doctor Ltd
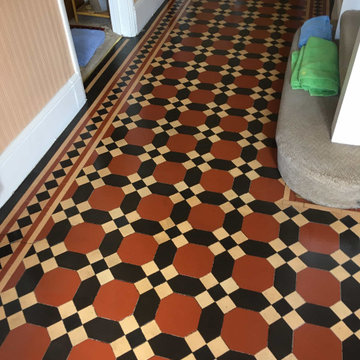
This Victorian floor in Twickenham, Middlesex was in good physical condition for its age but needed a good deep clean. Our customer had informed us that they had never cleaned or sealed the floor in the sixteen years that they had lived there so it was well overdue.
I went over to survey the floor and completed a test clean on a small section of tiling to see which products/techniques would work best. I like to do this as it demonstrates to the client what can be done, and it allows me to come up with an accurate price for doing the work.
As you can see from the pictures, there was quite a difference in the test patch compared to the rest of the floor. Years of foot traffic from the street had taken its’ toll and the floor was very dirty. Luckily, the floor was in very good condition and had not worn too badly.
Once they had seen the test patch, they were confident that it would be worth go ahead with my quote. It would ensure that the period feature was retained for many years to come. The colours on the floor were quite faded so it would be nice to get it restored.
I started the cleaning process by first taping up the surrounding skirting boards and doors to ensure they were protected from potential splashing. Cleaning involved spraying the Victorian tiles with a strong dilution of Tile Doctor Pro-Clean which is a dedicated Tile and Grout cleaning product. This was left to soak in for about ten minutes and then scrubbed in using a black pad fitted to a heavy-duty rotary scrubber.
This gives the floor a good mechanical scrub and works wonders releasing the ground-in dirt and soil from the tiles. The strong dilution of Pro-Clean will also remove any remaining sealers from the tile, however after sixteen years I doubted there would much trace of sealer left. Once done the floor was rinsed with water and all the soils removed with a wet vacuum.
Following the initial clean the colours were already much stronger. Next step however was to improve on that by giving the floor an acid rinse using Tile Doctor Grout Clean-Up. This removes mineral deposits and generally brightens up the appearance of the tile. After another round of scrubbing the floor was rinsed with our high-pressure washer and then vacuumed, extracting all of the dirty water and dirt away in one go. The floor was looking a lot better and was left to dry overnight.
After allowing the floor to dry overnight, we returned the next day to seal the floor. First, checking the floor was dry using the damp meter. Floors of this age can take a little longer to dry as there is no damp-proof membrane so it’s always worth checking as applying a sealer to damp tiles is not a good idea.
Once I was satisfied it was dry eight coats of Tile Doctor Seal and Go sheen finish sealer were applied. This takes a while to do as each coat needs to dry before applying the next. The sealer will protect the Victorian tiles for dirt and stains, it also enhanced the colours in the tile and will make it easier to keep the floor clean going forward.
My client was very pleased with the floor and mentioned that they should have called me in sooner! For aftercare cleaning I recommended Tile Doctor Neutral Clean which is an effective cleaner with a neutral pH, its designed for cleaning tiles without degrading the sealer.
Jonathan Oldham
South Middlesex Tile Doctor
 Tile Doctor Ltd
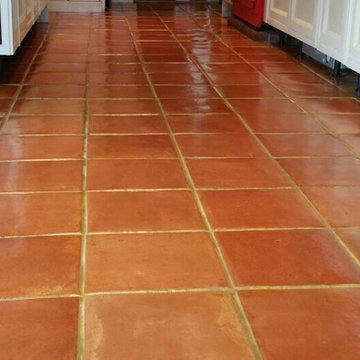
Here’s an interesting job I completed recently in the town of Lymington which is a lovely costal town within the New Forest and on the west side of the Solent. This Terracotta tiled floor was installed in the kitchen and was suffering from an efflorescence issue due to an ongoing leak which resulted in the salts in the water becoming deposited on the surface of the tiles as the water evaporated leaving a white bloom on the surface.
This process is more commonly known as efflorescence and is particularly common in old properties which have no damp proof membrane under the floor and white staining by the cupboards is especially visible in the below photograph.
My client was eager to have the problem fixed, and so enlisted Tile Doctor to get the job done.
To remove the efflorescence, the Terracotta tiled floor was acid washed using a mild dilution of Tile Doctor Grout Clean-Up which is primarily sold to remove grout smears but is equally effective at removing mineral deposits such as the white salts left behind by efflorescence.
The solution was scrubbed into the tiles using a stiff scrubbing brush and was successful at removing the white staining. Naturally it’s not advised to leave acid too long on any surface so the floor was treated in sections and then rinsed off with water and the residue removed using a wet-vacuum.
Following this, the floor was power-scrubbed in combination with a diluted solution of Tile Doctor Pro-Clean. Pro-Clean is a versatile cleaner that also contains stripping properties, allowing it to break down and remove old sealers, it also does a nice job getting the grout clean.
With the efflorescence treated and the floor now clean I was now happy with the condition of the tiles and give them a final rinse under pressure to ensure the floor was neutralised and any trace of products removed.
The Terracotta tiled floor was then left to dry overnight and I came back to seal the floor the next day. To seal the tiles I used three coats of Tile Doctor Seal & Go Extra, which provides a robust surface seal, and is recommended for internal floors with the damp issues.
Hopefully this quick report has offered some useful advice on how to treat efflorescence which is quite a common problem; naturally if you have further questions Tile Doctor does offer a free advice service so do get in touch.
Charles Okwechime
Hampshire Tile Doctor
 Tile Doctor Ltd
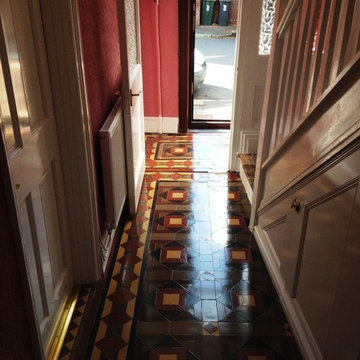
This Victorian tiled hallway at a house in the Forest of Dean had a very interesting pattern, consisting of an array of different colours, including shades of red, yellow and blue. Unfortunately, as you can see from the first photograph below, the tiles had lost all life, with the colours largely masked by months’ – or maybe even years’ – worth of ingrained dirt and muck. The floor as a whole was also suffering from a number of loose tiles that needed to be reset before it could be cleaned.
The property owner was keen to employ some professional assistance to restore the appearance of the floor and prevent it from getting in an even wrote state, and so contacted Tile Doctor who have a lot of experience working with Victorian tiled floors.
As mentioned, the loose tiles had to be repaired before the cleaning process could be started. I removed the tiles and extracted excess grout and old adhesive from the exposed concrete substrate using a vacuum, before putting the original tiles back into place and fixing them back into position carefully using fresh adhesive and matching grout.
Once happy the replaced tiles had set, I started the process of cleaning the entire area of hallway tiles using a combination of Tile Doctor Remove and Go to strip away the old sealer and Tile Doctor NanoTech HBU (formerly Ultra Clean) remover to get the tiles as clean as possible. The latter product contains nano-sized cleaning particles (hence the name) to reach difficult areas of trapped dirt, making it more effective than your run-of-the-mill tile cleaner. These two products were scrubbed into the tiles using a rotary machine fitted with a black scrubbing pad. The floor was then rinsed with water and the soiled residue was extracted with a wet vacuum.
I then paid particular attention to the grout, applying our alkaline-based multi-purpose cleaner Tile Doctor Pro-Clean to the grout lines, before scrubbing them with a narrow grout brush. This quickly had the grout looking clean again: I’d even go as far as to say that it matched it seamlessly with the fresh grout that had just been laid.
With the tile and grout as clean as it was possible to get it, I gave the whole floor a final rinse to neutralise the excess chemicals. I extracted as much water as possible with a wet vacuum and left the floor to dry overnight.
My first task upon returning to the property the next day was to check for any dampness. If you neglect to remove all excess moisture from the surface of the tiles before sealing it is more than likely going to cloud the sealer, rendering it less effective I’m protecting the stone against ingrained dirt and stains.
Once satisfied that the floor was completely dry, I proceeded to seal the tiles using multiple costs of Tile Doctor Seal and Go. Seal and Go is what we would classify as a topical sealer, meaning it rests on the surface of the tiles to act as a durable layer of protection against all kinds of muck. While providing surface protection, Seal and Go also adds a nice subtle sheen to the tiles, as per the customer’s request.
The customer was quite amazed at how quickly the appearance of the tiles had been restored. It was fantastic to see the colours we both knew were hidden in the tiles come to life once again. Another satisfied customer for sure!
Paul Wales
Monmouthshire Tile Doctor
 Tile Doctor Ltd
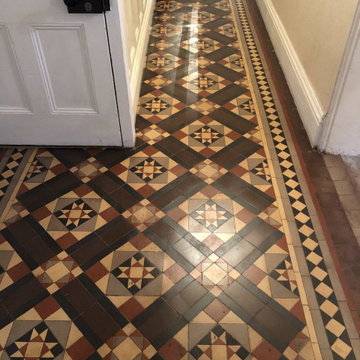
I received this Tile Doctor enquiry from a customer in the historic market town of Kidderminster who had a Victorian Minton Tiled hallway floor that had been covered in carpet for a long time. The carpet had since been removed and now the floor was fully exposed you could see it was covered in carpet glue and dirty with ingrained grime.
I arranged an appointment to inspect the floor thoroughly and provide a quote; you can never be sure what issues you might find, so surveying the floor first ensures I can give an accurate price. As anticipated the entire floor was covered in thick glue, fortunately apart from a few loose tiles the floor was in good order. I explained to the client the process I would use on the floor and that I was confident the floor could be restored for them. My quote was accepted, and we arranged a date to carry out the work.
I often get customers claiming to have an original Minton Tiled floor however there were many manufacturers creating similar patterns at the end of the 19th century, the only way to be certain is to lift a tile and look to see what’s stamped on the back. In this case we had a few loose ones that needed relaying, so I was able to confirm that quite easily.
I arrived on the booked day and the first step was to tape up the surrounding area to prevent any damage from splashing. I was then ready to tackle the glue. I applied a strong solution of Tile Doctor Remove and Go and covered the floor with industrial cling film to allow the solution to get to work without drying out. The film was removed after an hour and then the Remove and Go was worked into the tiles using a coarse 200-grit milling pad to cut through the glue and resurface the tiles.
Afterwards the floor was rinsed with water and the soil removed with a wet vacuum. Some of the glue proved very stubborn to remove and had to be dealt with carefully by hand using an industrial scraper, sometimes a bit of elbow grease is the only way to get the job done.
The floor was then given an Acid Rinse with Tile Doctor Acid Gel, this is designed to further clean the tiles and counter any efflorescent salts that might be present in the tiles due to the lack of damp proof membrane.
After another rinse and soil removal I turned my attention to the loose tiles which were secured by removing the tile, scraping out the adhesive and re-fixing. The appearance of the floor was much improved after day and the floor was then left overnight to dry out in preparation or the sealing process.
Returning the next day, I first checked the floor was dry using a damp meter. Once I was satisfied it was dry, I started to seal the floor. I had selected to use Tile Doctor Seal and Go Extra for sealing. It adds a richness to the colour of the tiles and a subtle sheen finish. I applied three coats, waiting for each one to dry before applying the next.
The pattern on the floor was really nice and the colours were now very vibrant. The client was very pleased and left a great review copied below:
“Our floor wasn’t easy as it had some form of coating on it which was difficult to remove but Mark took a lot of time to ensure the surface was thoroughly clean before the sealant was put down. Very pleased with how it looks. K. B, Kidderminster”
Mark Conway
Worcestershire Tile Doctor
 TVL Creative Ltd.
This project has been a labor of love for quite some time! The design ideas started flowing for this space back in 2016, and we are so excited to have recently completed the build-out process after our lengthy planning time frame. These wonderful clients completed a bathroom renovation with us last year, and we absolutely loved the charming, clean-lined farmhouse aesthetic we produced there. Wanting to carry that similar aesthetic into the kitchen, our clients hired us to transform their dated 90's builder-grade kitchen into a stunning showpiece for their home. While no major fixtures or appliances were relocated, nor were there major architectural changes, this space's transformation is a jaw-dropper. We began by removing the existing yellowed oak wood cabinets and replaced them with gorgeous custom cabinets from Tharp Cabinet Company. These cabinets are a very simple shaker style in a bright white paint color. We paired these fresh and bright cabinet with black hardware for a dramatic pop. We utilized the Blackrock pulls from Amerock and adore the playful contrast these pieces provide. On the backsplash, we used a very simple and understated white subway tile for a classic and timeless look that doesn't draw the eye away from the focal island or surrounding features. Over the range, we used a stunning mini-glass mosaic tile from TileBar that shimmers and showcases a variety of colors based on the time of day and light entry. The island is our favorite piece in this kitchen: a custom-built focal point from Tharp, painted in a gorgeous custom blue from Benjamin Moore. The island is topped with a dramatic slab of Arabescato from Pental Surfaces. On the perimeter cabinets, we've utilized the stunning White Fusion quartz, also from Pental. For final touches, we've utilized matte black wall sconces over the windows from Rejuvenation, and have a gorgeous sink faucet from Delta Faucet. Throughout the main level, we refinished the hardwood floors to bring them to a more soft, neutral brown color. New paint is carried throughout the house as well. We adore the bright simplicity of this space, and are so excited that our clients can enjoy this family friendly stunner for years to come!
 Tile Doctor Ltd
If you want a polished stone floor to keep its appearance, then it will need a regular maintenance plan in place, without it the stone will lose its polish and start to look dull and un-inviting which was the story with this Travertine tiled floor installed throughout much of the grout floor of this house in the village of Great Wilbraham near Cambridge.
I was able to find out from the owner that the floor was last treated six years ago with Lithofin Stain Stop which is a solvent based impregnating sealer which like all sealers will wear off after a few years. Naturally this depends on the amount of wear the floor receives and what tends to happen is this process occurs more rapidly in the high traffic areas leading to an uneven appearance.
The best course of action now would be to remove what was left of the sealer and re-polish and seal the floor.
During my inspection of the floor I had noticed a number of irregular holes in one of the Travertine tiles which needed filling with a colour matching filler; this worked out quite well and as you can see from the photographs below the result looked entirely natural.
After protecting the clients skirting boards with protective film we proceeded to burnish the floor through with a set of Tile Doctor Diamond encrusted honing pads.
During the application of the first coarse pad we also added a strong dilution of Tile Doctor Pro-Clean combined with NanoTech Ultra-Clean to aid the removal of sealer residues from the pores of the Travertine. The floor was then rinsed and the soiled solution extracted using a wet vacuum.
With the sealer remove we were now able to concentrate on building up the polish on the stone by applying the remaining pads from Medium, Fine through to Very Fine, each lubricated with a little water and ensuring to rinse in-between the application of each pad.
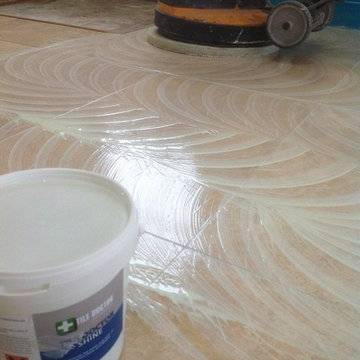
With the floor now clean and the polish restored the last step was to protect it so it would keep its appearance for as long as possible. There are a number of solutions for this but for a long durable shine I opted to work Tile Doctor Shine Powder into the Travertine.
The powder is applied liberally to the floor and then ground in using a slow speed floor rotary machine fitted with a white or tan buffing pad lubricated with water.
The shine on the floor has now been restored and the client has a beautiful and durable finish to their Travertine tiles.
Mick Conlon
Cambridge Tile Doctor
18