
Search results for "Quitting process" in Home Design Ideas

 New Vista Renovation
Congratulations to the family that allowed us to transform their kitchen space! We managed to complete this remodel - just in time for them to bring a beautiful baby girl into this world!
It was quite an amazing experience to design and remodel this home with our new Medallion Cabinetry product line. The main area of cabinetry features our Gold Line in Park Place door style, in the color Sea Salt with Pewter Highlight. Their new 7ft island is our Appaloosa Peppercorn with matching island legs.
New Vista managed this project from start to finish, including all permits required by the local building department.
The previous 20ft wall had been located from the area of the remaining post to the window to the right of the sink, shown in these photos. Proper removal of this wall did require a structurally sound weight load transfer in the attic. Safety comes first!
Also included: Granite counters, new appliances, brick style backsplash, flooring, gas line/plumbing/electrical relocation, can lighting and new plumbing fixtures.
Our CAD drawings are proving to be incredibly helpful in the design process of our remodels, allowing customers to really SEE what they can do with the space they have!
This project had closed without any change orders and the total time encompassed exactly 8wks - from demolition to final inspection!

 New Vista Renovation
Congratulations to the family that allowed us to transform their kitchen space! We managed to complete this remodel - just in time for them to bring a beautiful baby girl into this world!
It was quite an amazing experience to design and remodel this home with our new Medallion Cabinetry product line. The main area of cabinetry features our Gold Line in Park Place door style, in the color Sea Salt with Pewter Highlight. Their new 7ft island is our Appaloosa Peppercorn with matching island legs.
New Vista managed this project from start to finish, including all permits required by the local building department.
The previous 20ft wall had been located from the area of the remaining post to the window to the right of the sink, shown in these photos. Proper removal of this wall did require a structurally sound weight load transfer in the attic. Safety comes first!
Also included: Granite counters, new appliances, brick style backsplash, flooring, gas line/plumbing/electrical relocation, can lighting and new plumbing fixtures.
Our CAD drawings are proving to be incredibly helpful in the design process of our remodels, allowing customers to really SEE what they can do with the space they have!
This project had closed without any change orders and the total time encompassed exactly 8wks - from demolition to final inspection!
Find the right local pro for your project

 Vetter Architects
The client’s request was quite common - a typical 2800 sf builder home with 3 bedrooms, 2 baths, living space, and den. However, their desire was for this to be “anything but common.” The result is an innovative update on the production home for the modern era, and serves as a direct counterpoint to the neighborhood and its more conventional suburban housing stock, which focus views to the backyard and seeks to nullify the unique qualities and challenges of topography and the natural environment.
The Terraced House cautiously steps down the site’s steep topography, resulting in a more nuanced approach to site development than cutting and filling that is so common in the builder homes of the area. The compact house opens up in very focused views that capture the natural wooded setting, while masking the sounds and views of the directly adjacent roadway. The main living spaces face this major roadway, effectively flipping the typical orientation of a suburban home, and the main entrance pulls visitors up to the second floor and halfway through the site, providing a sense of procession and privacy absent in the typical suburban home.
Clad in a custom rain screen that reflects the wood of the surrounding landscape - while providing a glimpse into the interior tones that are used. The stepping “wood boxes” rest on a series of concrete walls that organize the site, retain the earth, and - in conjunction with the wood veneer panels - provide a subtle organic texture to the composition.
The interior spaces wrap around an interior knuckle that houses public zones and vertical circulation - allowing more private spaces to exist at the edges of the building. The windows get larger and more frequent as they ascend the building, culminating in the upstairs bedrooms that occupy the site like a tree house - giving views in all directions.
The Terraced House imports urban qualities to the suburban neighborhood and seeks to elevate the typical approach to production home construction, while being more in tune with modern family living patterns.
Overview:
Elm Grove
Size:
2,800 sf,
3 bedrooms, 2 bathrooms
Completion Date:
September 2014
Services:
Architecture, Landscape Architecture
Interior Consultants: Amy Carman Design
 Tile Doctor Ltd
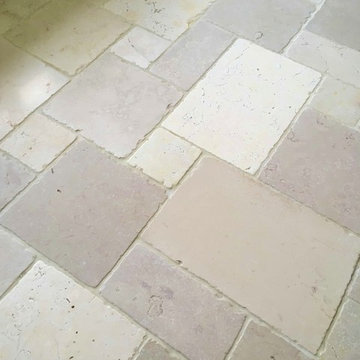
This Limestone tiled floor had been installed in the kitchen of a property in Teddington three years before and due to the use of the wrong cleaning product was now stripped of its protective sealer. Limestone like any natural stone is porous and without a sealer in place dirt becomes trapped in the stone making it very difficult to keep clean. The property was close to Bushy Park situated in South West London on the North bank of the Thames which is only about seven miles from my base in Shepperton.
I discovered all of this after visiting the property to quote for deep cleaning and resealing the floor. It turns out they have been using Flash multi-surface & floor cleaner which has an acidic pH of 10.3, compare this to Tile Doctor Remove and Go which we use to strip sealers off floors and has a pH of 12. Needless to say, this was not the right product to use and the old sealer had been completely stripped off the floor and probably within the first few months.
On top of this our customer had 3 children and a dog running in and out of the garden and was therefore transferring quite a lot of dirt into the stone. After surveying the floor, I discussed the renovation process with the customer which would take two days and include a deep clean of the Limestone followed by the application of a sealer to ensure it did not hold onto the dirt. They were after a sheen finish for the floor and were keen to have natural brown and cream variations in the stone highlighted. We agreed a price for the work and booked a date for the work to start.
To start with, we machine scrubbed the floor with Tile Doctor Pro-Clean to break down the dirt and release it from the stone. We find the best process is to spray the Pro-Clean onto the floor first and then leave to dwell for ten minutes before scrubbing. It’s not long before the cleaning solution turns dark with the dirt released from the pores of the stone and this soil is then rinsed with water and vacuumed off the floor with a low-pressure hard floor cleaning machine.
Following the cleaning, we honed the Limestone using a sequence of 800, 1500 and finally 3000-grit Tile Doctor Burnishing Pads. The pads are applied with water to lubricate and the slurry generated is rinsed off the floor as before. This burnishing process brings up the natural sheen of the stone and tightens up its pores prior to sealing. I left the floor overnight to allow it to dry out.
The next day I returned to the property and checked the floor for moisture using a damp meter. The readings were fine, so I proceeded with the application of the sealer for which I used two coats of Tile Doctor Colour Grow. This is an impregnating sealer that enhances the colours and contrast on the stone while protecting it against future soiling and spillages. It gave a lovely sheen finish to the floor as requested by the customer.
As you can see from the pictures the process made a huge difference to the floor which now looks lighter and brighter, certainly the customer was more than happy. Before leaving I recommended, they should clean the floor using Tile Doctor Stone Soap, this is a pH neutral product that will ensure the seal does not get broken down like it previously had using the household cleaners. It is gentle enough to use every day if you wish is designed to help maintain the patina of the burnished stone.
Jonathan Oldham
South Middlesex Tile Doctor

 Painting in Partnership, Inc.
As shown in the second picture, the problem was more severe on the East side of the house. The water had rusted through the original nails holding the dentals to the base molding. The base molding had warped and pulled away from the upper crown. In addition to the CPES product, we used epoxy to fill the gaps and cracks in the wood. As a final step before caulking and painting, we applied a coat of high-built adhesive primer to all the trim elements of the building, including the window casings, which were original to the house. The crown moldings and window casings were seemingly made of old-growth wood, which survived in these hash conditions, without rotting for over one hundred fifty years. This wood is still hard as stone today! Wood like this deserves every bit of care we can muster to help preserve it for another century or more.
As you can also see in the second picture, since our painting and decorating company is EPA Lead-Safe Certified, the paint scraping process was done in compliance with EPA regulations. It involved setting up containment for the paint debris, sealing the windows, wearing protective garments, respirators etc., all this in 90 degree heat this week!
As a pioneer and early settler’s house, the Colonel Palmer house is quite remarkable by its size, style and quality of materials used in its construction. This was no shack on the prairie! It is well worth preserving for the generations to come.
 New Vista Renovation
Congratulations to the family that allowed us to transform their kitchen space! We managed to complete this remodel - just in time for them to bring a beautiful baby girl into this world!
It was quite an amazing experience to design and remodel this home with our new Medallion Cabinetry product line. The main area of cabinetry features our Gold Line in Park Place door style, in the color Sea Salt with Pewter Highlight. Their new 7ft island is our Appaloosa Peppercorn with matching island legs.
New Vista managed this project from start to finish, including all permits required by the local building department.
The previous 20ft wall had been located from the area of the remaining post to the window to the right of the sink, shown in these photos. Proper removal of this wall did require a structurally sound weight load transfer in the attic. Safety comes first!
Also included: Granite counters, new appliances, brick style backsplash, flooring, gas line/plumbing/electrical relocation, can lighting and new plumbing fixtures.
Our CAD drawings are proving to be incredibly helpful in the design process of our remodels, allowing customers to really SEE what they can do with the space they have!
This project had closed without any change orders and the total time encompassed exactly 8wks - from demolition to final inspection!

 e4 Interior Design, LLC
e4 Interior Design
This farmhouse was purchased by the clients in the end of 2015. The timeframe for the renovation was tight, as the home is a hot summer rental in the historic district of Kennebunkport. This antique colonial home had been expanded over the years. The intention behind the renovation was quite simple; to remove wall paper, apply fresh paint, change out some light fixtures and renovate the kitchen. A somewhat small project turned into a massive renovation, with the renovation of 3 bathrooms and a powder room, a kitchen, adding a staircase, plumbing, floors, changing windows, not to mention furnishing the entire house afterwords. The finished product really speaks for itself!
The aesthetic is "coastal farmhouse". We did not want to make it too coastal (as it is not on the water, but rather in a coastal town) or too farmhouse-y (while still trying to maintain some of the character of the house.) Old floors on both the first and second levels were made plumb (reused as vertical supports), and the old wood beams were repurposed as well - both in the floors and in the architectural details. For example - in the fireplace in the kitchen and around the door openings into the dining room you can see the repurposed wood! The newel post and balusters on the mudroom stairs were also from the repurposed lot of wood, but completely refinished for a new use.
The clients were young and savvy, with a very hands on approach to the design and construction process. A very skilled bargain hunter, the client spent much of her free time when she was not working, going to estate sales and outlets to outfit the house. Their builder, as stated earlier, was very savvy in reusing wood where he could as well as salvaging things such as the original doors and door hardware while at the same time bringing the house up to date.

 Montana Timber Products
ranchwood™ Reclaimed Barn Wood Alternative – South Dakota timbers
-
Nothing embodies the South Dakota frontier spirit quite like Montana Timber Products pre-finished ranchwood™ Tackroom timbers constructed into a fine pergola.
-
Not just a siding company, Montana Timber Products also caters to your exposed, pre-finished beams and timbers.
-
ranchwood™ is Montana Timber Products' flagship rustic natural wood timbers, a reclaimed barn wood alternative that is milled from new, rough stock, kiln dried, chemical free wood.
ranchwood™ is put through a production process that creates aesthetically beautiful rustic wood siding and authentic reclaimed barn wood and reclaimed lumber alternatives.
Typically less expensive than antique reclaimed barn wood, ranchwood™ offers uncompromising rustic wood beauty.
-
ranchwood™ Tackroom timbers provides a strong, substantive look and function.
-
Montana Timber Products is a custom millwork shop. Montana Timber Products' common texturizing options are Wire Brushed and Circle Sawn. Wire Brushed offers aesthetic and physical depth to the wood grain. The traditional milling practice of using large circular saw blades creates Montana Timber Products' Circle Sawn texture.
The result of the texturizing process is greater surface area allowing Seal-Once, 100% NO VOC waterproofer with a 10 year guarantee, to more effectively penetrate the wood. Seal-Once is safe for pets and children, exterior and interior use.
-
Tackroom offers a darker, more robust look.
-
If the environment is important to you, Montana Timber Products natural wood siding, trim, interior accents, timbers -- all of our wood products -- do not use degenerative chemicals as some other companies do to achieve desired effects.
Reclaimed wood, barn wood alternatives, and faux vintage wood are popular building materials further exemplified by Montana Timber Products environmentally friendly manufacturing technique.
 Montana Timber Products
ranchwood™ Reclaimed Barn Wood Alternative – South Dakota timbers
-
Nothing embodies the South Dakota frontier spirit quite like Montana Timber Products pre-finished ranchwood™ Tackroom timbers constructed into a fine pergola.
-
Not just a siding company, Montana Timber Products also caters to your exposed, pre-finished beams and timbers.
-
ranchwood™ is Montana Timber Products' flagship rustic natural wood timbers, a reclaimed barn wood alternative that is milled from new, rough stock, kiln dried, chemical free wood.
ranchwood™ is put through a production process that creates aesthetically beautiful rustic wood siding and authentic reclaimed barn wood and reclaimed lumber alternatives.
Typically less expensive than antique reclaimed barn wood, ranchwood™ offers uncompromising rustic wood beauty.
-
ranchwood™ Tackroom timbers provides a strong, substantive look and function.
-
Montana Timber Products is a custom millwork shop. Montana Timber Products' common texturizing options are Wire Brushed and Circle Sawn. Wire Brushed offers aesthetic and physical depth to the wood grain. The traditional milling practice of using large circular saw blades creates Montana Timber Products' Circle Sawn texture.
The result of the texturizing process is greater surface area allowing Seal-Once, 100% NO VOC waterproofer with a 10 year guarantee, to more effectively penetrate the wood. Seal-Once is safe for pets and children, exterior and interior use.
-
Tackroom offers a darker, more robust look.
-
If the environment is important to you, Montana Timber Products natural wood siding, trim, interior accents, timbers -- all of our wood products -- do not use degenerative chemicals as some other companies do to achieve desired effects.
Reclaimed wood, barn wood alternatives, and faux vintage wood are popular building materials further exemplified by Montana Timber Products environmentally friendly manufacturing technique.
 Vetter Architects
The client’s request was quite common - a typical 2800 sf builder home with 3 bedrooms, 2 baths, living space, and den. However, their desire was for this to be “anything but common.” The result is an innovative update on the production home for the modern era, and serves as a direct counterpoint to the neighborhood and its more conventional suburban housing stock, which focus views to the backyard and seeks to nullify the unique qualities and challenges of topography and the natural environment.
The Terraced House cautiously steps down the site’s steep topography, resulting in a more nuanced approach to site development than cutting and filling that is so common in the builder homes of the area. The compact house opens up in very focused views that capture the natural wooded setting, while masking the sounds and views of the directly adjacent roadway. The main living spaces face this major roadway, effectively flipping the typical orientation of a suburban home, and the main entrance pulls visitors up to the second floor and halfway through the site, providing a sense of procession and privacy absent in the typical suburban home.
Clad in a custom rain screen that reflects the wood of the surrounding landscape - while providing a glimpse into the interior tones that are used. The stepping “wood boxes” rest on a series of concrete walls that organize the site, retain the earth, and - in conjunction with the wood veneer panels - provide a subtle organic texture to the composition.
The interior spaces wrap around an interior knuckle that houses public zones and vertical circulation - allowing more private spaces to exist at the edges of the building. The windows get larger and more frequent as they ascend the building, culminating in the upstairs bedrooms that occupy the site like a tree house - giving views in all directions.
The Terraced House imports urban qualities to the suburban neighborhood and seeks to elevate the typical approach to production home construction, while being more in tune with modern family living patterns.
Overview:
Elm Grove
Size:
2,800 sf,
3 bedrooms, 2 bathrooms
Completion Date:
September 2014
Services:
Architecture, Landscape Architecture
Interior Consultants: Amy Carman Design
 Montana Timber Products
ranchwood™ Reclaimed Barn Wood Alternative – South Dakota timbers
-
Nothing embodies the South Dakota frontier spirit quite like Montana Timber Products pre-finished ranchwood™ Tackroom timbers constructed into a fine pergola.
-
Not just a siding company, Montana Timber Products also caters to your exposed, pre-finished beams and timbers.
-
ranchwood™ is Montana Timber Products' flagship rustic natural wood timbers, a reclaimed barn wood alternative that is milled from new, rough stock, kiln dried, chemical free wood.
ranchwood™ is put through a production process that creates aesthetically beautiful rustic wood siding and authentic reclaimed barn wood and reclaimed lumber alternatives.
Typically less expensive than antique reclaimed barn wood, ranchwood™ offers uncompromising rustic wood beauty.
-
ranchwood™ Tackroom timbers provides a strong, substantive look and function.
-
Montana Timber Products is a custom millwork shop. Montana Timber Products' common texturizing options are Wire Brushed and Circle Sawn. Wire Brushed offers aesthetic and physical depth to the wood grain. The traditional milling practice of using large circular saw blades creates Montana Timber Products' Circle Sawn texture.
The result of the texturizing process is greater surface area allowing Seal-Once, 100% NO VOC waterproofer with a 10 year guarantee, to more effectively penetrate the wood. Seal-Once is safe for pets and children, exterior and interior use.
-
Tackroom offers a darker, more robust look.
-
If the environment is important to you, Montana Timber Products natural wood siding, trim, interior accents, timbers -- all of our wood products -- do not use degenerative chemicals as some other companies do to achieve desired effects.
Reclaimed wood, barn wood alternatives, and faux vintage wood are popular building materials further exemplified by Montana Timber Products environmentally friendly manufacturing technique.

 Kathleen Jennison
An Arts & Crafts Bungalow is one of my favorite styles of homes. We have quite a few of them in our Stockton Mid-Town area. And when C&L called us to help them remodel their 1923 American Bungalow, I was beyond thrilled.
As per usual, when we get a new inquiry, we quickly Google the project location while we are talking to you on the phone. My excitement escalated when I saw the Google Earth Image of the sweet Sage Green bungalow in Mid-Town Stockton. "Yes, we would be interested in working with you," I said trying to keep my cool.
But what made it even better was meeting C&L and touring their home, because they are the nicest young couple, eager to make their home period perfect. Unfortunately, it had been slightly molested by some bad house-flippers, and we needed to bring the bathroom back to it "roots."
We knew we had to banish the hideous brown tile and cheap vanity quickly. But C&L complained about the condensation problems and the constant fight with mold. This immediately told me that improper remodeling had occurred and we needed to remedy that right away.
The Before: Frustrations with a Botched Remodel
The bathroom needed to be brought back to period appropriate design with all the functionality of a modern bathroom. We thought of things like marble countertop, white mosaic floor tiles, white subway tile, board and batten molding, and of course a fabulous wallpaper.
This small (and only) bathroom on a tight budget required a little bit of design sleuthing to figure out how we could get the proper look and feel. Our goal was to determine where to splurge and where to economize and how to complete the remodel as quickly as possible because C&L would have to move out while construction was going on.
The Process: Hard Work to Remedy Design and Function
During our initial design study, (which included 2 hours in the owners’ home), we noticed framed images of William Morris Arts and Crafts textile patterns and knew this would be our design inspiration. We presented C&L with three options and they quickly selected the Pimpernel Design Concept.
We had originally selected the Black and Olive colors with a black vanity, mirror, and black and white floor tile. C&L liked it but weren’t quite sure about the black, We went back to the drawing board and decided the William & Co Pimpernel Wallpaper in Bayleaf and Manilla color with a softer gray painted vanity and mirror and white floor tile was more to their liking.
After the Design Concept was approved, we went to work securing the building permit, procuring all the elements, and scheduling our trusted tradesmen to perform the work.
We did uncover some shoddy work by the flippers such as live electrical wires hidden behind the wall, plumbing venting cut-off and buried in the walls (hence the constant dampness), the tub barely balancing on two fence boards across the floor joist, and no insulation on the exterior wall.
All of the previous blunders were fixed and the bathroom put back to its previous glory. We could feel the house thanking us for making it pretty again.
The After Reveal: Cohesive Design Decisions
We selected a simple white subway tile for the tub/shower. This is always classic and in keeping with the style of the house.
We selected a pre-fab vanity and mirror, but they look rich with the quartz countertop. There is much more storage in this small vanity than you would think.
The Transformation: A Period Perfect Refresh
We began the remodel just as the pandemic reared and stay-in-place orders went into effect. As C&L were already moved out and living with relatives, we got the go-ahead from city officials to get the work done (after all, how can you shelter in place without a bathroom?).
All our tradesmen were scheduled to work so that only one crew was on the job site at a time. We stayed on the original schedule with only a one week delay.
The end result is the sweetest little bathroom I've ever seen (and I can't wait to start work on C&L's kitchen next).
Thank you for joining me in this project transformation. I hope this inspired you to think about being creative with your design projects, determining what works best in keeping with the architecture of your space, and carefully assessing how you can have the best life in your home.
 Vetter Architects
The client’s request was quite common - a typical 2800 sf builder home with 3 bedrooms, 2 baths, living space, and den. However, their desire was for this to be “anything but common.” The result is an innovative update on the production home for the modern era, and serves as a direct counterpoint to the neighborhood and its more conventional suburban housing stock, which focus views to the backyard and seeks to nullify the unique qualities and challenges of topography and the natural environment.
The Terraced House cautiously steps down the site’s steep topography, resulting in a more nuanced approach to site development than cutting and filling that is so common in the builder homes of the area. The compact house opens up in very focused views that capture the natural wooded setting, while masking the sounds and views of the directly adjacent roadway. The main living spaces face this major roadway, effectively flipping the typical orientation of a suburban home, and the main entrance pulls visitors up to the second floor and halfway through the site, providing a sense of procession and privacy absent in the typical suburban home.
Clad in a custom rain screen that reflects the wood of the surrounding landscape - while providing a glimpse into the interior tones that are used. The stepping “wood boxes” rest on a series of concrete walls that organize the site, retain the earth, and - in conjunction with the wood veneer panels - provide a subtle organic texture to the composition.
The interior spaces wrap around an interior knuckle that houses public zones and vertical circulation - allowing more private spaces to exist at the edges of the building. The windows get larger and more frequent as they ascend the building, culminating in the upstairs bedrooms that occupy the site like a tree house - giving views in all directions.
The Terraced House imports urban qualities to the suburban neighborhood and seeks to elevate the typical approach to production home construction, while being more in tune with modern family living patterns.
Overview:
Elm Grove
Size:
2,800 sf,
3 bedrooms, 2 bathrooms
Completion Date:
September 2014
Services:
Architecture, Landscape Architecture
Interior Consultants: Amy Carman Design

 Jessica Cain
Vivi's Bedroom
Photo: Jessica Cain © 2017 Houzz
Inspiration for a bedroom eclectic girl carpeted and gray floor kids' bedroom remodel in Kansas City with gray walls
Inspiration for a bedroom eclectic girl carpeted and gray floor kids' bedroom remodel in Kansas City with gray walls

 Cure Design Group
The furniture was recently purchased so we really needed to get the job done in bedding, color, patterns, and infusing some key pieces/accessories to work in conjunction with the youthful furniture selection.
The inspiration to her design came from a Designers Guild wallpaper that resembled the color of the sky…from there we changed the wall color to a soft gray, added new bedding and pillows, gave the window treatments a neutral texture, changed out overhead lighting and lamps and infused some current accessories.
The change was exactly what was needed! But….we weren’t quite finished. We decided at that point that some extra storage was needed as well as an opportunity to bring that outdoor woodsy feeling into her room. We then changed her nightstand to more of a dresser wrapped in the gloss white and drawers in reclaimed wood.
What a difference!!! But, collectively we still I felt we needed one more change to give her room that “wow” factor. I then decided to change the drama of her existing headboard to one that was spectacular!! And it worked!!!
We are still in the process of changing out her desk, but for the most part we are there!!!

 Susan Yeley Homes
Like most of our projects, we can't gush about this reno—a new kitchen and mudroom, ensuite closet and pantry—without gushing about the people who live there. The best projects, we always say, are the ones in which client, contractor and design team are all present throughout, conception to completion, each bringing their particular expertise to the table and forming a cohesive, trustworthy team that is mutually invested in a smooth and successful process. They listen to each other, give the benefit of the doubt to each other, do what they say they'll do. This project exemplified that kind of team, and it shows in the results.
Most obvious is the opening up of the kitchen to the dining room, decompartmentalizing somewhat a century-old bungalow that was originally quite purposefully compartmentalized. As a result, the kitchen had to become a place one wanted to see clear through from the front door. Inset cabinets and carefully selected details make the functional heart of the house equal in elegance to the more "public" gathering spaces, with their craftsman depth and detail. An old back porch was converted to interior space, creating a mudroom and a much-needed ensuite walk-in closet. A new, larger deck went on: Phase One of an extensive design for outdoor living, that we all hope will be realized over the next few years. Finally, a duplicative back stairwell was repurposed into a walk-in pantry.
Modernizing often means opening spaces up for more casual living and entertaining, and/or making better use of dead space. In this re-conceptualized old house, we did all of that, creating a back-of-the-house that is now bright and cheerful and new, while carefully incorporating meaningful vintage and personal elements.
The best result of all: the clients are thrilled. And everyone who went in to the project came out of it friends.
Contractor: Stumpner Building Services
Cabinetry: Stoll’s Woodworking
Photographer: Gina Rogers
 Vetter Architects
The client’s request was quite common - a typical 2800 sf builder home with 3 bedrooms, 2 baths, living space, and den. However, their desire was for this to be “anything but common.” The result is an innovative update on the production home for the modern era, and serves as a direct counterpoint to the neighborhood and its more conventional suburban housing stock, which focus views to the backyard and seeks to nullify the unique qualities and challenges of topography and the natural environment.
The Terraced House cautiously steps down the site’s steep topography, resulting in a more nuanced approach to site development than cutting and filling that is so common in the builder homes of the area. The compact house opens up in very focused views that capture the natural wooded setting, while masking the sounds and views of the directly adjacent roadway. The main living spaces face this major roadway, effectively flipping the typical orientation of a suburban home, and the main entrance pulls visitors up to the second floor and halfway through the site, providing a sense of procession and privacy absent in the typical suburban home.
Clad in a custom rain screen that reflects the wood of the surrounding landscape - while providing a glimpse into the interior tones that are used. The stepping “wood boxes” rest on a series of concrete walls that organize the site, retain the earth, and - in conjunction with the wood veneer panels - provide a subtle organic texture to the composition.
The interior spaces wrap around an interior knuckle that houses public zones and vertical circulation - allowing more private spaces to exist at the edges of the building. The windows get larger and more frequent as they ascend the building, culminating in the upstairs bedrooms that occupy the site like a tree house - giving views in all directions.
The Terraced House imports urban qualities to the suburban neighborhood and seeks to elevate the typical approach to production home construction, while being more in tune with modern family living patterns.
Overview:
Elm Grove
Size:
2,800 sf,
3 bedrooms, 2 bathrooms
Completion Date:
September 2014
Services:
Architecture, Landscape Architecture
Interior Consultants: Amy Carman Design
 Cavalier Homes Inc
Kitchen Remodeling
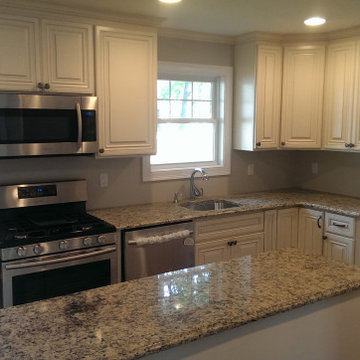
Do you believe that when someone looks at your kitchen, they should exclaim “WOW”? It is quite possible with our kitchen remodeling service. Cavalier Homes Inc. believes that the kitchen is the powerhouse of your family. Therefore, top-quality products combined with our impeccable craftsmanship have resulted in some of the most stunning kitchens in West Islip, Long Island, New York since 1985.
The kitchen of your dreams is well within your budget. If you’ve been envisioning something unique in terms of design, we can bring it to life. Kitchen remodeling is not always as simple as it appears. The upgrades must be finished, depending on the size of your kitchen. All you need is a team of experts to guide you through the entire kitchen remodeling process, from design to completion.
From project planning and design to sourcing materials and installation, Cavalier Homes is equipped to undertake every aspect of your kitchen remodel. We take on all of the responsibilities required to complete the kitchen remodeling work on time. Our home remodeling team is dedicated to making your kitchen as spectacular as you have imagined.
Important factors to consider before remodeling your kitchen:
As previously stated, a kitchen renovation can appear to be a massive undertaking. When you choose Cavalier Homes, you’ll be working with a Long Island home remodeling company that has been in business for nearly 40 years. Not only do we have four decades of design and craftsmanship experience, but we also have a professional team that will guide you through the entire kitchen remodeling process.
Here are some crucial factors to take into account in order to maximize the value of your kitchen remodeling service:
#1 Budget:
This is quite an important factor as every home renovation project starts here. Think about the aspects that are important to you before deciding on the overall remodeling budget. If it’s flooring, you should probably spend more money there and perhaps spend less on appliances and lighting.
#2 Design:
Keeping the existing design of your kitchen definitely keeps your budget low, but it may not be possible to realize what you have envisioned. However, walking through our ideas will yield the best results.
Take some time to consider your workflow when remodeling your kitchen. What would work best for your cooking style? Is it easy to move around your kitchen? What happens if your family grows?
#3 Appliances:
Upgrading their current appliances is one of the main reasons homeowners think about remodeling their kitchens. The adjustments that may be necessary to make room for the new appliances must possibly be taken into consideration. We will assist you in preparing the extra wiring, plumbing, and cabinetry.
#4 Countertops and Cabinets:
For a more elegant appearance, choose countertops made of wood, marble, or granite. Wooden surfaces add character and charm while not costing a lot. Solid wood cabinets and slabs of granite, marble, or quartz are classic choices that will never go out of style.
#5 Lighting and Flooring:
These elements can make a significant difference in your kitchen’s appearance, giving it a stunning and unique look.
In addition to the above, you’ll have to compare the costs and benefits of upgrading to current trends versus classic designs. Kitchen renovations remain one of the most popular home improvement projects among the majority of homeowners. Contact us to discuss the design of your new kitchen and how we can assist you in providing the best kitchen remodeling service possible.
 William Hoffman Architect
4 Steps to Achieving a Rewarding Cost Effective Home Renovation
1 Home Renovation an Introduction
A home renovation due to changes in family needs and space requirements can be a challenging, but also a rewarding experience. As a homeowner, gathering and coordinating resources and possibly help from professional consultants are required. Once the construction phase has started, patience, endurance and commitment to follow through are necessary. Despite the challenges, the rewards of a well-planned and successfully completed project are meaningful, adding aesthetic and economic value, also providing the opportunity to personalize a home, encompassing the function, comfort and aesthetics to accommodate individual taste and lifestyle.
A renovation of an existing home is a viable alternative to moving or building a new home, assuming that a home is structurally sound, the expenditure to enlarge or improve can be a cost effective alternative. A home possessing charm, style, historical significance, established landscaping or an exceptional location could be a significant motivation to consider purchasing another home with the intent to renovate.
The complexity of a project could be relatively simple, changing the use of a room, consolidating two rooms into one, or opening up a room to the outdoors. It could also be a more involved task requiring planning, design and construction documents to build a second floor addition, the addition of a new wing or completely gutting the interior. Some projects could be completed in a weekend’s work or more complex projects, using a “Master Plan”, a plan which provides overall guidance; a renovation can be accomplished all at once or divided into manageable projects over a period of time. With the home evolving gradually allowing the renovation to be planned, timed and tailored to meet individual needs and circumstances.
The due diligence phase should precede the decision to renovate whether it’s an existing home or a home that is purchased with the intent to renovate. The due diligence phase will reveal the factors affecting the nature and scope of the project or if a renovation makes sense.
Every renovation project is unique relative to personal requirements, architectural style & construction type. This guide will be helpful in developing an understanding of the preliminary groundwork required to realize a successful project. If properly planned, a home renovation project can be a positive and rewarding experience resulting in a comfortable, practical and an attractive living environment.
The first step of the planning process is documenting the goals and long-range plans referred to as the “Project Program”. This will dictate the nature, scope and feasibility of the project. Providing a guide to achieving defined goals, the timing or phasing of the project and budget required to achieve the desired end result.
2 Documenting Existing Conditions
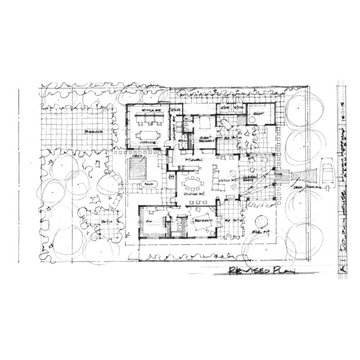
Once the “Project Program”, has been established, the next step is to determine what there is to work with. This requires documenting the home’s floor plan and site elements which includes drawing an “as built” floor & site plan consisting of the existing exterior walls, interior rooms, doors, windows, etc. and surrounding site elements, landscape and other significant exterior features. Additionally understanding and noting on the “as built” plan, the structural, mechanical and electrical systems as necessary. Gathering the “existing condition” information defines what there is to work with, creating the framework from which to facilitate and organize the decision making process and develop effective “project program” solutions.
3 Evaluating Existing Conditions
The goals and long-range plans have been established, and the existing floor plan and site elements have been documented. Before developing design solutions, the next step is to evaluate existing conditions. The evaluation includes: a detailed analysis of the structural, mechanical and electrical systems, determining the condition of the house, noting functional and aesthetic deficiencies. At the same time recognizing the home’s strengths, assets and evaluating its relationship to its site. The remaining parameters will be defined by the local jurisdiction’s zoning regulations, these regulations will define the “envelope”, within which the proposed project will be required to fit:
•required front, side & rear yard setbacks
•maximum allowable lot coverage & height
The previous three steps have provided the necessary foundation to start the design phase. The goals and long range plans have been established, existing conditions have been documented and the evaluation of what there is to work with are now in place. This will provide the framework from which to facilitate and organize design solutions. The consolidation of this information is manifested in the development of the “Master Plan” which will become the road map by which sound decision-making can be made as a home renovation evolves. Keeping the project, on a linear path, avoiding redundancies and back tracking, on time, within budget, concluding with a well crafted finished product. After all the “up front” research and documentation has been completed, the design phase of the project can now precede, with the creation of diagrammatic design drawings. Organizing interior spaces, taking into account the external elements, prevailing breezes, solar orientation, view, existing outdoor features, etc. Through the development of schematic sketches themes will emerge followed by design development drawings. Wise planning and renovation decisions can save money and time at the same time provide a well crafted finished project. The “Master Plan” provides a strategic path in the planning and decision making process leading to a successful and rewarding home renovation, which will add value and considerable enjoyment, for many years, living in a newly renovated home.
By virtue of having gone through these steps, frustrations sometimes encountered during a home renovation will be minimized, allowing the renovation to be a gratifying and rewarding experience. Being aware of the process allows one to become an “Educated Client,” which is worth quite a bit more than one might realize. The uneducated client may not realize the benefit of going through the planning, evaluation and documentation groundwork. He will only realize its benefits after having completed a prior renovation project. This rational approach keeps the design process on a direct path to achieving prescribed goals.
4 Exploring Design Solutions & Developing a Master Plan
The previous three steps have provided the necessary foundation to start the design phase. The goals and long range plans have been established, existing conditions have been documented and the evaluation of what there is to work with are now in place. This will provide the framework from which to facilitate and organize design solutions. The consolidation of this information is manifested in the development of the “Master Plan” which will become the road map by which sound decision-making can be made as a home renovation evolves. Keeping the project, on a linear path, avoiding redundancies and back tracking, on time, within budget, concluding with a well crafted finished product.
By virtue of having gone through these steps, frustrations sometimes encountered during a home renovation will be minimized, allowing the renovation to be a gratifying and rewarding experience. Being aware of the process allows one to become an “Educated Client,” which is worth quite a bit more than one might realize. The uneducated client may not realize the benefit of going through the planning, evaluation and documentation groundwork. He will only realize its benefits after having completed a prior renovation project. This rational approach keeps the design process on a direct path to achieving prescribed goals.
After all the “up front” research and documentation has been completed, the design phase of the project can now precede, with the creation of diagrammatic design drawings. Organizing interior spaces, taking into account the external elements, prevailing breezes, solar orientation, view, existing outdoor features, etc. Through the development of schematic sketches themes will emerge followed by design development drawings. Wise planning and renovation decisions can save money and time at the same time provide a well crafted finished project. The “Master Plan” provides a strategic path in the planning and decision making process leading to a successful and rewarding home renovation, which will add value and considerable enjoyment, for many years, living in a newly renovated home.
14