
Search results for "Reduce dark" in Home Design Ideas

 Boerne Kitchens and Baths
This large and bright kitchen was rethought from a dark cabinet, dark counter top and closed in feel. First the large separating wall from the kitchen into the back hallway overlooking the pool was reduced in height to allow light to spill into the room all day long. Navy Cabinets were repalinted white and the island was updated to a light grey. Absolute black counter tops were left on the perimeter cabinets but the center island and sink area were resurfaced in Cambria Ella. A apron front sign with Newport Brass bridge faucet was installed to accent the area. New pendant lights over the island and retro barstools complete the look. New undercabinet lighting, lighted cabinets and new recessed lighting finished out the kitchen in a new clean bright and welcoming room. Perfect for the grandkids to be in.
 Boerne Kitchens and Baths
This large and bright kitchen was rethought from a dark cabinet, dark counter top and closed in feel. First the large separating wall from the kitchen into the back hallway overlooking the pool was reduced in height to allow light to spill into the room all day long. Navy Cabinets were repalinted white and the island was updated to a light grey. Absolute black counter tops were left on the perimeter cabinets but the center island and sink area were resurfaced in Cambria Ella. A apron front sign with Newport Brass bridge faucet was installed to accent the area. New pendant lights over the island and retro barstools complete the look. New undercabinet lighting, lighted cabinets and new recessed lighting finished out the kitchen in a new clean bright and welcoming room. Perfect for the grandkids to be in.
 Boerne Kitchens and Baths
This large and bright kitchen was rethought from a dark cabinet, dark counter top and closed in feel. First the large separating wall from the kitchen into the back hallway overlooking the pool was reduced in height to allow light to spill into the room all day long. Navy Cabinets were repalinted white and the island was updated to a light grey. Absolute black counter tops were left on the perimeter cabinets but the center island and sink area were resurfaced in Cambria Ella. A apron front sign with Newport Brass bridge faucet was installed to accent the area. New pendant lights over the island and retro barstools complete the look. New undercabinet lighting, lighted cabinets and new recessed lighting finished out the kitchen in a new clean bright and welcoming room. Perfect for the grandkids to be in.
Find the right local pro for your project
 Boerne Kitchens and Baths
This large and bright kitchen was rethought from a dark cabinet, dark counter top and closed in feel. First the large separating wall from the kitchen into the back hallway overlooking the pool was reduced in height to allow light to spill into the room all day long. Navy Cabinets were repalinted white and the island was updated to a light grey. Absolute black counter tops were left on the perimeter cabinets but the center island and sink area were resurfaced in Cambria Ella. A apron front sign with Newport Brass bridge faucet was installed to accent the area. New pendant lights over the island and retro barstools complete the look. New undercabinet lighting, lighted cabinets and new recessed lighting finished out the kitchen in a new clean bright and welcoming room. Perfect for the grandkids to be in.
 Boerne Kitchens and Baths
This large and bright kitchen was rethought from a dark cabinet, dark counter top and closed in feel. First the large separating wall from the kitchen into the back hallway overlooking the pool was reduced in height to allow light to spill into the room all day long. Navy Cabinets were repalinted white and the island was updated to a light grey. Absolute black counter tops were left on the perimeter cabinets but the center island and sink area were resurfaced in Cambria Ella. A apron front sign with Newport Brass bridge faucet was installed to accent the area. New pendant lights over the island and retro barstools complete the look. New undercabinet lighting, lighted cabinets and new recessed lighting finished out the kitchen in a new clean bright and welcoming room. Perfect for the grandkids to be in.
 Boerne Kitchens and Baths
This large and bright kitchen was rethought from a dark cabinet, dark counter top and closed in feel. First the large separating wall from the kitchen into the back hallway overlooking the pool was reduced in height to allow light to spill into the room all day long. Navy Cabinets were repalinted white and the island was updated to a light grey. Absolute black counter tops were left on the perimeter cabinets but the center island and sink area were resurfaced in Cambria Ella. A apron front sign with Newport Brass bridge faucet was installed to accent the area. New pendant lights over the island and retro barstools complete the look. New undercabinet lighting, lighted cabinets and new recessed lighting finished out the kitchen in a new clean bright and welcoming room. Perfect for the grandkids to be in.
 Boerne Kitchens and Baths
This large and bright kitchen was rethought from a dark cabinet, dark counter top and closed in feel. First the large separating wall from the kitchen into the back hallway overlooking the pool was reduced in height to allow light to spill into the room all day long. Navy Cabinets were repalinted white and the island was updated to a light grey. Absolute black counter tops were left on the perimeter cabinets but the center island and sink area were resurfaced in Cambria Ella. A apron front sign with Newport Brass bridge faucet was installed to accent the area. New pendant lights over the island and retro barstools complete the look. New undercabinet lighting, lighted cabinets and new recessed lighting finished out the kitchen in a new clean bright and welcoming room. Perfect for the grandkids to be in.


 Kristi Spouse Interiors
Our client wanted to update many rooms including the kitchen, family room and den. We focused on reducing cost by utilizing the existing cabinets and refacing them with white painted shaker cabinet doors. We also extended the cabinets by filling in the void (aka Dust Trap) between the top cabinets and the ceiling. This lengthens the cabinets and gives them a built in custom cabinet look. The added crown trim, mill work panels and glossy paint looks great and avoids the "what do I put in the void above the cabinet" question. We added glass subway tile for back splash and honed Carrera marble counter tops.
Photos by Rebecca Anne Photography
 Boerne Kitchens and Baths
This large and bright kitchen was rethought from a dark cabinet, dark counter top and closed in feel. First the large separating wall from the kitchen into the back hallway overlooking the pool was reduced in height to allow light to spill into the room all day long. Navy Cabinets were repalinted white and the island was updated to a light grey. Absolute black counter tops were left on the perimeter cabinets but the center island and sink area were resurfaced in Cambria Ella. A apron front sign with Newport Brass bridge faucet was installed to accent the area. New pendant lights over the island and retro barstools complete the look. New undercabinet lighting, lighted cabinets and new recessed lighting finished out the kitchen in a new clean bright and welcoming room. Perfect for the grandkids to be in.

 Mottram Architecture
Timber frame homes offer unique challenges during a remodel. What often makes them beautiful and attractive to most homeowners, also makes them challenging for space requirements.
Context: The lovely couple that owned this home were struggling with some interesting floor plan challenges that just didn't work for their family. The loved the beautiful timbers and woodwork of their home, but the dramatically sloping ceilings on the second floor, particularly in the bathroom, just didn't work for this 1 1/2 bath home. Needing to use the skylight to approach the toilet was a less then ideal scenario. Although the bathroom footprint was more then adequate, the sloped ceiling only made half of the space useable. Check out the Before/After post on our blog to see the photos of the house pre-renovation. As much as they loved all the wood features in their home, another challenge they had was light. The wood ceiling made everything inside the house darker, even with a fantastic array of south facing windows, there were spaces in the home that felt dark and small. When they contacted us they wanted to know how could they make their brighter and more inviting, were there solutions to the 2nd floor sloped ceiling issues, and if they were going to do all of this work, how could they make their home more comfortable and efficient. A nagging water leak in the upstairs bathroom spurred them into action and here is how we solved their dilemma.
Conclusion: First, we added a little dormer to the rear of the house so we could get full headroom in nearly all of the upstairs bathroom! Then we decided to extend that dormer one more timber bay over to create a walk in closet with natural light and plenty of space. Since we were contemplating energy efficiency, we resolved a nagging issue that is present in a lot of timber frame construction, air tightness. Commonly found in timber frame construction, fiberglass insulation is installed in the rafter bays and board ceilings are installed over top. Unfortunately, board ceilings are anything but air tight, and fiberglass insulation needs to be in an airtight cavity for maximum effectiveness. So we were able to solve two issues at the same time for this homeowner. We removed the board ceiling and fiberglass insulation, we dense packed the rafter bays with cellulose insulation, and installed sheetrock in place of the boards. The boards were salvaged for re-use by the homeowner, and the space and light quality was dramatically improved. Some may think that losing the board ceiling took something away from the space, but what you'll see in the pictures is that it highly accentuates the heavy timbers and really makes them stand out in a beautiful way. Now with this added airtightness, better insulation, and brighter space, the homeowner hardly runs their wood stove, and it's so quiet in the space, an added bonus from changing the insulation. It became necessary to also add a sheetrock ceiling to the living room to hide the plumbing from the new bathroom layout above. Changing this ceiling gave the homeowner some real quality lighting that was lacking in the living room before. The brighter ceiling and new lighting layout completely transforms the living room into a space you want to hang out, even though the layout didn't change at all. When the homeowner saw the finished spaces she said "I can't believe this is my house, I want to live in this house"
Energy Efficiency: I touched a little on the efficiency above, but like all projects done with Mottram Architecture, we always want to leave you with a little extra. Timber frame construction with board ceilings and fiberglass insulation are notoriously leaky! If you want to know what we think about fiberglass insulation, check our our blog post on Why Fiberglass Insulation Sucks. By installing cellulose insulation and covering it with sheetrock we were able to greatly reduce the heat flowing out of this home. It not only improves cashflow it improves the comfort level in the space. Who wants to sit in their living room and feel a draft? Let us remind you, we are not saying cellulose insulation is an air barrier, we use the sheetrock to help with that, but it does significantly reduce the air flow over fiberglass insulation. And when we reduce the airflow, we reduce the heat flow. And when we reduce the heat flow, we reduce the need to re-heat that drafty air from outside. When it comes to energy efficiency the first and best place to start is air infiltration. We greatly reduced the air infiltration with the new insulation, but we also added a hat and warm boots. What I mean by that is, we improved the insulation in the roof, and we installed insulation in the basement. Maybe it's a silly analogy, but when you think about keeping warm, we always start with the hat and boots! With sustainability in mind, the next project will be to add a deck to the front of this house with rain catchment barrels from the metal roof. They are planning to plant a garden in the spring and the rain catchment system will help to irrigate the new garden.
Builder: East Shore Builders
Photographer: Michael Eric Berube
Michael Eric Berube, Maine Virtual Home Tours

 Period Architecture Ltd.
Angle Eye Photography
Example of a mid-sized classic enclosed medium tone wood floor living room design in Philadelphia with beige walls
Example of a mid-sized classic enclosed medium tone wood floor living room design in Philadelphia with beige walls

 Dion Designs
Kitchen update/redesign. The goal with this kitchen was to unite both rooms, visually heighten the ceilings and to make the room feel inviting, interesting and larger. We accomplished this by neutralizing the walls and ceilings in both rooms. The original soffits were reduced and pushed back to the cabinets, trimmed and painted to match the cabinets and new can lights were placed in the ceiling. The before photo of the kitchen shows a hint of what the old soffits looked like. They originally extended about a foot beyond and in front of the cabinets. The original soffits were housing can lights. Because they lights were physically lower than the ceiling, the ceiling height felt right on top of you. By pushing back the soffits and installing the lights into the ceiling the room now feels much bigger and taller. We added visual weight and interest to the eat-in area and balanced both rooms. The beautiful outdoors is now framed with new sliding doors which replaced the bay window in the before shot. Using a dark color to frame the outside of the sliding doors lengthens the room and draws interest and visual weight to the eat-in side of the Kitchen. This kitchen and owner were truly a delight to work with.
Gary G. Schempp www.garygschempp.com

 Studio Dearborn
This spacious kitchen in Westchester County is flooded with light from huge windows on 3 sides of the kitchen plus two skylights in the vaulted ceiling. The dated kitchen was gutted and reconfigured to accommodate this large kitchen with crisp white cabinets and walls. Ship lap paneling on both walls and ceiling lends a casual-modern charm while stainless steel toe kicks, walnut accents and Pietra Cardosa limestone bring both cool and warm tones to this clean aesthetic. Kitchen design and custom cabinetry, built ins, walnut countertops and paneling by Studio Dearborn. Architect Frank Marsella. Interior design finishes by Tami Wassong Interior Design. Pietra cardosa limestone countertops and backsplash by Marble America. Appliances by Subzero; range hood insert by Best. Cabinetry color: Benjamin Moore Super White. Hardware by Top Knobs. Photography Adam Macchia.

 Deck and Patio Company "Outdoor Living Experts"
This frequently bi-colored flower makes a dramatic statement in the garden and is an ideal plant for those who are new to gardening. In fact, this plant is so easy to grow it has been described as “tough to kill.” It is fairly drought-resistant, plus hummingbirds and butterflies love it. It is best planted in early spring or late fall.
When in bloom, the blossoms appear a bit like a hot poker or torch and for those feeling a bit of sadness saying good-bye to some of their lawn, note that these plants boast very “grass-like” leaves. This photo is of Vultaggio’s own garden and is courtesy of Sandra Vultaggio.
(Note: the dramatic dark blue/black flowers in the foreground are Salvia 'Black and Blue’ which bloom from late spring to early autumn.)
Photo: Courtesy of Sandra Vultaggio, Horticulture Consultant, Suffolk County Cornell Extension


 Kristi Spouse Interiors
Our client wanted to update many rooms including the kitchen, family room and den. We focused on reducing cost by utilizing the existing cabinets and refacing them with white painted shaker cabinet doors. We also extended the cabinets by filling in the void (aka Dust Trap) between the top cabinets and the ceiling. This lengthens the cabinets and gives them a built in custom cabinet look. The added crown trim, mill work panels and glossy paint looks great and avoids the "what do I put in the void above the cabinet" question. We added glass subway tile for back splash and honed Carrera marble counter tops.
Photos by Rebecca Anne Photography
 Kristi Spouse Interiors
Our client wanted to update many rooms including the kitchen, family room and den. We focused on reducing cost by utilizing the existing cabinets and refacing them with white painted shaker cabinet doors. We also extended the cabinets by filling in the void (aka Dust Trap) between the top cabinets and the ceiling. This lengthens the cabinets and gives them a built in custom cabinet look. The added crown trim, mill work panels and glossy paint looks great and avoids the "what do I put in the void above the cabinet" question. We added glass subway tile for back splash and honed Carrera marble counter tops.
Photos by Rebecca Anne Photography

 Kristi Spouse Interiors
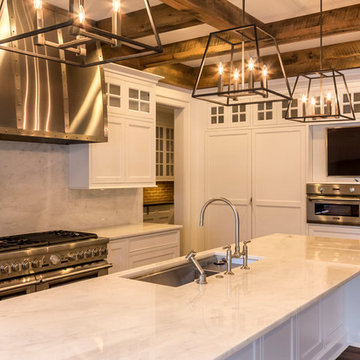
Our client wanted to update many rooms including the kitchen, family room and den. We focused on reducing cost by utilizing the existing cabinets and refacing them with white painted shaker cabinet doors. We also extended the cabinets by filling in the void (aka Dust Trap) between the top cabinets and the ceiling. This lengthens the cabinets and gives them a built in custom cabinet look. The added crown trim, mill work panels and glossy paint looks great and avoids the "what do I put in the void above the cabinet" question. We added glass subway tile for back splash and honed Carrera marble counter tops.
Photos by Rebecca Anne Photography

 Wendy Glaister Interiors
This kitchen's rustic quality immediately helps to relax its guests. Nothing is too precious to touch, and everything is natural. White perimeter cabinets keep the space open, but the texture of the travertine backsplash, granite counters, and rustic plank flooring keep things in perspective. The LED recessed lighting brightens the deepest part of the interior in an energy efficient manner.
Counter stools which echo the rustic feeling complete the space.

 King Visual Design Inc.
New gloss finish grey cabinets and engineered ministrip grey wood flooing contrast nicely with the light grey and white paint finishes. New stainless steel applieaces, sink and faucet blend together seamlessly. A Caesarstone engineered quart countertop was used to help reduce staining with the white finish. Porcelanosa mirror and porcelain minibrick mosaic is used as high back splash materials. New bronze finish aluminum windows which replaced the original glazing are shown.
60