
Search results for "Reduce molding" in Home Design Ideas
 Deskins Group LLC
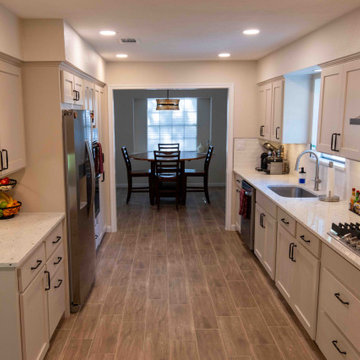
This whole-home renovation centered around creating a larger, more functional kitchen while maximizing the homeowner's budget. We expanded the kitchen into the former breakfast room, enlarged the opening between the spaces, removed a breakfast room window, and custom-built new cabinetry to seamlessly integrate the additional square footage. To reduce costs without sacrificing quality, we retained the existing refrigerator wall cabinetry and built matching custom cabinets around it, complete with new custom drawer systems, cabinet doors, crown molding, a refrigerator surround, updated hardware, and a Sherwin-Williams cabinet finish.
Beyond the kitchen, we installed new granite countertops, a custom tile backsplash, and new plank-style flooring throughout the home. In the living room, we removed dated wood paneling and installed new drywall to create a clean, modern appearance. Additional improvements included a full house repipe, new electrical work, a new pocket door between the kitchen and utility room, and numerous layout enhancements designed to improve the home's flow, function, and appearance. The result is a beautifully updated home with a spacious custom kitchen that delivers the look and functionality of a complete renovation while maintaining exceptional value
 MD Flooring Solutions, LLC
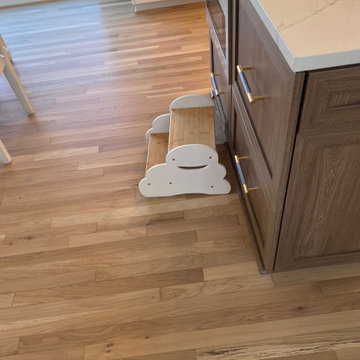
1x coat of Stain: Pickled Oak
- 1x coat Bona classic or intense sealer
- 2nd coat Commercial Grade Bona Traffic HD
- 3rd Coat Commercial Grade Bona Traffic HD
Finish: Satin
- To move 8x pieces of furniture out and back in from first level: front foyer, hallway, living room & dining room, family room, kitchen, closets
- Sand and refinish 2-1/4" Prefinished white oak hardwood floors in first level: front foyer, hallway, living room & dining room, family room, kitchen, closets - 968.06 sqft
- To remove Bevels from floors in first level: front foyer, hallway, living room & dining room, family room, kitchen, closets - 968.06 sqft
- To move Fridge Only and sand and refinish the area underneath it.
- To Sand & Refinish Transition: 3LFT of reducer kitchen to garage
- To Install Unfinished White Oak stained to match Shoe Molding in first level: front foyer, hallway, living room & dining room, family room, kitchen, closets
 John Cole Architect
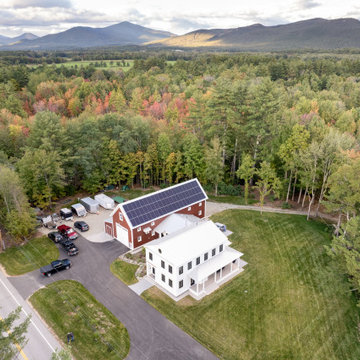
The goal set by the owners, a couple with farm family backgrounds, for a vacation and ultimately retirement home on 30 acres in the Mount Washington Valley was a high performance, low maintenance, Greek Revival inspired farmstead. The program included an open plan living/dining/kitchen area, first floor master suite, open and screen porches, mudroom, second floor guest bedrooms, and a barn to house farm equipment, recreational vehicles and a bocce court.
The building envelope includes continuously insulated R-32 walls, R-60 roof, R-18 foundation walls, and R-20 under the basement slab. Dense packed cellulose in wall and roof assemblies minimized the use of spray foam. A blower door test of 0.76 ACH50 confirmed a tightly constructed envelope. Traditional details, using non-traditional synthetic and composite products, were developed to clad the exterior and a 23 kW PV array was added to the south facing barn roof.
Energy efficient heating and cooling systems, along with balanced ventilation using an energy recovery ventilator (ERV), were integrated with the interiors. The second floor hallway is partitioned off from the stair to reduce heating and cooling loads when the guest rooms aren’t occupied. All LED lighting, including a cove light tucked into custom ceiling moldings, and Energy Star appliances reduced the electrical load. Two 30-yard containers of wood, plastic and cardboard were recycled during construction. The home achieved a HERS (Home Energy Rating System) rating of -30 (negative 30!), an order of magnitude below the 52 HERS average for New Hampshire and climate zone 6A in 2020. The electric meter has been running backward since the project was completed.
The result is a home that is healthy, comfortable, durable, and efficient, with electricity produced on site that more than offsets its use of fossil fuels.
Find the right local pro for your project


 Carlton Edwards
The Cherry Road project is a humble yet striking example of how small changes can have a big impact. A meaningful project as the final room to be renovated in this house, thus our completion aligned with the family’s move-in. The kitchen posed a number of problems the design worked to remedy. Such as an existing window oriented the room towards a neighboring driveway. The initial design move sought to reorganize the space internally, focusing the view from the sink back through the house to the pool and courtyard beyond. This simple repositioning allowed the range to center on the opposite wall, flanked by two windows that reduce direct views to the driveway while increasing the natural light of the space.
Opposite that opening to the dining room, we created a new custom hutch that has the upper doors bypass doors incorporate an antique mirror, then led they magnified the light and view opposite side of the room. The ceilings we were confined to eight foot four, so we wanted to create as much verticality as possible. All the cabinetry was designed to go to the ceiling, incorporating a simple coat mold at the ceiling. The west wall of the kitchen is primarily floor-to-ceiling storage behind paneled doors. So the refrigeration and freezers are fully integrated.
 Blackline Renovations
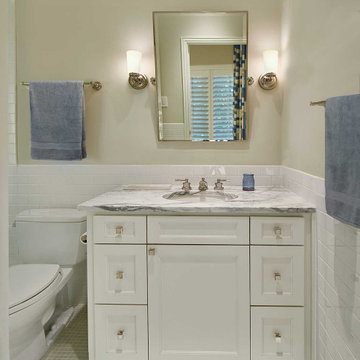
As a previous client of Blackline Renovations, we welcomed a third remodeling project with this homeowner. We were tasked with remodeling their boys’ two bathrooms—both located back-to-back and with identical layouts. To accommodate their sons’ growing needs, our clients wanted to remove the existing bathtubs and replace them with stand-alone showers. They also wanted new fixtures and finishes to match the classic-style look of the rest of their home.
OUR CREATIVE SOLUTION
Because the existing layout of each small bathroom had efficient space, there were minor adjustments needed to accommodate the new showers. By slightly reducing the size of the vanity cabinets and shifting the toilets closer to the vanities, we were able to install the new showers in place of the original bathtubs. Half inch frameless glass was used to enclose each shower to make the spaces feel even larger and more open.
To carry out a traditional classic look that the homeowners wanted, we installed classic 3×6 white subway tile in a traditional running bond pattern on the shower walls and as a tile wainscot throughout the bathroom. Polished nickel fixtures and hardware was used to further infuse the space with timeless design details.

 Gryphon Builders
The door capital is comprised of multiple specially crafted moldings. This design was created to reflect the style of the time in which the home was originally built.
For more information about this project please visit: www.gryphonbuilders.com. Or contact Allen Griffin, President of Gryphon Builders, at 281-236-8043 cell or email him at allen@gryphonbuilders.com
Sponsored
Columbus, OH

Hope Restoration & General Contracting
Columbus Design-Build, Kitchen & Bath Remodeling, Historic Renovations
 Keego blinds
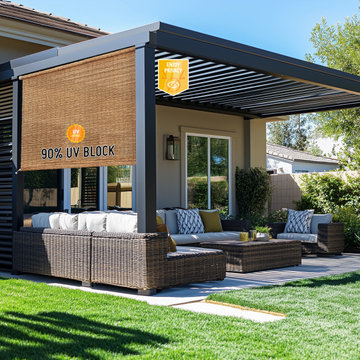
Scalable Design Solutions for Enterprise: Customizable Commercial Shade Systems Built to Last
Maximize ROI for your commercial clients with Scalable Shade Structures, engineered for multi-location deployments and high-traffic environments. Our heavy-duty commercial awnings feature modular fabric panels (up to 20ft widths) and military-grade aluminum frames (50mph wind resistance) to withstand harsh climates. Offering customizable branding options (vinyl lettering, logos) and low-maintenance coatings (anti-graffiti, mold-resistant), these awnings reduce operational costs by up to 35% through energy-efficient UV filtering (UPF 50+) and smart climate adaptation (auto-tensioning systems).
Certified to ETL and CUL safety standards, the solutions include nationwide service networks for rapid repairs and bulk order discounts for chains. Designed for hospitality sector uniformity and corporate campus branding, they integrate ADA-compliant mounting systems and 24/7 technical support.

 Ohana Home & Design
This 1800's Minneapolis kitchen needed to be updated! The homeowners were looking to preserve the integrity of the home and the era that it was built in, yet make it current and more functional for their family. We removed the dropped header and replaced it with a hidden header, reduced the size of the back of the fireplace, which faces the formal dining room, and took down all the yellow toile wallpaper and red paint. There was a bathroom where the new back entry comes into the dinette area, this was moved to the other side of the room to make the kitchen area more spacious. The woodwork in this house is truly a work of art, so the cabinets had to co-exist and work well with the existing. The cabinets are quartersawn oak and are shaker doors and drawers. The casing on the doors and windows differed depending on the area you were in, so we created custom moldings to recreate the gorgeous casing that existed on the kitchen windows and door. We used Cambria for the countertops and a gorgeous marble tile for the backsplash. What a beautiful kitchen!
SpaceCrafting
 MD Flooring Solutions, LLC
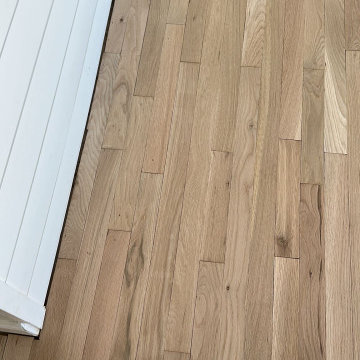
1x coat of Stain: Pickled Oak
- 1x coat Bona classic or intense sealer
- 2nd coat Commercial Grade Bona Traffic HD
- 3rd Coat Commercial Grade Bona Traffic HD
Finish: Satin
- To move 8x pieces of furniture out and back in from first level: front foyer, hallway, living room & dining room, family room, kitchen, closets
- Sand and refinish 2-1/4" Prefinished white oak hardwood floors in first level: front foyer, hallway, living room & dining room, family room, kitchen, closets - 968.06 sqft
- To remove Bevels from floors in first level: front foyer, hallway, living room & dining room, family room, kitchen, closets - 968.06 sqft
- To move Fridge Only and sand and refinish the area underneath it.
- To Sand & Refinish Transition: 3LFT of reducer kitchen to garage
- To Install Unfinished White Oak stained to match Shoe Molding in first level: front foyer, hallway, living room & dining room, family room, kitchen, closets
 MD Flooring Solutions, LLC
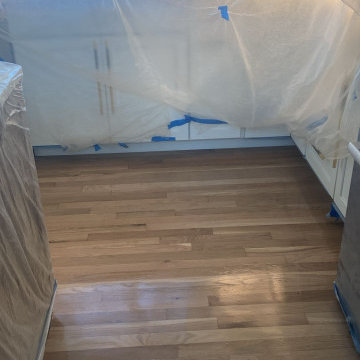
1x coat of Stain: Pickled Oak
- 1x coat Bona classic or intense sealer
- 2nd coat Commercial Grade Bona Traffic HD
- 3rd Coat Commercial Grade Bona Traffic HD
Finish: Satin
- To move 8x pieces of furniture out and back in from first level: front foyer, hallway, living room & dining room, family room, kitchen, closets
- Sand and refinish 2-1/4" Prefinished white oak hardwood floors in first level: front foyer, hallway, living room & dining room, family room, kitchen, closets - 968.06 sqft
- To remove Bevels from floors in first level: front foyer, hallway, living room & dining room, family room, kitchen, closets - 968.06 sqft
- To move Fridge Only and sand and refinish the area underneath it.
- To Sand & Refinish Transition: 3LFT of reducer kitchen to garage
- To Install Unfinished White Oak stained to match Shoe Molding in first level: front foyer, hallway, living room & dining room, family room, kitchen, closets

 Ohana Home & Design
This 1800's Minneapolis kitchen needed to be updated! The homeowners were looking to preserve the integrity of the home and the era that it was built in, yet make it current and more functional for their family. We removed the dropped header and replaced it with a hidden header, reduced the size of the back of the fireplace, which faces the formal dining room, and took down all the yellow toile wallpaper and red paint. There was a bathroom where the new back entry comes into the dinette area, this was moved to the other side of the room to make the kitchen area more spacious. The woodwork in this house is truly a work of art, so the cabinets had to co-exist and work well with the existing. The cabinets are quartersawn oak and are shaker doors and drawers. The casing on the doors and windows differed depending on the area you were in, so we created custom moldings to recreate the gorgeous casing that existed on the kitchen windows and door. We used Cambria for the countertops and a gorgeous marble tile for the backsplash. What a beautiful kitchen!
SpaceCrafting
Sponsored
Fredericksburg, OH

High Point Cabinets
Columbus' Experienced Custom Cabinet Builder | 4x Best of Houzz Winner
 Carlton Edwards
The Cherry Road project is a humble yet striking example of how small changes can have a big impact. A meaningful project as the final room to be renovated in this house, thus our completion aligned with the family’s move-in. The kitchen posed a number of problems the design worked to remedy. Such as an existing window oriented the room towards a neighboring driveway. The initial design move sought to reorganize the space internally, focusing the view from the sink back through the house to the pool and courtyard beyond. This simple repositioning allowed the range to center on the opposite wall, flanked by two windows that reduce direct views to the driveway while increasing the natural light of the space.
Opposite that opening to the dining room, we created a new custom hutch that has the upper doors bypass doors incorporate an antique mirror, then led they magnified the light and view opposite side of the room. The ceilings we were confined to eight-foot four, so we wanted to create as much verticality as possible. All the cabinetry was designed to go to the ceiling, incorporating a simple coat mold at the ceiling. The west wall of the kitchen is primarily floor-to-ceiling storage behind paneled doors. So the refrigeration and freezers are fully integrated.

 Friel Lumber Company
The homeowners chose to install perimeter cabinets using Dynasty by Omega. They chose the Madrid door style, Cherry wood, and a truffle stain. As for the island cabinets, they wanted the Madrid door style and Maple wood and then opted for the Pearl paint. The countertops are quartz and the island is granite.
Before the renovation started, the homeowners selected Jenn-Air appliances, including an induction cooktop and built-in microwave oven with speed cook. Once the construction was underway, we removed the bulkheads to allow new cabinets that extended to the ceiling with two PC crown molding. This provided a cleaner, more modern look along with added storage for items that are occasionally used.
We also swapped the pantry and refrigerator location to open up space as you enter the kitchen from the garage. The redesign also gave the refrigerator a built-in look. Then, we moved the cooktop to the corner and installed stainless steel Zephyr range hood and beveled subway tile in a herringbone pattern. The backsplash and new cooktop turned the most used area of the kitchen into a design feature.
The addition of an enlarged island allows extra seating for up to four people. Moreover, island cabinets include two full-sized waste baskets for recycling and standard waste. The new farmhouse sink from Kohler not only looks and functions well but the drain is positioned at the rear corner. The plumbing in the cabinet below is consolidated to the back corner providing much more storage. Last, the built-in TV not only looks great but also reduces counter clutter. Plus, the drawer below the TV contains USB outlet for small personal device charging.

 All Surface Restoration
Surface Saver Sealer is a water-based Silane-Siloxane water repellent and impregnating sealer for porous concrete and masonry surfaces. Surface Saver penetrates up to 1/4 to form a chemical bond deep within the substrate to provide long lasting protection against deterioration or staining due to water absorption. Surface Saver will not impair the natural breathing characteristics of treated substrates, nor will it produce a film or coating. Surface Saver will help concrete and masonry surfaces to resist common issues such as cracking, efflorescence, spalling, staining, and other damages caused by intrusion of water. Surface Saver will also help to reduce the formation of efflorescence and the growth of mold and mildew.
Uses: Unsealed concrete, broom finished concrete, trowel finished concrete, stamped colored concrete, exposed aggregate concrete, concrete pavers, brick pavers, pavers, clay tile, unglazed tile, cement, brick, stone, and other masonry.
Common Applications: driveway sealer, walkway and sidewalk sealer, patio and pool deck sealer, brick house and chimney sealer, clay tile roof sealer, garage floor sealer, warehouse floor sealer, basement wall and floor sealer, and other concrete and masonry applications.
Surface Saver maintain the natural, unsealed look and feel of the substrate. Will never peel, flake or fade. UV resistant, non-yellowing. No surface film or coating to maintain.
Resistant to freeze-thaw cycles and de-icing salts.
Provides excellent resistance to mold, mildew, and fungus.
Can be applied to interior & exterior, vertical & horizontal, above & below grade surfaces.
Surface Saver Sealer will cause water and other liquids to bead off the surface.
Breathable, low VOC.
5 gallon covers up to 750-1000 Square Feet in one coat, or up to 500 Square feet in 2 coats.
Surface Saver Sealer can be purchased in 5 gallon pails shipped UPS Ground to all 48 U.S. States except Alaska & Hawaii at: www.surfacerestoration.com/shop

 Kathleen Jennison
An Arts & Crafts Bungalow is one of my favorite styles of homes. We have quite a few of them in our Stockton Mid-Town area. And when C&L called us to help them remodel their 1923 American Bungalow, I was beyond thrilled.
As per usual, when we get a new inquiry, we quickly Google the project location while we are talking to you on the phone. My excitement escalated when I saw the Google Earth Image of the sweet Sage Green bungalow in Mid-Town Stockton. "Yes, we would be interested in working with you," I said trying to keep my cool.
But what made it even better was meeting C&L and touring their home, because they are the nicest young couple, eager to make their home period perfect. Unfortunately, it had been slightly molested by some bad house-flippers, and we needed to bring the bathroom back to it "roots."
We knew we had to banish the hideous brown tile and cheap vanity quickly. But C&L complained about the condensation problems and the constant fight with mold. This immediately told me that improper remodeling had occurred and we needed to remedy that right away.
The Before: Frustrations with a Botched Remodel
The bathroom needed to be brought back to period appropriate design with all the functionality of a modern bathroom. We thought of things like marble countertop, white mosaic floor tiles, white subway tile, board and batten molding, and of course a fabulous wallpaper.
This small (and only) bathroom on a tight budget required a little bit of design sleuthing to figure out how we could get the proper look and feel. Our goal was to determine where to splurge and where to economize and how to complete the remodel as quickly as possible because C&L would have to move out while construction was going on.
The Process: Hard Work to Remedy Design and Function
During our initial design study, (which included 2 hours in the owners’ home), we noticed framed images of William Morris Arts and Crafts textile patterns and knew this would be our design inspiration. We presented C&L with three options and they quickly selected the Pimpernel Design Concept.
We had originally selected the Black and Olive colors with a black vanity, mirror, and black and white floor tile. C&L liked it but weren’t quite sure about the black, We went back to the drawing board and decided the William & Co Pimpernel Wallpaper in Bayleaf and Manilla color with a softer gray painted vanity and mirror and white floor tile was more to their liking.
After the Design Concept was approved, we went to work securing the building permit, procuring all the elements, and scheduling our trusted tradesmen to perform the work.
We did uncover some shoddy work by the flippers such as live electrical wires hidden behind the wall, plumbing venting cut-off and buried in the walls (hence the constant dampness), the tub barely balancing on two fence boards across the floor joist, and no insulation on the exterior wall.
All of the previous blunders were fixed and the bathroom put back to its previous glory. We could feel the house thanking us for making it pretty again.
The After Reveal: Cohesive Design Decisions
We selected a simple white subway tile for the tub/shower. This is always classic and in keeping with the style of the house.
We selected a pre-fab vanity and mirror, but they look rich with the quartz countertop. There is much more storage in this small vanity than you would think.
The Transformation: A Period Perfect Refresh
We began the remodel just as the pandemic reared and stay-in-place orders went into effect. As C&L were already moved out and living with relatives, we got the go-ahead from city officials to get the work done (after all, how can you shelter in place without a bathroom?).
All our tradesmen were scheduled to work so that only one crew was on the job site at a time. We stayed on the original schedule with only a one week delay.
The end result is the sweetest little bathroom I've ever seen (and I can't wait to start work on C&L's kitchen next).
Thank you for joining me in this project transformation. I hope this inspired you to think about being creative with your design projects, determining what works best in keeping with the architecture of your space, and carefully assessing how you can have the best life in your home.



 Architectural Designs
This Craftsman home gives you 5,292 square feet of heated living space spread across its three levels as follows:
1,964 sq. ft. Main Floor
1,824 sq. ft. Upper Floor
1,504 sq. ft. Lower Level
Higlights include the 2 story great room on the main floor.
Laundry on upper floor.
An indoor sports court so you can practice your 3-point shot.
The plans are available in print, PDF and CAD. And we can modify them to suit your needs.
Where do YOU want to build?
Plan Link: http://www.architecturaldesigns.com/house-plan-73333HS.asp
 All Surface Restoration
Surface Saver penetrates up to 1/4 to form a chemical bond deep within the substrate to provide long lasting protection against deterioration or staining due to water absorption. Surface Saver will not impair the natural breathing characteristics of treated substrates, nor will it produce a film or coating. Surface Saver will help concrete and masonry surfaces to resist common issues such as cracking, efflorescence, spalling, staining, and other damages caused by intrusion of water. Surface Saver will also help to reduce the formation of efflorescence and the growth of mold and mildew.
Uses: Unsealed concrete, broom finished concrete, trowel finished concrete, stamped colored concrete, exposed aggregate concrete, concrete pavers, brick pavers, pavers, clay tile, unglazed tile, cement, brick, stone, and other masonry.
Common Applications: driveway sealer, walkway and sidewalk sealer, patio and pool deck sealer, brick house and chimney sealer, clay tile roof sealer, garage floor sealer, warehouse floor sealer, basement wall and floor sealer, and other concrete and masonry applications.
Surface Saver maintain the natural, unsealed look and feel of the substrate. Will never peel, flake or fade. UV resistant, non-yellowing. No surface film or coating to maintain.
Resistant to freeze-thaw cycles and de-icing salts.
Provides excellent resistance to mold, mildew, and fungus.
Can be applied to interior & exterior, vertical & horizontal, above & below grade surfaces.
Surface Saver Sealer will cause water and other liquids to bead off the surface.
Breathable, low VOC.
5 gallon covers up to 750-1000 Square Feet in one coat, or up to 500 Square feet in 2 coats.
Surface Saver Sealer can be purchased in 5 gallon pails shipped UPS Ground to all 48 U.S. States except Alaska & Hawaii at: www.surfacerestoration.com/shop
29