
Search results for "Reduce molding" in Home Design Ideas
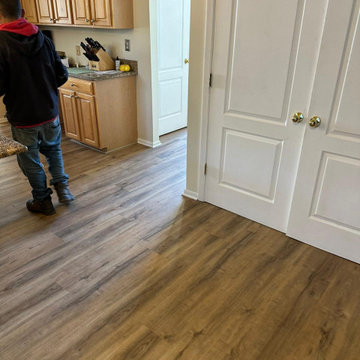
 MD Flooring Solutions, LLC
- To take up toilet and pedestal sink and reinstall from powder room.
- To take up and haul away carpet from dining room, living room & office (subfloor plywood) - 496 sqft.
- To apply 4x bags of self-leveling concrete in the grout grooves and on floors in Powder room, kitchen, laundry room, front foyer + closets - 463.50 sqft
- To install LVP ON TOP of ceramic tile floors in Powder room, kitchen, laundry room, front foyer + closets - 463.50 SQFT
- To install LVP in dining room, living room, office - 496 sqft
- To install 2x pieces of stair nosing: 5.5LFT kitchen to family room + 3.5 LFT kitchen to basement.
- To install 6x reducer pieces: 4LFT for front foyer to office + 4LFT front foyer to living room + 3LFT kitchen to dining room + 3LFT kitchen to laundry room + 6LFT kitchen to back sliding door + 3LFT laundry room to garage door
- To install shoe molding in dining room, living room, office + Powder room, kitchen, laundry room, front foyer + closets
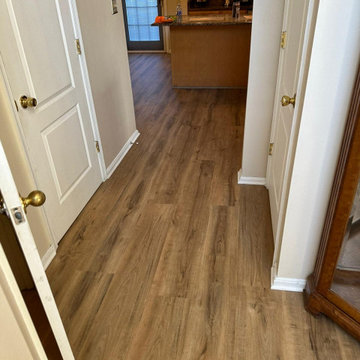 MD Flooring Solutions, LLC
- To take up toilet and pedestal sink and reinstall from powder room.
- To take up and haul away carpet from dining room, living room & office (subfloor plywood) - 496 sqft.
- To apply 4x bags of self-leveling concrete in the grout grooves and on floors in Powder room, kitchen, laundry room, front foyer + closets - 463.50 sqft
- To install LVP ON TOP of ceramic tile floors in Powder room, kitchen, laundry room, front foyer + closets - 463.50 SQFT
- To install LVP in dining room, living room, office - 496 sqft
- To install 2x pieces of stair nosing: 5.5LFT kitchen to family room + 3.5 LFT kitchen to basement.
- To install 6x reducer pieces: 4LFT for front foyer to office + 4LFT front foyer to living room + 3LFT kitchen to dining room + 3LFT kitchen to laundry room + 6LFT kitchen to back sliding door + 3LFT laundry room to garage door
- To install shoe molding in dining room, living room, office + Powder room, kitchen, laundry room, front foyer + closets
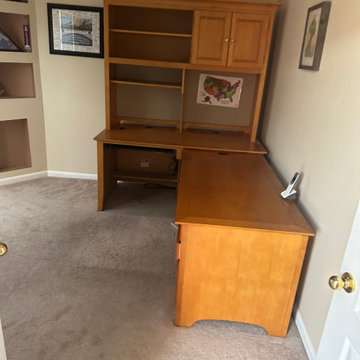 MD Flooring Solutions, LLC
- To take up toilet and pedestal sink and reinstall from powder room.
- To take up and haul away carpet from dining room, living room & office (subfloor plywood) - 496 sqft.
- To apply 4x bags of self-leveling concrete in the grout grooves and on floors in Powder room, kitchen, laundry room, front foyer + closets - 463.50 sqft
- To install LVP ON TOP of ceramic tile floors in Powder room, kitchen, laundry room, front foyer + closets - 463.50 SQFT
- To install LVP in dining room, living room, office - 496 sqft
- To install 2x pieces of stair nosing: 5.5LFT kitchen to family room + 3.5 LFT kitchen to basement.
- To install 6x reducer pieces: 4LFT for front foyer to office + 4LFT front foyer to living room + 3LFT kitchen to dining room + 3LFT kitchen to laundry room + 6LFT kitchen to back sliding door + 3LFT laundry room to garage door
- To install shoe molding in dining room, living room, office + Powder room, kitchen, laundry room, front foyer + closets
Find the right local pro for your project
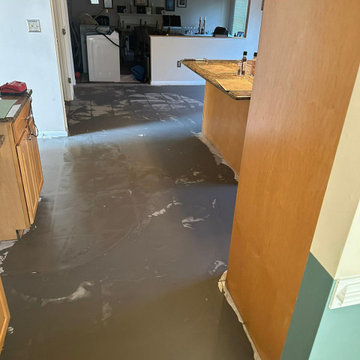 MD Flooring Solutions, LLC
- To take up toilet and pedestal sink and reinstall from powder room.
- To take up and haul away carpet from dining room, living room & office (subfloor plywood) - 496 sqft.
- To apply 4x bags of self-leveling concrete in the grout grooves and on floors in Powder room, kitchen, laundry room, front foyer + closets - 463.50 sqft
- To install LVP ON TOP of ceramic tile floors in Powder room, kitchen, laundry room, front foyer + closets - 463.50 SQFT
- To install LVP in dining room, living room, office - 496 sqft
- To install 2x pieces of stair nosing: 5.5LFT kitchen to family room + 3.5 LFT kitchen to basement.
- To install 6x reducer pieces: 4LFT for front foyer to office + 4LFT front foyer to living room + 3LFT kitchen to dining room + 3LFT kitchen to laundry room + 6LFT kitchen to back sliding door + 3LFT laundry room to garage door
- To install shoe molding in dining room, living room, office + Powder room, kitchen, laundry room, front foyer + closets
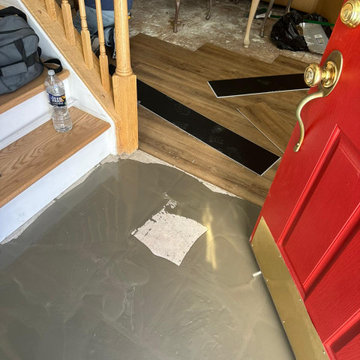 MD Flooring Solutions, LLC
- To take up toilet and pedestal sink and reinstall from powder room.
- To take up and haul away carpet from dining room, living room & office (subfloor plywood) - 496 sqft.
- To apply 4x bags of self-leveling concrete in the grout grooves and on floors in Powder room, kitchen, laundry room, front foyer + closets - 463.50 sqft
- To install LVP ON TOP of ceramic tile floors in Powder room, kitchen, laundry room, front foyer + closets - 463.50 SQFT
- To install LVP in dining room, living room, office - 496 sqft
- To install 2x pieces of stair nosing: 5.5LFT kitchen to family room + 3.5 LFT kitchen to basement.
- To install 6x reducer pieces: 4LFT for front foyer to office + 4LFT front foyer to living room + 3LFT kitchen to dining room + 3LFT kitchen to laundry room + 6LFT kitchen to back sliding door + 3LFT laundry room to garage door
- To install shoe molding in dining room, living room, office + Powder room, kitchen, laundry room, front foyer + closets
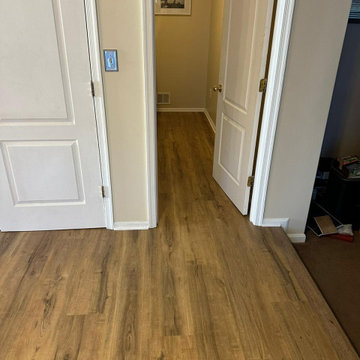 MD Flooring Solutions, LLC
- To take up toilet and pedestal sink and reinstall from powder room.
- To take up and haul away carpet from dining room, living room & office (subfloor plywood) - 496 sqft.
- To apply 4x bags of self-leveling concrete in the grout grooves and on floors in Powder room, kitchen, laundry room, front foyer + closets - 463.50 sqft
- To install LVP ON TOP of ceramic tile floors in Powder room, kitchen, laundry room, front foyer + closets - 463.50 SQFT
- To install LVP in dining room, living room, office - 496 sqft
- To install 2x pieces of stair nosing: 5.5LFT kitchen to family room + 3.5 LFT kitchen to basement.
- To install 6x reducer pieces: 4LFT for front foyer to office + 4LFT front foyer to living room + 3LFT kitchen to dining room + 3LFT kitchen to laundry room + 6LFT kitchen to back sliding door + 3LFT laundry room to garage door
- To install shoe molding in dining room, living room, office + Powder room, kitchen, laundry room, front foyer + closets

 AirField Systems, LLC
Robert Trent Jones Golf Club installs AirField Systems AirDrain.
The AirField Systems AirDrain for Golf Greens installed at Robert Trent Jones, home of The President’s Cup, continues to perform since 2004. Stronger roots, healthier turf, superior drainage and the ability to make it’s own nearly perfect perched water table without organics make AirDrain Golf Greens by AirField the choice of the most discriminating golf course architects, designers, owners and superintendents – and the savings in time, installation and maintenance make it the choice for everyone. View AirDrain Golf Greens in action after years of use at one of the most prestigious courses on the east coast.
Thru a research project conducted at Texas A&M, it was concluded that you can reduce your irrigation needs using AirField Systems AirDrain. The five year research project was jointly funded by the United States Golf Association and AirField Systems and was a collaborative effort between Texas A&M, AirField Systems and the United States Golf Association. The data from the research showed that the AirField Systems drainage profile provided between one to three more days of plant available water than a United States Golf Association recommended gravel and sand profile.
In addition, AirDrain by AirField Systems can significantly save on installation time because much less excavation is required compared to the traditional gravel drainage layers that have a much deeper profile. AirDrain arrives on site in 53” trailers, palletized and ready for install. Unlike gravel drainage, with AirDrain there is no need for heavy dump trucks that can compact your golf course.
Benefits of an AirField System Design for Golf Greens include:
1 to 3 more days of plant available water stored in the root zone (depending on climate)
Significantly reduces daily irrigation needs (as told to us by our customers)
Healthier turf / Stronger root system (as told to us by our customers)
100% Vertical Drainage under the entire playing surface
AirDrain is a 100% recycled copolymer with the impact modifier “metallocene” qualifying it as a “No Break” plastic
Helps eliminate standing water / Simplifies maintenance (as told to us by our customers)
Minimal site disturbance / Far less excavation and disposal
Several Installation days are saved over a gravel installation
Compact shipping that reduces overall storage and transportation costs
An AirDrain System sand profile creates its own perched water table without peat moss or clay
AirDrain’s sand profile and minimal organics puts it at very little risk for issues of mold or disease
http://www.rtjgc.com/Club/Scripts/Home/home.asp


 All Surface Restoration
Surface Saver penetrates up to 1/4 to form a chemical bond deep within the substrate to provide long lasting protection against deterioration or staining due to water absorption. Surface Saver will not impair the natural breathing characteristics of treated substrates, nor will it produce a film or coating. Surface Saver will help concrete and masonry surfaces to resist common issues such as cracking, efflorescence, spalling, staining, and other damages caused by intrusion of water. Surface Saver will also help to reduce the formation of efflorescence and the growth of mold and mildew.
Uses: Unsealed concrete, broom finished concrete, trowel finished concrete, stamped colored concrete, exposed aggregate concrete, concrete pavers, brick pavers, pavers, clay tile, unglazed tile, cement, brick, stone, and other masonry.
Common Applications: driveway sealer, walkway and sidewalk sealer, patio and pool deck sealer, brick house and chimney sealer, clay tile roof sealer, garage floor sealer, warehouse floor sealer, basement wall and floor sealer, and other concrete and masonry applications.
Surface Saver maintain the natural, unsealed look and feel of the substrate. Will never peel, flake or fade. UV resistant, non-yellowing. No surface film or coating to maintain.
Resistant to freeze-thaw cycles and de-icing salts.
Provides excellent resistance to mold, mildew, and fungus.
Can be applied to interior & exterior, vertical & horizontal, above & below grade surfaces.
Surface Saver Sealer will cause water and other liquids to bead off the surface.
Breathable, low VOC.
5 gallon covers up to 750-1000 Square Feet in one coat, or up to 500 Square feet in 2 coats.
Surface Saver Sealer can be purchased in 5 gallon pails shipped UPS Ground to all 48 U.S. States except Alaska & Hawaii at: www.surfacerestoration.com/shop

 Ohana Home & Design
This 1800's Minneapolis kitchen needed to be updated! The homeowners were looking to preserve the integrity of the home and the era that it was built in, yet make it current and more functional for their family. We removed the dropped header and replaced it with a hidden header, reduced the size of the back of the fireplace, which faces the formal dining room, and took down all the yellow toile wallpaper and red paint. There was a bathroom where the new back entry comes into the dinette area, this was moved to the other side of the room to make the kitchen area more spacious. The woodwork in this house is truly a work of art, so the cabinets had to co-exist and work well with the existing. The cabinets are quartersawn oak and are shaker doors and drawers. The casing on the doors and windows differed depending on the area you were in, so we created custom moldings to recreate the gorgeous casing that existed on the kitchen windows and door. We used Cambria for the countertops and a gorgeous marble tile for the backsplash. What a beautiful kitchen!
SpaceCrafting

 Lori Jolin Design, LLC.
Sutter Photographers
The Hardware Studio - hardware
Martinwood Cabinetry - millwork
Studio GlassWorks - glass countertop
Window Design Center - awning window
Nonn's Showplace - quartz, granite countertops
• A 36 inch Wolf gas stove and decorative hood that would hide the Wolf venting system. We added a soffit in the garage to allow for venting out of the exterior wall. This reduces the noise level of the system in the kitchen.
• Furniture legs, trim, decorative corbels, and valances were incorporated on some pieces to give it an upscale look.
• To lighten up the darker perimeter cabinets, we incorporated the new floor tile on the backsplash but in a different size.
• We accented it with some glass/slate/marble mosaic, which came in a lineal 12 x 12 mosaic or a 1/2 inch multi on a 12 x 12 mesh.
• By separating the 12 inch square mosaic into long 4 inch pieces, we were able to get more lineal feet.
• The field tile was intentionally installed vertically to complement the linear mosaic tile while adding subtle detail.
• The area behind the stove was made by
cutting the 20 inch tile into 6 x 6 pieces, picture framing it within the space, and adding the smaller 1/2 inch mosaic.
• Task lighting was installed under the cabinets on a hidden switch.

 David Thorne Landscape Architect
Photography by Treve Johnson
Huge transitional backyard patio photo in San Francisco with a fire pit and a gazebo
Huge transitional backyard patio photo in San Francisco with a fire pit and a gazebo
 Albert, Righter & Tittmann Architects, Inc.
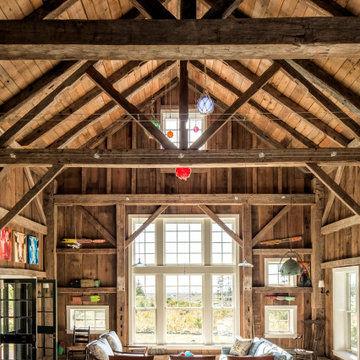
A summer house built around salvaged barn beams.
Not far from the beach, the secluded site faces south to the ocean and views.
The large main barn room embraces the main living spaces, including the kitchen. The barn room is anchored on the north with a stone fireplace and on the south with a large bay window. The wing to the east organizes the entry hall and sleeping rooms.

 S.J. Janis Company, Inc.
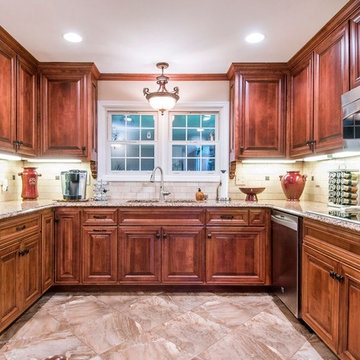
Timeless sophistication was achieved by integrating an architectural palette of natural materials that embraces the homeowner's taste. Bianco Romano polished granite flows throughout the kitchen with the understated truffle Blanco Precis double bowl under mount sink chosen for reduced maintenance.
Stunning 3 1/4 select yellow birch hardwood flooring provides warmth and appeal and extends throughout the kitchen, dinette, back hall and mudroom vestibule.


 GOODFELLAS CONSTRUCTION
This Magical Kitchen Remodel makes GoodFellas Construction seem more like magicians than a contracting company! From the marble countertops, to the sparkly backsplash - everything about this contemporary kitchen is jaw - dropping.


 ELEVATIONS | Design Solutions by Myers
Visit Our Showroom
8000 Locust Mill St.
Ellicott City, MD 21043
Signature Serenity Series Adams door w/ full-lite s/l’s and half-round transom, Sapele, Brass Caming
Sapele, Knotty Alder, Oak and Pine
Custom door & glass designs available
Sturdy glue and dowel construction
Engineered stile and rail core to reduce twist and bow
Doors feature 6 3/8″ stiles
Raised molding and panel profile
Panels are engineered back to back to inhibit splitting and allow independent movement for expansion or contraction
Pre-hung units
CNC routed hardware preps for precision fit on hinges, mortise and multipoint lock systems
Panels are 2-piece, back to back to allow for expansion between interior & exterior
Glass is siliconed to door openings, allowing it to “float” while maintaining a weather tight seal
One year door warranty. For more details, please visit
Thickness: 1 3/4″
Door Widths: 2’8″, 3’0″
Side-lite Widths: 1’0″, 1’2″
Door Heights: 6’8″, 8’0″
Panels: 1 3/8″ Raised profile
Glass: 1″ I.G.

 Friel Lumber Company
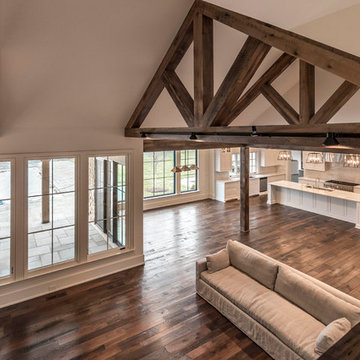
The homeowners chose to install perimeter cabinets using Dynasty by Omega. They chose the Madrid door style, Cherry wood, and a truffle stain. As for the island cabinets, they wanted the Madrid door style and Maple wood and then opted for the Pearl paint. The countertops are quartz and the island is granite.
Before the renovation started, the homeowners selected Jenn-Air appliances, including an induction cooktop and built-in microwave oven with speed cook. Once the construction was underway, we removed the bulkheads to allow new cabinets that extended to the ceiling with two PC crown molding. This provided a cleaner, more modern look along with added storage for items that are occasionally used.
We also swapped the pantry and refrigerator location to open up space as you enter the kitchen from the garage. The redesign also gave the refrigerator a built-in look. Then, we moved the cooktop to the corner and installed stainless steel Zephyr range hood and beveled subway tile in a herringbone pattern. The backsplash and new cooktop turned the most used area of the kitchen into a design feature.
The addition of an enlarged island allows extra seating for up to four people. Moreover, island cabinets include two full-sized waste baskets for recycling and standard waste. The new farmhouse sink from Kohler not only looks and functions well but the drain is positioned at the rear corner. The plumbing in the cabinet below is consolidated to the back corner providing much more storage. Last, the built-in TV not only looks great but also reduces counter clutter. Plus, the drawer below the TV contains USB outlet for small personal device charging.
 Modern Craftsman Remodeling Co.
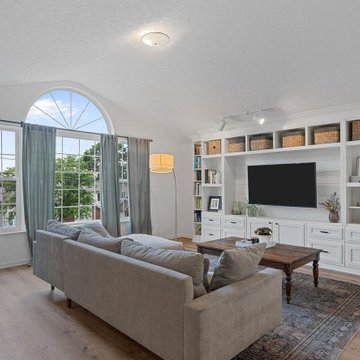
The family room, previously a flat wall with no built-in features, was transformed to reduce clutter and create a more organized space. A custom-built wall unit was designed to maximize storage and functionality. This large unit features a mounted flatscreen TV set against a shiplap backdrop, with wires neatly concealed within the wall to minimize visible cords. The built-in unit includes two floor-to-ceiling bookcases on either side, each with open shelving both above and below. The center of the unit offers a combination of drawers and cabinet doors, providing 10 additional storage solutions. This versatile space is ideal for organizing children’s artwork, art supplies, movies, electronics, games, and more.
To enhance the overall aesthetic, crown molding was added to complement the unique sloped ceiling, along with baseboards and additional trim work. Additionally, wood floor laminate was installed throughout the entire first floor of the home, replacing outdated carpet and contributing to a cohesive, modern look.
 All Surface Restoration
Deck Stripper DSI removes deteriorated semi-transparent oil-based stains and sealers. Deck Stripper DSI will also remove damaged and discolored wood fiber from all exterior wood surfaces including decks, wood siding and log homes. Deck Stripper DSI restores wood to its natural color and prepare surface for re-coating.
Features & Benefits:
Water-based formula
Quickly removes semi-transparent stains and sealers, gray weathered wood, water stains, mold, mildew and tannin bleeding
Safe for use around surrounding vegetation if pre-wetted prior to application
Restores the natural beauty of wood
Down Stream Injectable Up To 5:1
Biodegradable
Water rinse clean up
Easy to use
Available in 5 gallon size with concentrated formula
Typical Uses:
Deck Stripper DSI has been proven to effectively remove semi-transparent stains and solid colours as well as gray weathered wood, mold, mildew, tannin bleeding and water stains. The water-based formula will not harm surrounding vegetation (if pre-wetted) and is easily cleaned up.
For Use On Exterior Wood Surfaces:
Wood Decks
Fences
Railings
Siding
Log homes
Cedar shakes
Gazebos
Application:
Apply liberally using down stream injector mixed up to 5:1 with water. Wait approximately 5 to 45 minutes for Deck Stripper DSI to soften the coating. The coating should easily rinse off when ready. Rinse in direction of wood grain with a garden hose or pressure washer at low setting (500-1200 PSI) to reduce scrubbing.
Coverage
50 to 150 sq.ft. per US gallon
Deck Stripper DSI will strip most semi-transparent oil based wood-stains. Wood rich in tannin may darken during restoration. Apply Deck Brightening Agent DSI after final rinse of Deck Stripper DSI.
Deck Stripper DSI can be purchased & shipped via UPS Ground to all 48 U.S. States except Alaska & Hawaii at:
www.surfacerestoration.com/shop
32