
Search results for "Reduce room" in Home Design Ideas

 Katie Hutchison Studio
This larger home, constructed on Martha’s Vineyard, is a collection of informal, dormered gable components and grounding one-story, shed-roof elements that reduce its overall scale.
Designed to take advantage of a gently sloping up-Island property, this 5500 sq. ft. (not including finished basement) six-bedroom home includes staggered floor levels that climb from the front of the site to the rear. Generous, open living space on the entry level -- anchored on the west end by a fireplace and on the east end by the kitchen -- borders a dining area that’s nestled under a roof which also shelters the adjacent wrap-around porch. A deck off the rear of the dining space extends around the kitchen and is easily accessible from the nearby family room, too. Bedrooms occupy the other above-grade levels, including, at the upper-most level, the master suite comprised of a study, roof deck, master bath, walk-in closets and the master bedroom.
A clean-lined interior of warm neutrals sets a soothing tone in which the Island landscape is welcomed through expansive windows, porches and decks. Clad in white cedar shingles with a red cedar roof, the West Tisbury House will softly weather in-tune with its meadow site.
Katie Hutchison Studio collaborated with Geoffrey Koper Architect of Yarmouth Port, Mass. on the West Tisbury House. Kitchen fit-out and interior finishes, fixtures, and furnishings by others.
photo by Katie Hutchison
 highland
Renovating a home can completely transform the way a space looks, feels, and functions, but successful improvements require thoughtful planning rather than rushing into expensive changes. These renovation tips and tricks house ideas can help homeowners organize projects, control costs, select practical materials, and create rooms that remain useful for years. Start by identifying what genuinely needs improvement, such as outdated finishes, poor lighting, inefficient storage, damaged surfaces, or an inconvenient layout. Create a realistic budget that includes materials, labor, permits where applicable, and a contingency amount for unexpected issues. Taking measurements, collecting inspiration, and deciding priorities before work begins can prevent unnecessary purchases and make the renovation process much easier to manage.
One of the most useful renovation tips and tricks house projects can benefit from is improving the layout before focusing on decoration. A beautiful room will still feel inconvenient if furniture blocks walkways or storage is insufficient. Consider how people actually use each space and whether doors, windows, lighting, electrical outlets, and storage are positioned effectively. In kitchens, for example, practical work zones and accessible storage can make everyday tasks easier. In bedrooms and living rooms, built-in shelving, multifunctional furniture, and organized storage can reduce clutter without making the space feel crowded. Whenever possible, repair or improve the existing structure before replacing everything, because thoughtful upgrades can deliver significant results without creating unnecessary renovation costs.
Choosing materials carefully is another important part of renovation tips and tricks house planning. Look beyond appearance and consider durability, maintenance, safety, and suitability for the room. High-moisture areas require materials that can handle regular exposure to water, while frequently used floors and work surfaces should be selected for durability. Neutral foundations can also provide flexibility because wall colors, textiles, artwork, and accessories can be changed later without another major renovation. Lighting deserves equal attention: combine general illumination with task and accent lighting to make rooms more functional and visually comfortable. Energy-efficient lighting, improved insulation, weather sealing, and efficient fixtures may also contribute to better long-term household performance.
Before beginning major work, divide the project into manageable stages. A useful approach is to complete structural or repair work first, followed by electrical or plumbing updates when necessary, then walls, flooring, cabinetry, fixtures, and finally decorative details. This order can reduce the chance of damaging newly finished surfaces. Keep a record of measurements, product specifications, receipts, and important project decisions so replacements or future repairs are easier. For specialized work involving structural changes, electrical systems, plumbing, gas, or other regulated areas, consult appropriately qualified professionals and follow local requirements. Among the most practical renovation tips and tricks house owners can follow is to avoid changing too many things simultaneously; completing priority areas systematically makes budgets, timelines, and quality easier to control.
Finally, focus on improvements that combine appearance with everyday usefulness. Fresh paint, updated hardware, better organization, improved lighting, refreshed flooring, and carefully selected fixtures can make a noticeable difference without requiring a complete transformation. Outdoor areas can also benefit from simple maintenance, improved lighting, seating, planting, or repaired surfaces that extend the usable living space. Before declaring the project finished, inspect each room for functionality, storage, lighting, ventilation, safety, and finishing quality. The best renovation tips and tricks house approach is not necessarily about spending more it is about making informed choices that solve real problems and create a home that feels comfortable, practical, and personal.
One of the most useful renovation tips and tricks house projects can benefit from is improving the layout before focusing on decoration. A beautiful room will still feel inconvenient if furniture blocks walkways or storage is insufficient. Consider how people actually use each space and whether doors, windows, lighting, electrical outlets, and storage are positioned effectively. In kitchens, for example, practical work zones and accessible storage can make everyday tasks easier. In bedrooms and living rooms, built-in shelving, multifunctional furniture, and organized storage can reduce clutter without making the space feel crowded. Whenever possible, repair or improve the existing structure before replacing everything, because thoughtful upgrades can deliver significant results without creating unnecessary renovation costs.
Choosing materials carefully is another important part of renovation tips and tricks house planning. Look beyond appearance and consider durability, maintenance, safety, and suitability for the room. High-moisture areas require materials that can handle regular exposure to water, while frequently used floors and work surfaces should be selected for durability. Neutral foundations can also provide flexibility because wall colors, textiles, artwork, and accessories can be changed later without another major renovation. Lighting deserves equal attention: combine general illumination with task and accent lighting to make rooms more functional and visually comfortable. Energy-efficient lighting, improved insulation, weather sealing, and efficient fixtures may also contribute to better long-term household performance.
Before beginning major work, divide the project into manageable stages. A useful approach is to complete structural or repair work first, followed by electrical or plumbing updates when necessary, then walls, flooring, cabinetry, fixtures, and finally decorative details. This order can reduce the chance of damaging newly finished surfaces. Keep a record of measurements, product specifications, receipts, and important project decisions so replacements or future repairs are easier. For specialized work involving structural changes, electrical systems, plumbing, gas, or other regulated areas, consult appropriately qualified professionals and follow local requirements. Among the most practical renovation tips and tricks house owners can follow is to avoid changing too many things simultaneously; completing priority areas systematically makes budgets, timelines, and quality easier to control.
Finally, focus on improvements that combine appearance with everyday usefulness. Fresh paint, updated hardware, better organization, improved lighting, refreshed flooring, and carefully selected fixtures can make a noticeable difference without requiring a complete transformation. Outdoor areas can also benefit from simple maintenance, improved lighting, seating, planting, or repaired surfaces that extend the usable living space. Before declaring the project finished, inspect each room for functionality, storage, lighting, ventilation, safety, and finishing quality. The best renovation tips and tricks house approach is not necessarily about spending more it is about making informed choices that solve real problems and create a home that feels comfortable, practical, and personal.
 Katie Hutchison Studio
This larger home, constructed on Martha’s Vineyard, is a collection of informal, dormered gable components and grounding one-story, shed-roof elements that reduce its overall scale.
Designed to take advantage of a gently sloping up-Island property, this 5500 sq. ft. (not including finished basement) six-bedroom home includes staggered floor levels that climb from the front of the site to the rear. Generous, open living space on the entry level -- anchored on the west end by a fireplace and on the east end by the kitchen -- borders a dining area that’s nestled under a roof which also shelters the adjacent wrap-around porch. A deck off the rear of the dining space extends around the kitchen and is easily accessible from the nearby family room, too. Bedrooms occupy the other above-grade levels, including, at the upper-most level, the master suite comprised of a study, roof deck, master bath, walk-in closets and the master bedroom.
A clean-lined interior of warm neutrals sets a soothing tone in which the Island landscape is welcomed through expansive windows, porches and decks. Clad in white cedar shingles with a red cedar roof, the West Tisbury House will softly weather in-tune with its meadow site.
Katie Hutchison Studio collaborated with Geoffrey Koper Architect of Yarmouth Port, Mass. on the West Tisbury House. Kitchen fit-out and interior finishes, fixtures, and furnishings by others.
photo by Katie Hutchison
Find the right local pro for your project

 Sierra Living Concepts Inc
Dimension:
47" L X 17" D X 47.5" H
The Quiroga Reclaimed Teak Wood 2 Drawer Small Buffet Cabinet is the thing you need to bring your entryway to life. The possibilities for styling with the Quiroga cabinet are endless.
The console hallway buffet cabinet is made of solid reclaimed Teak wood, which is a great family-friendly option. Purchasing a reclaimed wood item means you're contributing to recycling and reducing your personal carbon footprint.
Each Quiroga console accent cabinet is 100% handcrafted. The ribbed detail you see at the top of the hallway console is carefully designed and carved to perfection.
There are 2 drawers to the hallway console, which can store keys, gloves, and hats for easy access before leaving your home. The larger cabinets underneath are a great place to store shoes, especially if you have pets that love to chew on them. By placing a work of art or two on the top of the storage cabinet, you'll create a statement piece that everyone is sure to love.
The Quiroga hallway console storage cabinet is the perfect furniture storage option for any entryway, dining room, or hallway, no matter what your style.
Special Features:
• 100% handcrafted
• Solid reclaimed Teak wood
• 2 drawers
• 2 cabinet doors with spacious shelves
Note: Real wood is a product of nature, and as such, no two pieces are alike. Variations in solid wood grain patterns are to be expected and make each furniture uniquely beautiful, just like us humans.
 Katie Hutchison Studio
This larger home, constructed on Martha’s Vineyard, is a collection of informal, dormered gable components and grounding one-story, shed-roof elements that reduce its overall scale.
Designed to take advantage of a gently sloping up-Island property, this 5500 sq. ft. (not including finished basement) six-bedroom home includes staggered floor levels that climb from the front of the site to the rear. Generous, open living space on the entry level -- anchored on the west end by a fireplace and on the east end by the kitchen -- borders a dining area that’s nestled under a roof which also shelters the adjacent wrap-around porch. A deck off the rear of the dining space extends around the kitchen and is easily accessible from the nearby family room, too. Bedrooms occupy the other above-grade levels, including, at the upper-most level, the master suite comprised of a study, roof deck, master bath, walk-in closets and the master bedroom.
A clean-lined interior of warm neutrals sets a soothing tone in which the Island landscape is welcomed through expansive windows, porches and decks. Clad in white cedar shingles with a red cedar roof, the West Tisbury House will softly weather in-tune with its meadow site.
Katie Hutchison Studio collaborated with Geoffrey Koper Architect of Yarmouth Port, Mass. on the West Tisbury House. Kitchen fit-out and interior finishes, fixtures, and furnishings by others.
photo by Katie Hutchison
 Gailani Designs Inc.
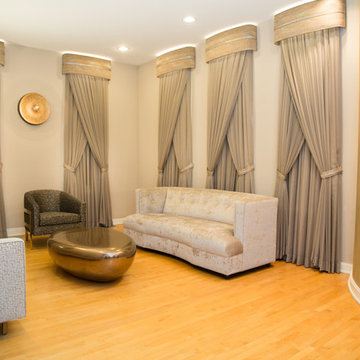
With sleek, contemporary styling, the living room boasts a curved wall with a textural copper-and-silver finish and five very tall, narrow windows. The room itself was all the inspiration I needed to envision big, bold and bright decorative hardware and trim, but the modern furniture and the eye-catching metallic-copper coffee table provided additional inspiration.
Because the clients don’t like floor lamps and because they entertain frequently, I suggested back-lit crowns to reflect light off the ceiling. They loved the idea, but then came the challenge.
Incorporating LED lighting in the design sounded easy enough, but a certified electrician had to be consulted to ensure safety and security. After spending considerable time learning about installing lights within the crowns, I set about designing how the lights needed to be placed to have the most dramatic effect.
Two rows of lights were installed. The upper row shines upward to create a curved light on the ceiling, which enhances the height of the windows, creates a rhythm suggestive of the curve of the accent wall, and mimics the pebble-like shape of the table. The second row of lights shine downward, creating beams of light on the drapery sheer for dramatic effect and helping illuminate the room. Dimmer switches were installed so the clients can adjust brightness.
A decorative trim of diamond crystals was attached to the center of the crowns to create visual interest and add a touch of luxury – a detail that was repeated on the tiebacks. The sheer draperies hanging under the crowns are very close in color to the walls, reducing the contrast between the wall and the draperies, which helps give the room a more open and expansive look and feel.
The clients are delighted with the end result and said that when visitors see the room for the first time, they never fail to comment on the amazing lights in the window treatments.

 TKS Design Group
Download our free ebook, Creating the Ideal Kitchen. DOWNLOAD NOW
This family from Wheaton was ready to remodel their kitchen, dining room and powder room. The project didn’t call for any structural or space planning changes but the makeover still had a massive impact on their home. The homeowners wanted to change their dated 1990’s brown speckled granite and light maple kitchen. They liked the welcoming feeling they got from the wood and warm tones in their current kitchen, but this style clashed with their vision of a deVOL type kitchen, a London-based furniture company. Their inspiration came from the country homes of the UK that mix the warmth of traditional detail with clean lines and modern updates.
To create their vision, we started with all new framed cabinets with a modified overlay painted in beautiful, understated colors. Our clients were adamant about “no white cabinets.” Instead we used an oyster color for the perimeter and a custom color match to a specific shade of green chosen by the homeowner. The use of a simple color pallet reduces the visual noise and allows the space to feel open and welcoming. We also painted the trim above the cabinets the same color to make the cabinets look taller. The room trim was painted a bright clean white to match the ceiling.
In true English fashion our clients are not coffee drinkers, but they LOVE tea. We created a tea station for them where they can prepare and serve tea. We added plenty of glass to showcase their tea mugs and adapted the cabinetry below to accommodate storage for their tea items. Function is also key for the English kitchen and the homeowners. They requested a deep farmhouse sink and a cabinet devoted to their heavy mixer because they bake a lot. We then got rid of the stovetop on the island and wall oven and replaced both of them with a range located against the far wall. This gives them plenty of space on the island to roll out dough and prepare any number of baked goods. We then removed the bifold pantry doors and created custom built-ins with plenty of usable storage for all their cooking and baking needs.
The client wanted a big change to the dining room but still wanted to use their own furniture and rug. We installed a toile-like wallpaper on the top half of the room and supported it with white wainscot paneling. We also changed out the light fixture, showing us once again that small changes can have a big impact.
As the final touch, we also re-did the powder room to be in line with the rest of the first floor. We had the new vanity painted in the same oyster color as the kitchen cabinets and then covered the walls in a whimsical patterned wallpaper. Although the homeowners like subtle neutral colors they were willing to go a bit bold in the powder room for something unexpected. For more design inspiration go to: www.kitchenstudio-ge.com
Sponsored
Sunbury, OH

J.Holderby - Renovations
Franklin County's Leading General Contractors - 2X Best of Houzz!
 RRS Design + Build, LLC
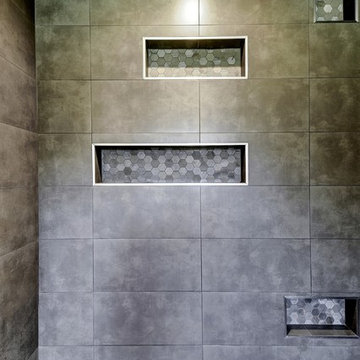
The stunning niches in this large walk in shower were placed a various heights to serve specific purposes. The lowest niche was added in place of a shower bench and provides a perch for shaving legs without taking up floor space. Higher niches provide for storage of bath products, candles and other decorative items as desired. The niches were edged with metal Schluter for a clean modern look. The hexagon tiles were repeated within the niche to add interest and connection to the shower floor. Safety is improved by using small format textured tiles on the shower floor which reduces risk of slipping.
RRS Design + Build is a Austin based general contractor specializing in high end remodels and custom home builds. As a leader in contemporary, modern and mid century modern design, we are the clear choice for a superior product and experience. We would love the opportunity to serve you on your next project endeavor. Put our award winning team to work for you today!

 Steamboat Architectural Associates
Ken Lee Photographer
Example of a large minimalist u-shaped medium tone wood floor eat-in kitchen design in Denver with recessed-panel cabinets, ceramic backsplash, stainless steel appliances and an island
Example of a large minimalist u-shaped medium tone wood floor eat-in kitchen design in Denver with recessed-panel cabinets, ceramic backsplash, stainless steel appliances and an island
 Flavin Architects
Devereux Beach House
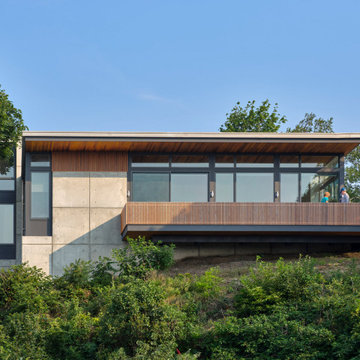
Our client presented Flavin Architects with a unique challenge. On a site that previously hosted two houses, our client asked us to design a modestly sized house and separate art studio. Both structures reduce the height and bulk of the original buildings. The modern concrete house we designed is situated on the brow of a steep cliff overlooking Marblehead harbor. The concrete visually anchors the house to stone outcroppings on the property, and the low profile ensures the structure doesn’t conflict with the surround of traditional, gabled homes.
Three primary concrete walls run north to south in parallel, forming the structural walls of the home. The entry sequence is carefully considered. The front door is hidden from view from the street. An entry path leads to an intimate courtyard, from which the front door is first visible. Upon entering, the visitor gets the first glimpse of the sea, framed by a portal of cast-in-place concrete. The kitchen, living, and dining space have a soaring 10-foot ceiling creating an especially spacious sense of interiority. A cantilevered deck runs the length of the living room, with a solid railing providing privacy from beach below. Where the house grows from a single to a two-story structure, the concrete walls rise magisterially to the full height of the building. The exterior concrete walls are accented with zinc gutters and downspouts, and wooden Ipe slats which softly filter light through the windows.
 Heidi Reis / Abode Agency LLC
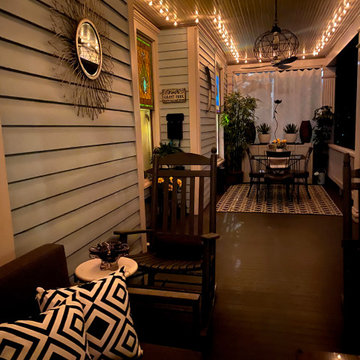
This porch, located in Grant Park, had been the same for many years with typical rocking chairs and a couch. The client wanted to make it feel more like an outdoor room and add much needed storage for gardening tools, an outdoor dining option, and a better flow for seating and conversation.
My thought was to add plants to provide a more cozy feel, along with the rugs, which are made from recycled plastic and easy to clean. To add curtains on the north and south sides of the porch; this reduces rain entry, wind exposure, and adds privacy.
This renovation was designed by Heidi Reis of Abode Agency LLC who serves clients in Atlanta including but not limited to Intown neighborhoods such as: Grant Park, Inman Park, Midtown, Kirkwood, Candler Park, Lindberg area, Martin Manor, Brookhaven, Buckhead, Decatur, and Avondale Estates.
For more information on working with Heidi Reis, click here: https://www.AbodeAgency.Net/

 A Creative Touch Draperies & Interiors
Open floor concept home with views from front to back. Family room has 16 foot wide x 10 foot high sliding glass door.Client wanted blackout curtains to block out extreme sunlight exposure in the mornings.

 Medford Design-Build
Another common trait we find in homes of this era is that the refrigerator is often located at the back of the kitchen. By anchoring the fridge on the outside edge of the kitchen, the amount of traffic is reduced, making for a better experience for both the cook and the person getting snacks from the fridge.
You’ll also notice that we removed the microwave from the upper cabinets and installed an under-counter microwave drawer. This neat little appliance is becoming a popular alternative to traditional microwaves, as it allows for easier, safer access (who ever thought pulling a hot dish out of a microwave that is above shoulder height was a good idea, anyway?!) Not only is it easier to reach, but it automatically slides out like a drawer instead of opening with a swing door. This design has a lot more space inside than its traditional counterpart. Many models can also be used as a warming drawer to keep dishes warm after they have been prepared. Our clients love the sleek look provided by this appliance and the fact that it contributes to a clean, clutter-free countertop.
Final photos by Impressia.net.

 Reico Kitchen & Bath
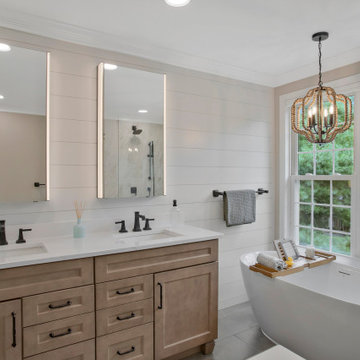
Bryon Berrier of Reico Kitchen and Bath in Timonium, MD collaborated with R Solomon Construction to design a transitional style inspired primary bathroom featuring Masterpiece cabinetry.
The cabinets feature the Bolton door style in Maple in a Translucent Driftwood finish, complemented by Silestone Etheral Haze quartz vanity tops.
Fixture selections for the bathroom are Kohler provided by GROF.
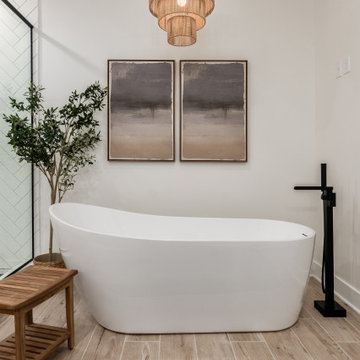
After remodeling the client's kitchen, Bryon was contacted to update the primary bathroom. "The original design had two separate rooms: one for the vanity and drop-in tub, and another for the shower and toilet, separated by a wall. We removed a wall to create a more open space, making the shower area feel less enclosed and used a free-standing tub to reduce crowding," Bryon explained.
"My favorite part is how well the materials coordinate and the use of Matte Black Hardware. I enjoyed working with the clients because they had a clear vision for the remodel and were easy to collaborate with.”
Photos courtesy of BTW Images.

 Carlton Edwards
The Cherry Road project is a humble yet striking example of how small changes can have a big impact. A meaningful project as the final room to be renovated in this house, thus our completion aligned with the family’s move-in. The kitchen posed a number of problems the design worked to remedy. Such as an existing window oriented the room towards a neighboring driveway. The initial design move sought to reorganize the space internally, focusing the view from the sink back through the house to the pool and courtyard beyond. This simple repositioning allowed the range to center on the opposite wall, flanked by two windows that reduce direct views to the driveway while increasing the natural light of the space.
Opposite that opening to the dining room, we created a new custom hutch that has the upper doors bypass doors incorporate an antique mirror, then led they magnified the light and view opposite side of the room. The ceilings we were confined to eight foot four, so we wanted to create as much verticality as possible. All the cabinetry was designed to go to the ceiling, incorporating a simple coat mold at the ceiling. The west wall of the kitchen is primarily floor-to-ceiling storage behind paneled doors. So the refrigeration and freezers are fully integrated.
The island has a custom steel base with hammered legs, with a natural wax finish on it. The top is soapstone and incorporates an integral drain board in the kitchen sink. We did custom bar stools with steel bases and upholstered seats. At the range, we incorporated stainless steel countertops to integrate with the range itself, to make that more seamless flow. The edge detail is historic from the 1930s.
There is a concealed sort of office for the homeowner behind custom, bi-folding panel doors. So it can be closed and totally concealed, or opened up and engaged with the kitchen.
In the office area, which was a former pantry, we repurposed a granite marble top that was on the former island. Then the walls have a grass cloth wall covering, which is pinnable, so the homeowner can display photographs, calendars, and schedules.
 McCabe By Design LLC
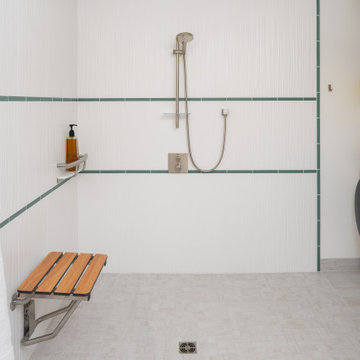
This wet room designed bathroom provides zero threshold access for bathing. The Ann Sacks teal glass deco tiles provide a visual guide for the shower area while adding a beautiful punch of color. A grab bar shampoo shelf by Invisia and an extra long second grab bar by Moen facilitates the transfer from a wheel chair or other mobility assistance devises to the shower seat (and toilet, behind the camera view). The handheld shower on an adjustable slide bar provides flexibility for bathers who are either seated or standing, as well as space for caregivers. The combination clothes washer/heat pump dryer makes good use of the space under the stairs as well as proximity to water supply pipes and waste drains that service the bathroom.
The 2" x 2" floor tiles in the shower area provide additional traction to mitigate the potential for slips and falls.

 Accent Window Fashions LLC
SILHOUETTE® Window Shadings with LiteRise®
Create beautiful ambient light
Silhouette® window shadings, with the Signature S-Vane™, magically float between two sheers and diffuse harsh sunlight. Simply tilt the vanes to achieve your desired level of light and privacy.
Light Control SUPERVISE THE SUN
Our Signature S-Vane™ is designed to put you in control of the amount of natural light that comes in, with beautiful effects.
Transform harsh exterior light by diffusing it, spreading it evenly throughout your room, so you can maximize daylight hours and reduce your need for artificial light.
Our beautiful sheer fabrics also softly filter out brightness, glare, and UV rays —protecting your furniture and flooring from fading.
View-Through DRAMATIC SOFTNESS
With no cords or tapes, the sheer facings allow you to view through the vanes to the outside, while maintaining a discreet level of privacy. For the most impactful view, choose our Quartette™ 4" vane size.
A Deux™ THE BEST OF BOTH WORLDS
A Deux™ offers a room-darkening option by combining a Silhouette shading and a room-darkening roller shade in a single headrail. Available as an option on LiteRise®, PowerRise® and EasyRise™ operating systems.
Platinum™ Technology CONTROL FROM YOUR PHONE OR TABLET
Controlling your window treatments with a mobile device means you can set your blinds to movie mode, work mode, or 8 a.m. mode with the touch of a button, without leaving your seat. It’s effortless, fun and smart—with perfectly smooth operation.
Lifetime Guarantee FOR LIFE
Hunter Douglas products are designed and custom-assembled in the U.S. with the highest level of quality. But just in case, every window treatment from Hunter Douglas is covered by our lifetime limited guarantee. Read the Hunter Douglas Warranty to learn more.
Silhouette® Window Shadings with LiteRise®
Fabric/Material: Chateau™
Color: Vin Blanc
Operating Systems: LiteRise, PowerRise 2.1 with Platinum Technology, Tilt-Only
Room: Dining Room
Room Styles: Traditional
Available from Accent Window Fashions LLC
Hunter Douglas Showcase Priority Dealer
Hunter Douglas Certified Installer
Hunter Douglas Certified Professional Dealer
#Hunter_Douglas #Silhouette #LiteRise #PowerRise #Platinum_Technology #TiltOnly #Window_Shadings #Dining_Room #Traditional #Window_Treatments #HunterDouglas #Accent_Window_Fashions
Copyright 2001-2014 Hunter Douglas, Inc. All rights reserved.
Sponsored
Delaware, OH

Buckeye Basements, Inc.
Central Ohio's Basement Finishing ExpertsBest Of Houzz '13-'21

 Amanda Martocchio Architecture
Photo credit Michael Moran.
The design for this client’s “dream house on the water” capitalizes on every opportunity to incorporate views of the Long Island Sound within the home. The placement and expanse of the fir windows and sliding doors underscore the water’s proximity. The interior gathering space spills out onto the raised outdoor deck and lap pool overlooking the seawall. Reducing the house’s carbon footprint is another priority, accomplished by generating renewable energy on site. The precise angle of the house on the property is calculated for optimal solar energy production by the rooftop photovoltaic panels and a geothermal system installed under the driveway provides heating and cooling for the house.
Due to the fact that the site is located on a floodplain, the ground floor of the house is raised and no basement is allowed. This presents a challenge in terms of carving out enough storage space in the main house that one might normally relegate to a basement. Rooms are efficiently sized and serve multiple functions and storage is built-in wherever possible.

 Kipnis Architecture + Planning
This is the lakeside of a home that combines modern lake house design with a number of sustainable best practices to create a stunning and amazingly comfortable low carbon home.
To maximize the view out to the lake, a very large segemented window wall was designed that integrated the structure directly into the window mulls to minimize visual obstructions. Skylights on remotes are set above the great room to encourage natural ventilation. Except for the bedrooms and bathrooms, the rooms are all open to one another, again for natural ventilation.
The energy concept for the home was to be all electric to reduce fracked natural gas usage. Natural gas is only used as a starter for the high efficiency, sealed combustion, outside combustion air fireplace and for a back up generator. The 9.8 kW PV 35 Panel array provides 32% of the homes energy usage, with the remaining electricity coming from 100% renewable energy credits from the grid.
The mechanical system is provided by a series of all electric, ultra high efficiency mini-splits, controlled by an integrated smart home system. An induction cooktop, hybrid electric water heater and hybrid electric dryer complete the items that typically use natural gas. Lighting is all high efficiency correctly colored LED’s.
A home office is included on the second floor complete with a balcony, facing towards the lake. Their zero carbon work commute consists of walking across the 2nd floor hallway.

 User
The open space plan on the main level of the Prairie Style home is deceiving of the actual separation of spaces. This home packs a punch with a private hot tub, craft room, library, and even a theater. The interior of the home features the same attention to place, as the natural world is evident in the use of granite, basalt, walnut, poplar, and natural river rock throughout. Floor to ceiling windows in strategic locations eliminates the sense of compression on the interior, while the overall window design promotes natural daylighting and cross-ventilation in nearly every space of the home.
Glo’s A5 Series in double pane was selected for the high performance values and clean, minimal frame profiles. High performance spacers, double pane glass, multiple air seals, and a larger continuous thermal break combine to reduce convection and eliminate condensation, ultimately providing energy efficiency and thermal performance unheard of in traditional aluminum windows. The A5 Series provides smooth operation and long-lasting durability without sacrificing style for this Prairie Style home.
200