
Search results for "Releases" in Home Design Ideas

 User
Charlie Neuman, photographer
Alcove bathtub - mid-sized coastal master blue tile and porcelain tile porcelain tile and gray floor alcove bathtub idea in San Diego with shaker cabinets, white cabinets, a two-piece toilet, blue walls, marble countertops and an undermount sink
Alcove bathtub - mid-sized coastal master blue tile and porcelain tile porcelain tile and gray floor alcove bathtub idea in San Diego with shaker cabinets, white cabinets, a two-piece toilet, blue walls, marble countertops and an undermount sink


 Dura Supreme Cabinetry
This contemporary kitchen features the NEW Stainless Steel Drawers and Roll-Out Shelves from Dura Supreme Cabinetry. The Bria (frameless) cabinets in Dura Supreme's "White" and Wired-Foil cabinets in Dura Supreme's "Wired-Mercury" are a great combination of cabinetry for creating the clean sleek look of this modern two-tone kitchen design.
Dura Supreme Cabinetry is excited to introduce NEW Stainless Steel Drawers and Roll-Out Shelves for their Bria Cabinetry (Frameless / Full-Access product line). For a limited time, this new metal drawer system is available exclusively from Dura Supreme as they partnered with Blum to be the first American manufacturer to bring it to market.
Dura Supreme’s Stainless Steel Drawers and Roll-Out Shelves are an attractive option for any kitchen design. Sleek, double-wall, stainless steel sides are only ½” thick and work with many of Dura Supreme’s wood drawer accessories, as well as the coordinating gray metal accessories designed specifically for Stainless Steel drawers. Concealed, undermount glides are integrated into the sides and are self-closing with a soft-close feature.
Our new Stainless Steel drawer option provides a contemporary alternative to our classic Maple dovetailed drawer. For homeowners that favor Transitional or Contemporary styling, this sleek, high-performance drawer system will be ideal!
Request a FREE Dura Supreme Brochure:
http://www.durasupreme.com/request-brochure
Find a Dura Supreme Showroom in your area:
http://www.durasupreme.com/dealer-locator
Want to become a Dura Supreme Dealer? Go to:
http://www.durasupreme.com/new-dealer-inquiry
To view a video and more info about this product go to: http://www.durasupreme.com/storage-solutions/stainless-steel-drawers-roll-outs
Find the right local pro for your project
 Tile Doctor Ltd
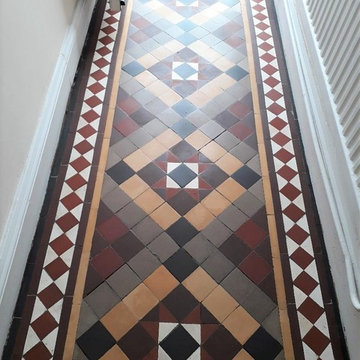
As is often the case in years past and for whatever reason many homeowners covered their decorative Victorian hallway tiles in a variety of products from carpet to laminate flooring. These days the trend has reversed and quite rightly many homeowners now realise the value a tiled floor can bring to a property and look to us to have it restored.
Our client had purchased a property in Norfolk seaport of Kings Lynn and, on lifting the dirty old carpet and decaying underlay in the hallway, discovered a beautiful tiled entrance hall. It was obvious that a previous owner had decided to lay carpet over the tiles as an easy way of hiding the result of careless renovation and decorating which had resulted in a thick coating of plaster, paint, carpet tape glue and various other contaminants which had become firmly stuck to the surface. There were also two small rectangular black and brown tiles missing behind the front door which had been damaged during the removal of some old lead pipes.
This was clearly a job which would need somewhat more than a scrubbing brush and a bottle of Flash!
Our first job was to remove as much of the solid contaminants as possible by hand with floor scrapers and a steamer which softened the more stubborn lumps. We then applied Tile Doctor Remove & Go which is a powerful alkaline stripper to the whole area, left it to dwell on the surface for twenty minutes and then scrubbed it in using a rotary machine fitted with a black scrubbing pad. The resulting slurry was then power rinsed and extracted away using our Ninja machine which is a high-power industrial vacuum. Any remaining patches where the carpet tape had been stuck down were spot treated using Tile Doctor Nanotech HBU which made short work of the hardened glue.
The result was a clean floor, but the surface still felt slightly rough and pitted, a problem which we resolved using the rotary machine fitted with a 200-grit diamond burnishing pad followed by a 400-grit pad with a little 400 grit honing powder which left the surface smooth, silky and ready for the application of a sealer.
Finally, we acid washed the whole area using Tile Doctor Acid Gel, a slow release product which would neutralise any remaining chemicals, improve new sealer adhesion and inhibit the future production of any efflorescence salts. We had used a fair amount of water during the cleaning process, so we left the floor to dry off thoroughly overnight with assistance from our commercial dehumidifier.
On our return the following day, we discussed the sealer options with the client and recommended using microporous Tile Doctor Colour Grow which is an impregnating sealer that seeps into the pores of the stone protecting it from within. It will provide an excellent fluid resistant seal whilst enhancing the natural colours in the stone, additionally it’s fully breathable thereby enabling any moisture trapped under the floor to rise through the floor and evaporate. This is important on old floors like this where no damp-proof membrane was installed. The sealer was applied with a paint pad in tow coats and allowed to dry for an hour before buffing the floor with a hog’s hair pad to give a rich natural-look sheen finish.
The Victorian tiles responded well to the treatments which were completed in two consecutive days. My client was extremely pleased with the results and left the following comment:
“My floor was in poor condition after being buried under carpet as well as many, many years of paint and muck. I enjoyed the time they spent at my home and wouldn’t hesitate to use (or recommend) the Tile Doctor service in the future.”
Nick White
Norfolk Tile Doctor

 Big Bear Remodeling
Stylish modern walk in shower with stacked stone shower wall and chrome shower head
Inspiration for a small modern 3/4 black and white tile and pebble tile porcelain tile doorless shower remodel in Cleveland with white walls
Inspiration for a small modern 3/4 black and white tile and pebble tile porcelain tile doorless shower remodel in Cleveland with white walls

 SUPERIOR CHIMNEY SERVICES CORPORATION
September 21st is the first day of Fall. I know we don’t want to think about it yet, but it is good to prepare and get the chimney swept early. Why? According to the Farmer’s Almanac, they are predicting a colder and snowier Winter. But you say, “eh, I got a gas fireplace.” Better yet, “I don’t use my fireplace, so why should I sweep it, and clean it early?” Let’s discuss why all types of chimneys and fireplaces need to be swept.
Why Do All Types of Chimney’s and Fireplaces Need to Be Swept?
When we think of the fireplace, we picture the real wood burning fireplace with the sounds of crackling wood. With regular use of the wood-burning fireplaces, a byproduct called creosote forms and over time, lines the side of the chimney flue. This needs to be swept at least once per year as creosote is flammable. However, all chimney’s, regardless of whether it burns wood or utilizes gas, needs to be professionally inspected and swept annually.
Many homeowners mistakenly believe that a gas or unused chimney is immune to problems since it doesn't produce a byproduct. However, these chimney systems face their own unique dangers. Gas fireplaces, especially those that are high-efficiency, can lead to the buildup of corrosive deposits. Over time, these deposits can degrade your chimney liner. Getting it inspected by a certified chimney technician will control this issue so it doesn’t turn into a problem.
4 Key Reasons to Prioritize Your Annual Chimney Inspection
The annual chimney inspection is more than just a sweep; it’s a comprehensive health check for your entire chimney system. We call it the 14 Point Inspection. A certified chimney technician will look for:
1. Fire Hazards: Again, for wood-burning chimneys, the removal of creosote is important to prevent a chimney fire. Gas fireplaces release corrosive deposits. If you don’t use the fireplace, you never know what debris may have settled in. If you want to use the fireplace, please be sure to have it professionally inspected and swept before use.
2. Obstructions: There’s a whole world outside of your home, and especially in the Fall, our little friends are searching for a warm place to stay. Your chimney looks pretty good. And, let’s not forget how the wind in the Chicagoland are does a great job of moving debris around that can get up and under the chimney cap or directly into the chimney if you don’t have a cap. These blockages need to be cleared for you and your home’s protection.
3. Structural Damage: A chimney technician will be able to spot cracks, water damage, or deterioration of the chimney and chimney liner that could compromise the system's safety.
4. Ventilation Issues: Ventilation is key for your home to breathe. The certified chimney technician will ensure proper draft and airflow, which is the best way to get rid of toxic gases.
NFPA
Remember, the National Fire Protection Association (NFPA) recommends an annual inspection for all chimney types. This simple, proactive maintenance can save you from costly repairs. Don't wait for a problem to become obvious.
Contact Superior Chimney today at 877-244-6349 to schedule a 14-Point Chimney inspection to ensure your home and family are protected.

 Victor Mulbauer
New Installation of Red Oak Wood, 3 1/4 in width. White-washed Bona Stain was used, Bona Finish, as well as Bona Traffic HD.
**This photo is of the Red Oak Wood (3 1/4 inch) prior to the application of the white-washed Bona Stain.
 Tile Doctor Ltd
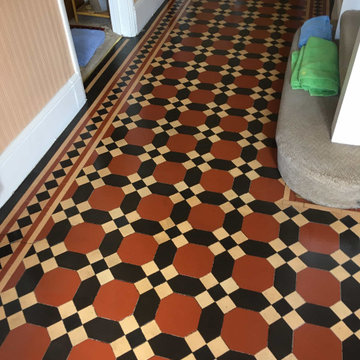
This Victorian floor in Twickenham, Middlesex was in good physical condition for its age but needed a good deep clean. Our customer had informed us that they had never cleaned or sealed the floor in the sixteen years that they had lived there so it was well overdue.
I went over to survey the floor and completed a test clean on a small section of tiling to see which products/techniques would work best. I like to do this as it demonstrates to the client what can be done, and it allows me to come up with an accurate price for doing the work.
As you can see from the pictures, there was quite a difference in the test patch compared to the rest of the floor. Years of foot traffic from the street had taken its’ toll and the floor was very dirty. Luckily, the floor was in very good condition and had not worn too badly.
Once they had seen the test patch, they were confident that it would be worth go ahead with my quote. It would ensure that the period feature was retained for many years to come. The colours on the floor were quite faded so it would be nice to get it restored.
I started the cleaning process by first taping up the surrounding skirting boards and doors to ensure they were protected from potential splashing. Cleaning involved spraying the Victorian tiles with a strong dilution of Tile Doctor Pro-Clean which is a dedicated Tile and Grout cleaning product. This was left to soak in for about ten minutes and then scrubbed in using a black pad fitted to a heavy-duty rotary scrubber.
This gives the floor a good mechanical scrub and works wonders releasing the ground-in dirt and soil from the tiles. The strong dilution of Pro-Clean will also remove any remaining sealers from the tile, however after sixteen years I doubted there would much trace of sealer left. Once done the floor was rinsed with water and all the soils removed with a wet vacuum.
Following the initial clean the colours were already much stronger. Next step however was to improve on that by giving the floor an acid rinse using Tile Doctor Grout Clean-Up. This removes mineral deposits and generally brightens up the appearance of the tile. After another round of scrubbing the floor was rinsed with our high-pressure washer and then vacuumed, extracting all of the dirty water and dirt away in one go. The floor was looking a lot better and was left to dry overnight.
After allowing the floor to dry overnight, we returned the next day to seal the floor. First, checking the floor was dry using the damp meter. Floors of this age can take a little longer to dry as there is no damp-proof membrane so it’s always worth checking as applying a sealer to damp tiles is not a good idea.
Once I was satisfied it was dry eight coats of Tile Doctor Seal and Go sheen finish sealer were applied. This takes a while to do as each coat needs to dry before applying the next. The sealer will protect the Victorian tiles for dirt and stains, it also enhanced the colours in the tile and will make it easier to keep the floor clean going forward.
My client was very pleased with the floor and mentioned that they should have called me in sooner! For aftercare cleaning I recommended Tile Doctor Neutral Clean which is an effective cleaner with a neutral pH, its designed for cleaning tiles without degrading the sealer.
Jonathan Oldham
South Middlesex Tile Doctor

 Five Star Tree Care
Trees and shrubs are a big part of our local environment. Some are intended to bear fruit, while others are there simply for aesthetics. Of course, some trees are planted to help conserve the environment, and some started to grow on their own. Regardless, there are many facts about trees that you may not know. Five Star Tree Services has put together a list of a few of those facts that you may find surprising!
Trees Live Longer Than Anything Else
Of all living things, trees can survive the longest on this earth. Some species of trees can survive for several thousands of years. For example, the baobab tree can thrive for thousands of years after it has reached maturity.
Trees Have a Godly Connection
There are many religions in the world, and in some, it is a common belief that certain trees are homes to the gods. Many of these older traditions and beliefs are currently less prevalent, but there has always been a strong connection between trees and deities.
Cottonwood Seeds Stay Airborne for Days
Most trees reproduce via seeds. While most tree seeds fall to the ground, or are carried off by animals, the cottonwood tree seed flies through the air for days before landing.
Trees Promote Rainfall
Mature trees take moisture from the ground and release it into the atmosphere. This then triggers precipitation. The result is more rain in the area where trees are abundant. The best way to prevent or derail desertification is by planting trees in an area.
There are Tree Genders
This may seem like a sound bite for likes and shares, but some trees have gendered scientific classifications. There are both male and female trees. One great example is the pine tree. The female trees produce seeds in the pine cones, while the male trees shed pollen from their cones to fertilize the female cones. The wind makes the magic happen, which results in a bevy of baby pine cone trees.
The Rings Show Its Age
Very few methods exist for pinning down the age of a tree. Carbon dating is a complex method of ageing a tree, but you can also count the rings on a cut tree to determine its age. We don’t suggest you cut down a tree just to count the rings, though!
Certain Tree Parts Grow Seasonally
Unlike people, trees grow in separated sections. The trunk will grow in the summer, while the foliage will thrive in the spring. The roots tend to spread during the fall and winter when the rest of the tree is dormant.
Trees Have Their Own Self-Defense Methods
If a tree is invaded by insects, it will flood its leaves with phenolics chemicals. This is a compound that discourages insects from eating their foliage. The tree also sends off signals to other trees about the attack so that they can prepare their defenses as well.
How We Can Help
Here at Five Star Tree Services, we’re passionate about what we do. Our team provides high-quality and affordable tree care and maintenance, including pruning and tree removal services in Toronto. If you require help with the trees on your property or have any questions for our experts, give us a call at (416) 990-3355.
 Tile Doctor Ltd
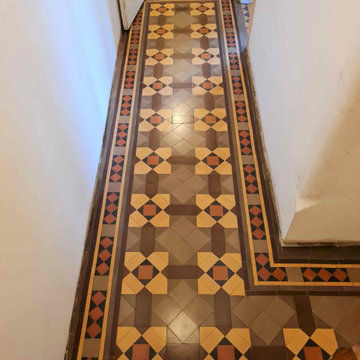
We were contacted by a customer in West Kirby who needed help renovating a Victorian tiled hallway in a house they had just purchased. Kirby is a desirable seaside location North of Heswall that expanded with the arrival of the railway in 1848. The railway brought a demand for property and so it’s not unusual to find housing stock in this area dating back to the Victorian era.
The Victorian tiles at this property appear to have been neglected by the previous owner and were now looking very dull and marked by paint from decorating; all the colours looked washed out and the floor was now looking very unappealing.
The good news however is that this problem is not uncommon and with a deep clean and a fresh sealer applied it can be transformed. I gave the owner a quote which was accepted a date agreed for my return to do the work.
On the first day the floor was sprayed with a neat solution of Tile Doctor Remove and Go which is a powerful alkaline cleaning and stripping agent used to remove old seals and paint. The solution was left to dwell for about twenty minutes so it could soak in and get to work. It was then scrubbed into the tiles using a coarse 200-grit pad fitted to a heavy buffing machine. Water was then added to the floor for lubrication and the soils released from the pores of the tile during scrubbing was removed by with a wet vacuum.
To treat the stubborn paint stains and remains of what I suspect was carpet adhesive a hand scraper and wire brush was used, this was made easier by the Remove and Go which had softened the paint etc.
The next stage was to give the Victorian tiles a mild acid wash using Acid Gel which is applied to the floor, scrubbed in, and rinsed off with a little water then extracted using the wet vacuum. We always recommend an acid wash for old floors like these as it will counter any efflorescent salts resident in the tiles and helps to remove other mineral contaminates and old grout that can mask the true beauty of the tiles.
I left the tiles to dry out for two days before returning to apply the sealer, first checking it was dry by testing for moisture in various places with an electronic damp tester. It’s not a good idea to apply a sealer to a damp floor so we always check first.
Satisfied the floor was dry, I started applying a coat of Tile Doctor Colour Grow which is a colour enhancing impregnating sealer that helps to bring out the true colours in the tile. This was allowed to dry for thirty minutes and then followed up five coats of Tile Doctor Seal and Go Extra which is a breathable sealer that leaves a lovely satin finish and builds on the protection.
Once done the Victorian hallway tiles looked so much cleaner and healthier. It was quite a transformation and the new sealer had given the floor a nice low sheen shine which the customer was very happy with.
For aftercare cleaning I left them with a bottle of Tile Doctor Neutral Cleaner which is specially formulated for cleaning sealed tiles. We don’t recommend tile cleaning products you find on supermarket shelves as the are usually too strong and can strip a sealer off the floor prematurely. If your choosing another product to clean your floor always read the label to make sure its compatible.
Andrew Robb
Merseyside Tile Doctor
 Concrete-Visions LLC
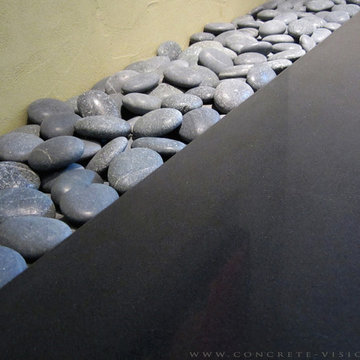
Modern Japanese Room Alcove (Tokonoma) with Black Polished Concrete by Concrete-Visions LLC.
www.concrete-visions.com
〜 Zen Design
Inspiration for an asian home design remodel in Denver
Inspiration for an asian home design remodel in Denver
 Tile Doctor Ltd
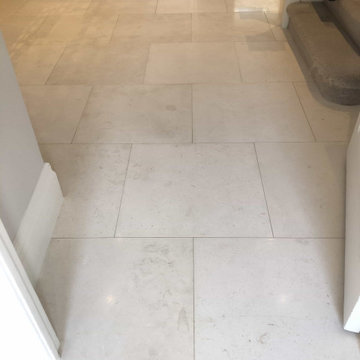
This client from Highgate in North London, N6 contacted us about their large honed Limestone tiled floor that was installed throughout the ground floor. It had been laid seven years prior and was now grubby and in need of a deep clean and seal including the grout which had turned black with dirt.
I visited the property to survey and assess what was required and provided the owner with a quotation for the renovation. The hallway pictured was in the worst condition, it was a busy house with young children and dogs and over the years the sealer had worn down leaving it vulnerable to ingrained dirt. Without a sealer to protect the stone it had become heavily soiled and lost its original polished appearance.
Happy with the quote we scheduled a date for the work to go ahead. The quote included deep cleaning and burnishing the stone to bring back the polish, grout cleaning and re-sealing the Limestone to protect it.
We arrived on the first day and prepared the area by taping up the skirting and woodwork to protect them from potential splashing. Next step was to burnish the floor using a set of Tile Doctor Diamond Burnishing Pads, specifically the 400, 800 and 1500 grit pads fitted to a rotary machine, these were used in sequence running each pad over the tiles several times with water to lubricate the process. The water turns into a fine slurry as pores in the stone are opened and the dirt is released, the slurry is rinsed off with more water and extracted using an industrial wet vacuum after each pad. The finer 800 and 1500-grit pads slowly close the pores and refine the appearance of the stone building up the polish in the process.
A strong dilution of Tile Doctor Pro-Clean was then applied to the grout lines, leaving it for a short while to soak in and then hand scrubbing with a grout brush. The dirty cleaning solution and were then removed from the floor with the wet vacuum.
This process was repeated across the different sections of the Limestone floor until I was satisfied with its appearance. Before leaving for the day, I rinsed the floor again using a buffing machine fitted with a brush fitted to give it a final clean. The floor was dried as much as possible using the wet vacuum and then allowed it to dry off fully overnight.
The following day the final 3000-grit pad in the four-pad set was applied to the floor to bring up the polish even further. The pad is applied dry with only a little water sprayed onto the tile. We call this process a “Spray Burnish” and as well as leaving the floor nice and dry ready for sealing it adds a nice subtle shine to the stone.
The floor was then sealed with two coats of Tile Doctor Colour Grow sealer. This is a colour intensifying impregnating sealer that works by occupying the pores in the stone so dirt cannot become ingrained there. It will provide durable protection and make the floor much easier to keep clean. It worked well on the pale Limestone and beautifully enhanced the colour and features in stone. Once complete the floor looked brand new again.
I left a complimentary bottle of Tile Doctor Stone Soap with the client and gave them some information about how best to maintain the floor. This product is pH neutral and cleans whilst maintaining the patina on the stone helping to keep the floor in great condition.
The client was delighted with the result and left us a great review.
“Andrew is excellent and gets on with the job and we got a fantastic result. Highly recommend. By Aaron S, Highgate, 15 March 2021”
Andrew Newstead
North London Tile Doctor
 Tile Doctor Ltd
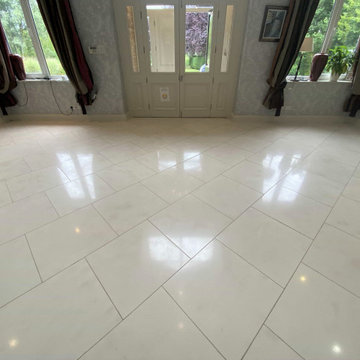
This job was for a repeat client in Toft near Cambridge who had aa stunning large hallway that was tiled in beautiful pale Limestone. My client had asked me back to work on the floor having previously completed the deep clean and seal of a Terracotta floor previously.
The Limestone tiling in the entrance hall had years of some type of topical sealer applied to it. This caused the stone to look slightly discoloured and from certain lights showed up hundreds of scratches and smudges embedded in the seal. I’ve tried to capture this problem in the photographs on this page, but it was very difficult.
A topical sealer sits on the surface of the tile where it is vulnerable to scratching, hallways are generally high traffic areas and so more likely to see this sort of problem. Ideally an impregnating sealer should have been applied, impregnators work by occupying the pores in the stone thus preventing soiling from becoming ingrained in the stone.
Before starting we protected the woodwork against splashing with blue film, I don’t usually make a great deal of mess, but you can never be too careful when working in someone’s property especially one as beautiful as this.
To strip off the old sealer I began by applying a strong dilution of Tile Doctor Remove and Go to the Limestone tiles. I split the floor into sections and used a 400-grit diamond burnishing pad to work the Tile Doctor Remove and Go into the tiles. The floor was then rinsed off using our high-pressure cleaning system that applies pressurised hot water to the floor whilst simultaneously extracting the soil with its built-in vacuum. The system is quite heavy, so it is built into my van, and I run a large flexible hose to a spinner tool that does the cleaning. It is an expensive tool, but it saves a lot of time and leaves the floor fairly dry afterwards.
The 400-grit pad had released a lot of the sealer but there were quite a few layers to get through, so I changed the burnishing pad to a coarse 200-grit pad and repeated the process. After another rinse and extract I would see it had the desired effect and I was able to carry on building up the finish on the Limestone by apply the 400-grit followed by the 800, 1500 grit pads. It was a large floor and so this took up much of the day so once complete I left for the day so it could dry off overnight.
The next day I finished the polishing process with the application of a 3000-grit burnishing pad which is applied with a little water sprayed onto the tile and really brings up the polish on the stone. This process has the added advantage of leaving the floor dry so not long afterwards I was able to move on to sealing.
For this floor two coats of Tile Doctor Ultra-Seal were applied, it is an impregnating sealer that won’t alter the colour of the tiles leaving a natural look.
My client was much happier with the new finish and has asked for another quotation on some more Terracotta flooring that needs attention. For aftercare I recommend using Tile Doctor stone soap, it’s a special formula that builds on the patina which will help maintain the polished appearance of the Limestone.
Tom Conlon
Cambridge Tile Doctor

 Charlen's Abstracts
This 30" x 24" abstract acrylic painting has been done in shades of cobalt blue, sky blue, citrine, chartreuse, white, soft sea green, and royal blue. Finished in gloss varnish to protect the piece from dust and UV light for years to come. Can be hung vertically or horizontally. Gorgeous vivid rich colors in a great contemporary style.


 Heidi Pribell Interiors
 puts a fresh twist on classic design serving the major Boston metro area. By blending grandeur with bohemian flair, Heidi creates inviting interiors with an elegant and sophisticated appeal. Confident in mixing eras, style and color, she brings her expertise and love of antiques, art and objects to every project.

 Philip Crawford
Outdoor patio, with recirculating water feature. Copper pipe through "building button" spout, mounted on beautiful fieldstone wall. Water falls into custom made copper trough.

 Custom Surface Solutions
 (www.css-tile.com) - Owner Craig Thompson (512) 430-1215. This project shows the remodel of a small 1950's vintage home master bathroom. 8"" x 18" Calcutta gold marble tile was used on the shower walls and floor wall base and ceramic gray penny tile on the floor. Shower includes curbless pan / floor, dual shower boxes, frameless glass slider, trough duel fixture sink and chrome fixtures.

 threshold interiors
Location: New York, NY, United States
This Loft was tastefully renovated back in the '90s, but was due for an update and an expansion of the kitchen and dining areas to accommodate the client's cooking skills and entertaining needs. EnlargIing the island and adding cabinetry to delineate the office, bar and dining areas was a priority. The bathroom was updated to feel like a tranquil spa with beautiful new tile, plumbing fixtures and cabinets. Our biggest challenge was coordinating the entire renovation while our client was out of town for the Summer!
Photographed by: James Salomon
73