
Search results for "Remove lines" in Home Design Ideas
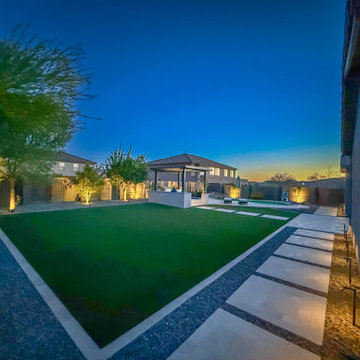
 Colorworks Landscape Design
FRONT YARD:
- Removed rip rap, existing pavers, and a large tree
- Graded and prepped for a driveway extension and new walkway
- Installed 1,000+ sq ft of Belgard Pavers (driveway + walkway to gate + front door entry)
- Upgraded irrigation: trenching, PVC lines, new valves, and bubblers
- Added new plantings
BACKYARD:
- Cleared 19 tons of granite + removed 1,100 sq ft of existing grass
- Installed 1,476 sq ft of ultra-lush 80oz Daytona synthetic turf
- Built a 14' custom BBQ island with travertine counters + stone veneer
- Added 100 ft gas line, dual risers, and grill cut-out for a Green Egg
- Installed Alumawood Pergola
- Laid down 1,200 sq ft of 'Pearlescent' travertine decking in a 3-piece pattern
- Added citrus trees, Italian Cypress, flowering vines, and more
- Finished with landscape lighting
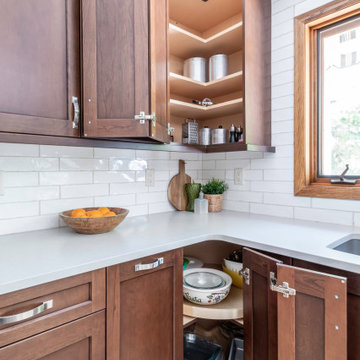
 Kowalske Kitchen & Bath
A couple hired us as the professional remodeling contractor to update the first floor of their Brookfield, WI home. The project included the kitchen, family room entertainment center, laundry room and mudroom.
The goal was to improve the functionality of the space, improving prep space and storage. Their house had a traditional style, so the homeowners chose a transitional style with wood and natural elements.
Kitchen Remodel
We wanted to give the kitchen a more streamlined, contemporary feel. We removed the soffits, took the cabinetry to the ceiling, and opened the space. Cherry cabinets line the perimeter of the kitchen with a soft gray island. We kept a desk area in the kitchen, which can be used as a sideboard when hosting parties.
This kitchen has many storage and organizational features. The interior cabinet organizers include: a tray/cutting board cabinet, a pull-out pantry, a pull-out drawer for trash/compost/dog food, dish peg drawers, a corner carousel and pot/pan drawers.
The couple wanted more countertop space in their kitchen. We added an island with a black walnut butcher block table height seating area. The low height makes the space feel open and accessible to their grandchildren who visit.
The island countertop is one of the highlights of the space. Dekton is an ultra-compact surface that is durable and indestructible. The ‘Trilium’ color comes from their industrial collection, that looks like patina iron. We also used Dekton counters in the laundry room.
Family Room Entertainment Center
We updated the small built-in media cabinets in the family room. The new cabinetry provides better storage space and frames the large television.
Laundry Room & Mudroom
The kitchen connects the laundry room, closet area and garage. We widened this entry to keep the kitchen feeling connected with a new pantry area. In this area, we created a landing zone for phones and groceries.
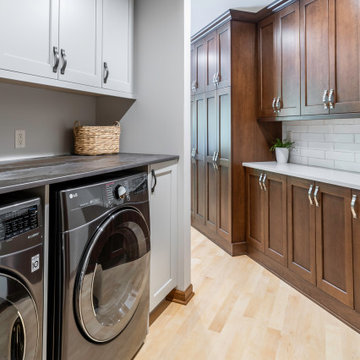
We created a folding area at the washer and dryer. We raised the height of the cabinets and floated the countertop over the appliances. We removed the sink and instead installed a utility sink in the garage for clean up.
At the garage entrance, we added more organization for coats, shoes and boots. The cabinets have his and hers drawers, hanging racks and lined shelves.
New hardwood floors were added in this Brookfield, WI kitchen and laundry area to match the rest of the house. We refinished the floors on the entire main level.
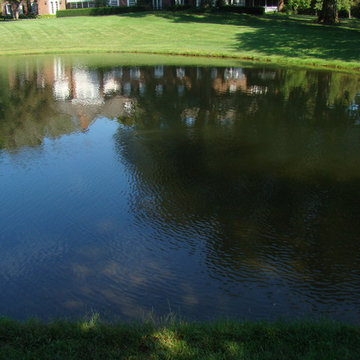
 Reflections Water Gardens
After two years of fighting with a failing pond liner, the resident decided to replace the liner in the pond. This 150’ x 115’pond sat above and flowed into a larger pond which was lined with PVC liner. We were replacing this with a 45 mil epdm fishsafe rubber liner. This presented a problem: there is no way to adhere the new rubber liner to the existing PVC liner in the lower pond. The solution was to pour a cement 18” wide x 2’ deep footing next to the wier damn between the two ponds in order to connect the two liners together. The old liner was placed on the top of the footing and a water-block sealant was used. The new rubber liner was placed on top and another layer of sealant along with stainless steel bars were laid atop the two materials in order to press them together to maintain a water-tight junction. A drain tile system was installed beneath the liner to relieve ground water pressure and vent off any gasses. Water tight seals also had to be provided for multiple plumbing penetrations through the liner. Non-woven geotextile planting media bags were used to prevent erosion around the perimeter of the pond. As the pond was landscaped with lawn and perennials, these had to be removed and preserved and maintained throughout the project in order to return them upon completion of the lining. All trenching work and removal of plant material was done by hand in order to maintain the surrounding landscape; great care was taken throughout the project in order to protect existing hard and softscape, so that upon completion, the area appeared almost exactly as it had been before work began.
Photo by Larry Carnes
Find the right local pro for your project
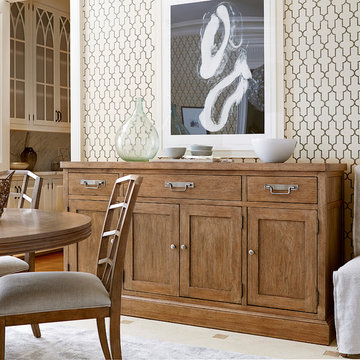
 El Dorado Furniture
Classic coastal style with modern accents are ready to delight, and beautify your dining room. The Modern Muse Sideboard is a grandiose piece crafted from select hardwood solids and veneers, finished in a warm bisque finish. The top features a built-to-last laminated metal top, three top drawers with chic metal handles open to reveal removable felt-lined trays in black, while four bottom doors have fixed shelves and platter storage. Here's to endless nights of family dinners!
 Dwelloquent Kitchen & Cabinetry Design
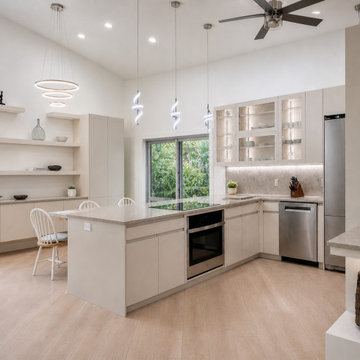
Modern Inspired Kitchen Transformation with Custom Display Lighting
Designed for a traditional home in Jupiter Farms, this renovation completely transformed the interior by opening up multiple walls to create a bright, modern, open-concept living space while still honoring the relaxed warmth of the property’s rural setting. Although the home sits on a farm-like property complete with animals and expansive outdoor views, the homeowners wanted the interior to feel lighter, cleaner, and more contemporary for everyday living and entertaining.
The redesigned kitchen features custom maple slab cabinetry finished in a soft linen-toned paint color, creating a calm and seamless backdrop throughout the space. Clean modern lines, integrated finger pulls, and minimalist detailing were carefully balanced with warm textures and natural materials so the kitchen would still feel welcoming and connected to the home’s surroundings.
A large waterfall island anchors the space and helps define the newly opened floorplan, while floating shelves and illuminated glass display cabinetry add openness and visual interest without overwhelming the airy architecture. Integrated LED lighting throughout the kitchen enhances the soft neutral palette and creates warmth and dimension in the evening.
One of the most personal design elements in the project is the custom illuminated display niche created specifically to showcase the homeowner’s treasured petrified wood sculpture. Carefully integrated LED lighting highlights the organic texture and natural beauty of the piece, turning it into a sculptural focal point within the kitchen and living space.
The remodel also incorporates extensive hidden functionality including appliance garages, roll-out trays, blind corner storage optimization, tray dividers, spice pull-outs, concealed recycling storage, and custom organization throughout.
The result is a thoughtfully balanced home that combines modern openness and clean-lined simplicity with the warmth and personality of a lived-in family farmhouse environment.
Features include:
Complete open-concept kitchen renovation
Structural wall removal to expand living space
Custom maple slab cabinetry
Soft linen painted finish
Waterfall island with integrated seating
Illuminated glass display cabinetry
Floating shelves and custom storage
Integrated LED lighting throughout
Custom petrified wood display niche with lighting
Hidden appliance garages and storage solutions
Contemporary kitchen within a traditional farmhouse-style home
Modern warm minimalist aesthetic
Designed by Dwelloquent | Kitchen & Bath Design + Custom Cabinetry | Florida Treasure Coast & Remote Design Services
 Paradise Found Construction
A small pinhole in the coupling of the hot water supply line from the Hot Water Heater developed and began leaking and spraying hot steamy mist. Because of its location in the seldom used Finished Full Basement, it initially went unnoticed.
By the time the homeowners noticed the leaking water, the moisture content in the ceiling sheetrock and well down the walls read 100%. The moist, warm environment proved to be ideal for colonies of mold spores to spread throughout the basement, aided by the HVAC systems return and supply lines circulating the mold spores. It didn’t take long before mold patches eventually covered all of the exposed materials and surfaces, furniture included.
The homeowners’ had protection from their insurance policy and were able to have repairs done after this unfortunate disaster.
Construction ensued. The ceiling, floors, and all of the interior and exterior walls were stripped down to the wood framing and masonry and disposed of. The 1st and 2nd Floor HVAC Ductwork was removed, and the entire existing Full Bath was gutted.
The remodeling included increasing the size of the full bath and removing the shower/tub as well as installing a large and comfortable tile shower. We added a small towel closet, and a separate entry into the adjoining room, which would now be reconfigured into a bedroom. A new EPA Water Sense-rated commode, a vanity cabinet with a natural granite countertop and an under-mount sink, a wall-hung mirror, and new sconce lights rounded out the update.
We turned the adjoining room next to the full bath into a bedroom. We added generous closet storage space and new lighting.
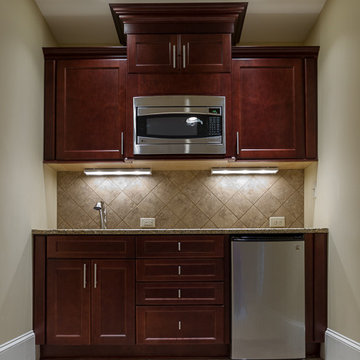
We finally turned our attention to the old kitchenette / wet bar. We took away some of the footprint to add to the full bath and designed an efficient and handsome wet bar / kitchenette.
Porcelain tile, no VOC interior paints, a complete replacement of the basement and 1st Floor HVAC ducting, air handler equipment cleaning, and green-certified carpet and pad combined to create a healthy and light-filled living environment.
 Kowalske Kitchen & Bath
A couple hired us as the professional remodeling contractor to update the first floor of their Brookfield, WI home. The project included the kitchen, family room entertainment center, laundry room and mudroom.
The goal was to improve the functionality of the space, improving prep space and storage. Their house had a traditional style, so the homeowners chose a transitional style with wood and natural elements.
Kitchen Remodel
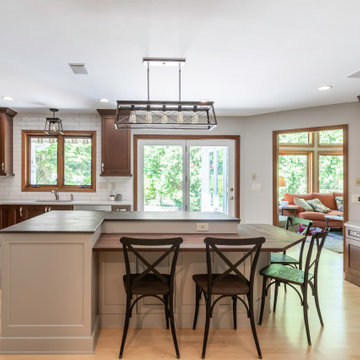
We wanted to give the kitchen a more streamlined, contemporary feel. We removed the soffits, took the cabinetry to the ceiling, and opened the space. Cherry cabinets line the perimeter of the kitchen with a soft gray island. We kept a desk area in the kitchen, which can be used as a sideboard when hosting parties.
This kitchen has many storage and organizational features. The interior cabinet organizers include: a tray/cutting board cabinet, a pull-out pantry, a pull-out drawer for trash/compost/dog food, dish peg drawers, a corner carousel and pot/pan drawers.
The couple wanted more countertop space in their kitchen. We added an island with a black walnut butcher block table height seating area. The low height makes the space feel open and accessible to their grandchildren who visit.
The island countertop is one of the highlights of the space. Dekton is an ultra-compact surface that is durable and indestructible. The ‘Trilium’ color comes from their industrial collection, that looks like patina iron. We also used Dekton counters in the laundry room.
Family Room Entertainment Center
We updated the small built-in media cabinets in the family room. The new cabinetry provides better storage space and frames the large television.
Laundry Room & Mudroom
The kitchen connects the laundry room, closet area and garage. We widened this entry to keep the kitchen feeling connected with a new pantry area. In this area, we created a landing zone for phones and groceries.
We created a folding area at the washer and dryer. We raised the height of the cabinets and floated the countertop over the appliances. We removed the sink and instead installed a utility sink in the garage for clean up.
At the garage entrance, we added more organization for coats, shoes and boots. The cabinets have his and hers drawers, hanging racks and lined shelves.
New hardwood floors were added in this Brookfield, WI kitchen and laundry area to match the rest of the house. We refinished the floors on the entire main level.


 Modus Furniture International Inc
Inspired by the classic appeal of modern metropolitan design, the distinctive scalloped surface of the Kentfield chest is crafted from wire brushed solid Mahogany wood and stained in a Black Oak finish. Brushed brass top mount bar pulls and a tubular steel base provide the finishing touch. Chest features removable felt lining in top drawer.
 Modus Furniture International Inc
Inspired by the classic appeal of modern metropolitan design, the distinctive scalloped surface of the Kentfield dresser is crafted from wire brushed solid Mahogany wood and stained in a Black Oak finish. Brushed brass top mount bar pulls and a tubular steel base provide the finishing touch. Dresser features removable felt lining in top drawer.
 Alair Homes Plano
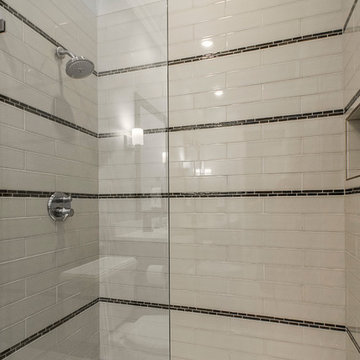
These secondary bathrooms were in need of an overhaul. The downstairs guest bath serves as the pool bath and also is used by seniors when they come to visit. We removed everything in this bath and started over. We opened up the space by removing the separating wall and created a large shower with low curb cast iron shower pan. We replaced the cabinets with shaker style cabinets from Waypoint. The upstairs Jack and Jill Baths were also remodeled. We replaced the cabinets, added wall sconces and replaced all of the tile. The walls in both baths were given a fresh, bright coat of gray paint to contrast the dark cabinets. White countertops and undermount sinks keep these bathrooms with the clean lines the owner was going for. Design by Hatfield Builders & Remodelers | Photography by Versatile Imaging
 Tile Doctor Ltd
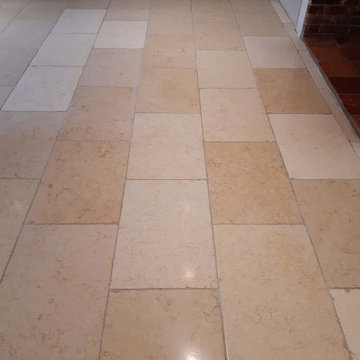
Earlier this year I was invited over to a property in the village of Silfield near Wymondham in Norfolk to inspect a Limestone tiled floor. Now I don’t usually quote my clients, but this is how the owner of the property had described the floor in the enquiry I received from Tile Doctor.
“Grout Black, where tiles have divots, dirt is encased,
plus no shine to floor, sealant non-existent.”
The problems listed were quite comprehensive and having had chance to survey the floor we found them to be quite accurate and really could not disagree with her comments! The Limestone tiles had been laid throughout the Kitchen diner and it was clear the sealer had worn off completely allowing dirt to become ingrained in the Limestone tiles and especially the grout which had turned black.
I understood from the owner that the grout lines should have been a pale cream colour rather than the black it was now, additionally the natural pitting in the Limestone was full of the same black contaminants. I ran a quick water test on the tiles to see if there was a seal present and it confirmed that if there had ever been one it was now completely compromised. The lack of sealer had allowed all liquid spills and dirt to soak straight into the tile making it dirty and exceedingly difficult to clean.
A large birthday celebration party had been planned and our client was desperate for the floor to be brought back to life beforehand. Although I couldn’t start immediately due to other commitments, it was able to return in time to get the floor clean for the party.
Our first job was to tackle the severe soiling trapped in the pits and grout lines. To do this a very strong dilution (2:1 ratio) of Tile Doctor Pro-Clean was applied to the floor and left to soak into the tile and grout for about 10 minutes. Then is was scrubbed into the tiles with help from a rotary buffer fitted with a soft/medium long-bristled nylon brush. The resulting slurry was then power rinsed with 60-degree hot water and extracted with our 400psi machine which jetted out all the black, oily contaminants from the grout and pits.
The floor was speed dried with the assistance of a large air mover. Once dry to the touch our attention was turned to filling the now exposed pitts in the Limestone tiles and two cracks with an appropriately coloured fast cure epoxy compound. Having allowed the filler time to reach full hardness, we ground down the excess material with 100 and 200 grit hand burnishing blocks in preparation for the next stage.
We find the best way to renovate the appearance of stone is to use a process called burnishing which hones the stone and beings up the polish. For this you need a set of 17-inch diamond encrusted burnishing pads. The pads fit the rotary buffer and are applied to the floor in sequence from 400, 800 and then 1500 grit using water to lubricate the process. The waster turns into a slurry as you work, and this is then rinsed off the floor with water after each pad and extracted using a wet vacuum. The floor was then left to dry thoroughly overnight with the assistance of our large capacity dehumidifier.
Returning the following day, we thoroughly vacuumed the floor to remove any remaining powder and grit left from the previous day’s wet work before spray burnishing the surface with a Tile Doctor 3000-grit diamond pad. This last pad really beings up the polished appearance of the Limestone and gave the tiles a deep and rich shine.
This last pad is applied without water and so leaves the floor dry and ready to for a new sealer to be applied. Our sealer of choice was Tile Doctor Ultra Seal, it’s a premium penetrating sealer that soaks into the pores of the stone protecting it from within. Ultra-Seal doesn’t alter the natural appearance of the stone giving it undetectable protection from staining. Having allowed the sealed floor to dry with the assistance of our air mover, the whole area was buffed using a white buffing pad and a small amount of finely sprayed water to remove any light smearing before vacuuming once again to finish.
My client was delighted with the result and left the following feedback for us:
“Totally renewed two flooring areas in our house to what looks like a recently laid floor. I have already had so many compliments without even telling people it had been professionally cleaned! Nick and Sue are always very easy to have about, inconspicuous and hard working. Absolutely delighted with the outcome and would recommend without hesitation. Thank you so much!”
For aftercare cleaning I recommended Tile Doctor Stone Soap, its designed for cleaning polished stone floors and will help build-up the patina. It’s a neutral pH product so won’t prematurely erode the sealer like many tile cleaning products you find in supermarkets which are really sold for cleaning glazed ceramic tiles not sealed natural stone.
Nick White
Norfolk Tile Doctor
 Reflections Water Gardens
After two years of fighting with a failing pond liner, the resident decided to replace the liner in the pond. This 150’ x 115’pond sat above and flowed into a larger pond which was lined with PVC liner. We were replacing this with a 45 mil epdm fishsafe rubber liner. This presented a problem: there is no way to adhere the new rubber liner to the existing PVC liner in the lower pond. The solution was to pour a cement 18” wide x 2’ deep footing next to the wier damn between the two ponds in order to connect the two liners together. The old liner was placed on the top of the footing and a water-block sealant was used. The new rubber liner was placed on top and another layer of sealant along with stainless steel bars were laid atop the two materials in order to press them together to maintain a water-tight junction. A drain tile system was installed beneath the liner to relieve ground water pressure and vent off any gasses. Water tight seals also had to be provided for multiple plumbing penetrations through the liner. Non-woven geotextile planting media bags were used to prevent erosion around the perimeter of the pond. As the pond was landscaped with lawn and perennials, these had to be removed and preserved and maintained throughout the project in order to return them upon completion of the lining. All trenching work and removal of plant material was done by hand in order to maintain the surrounding landscape; great care was taken throughout the project in order to protect existing hard and softscape, so that upon completion, the area appeared almost exactly as it had been before work began.
Photo by Larry Carnes
 Tile Doctor Ltd
This customer from the historic city of Cardiff was keen to see what Tile Doctor could do to put some life back into their treasured Limestone kitchen floor that was laid in 2008. My first observations were mainly centred on the horrific condition of the surface which although adequately sealed initially the floor had not received any subsequent maintenance and its condition had deteriorated over time. The light shining in from the patio doors highlighted all the imperfections in the floor caused by surface wear and tear commonly seen in high traffic areas such as a kitchen.
Upon closer inspection, there were further problems: the floor was stained and scuffed, and in most places the sealer had worn off completely allowing the dirt to become ingrained into the pores of the Limestone. Additionally the grout was recessed but was now flush with the tile surface due to dirt build-up. There were also areas contaminated with grease and kitchen cooking oil.
The Limestone floor tiles were 20mm thick French Limestone, and had been laid very well so there was no requirement to do any tile or grout repairs however to get this floor back to its original condition the surface would need to be reconditioned using the Tile Doctor four stage burnishing system.
I started by giving the floor a wash with a medium dilution of Tile Doctor Pro-Clean, focusing mainly on the grout lines in order to remove the muck that had built-up there. I used a special stiff grout brush for this activity; it’s quite narrow and ideal for grout scrubbing.
This worked well, but the significant build-up of dirt along some of the grout lines meant more work was required. I tackled this problem with a hand scraper assisted with steam. At the end of this process, the whole floor was then rinsed down with water to remove any soil and the resulting slurry was then extracted using a wet vacuum.
The next step was to start the burnishing process, which basically involves applying four diamond encrusted floor pads in sequence over the floor. Each pad is a different grade, starting with the most abrasive coarse pad and moving through to the finer grades using a little water to lubricate and rinsing away any slurry between each pad.
I eventually finished with the extra fine pad which builds up shine and lustre on the tile; it had taken two days to clean the grout and burnish the Limestone but the floor was much improved and so after a final rinse down I left the floor to dry off overnight with the aid of the underfloor heating.
During this time, I also addressed the stained Limestone in the area of the kitchen where the dustbin was situated. This had been a major upset for the customer and I’m happy to report I managed to deal with it. However, it was quite an involved process, so I’ll write about this in a separate post.
On the third day I came back to seal the floor, checking first that it had dried sufficiently with a damp meter. Fortunately, the underfloor heating had done a great job of drying the stone and I was able to seal the floor using three coats of Tile Doctor Colour Grow sealant. This sealant not only provides a durable seal but also penetrates deep into the pores of the stone protecting it from within and enhancing the natural colours of the Limestone in the process.
After the final layer of sealant, I worked over the floor again with the extra fine burnishing pad both to add shine again following sealing, and to ensure that no smear marks were visible as the lighting conditions were unforgiving and highlighted any imperfections.
The customer was delighted with the results: so much so, in fact, that they booked me in to restore their Victorian hallway floor as well but that’s a story for another time!
Julian Iancono
SE Wales Tile Doctor
Sponsored
Fredericksburg, OH

High Point Cabinets
Columbus' Experienced Custom Cabinet Builder | 4x Best of Houzz Winner

 Brooklyn City Furniture
The Foundry Upholstery Series showcases tailored minimalism with details that elevate fashion and function to suit any residential or commercial setting. Inspired by elements of classic Scandinavian design, the Foundry Bi-Sectional offers ample sophistication as a standalone piece, showcasing striking lines, an extra slender tightback frame and cushions that seem to float above elevated, cylindrical steel legs. Two bolsters offer additional style and comfort, while the sturdy, steel reinforced FSC®-Certified frame ensures that Foundry holds up in high-traffic environments.
Features elegant lines and thin, elevated legs.
The tightback sectional is comprised of two components, a Foundry Sofa and a Foundry Ottoman.
Has two removable seat cushions, a removable ottoman cushion and comes with two loose bolster cushions.
Seat and bolster cushions are made with Dacron-wrapped, high resiliency, medium density foam.
Inner frame is 100% kiln-dried FSC®-Certified hardwood in support of responsible forest management (FSC® 092551).
Frame is reinforced with steel for long lasting durability.
9-gauge No-Sag, sinuous spring suspension system.
Cylindrical legs are made from black powder-coated steel.
Non-marking leveler feet can be adjusted for stability on uneven floor surfaces.
Manufactured to meet California TB117-2013 fire safety standards without the use of flame retardant additives in the upholstery foam.
All fabric is California TB117-2013 certified and double rub tested.
* Fabric samples available upon request. Need help? Chat with us online or send us an email to info@cityfurnitureshop.com

 Kowalske Kitchen & Bath
A couple hired us as the professional remodeling contractor to update the first floor of their Brookfield, WI home. The project included the kitchen, family room entertainment center, laundry room and mudroom.
The goal was to improve the functionality of the space, improving prep space and storage. Their house had a traditional style, so the homeowners chose a transitional style with wood and natural elements.
Kitchen Remodel
We wanted to give the kitchen a more streamlined, contemporary feel. We removed the soffits, took the cabinetry to the ceiling, and opened the space. Cherry cabinets line the perimeter of the kitchen with a soft gray island. We kept a desk area in the kitchen, which can be used as a sideboard when hosting parties.
This kitchen has many storage and organizational features. The interior cabinet organizers include: a tray/cutting board cabinet, a pull-out pantry, a pull-out drawer for trash/compost/dog food, dish peg drawers, a corner carousel and pot/pan drawers.
The couple wanted more countertop space in their kitchen. We added an island with a black walnut butcher block table height seating area. The low height makes the space feel open and accessible to their grandchildren who visit.
The island countertop is one of the highlights of the space. Dekton is an ultra-compact surface that is durable and indestructible. The ‘Trilium’ color comes from their industrial collection, that looks like patina iron. We also used Dekton counters in the laundry room.
Family Room Entertainment Center
We updated the small built-in media cabinets in the family room. The new cabinetry provides better storage space and frames the large television.
Laundry Room & Mudroom
The kitchen connects the laundry room, closet area and garage. We widened this entry to keep the kitchen feeling connected with a new pantry area. In this area, we created a landing zone for phones and groceries.
We created a folding area at the washer and dryer. We raised the height of the cabinets and floated the countertop over the appliances. We removed the sink and instead installed a utility sink in the garage for clean up.
At the garage entrance, we added more organization for coats, shoes and boots. The cabinets have his and hers drawers, hanging racks and lined shelves.
New hardwood floors were added in this Brookfield, WI kitchen and laundry area to match the rest of the house. We refinished the floors on the entire main level.
 Reflections Water Gardens
After two years of fighting with a failing pond liner, the resident decided to replace the liner in the pond. This 150’ x 115’pond sat above and flowed into a larger pond which was lined with PVC liner. We were replacing this with a 45 mil epdm fishsafe rubber liner. This presented a problem: there is no way to adhere the new rubber liner to the existing PVC liner in the lower pond. The solution was to pour a cement 18” wide x 2’ deep footing next to the wier damn between the two ponds in order to connect the two liners together. The old liner was placed on the top of the footing and a water-block sealant was used. The new rubber liner was placed on top and another layer of sealant along with stainless steel bars were laid atop the two materials in order to press them together to maintain a water-tight junction. A drain tile system was installed beneath the liner to relieve ground water pressure and vent off any gasses. Water tight seals also had to be provided for multiple plumbing penetrations through the liner. Non-woven geotextile planting media bags were used to prevent erosion around the perimeter of the pond. As the pond was landscaped with lawn and perennials, these had to be removed and preserved and maintained throughout the project in order to return them upon completion of the lining. All trenching work and removal of plant material was done by hand in order to maintain the surrounding landscape; great care was taken throughout the project in order to protect existing hard and softscape, so that upon completion, the area appeared almost exactly as it had been before work began.
Photo by Larry Carnes


 Brooklyn City Furniture
The Foundry Upholstery Series showcases tailored minimalism with details that elevate fashion and function to suit any residential or commercial setting. Inspired by elements of classic Scandinavian design, the Foundry Bi-Sectional offers ample sophistication as a standalone piece, showcasing striking lines, an extra slender tightback frame and cushions that seem to float above elevated, cylindrical steel legs. Two bolsters offer additional style and comfort, while the sturdy, steel reinforced FSC®-Certified frame ensures that Foundry holds up in high-traffic environments.
Features elegant lines and thin, elevated legs.
The tightback sectional is comprised of two components, a Foundry Sofa and a Foundry Ottoman.
Has two removable seat cushions, a removable ottoman cushion and comes with two loose bolster cushions.
Seat and bolster cushions are made with Dacron-wrapped, high resiliency, medium density foam.
Inner frame is 100% kiln-dried FSC®-Certified hardwood in support of responsible forest management (FSC® 092551).
Frame is reinforced with steel for long lasting durability.
9-gauge No-Sag, sinuous spring suspension system.
Cylindrical legs are made from black powder-coated steel.
Non-marking leveler feet can be adjusted for stability on uneven floor surfaces.
Manufactured to meet California TB117-2013 fire safety standards without the use of flame retardant additives in the upholstery foam.
All fabric is California TB117-2013 certified and double rub tested.
* Fabric samples available upon request. Need help? Chat with us online or send us an email to info@cityfurnitureshop.com
 CH Burnham Inc.
1
1
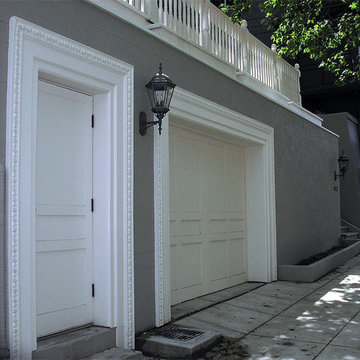
C.H. Burnham Inc., in partnership with Ciaran Rafferty Construction, completed this four car garage in Pacific Heights in early April, 2010. From precision excavation and shotcrete construction to the installation of marble slabs and plaster cast egg and dart trim, this project demanded expertise in every aspect of construction. Completed in both a timely matter and on budget, you will see in the following photos, our crews, with the assistance of Mulholland Electric, West Cork Welding, Hughes Plastering, Fong’s Plumbing & Fire Protection, and VBE Inc., efficiently executed a complex project.
pacific-heights-san-francisco-remodel-1
Before we could begin excavation for the garage, we needed to dig three 20′ deep underpinnings by hand beneath the 1906 home’s existing foundation. After we had successfully supported the home and installed the temporary shoring, we brought in expert excavator Billy Vaughn, owner of VBE Inc. Considering we were building up to both the western and eastern property lines, we excavated, formed and erected the walls in stages so as to not place the neighboring structures or the workmen in any unnecessary danger. After the walls and spread footers were complete, we poured a 10″ thick slab roof. While the roof slab cured, we installed the tapered sleeper joists for the deck. We then removed the supports for the roof slab and poured the slab floor.
1
1
C.H. Burnham Inc., in partnership with Ciaran Rafferty Construction, completed this four car garage in Pacific Heights in early April, 2010. From precision excavation and shotcrete construction to the installation of marble slabs and plaster cast egg and dart trim, this project demanded expertise in every aspect of construction. Completed in both a timely matter and on budget, you will see in the following photos, our crews, with the assistance of Mulholland Electric, West Cork Welding, Hughes Plastering, Fong’s Plumbing & Fire Protection, and VBE Inc., efficiently executed a complex project.
pacific-heights-san-francisco-remodel-1
Before we could begin excavation for the garage, we needed to dig three 20′ deep underpinnings by hand beneath the 1906 home’s existing foundation. After we had successfully supported the home and installed the temporary shoring, we brought in expert excavator Billy Vaughn, owner of VBE Inc. Considering we were building up to both the western and eastern property lines, we excavated, formed and erected the walls in stages so as to not place the neighboring structures or the workmen in any unnecessary danger. After the walls and spread footers were complete, we poured a 10″ thick slab roof. While the roof slab cured, we installed the tapered sleeper joists for the deck. We then removed the supports for the roof slab and poured the slab floor.
pacific-heights-san-francisco-remodel-7
Once we completed the concrete phases of construction, we moved onto the finish stages of the project. This included the installation of an ipe’ deck, a hand rail matching the existing railing on the third floor deck and six piece trim detail. After visiting several marble suppliers, we found a carrera marble that matched the existing steps (installed over 100 years ago) and polished/antiqued the materials accordingly. A few more elements, including a cement tiled entryway and a custom garage door, completed the integration of the new structure with the existing home. After cleaning the property and touching things up, we received the certificate of occupancy.

 Hold It Contemporary Home
The Evelyn Upholstered Bed by Calligaris is the perfect addition to your contemporary home, with minimal lines, and a distinctive, removable headboard. This beautiful design allows the architectural features of your home or accompanying furniture to really shine. Don't let the simplicity of this piece fool you though. With beautifully textured upholstery, small yet impactful details, and immense comfort, this bed will be the silent killer in your home design.
Shown with the Boston Nightstand, Baku Table Lamp, Sextans Table Lamp, and the Marocco Rug.
64