
Search results for "Rinsing" in Home Design Ideas
 Tile Doctor Ltd
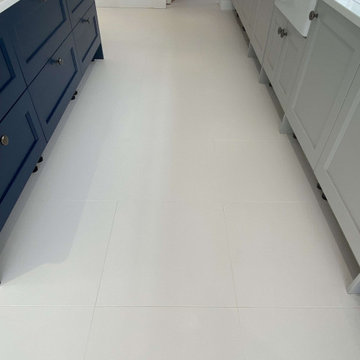
I was called out to clean a Porcelain tiled floor at a newly built property in Winwick near Huntingdon. The tiles were heavily marked with grout and dirt and were impossible to get clean. To make things worse the tiles were pale, almost white, in colour which made the staining more obvious. It was clear to me that the builder had not managed to polish off all the grout after tiling and this had now set hard on the surface.
This is a very common problem known as Grout Haze and fortunately there is a solution, in that it can be removed by giving the tiles a rinse with an acidic tile cleaner called Tile Doctor Grout Clean-up. To prove the point, I carried out a quick demonstration so the new owners could appreciate the difference.
I always like to test porcelain tiles for a reaction to acid prior to commencing work as acidic cleaners can have a negative effect on some types of polished porcelain however this one had a textured feel to it so there was no issue.
The test went well so having got the go head I began by first cleaning the tiles with a medium dilution of Tile Doctor Pro-Clean, this was left for about ten minutes before being worked into the tile with a black scrubbing pad fitted to a rotary machine. I also used a stiff brush along the grout lines to make sure the grout was as clean as the tile.
This process generates a lot of soiling which was then extracted using a truck mount machine. By Truck Mount I’m referring to a powerful cleaning machine that’s fitted into my van, it blasts the floor with hot water and then immediately extracts it using an equally powerful vacuum to grey tank in the vehicle, it’s incredibly effective and leaves very little water on the floor afterwards.
The next step was to tackle the grout haze and this is done as before by Acid Washing the floor using a dilution of Tile Doctor Grout Clean-up and scrubbing into the tile as before. Again, the resultant soils were extracted as before using the truck mount.
The floor was then speed dried using Dripods which are small horizontal fans designed to blow air downwards and ideal for drying carpets and hard floors. Once dry, a coat of Tile Doctor Ultra-Seal was applied, left to dry and any excess buffed away with a White pad.
The work was completed in one day and completely transformed the floor much to the delight of my customer who left the following message in a subsequent email:
“Thank you very much indeed, we are delighted with the floor.”
I’m pleased to say I have since returned to the neighbourhood and completed another identical grout removal job at a neighbour’s property who had the same issue with builder.
Tom Conlon
Cambridge Tile Doctor

 RST Brands
Our bestselling set just got even better. Introducing the Portofino™ Comfort 7 Piece Deep Seating Group, offering unparalleled quality, comfort and value in outdoor living. Create the perfect outdoor living room with this complete seating group, including our new one-piece sofa, set of two club chairs, ottomans, coffee and side table. Sink in and relax with true deep seating featuring plush 6-inch thick Sunbrella wrapped cushions with accent toss pillows. Constructed from the highest quality materials engineered for outdoor use, this outdoor seating set is the perfect seating group for any outdoor relaxation space.
Features:
Set includes one-piece 88" sofa, 2 club chairs, 2 club ottomans, coffee table, and side table. Also includes weatherproof outdoor furniture covers - $199 value
Constructed from durable SolarFast all-weather resin wicker engineered for outdoor use, hand woven over a strong and lightweight powder coated aluminum frame.
High density, quick drying foam cushions in Heather Beige Sunbrella ensure comfort and convenience.
Cushions feature breathable mesh bottom with integrated Velcro straps to hold cushions securely in place.
All covers are zippered, machine washable, and resistant to mold and mildew.
20 inch Taupe and 16 inch Empire Dove accent pillows feature rich contrast piping.
UV, weather and color fast fade resistant. Holds up great in salt and chlorinated environments. Perfect for coastal living.
Virtually maintenance free - simply rinse clean with a hose and mild cleanser.
 Tile Doctor Ltd
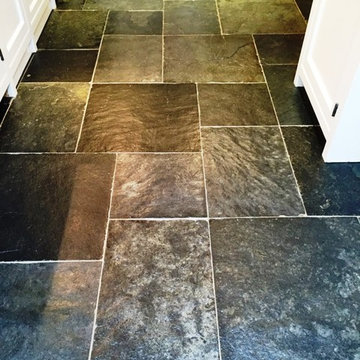
These photographs below are of a Slate Tiled Kitchen floor taken at a customer’s house in Henley-on-Thames which, as its name suggests, sits alongside the River Thames in Oxfordshire. My client’s Slate kitchen floor had recently been cleaned with unsuitable cleaning products which I suspect impacted the sealer leaving it looking dull. Sealers really to improve the look of a stone floor so unsurprisingly once the sealer had been damaged my client had been unable to find a cleaning product that could have any kind of positive effect on the tiles.
It’s fairly well known that many supermarket quality cleaners are only really designed for use on Ceramic or Porcelain tiled floors as they contain acids which strip away at sealers and acid sensitive stone floors, leaving the stone beneath vulnerable. So your select a cleaning product for your floor always read the small print on the back of the label and make sure you avoid anything that mentions not for use on acid sensitive stone; belter still Tile Doctor have a number of products for cleaning tiled floors including Neutral Cleaner and Stone Soap.
To clean the floor and remove any remaining sealer I first made a strong dilution of Tile Doctor Pro Clean which is a strong alkaline cleaner and then spread this over the floor, leaving it to dwell. This allows the cleaner to seep into the slate and get underneath, breakdown sealers and start to lift out ingrained dirt.
Following a dwelling period of roughly ten minutes, I agitated the floor periodically with a rotary machine fitted with a black scrubbing pad and scrubbed along the grout lines with a stiff grout brush. I then used a wet vacuum to extract the resultant slurry away and then followed up by rinsing the floor with clean water, and once again vacuumed up the residue.
Any stubborn areas were retreated until I was happy with the floor and then I left the floor to dry off completely overnight, in preparation for sealing the following day.
Upon my return to the house the following day, I ran some damp tests on different parts of the floor to check for any excess moisture which could potentially damage the performance of the sealer. Once I was satisfied that the floor was completely dry, I proceeded to seal the tiles using Tile Doctor Seal & Go. This will provide a robust surface seal for the future, along with an aesthetically pleasing low-sheen finish.
This sealer works particularly well on Slate tiles and, being a water-based sealant, additionally Seal & Go does not emit an unpleasant smell as it dries. Slate is quite a porous stone so I applied six coats of seal to provide long-lasting protection.
Barry Woodward
Oxfordshire Tile Doctor
Find the right local pro for your project

 Nelson Builders
The white oak cabinets and built-in hood were custom made by the client's father, a personal touch for a family home.
Enclosed kitchen - mid-sized country single-wall light wood floor and beige floor enclosed kitchen idea in Chicago with an undermount sink, light wood cabinets, quartz countertops, white backsplash, stainless steel appliances, an island, shaker cabinets, porcelain backsplash and white countertops
Enclosed kitchen - mid-sized country single-wall light wood floor and beige floor enclosed kitchen idea in Chicago with an undermount sink, light wood cabinets, quartz countertops, white backsplash, stainless steel appliances, an island, shaker cabinets, porcelain backsplash and white countertops
 Enviable Designs Inc.
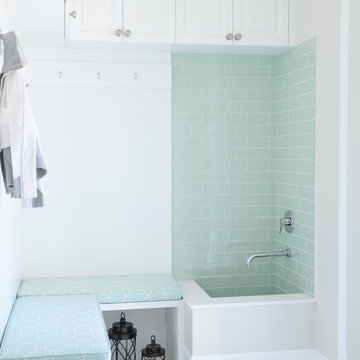
A serene yet practical mudroom for this custom home. Featuring glass tiles, upholstered benches and coat storage, the room also has a very functional mop basin.
 Seacliff Construction & Design
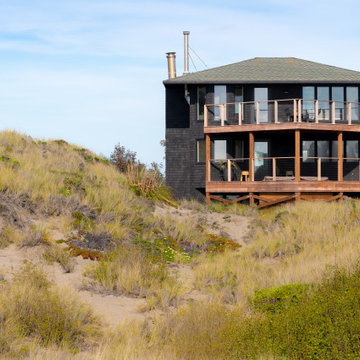
The owners of this beachfront retreat wanted a whole-home remodel. They were looking to revitalize their three-story vacation home with an exterior inspired by Japanese woodcraft and an interior the evokes Scandinavian simplicity. Now, the open kitchen and living room offer an energetic space for the family to congregate while enjoying a 360 degree coastal views.
Built-in bunkbeds for six ensure there’s enough sleeping space for visitors, while the outdoor shower makes it easy for beachgoers to rinse off before hitting the deckside hot tub. It was a joy to help make this vision a reality!

 Tile Doctor Ltd
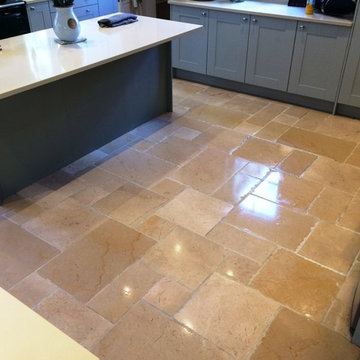
Earlier this year I was contacted by a lady in Icklesham which is a small village near Hastings. My client requested a deep clean for her Limestone tiled kitchen floor which had, over time, become quite dirty, with the grout in particular being very much worse for wear. Limestone is a popular choice for tiled floors however it needs to be sealed to ensure dirt doesn’t get into the pores of the stone otherwise it becomes difficult to clean and if the sealer is not maintained it will wear down and the floor will lose its protection especially in high traffic areas such as kitchens.
Cleaning a Limestone tiled kitchen floor
My product of choice for cleaning this floor was Tile Doctor Pro-Clean, which I found to be particularly effective in lifting ingrained dirt out of the grout. I used a stiff grout brush to work the solution of Pro-Clean diluted with warm water to work the cleaner deep into the grout. I also used a buffing machine fitted with a scrubbing pad and more Pro-Clean to lift the dirt out of the Limestone tiles. It wasn’t long before the dirty grout lines began to disappear, and the floor was well on its way to looking great again.
Once I’d also cleaned the nearby utility room, bathroom and cloakroom in a similar manner, I gave the floor a thorough rinse with fresh water before using a wet-dry vac machine to remove the soiled water from the surface of the tiles. I removed as much moisture from the Limestone tile and grout as possible to speed up the drying process as it’s important to ensure a stone floor is bone dry before sealing it as any excess moisture will compromise the sealer.
Applying Tile Doctor Colour Grow sealer to Limestone tiles
I left the floor for three days to dry before returning and used a damp meter on my return to confirm the floor was in-deed dry, spring had arrived and the sunshine really helped. My choice of sealer for the Limestone tiles was Tile Doctor Colour Grow, a product which soaks into the pores of the stone to enhance the colour of tiles whilst also providing durable protection. In this case two coats of Colour Grow were applied and as you can see from the photographs this really did bring out the fantastic natural colours in the Limestone and exaggerate the shading. At the same time, the added surface protection will help the floor stay looking great for longer, even with a lot of usage.
When she returned from dog walking, my client was so pleased with the final result that she almost screamed the house down! She was so pleased, in fact, that she promised to have me return every year to ensure her floor was maintained to a high standard. I was also really happy with my work, particularly in terms of getting the grout into far better condition than it had been before.
 Tile Doctor Ltd
I was recently contacted by a client who had just moved into a large Victorian property in the West Cheshire village of Tarvin about renovating their Victorian tiled hallway. Apparently, the floor was in good condition, and it would just be a case of removing what was left of the old sealer, deep cleaning the tiles and then applying a fresh seal. Unless the floor has been regularly maintained with the same sealer it’s important to remove all traces of old sealers before applying fresh.
Victorian Hallway Before Cleaning Tarvin Cheshire
A lot of the work we do at Tile Doctor can be a lot more involved, often requiring the sourcing of matching replacement tiles and rebuilding large sections of tiled flooring so straight forward clean and seal job is always welcome.
To remove what was left of the sealer and the ingrained dirt from the pores of the Victorian tile I dressed the floor with a strong dilution of Tile Doctor Pro-Clean. On this occasion I used a 1:3 dilution with water and applied it to the floor with a mop. I left it to soak into the tile for fifteen minutes before scrubbing so it could get to work breaking down the old sealer.
During this time, I set up a weighted floor buffer and fitted a black buffing pad, these pads are designed for scrubbing hard floors and lifting out the dirt. I applied a little water as required during this process to ensure the pad was lubricated. Shortly the cleaning solution darkened as the old sealer and dirt was released from the tile.
The soil was rinsed away with water and then removed using a wet vacuum. Once clear the floor was inspected and the process repeated until I was satisfied it was as clean as it could be and free of sealer.
I left the floor to dry off overnight and returned the next day to apply a new sealer. Before doing so however I like to use a damp meter to take moisture readings from the floor. This is needed to ensure it is dry enough to seal which is important as any moisture in the tile can affect the sealer and lead to an inconsistent finish.
To seal I started with the application of a single coat of Tile Doctor Colour Grow which is a colour intensifying breathable impregnator that soaks into the tile improving appearance and adding protection from within. Any excess sealant was removed by wiping the floor with a microfibre cloth and then it was left to dry for an hour.
This was followed with four coats of Tile Doctor Seal and Go Extra which is an acrylic breathable sealer which adds a pleasing subtle shine to the tile. This is an important feature when choosing a sealer for old floors where moisture needs to be allowed to rise through the tile, otherwise it can become trapped under the floor and reach out to the walls causing rising damp.
The customer was very happy with the revamped hallway which made the house a lot brighter and welcoming. Before closing I should mention that for aftercare cleaning I recommend Tile Doctor Neutral cleaner which is designed for the daily cleaning for sealed tiles, this is important as most domestic supermarket cleaners are simply too strong and can prematurely erode the sealer.
Alastair Robb
West Cheshire Tile Doctor
 David Lawrence Brown, AIA
dlb
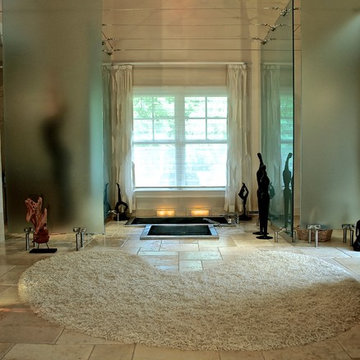
Large minimalist master beige tile and stone tile limestone floor bathroom photo in New York with furniture-like cabinets, an integrated sink, dark wood cabinets, glass countertops, a one-piece toilet and beige walls
Large minimalist master beige tile and stone tile limestone floor bathroom photo in New York with furniture-like cabinets, an integrated sink, dark wood cabinets, glass countertops, a one-piece toilet and beige walls
 Windhill+Co.
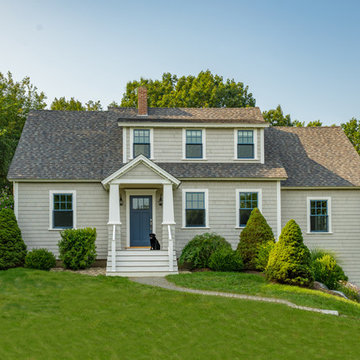
With a location-to-die-for on Great Neck-Ipswich, MA, this perfectly perched home was desperate for an upgrade. The clients, anxious to downsize and create a lifestyle more true to their hearts, left their hectic Wellesley address behind and set out, with kayaks in tow, for life on The Neck!
Once a cookie-cutter spec-home, this reinvented craftsman style, now reminiscent of Martha’s Vineyard and the like, will inspire you to rub your eyes, blink hard and say, “We’re not in Wellesley anymore!”.
The selections couldn’t have been more appropriate: Cascade Blue window cladding to compliment the Seacoast Grey Maibec shingles, the simulated divided light/multi-pane windows, the nature-inspired & earthy color palette, partially paned door, tapered columns, and an outdoor (Vineyard staple) shower adorned by a pergola overhead. The understated outdoor shower only adds to the vacation feel of this retirement retreat, perfect for rinsing off the sand after a day at Clark Beach or kayaking Ipswich Bay & Plum Island Sound.
Photo By Eric Roth
 Charlotte DreamScapes
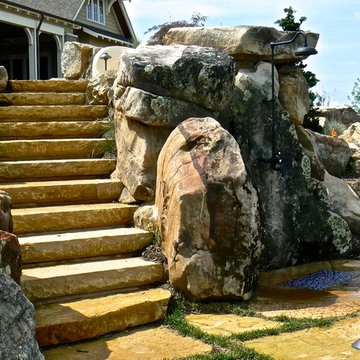
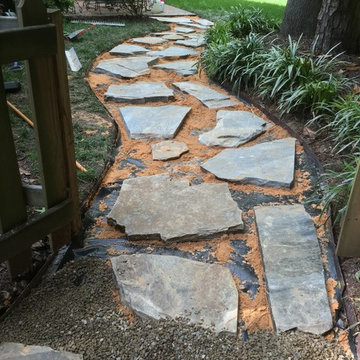
With the sand and Tennessee chocolate brown flagstone in place, it's time to place the Pennsylvania/Delaware pea gravel. It looks dirty right now, but once it's down and rinsed off, vibrant colors shine through showing yellow, burgundy, purple, and more.
 TKS Design Group
Free ebook, Creating the Ideal Kitchen. DOWNLOAD NOW
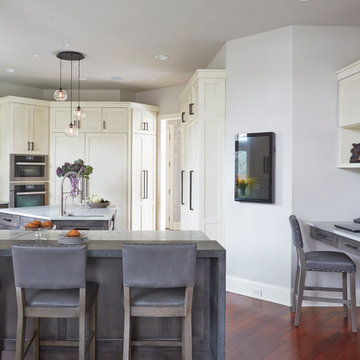
Sometimes it take a few tries to get a space to work how you want it to and that’s exactly what happened with this Hinsdale client. Their desire for a family friendly, open floor plan had them reworking an opening between the kitchen and family room and relocating some pantry cabinets in an attempt to make their home’s flow more suitable to their lifestyle. After living with this small change for a few years, they decided that a full kitchen remodel was really what was needed to make their home function the way they desired.
They came in with the stereotypical “sketch on a napkin” done by an architect friend, and we proceeded to make that design come to life with a few tweaks along the way. The space was quite unique and also a bit challenging because of its multiple angled walls. While interesting, angles can be a challenge when trying make a space functional.
The new kitchen has a great lineup of large appliances, including a large built-in fridge, steam oven and Galley workstation, which is a large prep sink that utilizes several inserts such as strainers and cutting boards and acts as a very large prep space. The new induction cooktop is easy to keep clean and a microwave drawer in the island is located away from the main prep space for convenient access.
The main perimeter has tons of countertop space, with additional prep space available at the island and a slightly raised peninsula for casual meals and nice homework spot for the couple’s teenaged children. The kitchen also included a large shallow depth pantry and a large counter height desk area for keeping track of paperwork.
The weathered finish on the cabinets and custom metal hood are a nice juxtaposition to the more sleek glass mosaic backsplash and waterfall countertops. The pendants and cabinet hardware provide modern details that provide an overall casual yet sophisticated feel in this transitional design.
Designed by: Susan Klimala, CKD, CBD
Photography by: Mike Kaskel
For more information on kitchen and bath design ideas go to: www.kitchenstudio-ge.com
 ModCountryHome LLC
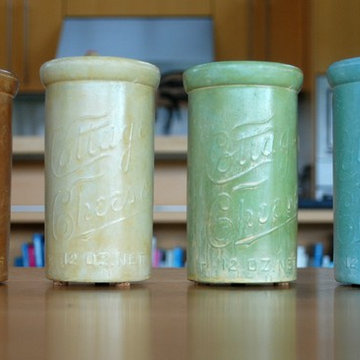
This unique concrete jar is designed to work with votive or tea light candles, and can also be used for air plants or succulents. This piece is nice and sturdy, making it great for indoor and outdoor use.
These cool concrete jars come in the four colors pictured in the photo.
--Espresso - https://www.etsy.com/listing/219077433
--Golden wheat - https://www.etsy.com/listing/219078521
--Rubbed sage - https://www.etsy.com/listing/219078249
--Sky blue - https://www.etsy.com/listing/219077508
I made the mold for this piece from a vintage cottage cheese glass jar found way at the back of a local antique store.
I hand pour and finish each piece and then apply acid stain which works differently each time, giving each jar its unique character. The final steps in the process are to apply a concrete sealer and add feet to protect the surfaces of your home.
Cottage cheese jar particulars:
Height – about 5 1/2 inches high
Diameter of jar - about 2 1/2 inches
Hole in the center - about 2 inches in diameter
Weight – about 1 pounds 14 ounces
Please note that these particulars vary slightly due to the handmade nature of these pieces.
Care instructions:
Each piece is sealed so you can wipe it down or rinse it off if it gets dirty.
Please be sure to set candle securely into the candle holders and always use caution when handling lit or hot candles.
 Tile Doctor Ltd
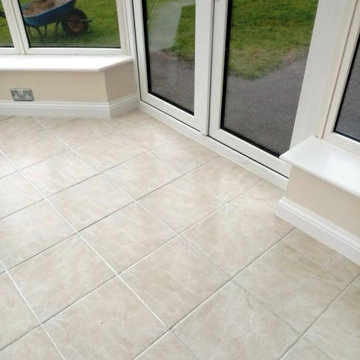
This customer from Stroud was soon to be re-letting her house but the Ceramic tiled floor and especially the grout had been left in a poor and dirty condition by the previous tenant. The ceramic tiled floor was installed throughout the Kitchen and through into the adjacent conservatory. Conscious this would affect future lettings she contacted Tile Doctor to see if we could help.
I paid a visit to the property to survey the floor and discuss how we would restore the Ceramic tiles and get them looking clean again. She was happy to hear we could help and agreed to my quote and we booked the work in for the following week. It would only take a day which suited her perfectly as she was keen to get the property back on the market.
Stroud is a lovely market town and in the centre of Gloucestershire. It is the main town in Stroud District and forms the centre for numerous surrounding market towns.
The Cotswold Area of Outstanding Natural Beauty surrounds the town, and the Cotswold Way path passes by it to the west, so it really is a desirable place to live with lots of lovely walks.
The first job was to protect all the walls and units to ensure they did not get splashed by the products we would be using. I then sprayed Tile Doctor Remove and Go all over the floor and the grout lines, this was left for a short time to dwell and get to work breaking down the dirt. The floor was then scrubbed using a black buffing pad fitted to a buffing machine finishing off by scrubbing the grout lines with a stiff brush. The soil released from the floor was then rinsed off with water and extracted with a wet vacuum. Once I was happy with the result the floors were speed dried with a blow heater. The alternative was to leave the floor overnight, but as time was of the essence speed drying was the best option.
Later that day the floor was dry, and I was able to seal the grout lines with Tile Doctor Ultra Seal. I used a pipette to apply the sealer directly to the grout to ensure maximum coverage. The tiles themselves did not require any sealant as ceramic tiles are sealed at the factory when they are produced. Grout being cementitious however does attract dirt and so sealing it will keep it looking fresh for some time to come and make it easier to clean.
The client was very pleased with the results and relieved she could re-let the house again. Now the floor was clean and much more attractive it would ensure she could achieve the best rental value.
I suggested she left a bottle of Tile Doctor Neutral Tile Cleaner for the new tenants as this would be the best product to keep the floor clean moving forward, you only need a small amount to dilute and it has a pleasant fresh fragrance. At least if the product is on site the tenant is more likely to keep the floor looking good and not resort to everyday household cleaners which eventually break down the grout and its’ seal. She thought this was a great idea.
Malcolm Crowther
Gloucester Tile Doctor
 Maugel DeStefano Architects
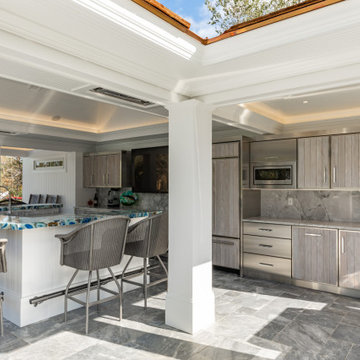
Nestled along the picturesque shoreline of Sagamore Creek, this property's new pool house features a weathered cedar shingle exterior complemented by crisp white trim, evoking the charm of traditional New England Seacoast homes. The pitched roof, adorned with an eyebrow window, not only enhances the building's visual appeal but also reflects the area's architecture.
The open layout features a large bar with a polished granite countertop, providing an inviting space for socializing and taking in views of Sagamore Creek. A strategically positioned TV is integrated into the millwork, allowing for entertainment without compromising the picturesque waterfront ambiance.
The changing area is designed with convenience in mind, featuring thoughtfully placed hooks and storage for towels and swimwear. Adjacent to this space, an outdoor shower adds a touch of luxury, allowing residents and guests to rinse off while enjoying the refreshing sea breeze after a day on the boat.
Also added to the property is a stunning new detached 3-car garage. This multifaceted structure not only provides ample parking space but also incorporates a thoughtfully designed office space above, offering a versatile and inspiring work environment. The inclusion of a cupola enhances the architectural charm while allowing natural light to flood the interior.
 AAA Advanced Residential Rehab, LLC
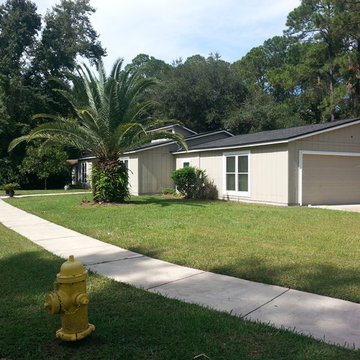
After photos.
Heavy pressure washing with premium bleach (Clorox) followed by an extra rinse. 2.5 cases on a never-caulked home followed by our seven-step corrosion control regiment. After time for all these products to cure and harden followed by two separated thick coats of Superpaint exterior satin.

 Bob Chatham Custom Home Design
A boardwalk extends from the pool down to the beach. There is a shower on the boardwalk for a quick rinse off before enjoying the pool area. Built by Greg Miller of Miller Construction and designed by Bob Chatham Custom Home Design. To rent this beautiful Gulf Shores beach house Banana Cabana 2.0 please visit https://www.fortmorganpropertymanagement.com/vacation-rentals/rental/8740/
 Tile Doctor Ltd
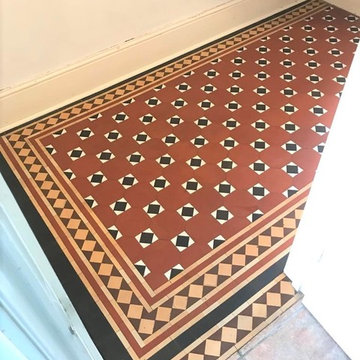
Our client had recently moved to a property in Newport, Gwent and when removing the carpet in the hallway she discovered this beautiful Victorian Tiled floor. The property had numerous period features and realising the value that the floor could add to the property she was keen to have it restored and so contacted Tile Doctor for help.
We popped round to survey the floor and except for a couple of broken tiles it had preserved well under the carpet. It was a shame the previous owner had covered the floor over but I was confident we could source some matching tiles to replace the broken ones and then restore the overall appearance. We gave the client a quote for the work which would take a couple of days. Pleased to hear that the floor could be restored and that it could soon be on show the quote was accepted and a date set to do the work.
We returned later the same month to renovate the floor and started by removing the broken tiles, cleaning out the old grout and adhesive and then relaying matching replacements. There are several specialist suppliers that can supply Victorian tiles so we can usually source reclaimed or reproduction tiles.
Some of the grout lines had dropped so as well as grouting around the replacement tiles more renovation work was needed to ensure the grout was level. We used quick setting products for this work, so I was able to move on to cleaning the floor later that afternoon.
To restore the appearance of the Victorian Tiles I used a strong dilution of Tile Doctor Pro-Clean combined with Tile Doctor Remove and Go which was left to soak in for ten minutes before being scrubbed into the tiles. This created a powerful cleaner/stripper cocktail which gets to work at removing dirt, grime and breaking down old sealers paint splashes.
After extracting the soil using a wet vacuum the floor was inspected. There were a few stubborn areas which were treated to a repeat clean and a wire brush to get the floor as clean as possible.
The floor was rinsed with water to remove any trace of cleaning products and then as much moisture as possible was extracted using a wet vacuum. The floor was left to dry off overnight and we arranged to return the next day to apply a sealer.
The following morning, we checked the floor was dry using a damp meter and this confirmed we were good to apply the sealer. The floor was sealed with Tile Doctor Colour Grow which is an impregnating sealer that protects the floor and enhances the beautiful colours in the tile. Three coats of the sealer were applied allowing each coat to dry before applying the next.
The client was very happy with the result and how beautiful the floor looked as you can see from the picture.
Paul Wales
Monmouthshire Tile Doctor
 b.b.begonia
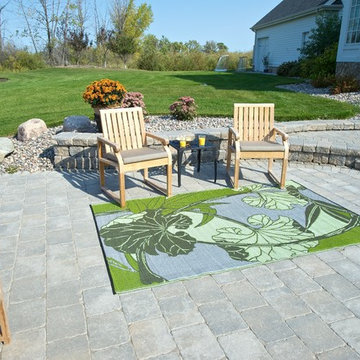
The b.b.begonia Blossom Outdoor Rug is an artistic addition to your lovely flooring. Featuring a blend of green and grey colors, this rug sports a captivating floral design that can complement all types of decors. You’ll definitely adore this accent piece to match your furniture and the outdoors. This reversible mat is a great solution for the patio, deck, pool area or yard.
Made from recycled Polypropylene, this b.b.begonia Blossom Outdoor Rug is mold and mildew resistant as it doesn’t absorb dirt or stains. Easy to clean, leaves, mud or food spills are rinsed away with water and soap with no trouble. Plus the tightly woven tubular yarn material of b.b.begonia rugs supports your need for a durable and strong rug to outlast the elements. Moreover, the rugs are treated with U.V. inhibitors and state of the art conditioners to ensure color fastness.
65