
Search results for "Sequence" in Home Design Ideas
 Media Rooms Inc
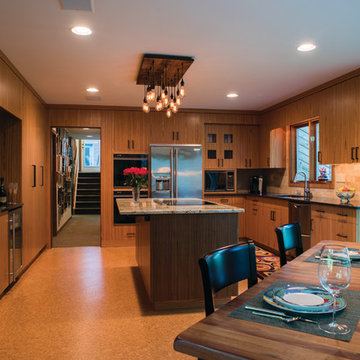
Custom built cabinetry constructed in sequenced matched Teak veneer. Kitchen was designed by Rob Dzedzy, and fabricated and installed by Media Rooms Inc. Hanging vintage bulb light fixture in center of room was designed and fabricated by Rob Dzedzy. Kitchen includes all cabinets fit to ceiling, soft close hinges and drawers. Every bit of space is maximized for storage. Kitchen also includes distributed video and music, and an automated Lutron lighting control system, all installed by Media Rooms Inc.
 Rosenhaus Design Group, Inc.
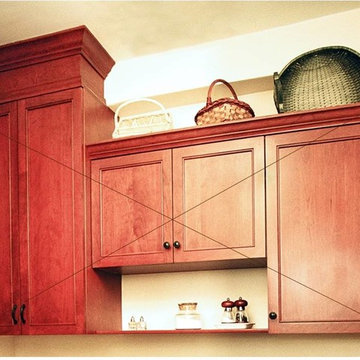
The goal of this renovation was to create balance without mirror symmetry.
Designing with the Golden Rectangle based on the Fibonacci numbers, where the width is 62% of its height is the pleasing proportion that all objects in the universe, including the DNA module, are based. The cabinets or their combinations in this composition are either golden rectangles or squares. Their specific size and placement creates the focal point above the open shelf which is confirmed by the crossing of the diagonal lines.
Based on our perception and use of the golden proportion, the sink backsplash is 7” of granite, 11” painted. Similarly, the same dimensions as a stair riser and tread.
In a high ceiling making only one cabinet taller and deeper alludes to the space without being overwhelming. Form is in the cherry cabinets and granite counter tops. Function includes the dog bowl.
 Polhemus Savery DaSilva
Pleasant Heights is a newly constructed home that sits atop a large bluff in Chatham overlooking Pleasant Bay, the largest salt water estuary on Cape Cod.
-
Two classic shingle style gambrel roofs run perpendicular to the main body of the house and flank an entry porch with two stout, robust columns. A hip-roofed dormer—with an arch-top center window and two tiny side windows—highlights the center above the porch and caps off the orderly but not too formal entry area. A third gambrel defines the garage that is set off to one side. A continuous flared roof overhang brings down the scale and helps shade the first-floor windows. Sinuous lines created by arches and brackets balance the linear geometry of the main mass of the house and are playful and fun. A broad back porch provides a covered transition from house to landscape and frames sweeping views.
-
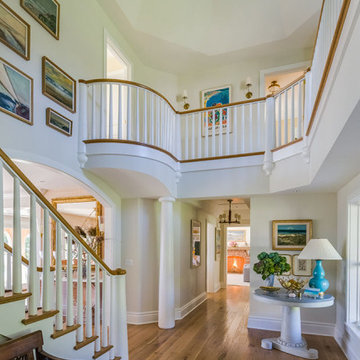
Inside, a grand entry hall with a curved stair and balcony above sets up entry to a sequence of spaces that stretch out parallel to the shoreline. Living, dining, kitchen, breakfast nook, study, screened-in porch, all bedrooms and some bathrooms take in the spectacular bay view. A rustic brick and stone fireplace warms the living room and recalls the finely detailed chimney that anchors the west end of the house outside.
-
PSD Scope Of Work: Architecture, Landscape Architecture, Construction |
Living Space: 6,883ft² |
Photography: Brian Vanden Brink |
Find the right local pro for your project
 Chen + Suchart Studio
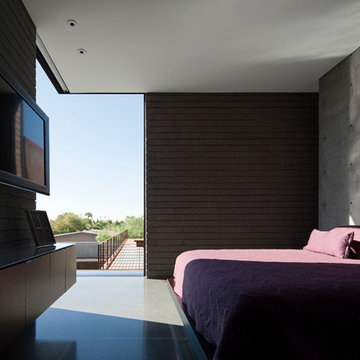
The master bedroom for this home overlooks a koi pond which is part of the entry sequence. A cast in place concrete wall acts as a headboard for the bed in this space. Exterior mounted sliding glass doors have the ability to expose the corner of the space to the view of Camelback Mountain, a local Phoenix landmark. A floating wenge wood cabinet with a non-directional stainless steel countertop serve as storage for this space.
Bill Timmerman - Timmerman Photography
 Yohe Architecture + Design, PC
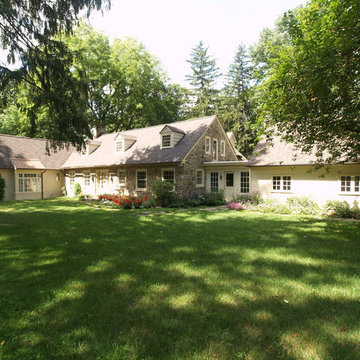
The original home had many of the features that you would expect from the 1950's: expert craftsmanship, beautiful hardwood floors, and understated charm; but also a small secluded kitchen, small windows, and small closets. The renovated home features a master bedroom addition with windows designed to capture the views of the stunning site, a master bathroom with a lofted ceiling, walk-in shower and soaking tub, a new kitchen addition, and a 2nd floor bedroom expansion. The redesign also provided clarity to the entry sequence.
 Lynch Landscape and Tree Service, Inc.
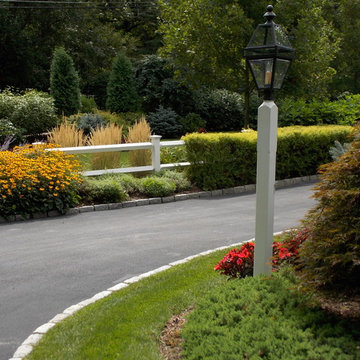
The cobblestones and colorful plantings help grab your eye and really enhance the entry sequence to this home
Transitional entryway photo in Boston
Transitional entryway photo in Boston
 Windy City Painters
PREPARATION AND PLANNING
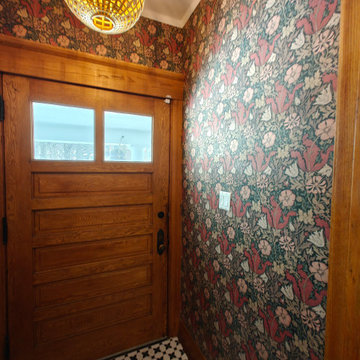
First, we assessed existing wall conditions and repaired minor imperfections. Next, surfaces were thoroughly cleaned and primed for maximum adhesion. Then, precise measurements ensured perfect pattern alignment throughout the space.
INSTALLATION PROCESS
Subsequently, we carefully cut each strip accounting for pattern matching. Moreover, professional installation techniques eliminated bubbles and ensured seamless seams. Finally, detailed finishing work created flawless edges and corners.
CHICAGO-SPECIFIC CHALLENGES
Furthermore, older Chicago buildings present unique challenges including settling walls, vintage plaster surfaces, and lead paint considerations. Therefore, proper preparation becomes crucial for long-lasting results that withstand seasonal temperature fluctuations.
RESULTS AND QUALITY
Consequently, the finished installation showcases perfect pattern alignment and professional craftsmanship. The wallpaper enhances the entry hall's architectural character while providing durability for high-traffic use.
PROFESSION AL TIPS
Homeowners should always hire experienced installers for complex patterns. Additionally, investing in quality primer saves money long-term by ensuring proper adhesion and easier future removal.
See more work and request free estimate at windypainters.com.
Q: How long does wallpaper installation take? / A: Most entry halls require one to two days depending on pattern complexity, surface preparation needs, and room size for professional wallpaper installation.
Q: Can you install over existing wallpaper? / A: We recommend removing old wallpaper first for best adhesion, though some situations allow installation over existing wallpaper after proper preparation and assessment.
Q: What wallpaper works best in Chicago? / A: Vinyl and fabric-backed wallpapers handle Chicago's climate changes best, providing durability against humidity fluctuations and temperature variations throughout seasons.
Q: Do you guarantee installation work? / A: Yes, Windy City Painters provides comprehensive warranties covering wallpaper installation craftsmanship and adhesion for specified warranty periods on all projects.
Q: How do you handle pattern matching? / A: We carefully measure walls, calculate pattern repeats, and plan installation sequence to ensure perfect wallpaper installation pattern alignment throughout the space.
Q: Can wallpaper work in vintage buildings? / A: Absolutely, we specialize in wallpaper installation for older Chicago homes, understanding unique challenges like settling walls and vintage plaster surfaces.
Q: What preparation is required? / A: Proper wallpaper installation requires surface assessment, repairs, thorough cleaning, appropriate priming, and climate control for optimal adhesion and lasting results.
Q: Do you remove old wallpaper? / A: Yes, we provide professional wallpaper removal services using safe techniques that protect underlying wall surfaces during the wallpaper installation preparation process.
Q: How much does installation cost? / A: Wallpaper installation costs vary based on room size, pattern complexity, surface preparation needs, and wallpaper selection - contact for detailed estimates.
Q: What tools do professionals use? / A: Professional wallpaper installation requires specialized smoothing tools, precision cutting equipment, quality brushes, and professional-grade adhesives for optimal results and longevity.


 All Oregon Landscaping
Driveway entry sequence. Landscaped with Boulder retaining wall for natural boundary. Accented with plantings to break up hardness and provide visual interest.
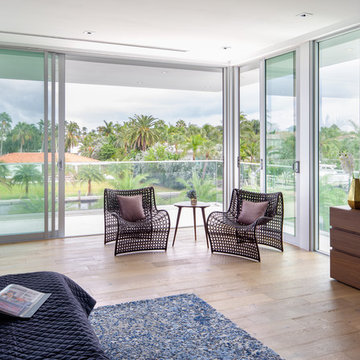
 SDH Studio Architecture and Interior Design
SDH Studio - Architecture and Design
Location: Golden Beach, Florida, USA
Set on a unique corner lot overlooking the water in Golden Beach this home was designed as a sequence of experiences that frame the beautiful views and lead to a seamless transition between interior and exterior architecture.
 George Ocampo
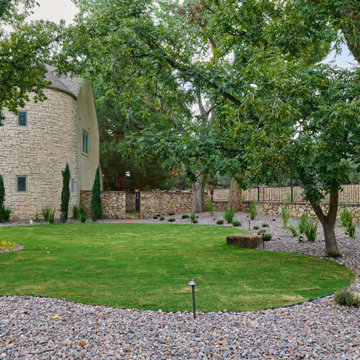
Upper Valley Estate Curb Appeal – El Paso, Texas
This curb appeal transformation was conceived as a deliberate sequence—an arrival experience where architecture, landscape, and lighting work together as one. Every element was designed to honor the home’s stone construction, turreted forms, and Old World character while responding precisely to the Upper Valley climate and lifestyle.
By day, the experience is grounded and composed. Brick-edged concrete drives establish order and permanence, guiding movement through the property with clarity and intention. Natural stone walls and columns anchor the architecture, while layered gravel beds, drought-tolerant plantings, and manicured turf soften transitions and connect the home to its desert setting. Mature trees were preserved and carefully integrated, providing scale, shade, and a sense of continuity.
As afternoon shifts toward sunset, the materials begin to speak differently. Stone warms, textures deepen, and sightlines subtly draw the eye toward the front entry. The landscape narrows the focus, creating a moment of pause before arrival—calm, quiet, and refined.
At night, the design reveals its final layer. Low-voltage lighting is integrated with precision, washing stone surfaces, tracing architectural curves, and uplighting specimen trees to create depth without glare. The drive, walkways, and entry feel safe, legible, and inviting, while the home itself glows with a restrained elegance. Coming home after dark feels intentional—protected, welcoming, and unmistakably yours.
What was created is more than curb appeal. It is a cohesive design-build solution where nothing is ornamental without purpose and nothing is built without intention. A daily experience of arrival that reflects craftsmanship, care, and the enduring character of the Upper Valley.
 Solid Apollo LED
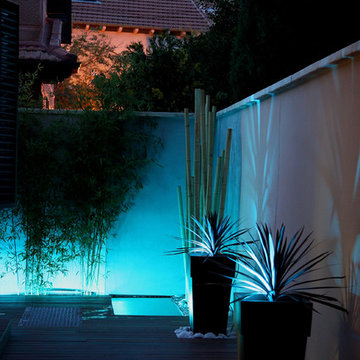
Solid Apollo LED. This inclosed city patio was brought to life with the addition of vibrant color changing LED lights. Along the main wall color changing RGB LED Strip Light was laid flush in the ground. The planter boxes along the other wall had Pathway Outdoor LED Landscaping Lights each to bring the palm plants to life. All the lights were tied together so single colors and color changing programs could be played in sequence using the 10 Zone RGBW controller.
 Patrick Ahearn Architect
Greg Premru
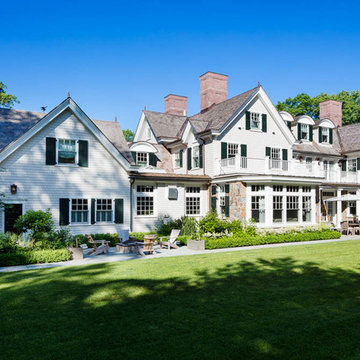
Huge traditional gray three-story mixed siding gable roof idea in Boston
Huge traditional gray three-story mixed siding gable roof idea in Boston

 Tile Doctor Ltd
This customer from the historic city of Cardiff was keen to see what Tile Doctor could do to put some life back into their treasured Limestone kitchen floor that was laid in 2008. My first observations were mainly centred on the horrific condition of the surface which although adequately sealed initially the floor had not received any subsequent maintenance and its condition had deteriorated over time. The light shining in from the patio doors highlighted all the imperfections in the floor caused by surface wear and tear commonly seen in high traffic areas such as a kitchen.
Upon closer inspection, there were further problems: the floor was stained and scuffed, and in most places the sealer had worn off completely allowing the dirt to become ingrained into the pores of the Limestone. Additionally the grout was recessed but was now flush with the tile surface due to dirt build-up. There were also areas contaminated with grease and kitchen cooking oil.
The Limestone floor tiles were 20mm thick French Limestone, and had been laid very well so there was no requirement to do any tile or grout repairs however to get this floor back to its original condition the surface would need to be reconditioned using the Tile Doctor four stage burnishing system.
I started by giving the floor a wash with a medium dilution of Tile Doctor Pro-Clean, focusing mainly on the grout lines in order to remove the muck that had built-up there. I used a special stiff grout brush for this activity; it’s quite narrow and ideal for grout scrubbing.
This worked well, but the significant build-up of dirt along some of the grout lines meant more work was required. I tackled this problem with a hand scraper assisted with steam. At the end of this process, the whole floor was then rinsed down with water to remove any soil and the resulting slurry was then extracted using a wet vacuum.
The next step was to start the burnishing process, which basically involves applying four diamond encrusted floor pads in sequence over the floor. Each pad is a different grade, starting with the most abrasive coarse pad and moving through to the finer grades using a little water to lubricate and rinsing away any slurry between each pad.
I eventually finished with the extra fine pad which builds up shine and lustre on the tile; it had taken two days to clean the grout and burnish the Limestone but the floor was much improved and so after a final rinse down I left the floor to dry off overnight with the aid of the underfloor heating.
During this time, I also addressed the stained Limestone in the area of the kitchen where the dustbin was situated. This had been a major upset for the customer and I’m happy to report I managed to deal with it. However, it was quite an involved process, so I’ll write about this in a separate post.
On the third day I came back to seal the floor, checking first that it had dried sufficiently with a damp meter. Fortunately, the underfloor heating had done a great job of drying the stone and I was able to seal the floor using three coats of Tile Doctor Colour Grow sealant. This sealant not only provides a durable seal but also penetrates deep into the pores of the stone protecting it from within and enhancing the natural colours of the Limestone in the process.
After the final layer of sealant, I worked over the floor again with the extra fine burnishing pad both to add shine again following sealing, and to ensure that no smear marks were visible as the lighting conditions were unforgiving and highlighted any imperfections.
The customer was delighted with the results: so much so, in fact, that they booked me in to restore their Victorian hallway floor as well but that’s a story for another time!
Julian Iancono
SE Wales Tile Doctor
 SDH Studio Architecture and Interior Design
SDH Studio - Architecture and Design
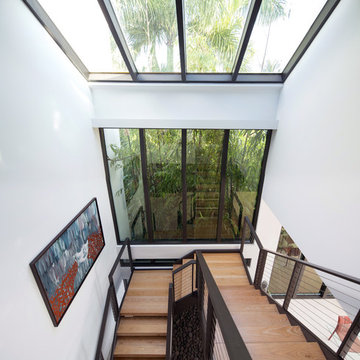
Location: Golden Beach, Florida, USA
Located on a waterfront lot, this home was designed as a narrative of the family’s love for green, quiet and light infused spaces. The use of natural materials in its architecture emphasizes the relationship between the structure and its surroundings, while a sequence of private/public spaces lead to an oversized cantilevered overhang that integrates the interior living area to the landscape.
 Studio TOOP
design: Studio TOOP, 2008
location: Driebergen, NL
status: built in 2008, Tuinvreugd
photo: Jolanthe Lalkens, 2010
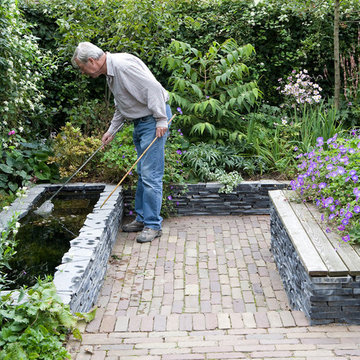
A letter from the town of Driebergen explaining that there were subsidies available if residents wanted to build a rainwater catchment in their garden was the impulse necessary for Ben and Ine to finally redo their garden. About to start retirement they had more time to garden and enjoy being at home. Ine hd been a gardener for years and looked for the opportunity to spend more time on the hobby and Ben was already working out the technical details of the rainwater catchment and ponds.
Studio TOOP helped them translate their wishes and interests into a clear design that made smart use of the small elevation change in the garden. Sequences of steps and raised beds separate each section of the garden. Three lines - a row of three ponds, a row of crab apple trees and a rose covered pergola - emphasize the gardens length. Each pond is 15 cm lower than the next, allowing the water to flows from one to another, and then to another lower lying pond at the end of the pergola. Under a lid that works as a bench integrated into two of the raised beds are the rainwater tanks.
 k YODER design
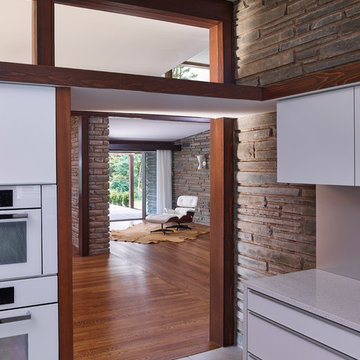
Bay spacing and sequences of light and dark, glass and partition, were upheld in the renovation and restoration, as were the classic modern reveal details, which let each material read individually. New cabinetry fits precisely within the original bay spacing, with equal dimensions and reveals on either side to expose the wood columns and cabinetry. © Jeffrey Totaro, photographer
 EW Architecture Inc.
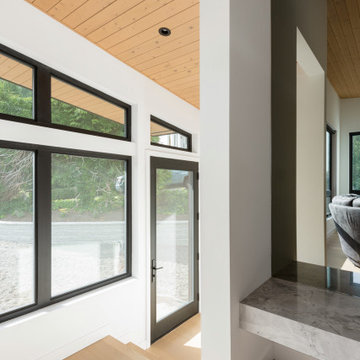
This 1967 home has been transformed. LANTERN HOUSE is located at the edge of the forest, the edge of urbanity, where the glass and metal clad entry and stair volumes glow like lanterns in the night. The sloping, trapezoidal site posed challenges, resulting in a very unique geometry with a courtyard, a bridge, and a new stair tower link old to new. A new porch and foyer create a gradual entry sequence into the existing main house. A new roof form provides vaulted ceilings in an open plan concept. The primary living spaces are connected to private outdoor spaces for entertaining and everyday living, and the main addition contains a private master retreat with secluded access from the stair tower. The connection with nature is ever present throughout the house with intentionally placed glazing framing views to the surrounding trees.
 Marcus Gleysteen Architects
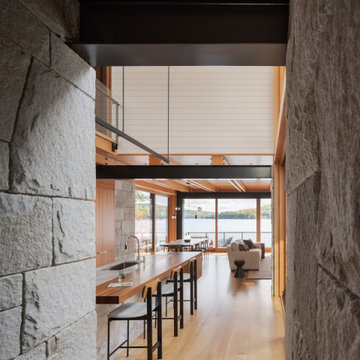
Cove House is a contemporary shoreline sanctuary in the lake region of New Hampshire. The wooded property, which includes several accessory outbuildings and an existing guest cottage, makes up a private micro-cove. The new modern house and existing traditional cottage turn both toward the lake and to each other. Thoughtful siting and landscape architecture establish a connective flow between the two residences, with a notched stone courtyard in the house inviting visitors to go back and forth.
Inspired by the craftsmanship of an antique mahogany powerboat, Cove House pursues architectural quality and beauty at the highest level. The design uses materiality, texture, and daylight to balance livability and artistry. The main entrance leads through a slot-canyon-like hall where a sequence of monumental granite walls reveals a glorious, light-filled living room. A steel moment frame spanning two levels imparts unobstructed panoramic views of the lake.
The magnetism of the New Hampshire waterfront is equalized by a coordinated series of openings, which attune daylight throughout the interior. Large sliding glass doors and windows draw light through the courtyard and into the home’s core – a bright and lofty kitchen. Below the kitchen, a walkout patio illuminates a refined wine-tasting room.
Near the front entry, a gracious granite and steel stair delivers daylight to each level though open risers and glass balustrades. Skylights draw light from above and cast grazing shadows against the textured tile walls of the upper bathrooms.
“We aimed to create a “beautiful reward” and an environment that our clients will enjoy for the rest of their lives.”
– Marcus Gleysteen

49