
Search results for "Shining pores" in Home Design Ideas
 Tile Doctor Ltd
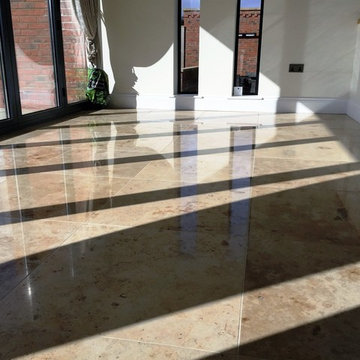
These Marble tiles were installed at a lovely property in North Ferriby by another tile company who although has done a great job laying the floor had neglected to provide the owner with any kind of post-installation maintenance.
Thus the tiles, which covered a large kitchen and hallway area, appeared dull and certainly not up to the standard that could be achieved with the right methods. Funnily enough, the tile company had told the property owner that the stone would need to be sealed, but did not offer to carry out the process themselves.
After conducting their own research, the property owner contacted her local Tile Doctor to see what could be done. I came round to inspect the floor and recommended the floor was polished through a process known as burnishing, followed by the application of a sealer to provide durable protection for the stone.
Burnishing involves the application of diamond encrusted pads with different levels of grit. At Tile Doctor we work with a four pad system that allows us to gradually refine the polish on suitable tiled floors, including Marble and Limestone.
I started the process by applying a Coarse grit burnishing pad across the entire floor lubricated with a little water, the 17 inch pads fit a rotary floor buffing machine and so are relatively straight forward to use but do take time. Following this, I worked my way through the burnishing system, repeating the process with Medium, Fine and Very Fine grit burnishing pads to achieve a brilliant, consistent shine. The floor is given a quick rinse between pads in-order to remove the resultant slurry before starting with the next pad.
The second part of the restoration was to seal the floor to protect the stone against future dirt, stains and damage, which is more common in busy areas of a house like the kitchen. I opted to seal the Marble tiles with two coats of Tile Doctor Ultra Seal.
This is a premium, no-sheen sealer that leaves the Marble with a more natural looking polished appearance. As a solvent-based, penetrating sealer it gets deep into the pores of the stone to protect against stains and ingrained dirt, especially in food preparation areas. To finish off I used the very fine diamond pad just to guarantee the brilliant shine you can see in the photos.
The property owners were exceptionally pleased with the results achieved and will undoubtedly be glad that their lovely Marble tiled flooring is now protected for long-term use. Another satisfied client.
Ronnie Phipps
East Yorkshire Tile Doctor


 Tile Doctor Ltd
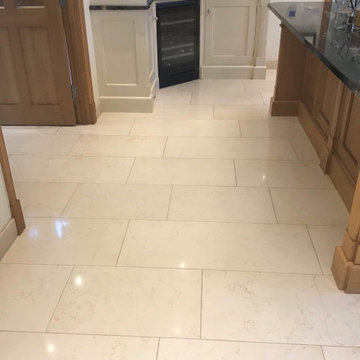
These photos are of a four-year-old Limestone kitchen floor at a property in Boughton that the customer was finding hard to keep clean and maintain a shine. Part of the problem was he owned two dogs and we often warn about the problems of dog urine on sealed tile and stone due to it being high in nitrogen.
On my initial visit I was able to ascertain that the sealer had almost completely worn off, leaving the stone vulnerable to dirt becoming ingrained into the pores of the stone. I come across this problem a lot, in my experience when stone floors are installed by tilers, they generally apply a single coat of sealant which wears off over time, and as discussed earlier can be prematurely degraded by strong chemicals.
My quote to renovate the Limestone floor was accepted and included a deep clean to the stone and grout, stone polish and then re-seal.
I arrived on site on the arranged date and began by scrubbing all the grout lines with Tile Doctor grout brushes and a 3:1 dilution of Tile Doctor Pro-Clean. I then moved on to a small handheld polishing machine to clean around the tile edges using 800 and 1500 grit diamond encrusted burnishing pad to achieve a deep clean.
The process was then repeated throughout the rest of the area using larger 17” burnishing pads fitted to a floor polishing machine. The burnishing pads I used come in a set of four starting with 400-grit and moving up to 800, 1500 and 3000 grit, after each pad is applied the floor is rinsed with water and the soil extracted with a wet vacuum.
It took me much of the day to complete this stage of the renovation and the floor was still damp so once done I left for the day, allowing the floor to dry off overnight.
I returned the following day to complete the final polish using the 3000-grit burnishing pad, this gave a high polished finish which the customer had requested. This last pad is applied dry with only a little water splashed onto the tile, a process we call a spray burnish.
The floor was then sealed with three applications of Tile Doctor Ultra Seal Sealant to protect the newly restored and polished tiles. Ultra-Seal is a penetrating sealer that soaks into those recently cleaned pores in the stone, occupying the space and preventing any dirt from becoming ingrained there. It’s also a natural look sealer so it doesn’t change the colour of the stone in anyway and is almost indetectable once applied.
“Hard work from Philip has left us with a kitchen floor brought back to life – cleaned and sealed in little over 24 hours – brilliant job – Thanks”
Before leaving I gave the customer some tips on maintenance and a complimentary bottle of Tile Doctor Stone Soap to enable him to keep the floor looking its best, this product works well with the sealant we applied and is PH neutral so won’t degrade the new sealer.
Phil Vissian
Northamptonshire Tile Doctor
Find the right local pro for your project
 Tile Doctor Ltd
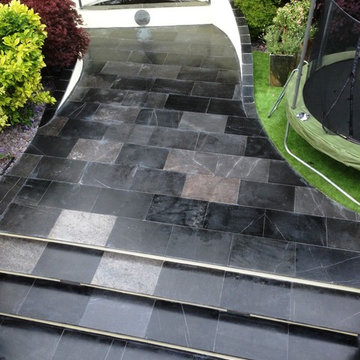
Details of a Limestone patio I was asked to clean at a property in the affluent neighbourhood of Alderly Edge, Cheshire, famous for being the home of choice for several Premier League footballers. In fact Alderly Edge, which lies not too far south of Manchester and is one of the most sought after places to live in the UK. My client was unhappy with the look of the patio had previously been sealed using a topical sealer, and this had left the tiles looking dull and lifeless.
Limestone is a fantastic natural stone, popularly used for internal floors as well as patios, it comes in a variety of fantastic colours and shades. What my client really wanted for the patio was a wet look to bring out the character of the Limestone. So, my job was to strip the old sealer off and replace it will one that would achieve the desired finish.
To strip the old sealer from the patio, I used a series of fine diamond encrusted burnishing pads which are applied in order from Coarse, Medium, Fine and then Super Fine. The coarse pad is effective at stripping off sealer without damaging the tile, and without the need to use a liquid product. The finer burnishing pads then rebuild the appearance of the Limestone to provide a nice deep shine.
The new sealer of choice was Tile Doctor Colour Grow, which can be used on both internal and external natural stone surfaces. Colour Grow is an impregnating sealer which penetrates deep into the pores of the stone, providing both long-lasting resistance and durable protection against ingrained dirt and stains. As you can see from the photos, Colour Grow is also specially formulated to intensify the natural colours in the stone, and it really helped to bring the Limestone back to life again.
The finished job left this patio with the wet, polished look my client had requested. She was very pleased with the result and amazed by just how quickly such a marked difference could be made. Another happy client!
Steve Keary
North Cheshire Tile Doctor
 Tile Doctor Ltd
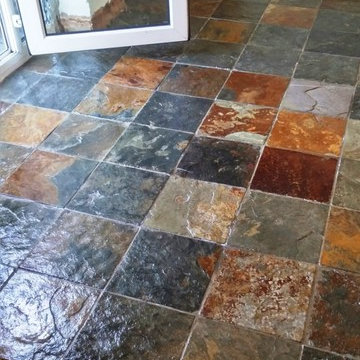
We recently deep cleaned two different tiled floors at a property in the village of Coningsby in the centre of Lincolnshire. The floor was split into two areas one laid with natural Sandstone and the other Riven Slate tiles. Both tiled areas had been sealed previously but the sealer was clearly not doing the job as the floor had a very dull finish due to dirt being absorbed into the tile.
The floors were in need of a deep clean to remove the ingrained dirt and remaining sealer so the first step was to soak the tiles in a strong dilution of Tile Doctor Pro-Clean and then work it in using a rotary machine fitted with a black pad and a stiff brush along the grout lines. This did the job and there’s a great photograph below that shows the difference this made.
To extract the now soiled cleaning solution the floor was rinsed using water which was then extracted using our wet pick up system. Once the floor was clear we were able to see where more work was required and the process was repeated until we were happy the floor was thoroughly clean and free of any remaining sealer.
To get the floor dry a number of turbo air dryers were setup around the floor and we left for the day to allow the floor to thoroughly dry off overnight.
The following morning we tested the tiles to make sure that both were dry which they were. We then applied Tile Doctor quality sealers to both floors; two different finishes were required for the different types of floor so we applied three coats of Colour Grow sealer to the Sandstone flooring as this impregnates the pores in the stone protecting it from staining and enhancing the natural colours to provide a natural look. We than applied four coats of Seal and Go sealer to the Slate floor, Seal and Go adds a nice subtle shine and works well on Riven Slate to highlight the different shades.
The customer was delighted with the results and left an excellent review which you can read below:
The floors look absolutely beautiful. I am very pleased with the service.
J. Gibbons, Coningsby
She wants us to return soon to seal the other stone areas in their property. As you can see from the photos the before and after is very striking. The floors were ready to take light use that same afternoon.

 Complete Flooring
Chris Golden
Inspiration for a transitional carpeted living room remodel in Phoenix with beige walls, a standard fireplace and a tile fireplace
Inspiration for a transitional carpeted living room remodel in Phoenix with beige walls, a standard fireplace and a tile fireplace
 Tile Doctor Ltd
This detailed Victorian tiled hallway at a property in Camden was overdue some much-needed repair and maintenance. The owners of the property appreciated that original period features like this add a lot of value to a property and asked me to visit the property to quote for renovating it. The property was in a terrace of similar properties most of which appeared to have retained their Victorian character.
I inspected the floor and found there were a couple of loose, cracked, worn and broken tiles that needed to be replaced. In addition, the floor tiles needed a deep clean and then seal to bring back the wow factor. I was confident we could renovate the floor but at that point unsure if we would be able to find exact match replacements for the damaged tiles. Fortunately, Victorian tiles are still in demand and I knew of several companies I could check with so I was confident they could be found.
We discussed how long the work would take and assuming I could source the replacements agreed a price for the full restoration of the floor. After doing some research I managed to find suitable replacements with a company called Original Style and the work was scheduled for the following month.
Firstly, we prepared all areas with protective tapes to threshold edges and skirting.
This was followed by spaying the tiles with a strong dilution of Tile Doctor Remove & Go which is product designed to remove old sealers and coatings. After about ten minutes the tiles were scrubbed with black scrubbing pads and scrubbing brushes. Fresh water was used to rinse the floor and the slurry was extracted using a wet vacuum.
The floor was inspected and then a second clean carried out, this time using Tile Doctor Pro-Clean which is a Tile and Grout cleaning agent. The same process of application was used and after rinsing and extracting the dirt the tiles were given a steam clean. This ensured all the dirt was lifted out of the pores of the tile and the floor was now as clean as it possible could be.
The next step was the remove the loose and cracked tiles using the reclaimed tiles we had sourced earlier. Some cuts were necessary to get the replacements to match the originals but overall the plan worked. A quick drying adhesive was used to secure the tiles so we could apply the grout shortly after. The whole floor was then re-grouted and cleaned off to ensure a good match. The floor was left to dry off overnight, and you could already see it was now looking considerably improved.
Returning the next morning we checked the floor was dry using a moisture meter, this is important as to apply a sealer to damp tiles will lead to a patchy experience. All was well so we were ready to apply the sealer.
To start a single base coat of Tile Doctor Colour Grow sealer was applied to the floor and left to dry. This sealer is an impregnator that protects from within by occupying the pores in the clay tile improving colour in the process. This sealer does leave a matt finish however and the client wanted a subtle shine so one dry it was followed by four coats of Tile Doctor Seal & Go. The combination of the two sealers works really well to add long lasting protection to the tiles and provide the desired finish to the floor.
The floor was much improved, and the client was delighted. The detailed pattern and colours were now much more prominent, and the hallway looked much more inviting for both the owner and their guests. For the aftercare of Victorian tiles, I recommended the use of Tile Doctor Neutral Cleaner which is pH neutral and won’t prematurely erode the life of the sealer.
Nigel Voyce
North London Tile Doctor

 Quality Edge
TruCedar Steel Siding shown in 10" Board & Batten in Napa Vine.
Beige two-story metal exterior home idea in Grand Rapids
Beige two-story metal exterior home idea in Grand Rapids
 Tile Doctor Ltd
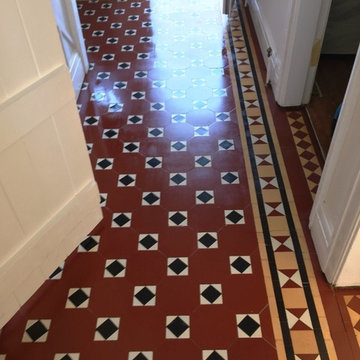
This Victorian tiled hallway was one of the most beautiful Victorian floors I have ever had the pleasure to work on. With the wide range of patterns and colours they are available in, it seems no two Victorian tiled floors are exactly the same, and this uniqueness is part of what makes them so appealing to property owners.
Unfortunately, this floor had been poorly maintained over the years, even suffering from a few loose and missing tiles. There was a thick coating of dust and dirt soiling its appearance, and the property owner was understandably keen to remedy the situation. Having realised that everyday household cleaners are not likely to achieve great results, she asked me to carry out a full professional restoration, including making some repairs where necessary. I was pleasantly surprised to find out that this property was situated in the town of Wyken, which is a few miles outside of Coventry city centre and in fact just down the road from where I live myself!
Before making a start on the cleaning process, it was first necessary to re-fix the small number of loose tiles and replace a single missing tile by the radiator. Fortunately, I’ve been working on these types of floors for some time and have built up a good collection of replacement Victorian tiles so I was able to find one that matched in nicely with the rest of the floor without too much problem.
To clean the tiles, I began by applying a layer of Tile Doctor Oxy-Gel directly into the floor with a small brush. This product is very similar to the popular Tile Doctor Pro Clean: both are strong alkaline cleaners, strippers and degreasers, with the main difference being that Oxy-Clean comes in a gel form, making it easier to control and therefore ideal for precise cleaning, or for application to vertical surfaces. Like Pro Clean and being an alkaline base it is suitable for use on all types of natural stone and tile. The Oxy-Gel was left to soak into the tiles for around ten minutes before being scrubbed in and then rinsed off carefully with water, I then used a wet vacuum to extract the now soiled cleaning solution off the floor.
The next step was to acid wash the floor using Tile Doctor Acid Gel; this served to break down alkaline mineral deposits inherent in the grout along with some excess grout that had been left on the untidily left on tile from installation. It is recommended not to use this product on acid-sensitive soon such as Marble and Limestone as it can cause irreparable etching but its fine on Victorian tiles as long as you don’t leave it on too long.
Finally, the floor was given a rinse with clean water to remove any trace of chemicals from the cleaning and to neutralise the area in preparation for sealing.
I left the floor for 48 hours to dry before returning to the property to seal the tiles. This allowed plenty of time for the floor to dry completely, which is important as any excess moisture can damage the ability of the sealer to protect against dirt and stains.
My choice of sealer for this floor was Tile Doctor High Shine; three coats in total were applied, providing – as the product name suggests – the high shine finish that the customer had requested. The sealer will provide durable surface protection going forward preventing dirt from becoming ingrained into the pores of the tile and ensuring it remains easy to clean and keeping its appearance for some time to come.
As a big fan of Victorian tiles, it was a great pleasure to restore this floor, and my customer was certainly pleased too. It’s amazing how far a little professional maintenance can go to improving the appearance of these fantastic types of floor.
Mick Gayton
Warwickshire Tile Doctor
 ReVision Design + Build
© Ascendant Imaging
Inspiration for a large transitional master white tile and porcelain tile porcelain tile, beige floor, double-sink and wallpaper freestanding bathtub remodel in Charlotte with furniture-like cabinets, green cabinets, a two-piece toilet, white walls, an undermount sink, quartz countertops, a hinged shower door, white countertops, a niche and a built-in vanity
Inspiration for a large transitional master white tile and porcelain tile porcelain tile, beige floor, double-sink and wallpaper freestanding bathtub remodel in Charlotte with furniture-like cabinets, green cabinets, a two-piece toilet, white walls, an undermount sink, quartz countertops, a hinged shower door, white countertops, a niche and a built-in vanity
 Tile Doctor Ltd
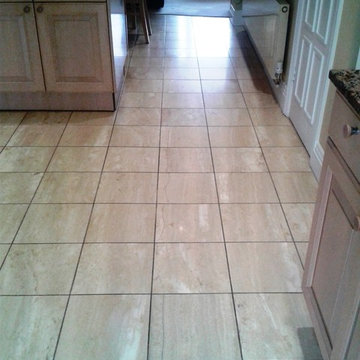
Every now and again, I get a call from a client located on the small peninsula of Sandbanks, Poole. Sandbanks, sometimes referred to as ‘Britain’s Palm Beach’, is known for its fantastic beach and high value property. My client asked me to take a look at a Travertine floor in his kitchen which was, in fact, more highly polished than he had wanted. The polished finish had worn off the travertine tiles where they had been walked on, leaving a dull trackway running down the centre of the kitchen. With its distinct characteristics, travertine is a popular choice for kitchen flooring, although it is also quite often used in bathrooms. In any case Travertine tiles will need regular maintenance to keep them looking their best.
Unfortunately, the kitchen floor must have experienced some sort of settlement or shrinkage as a long crack has appeared, which ran along the same line as the dull trackway. It is not uncommon for Travertine tiles to crack due to wear over time, or even bad fitting in some cases. While the exact cause of the crack was unclear, the homeowner concluded that the floor was certainly in need of restoration.
Repairing a crack in a Travertine tiled floor
Replacing the Travertine tiles was not an option due to a lack of spare tiles, so I opted instead to fill the crack in the floor using Harbro Stone Filler, an epoxy stone filler, matching the colour of the tile as closely as possible. I left this to set, before sanding down the excess filler.
My next action was to use a set of Tile Doctor Diamond burnishing pads to sand out any scratches and restore a more even shine to the floor, as per the client’s request. For polished stone, I recommend using a set of four burnishing pads applied in order: Coarse, Medium, Fine, and Very Fine. I used these one after the other with a little water to lubricate and restore the surface polish to the desired level.
Sealing a Travertine tiled floor
The next day, I returned to seal the floor with a couple of coats of Tile Doctor Colour Grow sealer. Colour Grow is a colour enhancing, impregnating sealer which penetrates deeply into the pores of the stone, thereby preventing dirt from becoming ingrained within. This particular sealer also enhances the natural colours within the Travertine tile, whilst also providing long term durable protection.
Although the crack could not be made to disappear completely, its appearance was much improved. The customer was also very pleased with the long-lasting lower sheen provided, describing it as “the finish I had wanted in the first place when the tiles were fitted”.

 Village Home Stores
Full-overlay Rustic Beech cabinets in the "Charleston" door style and "Briarwood" finish.
Village Home Stores
Example of a large mountain style kitchen design in Chicago
Example of a large mountain style kitchen design in Chicago

 Shelley Morris Interiors
Photography by Michael Biondo
Example of a mid-sized powder room design in New York with multicolored walls
Example of a mid-sized powder room design in New York with multicolored walls
 Tile Doctor Ltd
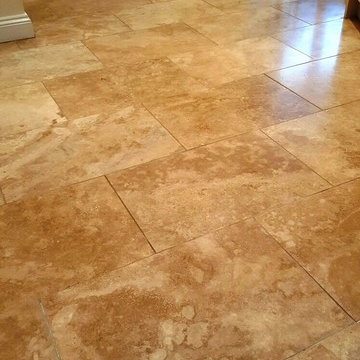
This fantastic Travertine tiled kitchen floor was in a bad way. Not only had it not been treated to a proper clean and seal in a long while, but it has also suffered from natural pitting, leaving lots of little holes that damaged the overall appearance of the floor. Travertine is very aesthetic, but suffers from the drawback of being quite soft compared to other types of stone (typically it sits between 3-4 on the Moh’s scale of mineral hardness).
The customer, who lives in the town of Sleaford a small Lincolnshire market town, was keen to have the situation remedied through a complete restoration. This would need to include small repairs, along with a deep clean and a fresh seal.
My first job was to deep clean the whole area, which I did using a solution of Tile Doctor Pro Clean and clean water. Pro Clean is a strong alkaline product which has a long history of producing reliable results of a wide range of natural stone floors, including Travertine, Granite, Limestone, and Slate. I applied the solution to both the tiles and the grout lines, and proceeded to scrub it in using a scrubbing pad fitted to a rotary floor machine.
This left the floor fresh and clean, but I would also need to restore the polish to the Travertine to really take its appearance to the next level. To do this I used the process known as burnishing, which essentially involves the consecutive application of different gritted pads to achieve a high quality polish on tiles. Our burnishing system, which consists of four pads, achieves fantastic results on high-end polished stone like Limestone, Marble and, of course, Travertine. I started by applying the Coarse grit burnishing pad, before gradually working my way through to the Medium, Fine, and finally Very Fine pads to achieve a brilliant shine and light reflection finish.
To round off the first day of the restoration, I used a flexible matching filler to fill up any pitted holes present on the surface of the tiles. Following this, I installed a turbo dryer to make sure the floor would dry fully overnight, and be ready to seal the following day.
The next day I returned to the property and proceeded to seal the Travertine tiles using several costs of Tile Doctor Colour Grow sealer to protect the tiles and also really enhance the natural colours in the stone. As an impregnating sealer, Colour Grow penetrates into the stone and fills its pores to safeguard it against ingrained dirt and stains from within.
As you can see from the photographs, the combination of a deep clean, high quality polish and fresh seal really transformed the appearance of the floor from dull and lifeless to a really asset to the kitchen. The customer was absolutely delighted with the results, leaving the following feedback: “Very good job – delighted! Thank you Phil!”
Phil Barrs
Lincolnshire Tile Doctor
 Tile Doctor Ltd
I was recently contacted by a client who had just moved into a large Victorian property in the West Cheshire village of Tarvin about renovating their Victorian tiled hallway. Apparently, the floor was in good condition, and it would just be a case of removing what was left of the old sealer, deep cleaning the tiles and then applying a fresh seal. Unless the floor has been regularly maintained with the same sealer it’s important to remove all traces of old sealers before applying fresh.
Victorian Hallway Before Cleaning Tarvin Cheshire
A lot of the work we do at Tile Doctor can be a lot more involved, often requiring the sourcing of matching replacement tiles and rebuilding large sections of tiled flooring so straight forward clean and seal job is always welcome.
To remove what was left of the sealer and the ingrained dirt from the pores of the Victorian tile I dressed the floor with a strong dilution of Tile Doctor Pro-Clean. On this occasion I used a 1:3 dilution with water and applied it to the floor with a mop. I left it to soak into the tile for fifteen minutes before scrubbing so it could get to work breaking down the old sealer.
During this time, I set up a weighted floor buffer and fitted a black buffing pad, these pads are designed for scrubbing hard floors and lifting out the dirt. I applied a little water as required during this process to ensure the pad was lubricated. Shortly the cleaning solution darkened as the old sealer and dirt was released from the tile.
The soil was rinsed away with water and then removed using a wet vacuum. Once clear the floor was inspected and the process repeated until I was satisfied it was as clean as it could be and free of sealer.
I left the floor to dry off overnight and returned the next day to apply a new sealer. Before doing so however I like to use a damp meter to take moisture readings from the floor. This is needed to ensure it is dry enough to seal which is important as any moisture in the tile can affect the sealer and lead to an inconsistent finish.
To seal I started with the application of a single coat of Tile Doctor Colour Grow which is a colour intensifying breathable impregnator that soaks into the tile improving appearance and adding protection from within. Any excess sealant was removed by wiping the floor with a microfibre cloth and then it was left to dry for an hour.
This was followed with four coats of Tile Doctor Seal and Go Extra which is an acrylic breathable sealer which adds a pleasing subtle shine to the tile. This is an important feature when choosing a sealer for old floors where moisture needs to be allowed to rise through the tile, otherwise it can become trapped under the floor and reach out to the walls causing rising damp.
The customer was very happy with the revamped hallway which made the house a lot brighter and welcoming. Before closing I should mention that for aftercare cleaning I recommend Tile Doctor Neutral cleaner which is designed for the daily cleaning for sealed tiles, this is important as most domestic supermarket cleaners are simply too strong and can prematurely erode the sealer.
Alastair Robb
West Cheshire Tile Doctor

 In Your Space Interior Design
Designed By Runa Novak
In Your space Interior Design
Example of a small minimalist medium tone wood floor powder room design in Chicago with a wall-mount sink
Example of a small minimalist medium tone wood floor powder room design in Chicago with a wall-mount sink
 Tile Doctor Ltd
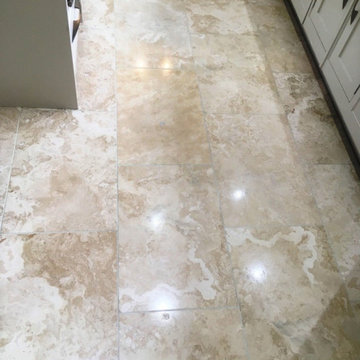
This is a Travertine tiled floor installed at a property in the popular Cheshire town of Wilmslow around 16 years prior. It had previously been maintained by a Tile Doctor colleague about three years ago and the owner was hoping the floor could be given a simple maintenance clean and seal. This is a service we provide as part of an annual maintenance plan, unfortunately after surveying the floor it was clear they had left it far too long, the floor had lost its shine and it would now need to be resurfaced with a set of diamond burnishing pads and then resealed.
Naturally burnishing the floor costs more than a simple seal and polish but if you are going to opt for the quicker maintenance plan route it does need to be done at least annually and possibly more frequently if it’s a floor in frequent use such as a kitchen. We agreed a price for the work, and I arranged a time with them to return and renovate the floor.
To restore the polished appearance of the Travertine I used a set of four burnishing pads which are applied to the floor with a rotary machine. You start with a coarse 400-grit pad using water to lubricate and running it over each tile at least three times. This first pad cleans up the stone and removes old sealers. This is then followed with the finer 800-grit, 1500-grit and finally a 3000-grit pad. Except for the 3000-grit, each pad is applied with water and the floor is rinsed and the soil extracted afterwards with the wet vacuum.
The Grout lines were also deep cleaned with a scrubbing brush and Tile Doctor Pro-Clean tile and grout cleaner. The product really gets to into deep seated dirt and grease which tends to accumulate in the grout. After a final rinse and extraction, the floor was then left to dry off overnight.
I returned on the second day and started by checking the floor was dry by taking several moisture readings with a damp meter. The readings were good, so I proceeded to seal the floor using a couple of coats of Tile Doctor Colour Grow. Colour Grow is an ideal sealer for Travertine as it seeps into the pores of the stone enhancing the natural brown colours in the process. It also offers great protection going forward.
Whilst I was there I had noticed that one of the doors had scratched the floor, fortunately the polishing process had got the scratches out of the stone but to prevent future scratching I helped them remove the door so a carpenter could shave off a few mm’s from the bottom.
My customer left the following feedback:
“Second time had Travertine floor restored, cleaned & sealed, the first time was 3 years ago. Great job done then by Simon Bywater. This time Kamila did a really professional job on the kitchen limestone floor. A bit more expensive this time, but a good job was done. Have left instructions for her to contact me in 12 months time for annual maintenance on the same floor, hopefully to prevent restoration being required! Highly recommend the service.”
The floor looked great and they should now be able to maintain it in between the maintenance visits, with day to day cleaning using Tile Doctor Neutral Tile Cleaner.
Kamila Logonzy
East Cheshire Tile Doctor
 Banker Wire
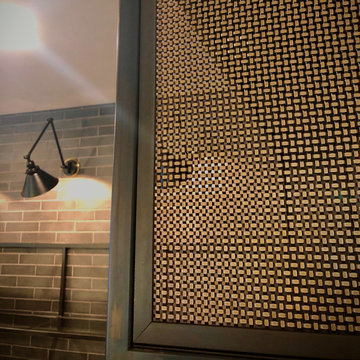
The 5,600 square foot Willow Creek ranch home blends industrial and organic design elements for a modern but classic design scheme. For an aesthetic that is simultaneously traditional and contemporary, By Design Interiors utilized Banker Wire’s fine woven wire mesh pattern S-12 in two separate areas of the home—the French Country inspired kitchen, and the game room bar—to provide unexpected touch points while creating a cohesive design experience.
The modern French Country inspired kitchen was designed from the ground up. As a central point in the open concept home, the theme of organic-meets-industrial originates here. Specified in an antique brass finish, Banker Wire’s S-12—a fine woven wire mesh pattern—was fabricated into the front of the kitchen cabinets. The robust woven wire mesh provides a warm aesthetic touch to the surrounding neutral color palette while also giving a near opaque cover to the storage space. The highly faceted surface of S-12 both absorbs and reflects the colors of its surroundings, adding texture and depth to the striking design.
“Banker Wire’s S-12 provides the integral industrial element in the kitchen area, helping to create the high/low aesthetic of the space—accentuating the organic materials, such as the leathered quartzite countertop island and single-sided waterfall edge, and the custom zinc vent range hood,” says Ayca Stiffel, Senior Interior Designer, Design Interiors. “The nearby dining room chandelier, grey-white walls, and natural light add a softness to the space, when contrasted with the industrial look and feel of the mesh.”
Departing from the traditional French touchpoints found in the kitchen, By Design Interiors leaned more heavily on industrial accents to realize the custom game room bar. The homeowner’s requested a fun “industrial” space different from any home bar they had seen before. Using Banker Wire’s fine woven wire mesh pattern S-12, multiple sliding screen doors were crafted to create customizable storage space for the bar. The antique brass finish of the mesh reflects the warm light, adding a lighter tone that contrasts the chocolate browns and matte black finishes of the surrounding space. Leather chairs and metal work on the foot bars, bar front and frame compliment the woven wire mesh, creating a cohesive environment that is both unique and welcoming.
Edgy, sophisticated, and familiar, the Willow Creek Texas Ranch Home exemplifies the role that unique materiality—such as Banker Wire’s architectural woven wire mesh—can play in a contemporary residential design scheme.

 Plaistow Cabinet
Shiloh Cabinetry. Polar White, Inset
Kitchen - transitional kitchen idea in Manchester with white cabinets, beaded inset cabinets, marble countertops, white backsplash, marble backsplash and stainless steel appliances
Kitchen - transitional kitchen idea in Manchester with white cabinets, beaded inset cabinets, marble countertops, white backsplash, marble backsplash and stainless steel appliances

 Debra Kay George Interiors
"Vintage Aviator" shower
Inspiration for a large modern master gray tile and porcelain tile porcelain tile walk-in shower remodel with white walls and a vessel sink
Inspiration for a large modern master gray tile and porcelain tile porcelain tile walk-in shower remodel with white walls and a vessel sink
2