
Search results for "Soil quality" in Home Design Ideas

 Tri County Landscape
This landscape is filled with tropical plants, bushes, flowers, and palms. The full landscape adds shade to the walkways and still allows the "full sun" plants to flourish. The garden beds have unique specimens placed throughout which add character to the landscape.

 Floret
Learn seed starting basics and get a jump start on growing the flower garden of your dreams. In this striking guide you will find everything you need to grow, harvest, and arrange stunning seasonal blooms. With equal parts instruction and inspiration, Floret Farm’s Cut Flower Garden welcomes you into Erin Benzakein’s abundant, bloom-filled world, and is a feast for every flower lover’s eyes and soul. Floret Farm's Cut Flower Garden. Written by Erin Benzakein with Julie Chai. Photos by Michèle M. Waite. Published by Chronicle Books.

 Verdant Grounds
A colorful front landscape border. We choose plants that work well throughout the seasons so your landscape always looks its colorful best. Pentas and Lamb's Ear are excellent through North Texas summers.
Find the right local pro for your project
 Tile Doctor Ltd
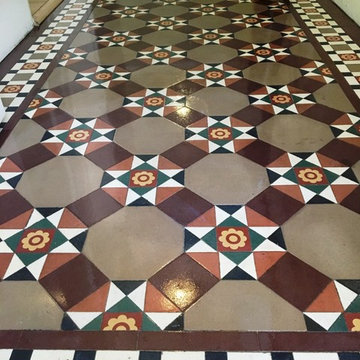
Esher is a small suburb in Surrey, situated just outside London. It was a fashionable area to live in amongst royalty and the aristocracy in the Victorian period, and during this time many buildings were built.
One such building has since been turned into a block of separate flats, and some of the flats still contain the original Victorian tiles in the hallway. I was contacted by one of these flat owners about restoring their tiles back to the best possible condition. Interestingly this customer’s tiles were part of a larger floor that had been divided between two flats.
I began the restoration by spreading Tile Doctor Remove and Go across the entire set of tiles. Remove and Go is a heavy-duty stripper that helped to loosen and remove old glue deposits where carpet had been laid over the tile, it will also strip off old sealers and release ingrained muck.
The Remove and Go was worked into the tile and grout with a stiff brush and then the soiled solution rinsed off and extracted using a wet vacuum. I followed by this applying a coarse 200-grit diamond encrusted burnishing pad, fitted to a handheld buffer, to grind away the particularly stubborn dirt and stains to restore the appearance of the stone. Afterwards, I rinsed the tiles again with water and soaked up the resultant slurry with a wet vacuum.
I noticed that there remained several ingrained stains dotted across the floor, so to remove these I aggressively burnished the affected areas with a very coarse 50-grit handheld diamond block. This essentially removed the very top layer of the stone, taking with it the ingrained marks.
Next, I dried the area with a large blower and heat gun. Under normal circumstances, 48 hours needs to pass before the tiles can be sealed, but as this was a small area I was able to dry it very quickly. After carrying out a damp test, I determined the tiles were ready to be sealed.
To seal the Victorian Tiles, I applied six coats of Tile Doctor Seal and Go sealer, which provides a high-quality sheen finish, as well as plenty of protection for the future. Tile Doctor have a range of suitable sealers available including Colour Grow which provides a matte finish – it’s just a matter of personal choice for the customer.
The outcome of the restoration was fantastic and the customer was very pleased, leaving the following testimonial.
“Promptly organised, delivered when promised. Good looking job when complete. Well done.”
Rupert Mcleod
West Surrey Tile Doctor

 Jay Sifford
'Toffee Twist' carex contrasts well with the 'Blue Cascade' blue atlas cedar. Photo by Jay Sifford.
Design ideas for a contemporary landscaping in Charlotte.
Design ideas for a contemporary landscaping in Charlotte.
 Tile Doctor Ltd
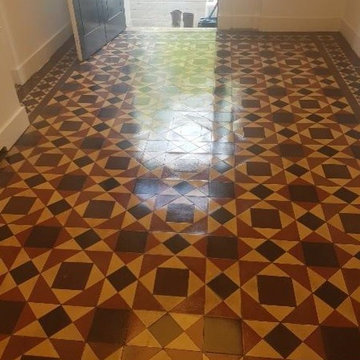
These are photos of a Victorian tiled floor we renovated at the new Scottish head office of the Peoples Postcode Lottery in the centre of Edinburgh City where the building was going through a multi million pound refurbishment. Edinburgh has a lot of Georgian and Victorian architecture, much of which is listed and as a result many still have original Victorian tiled flooring.
I’ve not really looked at the Postcode Lottery until now but put simply you give the lottery £10 a month and your postcode is your winning ticket number, there are prize draws every day and if your postcode comes up every one in the system with that postcode wins; they also give 31% to charity which is impressive.
You can see from the photograph that the floor was in good physical condition but was looking tired and dull. This is not unusual for Victorian tiles as once the sealer wears down dirt can penetrate into the pores of the tile causing it to lose its appearance.
On the first day we set about stripping the floor of what remained of the old sealant using a strong dilution of Tile Doctor Pro-Clean which is an industrial strength alkaline tile and grout cleaning product that is safe to use on Tile and Stone. The product is applied to the floor, left to soak in for ten minutes and the scrubbed into the tile using a black scrubbing pad fitted to a rotary bonnet machine. The floor was then rinsed and the now soiled cleaning solution extracted using a wet vacuum.
The process was repeated several times until we were happy the floor was clean and free of sealer and then given a final rinse with water. Before leaving for the day the floor was dried as much as possible using the wet vacuum to extract as much moisture as possible.
On the second day our first task was to check the floor with a damp meter in several places to ensure the tiles had dried off overnight. All was well and we began the process of sealing the floor with a Tile Doctor Seal and Go. This is a topical sealer which provides a high-quality low-sheen finish and protection against ingrained dirt and stains.
Victorian tiles are quite porous and five coats were needed to fully seal the floor. This took some time to complete as you have to wait until the first coat is dry before applying the next however it was well worth the effort as the floor looked fantastic afterwards.
Thomas Wilson
Edinburgh Tile Doctor
 Tile Doctor Ltd
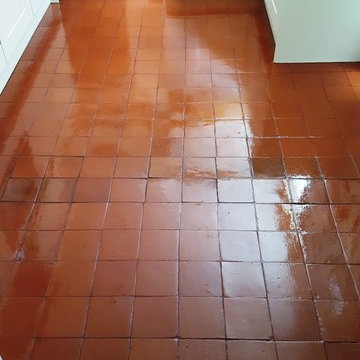
If you’re a first time buyer in the process of renovating or redecorating your new property, you may well discover some fantastic tiled floors hidden under your carpets. Certainly in my experience this happens quite often, so it came as no surprise when I got a call from a couple who had pulled up the carpet in the kitchen of their new house in Chester to find Quarry tiles, along with some fantastic Victorian tiles in the hallway.
While the Quarry tiles were in relatively good condition – having been shielded by carpet for many years – the couple were still understandably keen to get them back to looking their very best. I was more than happy to help them do just that.
Before beginning the restoration, I removed the kick boards from the kitchen cupboards so as not to damage them. I then applied a solution of our versatile, high alkaline cleaner, Tile Doctor Pro Clean, and let it soak into the tiles for a short period before scrubbing it in using a rotary machine fitted with a black scrubbing pad. Pro Clean is suitable for use on most natural stone tiles, including Quarry, Victorian and Slate, doing the trick to break down medium to heavy soil buildup.
The floor was then rinsed off with clean water, and the resulting slurry was promptly removed using a wet vac. I then left the floor dry out overnight.
I returned to the property the next morning, and started out by taking a couple of damp meter readings to make sure the floor was dry enough to seal. This is an essential task before sealing any tiled floor as even the smallest amount of excess moisture can cloud the sealer and damage its performance.
To seal the floor, I firstly applied one coat of Tile Doctor Colour Grow, which really brought out the natural reddish shades in the Quarry. As an impregnating sealer, Colour Colour fills the pores in the stone and prevents dirt from becoming ingrained. I followed the application of Colour Grow by applying three coats of Tile Doctor Seal and Go Extra. As a topical sealer, Seal and Go Extra forms an additional stain resistant seal on the surface of the tiles to protect against dirt and stains. It also gave the tiles a quality sheen finish as requested by the customer.
The customers were very happy with their newly restored Quarry tiled floor. They left the following feedback:
“We were both thrilled to bits with how nice the Quarry tiled kitchen floor looked, after being cleaned and sealed. Alastair was a pleasure to deal with and we would highly recommend him to anyone considering having their floor done.”
Alastair Robb
West Cheshire Tile Doctor
Sponsored
Fredericksburg, OH

High Point Cabinets
Columbus' Experienced Custom Cabinet Builder | 4x Best of Houzz Winner

 Tile Doctor Ltd
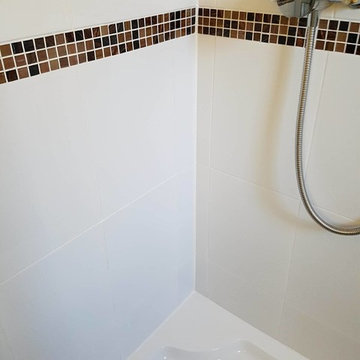
The photographs below are from the bathroom of a house in the Moston area of Manchester which is primarily residential and only 3 miles away from the city centre. My customer had been primarily concerned with the removal of unsightly mould but was also keen to have the grout in the ceramic tiled shower cubicle given a good deep clean.
To clean the Shower Cubicle, I used a strong dilution of Tile Doctor Pro Clean which is a strong alkaline cleaner that works really well on grout. The Pro-Clean solution was decanted into a spray bottle and then sprayed onto the grout lines and left it to dwell. The air in the solution makes it lighter and easier for it to stick to vertical surfaces.
After a few minutes the Pro-Clean was scrubbed in using a stiff grout brush. The tiles were then rinsed with water to remove the soiled solution from the tiles and the process repeated where required.
Although cleaning process was a success there were still a few mould marks left so to tackle these I used Tile Doctor Mould Away spray using the same process of scrubbing and rinsing. The Mould Away spray did the trick for me and I moved on to remove the silicone around the shower cubicle. When removing silicone, you must make sure you get all mouldy silicone out otherwise it can spread from the old to the new.
After I had finished removing the silicone I tidied the shower cubicle and used a bit of gentle heat from my heat gun to dry the grout lines and edges where silicone used to be.
I used my damp tester to make ensure there was no dampness anywhere around the working area and then moved on to colouring the grout which would give the whole shower a fresh and consistent appearance. On this occasion, I used a White colour from the Tile Doctor range of Grout Colourant’s, it’s an epoxy based colourant that protects and rejuvenate the grout lines.
I had to use 2 coats of colourant to get the best result and then moved on to putting new silicone around the shower base with a high-quality mould resistant silicone. When finished adding fresh silicone I tidied up again and the job was complete.
I think you can’t argue the shower cubicle was transformed and customer even said it looks better then when it was new; we also fixed few chips for her whilst there and stripped and replaced the silicone around the sink as a bonus.
Tony Olmet
Greater Manchester Tile Doctor

 Patti Ogden Design
Inspiration for a mid-sized timeless l-shaped light wood floor and brown floor open concept kitchen remodel in San Francisco with a drop-in sink, shaker cabinets, white cabinets, green backsplash, an island, granite countertops, glass tile backsplash, stainless steel appliances and green countertops


 Kaiser Gardens
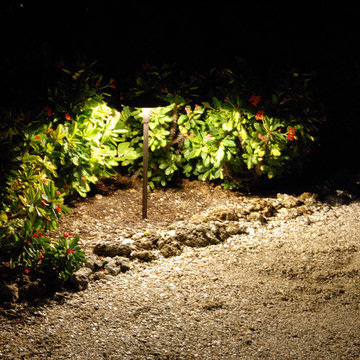
This is a California xeriscape succulent garden. Clients wanted color and texture with drought-resistant plant materials. They enjoy garden sculptures, so we included a Buddha and a Roman bust planted with succulents. The previous owners of the property left behind some old San Francisco cobblestones, which we incorporated into the new design, using them as garden steps.
We built low, raised beds out of stone, also existing on the property, and used containers along steps and against existing concrete walls to soften the hard surfaces.
 Tile Doctor Ltd
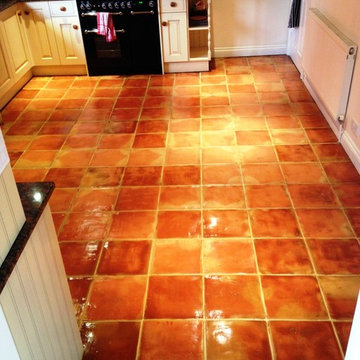
Terracotta may be one of the most aesthetically pleasing types of tiled floor, but as many of our customers will tell you can be particularly difficult to keep clean. This is due to the naturally high porosity of clay, which allows dirt to become very easily trapped. Quite commonly this situation is made worse by a lack of an adequate sealer to block the intrusion of muck. Of course, poor quality cleaning products also make it difficult for property owners to keep their Terracotta tiles clean, and a combination of the two problems can leave these floors looking a lot like this one, located in the kitchen of a house in the beautiful Forest of Dean.
The property owner was keen to have me restore some character to her dull Terracotta tiles. It was proving increasingly difficult for her to keep them clean due to the reasons described before, and the grout had also become very dirty. So, the customer turned to me for some professional assistance.
While these Terracotta tiles had been sealed previously it had, over time, lost its ability to protect the stone against ingrained dirt. To remove the old excess sealer my product of choice was the heavy duty soil remover and stripper, Tile Doctor Remove & Go, which I applied liberally across the surface and scrubbed in to the tile used a rotary machine fitted with a scrubbing pad. This also helped to remove the trapped dirt and left the stone looking fresher.
Once the old sealer was removed – to be replaced with a fresh sealer once cleaning was complete – I was free to focus on the troublesome grout lines with Tile Doctor Pro Clean, an alkaline cleaner that reliably breaks down dirt. When cleaning the grout, I opted to use a handheld grout brush that allowed for more precise, careful application of the product.
As per usual, the floor was given a good rinse and left to dry for 24 hours.
Upon returning to the property I checked the floor was completely dry, ready for sealing. My process for sealing actually involved the application of two different kinds of sealer; initially I applied a single coat of Tile Doctor Colour Grow which has soaks into the pores of the tile and has the added bonus of enhancing its natural colours.
Once this had dried I then applied ix coats of Tile Doctor Seal and Go, a product which forms a durable layer of protection of the surface of the tiles and at the same time provides a lovely sheen finish.
The combination of the two sealers will certainly offer a long-term solution to the ingrained dirt problem, and the appearance-enhancing properties in the products really helped to transform the tiles from dull and dirty to lively and eye-catching. Nonetheless, before departing the property, I also left my very pleased customer with some cleaning advice for the future.
Paul Wales
Monmouthshire Tile Doctor

Sponsored
Fredericksburg, OH
High Point Cabinets
Columbus' Experienced Custom Cabinet Builder | 4x Best of Houzz Winner
 RG Cowan Design Build
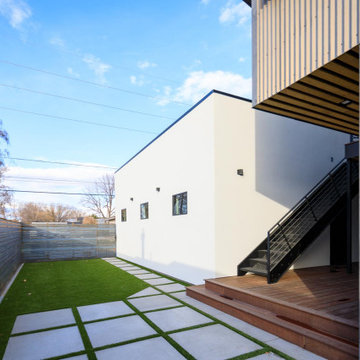
Our Modern Aspen ave. project was a home that grew out of our clients desire to have a modern home in the heart of the art filled, mountain-biking-community of Fruita, Colorado. Our original concept was to renovate an older existing home to be able to better function as a 2-3 bedroom home for her friends and family to come stay, ride bikes, play and enjoy downtown Fruita. Due to a combination of the poor quality of the existing structure, an almost non existent foundation and discovered geotechnical site conditions, the project became a new construction dream getaway.
Design Concept:
In developing this project our client desired, a modern, open floor plan home filled with natural light and a durable maintenance free exterior. From this program we massed the home into 3 distinctly separate zones contained within 3 simple modern forms; a transitional entry space, the public living spaces and the private bedroom spaces. These zones of the home were each to become visible from the exterior through the use of 3 separate durable exterior material claddings of wood, stucco and steel respectively.
Spaces:
The entry of the home, clad in wood, was created as a transitional space between the exterior and the living spaces by creating a feeling of compression before entering into the voluminous, light filled, living area. The large volume, tall windows and natural light of the living area allows for light and views to the exterior in all directions. The custom kitchen cabinets and cabinetry storage are “tucked in” under the stairs and loft allowing for a sense of refuge while in the “command center” of the home. In this design every inch of usable space was thoughtfully incorporated into its function. The private bedroom zone of the home has bedrooms stacked on 2 levels with the master suite on the main level and guest bedrooms and guest bath above. These Bedrooms adjoin a loft area that flows onto a covered and well shaded 2nd level deck. The loft and 2nd level deck allows for a separate living space to relax and gather with family and friends.
Garage and Exterior landscaping:
This project also considered our clients' need for storage and love for travel by creating storage space for an Airstream camper in the oversized 2 car garage at the back of the property. The design of the garage was flat roofed in order to preserve views and light on the north side of the home, while also allowing room for a photovoltaic (PV) solar system to offset electrical needs.
The “lawn” and landscaping of the home were designed as a part of a no maintenance exterior requirement. Although wanting to be maintenance as maintenance free as possible on the exterior, her love for dogs required the home to have some form of grass, so we opted for a K-9 Grass turf system that is designed for pets and allows the turf to be rinsed into the soil through the use of a typical sprinkler system.
Energy Efficiency:
As in all of our homes, we design and built this project with increased energy efficiency standards in mind. Our standards begin below grade by designing our foundations with insulated concrete forms (ICF) for all of our exterior foundation walls, providing the below grade walls with an R value of 23. As a standard, we also install a passive radon system and a heat recovery ventilator to efficiently mitigate the indoor air quality within all of the homes we build. Above grade, the exterior walls on this home are built with 2x6 construction and sheathed with the Zip R-3 system allowing for an air and weather tight, R-27 exterior wall assembly. The flat roofs of the home are insulated with a hybrid closed cell foam and batt insulation system creating an affordable R-45 insulation. These roofs are covered with a reflective white, TPO membrane roof to reflect the excess heat during the hot summer months. The pitched roofs of the home are vented insulated with a breathable R-50 blown fiberglass insulation.

 Linda Estrin Garden Design
Pots, planters, old birdbaths, living walls. My succulent designs have been featured in numerous publications, most notably three books written by The Succulent Queen, Debra Lee Baldwin: "Succulent Container Gardens" and "Succulents Simplified," I love doing what I do. Let's talk!
 Tile Doctor Ltd
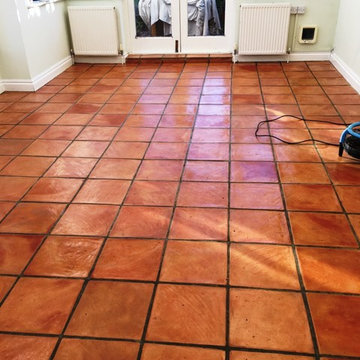
This couple, who live in the seaside resort of Brighton, had purchased their house four months before Christmas and wanted to have the fantastic Terracotta tiled floor in the kitchen and conservatory looking its best before the festive period, since they had family visiting. The floor was looking washed out and it was clear the sealer had failed in the high traffic areas and was now allowing dirt to penetrate into the pores of the tile making it difficult to clean.
We often get calls from new home owners keen to put their own stamp on a property shortly after moving in; stone floors rarely come with cleaning instructions so if you have a stone floor it makes sense to get in touch, so we can advise you on how best to maintain it.
We provided a quote which included stripping the floor of old sealers, cleaning, oiling and then sealing it again to restore cleanliness and character to the Terracotta. There was a lot to do and two areas to clean so I anticipated it would take four days to complete.
Having accepted the quote our first task upon returning to the property was to give the Terracotta tiles a deep clean and remove any remaining sealer present on the tile. This was achieved by applying a strong combination of Tile Doctor Pro-Clean and Tile Doctor NanoTech HBU to the tiles and then covering it in a plastic sheet, so it wouldn’t dry out. This method allows the products to really soak into the pores of the Terracotta and draw out the dirt. I should also mention that Pro-Clean is a very effective Tile and Grout cleaner whilst HBU enhances it by adding nano-sized cleaning particles.
The plastic blanket was left in place for a few hours before being peeled off and then the cleaning products scrubbed into the tile and grout using a black pad fitted to a rotary floor machine and hand brushes. The now soiled product was rinsed off with water which was then extracted using a wet vacuum. The floor was inspected, and stubborn marks spot treated until the floor was clean.
After thoroughly cleaning the Terracotta over two days, we left the floor to completely dry off over the weekend. The tiles would need to be sufficiently dry to receive fresh sealant, as excess moisture can cloud the sealant and prevent it from working correctly.
When we returned to the property, we proceeded to apply Tile Doctor Stone Oil to the tiles. Stone Oil is a sealer which restores the colour and texture of tiled floors, as well as mechanical strength once cured.
We applied a single coat of the Stone Oil before topping it up with multiple coats of Tile Doctor Seal and Go, a topical sealer which provides a high-quality sheen finish to help accentuate the appearance of the Terracotta tiles as well as adding protection.
You can see the results of the restoration below. The couple were so impressed that they have now agreed to have Tile Doctor visit once a year (at a fraction of the cost of the original restoration) to complete a maintenance clean. This will make sure this Terracotta is always looking at its best!
Mick Conlon
East Sussex Tile Doctor
Sponsored
Fredericksburg, OH
High Point Cabinets
Columbus' Experienced Custom Cabinet Builder | 4x Best of Houzz Winner

 Calafia Design
Katy Sheppard
Photo of a small transitional shade courtyard concrete paver landscaping in Chicago.
Photo of a small transitional shade courtyard concrete paver landscaping in Chicago.

 Ehrlich Yanai Rhee Chaney Architects
The ground floor volumes wrapped in an elongated hand-fired brick, emphasizing the horizontality of the architecture that lays solidly on the land.
(Photography by: Matthew Millman)

 Zeterre Landscape Architecture
This is an example of a mid-sized asian partial sun backyard concrete paver formal garden in San Francisco.
15