
Search results for "Specific actions" in Home Design Ideas

 Tuscanbasins
The Berkeley is designed with clean and simple styling in mind and finished in an elegant mocha stain. The Berkeley makes any living room, den or man cave really stand out.
The Berkeley TV lift cabinet was inspired by the same construction and finish of the Brookside TV lift cabinet. Taking from it's subtle lines and mocha finish it has quickly become one of our most popular units. The Berkeley features interior shelf lighting and tons of room behind the cabinet doors for your component and media storage.
The Berkeley accommodates most 60" diagonal flat panel plasma and LCD TVs, measuring 55"W x 4.5"D x 35"H. Behind the front doors is ample storage space for your DVD movie & video game boxes. The cabinet is equipped with sliding rear panels for easy access to your TV connections.
Video
Product Features:
Universal Mounting System: Simple mounting kit includes all the hardware and brackets you need to hold your flat screen TV on the Touchstone lift mechanism.
Component Storage Space: The Berkeley has 8" of vertical storage height and 50" of width horizontal space for your Satellite Box, Cable Box, Recorders, Amps, Surround Sound, and Video Games.
Personal Storage Space: The Berkeley has 4 adjustable shelves for your DVD boxes, Video Game boxes and CD cases.
RF Remote Control: Includes 1 RF remote control for raising/lowering the lift mechanism without requiring line of sight.
Backup Wired Remote Control: Each unit has a backup on/off switch and set control switch inside the cabinet.
Finishing Process: Our thorough 7 step finishing process uses a combination of hand-staining and automated application tools that insures all woods and stains are applied uniformly and precisely to produce a quality cabinet that will last a lifetime.
English Dovetail Joints: A time-honored fine cabinet-making technique, Dovetail joints become self-locking even before the glue is applied, so solid overall construction can be guaranteed.
Solid Wood Tongue and Groove Corner Blocks: Incorporates the side panels of the cabinet with the foot of the cabinet, adding structural support which enhances durability.
24 point QC audit inspection of every cabinet.
Specifications
Cabinet Wood Finish: Mocha
Unit Dimensions: 59"W x 23"D x 41.5"H
Maximum Cabinet TV Size: 55"W x 4.5"D x 35"H (TV plus component height)
Unit Weight: 321 lbs.
Unit Shipping Weight:395 lbs.
Touchstone's TV Lift System
The Berkeley is ready for entertainment action with Touchstone's quiet and smooth TV lift system for your flatscreen television. The Berkeley includes a wireless RF remote control for operation of the cabinet's lift as well as a backup controller wired into the inside of the cabinet just in case you ever lose or can’t find the wireless remote.

 Moss Yaw Design studio
Engineered cedar siding creates beautiful gray-blue tones at the exterior of the home, while adding a textural element to activate the simple exterior design.
 Homestead Doors, Inc.
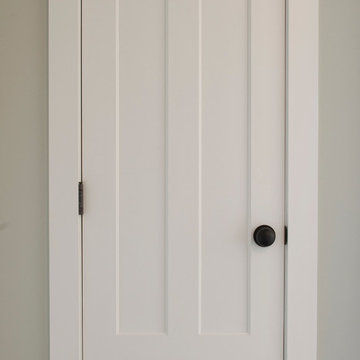
Door #10
FP3190
Flat 3 Panel Interior Door with Farmhouse Sticking
Solid Poplar stiles and rails
MDF panels
Painted White
1 x 4 door casing
1 x 6 baseboard
Bravura 336B door knob
Call us for a quote on your door project
419-684-9582
Visit https://www.door.cc
Find the right local pro for your project
 GriD architects
Paul Burk Photography
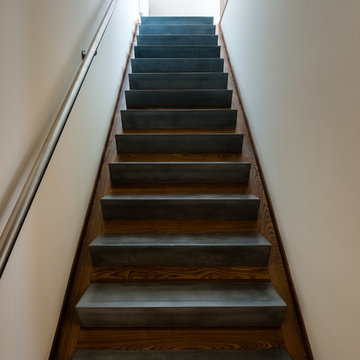
Staircase - mid-sized modern concrete straight metal railing staircase idea in Baltimore with wooden risers
Staircase - mid-sized modern concrete straight metal railing staircase idea in Baltimore with wooden risers

 Dynamic Garage Door
Dynamic Garage Door specializes in Tuscan Architectural beautification in the Newport Beach, CA through our custom designed and hand made architectural shutters, garden gates and garage doors. This Newport-Mesa Tuscan home was exquisitely decorated with a combination of custom gates, decorative shutters and balcony barn door style shutters all handcrafted out of authentic, century-old reclaimed barn wood specifically harvested for this custom project.
Beginning with the balcony shutters which actually slide from side to side like a real barn door we worked a charming rustic shutter design that would typically be seen in the Tuscan Riviera. We opted for sliding shutters as the balcony spacing limited the swing action of even bi-folding shutters. Incorporating real barn door hardware railing and crowing it behind the faux reclaimed wood beam made an excellent statement while adding functional shutters that can be shut close for comfort during the summer morning when the sun beats down into the master suite. The four shutter leafs are decorated with real hand forged dummy straps that were hammered and crafted by hand to achieve that gorgeous rustic charm typical of Tuscan architecture. The reclaimed barn wood from a century-old barn gives off a timeless appearance that increase in characters as the years go by. Because rustic barn wood has already aged beautifully over hundreds of years, the next century will only increase its authentically gorgeous appearance. The culmination of this project has been a meticulous collaborative input of our in-house head designer and the clients themselves. Although the completion of this project is lengthy and intricate, the results speak volumes and the wait simply justifies the outcome.
The rest of thew windows on this Tuscan home have been accessorized with rustic barn wood as well and accentuated with our custom designed and handmade dummy iron hinge straps. Our dummy hardware is so authentically done in the same tradition used for hundreds of years in Europe to create shutter hardware that looks authentic and functional although it is only decorative. The details of our custom shutters is evident in the slightest of details including the bolts used to hold the shutter straps in place. Each of the shutter also has a decorative ring pull with a hand-hammered back plate which enhances the appearance of true functional shutters and defining that authentic Tuscan look.
The beauty of this Tuscan home is visible throughout the entire property including the garden gates, garage doors and entry door. Again, for the garden gates, we went with rustic barn wood carefully crafted to preserve the original surface that has aged over hundreds of years but building the gates on galvanized steel frames that will ensure structural durability for the next few hundred years. The gates are highly secure, sound and can definitely hold back a crowd with authentic rustic charm. Don't be fooled with the simple-looking gate design. It is quite intricate with its 45 degree angle cuts around the perimeter of the trim which deviates water away from crevices that would otherwise make the gates vulnerable to the accumulation of moisture from the elements, sprinkler system or simply air humidity since the home is located near the ocean. Each one of the garden gates is equipped with European style mortise lock mechanisms and roller catches. Dynamic Garage Door gates are not your typical garden gates, they are truly made with quality and durability in mind as well as aesthetic attention to detail. Everything, from the hardware used, the core steel frame and overlay material used is hand selected and approved individually for maximum beauty and timeless appreciation.
At Dynamic Garage Door, we specialize in multiple facet projects that include garden gates, driveway gates as well as barn doors and shutters. It is very important because these are the accessories that can make or break the beauty and continuity of your home's architectural style and authenticity.
Increase your curb appeal and home value with Dynamic Garage Door's gates, shutters and automatic custom garage doors. Our in-house designers would love to speak with you today!
Design Consultation Center: (855) 343-3667
 Tile Doctor Ltd
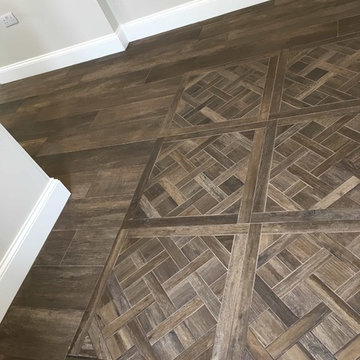
Grout haze or grout smears as it is often called can be a huge problem when laying tiles. Grout haze is basically grout that has been left to dry on the surface of the tile after installation. It’s a common problem which is exacerbated by the use of quick drying products. Take for example this interesting Wood Effect Ceramic Tile installation at a house in Guildford following installation by a builder.
I was a bit slow in following up on the initial enquiry as we had been very busy so by the time, I got in touch I was told they had employed someone else to carry out the work. I apologised for my late response and said to call me if he needed help in the future. Three days later I got a call so we arranged a visit so that I could carry out a test and quote a price.
As it turns out the builder had returned and failed to remove the grout haze and so had a rival firm that seemed more interested in selling unnecessary sealer than fixing the problem. I was astonished to see what a state the builder had left his floor. Grout was all over the floor with footprints walked across thresholds and more. I could understand it if there was some grout was missed after installation but not to this level!
I carried out a successful test and confirmed to the customer that there was absolutely no need to rip and replace his £2k floor. We agreed a date to resolve the problem and to say he was relieved was an understatement!
The builders had used Mapei grout which contains polymers. Polymers offer better flexibility and adhesion, however in order to remove the grout haze we would first need to break down the polymers in the grout first and this is why the rival firm failed.
With that in mind, my first action was to apply Tile Doctor Remove and Go to the floor and leave it to dwell for five to ten minutes. I then worked it into the tile using a scrubbing pad fitted to a rotary machine.
After washing the soil away with warm water and extracting with a wet vacuum I applied Tile Doctor Grout Clean-up to treat the grout. Grout Clean-up is an acid-based product that breaks down the grout so it can be rinsed away and extracted as before. Afterwards I rinsed the floor with warm water and extracted again to remove any trace of product and neutralise the floor. After removing as much moisture as possible with the wet vacuum I speed dried the tiles with a blower.
Ceramic tiles won’t accept a sealer so once the floor had dried the job was finished and it took less than a day.
The customer was over the moon with the difference. While his floor was in such a state, he has been unable to bring in new furniture as the serious possibility of removing the tiles was hanging over him.
Relieved that the problem was now resolved he kindly left the following review:
“I had a floor that had just been laid with very heavy grout haze. I had already had advice from two other professional floor cleaners who had advised me that the floor was irreparable and would need to be pulled up. As soon as I spoke with Rupert, it was clear he was extremely knowledgeable. He asked questions none of the other companies had. By understanding the specific nature of the problem, he was able to solve it by first removing the grout polymers and then applying an acid wash. The floor came up brilliantly. Rupert was the only person I spoke to that could fix this, everyone else told me I needed to replace my floor! Superbly knowledgeable, professional and did an excellent job. Don’t bother speaking to anyone else, just call Rupert! “
Rupert Mcleod
West Surrey Tile Doctor
 Tile Doctor Ltd
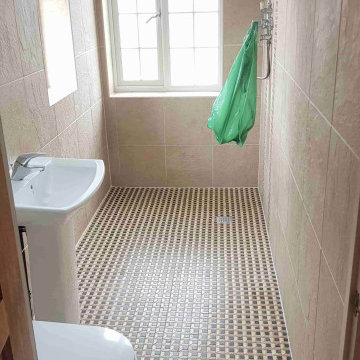
This wet room in Doncaster had become so mouldy and dirty the owners didn’t know what to do with it. The Limestone and Marble Mosaics on the floor and the Ceramic wall tile and Grout throughout the bathroom had become so badly affected with mould, nothing they could buy from could resolve it.
Following my site visit I was confident the room could be cleaned up (in-fact I have seen worse), I explained what we could do to restore and revamp the wet room and they were happy to go ahead with my quote.
First, I opened windows to maximise ventilation and then working top down I set about tackling the Ceramic wall tile and grout by spraying on a strong dilution of Tile Doctor Pro-Clean. Spraying on the solution mixes it with air making it lighter and easier to stick to the wall where it can soak in and get to work breaking down the mould.
After about fifteen minutes it was scrubbed into the tile and specifically the grout joints where it was needed most. This action releases grime and other contamination from the grout. The room needed a series of different treatments due to the different tiles and areas of mould, so I followed that up with Tile Doctor Duo Clean. This is a bleach-based cleaner which is brilliant at tackling mould and getting the grout back to its original colour.
The Ceramic tile in this bathroom has a textured surface which traps dirt so to get them clean I also used Tile Doctor Oxy-Gel. Being a Gel is easily sticks to the vertical surface allowing for longer dwell times which allows the product to dissolve the dirt and make it easier to remove.
With the walls looking much clear for my efforts I turned my attention to the Mosaic floor tiles. For these I went straight in with a cocktail combination of Tile Doctor Pro-Clean and Duo Clean cleaners which I knew from cleaning the wall tiles would have the right impact.
I was also able to use a buffing machine fitted with a poly brush attachment and running at medium speed to do most of the scrubbing. The grout lines were green with mould, and I was able to get this process to return the Mosaics and grout lines back to their original state.
The slurry was removed with a wet vacuum and rinsed thoroughly with water. It took many hours and repeated scrubbing to get the room looking like it should. I was then able to finally leave for the day and allow the wet room to dry out overnight.
I returned the following morning and started by removing all the old silicone from the corners of the room, much of it had become stained and difficult to get clean so replacement was the best option. The waste was removed and replaced with a new bead of mould resistant silicone colour matched to suit the tiles.
The Mosaics has fully dried by this point, so I was then able to apply a sealer to floor to seal in the Marble and Limestone floor Mosaics and grout. I used a couple of coats of Tile Doctor Colour Grow for this, it’s a breathable impregnating sealer that’s suitable for wet rooms. For the wall tile and grout, I used an aerosol sealer which will help protect the walls from getting mouldy and dirty again.
Once I had finished, I educated the owners on how to keep up the cleaning of the room supplying them with a complimentary bottle of Tile Doctor Aqua-Pro shower tile Cleaner. This is much better than any supermarket cleaner as it is pH neutral and will ensure that the newly applied sealant will not be prematurely affected. Hopefully, this will ensure it never gets quite so bad in the future however improved ventilation is the real key to solving that problem. They were very satisfied with the work we carried out and as you can see from the photographs on this page, the wet room has been transformed.
Matthew Lovett
South Yorkshire Tile Doctor

 Lisa Tharp Design
Governor's House Entry by Lisa Tharp. 2019 Bulfinch Award - Interior Design. Photo by Michael J. Lee
Transitional painted wood floor foyer photo with white walls and a black front door
Transitional painted wood floor foyer photo with white walls and a black front door


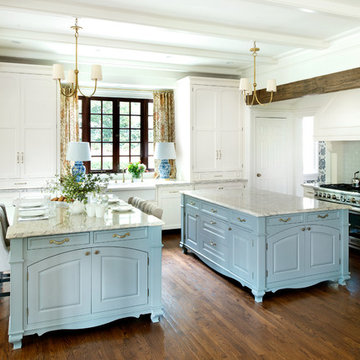
 KINGDOM WOODWORKS
Collaboration with Canonbury Homes and Frank Neely Design Associates.
Inspiration for a timeless open concept kitchen remodel in Atlanta with beaded inset cabinets and two islands
Inspiration for a timeless open concept kitchen remodel in Atlanta with beaded inset cabinets and two islands

 Atlas Roofing - Shingles
Summer will soon be knocking at your door, begging you to come outside and spend time in its warm sunshine. The nicer weather means hosting family barbecues and parties, kicking back in the shade with a good book or floating around in the pool, allowing the stresses of everyday life to slowly drift away.
Outdoor Seating - Sectional
Is your back yard ready for all of the summertime fun? More specifically, take a good look at your patio furniture. Perhaps certain pieces should be spruced up or repurposed, while others may need to be replaced altogether.
Whether you’re dealing with a big or small project, don’t let the details intimidate you. With the right preparation and planning, you can transform your outdoor living space into an oasis where everyone can relax and enjoy themselves.
Choose Your Aesthetic
Before you dive into an outdoor renovation and end up feeling like you’re drowning in all of the possibilities and decisions, take some time to think about how you envision your new space. How will you be using it? Do you spend more time entertaining or relaxing? What kind of seating do you need? Does it need to be kid- and/or pet-friendly? Do you prefer clean, modern lines or playful, colorful textures? Do you like harder surfaces, such as wood, or softer ones, like cushions?
Addressing these questions should help you narrow down the outdoor seating options that work best for your family.
Get Trendy
Once you’ve honed in on your desired aesthetic, start putting your ideas into action. Looking at this year’s trends can help.
For instance, the biggest trend of 2017 is bringing the indoor look outdoors. This theme incorporates plush sofas made from durable fabrics, side tables, ottomans, vibrant-colored throw pillows and outdoor rugs. To protect their outdoor living room, many homeowners also opt for a patio cover, which can be either a hard cover or soft awning.
Outdoor Seating - Benches
This year’s outdoor furniture also blends wood-grain finishes with worn surface textures and pairs neutral colors with pastels for a washed-out effect. When it comes to dining tables and chairs, classic wrought-iron tea garden furniture is always in style.
Go Green
Adding a new chair or replacing an entire outdoor living room can be a great opportunity to bring in materials that look great and are also good for the environment. You can make your own (try these ideas from WooHome) or purchase eco-friendly furniture from shops such as Breezesta and Viesso, which offer “green” seating options in a variety of styles and colors.
Create A Warm Front
While you’ll probably focus on furnishing your back yard, don’t forget to pay some attention to the front of your house, too. Curb appeal counts – it’s the first thing your friends and neighbors see, so making a good impression is a must.
Be sure to keep the area clean. As for décor, don’t over-decorate. A simple rocking chair or swing can generate a warm, welcoming feeling for all.
Stay On Budget
Outdoor Seating - Wicker
Whether money is no object or you follow a strict budget, options are available for every wallet.
High-end luxury furniture sites such as Frontgate, offer posh designer couches, mosaic dining tables, cushioned hammocks and even a hanging daybed.
However, affordable, luxurious-looking options are available, too — especially if you’re not afraid to roll up your sleeves and do some of the work yourself. Pinterest provides countless design inspirations for do-it-yourselfers, such as repurposing an old tire into a cushioned seat and building a lawn chair using wood pallets, among others.
Plus, check out money-saving suggestions from Better Homes and Gardens’ Budget-Friendly Ideas for Outdoor Rooms, DIY Network’s 10 Outdoor Rooms on a Budget and HGTV’s 25 Budget-Friendly Ideas for Small Outdoor Spaces.
Remember, you don’t have to do everything at once. Concentrate on small areas and budget your time and money for the items that will best fit each space.
Have you recently redone your outdoor living space? We’d love to see photos! Post them in the comments below.
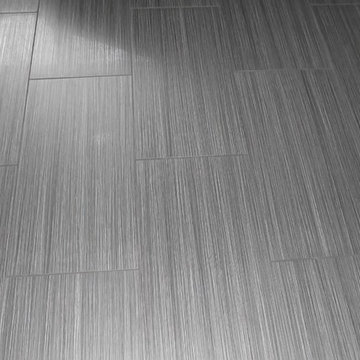
 McCullough's Flooring
Gorgeous master bath finished with Dal-Tile's Fabrique porcelain tile in the color Noir Linen polished. Tile size is 12"x24" installed in a brick joint pattern. The floor boasts underfloor heating on a timed thermostat.
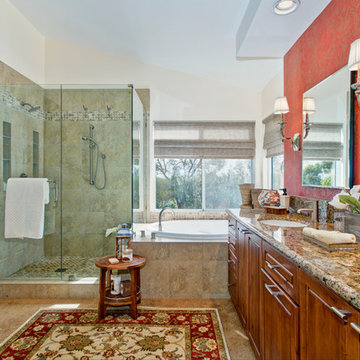
 CairnsCraft Design & Remodel
Great spacious bathroom with lot of amenities.
Photographer: Jon Upson
Large elegant master beige tile and porcelain tile drop-in bathtub photo in San Diego with an undermount sink, raised-panel cabinets, medium tone wood cabinets, granite countertops, beige walls and a two-piece toilet
Large elegant master beige tile and porcelain tile drop-in bathtub photo in San Diego with an undermount sink, raised-panel cabinets, medium tone wood cabinets, granite countertops, beige walls and a two-piece toilet
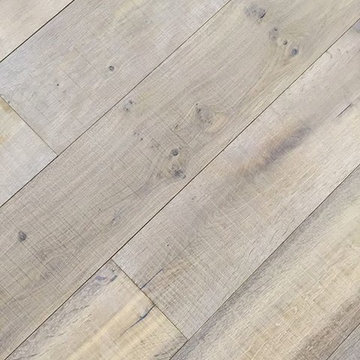
 Interior Pros - Design Studio
The grey trend has evolved in the last twelve months. Nowadays browns, beige and a touch of grey are in demand. Greige is the new buzzword.
Heavier hand scraped or contoured products, the rage that started around 2005 has taken a back seat in most areas, while a softer wire brushed "ceruse effect" seen mostly on White Oak has been remarkably strong showing no effects of becoming “dated” like the others mentioned.
Ceruse Color Possibilities
There are numerous color combinations to the "cerused" process with the most popular being white or off white. This design trend in hardwood flooring can have darker gray white oak with a mild ceruse off white effect.
There are limitless possibilities in either a prefinished hardwood floor or with what we can create for you in a custom on-site finished hardwood floor.
If something suits your fancy, contact us and we can work on creating just the look and sense of style you are looking for.
 Spire North
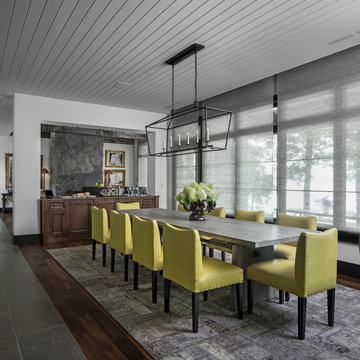
Tucked away in the backwoods of Torch Lake, this home marries “rustic” with the sleek elegance of modern. The combination of wood, stone and metal textures embrace the charm of a classic farmhouse. Although this is not your average farmhouse. The home is outfitted with a high performing system that seamlessly works with the design and architecture.
The tall ceilings and windows allow ample natural light into the main room. Spire Integrated Systems installed Lutron QS Wireless motorized shades paired with Hartmann & Forbes windowcovers to offer privacy and block harsh light. The custom 18′ windowcover’s woven natural fabric complements the organic esthetics of the room. The shades are artfully concealed in the millwork when not in use.
Spire installed B&W in-ceiling speakers and Sonance invisible in-wall speakers to deliver ambient music that emanates throughout the space with no visual footprint. Spire also installed a Sonance Landscape Audio System so the homeowner can enjoy music outside.
Each system is easily controlled using Savant. Spire personalized the settings to the homeowner’s preference making controlling the home efficient and convenient.


 Jack Calderone
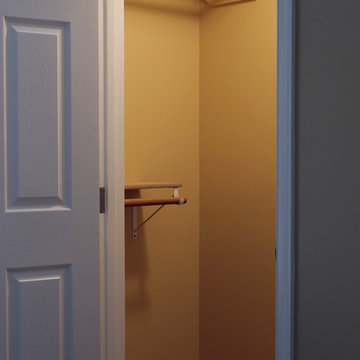
This bedroom and full bathroom are part of an adventuresome project my wife and I embarked upon to create a complete apartment in the basement of our townhouse. We designed a floor plan that creatively and efficiently used all of the 385-square-foot-space, without sacrificing beauty, comfort or function – and all without breaking the bank! To maximize our budget, we did the work ourselves and added everything from thrift store finds to DIY wall art to bring it all together.
A partial double closet bar adds a little extra space while still leaving room for longer hanging clothes.

 Home service
Your kitchen is more than just a cooking space; it's the heart of your home—a place for family gatherings, shared meals, and unforgettable memories. If you're here, chances are you're dreaming of a kitchen upgrade that better serves your needs while enhancing its beauty and functionality. Whether you're aiming for a sleek modern design, a functional workspace, or a charming rustic vibe, finding the right kitchen remodel services is key to turning that dream into reality.
This guide will walk you through everything you need to know about choosing the best kitchen remodel near me. From understanding your specific needs to identifying reliable services, we've got you covered.
Understanding Your Unique Kitchen Remodeling Needs
Before hiring a kitchen remodel service, it’s essential to pinpoint why you're looking to remodel in the first place. Knowing your priorities will help you make informed decisions and ensure you choose a service that aligns with your vision.
1. Functionality Upgrades
Is your kitchen outdated or inefficient? Maybe you're dealing with limited countertop space or outdated appliances that make cooking a hassle. A remodel can help optimize the layout and incorporate modern solutions, such as smart appliances or ergonomic cabinets.
2. Aesthetic Enhancements
Perhaps you’re looking to give your kitchen a fresh, stylish look that reflects your personality. Whether it’s a chic industrial design or a cozy farmhouse style, professional remodelers can help bring your aesthetic dreams to life.
3. Improved Home Value
A beautifully renovated kitchen is one of the top features potential buyers look for. According to real estate experts, a well-designed kitchen remodel can deliver up to a 70%-80% return on investment.
4. Lifestyle Changes
Has your family grown? Do you cook at home more often now? Your kitchen should adapt to these shifts, accommodating more people or making meal prep seamless.
Clearly outlining your specific goals will make it easier to choose home remodeling contractor professionals who can meet (and exceed) your expectations.
Researching for the Best Kitchen Remodel Services Near Me
Once you’ve defined your needs, the next step is to start researching. But how do you pinpoint the best kitchen remodelers in your area? Here are actionable tips:
1. Read Reviews and Testimonials
Start by checking online reviews on platforms like Google, Yelp, and Houzz. Look for consistently positive feedback, with special attention paid to customer comments about quality, communication, and timelines.
2. Check Portfolios
A picture is worth a thousand words—and reading about a remodeling company’s success isn’t enough. Browse their portfolio to ensure the quality of their work aligns with what you’re envisioning.
3. Ask for Recommendations
Word of mouth is still one of the best ways to find trustworthy services. Ask friends, family, or coworkers if they’ve worked with a remodeling service they’d recommend.
4. Look for Professional Credentials
Make sure the companies you’re vetting hold all required licenses, certifications, and insurance. It’s a sign of their professionalism and ensures accountability.
5. Conduct Interviews
Consider meeting with a few top contenders. Ask about their experience, approach to projects similar to yours, and estimated costs. Don’t shy away from asking detailed questions—it’s important to feel confident in your choice.
By thoroughly researching, you'll narrow down your options and find a remodeler who matches your vision, budget, and style.
Key Factors to Consider Before Hiring
Deciding on the right kitchen remodel near me is about more than just skills. Here are some critical factors to weigh before signing any contracts.
1. Set a Clear Budget
It’s important to have a realistic budget in mind before you begin. A reliable remodeler will respect your financial boundaries and offer solutions that maximize your investment without overspending.
2. Outline Your Timeline
Discussing deadlines ensures the project starts and finishes on time. Make sure the remodeler can meet your schedule without compromising quality.
3. Communication is Key
Clear communication is essential. You want experts who listen carefully to your needs, explain their process, and keep you updated throughout the project.
4. Warranties and Guarantees
Always ask if the service provides warranties for craftsmanship and materials. It’s a sign they stand by the quality of their work.
Why RightWay Home Builders is the Solution to Your Kitchen Remodeling Needs
Looking for trusted experts who deliver stunning, functional kitchens? Meet RightWay Home Builders, a leading name in local remodeling services. Here's why they're a standout choice for your kitchen remodel project.
1. Proven Expertise: With over 10 years of experience in the industry, their portfolio boasts beautifully transformed kitchens that reflect each client’s unique style.
2. Customer-Centric Approach: RightWay prioritizes the client experience. From the initial consultation to the project's completion, their team ensures you’re heard every step of the way.
3. Comprehensive Services: From initial designs to installation, RightWay Home Builders handles every stage of remodeling with precision and care.
Their happy customers say it all. “RightWay took my outdated kitchen and turned it into something from a magazine. Their attention to detail was amazing, and they were a pleasure to work with!” - Sarah M.
Why Visit RightWayHomeBuilders.com?
Booking your dream remodel has never been simpler. RightWay’s website offers a streamlined process where you can request a consultation, view portfolios, and even access exclusive home remodeling tips. Don’t wait! Visit https://www.rightwayhomebuilders.com to kick-start your remodeling adventure.
FAQs About Kitchen Remodeling
1. How much does a kitchen remodel cost?
The cost depends on the size of your kitchen and the scope of the project, but the average remodel.
2. How long does the remodeling process take?
Most remodeling projects take 6 to 12 weeks, depending on the complexity.
3. Will a kitchen remodel increase my home’s value?
Absolutely! A well-done remodel can boost your home value significantly and make it more appealing to buyers.
4. Can I stay home during the remodel?
While it’s possible, the noise and dust might be inconvenient. Many clients prefer staying elsewhere temporarily.
Conclusion
Your dream kitchen is closer than you think. Whether you're upgrading for better functionality, fresh aesthetics, or added value, investing in the right kitchen remodel service will ensure your vision comes to life.
Explore your options, do your research, and don’t hesitate to reach out to trusted experts like RightWay Home Builders. Begin the first step today—schedule your consultation at RightWayHomeBuilders.com and take the leap toward the ultimate kitchen transformation.



 BAUFORMAT
Wavy mother of pearl porcelain tile, wavy white tile for bathroom shower or backsplash. Perfect for fireplace or accent wall
Example of a trendy bathroom design in Los Angeles
Example of a trendy bathroom design in Los Angeles
7