
Search results for "Start losing" in Home Design Ideas

 Revealing Redesign
In June of 2015 an amazing sudden summer storm hit our area with violent winds, rain, and tornados. In the aftermath, my clients found, on top of losing 30 or so trees on their property overall, one had actually struck their home, piercing the roof in their great room.
The great room was the very last room in their house that we hadn't done a complete overhaul in. Sure, we had tweaked it, purchased a few pieces of furniture, reworked the layout, but the colors and design were much the same as they had been for decades.
Since things needed to be repaired and painted already, it was decided to jump in with both feet and totally rethink the room, change almost everything, and add architectural details that seemed to be missing in the original design from the 1980's.
So not only were the color palette, rugs, and furnishings changed, but some very important architectural interest was added. For instance, a new, more elegant post was added at the back of the space, visually connecting the downstairs with the loft above. Also, three beaded beams have been added across the vaulted ceiling, as well as a large chandelier, giving warmth, light and visual heft to the peak and upper corners of the room.
The fireplace was given a total facelift as well. New original artwork, which had inspired the palette for the space, is now highlighted inside a custom panel over a beautiful new mantel and fireplace surround.
Even though this project started with something quite unexpected and scary, my clients tell me that the results are something that they just love and enjoy whether at home just the two of them, or entertaining extended family and friends.
Photos by Laura Kicey
 Revealing Redesign
In June of 2015 an amazing sudden summer storm hit our area with violent winds, rain, and tornados. In the aftermath, my clients found, on top of losing 30 or so trees on their property overall, one had actually struck their home, piercing the roof in their great room.
The great room was the very last room in their house that we hadn't done a complete overhaul in. Sure, we had tweaked it, purchased a few pieces of furniture, reworked the layout, but the colors and design were much the same as they had been for decades.
Since things needed to be repaired and painted already, it was decided to jump in with both feet and totally rethink the room, change almost everything, and add architectural details that seemed to be missing in the original design from the 1980's.
So not only were the color palette, rugs, and furnishings changed, but some very important architectural interest was added. For instance, a new, more elegant post was added at the back of the space, visually connecting the downstairs with the loft above. Also, three beaded beams have been added across the vaulted ceiling, as well as a large chandelier, giving warmth, light and visual heft to the peak and upper corners of the room.
The fireplace was given a total facelift as well. New original artwork, which had inspired the palette for the space, is now highlighted inside a custom panel over a beautiful new mantel and fireplace surround.
Even though this project started with something quite unexpected and scary, my clients tell me that the results are something that they just love and enjoy whether at home just the two of them, or entertaining extended family and friends.
Photos by Laura Kicey

 TVL Creative Ltd.
This project was such an incredible design opportunity, and instilled inspiration and excitement at every turn! Our amazing clients came to us with the challenge of converting their beloved family home into a welcoming haven for all members of the family. At the time that we met our clients, they were struggling with the difficult personal decision of the fate of the home. Their father/father-in-law had passed away and their mother/mother-in-law had recently been admitted into a nursing facility and was fighting Alzheimer’s. Resistant to loss of the home now that both parents were out of it, our clients purchased the home to keep in in the family. Despite their permanent home currently being in New Jersey, these clients dedicated themselves to keeping and revitalizing the house. We were moved by the story and became immediately passionate about bringing this dream to life.
The home was built by the parents of our clients and was only ever owned by them, making this a truly special space to the family. Our goal was to revitalize the home and to bring new energy into every room without losing the special characteristics that were original to the home when it was built. In this way, we were able to develop a house that maintains its own unique personality while offering a space of welcoming neutrality for all members of the family to enjoy over time.
The renovation touched every part of the home: the exterior, foyer, kitchen, living room, sun room, garage, six bedrooms, three bathrooms, the laundry room, and everything in between. The focus was to develop a style that carried consistently from space to space, but allowed for unique expression in the small details in every room.
Starting at the entry, we renovated the front door and entry point to offer more presence and to bring more of the mid-century vibe to the home’s exterior. We integrated a new modern front door, cedar shingle accents, new exterior paint, and gorgeous contemporary house numbers that really allow the home to stand out. Just inside the entry, we renovated the foyer to create a playful entry point worthy of attention. Cement look tile adorns the foyer floor, and we’ve added new lighting and upgraded the entry coat storage.
Upon entering the home, one will immediately be captivated by the stunning kitchen just off the entry. We transformed this space in just about every way. While the footprint of the home ultimately remained almost identical, the aesthetics were completely turned on their head. We re-worked the kitchen to maximize storage and to create an informal dining area that is great for casual hosting or morning coffee.
We removed the entry to the garage that was once in the informal dining, and created a peninsula in its place that offers a unique division between the kitchen/informal dining and the formal dining and living areas. The simple light warm light gray cabinetry offers a bit of traditional elegance, along with the marble backsplash and quartz countertops. We extended the original wood flooring into the kitchen and stained all floors to match for a warmth that truly resonates through all spaces. We upgraded appliances, added lighting everywhere, and finished the space with some gorgeous mid century furniture pieces.
In the formal dining and living room, we really focused on maintaining the original marble fireplace as a focal point. We cleaned the marble, repaired the mortar, and refinished the original fireplace screen to give a new sleek look in black. We then integrated a new gas insert for modern heating and painted the upper portion in a rich navy blue; an accent that is carried through the home consistently as a nod to our client’s love of the color.
The former entry into the old covered porch is now an elegant glass door leading to a stunning finished sunroom. This room was completely upgraded as well. We wrapped the entire space in cozy white shiplap to keep a casual feel with brightness. We tiled the floor with large format concrete look tile, and painted the old brick fireplace a bright white. We installed a new gas burning unit, and integrated transitional style lighting to bring warmth and elegance into the space. The new black-frame windows are adorned with decorative shades that feature hand-sketched bird prints, and we’ve created a dedicated garden-ware “nook” for our client who loves to work in the yard. The far end of this space is completed with two oversized chaise loungers and overhead lights…the most perfect little reading nook!
Just off the dining room, we created an entirely new space to the home: a mudroom. The clients lacked this space and desperately needed a landing spot upon entering the home from the garage. We uniquely planned existing space in the garage to utilize for this purpose, and were able to create a small but functional entry point without losing the ability to park cars in the garage. This new space features cement-look tile, gorgeous deep brown cabinetry, and plenty of storage for all the small items one might need to store while moving in and out of the home.
The remainder of the upstairs level includes massive renovations to the guest hall bathroom and guest bedroom, upstairs master bed/bath suite, and a third bedroom that we converted into a home office for the client.
Some of the largest transformations were made in the basement, where unfinished space and lack of light were converted into gloriously lit, cozy, finished spaces. Our first task was to convert the massive basement living room into the new master bedroom for our clients. We removed existing built-ins, created an entirely new walk-in closet, painted the old brick fireplace, installed a new gas unit, added carpet, introduced new lighting, replaced windows, and upgraded every part of the aesthetic appearance. One of the most incredible features of this space is the custom double sliding barn door made by a Denver artisan. This space is truly a retreat for our clients!
We also completely transformed the laundry room, back storage room, basement master bathroom, and two bedrooms.
This home’s massive scope and ever-evolving challenges were thrilling and exciting to work with, and the result is absolutely amazing. At the end of the day, this home offers a look and feel that the clients love. Above all, though, the clients feel the spirit of their family home and have a welcoming environment for all members of the family to enjoy for years to come.
Find the right local pro for your project
 Prime Design and Build
Designing with Intent: Creating Homes That Tell a Story
Have you ever stepped into a home and felt an instant connection, as if the space itself welcomed you? That’s the power of designing with intent—a thoughtful approach that blends beauty with purpose, ensuring every detail has meaning.
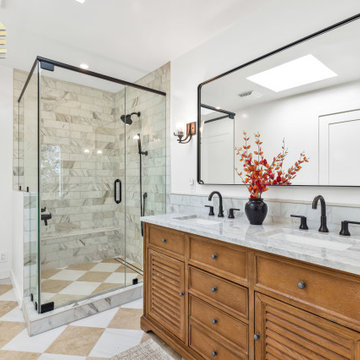
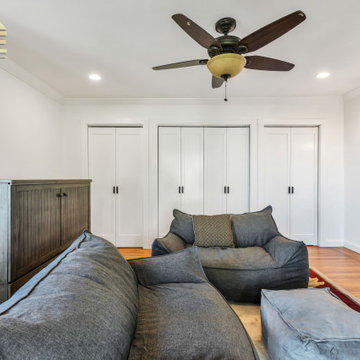
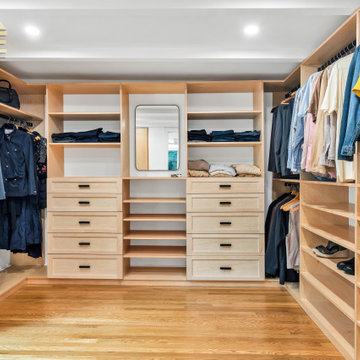
We recently worked on a remarkable 1937 home in Palomar Park, California. The project involved reimagining the second floor to create a master bedroom with a walk in closet and master bathroom while preserving the home’s traditional charm. For the homeowners, this house held decades of memories, and our goal was to honor its legacy while creating a space ready for the next chapter.
The Challenge: Balancing Tradition and Modernity
The homeowners wanted their remodeled space to feel fresh and functional without losing its historic character. This meant every decision, from the layout to the materials, had to strike the perfect balance.
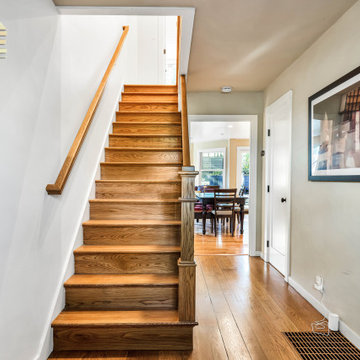
We rebuilt the upstairs including reconstruction of the existing bathroom to make an impressive master bathroom and dressing room, and refinished the hardwood floors to preserve the details that tied back to the home’s 1937 roots. By incorporating traditional elements like marble floors and walls in the bathroom , aged wood vanities and new crown molding for the whole upstairs, we ensured the updated design felt authentic and timeless.
3 Tips for Designing with Intent
Whether you’re working with a historic home or starting a new build, designing with intent can elevate your project. Here are three practical tips to help you create a space that’s as meaningful as it is beautiful:
1. Embrace the Home’s Character
Every home has unique features that tell a story. Whether it’s an original fireplace, old wood floors, or a quirky architectural detail, look for ways to celebrate and integrate these elements into your design.
2. Let Function Drive the Design
No matter how stunning a space looks, it needs to work for your lifestyle. Think about how you use each area and design accordingly. A thoughtful layout, smart storage solutions, and durable materials can transform a home from simply beautiful to truly livable.
In this project, reconfiguring the upstairs wasn’t just about aesthetics—it was about creating a layout that served the family’s everyday needs.
3. Personalize Your Space
The best designs reflect the people who live in them. Incorporate personal touches, such as family heirlooms, meaningful colors, or custom features, to make the space truly yours.
For this home, the homeowners were involved in selecting fixtures and materials that resonated with their style, ensuring the final design felt deeply personal.
Why Intentional Design Matters
Designing with intent transforms a house into a home. It’s about more than just aesthetics—it’s about creating a space that feels deeply connected to your story and needs.
At Prime Design and Build, we believe every project should start with understanding your vision. We work closely with our clients to ensure the design reflects their personality, values, and lifestyle.
Let’s Bring Your Vision to Life
If you’ve been dreaming of a home that feels like a true reflection of you, let’s make it happen. Whether it’s updating a historic property or starting fresh, we’re here to guide you through the process with expertise and care.
As I said in our Palomar Park video, “When we come over to your house, we will get to know you so that we can make your home feel like home too.”
Ready to start your journey? Reach out today for a consultation, and let’s design with intent.
 Prime Design and Build
Designing with Intent: Creating Homes That Tell a Story
Have you ever stepped into a home and felt an instant connection, as if the space itself welcomed you? That’s the power of designing with intent—a thoughtful approach that blends beauty with purpose, ensuring every detail has meaning.
We recently worked on a remarkable 1937 home in Palomar Park, California. The project involved reimagining the second floor to create a master bedroom with a walk in closet and master bathroom while preserving the home’s traditional charm. For the homeowners, this house held decades of memories, and our goal was to honor its legacy while creating a space ready for the next chapter.
The Challenge: Balancing Tradition and Modernity
The homeowners wanted their remodeled space to feel fresh and functional without losing its historic character. This meant every decision, from the layout to the materials, had to strike the perfect balance.
We rebuilt the upstairs including reconstruction of the existing bathroom to make an impressive master bathroom and dressing room, and refinished the hardwood floors to preserve the details that tied back to the home’s 1937 roots. By incorporating traditional elements like marble floors and walls in the bathroom , aged wood vanities and new crown molding for the whole upstairs, we ensured the updated design felt authentic and timeless.
3 Tips for Designing with Intent
Whether you’re working with a historic home or starting a new build, designing with intent can elevate your project. Here are three practical tips to help you create a space that’s as meaningful as it is beautiful:
1. Embrace the Home’s Character
Every home has unique features that tell a story. Whether it’s an original fireplace, old wood floors, or a quirky architectural detail, look for ways to celebrate and integrate these elements into your design.
2. Let Function Drive the Design
No matter how stunning a space looks, it needs to work for your lifestyle. Think about how you use each area and design accordingly. A thoughtful layout, smart storage solutions, and durable materials can transform a home from simply beautiful to truly livable.
In this project, reconfiguring the upstairs wasn’t just about aesthetics—it was about creating a layout that served the family’s everyday needs.
3. Personalize Your Space
The best designs reflect the people who live in them. Incorporate personal touches, such as family heirlooms, meaningful colors, or custom features, to make the space truly yours.
For this home, the homeowners were involved in selecting fixtures and materials that resonated with their style, ensuring the final design felt deeply personal.
Why Intentional Design Matters
Designing with intent transforms a house into a home. It’s about more than just aesthetics—it’s about creating a space that feels deeply connected to your story and needs.
At Prime Design and Build, we believe every project should start with understanding your vision. We work closely with our clients to ensure the design reflects their personality, values, and lifestyle.
Let’s Bring Your Vision to Life
If you’ve been dreaming of a home that feels like a true reflection of you, let’s make it happen. Whether it’s updating a historic property or starting fresh, we’re here to guide you through the process with expertise and care.
As I said in our Palomar Park video, “When we come over to your house, we will get to know you so that we can make your home feel like home too.”
Ready to start your journey? Reach out today for a consultation, and let’s design with intent.
 Prime Design and Build
Designing with Intent: Creating Homes That Tell a Story
Have you ever stepped into a home and felt an instant connection, as if the space itself welcomed you? That’s the power of designing with intent—a thoughtful approach that blends beauty with purpose, ensuring every detail has meaning.
We recently worked on a remarkable 1937 home in Palomar Park, California. The project involved reimagining the second floor to create a master bedroom with a walk in closet and master bathroom while preserving the home’s traditional charm. For the homeowners, this house held decades of memories, and our goal was to honor its legacy while creating a space ready for the next chapter.
The Challenge: Balancing Tradition and Modernity
The homeowners wanted their remodeled space to feel fresh and functional without losing its historic character. This meant every decision, from the layout to the materials, had to strike the perfect balance.
We rebuilt the upstairs including reconstruction of the existing bathroom to make an impressive master bathroom and dressing room, and refinished the hardwood floors to preserve the details that tied back to the home’s 1937 roots. By incorporating traditional elements like marble floors and walls in the bathroom , aged wood vanities and new crown molding for the whole upstairs, we ensured the updated design felt authentic and timeless.
3 Tips for Designing with Intent
Whether you’re working with a historic home or starting a new build, designing with intent can elevate your project. Here are three practical tips to help you create a space that’s as meaningful as it is beautiful:
1. Embrace the Home’s Character
Every home has unique features that tell a story. Whether it’s an original fireplace, old wood floors, or a quirky architectural detail, look for ways to celebrate and integrate these elements into your design.
2. Let Function Drive the Design
No matter how stunning a space looks, it needs to work for your lifestyle. Think about how you use each area and design accordingly. A thoughtful layout, smart storage solutions, and durable materials can transform a home from simply beautiful to truly livable.
In this project, reconfiguring the upstairs wasn’t just about aesthetics—it was about creating a layout that served the family’s everyday needs.
3. Personalize Your Space
The best designs reflect the people who live in them. Incorporate personal touches, such as family heirlooms, meaningful colors, or custom features, to make the space truly yours.
For this home, the homeowners were involved in selecting fixtures and materials that resonated with their style, ensuring the final design felt deeply personal.
Why Intentional Design Matters
Designing with intent transforms a house into a home. It’s about more than just aesthetics—it’s about creating a space that feels deeply connected to your story and needs.
At Prime Design and Build, we believe every project should start with understanding your vision. We work closely with our clients to ensure the design reflects their personality, values, and lifestyle.
Let’s Bring Your Vision to Life
If you’ve been dreaming of a home that feels like a true reflection of you, let’s make it happen. Whether it’s updating a historic property or starting fresh, we’re here to guide you through the process with expertise and care.
As I said in our Palomar Park video, “When we come over to your house, we will get to know you so that we can make your home feel like home too.”
Ready to start your journey? Reach out today for a consultation, and let’s design with intent.
 Prime Design and Build
Designing with Intent: Creating Homes That Tell a Story
Have you ever stepped into a home and felt an instant connection, as if the space itself welcomed you? That’s the power of designing with intent—a thoughtful approach that blends beauty with purpose, ensuring every detail has meaning.
We recently worked on a remarkable 1937 home in Palomar Park, California. The project involved reimagining the second floor to create a master bedroom with a walk in closet and master bathroom while preserving the home’s traditional charm. For the homeowners, this house held decades of memories, and our goal was to honor its legacy while creating a space ready for the next chapter.
The Challenge: Balancing Tradition and Modernity
The homeowners wanted their remodeled space to feel fresh and functional without losing its historic character. This meant every decision, from the layout to the materials, had to strike the perfect balance.
We rebuilt the upstairs including reconstruction of the existing bathroom to make an impressive master bathroom and dressing room, and refinished the hardwood floors to preserve the details that tied back to the home’s 1937 roots. By incorporating traditional elements like marble floors and walls in the bathroom , aged wood vanities and new crown molding for the whole upstairs, we ensured the updated design felt authentic and timeless.
3 Tips for Designing with Intent
Whether you’re working with a historic home or starting a new build, designing with intent can elevate your project. Here are three practical tips to help you create a space that’s as meaningful as it is beautiful:
1. Embrace the Home’s Character
Every home has unique features that tell a story. Whether it’s an original fireplace, old wood floors, or a quirky architectural detail, look for ways to celebrate and integrate these elements into your design.
2. Let Function Drive the Design
No matter how stunning a space looks, it needs to work for your lifestyle. Think about how you use each area and design accordingly. A thoughtful layout, smart storage solutions, and durable materials can transform a home from simply beautiful to truly livable.
In this project, reconfiguring the upstairs wasn’t just about aesthetics—it was about creating a layout that served the family’s everyday needs.
3. Personalize Your Space
The best designs reflect the people who live in them. Incorporate personal touches, such as family heirlooms, meaningful colors, or custom features, to make the space truly yours.
For this home, the homeowners were involved in selecting fixtures and materials that resonated with their style, ensuring the final design felt deeply personal.
Why Intentional Design Matters
Designing with intent transforms a house into a home. It’s about more than just aesthetics—it’s about creating a space that feels deeply connected to your story and needs.
At Prime Design and Build, we believe every project should start with understanding your vision. We work closely with our clients to ensure the design reflects their personality, values, and lifestyle.
Let’s Bring Your Vision to Life
If you’ve been dreaming of a home that feels like a true reflection of you, let’s make it happen. Whether it’s updating a historic property or starting fresh, we’re here to guide you through the process with expertise and care.
As I said in our Palomar Park video, “When we come over to your house, we will get to know you so that we can make your home feel like home too.”
Ready to start your journey? Reach out today for a consultation, and let’s design with intent.

 Prime Design and Build
Designing with Intent: Creating Homes That Tell a Story
Have you ever stepped into a home and felt an instant connection, as if the space itself welcomed you? That’s the power of designing with intent—a thoughtful approach that blends beauty with purpose, ensuring every detail has meaning.
We recently worked on a remarkable 1937 home in Palomar Park, California. The project involved reimagining the second floor to create a master bedroom with a walk in closet and master bathroom while preserving the home’s traditional charm. For the homeowners, this house held decades of memories, and our goal was to honor its legacy while creating a space ready for the next chapter.
The Challenge: Balancing Tradition and Modernity
The homeowners wanted their remodeled space to feel fresh and functional without losing its historic character. This meant every decision, from the layout to the materials, had to strike the perfect balance.
We rebuilt the upstairs including reconstruction of the existing bathroom to make an impressive master bathroom and dressing room, and refinished the hardwood floors to preserve the details that tied back to the home’s 1937 roots. By incorporating traditional elements like marble floors and walls in the bathroom , aged wood vanities and new crown molding for the whole upstairs, we ensured the updated design felt authentic and timeless.
3 Tips for Designing with Intent
Whether you’re working with a historic home or starting a new build, designing with intent can elevate your project. Here are three practical tips to help you create a space that’s as meaningful as it is beautiful:
1. Embrace the Home’s Character
Every home has unique features that tell a story. Whether it’s an original fireplace, old wood floors, or a quirky architectural detail, look for ways to celebrate and integrate these elements into your design.
2. Let Function Drive the Design
No matter how stunning a space looks, it needs to work for your lifestyle. Think about how you use each area and design accordingly. A thoughtful layout, smart storage solutions, and durable materials can transform a home from simply beautiful to truly livable.
In this project, reconfiguring the upstairs wasn’t just about aesthetics—it was about creating a layout that served the family’s everyday needs.
3. Personalize Your Space
The best designs reflect the people who live in them. Incorporate personal touches, such as family heirlooms, meaningful colors, or custom features, to make the space truly yours.
For this home, the homeowners were involved in selecting fixtures and materials that resonated with their style, ensuring the final design felt deeply personal.
Why Intentional Design Matters
Designing with intent transforms a house into a home. It’s about more than just aesthetics—it’s about creating a space that feels deeply connected to your story and needs.
At Prime Design and Build, we believe every project should start with understanding your vision. We work closely with our clients to ensure the design reflects their personality, values, and lifestyle.
Let’s Bring Your Vision to Life
If you’ve been dreaming of a home that feels like a true reflection of you, let’s make it happen. Whether it’s updating a historic property or starting fresh, we’re here to guide you through the process with expertise and care.
As I said in our Palomar Park video, “When we come over to your house, we will get to know you so that we can make your home feel like home too.”
Ready to start your journey? Reach out today for a consultation, and let’s design with intent.

 Streeter Custom Builder
Dramatic home bar separated from dining area by chainmail curtain. Tile blacksplash and custom wine storage above custom dark wood cabinets with brass pulls.

 Classic Kitchens, Etc.
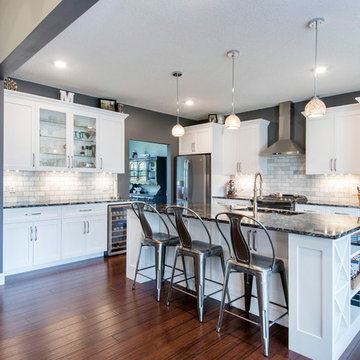
As soon as we walked into this beautiful Spanish Revival home, we knew our design had to be second to none. To bring a bit of modernism into a space so authentic without losing any charm and originality was going to be a challenge well worth taking. This home, “Cielito Lindo”, which means “Beautiful Little Heaven”, was designed by the famous architect Henry Jekel in 1928. We had the pleasure of renovating it, and we think Henry would be proud. Starting in the Kitchen we relocated the sink into the peninsula and opened it up for seating near the dining area for a broad continuous space. A 48” Wolf commercial range is surrounded by white shaker cabinets and white statuario, marble look, quartz countertops. The backsplash is made up of white 2x12 tiles set in both brick and herringbone patterns. Irregular edges give it that old world look, then matched with gray grout to duplicate look of cement. LED under cabinet lighting set on a dimmer switch sets whatever mood you are in. Oil rubbed bronze plumbing fixtures and hardware, all atop natural hardwood floors finish off this Peninsula Kitchen donning that Spanish Revival feel, with a fresh twist. Next we added a wet bar and passthrough using accenting light blue tiles matching the white tiles used throughout kitchen. Cool colors and old world touches, such as the custom leaded glass upper cabinet doors stylize the area. Of course, we added a bit of modernism with an oversized wine fridge, all directly off the game room. Like we said, Henry would be proud.
 Tile Doctor Ltd
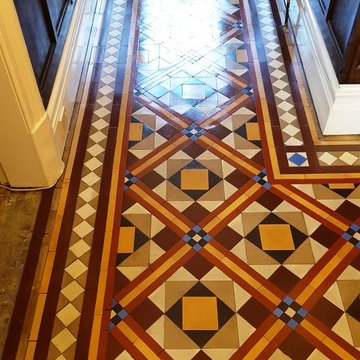
The colourful and diverse geometric patterns of a Victorian tiled floor can give a property a regal, elegant and timeless feel, making it a popular choice even in the 21st century. However, as time passes without regular care and maintenance, Victorian tiles can quickly lose their colour and appear deadened by the buildup of dirt and dust over several months (and sometimes years).
This property owner in Hebden a very small village in North Yorkshire of less than 300 people, had this common problem. Her Victorian tiled hallway had not been adequately maintained and was now more difficult to keep clean than ever. To add to the problem, most of the tiles along the edges were either broken, cracked, or filled with holes, probably I suspect from the installation of carpet grippers at some point in the past.
At this point, the property owner turned to Tile Doctor to see what could be done.
Before beginning a deep clean of the entire length of the hallway, it was first necessary to source and install replacement tiles for those that had been broken and damaged. I also relaid any that were loose.
When finished, I left the tiles to set and returned the next day to start the clean. My choice of cleaner in this situation was Tile Doctor Pro Clean, which was scrubbed into the floor with a special pad fitted to a rotary machine to break down ingrained dirt and stains. Pro Clean does this very effectively on all types of tile, including natural stone and of course Victorian tiles.
The floor was then rinsed with water and the soiled cleaning solution extracted from the floor using a vet vacuum. Stubborn areas were re-treated with more Pro Clean, and when I was satisfied with the condition of the tiles the floor was given a final but thorough rinse to remove any trace of cleaning product.
The floor was then left to dry completely overnight to ensure all excess moisture had disappeared, leaving it fresh to be sealed. I returned in the morning for a third day of work to seal the Victorian tiles with four coats of Tile Doctor Seal and Go, a topical sealer which provides a rich satin finish to really add depth to the colours in the tile while protecting it against dirt and stains.
The customer was delighted with the restoration and couldn’t quite believe the huge improvement in the appearance of the tiles, especially in regards to the enhancement in the different colours. Another satisfied customer!
Nigel Stoker
North West Yorkshire Tile Doctor

 Five Star Tree Care
Spring brings the first rays of steady sunlight that encourage your trees to start sprouting fruit and flowers. However, sometimes at the start of spring, the cold weather makes a sudden and abrupt turn as winter tries to reassert its dominance. This can cause a late freeze, which is difficult for many trees to combat. Fruit trees are the most vulnerable during a late freeze, but Five Star Tree Services has some suggestions to help you protect your fruit and flowering trees from a late freeze.
Protecting Your Trees
Some fruit trees are better able to protect themselves from the cold, but all trees need to be protected from the frost. Depending on the type of tree you have, several methods of protection are effective.
Peach Trees: To protect peach trees, cover them with a blanket or a sheet during the day. This will allow heat to build up that will protect them at night during the freeze. Make sure to leave the cover in place until the freeze passes.
Citrus Trees: These are the most fragile of all trees. Small trees should be draped with burlap, a sheet, a tree frost blanket, or any other type of fabric at least a day before the freeze occurs. The cover has to surround the whole tree to trap the heat and prevent frost.
Apple Trees: These trees are pretty sturdy compared to other fruit-bearing trees. They can handle the cold, but it is still a good idea to cover them during sudden frost.
It is important to avoid placing ground covers, mulch, and weeds from around the base of a tree during cold weather and frost periods. The moist bare soil emits more heat than soil that is mulched. Watering trees ahead of a frost can also help to protect them as water also emits heat. When you expect a freeze, it is also best to furrow-irrigate at night or use a sprinkler on its low setting while ensuring there is proper drainage for your trees. Any time the outside temperature is forecast to drop below 32 degrees; you should cover your trees.
Which Trees Can Survive in the Cold?
No fruit-bearing trees are made for cold climates, but some are better equipped to handle the cold than others. The Plant Hardiness Zone can help you choose the right trees to plant for the area where you live. For example, lemon trees and other citrus trees need to be planted in zones 9-11 where the risk of cold weather is minimal. Pear trees, on the other hand, need cold weather to thrive and should be planted in zones 4-8.
Freezing Dangers
Some fruit or flowering trees that are caught unguarded during the late frost may lose their blossoms. In many cases, these trees will no longer sprout during the current growing season but will come back next spring as healthy as ever.
Younger trees are more prone to damage than mature trees. Trees that have closed buds are also able to handle the cold better than those that have already started to bloom. Of course, the longer a freeze is present, the more dangerous it is for your trees.
How We Can Help
The skilled arborists here at Five Star Tree Services are always on hand to help protect your trees from frost and with regular maintenance. Some of the other services we provide include tree removal, tree planting, and tree pruning in Richmond Hill and the Greater Toronto Area. If you require our assistance, give us a call at (416) 990-3355 today.
 Tile Doctor Ltd
Slate is a popular choice for tiled kitchen floors and when properly maintained looks fantastic, however like all natural stone products without an effective cleaning plan dirt will become ingrained in the stone and will start to lose its appearance.
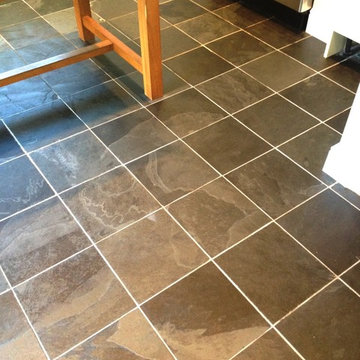
This was the case with this fantastic Slate tiled kitchen floor in Twickenham which had the potential to look really nice, but hadn’t received the proper maintenance for a long while, leaving it looking very tired. It now needed what was left of its old surface sealer stripped off, followed by a deep cleaning of the tile and grout before having a fresh seal applied.
To begin the restoration, I mixed a 50:50 solution of Tile Doctor Remove and Go and Tile Doctor Pro Clean. This was applied to the floor and allowed to dwell. Remove and Go functions as a stripper that breaks down the old sealer, while Pro Clean is a versatile, high alkaline cleaner that is safe to use on all types of natural stone flooring.
To use it to full effect, I machine scrubbed this solution into the floor to completely remove all dirt, stains, and old sealer. I also ran a stiff brush along the grout lines to remove the particularly stubborn dirt ingrained in the grout. The resulting cleaning slurry was then rinsed with water and extracted using a wet vacuum and the floor checked for stubborn marks which were retreated using the same process.
The floor was left to dry overnight and I came back the next day to apply a new seal. It’s important to leave a tiled floor to dry completely before sealing and at this time of year 24 hours is usually enough. This is necessary to ensures there is no excess moisture in the tile as this has the potential to cloud the sealer and affect its effectiveness.
The customer required a low sheen finish and a floor that was easy to maintain. I opted to use Seal & Go, which provides exactly that. It is a water-based with a high sheen blend of acrylic polymers that offers a both a stain resistant surface seal and a durable low sheen finish, also being water based it doesn’t leave a smell as it dries. Seal and Go is also a breathable sealer that will allow moisture to rise up through the tile and allow the floor to breathe.
As you can see from the pictures, the lustre has been completely restored to the Slate tiles and the sealer will allow for easy maintenance for the customer in the future.
Jonathan Oldham
South Middlesex Tile Doctor
 TVL Creative Ltd.
This project was such an incredible design opportunity, and instilled inspiration and excitement at every turn! Our amazing clients came to us with the challenge of converting their beloved family home into a welcoming haven for all members of the family. At the time that we met our clients, they were struggling with the difficult personal decision of the fate of the home. Their father/father-in-law had passed away and their mother/mother-in-law had recently been admitted into a nursing facility and was fighting Alzheimer’s. Resistant to loss of the home now that both parents were out of it, our clients purchased the home to keep in in the family. Despite their permanent home currently being in New Jersey, these clients dedicated themselves to keeping and revitalizing the house. We were moved by the story and became immediately passionate about bringing this dream to life.
The home was built by the parents of our clients and was only ever owned by them, making this a truly special space to the family. Our goal was to revitalize the home and to bring new energy into every room without losing the special characteristics that were original to the home when it was built. In this way, we were able to develop a house that maintains its own unique personality while offering a space of welcoming neutrality for all members of the family to enjoy over time.
The renovation touched every part of the home: the exterior, foyer, kitchen, living room, sun room, garage, six bedrooms, three bathrooms, the laundry room, and everything in between. The focus was to develop a style that carried consistently from space to space, but allowed for unique expression in the small details in every room.
Starting at the entry, we renovated the front door and entry point to offer more presence and to bring more of the mid-century vibe to the home’s exterior. We integrated a new modern front door, cedar shingle accents, new exterior paint, and gorgeous contemporary house numbers that really allow the home to stand out. Just inside the entry, we renovated the foyer to create a playful entry point worthy of attention. Cement look tile adorns the foyer floor, and we’ve added new lighting and upgraded the entry coat storage.
Upon entering the home, one will immediately be captivated by the stunning kitchen just off the entry. We transformed this space in just about every way. While the footprint of the home ultimately remained almost identical, the aesthetics were completely turned on their head. We re-worked the kitchen to maximize storage and to create an informal dining area that is great for casual hosting or morning coffee.
We removed the entry to the garage that was once in the informal dining, and created a peninsula in its place that offers a unique division between the kitchen/informal dining and the formal dining and living areas. The simple light warm light gray cabinetry offers a bit of traditional elegance, along with the marble backsplash and quartz countertops. We extended the original wood flooring into the kitchen and stained all floors to match for a warmth that truly resonates through all spaces. We upgraded appliances, added lighting everywhere, and finished the space with some gorgeous mid century furniture pieces.
In the formal dining and living room, we really focused on maintaining the original marble fireplace as a focal point. We cleaned the marble, repaired the mortar, and refinished the original fireplace screen to give a new sleek look in black. We then integrated a new gas insert for modern heating and painted the upper portion in a rich navy blue; an accent that is carried through the home consistently as a nod to our client’s love of the color.
The former entry into the old covered porch is now an elegant glass door leading to a stunning finished sunroom. This room was completely upgraded as well. We wrapped the entire space in cozy white shiplap to keep a casual feel with brightness. We tiled the floor with large format concrete look tile, and painted the old brick fireplace a bright white. We installed a new gas burning unit, and integrated transitional style lighting to bring warmth and elegance into the space. The new black-frame windows are adorned with decorative shades that feature hand-sketched bird prints, and we’ve created a dedicated garden-ware “nook” for our client who loves to work in the yard. The far end of this space is completed with two oversized chaise loungers and overhead lights…the most perfect little reading nook!
Just off the dining room, we created an entirely new space to the home: a mudroom. The clients lacked this space and desperately needed a landing spot upon entering the home from the garage. We uniquely planned existing space in the garage to utilize for this purpose, and were able to create a small but functional entry point without losing the ability to park cars in the garage. This new space features cement-look tile, gorgeous deep brown cabinetry, and plenty of storage for all the small items one might need to store while moving in and out of the home.
The remainder of the upstairs level includes massive renovations to the guest hall bathroom and guest bedroom, upstairs master bed/bath suite, and a third bedroom that we converted into a home office for the client.
Some of the largest transformations were made in the basement, where unfinished space and lack of light were converted into gloriously lit, cozy, finished spaces. Our first task was to convert the massive basement living room into the new master bedroom for our clients. We removed existing built-ins, created an entirely new walk-in closet, painted the old brick fireplace, installed a new gas unit, added carpet, introduced new lighting, replaced windows, and upgraded every part of the aesthetic appearance. One of the most incredible features of this space is the custom double sliding barn door made by a Denver artisan. This space is truly a retreat for our clients!
We also completely transformed the laundry room, back storage room, basement master bathroom, and two bedrooms.
This home’s massive scope and ever-evolving challenges were thrilling and exciting to work with, and the result is absolutely amazing. At the end of the day, this home offers a look and feel that the clients love. Above all, though, the clients feel the spirit of their family home and have a welcoming environment for all members of the family to enjoy for years to come.
 Tile Doctor Ltd
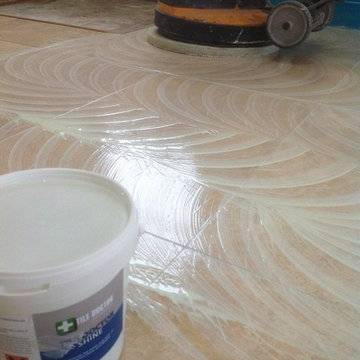
If you want a polished stone floor to keep its appearance, then it will need a regular maintenance plan in place, without it the stone will lose its polish and start to look dull and un-inviting which was the story with this Travertine tiled floor installed throughout much of the grout floor of this house in the village of Great Wilbraham near Cambridge.
I was able to find out from the owner that the floor was last treated six years ago with Lithofin Stain Stop which is a solvent based impregnating sealer which like all sealers will wear off after a few years. Naturally this depends on the amount of wear the floor receives and what tends to happen is this process occurs more rapidly in the high traffic areas leading to an uneven appearance.
The best course of action now would be to remove what was left of the sealer and re-polish and seal the floor.
During my inspection of the floor I had noticed a number of irregular holes in one of the Travertine tiles which needed filling with a colour matching filler; this worked out quite well and as you can see from the photographs below the result looked entirely natural.
After protecting the clients skirting boards with protective film we proceeded to burnish the floor through with a set of Tile Doctor Diamond encrusted honing pads.
During the application of the first coarse pad we also added a strong dilution of Tile Doctor Pro-Clean combined with NanoTech Ultra-Clean to aid the removal of sealer residues from the pores of the Travertine. The floor was then rinsed and the soiled solution extracted using a wet vacuum.
With the sealer remove we were now able to concentrate on building up the polish on the stone by applying the remaining pads from Medium, Fine through to Very Fine, each lubricated with a little water and ensuring to rinse in-between the application of each pad.
With the floor now clean and the polish restored the last step was to protect it so it would keep its appearance for as long as possible. There are a number of solutions for this but for a long durable shine I opted to work Tile Doctor Shine Powder into the Travertine.
The powder is applied liberally to the floor and then ground in using a slow speed floor rotary machine fitted with a white or tan buffing pad lubricated with water.
The shine on the floor has now been restored and the client has a beautiful and durable finish to their Travertine tiles.
Mick Conlon
Cambridge Tile Doctor
 Tile Doctor Ltd
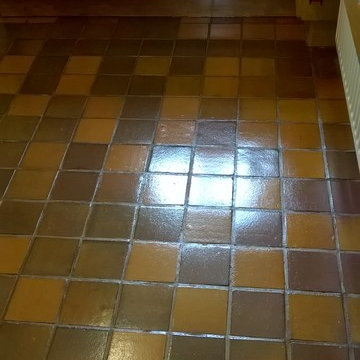
This Quarry tiled kitchen floor was in very good condition, with no cracked or broken tiles. However, my customer, who lives in the town of Tutbury, near Burton-on-Trent, was keen to boost the condition of the tiles further through professional maintenance, including a deep clean and a fresh seal to restore the sheen to the Quarry. NB, did you know it’s estimated that Tutbury has actually been inhabited for 3000 years, having once been the site of an Iron Age hill fort, this house of course was a lot more recent.
To clean the tiles, I chose to use our tried and trusted alkaline cleaner, Tile Doctor Pro Clean. We use Pro Clean on most types of natural stone floor, including Quarry, Slate, and Victorian. I applied Pro Clean liberally across the floor and left it to dwell for a short period, giving it time to seep into the tile to get underneath and lift out any ingrained dirt. The cleaner was then agitated using a scrubbing pad fitted to a rotary machine to remove the dirt and other general muck.
I then rinsed the floor with cold water and soaked up the resulting slurry with a wet-vac machine. Some areas of the floor proved to be quite stubborn to clean, so in these areas the cleaning process was repeated until satisfactory results were achieved. Finally, the floor was given another rinse and left to dry off overnight.
The next day I returned to the property and checked that the floor was ready to seal by running several damp tests, with the results indicating that was no excess moisture remaining on the tiles. We carry out these tests before sealing because moisture can cloud the sealer and prevent it from properly protecting the tiles.
My choice of sealer was Tile Doctor Seal & Go, a cost effective topical sealer that builds up a robust layer of protection on the surface of the floor and provides a durable sheen finish that, as you can see from the photographs, really lifts the appearance of the tiles.
It’s a fact that any sealed tiled floor will need to be regularly maintained as sealers do wear off over time, especially in the high traffic areas, and this is when the floor starts to lose its appearance as dirt becomes trapped in the pores of the stone. The life of the sealer can be extended however by ensuring you only clean the floor with a PH Neutral cleaner.
Trevor Preeece

 Calming Spaces Interiors, Design & Remodeling
Enclosed kitchen - mid-sized southwestern u-shaped porcelain tile and gray floor enclosed kitchen idea in Austin with a double-bowl sink, shaker cabinets, beige cabinets, granite countertops, multicolored backsplash, stainless steel appliances, two islands and beige countertops
 TVL Creative Ltd.
This project was such an incredible design opportunity, and instilled inspiration and excitement at every turn! Our amazing clients came to us with the challenge of converting their beloved family home into a welcoming haven for all members of the family. At the time that we met our clients, they were struggling with the difficult personal decision of the fate of the home. Their father/father-in-law had passed away and their mother/mother-in-law had recently been admitted into a nursing facility and was fighting Alzheimer’s. Resistant to loss of the home now that both parents were out of it, our clients purchased the home to keep in in the family. Despite their permanent home currently being in New Jersey, these clients dedicated themselves to keeping and revitalizing the house. We were moved by the story and became immediately passionate about bringing this dream to life.
The home was built by the parents of our clients and was only ever owned by them, making this a truly special space to the family. Our goal was to revitalize the home and to bring new energy into every room without losing the special characteristics that were original to the home when it was built. In this way, we were able to develop a house that maintains its own unique personality while offering a space of welcoming neutrality for all members of the family to enjoy over time.
The renovation touched every part of the home: the exterior, foyer, kitchen, living room, sun room, garage, six bedrooms, three bathrooms, the laundry room, and everything in between. The focus was to develop a style that carried consistently from space to space, but allowed for unique expression in the small details in every room.
Starting at the entry, we renovated the front door and entry point to offer more presence and to bring more of the mid-century vibe to the home’s exterior. We integrated a new modern front door, cedar shingle accents, new exterior paint, and gorgeous contemporary house numbers that really allow the home to stand out. Just inside the entry, we renovated the foyer to create a playful entry point worthy of attention. Cement look tile adorns the foyer floor, and we’ve added new lighting and upgraded the entry coat storage.
Upon entering the home, one will immediately be captivated by the stunning kitchen just off the entry. We transformed this space in just about every way. While the footprint of the home ultimately remained almost identical, the aesthetics were completely turned on their head. We re-worked the kitchen to maximize storage and to create an informal dining area that is great for casual hosting or morning coffee.
We removed the entry to the garage that was once in the informal dining, and created a peninsula in its place that offers a unique division between the kitchen/informal dining and the formal dining and living areas. The simple light warm light gray cabinetry offers a bit of traditional elegance, along with the marble backsplash and quartz countertops. We extended the original wood flooring into the kitchen and stained all floors to match for a warmth that truly resonates through all spaces. We upgraded appliances, added lighting everywhere, and finished the space with some gorgeous mid century furniture pieces.
In the formal dining and living room, we really focused on maintaining the original marble fireplace as a focal point. We cleaned the marble, repaired the mortar, and refinished the original fireplace screen to give a new sleek look in black. We then integrated a new gas insert for modern heating and painted the upper portion in a rich navy blue; an accent that is carried through the home consistently as a nod to our client’s love of the color.
The former entry into the old covered porch is now an elegant glass door leading to a stunning finished sunroom. This room was completely upgraded as well. We wrapped the entire space in cozy white shiplap to keep a casual feel with brightness. We tiled the floor with large format concrete look tile, and painted the old brick fireplace a bright white. We installed a new gas burning unit, and integrated transitional style lighting to bring warmth and elegance into the space. The new black-frame windows are adorned with decorative shades that feature hand-sketched bird prints, and we’ve created a dedicated garden-ware “nook” for our client who loves to work in the yard. The far end of this space is completed with two oversized chaise loungers and overhead lights…the most perfect little reading nook!
Just off the dining room, we created an entirely new space to the home: a mudroom. The clients lacked this space and desperately needed a landing spot upon entering the home from the garage. We uniquely planned existing space in the garage to utilize for this purpose, and were able to create a small but functional entry point without losing the ability to park cars in the garage. This new space features cement-look tile, gorgeous deep brown cabinetry, and plenty of storage for all the small items one might need to store while moving in and out of the home.
The remainder of the upstairs level includes massive renovations to the guest hall bathroom and guest bedroom, upstairs master bed/bath suite, and a third bedroom that we converted into a home office for the client.
Some of the largest transformations were made in the basement, where unfinished space and lack of light were converted into gloriously lit, cozy, finished spaces. Our first task was to convert the massive basement living room into the new master bedroom for our clients. We removed existing built-ins, created an entirely new walk-in closet, painted the old brick fireplace, installed a new gas unit, added carpet, introduced new lighting, replaced windows, and upgraded every part of the aesthetic appearance. One of the most incredible features of this space is the custom double sliding barn door made by a Denver artisan. This space is truly a retreat for our clients!
We also completely transformed the laundry room, back storage room, basement master bathroom, and two bedrooms.
This home’s massive scope and ever-evolving challenges were thrilling and exciting to work with, and the result is absolutely amazing. At the end of the day, this home offers a look and feel that the clients love. Above all, though, the clients feel the spirit of their family home and have a welcoming environment for all members of the family to enjoy for years to come.
 TVL Creative Ltd.
This project was such an incredible design opportunity, and instilled inspiration and excitement at every turn! Our amazing clients came to us with the challenge of converting their beloved family home into a welcoming haven for all members of the family. At the time that we met our clients, they were struggling with the difficult personal decision of the fate of the home. Their father/father-in-law had passed away and their mother/mother-in-law had recently been admitted into a nursing facility and was fighting Alzheimer’s. Resistant to loss of the home now that both parents were out of it, our clients purchased the home to keep in in the family. Despite their permanent home currently being in New Jersey, these clients dedicated themselves to keeping and revitalizing the house. We were moved by the story and became immediately passionate about bringing this dream to life.
The home was built by the parents of our clients and was only ever owned by them, making this a truly special space to the family. Our goal was to revitalize the home and to bring new energy into every room without losing the special characteristics that were original to the home when it was built. In this way, we were able to develop a house that maintains its own unique personality while offering a space of welcoming neutrality for all members of the family to enjoy over time.
The renovation touched every part of the home: the exterior, foyer, kitchen, living room, sun room, garage, six bedrooms, three bathrooms, the laundry room, and everything in between. The focus was to develop a style that carried consistently from space to space, but allowed for unique expression in the small details in every room.
Starting at the entry, we renovated the front door and entry point to offer more presence and to bring more of the mid-century vibe to the home’s exterior. We integrated a new modern front door, cedar shingle accents, new exterior paint, and gorgeous contemporary house numbers that really allow the home to stand out. Just inside the entry, we renovated the foyer to create a playful entry point worthy of attention. Cement look tile adorns the foyer floor, and we’ve added new lighting and upgraded the entry coat storage.
Upon entering the home, one will immediately be captivated by the stunning kitchen just off the entry. We transformed this space in just about every way. While the footprint of the home ultimately remained almost identical, the aesthetics were completely turned on their head. We re-worked the kitchen to maximize storage and to create an informal dining area that is great for casual hosting or morning coffee.
We removed the entry to the garage that was once in the informal dining, and created a peninsula in its place that offers a unique division between the kitchen/informal dining and the formal dining and living areas. The simple light warm light gray cabinetry offers a bit of traditional elegance, along with the marble backsplash and quartz countertops. We extended the original wood flooring into the kitchen and stained all floors to match for a warmth that truly resonates through all spaces. We upgraded appliances, added lighting everywhere, and finished the space with some gorgeous mid century furniture pieces.
In the formal dining and living room, we really focused on maintaining the original marble fireplace as a focal point. We cleaned the marble, repaired the mortar, and refinished the original fireplace screen to give a new sleek look in black. We then integrated a new gas insert for modern heating and painted the upper portion in a rich navy blue; an accent that is carried through the home consistently as a nod to our client’s love of the color.
The former entry into the old covered porch is now an elegant glass door leading to a stunning finished sunroom. This room was completely upgraded as well. We wrapped the entire space in cozy white shiplap to keep a casual feel with brightness. We tiled the floor with large format concrete look tile, and painted the old brick fireplace a bright white. We installed a new gas burning unit, and integrated transitional style lighting to bring warmth and elegance into the space. The new black-frame windows are adorned with decorative shades that feature hand-sketched bird prints, and we’ve created a dedicated garden-ware “nook” for our client who loves to work in the yard. The far end of this space is completed with two oversized chaise loungers and overhead lights…the most perfect little reading nook!
Just off the dining room, we created an entirely new space to the home: a mudroom. The clients lacked this space and desperately needed a landing spot upon entering the home from the garage. We uniquely planned existing space in the garage to utilize for this purpose, and were able to create a small but functional entry point without losing the ability to park cars in the garage. This new space features cement-look tile, gorgeous deep brown cabinetry, and plenty of storage for all the small items one might need to store while moving in and out of the home.
The remainder of the upstairs level includes massive renovations to the guest hall bathroom and guest bedroom, upstairs master bed/bath suite, and a third bedroom that we converted into a home office for the client.
Some of the largest transformations were made in the basement, where unfinished space and lack of light were converted into gloriously lit, cozy, finished spaces. Our first task was to convert the massive basement living room into the new master bedroom for our clients. We removed existing built-ins, created an entirely new walk-in closet, painted the old brick fireplace, installed a new gas unit, added carpet, introduced new lighting, replaced windows, and upgraded every part of the aesthetic appearance. One of the most incredible features of this space is the custom double sliding barn door made by a Denver artisan. This space is truly a retreat for our clients!
We also completely transformed the laundry room, back storage room, basement master bathroom, and two bedrooms.
This home’s massive scope and ever-evolving challenges were thrilling and exciting to work with, and the result is absolutely amazing. At the end of the day, this home offers a look and feel that the clients love. Above all, though, the clients feel the spirit of their family home and have a welcoming environment for all members of the family to enjoy for years to come.

 Mottram Architecture
Timber frame homes offer unique challenges during a remodel. What often makes them beautiful and attractive to most homeowners, also makes them challenging for space requirements.
Context: The lovely couple that owned this home were struggling with some interesting floor plan challenges that just didn't work for their family. The loved the beautiful timbers and woodwork of their home, but the dramatically sloping ceilings on the second floor, particularly in the bathroom, just didn't work for this 1 1/2 bath home. Needing to use the skylight to approach the toilet was a less then ideal scenario. Although the bathroom footprint was more then adequate, the sloped ceiling only made half of the space useable. Check out the Before/After post on our blog to see the photos of the house pre-renovation. As much as they loved all the wood features in their home, another challenge they had was light. The wood ceiling made everything inside the house darker, even with a fantastic array of south facing windows, there were spaces in the home that felt dark and small. When they contacted us they wanted to know how could they make their brighter and more inviting, were there solutions to the 2nd floor sloped ceiling issues, and if they were going to do all of this work, how could they make their home more comfortable and efficient. A nagging water leak in the upstairs bathroom spurred them into action and here is how we solved their dilemma.
Conclusion: First, we added a little dormer to the rear of the house so we could get full headroom in nearly all of the upstairs bathroom! Then we decided to extend that dormer one more timber bay over to create a walk in closet with natural light and plenty of space. Since we were contemplating energy efficiency, we resolved a nagging issue that is present in a lot of timber frame construction, air tightness. Commonly found in timber frame construction, fiberglass insulation is installed in the rafter bays and board ceilings are installed over top. Unfortunately, board ceilings are anything but air tight, and fiberglass insulation needs to be in an airtight cavity for maximum effectiveness. So we were able to solve two issues at the same time for this homeowner. We removed the board ceiling and fiberglass insulation, we dense packed the rafter bays with cellulose insulation, and installed sheetrock in place of the boards. The boards were salvaged for re-use by the homeowner, and the space and light quality was dramatically improved. Some may think that losing the board ceiling took something away from the space, but what you'll see in the pictures is that it highly accentuates the heavy timbers and really makes them stand out in a beautiful way. Now with this added airtightness, better insulation, and brighter space, the homeowner hardly runs their wood stove, and it's so quiet in the space, an added bonus from changing the insulation. It became necessary to also add a sheetrock ceiling to the living room to hide the plumbing from the new bathroom layout above. Changing this ceiling gave the homeowner some real quality lighting that was lacking in the living room before. The brighter ceiling and new lighting layout completely transforms the living room into a space you want to hang out, even though the layout didn't change at all. When the homeowner saw the finished spaces she said "I can't believe this is my house, I want to live in this house"
Energy Efficiency: I touched a little on the efficiency above, but like all projects done with Mottram Architecture, we always want to leave you with a little extra. Timber frame construction with board ceilings and fiberglass insulation are notoriously leaky! If you want to know what we think about fiberglass insulation, check our our blog post on Why Fiberglass Insulation Sucks. By installing cellulose insulation and covering it with sheetrock we were able to greatly reduce the heat flowing out of this home. It not only improves cashflow it improves the comfort level in the space. Who wants to sit in their living room and feel a draft? Let us remind you, we are not saying cellulose insulation is an air barrier, we use the sheetrock to help with that, but it does significantly reduce the air flow over fiberglass insulation. And when we reduce the airflow, we reduce the heat flow. And when we reduce the heat flow, we reduce the need to re-heat that drafty air from outside. When it comes to energy efficiency the first and best place to start is air infiltration. We greatly reduced the air infiltration with the new insulation, but we also added a hat and warm boots. What I mean by that is, we improved the insulation in the roof, and we installed insulation in the basement. Maybe it's a silly analogy, but when you think about keeping warm, we always start with the hat and boots! With sustainability in mind, the next project will be to add a deck to the front of this house with rain catchment barrels from the metal roof. They are planning to plant a garden in the spring and the rain catchment system will help to irrigate the new garden.
Builder: East Shore Builders
Photographer: Michael Eric Berube
12