
Search results for "Starting watering" in Home Design Ideas

 Selah Pools & Spas
Material Masterpiece
Great clients with great vision. The best of Selah Pools & Custom Outdoor Environments starts with our client's willingness to participate in the design process as we build their custom dream.
Ultra-Luxe design is found in the details. Each hand cut & placed dry stack stone in this scene, from their outdoor kitchen to the booted patio extension column, throughout the raised spa, the water feature wall, and the fire bowl columns are placed for depth & dimensional effect.
The 1x1 glass tile forming the spa spillway attracts the waterfall like a magnet to deliver a gentle edgeless connection to the swimming pool. With carefully cut & placed tile match on the "rolled beam" of the spa interior, the entire spa scene gleams with intent as it delivers smooth, restful comfort.
Completing the scene with an expansive pool deck color matched to bring it all together and leaving plenty of room for sports, play & relaxation delivers the total residential dream oasis.

 Studio TOOP
design: Studio TOOP, 2008
location: Driebergen, NL
status: built in 2008, Tuinvreugd
photo: Jolanthe Lalkens, 2010
A letter from the town of Driebergen explaining that there were subsidies available if residents wanted to build a rainwater catchment in their garden was the impulse necessary for Ben and Ine to finally redo their garden. About to start retirement they had more time to garden and enjoy being at home. Ine hd been a gardener for years and looked for the opportunity to spend more time on the hobby and Ben was already working out the technical details of the rainwater catchment and ponds.
Studio TOOP helped them translate their wishes and interests into a clear design that made smart use of the small elevation change in the garden. Sequences of steps and raised beds separate each section of the garden. Three lines - a row of three ponds, a row of crab apple trees and a rose covered pergola - emphasize the gardens length. Each pond is 15 cm lower than the next, allowing the water to flows from one to another, and then to another lower lying pond at the end of the pergola. Under a lid that works as a bench integrated into two of the raised beds are the rainwater tanks.

 America Green Builders
This house had a large water damage and black mold in the bathroom and kitchen area for years and no one took care of it. When we first came in we called a remediation company to remove the black mold and to keep the place safe for the owner and her children. After remediation process was done we start complete demolition process to the kitchen, bathroom, and floors around the house. we rewired the whole house and upgraded the panel box to 200amp. installed R38 insulation in the attic. replaced the AC and upgraded to 3.5 tons. Replaced the entire floors with laminate floors. open up the wall between the living room and the kitchen, creating open space. painting the interior house. installing new kitchen cabinets and counter top. installing appliances. Remodel the bathroom completely. Remodel the front yard and installing artificial grass and river stones. painting the front and side walls of the house. replacing the roof completely with cool roof asphalt shingles.
Find the right local pro for your project

 Village Home Stores
Custom Amish-built cabinetry in a combination of Rustic Alder, White, and Gray painted finishes. Open concept kitchen with large island, dinette, hutch, and wetbar. Nearby laundry, mudroom, powder room, dining and living rooms also get a new look. Cambria Brittanicca Warm quartz and KitchenAid appliances also featured. Quad Cities area remodel from start to finish by Village Home Stores.
 Tile Doctor Ltd
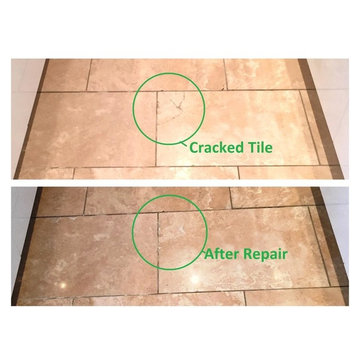
This Travertine tiled kitchen floor had been laid around five years previously in a house in Didsbury and now most of the sealer had worn down making the floor difficult to clean effectively. This resulted in the tiles looking continually dirty and a few of the tiles had cracked which you can see in the photograph below.
To start off with i scrubbed Tile Doctor Pro-Clean into all the grout lines with a stiff brush in order to get them as clean as possible followed by a rinse with water which was extracted using a wet vacuum.
The next step was to strip the Travertine of any remaining sealer and dirt using a set of four Diamond encrusted burnishing pads which come in a number of grades and are applied from coarse to extra fine with a little water to help lubricate.
I used the first three pads from coarse to fine rinsing between each pad to restore the polished finish of the stone but stopped before applying the final pad so I could fill all the cracked tiles with a resin filler in a matching shade. Once the filler had dried I gave the floor a final polish with the fourth extra fine burnishing pad and gave the floor a final rinse at the end to make sure the floor was clean before sealing.
Once the floor was dry it was sealed using a couple of coats of Tile Doctor Colour Grow which is an impregnating sealer that occupies the pores in the stone so dirt cannot become ingrained there. This particular sealer also enhances the natural colours in the stone.
After the final polish and sealing the cracked areas had blended in very nicely and the customer was very pleased with the overall result.
Steve Keary
Greater Manchester Tile Doctor
 America Green Builders
This house had a large water damage and black mold in the bathroom and kitchen area for years and no one took care of it. When we first came in we called a remediation company to remove the black mold and to keep the place safe for the owner and her children. After remediation process was done we start complete demolition process to the kitchen, bathroom, and floors around the house. we rewired the whole house and upgraded the panel box to 200amp. installed R38 insulation in the attic. replaced the AC and upgraded to 3.5 tons. Replaced the entire floors with laminate floors. open up the wall between the living room and the kitchen, creating open space. painting the interior house. installing new kitchen cabinets and counter top. installing appliances. Remodel the bathroom completely. Remodel the front yard and installing artificial grass and river stones. painting the front and side walls of the house. replacing the roof completely with cool roof asphalt shingles.

 TKS Design Group
The homeowners came to us with the desire to update their master bathroom into a more spa-like retreat that was also more functional for their daily needs. The existing space was large with a vaulted ceiling, lots of natural light and an existing private water closet. So the bones of the space were great and the room just needed a few tweaks.
We started by relocating the cramped shower that shared the water closet room, to the existing tub location. The giant whirlpool tub took up more than its share of real estate in the room, and the beautiful new shower, which gets used daily, now sits in its spot. The new shower features beautiful lass tile accents as well as a bench seat and frameless shower door.
The new tub is freestanding and sits in front of an updated slightly smaller window, providing a sculptural focal point upon entry to the room. There was still plenty of room for two large vanities, and a corner storage cabinet and appliance garage that hides small bathroom necessities.
The water closet remains in its own private room and the area that once housed the shower, is now an additional closet for the master bedroom. The room is a pallet of soft grays and whites with the cherry vanities adding some warmth. Polished chrome and glass accents bring some sparkle to the space.
Designed by: Susan Klimala, CKD, CBD
Photography by: Mike Kaskel
For more information on kitchen and bath design ideas go to: www.kitchenstudio-ge.com
Sponsored
Columbus, OH
Free consultation for landscape design!

Peabody Landscape Group
Columbus' Reliable Landscape Design & Contracting
 America Green Builders
This house had a large water damage and black mold in the bathroom and kitchen area for years and no one took care of it. When we first came in we called a remediation company to remove the black mold and to keep the place safe for the owner and her children. After remediation process was done we start complete demolition process to the kitchen, bathroom, and floors around the house. we rewired the whole house and upgraded the panel box to 200amp. installed R38 insulation in the attic. replaced the AC and upgraded to 3.5 tons. Replaced the entire floors with laminate floors. open up the wall between the living room and the kitchen, creating open space. painting the interior house. installing new kitchen cabinets and counter top. installing appliances. Remodel the bathroom completely. Remodel the front yard and installing artificial grass and river stones. painting the front and side walls of the house. replacing the roof completely with cool roof asphalt shingles.

 Natural Stone Institute
Columbia Stone designed and installed the 23,000 square feet of French limestone cladding that was utilized on the exterior of a private residence in San Francisco, CA. The project included 2" thick typical cladding with 2 3/4" thick bands to create a reveal, as well as, carved columns, carved balustrades, carved cornices, carved window surrounds, cubic parapet caps, and carved chimney enclosures. The project provided several serious challenges including water control, waterproofing, and the fact that the location was very tight. The site only allowed for 10 feet of clearance on each side of the building and a 2-4 story elevation difference from front to back. Due to the soft nature of French limestone, extreme care hat to be taken in handling the stone. The selection and inspection of the material was a full-time job for Columbia's inspector in France, who reviewed each of the approximately 6,000 pieces prior to shipping. From start to finish, this beautiful residence took 5 years to complete.

 Tracy Berman Interiors
This gorgeous beach condo sits on the banks of the Pacific ocean in Solana Beach, CA. The previous design was dark, heavy and out of scale for the square footage of the space. We removed an outdated bulit in, a column that was not supporting and all the detailed trim work. We replaced it with white kitchen cabinets, continuous vinyl plank flooring and clean lines throughout. The entry was created by pulling the lower portion of the bookcases out past the wall to create a foyer. The shelves are open to both sides so the immediate view of the ocean is not obstructed. New patio sliders now open in the center to continue the view. The shiplap ceiling was updated with a fresh coat of paint and smaller LED can lights. The bookcases are the inspiration color for the entire design. Sea glass green, the color of the ocean, is sprinkled throughout the home. The fireplace is now a sleek contemporary feel with a tile surround. The mantel is made from old barn wood. A very special slab of quartzite was used for the bookcase counter, dining room serving ledge and a shelf in the laundry room. The kitchen is now white and bright with glass tile that reflects the colors of the water. The hood and floating shelves have a weathered finish to reflect drift wood. The laundry room received a face lift starting with new moldings on the door, fresh paint, a rustic cabinet and a stone shelf. The guest bathroom has new white tile with a beachy mosaic design and a fresh coat of paint on the vanity. New hardware, sinks, faucets, mirrors and lights finish off the design. The master bathroom used to be open to the bedroom. We added a wall with a barn door for privacy. The shower has been opened up with a beautiful pebble tile water fall. The pebbles are repeated on the vanity with a natural edge finish. The vanity received a fresh paint job, new hardware, faucets, sinks, mirrors and lights. The guest bedroom has a custom double bunk with reading lamps for the kiddos. This space now reflects the community it is in, and we have brought the beach inside.

 Hillcrest Builders
Our client wanted a SIP built home and we incorporated this and many other energy and sustainability features into this home which was in the Sheboygan County Parade of Homes.
Named "The Green Balanced Home", this project was all about creating practical and stunning living spaces that combined with sound environmental building materials and methods. By showcasing an assortment of leading-edge- green technologies, the Green Balanced Home was the talk of the Parade that year. In cooperation with our client, our methodology was:
Start with the site:
1. Protected tree lines
2. Drought resistant vegetation
3. High proportion of natural, plantings versus higher maintenance lawn
4. Optimal home placement on lot for solar exposure
5. Narrower streets
Build a high thermal envelope:
1. R-10 Gold Guard laminated EPS foam under basement, garage, and patio.
2. R-10 Gold Guard laminated EPS foam around exterior foundation walls.
3. R-10 ESP foam "shirt" around foundation
4. R-24 Structural Insulated panels (SIPs) for exterior walls, including garage
5. Sprayed foam in basement box sills and attic separation walls
6. R-15 garage door
7. R-60 blown cellulose attic insulation
Add efficient heating, cooling, ventilation, and electric utilization elements:
1. High efficiency fireplace with auxiliary ducting
2. Pull-out exterior wood-loading drawer
3. Air-to-air heat pump
4. 95% efficient, ultra-quiet variable capacity furnace
5. 19 SEER air conditioner
6. Five zones with programmable thermostats
7. Heat reclamation from hot water usage
8. LED lighting
9. Skylights
10. Energy Star appliances
11. Prep for in-floor heating system
12. Prep for photovoltaic (PV) solar
13. Prep for solar hot water
Incorporate water conservation:
1. Rain water recapture for toilet flushing and irrigation
2. Motion activated hot water circulation system
3. Power flush toilets
4. Dual flush toilets
Create high indoor air quality:
1. HEPA and UV filters
2. Air-to-air exchanger
3. Ultra-quiet bathroom fans with moisture sensor activation
Integrate sustainable, efficient materials:
* Expanded polystyrene (ESP) foam that does not emit HCFC "greenhouse" gases
* Oriented strand board (OSB) based siding, trim, and shutters
* SIPs panels that contain ESP an OSB
* Carpeting pads made from recycled materials
* Stewardship-certified cabinet manufacturing
* Job site recycling and reduce waste with SIPs
 KitchenLab Interiors
’ first, entirely new construction project in collaboration with GTH architects who designed the residence. KLI was responsible for all interior finishes, fixtures, furnishings, and design including the stairs, casework, interior doors, moldings and millwork. KLI also worked with the client on selecting the roof, exterior stucco and paint colors, stone, windows, and doors. The homeowners had purchased the existing home on a lakefront lot of the Valley Lo community in Glenview, thinking that it would be a gut renovation, but when they discovered a host of issues including mold, they decided to tear it down and start from scratch. The minute you look out the living room windows, you feel as though you're on a lakeside vacation in Wisconsin or Michigan. We wanted to help the homeowners achieve this feeling throughout the house - merging the causal vibe of a vacation home with the elegance desired for a primary residence. This project is unique and personal in many ways - Rebekah and the homeowner, Lorie, had grown up together in a small suburb of Columbus, Ohio. Lorie had been Rebekah's babysitter and was like an older sister growing up. They were both heavily influenced by the style of the late 70's and early 80's boho/hippy meets disco and 80's glam, and both credit their moms for an early interest in anything related to art, design, and style. One of the biggest challenges of doing a new construction project is that it takes so much longer to plan and execute and by the time tile and lighting is installed, you might be bored by the selections of feel like you've seen them everywhere already. “I really tried to pull myself, our team and the client away from the echo-chamber of Pinterest and Instagram. We fell in love with counter stools 3 years ago that I couldn't bring myself to pull the trigger on, thank god, because then they started showing up literally everywhere", Rebekah recalls. Lots of one of a kind vintage rugs and furnishings make the home feel less brand-spanking new. The best projects come from a team slightly outside their comfort zone. One of the funniest things Lorie says to Rebekah, "I gave you everything you wanted", which is pretty hilarious coming from a client to a designer.
 Selah Pools & Spas
Material Masterpiece
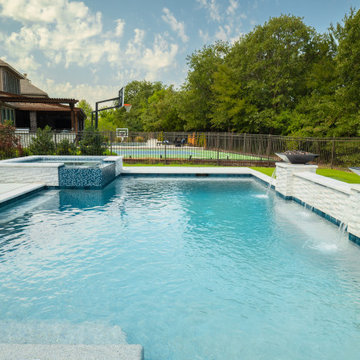
Great clients with great vision. The best of Selah Pools & Custom Outdoor Environments starts with our client's willingness to participate in the design process as we build their custom dream.
Ultra-Luxe design is found in the details. Each hand cut & placed dry stack stone in this scene, from their outdoor kitchen to the booted patio extension column, throughout the raised spa, the water feature wall, and the fire bowl columns are placed for depth & dimensional effect.
The 1x1 glass tile forming the spa spillway attracts the waterfall like a magnet to deliver a gentle edgeless connection to the swimming pool. With carefully cut & placed tile match on the "rolled beam" of the spa interior, the entire spa scene gleams with intent as it delivers smooth, restful comfort.
Completing the scene with an expansive pool deck color matched to bring it all together and leaving plenty of room for sports, play & relaxation delivers the total residential dream oasis.

Sponsored
Sunbury, OH

J.Holderby - Renovations
Franklin County's Leading General Contractors - 2X Best of Houzz!
 America Green Builders
This house had a large water damage and black mold in the bathroom and kitchen area for years and no one took care of it. When we first came in we called a remediation company to remove the black mold and to keep the place safe for the owner and her children. After remediation process was done we start complete demolition process to the kitchen, bathroom, and floors around the house. we rewired the whole house and upgraded the panel box to 200amp. installed R38 insulation in the attic. replaced the AC and upgraded to 3.5 tons. Replaced the entire floors with laminate floors. open up the wall between the living room and the kitchen, creating open space. painting the interior house. installing new kitchen cabinets and counter top. installing appliances. Remodel the bathroom completely. Remodel the front yard and installing artificial grass and river stones. painting the front and side walls of the house. replacing the roof completely with cool roof asphalt shingles.
 Landis Architects | Builders
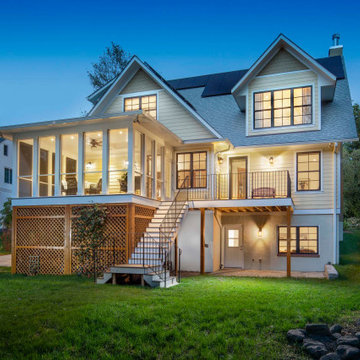
This older couple wanted to create a forever home where they could age in place and welcome family and friends. They purchased a small house on a large lot – a rare find close to downtown Bethesda. We worked with them to reclaim and donate as much as possible from the existing house prior to demolition.
The overall house design and location provide features that address four main requests from the client:
• Aging-in-Place Features
• Understated Design
• Maximizing Garden/Landscape Area
• Optimal Orientation for Solar Panels
The couple’s goal is to live in the house as long as possible, so they wanted wheelchair access to all major parts of the house. Starting with the exterior, they wanted a level, walk-in front door, and a walk-in garage/basement entry. With a lot that had a 6-foot grade change, it was a construction and aesthetic challenge to make it resemble a natural grade.
We added soil at the front to raise the entry but did not want it to look like the house was rising from the ground. We also avoided using mechanical drainage. The yard is flatter at the back, the water drains down and away from the house. We also created a maintenance-free exterior with fiber cement siding and composite decking.
 Studio TOOP
design: Studio TOOP, 2008
location: Driebergen, NL
status: built in 2008, Tuinvreugd
photo: Jolanthe Lalkens, 2010
A letter from the town of Driebergen explaining that there were subsidies available if residents wanted to build a rainwater catchment in their garden was the impulse necessary for Ben and Ine to finally redo their garden. About to start retirement they had more time to garden and enjoy being at home. Ine hd been a gardener for years and looked for the opportunity to spend more time on the hobby and Ben was already working out the technical details of the rainwater catchment and ponds.
Studio TOOP helped them translate their wishes and interests into a clear design that made smart use of the small elevation change in the garden. Sequences of steps and raised beds separate each section of the garden. Three lines - a row of three ponds, a row of crab apple trees and a rose covered pergola - emphasize the gardens length. Each pond is 15 cm lower than the next, allowing the water to flows from one to another, and then to another lower lying pond at the end of the pergola. Under a lid that works as a bench integrated into two of the raised beds are the rainwater tanks.
 Tile Doctor Ltd
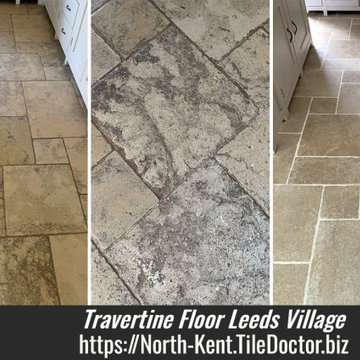
I was contacted about a Georgian property in the Kent village of Leeds , to see if I could do anything to improve a Travertine tiled floor. The use of Travertine was extensive and had been installed throughout the ground floor including the kitchen, dining room, utility and bathroom WC. Travertine is probably my favourite stone, but it is acid sensitive and attracts dirt easily, due to its ‘holey’ composition.
Initially we discussed the floor over the phone where I got to know about the issues they were experiencing, and I detailed the renovation process I normally use to restore it including the products and timelines. Naturally they wanted to me to provide a quote for the work however its tricky to do that accurately without seeing the floor, so I arranged a date to pop over.
Upon arriving I could see the tiles and the wide grout joints had extensive, ingrained dirt indicating the previous sealer had long since worn away. This is a common issue with stone floors, and to re-assure myself and the client it could be resolved I cleaned a small area in the utility room with pleasing results!
This test clean helped me to understand which products and methods would work best on the floor and later that day I emailed over a detailed quote for the renovation. Happy with the quote I received a reply the same day asking when I could start.
My colleague and I arrived on the agreed date and work started with adding protection to all areas that required it. We use a lot of water during the cleaning process and some materials such as MDF can become damaged with water ingress, so it makes sense to do this.
To get the floor clean, a coarse Carbide Brush fitted to a rotary machine was run over the Travertine tiles to scrub in a strong solution of Tile Doctor Pro-Clean. This process generates a lot of slurry as the dirt was washed out of the stone and grout which is extracted with a wet vacuum as we progressed.
Next it was on hands and knees with more Tile Doctor Pro-Clean and handheld brushes run over stubborn areas and along the grout lines to take them from 80% up to 100%.
Happy with the results, the next step was to renovate the stone using a series of diamond encrusted burnishing pads. Using only water for lubrication this process starts with the application of a coarse 400-grit burnishing pad attached to the floor buffer. This produces a lot of slurry which again was removed with a wet vacuum.
This left the Travertine clean, but the pores of the stone had been opened giving the floor a matt finish and more absorbent than it was originally. To further refine the appearance of the stone the next two burnishing pads were applied which are 800 and 1500-grit. These pads polish the stone and close the pores, restoring the natural sheen in the process. After each pad was applied the slurry was rinsed off the floor with water and extracted with the wet vacuum. Once complete the floor was left to dry off fully overnight.
I arrived the next day and took several moisture readings from the floor to check that it had dried off sufficiently overnight. The results were good, so work moved onto sealing the Travertine with two coats of Tile Doctor Ultra Seal which is a natural look impregnating sealer. It works by soaking into the stone, occupying the pores and thereby preventing dirt from becoming ingrained there. This ensures dirt remains on the surface where it is easily cleaned away.
The final step in the floor’s renovation was to apply the last of the diamond polishing pads which is a very fine 3000-grit. This pad further improves the polished appearance of the stone resulting in a satisfying sheen.
The work made a massive difference to the floor, and I received an email the next day from one of the owners who was really pleased with the transformation:
”Floors look brilliant. Very pleased.”
For the care and maintenance of polished sealed floors I recommend the use of Tile Doctor’s Stone Soap which is a gentle but effective cleaning product that won’t impact the sealer and contains a patina enhancer. When it comes to sealed floors my mantra is:
“If you look after the sealer, the sealer will look after the floor!”
Graham Davis
North Kent Tile Doctor

 Village Home Stores
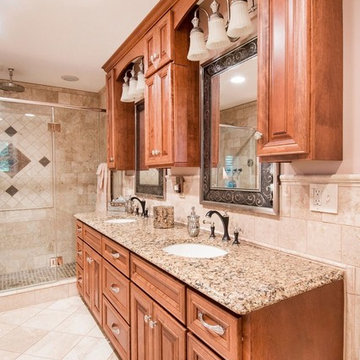
Custom Amish-built cabinetry in a combination of Rustic Alder, White, and Gray painted finishes. Open concept kitchen with large island, dinette, hutch, and wetbar. Nearby laundry, mudroom, powder room, dining and living rooms also get a new look. Cambria Brittanicca Warm quartz and KitchenAid appliances also featured. Quad Cities area remodel from start to finish by Village Home Stores.

 Sew Beautiful
Our client came to us during construction of her new home to help her with interior design and window treatments for the whole house. The living room, long and narrow with three window walls presented the greatest design challenge. Our plan started with the colorful palette of her prior home and the integration of several furniture pieces and a few window treatments from that home as well.
In the living room, with such expansive views of the water we knew the window treatments on the door walls would have to be subtle to frame the view, not take away from it. In this room, privacy and light control (filtering the harsh sun reflecting off the water), were equally important. Traversing panels offer needed functionality but we had to balance the volume and stack back of the fabric that would be needed to cover the expansive windows/door walls. An unlined pleated sheer is a good way to accomplish this. The fabric we chose, an embroidered sheer provides subtle texture and a quiet backdrop allowing the outside to blend with the colorful blues and greens of the interior furnishings.
Sofa, chairs, and chaise were all reupholstered in coordinating fabrics in blues and greens, not only our client’s favorite colors, but a means of bringing the outdoors in!
The kitchen valance, one of our client’s favorites that we had custom made for her prior home, was resized to fit the new kitchen window.
 Tile Doctor Ltd
This was an unusual request to clean a modern piece of contemporary artwork by New York City artist Mel Kendrick on display in one of the gardens of the Wormsley Estate. I’m no art expert but having done some research on the internet it appears to be part of a collection known as “Markers” that were on display at the Madison Square Park in 2009. The work is made from concrete cast into different coloured sections and fitted together to form a rather larger piece of art which having been exposed to the UK elements was now starting to discolour and go orange in part.
Cleaning Modern Concrete Artwork
Being such a prestigious work of art i had to be careful not to damage the stone in anyway so after careful consideration I worked out a process using an alkaline cleaning product Tile Doctor Pro-Clean.
To get the statue clean I used a warm water dilution of Tile Doctor Pro Clean working it into small areas at a time spraying the solution on and scrubbing with a brush, then rinsing it off with clean water. This process took some time but certainly did the trick.
Sealing a Concrete Artwork
With this project being outdoors and with it taking a couple of days I had to pick a good weather window and fortunately the weather held out long enough so I could continue and seal the concrete in order to protect it going forward. Again careful consideration had to be given to the choice of sealer and in the end I went with Tile Doctor Ultra Seal which is an impregnating sealer that soaks into the pores protecting from within and most importantly it’s a natural look sealer that does not change or enhance the colours.
If you’re a lover a modern art then you should appreciate the difference and will agree with me that the statue now looks new again.
142