
Search results for "Template features" in Home Design Ideas


 SHOPHOUSE
Interiors by SHOPHOUSE Design
Kyle Born Photography
Inspiration for a coastal bathroom remodel in Philadelphia
Inspiration for a coastal bathroom remodel in Philadelphia

 Medford Design-Build
One of the most exciting times for our clients during a kitchen remodel is selecting their countertop material at the stone yard and then seeing the fabricated pieces installed in their home. It’s one thing to fall in love with the material by itself, but seeing it in place with the rest of your remodeled kitchen is truly a thrilling experience! For this project, our clients chose a beautiful 3cm Viscount white granite with intricate, unique veining. The portion they really loved featured a large dark wave swirled across the white. Our talented fabricator was able to template the granite so that this beautiful design was on display across the peninsula. The end result is a stunning, one-of-a-kind look that really accentuates the new kitchen.
Final photos by Impressia Photography.
Find the right local pro for your project

 RDM Architecture
Matt Kocourek
Inspiration for a mid-sized contemporary single-wall light wood floor open concept kitchen remodel in Kansas City with a single-bowl sink, shaker cabinets, white cabinets, quartz countertops, blue backsplash, glass sheet backsplash, stainless steel appliances and an island
Inspiration for a mid-sized contemporary single-wall light wood floor open concept kitchen remodel in Kansas City with a single-bowl sink, shaker cabinets, white cabinets, quartz countertops, blue backsplash, glass sheet backsplash, stainless steel appliances and an island

 Tuck-Bernstein Design, LLC
C.Bernstein added a practical, feature for the supreme chef of the house: a copper herb bin that drains directly into the sink drain. No more over watering and flooding the plants! The copper spray faucet facilitates the growth of culinary and medicinal herbs. Photography: Robin G. London
 Gallery KBNY
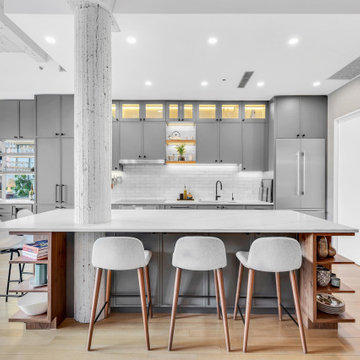
A classic West Side loft in Hell’s Kitchen, Gallery’s main task was to renovate the large kitchen. The clients like to entertain, so in addition to remodeling the aesthetic, we expanded the footprint of the island and built an entirely new bar at the opposite end of the kitchen. Some design choices are a natural fit for the space. In this case, that meant leaning into the industrial vibe of the exposed concrete while bringing in some character with the material choices.
INDUSTRIAL CHIC
With an industrial aesthetic in mind, gray was a natural color choice for the fully custom Miralis cabinets. The backsplash was designed in a subway brick pattern, but rather than the typical porcelain or marble, a clay tile in a white matte tone resembling cement was chosen to further coordinate with the exposed concrete.
Stacked cabinets were installed to accommodate the tall loft ceilings. For contrast, we incorporated glass front cabinetry with lighting in some areas. The resulting marriage of concrete, glass, and wood is well-matched for an industrial chic loft kitchen.
Further highlighting the homeowners’ love of entertaining, we also built an entirely custom bar at one end of the space, featuring open shelving in contrasting wood tones with underlighting and a custom mirrored backsplash for an authentic bar feel.
ADVENTURES IN APPROACHING COLUMNS
Loft renovations tend to come with two common needs: how to fill all that space tastefully and how to work with those ever present columns. In the case of this loft kitchen renovation, it suited the industrial aesthetic not to wrap the concrete column as one typically would, but rather to leave it exposed, accentuating the raw character of the space. Partially as a result, the island expanded too, creating more room for functional additions such as a built-in microwave, wine fridge, and more open shelving to match the bar, outlined with a countertop overhang to optimize counter space and chair storage.
ANCHORED IN SYMMETRY
With a loft space as unusually large as this one, an ideal design strategy, especially when high ceilings are involved, is to anchor the kitchen on opposing sides. Here, one side is anchored by a large floor-to-ceiling pantry, while the other is anchored by the counter-depth fridge with cabinetry above. The connecting element is the counter space in the middle, resulting in the visual impact of a long kitchen run within the open floor plan of a loft.
SOME HIGHLIGHTS
- Entirely custom-built bar with custom mirrored backsplash templated specifically for this project
- Large, oversized island with seating all around, open shelving, and built-in microwave
- Subway backsplash tiles in clay rather than porcelain or marble
- Olympian white marble countertops
Considering a kitchen loft renovation in New York? Our expertise is in renovating all kinds of New York Spaces, from gut renovations of historic landmark buildings like brownstones and townhomes to kitchens and bathrooms in lofts and other apartments in managed buildings. Contact us to find out if our full-scale design-and-build approach is right for your project.

 Knockout Renovation
blue backsplash, Renovation of 2-bedroom apt. app. 1000SF. Complete
remodel of bathroom. Painting and floor sanding/stain
throughout. Prime and paint with Benjamin Moore one color walls, one
color ceilings, semi gloss doors and moldings, Replace all windows, Install new porcelain floor tile straight pattern 115SF over
existing subfloor, Install 2 matching stone saddles, Template and install silestone or granite C-top, Install ceramic or porcelain backsplash tile in straight pattern
on sink and stove wall
Sponsored
Columbus, OH
Free consultation for landscape design!

Peabody Landscape Group
Franklin County's Reliable Landscape Design & Contracting
 Nathan Allan Glass Studios Inc.
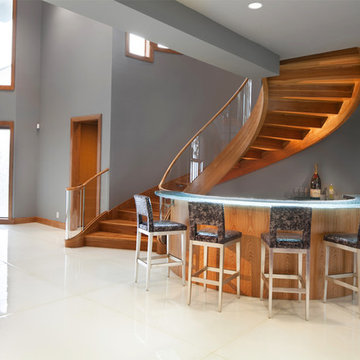
What surprises people most when entering and walking on the glowing white surface in this particular Private Residence (Williamsburg, VA) is when they find out they are walking on a sea of glass! Yes, GLASS! Not marble, not granite, but GLASS! Nathan Allan has created a very fresh, unique flooring surface, which is smooth to touch on the majority of the glass surface, yet has an almost invisible safety finish permanently embedded in the glass surface.
THE GLASS
Nathan Allan’s Glass Flooring incorporates features which are visually stunning, while also providing a safety finish which provides comfort to everyone walking on the glass. Our Sandstone texture is forged into the bottom surface of the glass, while our exclusive Glass Sandpaper safety finish is fused onto the walking surface. To enhance all features, we added a bright, sparkling, White Metallic color finish throughout each flooring panel.
SPECIFICATIONS
Each Glass Flooring panel is produced in 1/2″ (12mm) thick, Low Iron, tempered safety glass. Tempered glass provides added strength, insuring that the Glass Flooring can accept a heavy load. Panels vary in size and dimension, with most panels measured at a block size of 5’0 x 6’0 (1500mm x 1800mm). Perimeter Edge panels were carved and shaped to fit tightly against the curved walls. Glass Sandpaper, ASTM tested in labs with the highest slip-coefficient safety ratings, is fused onto the walking surface, to provide a very comfortable and effective safety feature.
Flooring Glass Details:
1/2″ (12mm) thick, Low iron tempered safety glass
Flat Polished Edges
Glass Sandpaper on walking surface
Sandstone texture on bottom surface
White Metallic color finish on bottom surface
Panels sizes up to 5’0 x 6’0
Approximately 800 square feet of glass flooring
Perimeter panels shape cut to fit
Almost overshadowed by the spectacular flooring is a 1.5” thick, Heavy Glasstop, Crescent shaped, with Nathan Allan’s Rocky Mountain texture.
DESIGN
A White Sea of Glass flooring is the finished result of combining a light Sandstone texture on the bottom glass surface, with the added touch of a sparkling White Metallic color finish. Combined with our Glass Sandpaper safety finish, and the natural and artificial light sources, our Glass Flooring shimmers within the entire entrance space.
INSTALLATION
Using very important installation techniques, Nathan Allan worked hand in hand with great team of professionals: Vicki Bristow, designer, W. M. Jordan Company, GC, and Pompei Inc, glass flooring installer. Templates were produced for all perimeter edge panels, and every shaped panel. All flooring panels are secured to the substrate with special adhesives, and joints are filled with matching color sealants.
“A beautiful project is always enhanced when working with quality, prestigious builders, and talented trade’s people. The tight organization and open communication by all the team members contributed greatly to a project proceeding seamlessly, with the incredible visual results to prove it.” Barry Allan – Director
Photo credit: Morgan Howarth

 Landscape Oasis LLC
Our client is an amateur astronomer. Our suggestion to make this a focal point of the garden was very well received. We designed, created the template, coordinated the fabrication, and installed this landscape detail.
 Nathan Allan Glass Studios Inc.
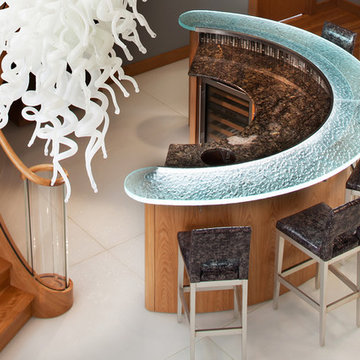
What surprises people most when entering and walking on the glowing white surface in this particular Private Residence (Williamsburg, VA) is when they find out they are walking on a sea of glass! Yes, GLASS! Not marble, not granite, but GLASS! Nathan Allan has created a very fresh, unique flooring surface, which is smooth to touch on the majority of the glass surface, yet has an almost invisible safety finish permanently embedded in the glass surface.
THE GLASS
Nathan Allan’s Glass Flooring incorporates features which are visually stunning, while also providing a safety finish which provides comfort to everyone walking on the glass. Our Sandstone texture is forged into the bottom surface of the glass, while our exclusive Glass Sandpaper safety finish is fused onto the walking surface. To enhance all features, we added a bright, sparkling, White Metallic color finish throughout each flooring panel.
SPECIFICATIONS
Each Glass Flooring panel is produced in 1/2″ (12mm) thick, Low Iron, tempered safety glass. Tempered glass provides added strength, insuring that the Glass Flooring can accept a heavy load. Panels vary in size and dimension, with most panels measured at a block size of 5’0 x 6’0 (1500mm x 1800mm). Perimeter Edge panels were carved and shaped to fit tightly against the curved walls. Glass Sandpaper, ASTM tested in labs with the highest slip-coefficient safety ratings, is fused onto the walking surface, to provide a very comfortable and effective safety feature.
Flooring Glass Details:
1/2″ (12mm) thick, Low iron tempered safety glass
Flat Polished Edges
Glass Sandpaper on walking surface
Sandstone texture on bottom surface
White Metallic color finish on bottom surface
Panels sizes up to 5’0 x 6’0
Approximately 800 square feet of glass flooring
Perimeter panels shape cut to fit
Almost overshadowed by the spectacular flooring is a 1.5” thick, Heavy Glasstop, Crescent shaped, with Nathan Allan’s Rocky Mountain texture.
DESIGN
A White Sea of Glass flooring is the finished result of combining a light Sandstone texture on the bottom glass surface, with the added touch of a sparkling White Metallic color finish. Combined with our Glass Sandpaper safety finish, and the natural and artificial light sources, our Glass Flooring shimmers within the entire entrance space.
INSTALLATION
Using very important installation techniques, Nathan Allan worked hand in hand with great team of professionals: Vicki Bristow, designer, W. M. Jordan Company, GC, and Pompei Inc, glass flooring installer. Templates were produced for all perimeter edge panels, and every shaped panel. All flooring panels are secured to the substrate with special adhesives, and joints are filled with matching color sealants.
“A beautiful project is always enhanced when working with quality, prestigious builders, and talented trade’s people. The tight organization and open communication by all the team members contributed greatly to a project proceeding seamlessly, with the incredible visual results to prove it.” Barry Allan – Director
Photo credit: Morgan Howarth

 Interlocking Concrete Pavement Institute
HNA Hardscape Project Award Winner
Virginia Street Residence
Omaha, NE
Paver Designs, LLC
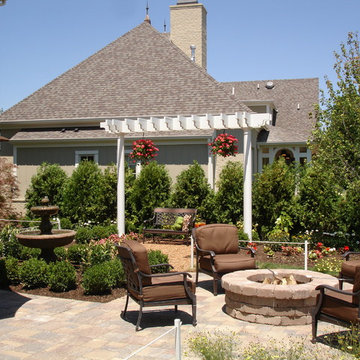
This project was built in two stages. The front patio area was finished for a family wedding, and the driveway was added after the wedding. The driveway was excavated to a depth of 16-18 in. and the patio is 12 in. deep. Crushed recycled concrete was used for the base with one inch of paver sand placed on top. After the concrete pavers were laid, another inch of base was added for the concrete paver areas. Three round seats were built next to the water feature and pebble designs were created in the center of each. Columns for the freestanding wall were designed with recessed areas for lights and for use as planters. Three by six inch concrete pavers were cut in half for the triple border in the narrower areas of the patio. The front paver entrance is gently ramped with no step for handicapped accessibility if the need should arise. Probably the most difficult stage of this project was drawing over 20 diverse designs over the winter months and then making a final selection. Using our basement floor as a drawing board, the "Y" shaped designs were drawn on Masonite at appropriate angles and distances so that the mirrored pairs nearly touched, and a template was made from this. After laying the field of concrete pavers, we marked the mosaic areas with the template. These pavers were cut out one at a time. All of the colored pavers were cut into thirds, and then angles were cut to follow curves. The template was moved and traced twelve times; each triple-row design took eight hours to complete, an approximate total time of 96 house (just) for the mosaic patterns. Many additional hours were spent cutting and installing the fish, triple borders, etc. The pavers in the mosaic, as well as the koi and borders, were coated with corresponding colors of sealer. These colors are amazingly rich and bright, well worth the extra time and effort! The two sets of koi are different as our designs are constantly evolving. A color booster in matte finish was applied to the pavers on the driveway.

 Integrated Resources Group
Tiffany also added a second top row of cabinets to increase storage space while adhering to HOA footprint restrictions. And since function and accessibility for all family members was important, a small utility cabinet with ladder was added for easy access to the higher areas.
The ceiling’s ball pendant with yoke hanger construction offers dramatic and decorative elements that play off luxurious Breccia Capraia marble that extends up the backsplash and around the window.
Sponsored
Sunbury, OH

J.Holderby - Renovations
Franklin County's Leading General Contractors - 2X Best of Houzz!


 Jano Sanitary
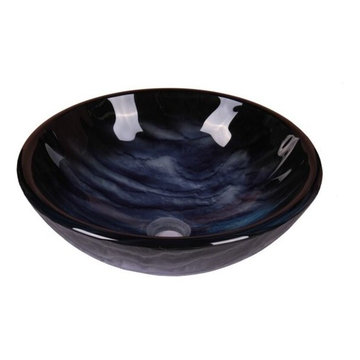
Embrace your peaceful lifestyle with this Jano Ripples Abstract tempered glass basin. This Ripples Abstract Tempered Glass basin brings out character to give your bathroom décor the final touch. This is simply designed for above and partially below the counter installation and will surely be a compliment to any color and updated design for a bathroom remodel. Make the installation a lot easier with the included hole diameter template. Save your trip to the hardware store as it also includes an official Jano Popup Drain. You can finally take advantage and enjoy this easy home improvement project that can save the headache. It is also great for home, spa, hotel, restaurant or other commercial use and home use!
Features:
Ripples Abstract tempered glass basin is inspired by the touch of nature
Made from high quality thick tempered glass to prevent breakage
Includes stainless steel pop up drain to save the trip hassle
Includes 1.77in. drain hole template to ensure the perfect fit
Dimensions:16.5inx6.7in, Thickness:19mm, G.W 22.65lb
Item Model Number: JGV1026
Thickness: 19mm
Item Weight: 20.7lb
Product Dimensions: 16.5" x 16.5" x 6.7"
Assembly Diameter: 16.5"
Package Content:
1x Jano Ripples Abstract Tempered Glass basin
1x Hole Diameter Template
1x Popup Drain with mounting Rings
1x User Manual
 Mitchell Precision Builders, LLC
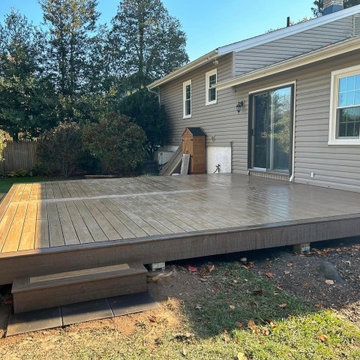
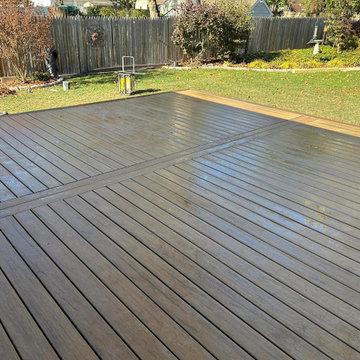
Beautiful TimberTech composite deck construction in Yardley, PA featuring durable low-maintenance decking with integrated steps and paver patio installed below. Contemporary design with wraparound fascia creates seamless indoor-outdoor living space. Expertly built by Mitchell Precision Builders with attention to detail and quality craftsmanship. Perfect for entertaining and relaxation.
 Kitchens & Baths by Design
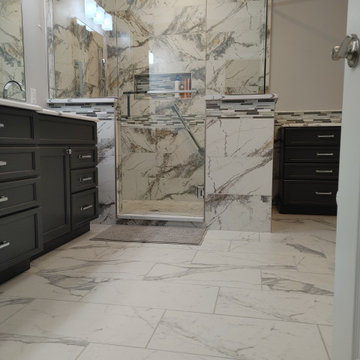
Contractor John Girata
Granite fabricated and installed by Premier Granite, Carnegie PA
Shower enclosure with 3/8" tempered glass templated and installed by Capri Glass, Coraopolis, PA
Tile from The Tile Shop, Wexford, PA with Arianne Eichner
Sponsored
Columbus, OH
Free consultation for landscape design!
Peabody Landscape Group
Franklin County's Reliable Landscape Design & Contracting


 Mitchell Precision Builders, LLC
Beautiful TimberTech composite deck construction in Yardley, PA featuring durable low-maintenance decking with integrated steps and paver patio installed below. Contemporary design with wraparound fascia creates seamless indoor-outdoor living space. Expertly built by Mitchell Precision Builders with attention to detail and quality craftsmanship. Perfect for entertaining and relaxation.

 SGDI - Sarah Gallop Design Inc.
For a family that loves hosting large gatherings, this expansive home is a dream; boasting two unique entertaining spaces, each expanding onto outdoor-living areas, that capture its magnificent views. The sheer size of the home allows for various ‘experiences’; from a rec room perfect for hosting game day and an eat-in wine room escape on the lower-level, to a calming 2-story family greatroom on the main. Floors are connected by freestanding stairs, framing a custom cascading-pendant light, backed by a stone accent wall, and facing a 3-story waterfall. A custom metal art installation, templated from a cherished tree on the property, both brings nature inside and showcases the immense vertical volume of the house.
Photography: Paul Grdina
5