
Search results for "Utiliser" in Home Design Ideas
 Tile Doctor Ltd
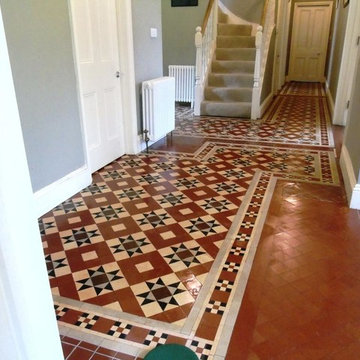
Victorian tiles are very hard-wearing and historically a popular choice for heavy traffic areas such as hallways. Still popular today they are nonetheless like most tiles and can become ingrained with dirt over time.
This particular floor, located in a property in the old market town of Tewkesbury is a good example of a floor that was in good physical condition, but heavily ingrained with dirt due to a lack of regular maintenance. At a loss for how to remedy the situation by themselves, the property owner asked me to pay a visit to restore the tiles back to their best possible condition.
In this particular scenario, I opted to mix and apply a solution of different cleaning products from our professional range, each serving a different purpose. These products were Tile Doctor Pro Clean, Tile Doctor Remove and Go, and Tile Doctor NanoTech HBU. Remove and Go serves the purpose of stripping away any old sealer on the tiles, while Pro Clean is an alkaline cleaner that reliably removes dirt and staining. NanoTech HBU is a particularly powerful cleaner which utilises nano-sized particles to penetrate deep into the pores of the stone, get underneath difficult stains and lift them out.
I spread this potent solution across the length and width of the tiled hallway and left it to soak for approximately 10 minutes, before using a black scrubbing pad fitted to my buffing machine to give the tiles a deep scrub. Next, I rinsed the soiled solution away and neutralised the chemicals with plain water, before extracting any residue using a wet vacuum. I repeated the cleaning process several times to achieve the best results possible, and I also employed the aid of a steam cleaner to spot clean any particularly stubborn marks.
Cleaning the floor took two days in total. At the end of the second day, I gave the floor a thorough and final rinse before leaving it to dry completely overnight. The next day, I returned to the property to seal the floor after checking the floor was dry. Ensuring before sealing that the floor is completely dry is crucial – even the smallest quantity of moisture remaining can potentially cloud the sealer and damage its performance.
My choice of sealer was Tile Doctor Colour Grow, an impregnating sealer that penetrates and fills the pores of the tile to prevent trapped dirt and makes regular cleaning much easier. Colour Grow is a great choice of sealer for Victorian tiles because it really enhances the colourful patterns which are characteristic of this type of tile.
My customer was very impressed with the service and remarked on the huge improvement to the appearance of the floor. You can see this for yourself – just take a look at the before and after photos!
Malcolm Crowther
Gloucester Tile Doctor

 Lorraine Masse Design
Design de cuisine & Salle à dîner par Lorraine Masse Design - photographier par Vincent Provost
Inspiration for a mid-sized contemporary u-shaped medium tone wood floor eat-in kitchen remodel in Montreal with an undermount sink, shaker cabinets, white cabinets, quartzite countertops, white backsplash, porcelain backsplash, white appliances and an island
Inspiration for a mid-sized contemporary u-shaped medium tone wood floor eat-in kitchen remodel in Montreal with an undermount sink, shaker cabinets, white cabinets, quartzite countertops, white backsplash, porcelain backsplash, white appliances and an island

 User
UserTom Aiken
Eat-in kitchen - mid-sized traditional l-shaped light wood floor eat-in kitchen idea in Miami with a farmhouse sink, shaker cabinets, white cabinets, quartz countertops, white backsplash, subway tile backsplash, stainless steel appliances and an island
Eat-in kitchen - mid-sized traditional l-shaped light wood floor eat-in kitchen idea in Miami with a farmhouse sink, shaker cabinets, white cabinets, quartz countertops, white backsplash, subway tile backsplash, stainless steel appliances and an island
Find the right local pro for your project
 Tile Doctor Ltd
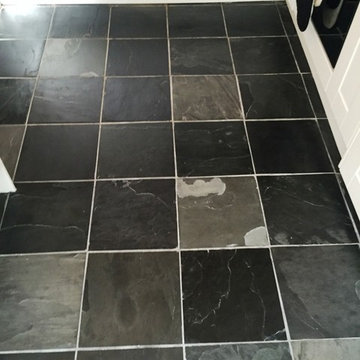
These Slate kitchen floor tiles at a property in Oxford were in good physical condition, but had become dull over time due to heavy usage, and upon close inspection the grout was stained. The customer contacted me as she was keen to get the tiles back to looking their best. This would require a thorough clean and the application of a fresh sealer.
While Slate floor tiles are reputed to be hard wearing and damage resistant – and are therefore a popular choice for high traffic areas like kitchens – this does not exclude them from needing regular maintenance.
To begin, I mixed a strong solution of Tile Doctor Pro Clean and water. Pro-Clean is a versatile cleaner that when used in a weak dilution can be used as a regular cleaner for most types of natural stone floor, including more sensitive stones such as Limestone and Marble.
The cleaning was then spread across the surface area of the floor, and left it to dwell for ten minutes to allow the solution to seep into the pores of the stone and lift the ingrained dirt to the surface. Pro-Clean in a strong dilution also functions as a stripping product, meaning it works to strip away any old and ineffectual sealer.
I then scrubbed the solution into the floor using a stiff scrubbing brush, paying particular attention to the grout in order to break down the visible staining. The tiles and grout lines came up really well during the cleaning process – this became clear once I had rinsed the floor and removed the residue using a wet vacuum.
With the customer eager to have the job completed quickly, I installed portable room dryers and utilised a heat gun to dry the floor, allowing me to seal it on the same day.
Once I had ensured the floor was completely dry, I commenced the sealing process by firstly applying a coat of Tile Doctor Stone Oil, a product which is designed to bring out all of the natural dark shades in the Slate.
When this was dry, I applied a single coat of Tile Doctor Colour Grow. This is an impregnating sealer, meaning that it soaks into pores of the stone to provide durable protection from within against ingrained dirt and stains. Colour Grow also enhances the natural colours in the stone even further.
The customer was amazed by just how big a difference could be made to the tiles in the space of just a day. Although the tiles were generally in very good nick, my main task was to be liven them up – judging by the before and after photos, I think this was achieved. And, now that they have been treated to a fresh seal, the tiles will be prevented from quickly becoming dull again.
Barry Woodward
Oxfordshire Tile Doctor

 Stormore Home Solutions
Stor-More Closet & Blinds
Pull Out Chrome Wire Baskets - help keep bags of chips and snacks organized
Inspiration for a timeless kitchen remodel in Vancouver
Inspiration for a timeless kitchen remodel in Vancouver


 Rebecca Foster- Interior Designer
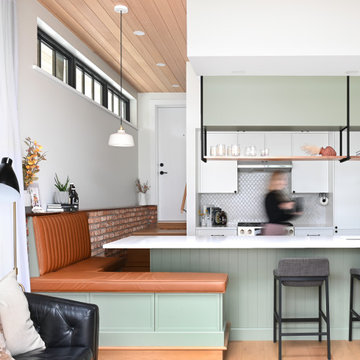
This North Vancouver Laneway home highlights a thoughtful floorplan to utilize its small square footage along with materials that added character while highlighting the beautiful architectural elements that draw your attention up towards the ceiling.
Build: Revel Built Construction
Interior Design: Rebecca Foster
Architecture: Architrix

 KINGDOM WOODWORKS
Collaboration with Canonbury Homes and Frank Neely Design Associates.
Inspiration for a timeless open concept kitchen remodel in Atlanta with beaded inset cabinets and two islands
Inspiration for a timeless open concept kitchen remodel in Atlanta with beaded inset cabinets and two islands
 Tile Doctor Ltd
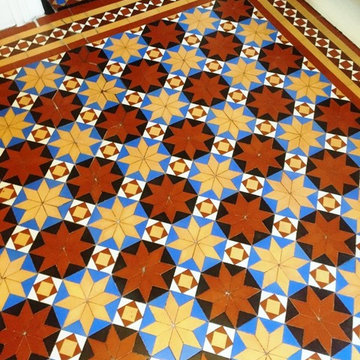
Victorian tiled floors are known for their interesting and unique mosaic patterns – and this one was no different. It was installed at a house in the historic West Midlands town of Stourbridge (famous for its glass industry). Unfortunately it was now looking worse for wear and was in dire need of not just cleaning and sealing, but also some minor repairs and the owner was keen to have it restored back to its former glory.
This particular Victorian tiled floor had been arranged in a fantastic pattern comprising tiles in shades of yellow, blue, red and white. There were, however, some missing tiles but fortunately I know a number of specialist suppliers where I can source replacements. I spent the first day making minor repairs and replacing the missing tiles, including the grouting, and then left the treated areas to set overnight.
On the second day I returned to the house to complete the cleaning process starting with a combination of Tile Doctor Remove & Go – a powerful sealer stripper – and Tile Doctor NanoTech HBU cleaner to lift out ingrained dirt and break down old layers of sealer. NanoTech HBU is particularly effective as it utilises tiny nano sized particles to penetrate deep into the stone and lift out the dirt. The resultant slurry was rinsed off the floor and removed using a wet vacuum.
The next step was to give the floor an acid wash using Tile Doctor Acid Gel, this product can remove old grout haze and other mineral deposits, additionally being in a gel form makes it easy to control and although primarily designed for use on walls it works really well on floors as well. Following this I gave the floor a thorough rinse, dried as much as possible with a wet vacuum and left it to dry overnight, ready to be sealed the next day.
Upon my return to the house on the third day I set about sealing the floor, checking first that the area was completely dried by running damp tests with damp meter, all was well so I able to start applying the sealer. The sealer chosen for this floor was Tile Doctor Seal and Go which is a water based product which is a popular choice as it gives the floor a nice sheen and doesn’t leave the smell that the solvent based sealers do; three thin coats were applied to provide a robust surface seal and to achieve a semi-shine finish, as per the client’s requested.
My client was extremely pleased with the results, with a lot achieved over the space of roughly two and a half days. They left the following feedback:
“Mick did a fantastic job. He was polite and friendly and kept us informed at every stage of the work. He is extremely professional and it is obvious that he takes a great deal of pride in his work. We are thrilled with our ‘new’ floor.”
Michael Leonard
Worcestershire Tile Doctor

 M Atelier
A growing trend in today’s home interiors is that of luxurious bathrooms. Homeowners think about investing in an elegant and cosy bathroom due to various reasons. Some of them see the bathroom as their temple of solace, where they do all their special self-care activities. Others want their bathrooms to be the space where they can enjoy the time with themselves. People also see the bathroom as an extension of their taste and personality.
There are ways, however, to achieve a luxurious ambiance in your bathroom. If you check out the best interior design in Singapore recommendations, here are some of the most valuable tips and tricks that you may do:
1. Invest in cove lighting.
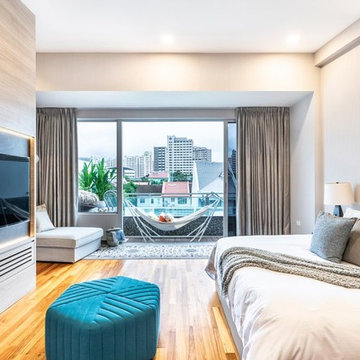
Cove lights are trending these days because of the way they change the environmental settings of any room. They are not as bright as general lighting, but they can illuminate the space just right. They are also very versatile and can be installed in bedrooms, kitchens, living rooms, and most notably, bathrooms.
Instead of using a central light in your bathroom, it would be posher to use cove lights. The light source is not blinding but is enough to illuminate the area evenly. The lights, due to their skewed diffusion, do not overlap each other, so you can enjoy an intimate ambiance while doing your self-care tasks.
2. Have a bathtub in place.
One of the most important aspects of a luxurious bathroom is the bathtub. It not only symbolises that you have the money to spend on one, but more importantly, you can afford the space for it. You also have the time to relax and enjoy a long bath with the tub in your bathroom.
While it is more common to have a built-in tub in most bathrooms (as a way to utilise space), you may opt for the standalone kind. This tub is not fastened onto the wall but instead held stable on the floor (similar to those in Victorian-era mansions). You may also have your water system customised to accommodate the tub.
3. Declutter.
Achieving a luxurious bathroom doesn’t mean you have to spend a lot on it. The best interior designs in Singapore feature bathrooms that are minimalist in terms of décor and style.
You can start by removing all the unnecessary items in your bathroom, cleaning up all corners down to the last speck of dust. You may then have it repainted with a colour scheme that speaks of cleanliness, relaxation, and peace. These shades include white, grey, blue, and green, as they are relaxing to the eyes and easy to clean.
You may also want to invest in an organiser, where you can place all your toiletries in one place and not have them occupy your bathroom surfaces. This way, it will be easier for you to add decorations and other accents to create a cosy vibe.
It also pays to have an indoor plant as an accent in your bathroom. Not only does it speak of freshness (which today’s luxe homes embrace), but it also offers a pop of colour that breaks the monotony of your bathroom colour scheme.
 Tile Doctor Ltd
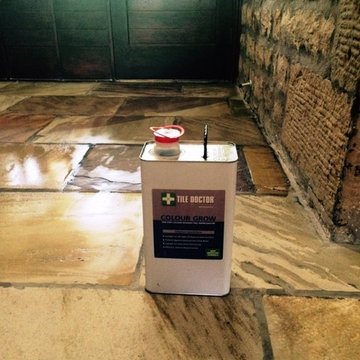
Here we have a six year old Indian Sandstone tiled floor located a property on the outskirts of Lancaster. Measuring 100 metres squared, the very large floor had under floor heating in the concrete sub base. The type of stone used inside the property is what we commonly refer to as ‘patio Sandstone’, a material which is usually used outside because of its very rough texture. It’s not particularly comfortable to walk across in bare feet, hence why many people consider it be impractical for internal flooring.
Nonetheless, the property owner was keen to make the rough textured floor as feet-friendly as possible for people walking over it. At Tile Doctor we have developed a process known as milling, which utilises diamond encrusted pads combined with a weighted rotary machine to smooth the rough surface, leaving it looking and feeling a lot nicer and more practical to live with. The milling process is only done once, but while the Sandstone will still need cleaning and sealing in the future, it won’t be nearly as difficult as when it was rough.
The job would take over two weeks to complete due to the fact that the existing grout needed to be removed and replaced with a flexible floor grout: a very time consuming process.
As mentioned, the surface of the Sandstone was very rough, and so needed to be milled down to make it a lot smoother to look after and make it easy to clean and seal. This was achieved by using Tile Doctor’s 50 Grit diamond encrusted burnishing pads, fitted to a weighed rotary machine and run along the entire surface area of the floor. Through this process the stone became much smoother and more aesthetic – completing one of our main objectives for the customer.
Next, we started breaking out the already loose and badly applied grout with our grout removal tools. The builder who had installed the floor had used a sand/cement-based grout which wasn’t flexible. As a result, it started to crumble and loosen quite quickly after exposure to the underfloor heating. We removed this and replaced it with a far more flexible grout.
Once the whole area had been successfully milled and the grout replaced, the Sandstone floor was left to dry out over the weekend. Upon our return to the property, we cleaned off any dust and resin left over from the milling and grouting processes, before leaving it to dry for a further 24 hours.
The next day we returned to seal the whole floor with two coats of our impregnating sealer Tile Doctor Colour Grow. The sealer fills the pores of the Sandstone to prevent ingrained dirt and stains, while also emphasising the natural colours in the stone. It also provides a robust matte finish, which is what the customer wished for.
It wasn’t the easiest of processes to get the Indian Sandstone into a condition where it would be both suitable for internal flooring and aesthetically pleasing, but the results proved to be very much worth the time and effort invested. The customer was very pleased with the transformation.
Russell Taylor
Lancashire Tile Doctor

 Acadia Stairs
Example of a mid-sized mountain style loft-style carpeted family room design in New York with no fireplace, no tv and blue walls

 Fox Mowing & Gardening
Lawn care maintenance by the seasons is a year long, continuous affair. To keep your lawn healthy and looking its best all through the year requires a considerable effort. Lawn care maintenance differs from season to season so here are some tips to get you started:
Lawn Care Maintenance in Summer
1 Proper watering is important in this season so that the soil does not dry out.
2 In summer the grass grows faster, so you'll need to mow it more often. However ensure that you don't cut off more than 1/3rd portion of the grass blades.
3 Just like the grass, weeds also thrive in warmer climates. Make sure to do some timely weeding in this season so that weed growth does not go out of hand.
4 During summer insects and pests are very active. Check the lawn soil for grubs, larvae of beetles and other insects that cause bare or dry patches. Go for pest control if you find an infestation. Re-seed the bare patches if needed.
Lawn Care Maintenance in the Fall
1 Falling leaves must be cleared more often during fall. This allows the grass to breathe and utilise the sunlight in preparation for the coming winter.
2 Clear any dead grass and other debris from the lawn in this season.
3 It is important to fertilise your lawn during the fall so that it gets the nourishment required for the dormant wintertime.
Lawn Care Maintenance in Winter
1 Leave the grass level as short as possible in preparation for the winter. This will prevent the blades from bending under the weight of the snow.
2 Just before the onset of winter is a good time to prune the shrubs and trees to encourage new growth and flowering as spring approaches.
3 It is a good idea to clear the lawn and yard of all outdoor furniture, pots, planters, logs, etc. This prevents the formation of dead patches as the snow vanishes.
4 Try to keep the side-walks and other spaces free of snow as much as possible.
Lawn Care Maintenance in Spring
1 Clean up the lawn of debris like leaves, twigs and other dead material that has collected over the winter.
2 Early spring is the time to fertilise the lawn which helps in its growth.
3 To get ready for mowing, begin by tuning up your lawn mower. Now is the time for a routine maintenance check.
4 Check for weed growth and de-weed your lawn so that it not only looks neat, but also ensures healthy growth.
You can follow these lawn care maintenance tips and do it all yourself or you could hire a professional lawn maintenance service like Fox Mowing to keep up the schedules. Fox Mowing( http://foxmowing.com.au/) takes up lawn and Garden Maintenance Professionals contracts along with other jobs like weeding and pest control, fertilising, mulching, debris removal, pruning, hedge maintenance, etc.
Lawn Care Maintenance in Summer
1 Proper watering is important in this season so that the soil does not dry out.
2 In summer the grass grows faster, so you'll need to mow it more often. However ensure that you don't cut off more than 1/3rd portion of the grass blades.
3 Just like the grass, weeds also thrive in warmer climates. Make sure to do some timely weeding in this season so that weed growth does not go out of hand.
4 During summer insects and pests are very active. Check the lawn soil for grubs, larvae of beetles and other insects that cause bare or dry patches. Go for pest control if you find an infestation. Re-seed the bare patches if needed.
Lawn Care Maintenance in the Fall
1 Falling leaves must be cleared more often during fall. This allows the grass to breathe and utilise the sunlight in preparation for the coming winter.
2 Clear any dead grass and other debris from the lawn in this season.
3 It is important to fertilise your lawn during the fall so that it gets the nourishment required for the dormant wintertime.
Lawn Care Maintenance in Winter
1 Leave the grass level as short as possible in preparation for the winter. This will prevent the blades from bending under the weight of the snow.
2 Just before the onset of winter is a good time to prune the shrubs and trees to encourage new growth and flowering as spring approaches.
3 It is a good idea to clear the lawn and yard of all outdoor furniture, pots, planters, logs, etc. This prevents the formation of dead patches as the snow vanishes.
4 Try to keep the side-walks and other spaces free of snow as much as possible.
Lawn Care Maintenance in Spring
1 Clean up the lawn of debris like leaves, twigs and other dead material that has collected over the winter.
2 Early spring is the time to fertilise the lawn which helps in its growth.
3 To get ready for mowing, begin by tuning up your lawn mower. Now is the time for a routine maintenance check.
4 Check for weed growth and de-weed your lawn so that it not only looks neat, but also ensures healthy growth.
You can follow these lawn care maintenance tips and do it all yourself or you could hire a professional lawn maintenance service like Fox Mowing to keep up the schedules. Fox Mowing( http://foxmowing.com.au/) takes up lawn and Garden Maintenance Professionals contracts along with other jobs like weeding and pest control, fertilising, mulching, debris removal, pruning, hedge maintenance, etc.


 Kathy Kuo Designs Inc
One of our favorite features of the room that we helped design was this Kallax shelf unit from IKEA that we used as a bench. We IKEA-hacked the piece by creating custom storage bins to fit the units underneath (not pictured) with rose gold pulls so the piece ended up looking fully custom. We then had a cushion custom made in an ultra-luxe silk velvet with white contrast piping to lay on top. And, of course, we added fun throw pillows and the cutest stuffed animals on top! We love this kids bedroom idea as a way to fit in an additional seating area while also creating maximum storage!

 CairnsCraft Design & Remodel
Great spacious bathroom with lot of amenities.
Photographer: Jon Upson
Large elegant master beige tile and porcelain tile drop-in bathtub photo in San Diego with an undermount sink, raised-panel cabinets, medium tone wood cabinets, granite countertops, beige walls and a two-piece toilet
Large elegant master beige tile and porcelain tile drop-in bathtub photo in San Diego with an undermount sink, raised-panel cabinets, medium tone wood cabinets, granite countertops, beige walls and a two-piece toilet
 Bespoke By Acorn
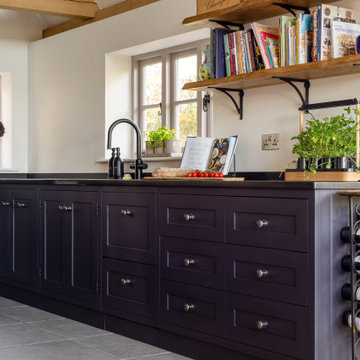
This wonderful bespoke country kitchen was designed and built for our clients’ new oak-framed extension at their Grade II listed home in the historic village of Billingshurst in West Sussex. Acorn Bespoke Carpentry and Joinery undertook the entire kitchen project which includes a hidden walk-in pantry, bar unit and solid hardwood windows.
The owners wanted to achieve a high-quality interior that stayed true to the traditional character and heritage of their property. Their keen eye for design is evident in their chosen sophisticated colour palette and finishes.
An AGA® was to be a focal point and key feature of the kitchen layout, and we designed the cabinetry to align perfectly with the extra depth and height of the cooker, leaving no unsightly gaps.
There are no upper wall cabinets in this kitchen which creates an open airy feel and allows more natural light. Instead, a run of generous base cabinets with customised deep drawers and pull-outs, as well as a kitchen island, open shelving and large pantry provide a wealth of superb storage solutions. One empty wall has been dedicated for full-height floor to ceiling cabinets for integrated appliances and a pantry.
Traditional style with a modern twist
The custom-made cabinets have been traditionally constructed in an authentic shaker-style and feature solid oak dovetailed drawers. The doors and frames are in solid maple, which has a smooth grain and is an extremely hard and durable timber, and perfect for taking a painted finish.
The cabinets are all spraypainted in Fired Earth Moon Grape, a deliciously distinctive purple-black colour. We then hand painted exterior surfaces for a textured effect which can also be easily touched up in the future. The shaker style in this striking dark colour adds grandeur to the space, without feeling too overbearing or showy.
All the kitchen cabinets are internally finished with premium quality Egger MFC. The hardwearing Unistone worktops are Nero Assoluto with a Velluto finish - a durable, jet black, velvet-like black texture, which gives depth without gloss.
Hidden walk-in pantry
Floor-to-ceiling doors neatly conceal an impressive hidden walk-in pantry, which we cleverly integrated into the overall kitchen design. As soon as you open the doors, the interior shelves are automatically illuminated by a motion-activated sensor. Every inch of space has been utilised with a range of open shelving laden with artisan ingredients, deep handcrafted drawers and basket storage, perfect for storing anything from vegetables to fresh bread.
Beautiful bespoke bar unit
Innovative pocket doors fold elegantly away to reveal a stunning well-equipped bar with a vibrant pink glass back panel and painted interior. This bright pink is a signature colour from the 1970s - Leather by Little Greene. The colour is a strategic choice by our clients to create a statement and infuse their home with an uplifting, spirited atmosphere. Undershelf lighting and a spotlight are activated as soon as the doors are opened enhancing the wow factor.
Bespoke freestanding island featuring upcycled wood
A focal point of the room, the kitchen island provides extra storage and worktop space. We handcrafted the island in solid hardwood with the top was once our clients’ old French dining table which we repurposed. Reusing old wood creates beautiful and unique pieces of furniture and has significant environmental benefits too. The mantle above the range cooker is salvaged timber too, made from an old oak beam.
 M Atelier
Lighting fixtures come in different forms and styles, and they are used to provide a source of light in the home. Indeed, if you are to take photos of your rooms, you will see that they contribute to the style implemented by your interior designer. However, these lighting fixtures do more than add to a home’s aesthetic; they are placed in such positions, in such forms, to perform a specific function.
Every interior design company in Singapore knows that lighting design comes in three forms: ambient or general lighting, task lighting, and accent lighting. Accent lights are often seen to support both ambient and task lighting sources, but how do you maximise their features?
According to interior design companies in Singapore, lamps are used to accentuate homes in various ways, such as the following:
1. Accent lighting brings out the function of space.
As homeowners, we do not always realise the true function of space apart from its semantic or aesthetic value. By strategically placing an accent light, we can see, feel, and utilise the purpose of a specific area of the house. For example, corridors leading to bedrooms are often empty and left unattended.
However, with recessive lights installed, we can better see that these passageways direct us to different rooms where we find comfort. Lights in corridors also give us the freedom of movement, as the illumination guides us when moving from one part of the house to the other.
2. Accent lights help build the ambiance in the room.
Another important aspect of home interiors is the ambiance. The right ambiance gives you as the homeowner, as sense of belongingness in your own space. Ambiance is an underlying reason people hire interior designers to renovate their homes –they want to make their space liveable, and at it all begins by achieving the right environment.
While ambient lighting provides the general illumination around the room, accent lights support them by boosting the level of surrounding ambiance. You may notice these when you switch on the corner lights or the frosted wall lamps instead of the centre light; your room becomes cosier and indulging, allowing you to relax feel at ease.
An excellent type of accent lighting are backlights. They keep the room lit without having to brighten up the entire space. Interior designers use these in areas of the house where a cosy or comforting ambiance is most wanted, such as the bedroom. They also use it in kitchens and living rooms to maintain a peaceful vibe at night without making the space dark.
3. Accent lighting also creates balance between pattern, texture, and form in the home.
Accent lighting likewise creates balance between the different elements of interior design. These include pattern, texture, and form. While ambient lighting illuminates the entire room space, accent lights on the other hand help make the space look wider at certain situations. They can also be used to tone down sharp textures in between the spaces, from ceilings to walls to floors. In a way, accent lights create harmony and continuity across the home’s interiors.
Overall, accent lighting is all about amplifying a chosen mood for the room. Using the right fixtures, you can achieve the kind of atmosphere you want not only in your specific places but for your entire house.

 Spire North
Tucked away in the backwoods of Torch Lake, this home marries “rustic” with the sleek elegance of modern. The combination of wood, stone and metal textures embrace the charm of a classic farmhouse. Although this is not your average farmhouse. The home is outfitted with a high performing system that seamlessly works with the design and architecture.
The tall ceilings and windows allow ample natural light into the main room. Spire Integrated Systems installed Lutron QS Wireless motorized shades paired with Hartmann & Forbes windowcovers to offer privacy and block harsh light. The custom 18′ windowcover’s woven natural fabric complements the organic esthetics of the room. The shades are artfully concealed in the millwork when not in use.
Spire installed B&W in-ceiling speakers and Sonance invisible in-wall speakers to deliver ambient music that emanates throughout the space with no visual footprint. Spire also installed a Sonance Landscape Audio System so the homeowner can enjoy music outside.
Each system is easily controlled using Savant. Spire personalized the settings to the homeowner’s preference making controlling the home efficient and convenient.
 Bespoke By Acorn
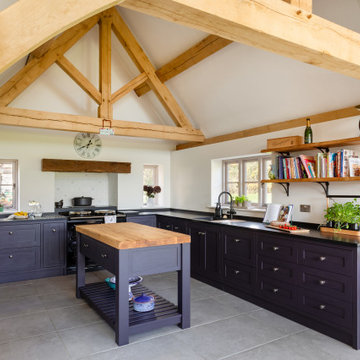
This wonderful bespoke country kitchen was designed and built for our clients’ new oak-framed extension at their Grade II listed home in the historic village of Billingshurst in West Sussex. Acorn Bespoke Carpentry and Joinery undertook the entire kitchen project which includes a hidden walk-in pantry, bar unit and solid hardwood windows.
The owners wanted to achieve a high-quality interior that stayed true to the traditional character and heritage of their property. Their keen eye for design is evident in their chosen sophisticated colour palette and finishes.
An AGA® was to be a focal point and key feature of the kitchen layout, and we designed the cabinetry to align perfectly with the extra depth and height of the cooker, leaving no unsightly gaps.
There are no upper wall cabinets in this kitchen which creates an open airy feel and allows more natural light. Instead, a run of generous base cabinets with customised deep drawers and pull-outs, as well as a kitchen island, open shelving and large pantry provide a wealth of superb storage solutions. One empty wall has been dedicated for full-height floor to ceiling cabinets for integrated appliances and a pantry.
Traditional style with a modern twist
The custom-made cabinets have been traditionally constructed in an authentic shaker-style and feature solid oak dovetailed drawers. The doors and frames are in solid maple, which has a smooth grain and is an extremely hard and durable timber, and perfect for taking a painted finish.
The cabinets are all spraypainted in Fired Earth Moon Grape, a deliciously distinctive purple-black colour. We then hand painted exterior surfaces for a textured effect which can also be easily touched up in the future. The shaker style in this striking dark colour adds grandeur to the space, without feeling too overbearing or showy.
All the kitchen cabinets are internally finished with premium quality Egger MFC. The hardwearing Unistone worktops are Nero Assoluto with a Velluto finish - a durable, jet black, velvet-like black texture, which gives depth without gloss.
Hidden walk-in pantry
Floor-to-ceiling doors neatly conceal an impressive hidden walk-in pantry, which we cleverly integrated into the overall kitchen design. As soon as you open the doors, the interior shelves are automatically illuminated by a motion-activated sensor. Every inch of space has been utilised with a range of open shelving laden with artisan ingredients, deep handcrafted drawers and basket storage, perfect for storing anything from vegetables to fresh bread.
Beautiful bespoke bar unit
Innovative pocket doors fold elegantly away to reveal a stunning well-equipped bar with a vibrant pink glass back panel and painted interior. This bright pink is a signature colour from the 1970s - Leather by Little Greene. The colour is a strategic choice by our clients to create a statement and infuse their home with an uplifting, spirited atmosphere. Undershelf lighting and a spotlight are activated as soon as the doors are opened enhancing the wow factor.
Bespoke freestanding island featuring upcycled wood
A focal point of the room, the kitchen island provides extra storage and worktop space. We handcrafted the island in solid hardwood with the top was once our clients’ old French dining table which we repurposed. Reusing old wood creates beautiful and unique pieces of furniture and has significant environmental benefits too. The mantle above the range cooker is salvaged timber too, made from an old oak beam.
69