
Search results for "Vulnerability" in Home Design Ideas
 Get My Rugs LLC
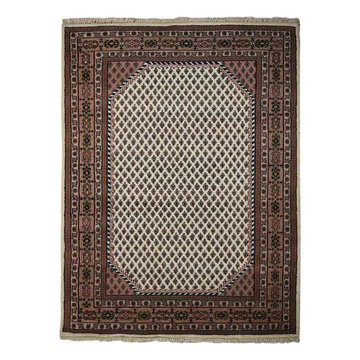
"Mesmerizing would be an understatement for this rug. This unique hand knotted original Persian rug will keep your eyes glued to the floor. With the cream as its primary color this stunning rug is a gem in itself.
Product Features:-
Construction: Handmade
Technique: Hand knotted Persian Wool
Shape: Rectangle
Pile: 0.75 inches
Pattern: Oriental
Material: Persian Wool
Weight: 19.63 lbs
Origin of Manufacturing: India
Recommended Use: Indoor
Eco-Friendly: Yes
Shipping: Free Shipping
Handmade by skilled artisans enhancing in-depth color and product durability Oriental designed and weaved by hand knotted technique with higher knots per square inches. Soft wool yarn with pile height of 0.75 inches for underfoot comfort Designer area rugs perfect for Living Room, Bedroom, Study Room, Dinning Room, Foyer. Free shipping and quick order dispatch. With quality product we deliver quality services to customers.
Weave:- Hand knotted rugs are among the connoisseurs’ and collectors’ favorites, as every knot of the rug is perfected by a skilled weaver’s hands, without any machine's intervention. The quality and cost of a hand knotted rug are determined by the number of knots per square inch, as some fine weaves can take up to a year to create a single master-piece rug. Rugs weaved through hand knotted technique can be designed very beautifully and its sturdiness will be alive for countless years. The price is a bit high but the quality of construction is appreciable.
Material:- In the universe of rug-fabrics, wool is considered one of the finest, owing to the touch, feel & practical benefits of this natural wonder-fiber. Wool has many qualities that place it far ahead in the rug-making business – e.g. high durability, warmth, rich look & feel etc. Wool is a pre-eminent choice for a classy rug that can last you for decades.
Pile:- The rug is quite thick which make its very sturdy and can bear high traffic without any wear and tear. Its long durability and less vulnerability of inner surface to dust is guaranteed by its high density weaving.
Proper Set Up & Care:- The rug is weaved by the expert artisans with high density for its unmatched durability. It can be placed on high traffic areas with proper care. It can be installed over any kind of surface and creases can be removed just by rolling up the rug in reverse order.
Floor Protection:- For floor protection, this rug can be used with pads that keep the safety of the floor intact. Be it the stone flooring, wooden or tile flooring, the rug pads will be the best for protection.
Cleaning Methods:- It is advised to choose the vacuum cleaning option as the material is wool and the weaving is hand knotted. For any stain, the users can opt for professional dry cleaning method."
 Tile Doctor Ltd
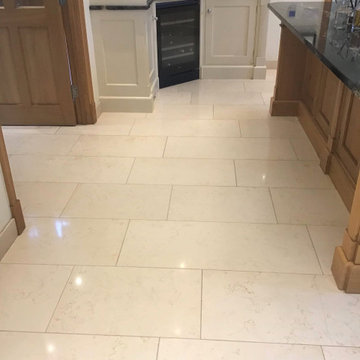
These photos are of a four-year-old Limestone kitchen floor at a property in Boughton that the customer was finding hard to keep clean and maintain a shine. Part of the problem was he owned two dogs and we often warn about the problems of dog urine on sealed tile and stone due to it being high in nitrogen.
On my initial visit I was able to ascertain that the sealer had almost completely worn off, leaving the stone vulnerable to dirt becoming ingrained into the pores of the stone. I come across this problem a lot, in my experience when stone floors are installed by tilers, they generally apply a single coat of sealant which wears off over time, and as discussed earlier can be prematurely degraded by strong chemicals.
My quote to renovate the Limestone floor was accepted and included a deep clean to the stone and grout, stone polish and then re-seal.
I arrived on site on the arranged date and began by scrubbing all the grout lines with Tile Doctor grout brushes and a 3:1 dilution of Tile Doctor Pro-Clean. I then moved on to a small handheld polishing machine to clean around the tile edges using 800 and 1500 grit diamond encrusted burnishing pad to achieve a deep clean.
The process was then repeated throughout the rest of the area using larger 17” burnishing pads fitted to a floor polishing machine. The burnishing pads I used come in a set of four starting with 400-grit and moving up to 800, 1500 and 3000 grit, after each pad is applied the floor is rinsed with water and the soil extracted with a wet vacuum.
It took me much of the day to complete this stage of the renovation and the floor was still damp so once done I left for the day, allowing the floor to dry off overnight.
I returned the following day to complete the final polish using the 3000-grit burnishing pad, this gave a high polished finish which the customer had requested. This last pad is applied dry with only a little water splashed onto the tile, a process we call a spray burnish.
The floor was then sealed with three applications of Tile Doctor Ultra Seal Sealant to protect the newly restored and polished tiles. Ultra-Seal is a penetrating sealer that soaks into those recently cleaned pores in the stone, occupying the space and preventing any dirt from becoming ingrained there. It’s also a natural look sealer so it doesn’t change the colour of the stone in anyway and is almost indetectable once applied.
“Hard work from Philip has left us with a kitchen floor brought back to life – cleaned and sealed in little over 24 hours – brilliant job – Thanks”
Before leaving I gave the customer some tips on maintenance and a complimentary bottle of Tile Doctor Stone Soap to enable him to keep the floor looking its best, this product works well with the sealant we applied and is PH neutral so won’t degrade the new sealer.
Phil Vissian
Northamptonshire Tile Doctor

 Windows on Washington Ltd
Decra Shake XD (Chestnut). The shake appearance give the roof a more organic feel. The beauty of a steel roof is the fact that it will be the last roof you put on any home.
Find the right local pro for your project

 Dynamic Garage Door
 specializes in Tuscan Architectural beautification in the Newport Beach, CA through our custom designed and hand made architectural shutters, garden gates and garage doors. This Newport-Mesa Tuscan home was exquisitely decorated with a combination of custom gates, decorative shutters and balcony barn door style shutters all handcrafted out of authentic, century-old reclaimed barn wood specifically harvested for this custom project.
Beginning with the balcony shutters which actually slide from side to side like a real barn door we worked a charming rustic shutter design that would typically be seen in the Tuscan Riviera. We opted for sliding shutters as the balcony spacing limited the swing action of even bi-folding shutters. Incorporating real barn door hardware railing and crowing it behind the faux reclaimed wood beam made an excellent statement while adding functional shutters that can be shut close for comfort during the summer morning when the sun beats down into the master suite. The four shutter leafs are decorated with real hand forged dummy straps that were hammered and crafted by hand to achieve that gorgeous rustic charm typical of Tuscan architecture. The reclaimed barn wood from a century-old barn gives off a timeless appearance that increase in characters as the years go by. Because rustic barn wood has already aged beautifully over hundreds of years, the next century will only increase its authentically gorgeous appearance. The culmination of this project has been a meticulous collaborative input of our in-house head designer and the clients themselves. Although the completion of this project is lengthy and intricate, the results speak volumes and the wait simply justifies the outcome.
The rest of thew windows on this Tuscan home have been accessorized with rustic barn wood as well and accentuated with our custom designed and handmade dummy iron hinge straps. Our dummy hardware is so authentically done in the same tradition used for hundreds of years in Europe to create shutter hardware that looks authentic and functional although it is only decorative. The details of our custom shutters is evident in the slightest of details including the bolts used to hold the shutter straps in place. Each of the shutter also has a decorative ring pull with a hand-hammered back plate which enhances the appearance of true functional shutters and defining that authentic Tuscan look.
The beauty of this Tuscan home is visible throughout the entire property including the garden gates, garage doors and entry door. Again, for the garden gates, we went with rustic barn wood carefully crafted to preserve the original surface that has aged over hundreds of years but building the gates on galvanized steel frames that will ensure structural durability for the next few hundred years. The gates are highly secure, sound and can definitely hold back a crowd with authentic rustic charm. Don't be fooled with the simple-looking gate design. It is quite intricate with its 45 degree angle cuts around the perimeter of the trim which deviates water away from crevices that would otherwise make the gates vulnerable to the accumulation of moisture from the elements, sprinkler system or simply air humidity since the home is located near the ocean. Each one of the garden gates is equipped with European style mortise lock mechanisms and roller catches. Dynamic Garage Door gates are not your typical garden gates, they are truly made with quality and durability in mind as well as aesthetic attention to detail. Everything, from the hardware used, the core steel frame and overlay material used is hand selected and approved individually for maximum beauty and timeless appreciation.
At Dynamic Garage Door, we specialize in multiple facet projects that include garden gates, driveway gates as well as barn doors and shutters. It is very important because these are the accessories that can make or break the beauty and continuity of your home's architectural style and authenticity.
Increase your curb appeal and home value with Dynamic Garage Door's gates, shutters and automatic custom garage doors. Our in-house designers would love to speak with you today!
Design Consultation Center: (855) 343-3667
 Tile Doctor Ltd
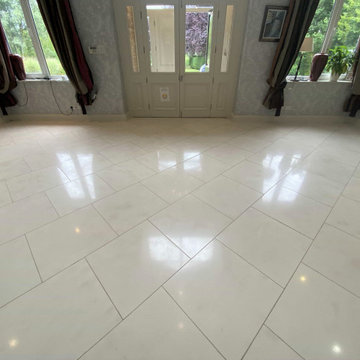
This job was for a repeat client in Toft near Cambridge who had aa stunning large hallway that was tiled in beautiful pale Limestone. My client had asked me back to work on the floor having previously completed the deep clean and seal of a Terracotta floor previously.
The Limestone tiling in the entrance hall had years of some type of topical sealer applied to it. This caused the stone to look slightly discoloured and from certain lights showed up hundreds of scratches and smudges embedded in the seal. I’ve tried to capture this problem in the photographs on this page, but it was very difficult.
A topical sealer sits on the surface of the tile where it is vulnerable to scratching, hallways are generally high traffic areas and so more likely to see this sort of problem. Ideally an impregnating sealer should have been applied, impregnators work by occupying the pores in the stone thus preventing soiling from becoming ingrained in the stone.
Before starting we protected the woodwork against splashing with blue film, I don’t usually make a great deal of mess, but you can never be too careful when working in someone’s property especially one as beautiful as this.
To strip off the old sealer I began by applying a strong dilution of Tile Doctor Remove and Go to the Limestone tiles. I split the floor into sections and used a 400-grit diamond burnishing pad to work the Tile Doctor Remove and Go into the tiles. The floor was then rinsed off using our high-pressure cleaning system that applies pressurised hot water to the floor whilst simultaneously extracting the soil with its built-in vacuum. The system is quite heavy, so it is built into my van, and I run a large flexible hose to a spinner tool that does the cleaning. It is an expensive tool, but it saves a lot of time and leaves the floor fairly dry afterwards.
The 400-grit pad had released a lot of the sealer but there were quite a few layers to get through, so I changed the burnishing pad to a coarse 200-grit pad and repeated the process. After another rinse and extract I would see it had the desired effect and I was able to carry on building up the finish on the Limestone by apply the 400-grit followed by the 800, 1500 grit pads. It was a large floor and so this took up much of the day so once complete I left for the day so it could dry off overnight.
The next day I finished the polishing process with the application of a 3000-grit burnishing pad which is applied with a little water sprayed onto the tile and really brings up the polish on the stone. This process has the added advantage of leaving the floor dry so not long afterwards I was able to move on to sealing.
For this floor two coats of Tile Doctor Ultra-Seal were applied, it is an impregnating sealer that won’t alter the colour of the tiles leaving a natural look.
My client was much happier with the new finish and has asked for another quotation on some more Terracotta flooring that needs attention. For aftercare I recommend using Tile Doctor stone soap, it’s a special formula that builds on the patina which will help maintain the polished appearance of the Limestone.
Tom Conlon
Cambridge Tile Doctor
 Tile Doctor Ltd
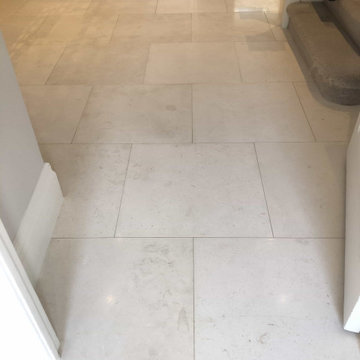
This client from Highgate in North London, N6 contacted us about their large honed Limestone tiled floor that was installed throughout the ground floor. It had been laid seven years prior and was now grubby and in need of a deep clean and seal including the grout which had turned black with dirt.
I visited the property to survey and assess what was required and provided the owner with a quotation for the renovation. The hallway pictured was in the worst condition, it was a busy house with young children and dogs and over the years the sealer had worn down leaving it vulnerable to ingrained dirt. Without a sealer to protect the stone it had become heavily soiled and lost its original polished appearance.
Happy with the quote we scheduled a date for the work to go ahead. The quote included deep cleaning and burnishing the stone to bring back the polish, grout cleaning and re-sealing the Limestone to protect it.
We arrived on the first day and prepared the area by taping up the skirting and woodwork to protect them from potential splashing. Next step was to burnish the floor using a set of Tile Doctor Diamond Burnishing Pads, specifically the 400, 800 and 1500 grit pads fitted to a rotary machine, these were used in sequence running each pad over the tiles several times with water to lubricate the process. The water turns into a fine slurry as pores in the stone are opened and the dirt is released, the slurry is rinsed off with more water and extracted using an industrial wet vacuum after each pad. The finer 800 and 1500-grit pads slowly close the pores and refine the appearance of the stone building up the polish in the process.
A strong dilution of Tile Doctor Pro-Clean was then applied to the grout lines, leaving it for a short while to soak in and then hand scrubbing with a grout brush. The dirty cleaning solution and were then removed from the floor with the wet vacuum.
This process was repeated across the different sections of the Limestone floor until I was satisfied with its appearance. Before leaving for the day, I rinsed the floor again using a buffing machine fitted with a brush fitted to give it a final clean. The floor was dried as much as possible using the wet vacuum and then allowed it to dry off fully overnight.
The following day the final 3000-grit pad in the four-pad set was applied to the floor to bring up the polish even further. The pad is applied dry with only a little water sprayed onto the tile. We call this process a “Spray Burnish” and as well as leaving the floor nice and dry ready for sealing it adds a nice subtle shine to the stone.
The floor was then sealed with two coats of Tile Doctor Colour Grow sealer. This is a colour intensifying impregnating sealer that works by occupying the pores in the stone so dirt cannot become ingrained there. It will provide durable protection and make the floor much easier to keep clean. It worked well on the pale Limestone and beautifully enhanced the colour and features in stone. Once complete the floor looked brand new again.
I left a complimentary bottle of Tile Doctor Stone Soap with the client and gave them some information about how best to maintain the floor. This product is pH neutral and cleans whilst maintaining the patina on the stone helping to keep the floor in great condition.
The client was delighted with the result and left us a great review.
“Andrew is excellent and gets on with the job and we got a fantastic result. Highly recommend. By Aaron S, Highgate, 15 March 2021”
Andrew Newstead
North London Tile Doctor
 Green Gorge Construction
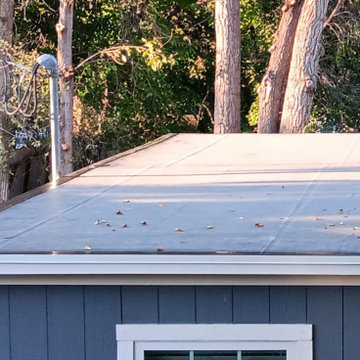
Due to its deteriorating condition, the asphalt roll roofing on this ADU required replacement before the Fall rains. Asphalt roll roofing generally lasts only 5-10 years, leading to ongoing maintenance challenges. The original 1×10 sheathing showed significant sagging in several spots, resulting in standing water not suitable for asphalt. Additionally, there was a complete absence of ventilation after improper installation of R-21 fiberglass insulation, leaving no air gap between the sheathing and insulation. A noticeable hump along the center of the roof indicated that the load-bearing wall had been supporting that section since construction, contributing to light sagging between the walls.
The old roof was completely removed down to the joists, revealing a solid base for the new installation. The central hump was eliminated by shaving the high point along that line. 2×6 beams were ripped in half then nailed on top of the existing joists, creating a 1.5″ gap for insulation and providing strong attachment points for the OSB sheathing, which was secured with screws to prevent any potential issues with nail heads popping through over the roof’s expected lifespan of over 50 years. The EPDM membrane was then adhered using glue and contact cement along the edges of each sheet, with the ends folded over the roof edges and secured with termination bars. Drip edge flashing was added and taped to ensure a water-tight seal, and EPDM-safe caulking was applied over the seams for additional protection. Finally, all exposed wood was primed and painted.
The new roof features a 60mil commercial-grade EPDM rubber membrane, offering a lifespan exceeding 50 years, in stark contrast to the 5-10 year lifespan of asphalt roll roofing.
Using two sheets of EPDM for installation streamlined the process, resulting in one single seam across the entire roof, compared to the asphalt roll’s dimensions of 3 feet wide by 33 feet long, which created 8 vertical seams and 9 horizontal seams—significantly increasing the risk of leakage and failure. Wrapping the rubber over the edge of the roof effectively addressed concerns about water infiltration at the edges, an issue prevalent with the asphalt and drip edge interface.
Another benefit to removing the splitting 1×10 decking and replacing it with OSB sheathing is the increase in structural integrity, moisture resistance, longevity and consistency.
The project successfully transformed the ADU’s roof from a maintenance-prone asphalt roll system to a highly durable 60mil EPDM rubber membrane. By addressing critical structural issues, including sagging sheathing and inadequate ventilation, the team ensured that the new roof not only offers superior water resistance and longevity but also meets higher performance standards for insulation and durability. The replacement process eliminated common weak points, such as numerous seams and poor edge sealing, which were vulnerabilities in the old roofing system. The result is a streamlined, secure installation that provides peace of mind and long-term value, with a lifespan extending well beyond the original roof.

 GS Construction
Example of a small classic 3/4 white tile and stone tile mosaic tile floor alcove shower design in Chicago with an undermount sink, recessed-panel cabinets, black cabinets, quartzite countertops, a two-piece toilet and gray walls
 Tile Doctor Ltd
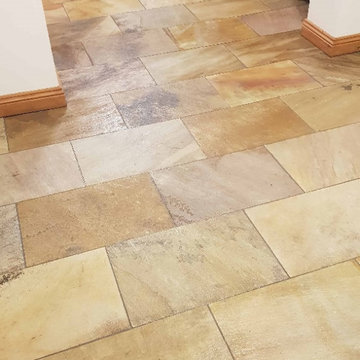
The photos on this page are of a Sandstone Kitchen floor at a house in the High Green suburb of Sheffield. The Sandstone tiles looked grubby and needed some love and attention. Our client was getting fed up trying to keep the stone clean, particularly around the kitchen area where cleaning didn’t seem to make much. You can see how dirty it had become on the before picture below, this is stark contrast to the middle of the of the kitchen where the portable kitchen island normally sits.
I went to the property to get a better look at the problem floor and carried out a small test clean to see which products and methods would have the best impact. The patch came up really clean without much difficulty, so I was confident on being able to restore its appearance.
It was clear to me the original protective sealer had worn off and dirt had become ingrained in the pores of the stone where it was proving difficult to remove. My client was very encouraged by the test clean initial result and agreed to go ahead with the quote. We arranged a suitable time to carry out the work on a day when the family would be out of the way.
I started by taping up the area to make sure the skirting and woodwork were protected from splashing. Once done a strong dilution of Tile Doctor Pro-Clean was sprayed onto Sandstone tile and grout. It was left to dwell for approximately ten minutes to help break down all the grime and dirt and was then worked into the stone using a rotary floor machine fitted with a stiff bristled brush.
This method totally transformed the dull sandstone, the stunning sandstone colours started to leap out and I could see the stone was well on its way to being transformed. The floor was then rinsed several times with water and the now soiled cleaning solution carefully removed with an industrial wet vacuum.
With the floor clean I inspected all the tiles and repeated the process until I was happy the floor was total clean. I should mention It’s not always this easy to clean a stone floor and quite often I find myself having to utilise all sorts of products and methods before I’m totally satisfied it’s as clean as it could possibly be.
With the cleaning done I left the floor to dry out overnight aided with heaters and air blowers.
I returned to seal the floor the next day checking first that the stone was dry with a damp meter. Leaving the blowers on overnight had helped and the readings I took from the floor confirmed it was now ready for sealing.
Earlier I had discussed the different types of sealer available with my clients and they had chosen to have the floor sealed with Tile Doctor Seal & Go. This works really well on Sandstone, enhancing its appearance, improving colour and of course adding protection to the stone to prevent grime and dirt stuck in the pores of the stone. Several coats were applied until I could see if was fully sealed and the right level of finish had been achieved. Sealing a floor can take some time as you need to allow each coat to dry before applying the next.
Once done the floor looked meticulously clean and the new sealer had added a lovely subtle sheen to the stone. My client was very please with the transformation and left the following feedback.
‘Very professional approach, friendly, and offered great advice throughout the job. Very pleased with the finish Cheers Matt we will see you again’
One of the problems we find with many homeowners is that for cleaning they use strong bleach-based cleaning product on their sealed tiles, and this actually strips off the sealer leaving the stone vulnerable to ingrained dirt. As a result, Tile Doctor has developed Tile Doctor Neutral Tile Cleaner, it is pH neutral and gentle enough for everyday use without affecting the sealer.
Matthew Lovett
South Yorkshire Tile Doctor

 contact7524
This stained glass window was created as part of our signature Aspen Stained Glass line. These windows look beautiful in cottage style or contemporary homes and are a great way for outdoor enthusiasts to celebrate their love of nature. The textured appearance of the glass provides the homeowners with a high level of privacy and comfort.

 Five Star Tree Care
Spring brings the first rays of steady sunlight that encourage your trees to start sprouting fruit and flowers. However, sometimes at the start of spring, the cold weather makes a sudden and abrupt turn as winter tries to reassert its dominance. This can cause a late freeze, which is difficult for many trees to combat. Fruit trees are the most vulnerable during a late freeze, but Five Star Tree Services has some suggestions to help you protect your fruit and flowering trees from a late freeze.
Protecting Your Trees
Some fruit trees are better able to protect themselves from the cold, but all trees need to be protected from the frost. Depending on the type of tree you have, several methods of protection are effective.
Peach Trees: To protect peach trees, cover them with a blanket or a sheet during the day. This will allow heat to build up that will protect them at night during the freeze. Make sure to leave the cover in place until the freeze passes.
Citrus Trees: These are the most fragile of all trees. Small trees should be draped with burlap, a sheet, a tree frost blanket, or any other type of fabric at least a day before the freeze occurs. The cover has to surround the whole tree to trap the heat and prevent frost.
Apple Trees: These trees are pretty sturdy compared to other fruit-bearing trees. They can handle the cold, but it is still a good idea to cover them during sudden frost.
It is important to avoid placing ground covers, mulch, and weeds from around the base of a tree during cold weather and frost periods. The moist bare soil emits more heat than soil that is mulched. Watering trees ahead of a frost can also help to protect them as water also emits heat. When you expect a freeze, it is also best to furrow-irrigate at night or use a sprinkler on its low setting while ensuring there is proper drainage for your trees. Any time the outside temperature is forecast to drop below 32 degrees; you should cover your trees.
Which Trees Can Survive in the Cold?
No fruit-bearing trees are made for cold climates, but some are better equipped to handle the cold than others. The Plant Hardiness Zone can help you choose the right trees to plant for the area where you live. For example, lemon trees and other citrus trees need to be planted in zones 9-11 where the risk of cold weather is minimal. Pear trees, on the other hand, need cold weather to thrive and should be planted in zones 4-8.
Freezing Dangers
Some fruit or flowering trees that are caught unguarded during the late frost may lose their blossoms. In many cases, these trees will no longer sprout during the current growing season but will come back next spring as healthy as ever.
Younger trees are more prone to damage than mature trees. Trees that have closed buds are also able to handle the cold better than those that have already started to bloom. Of course, the longer a freeze is present, the more dangerous it is for your trees.
How We Can Help
The skilled arborists here at Five Star Tree Services are always on hand to help protect your trees from frost and with regular maintenance. Some of the other services we provide include tree removal, tree planting, and tree pruning in Richmond Hill and the Greater Toronto Area. If you require our assistance, give us a call at (416) 990-3355 today.

 Simple Steps
This modern bathroom wall is a very dark grey tile made from recycled stone dust. Its color is PB 3106 Dark Grey and is in the brushed texture.
Example of a mid-sized minimalist master gray tile and stone tile bathroom design in Miami with gray walls
Example of a mid-sized minimalist master gray tile and stone tile bathroom design in Miami with gray walls


 Tile Doctor Ltd
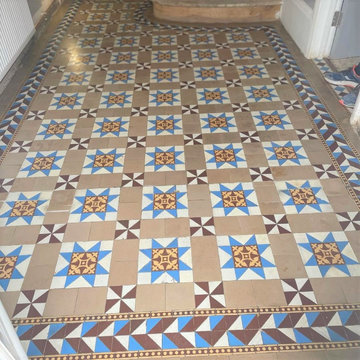
These pictures of a Victorian Tiled Hallway are from a property in Canterbury that was once a nursing home and was now being renovated to become a children’s home. The building was being gutted and extended at the same time and when the carpet was pulled up in the hallway, they were surprised to find a relatively intact Victorian tiled floor underneath.
Whilst they thought it bizarre that anyone would want to cover up such an attractive floor the carpet had protected it over the years. They realized it would make a marvellous feature at the entrance to the property, but professional restoration would be needed to do it justice. After a bit of research, they came across Tile Doctor and got in touch.
Canterbury comes under my North Kent designation, so I went to visit the property and survey the floor and quote for doing the restoration. There were a few missing and loose tiles that would need replacing and refixing also there was a lot of ingrained dirt so a deep clean and application of a new sealer would be required. I gave them a price for the work which they readily accepted, and we arranged a suitable time to carry out the work. Subject to the building schedule I had calculated the floor would take three days to restore.
On the first day I set about replacing and re-fixing the missing, broken, and loose tiles. This is delicate work as you need to extract the old tile without disturbing its neighbours and then clean up the area ready for its replacement. Being a Tile Doctor I keep a selection of stock tiles for repairs, some are reclaimed, and some are replica. Also, there are several companies still making Victorian style tiles so I can usually source what I need.
After the individual missing and broken tiles had been replaced and the adhesive had set, it was then a matter of renovating the floor as a whole. The tiles were covered in a thick layer of carpet adhesive which needed a combination of specialist tools and products to remove. First, a liberal layer of Tile Doctor Remove and Go was applied and left to dwell for thirty minutes. Next, Tile Doctor Pro-Clean was added and scrubbed in with a black pad.
This process softened the adhesive sufficiently in readiness for the next stage which involves using a set of diamond burnishing pads on a weighted buffing machine. Several applications were needed, each time with a successively finer grade of diamond pad and rinsing off the slurry in between. The tiles were first milled using a very coarse 50-grit pad, followed by 100, 200 and finally burnished with a 400-grit burnishing pads. This removed all the adhesive and dirt in the tiles, which was cleaned up using the wet vacuum.
Old Victorian floors like this do not have a damp proof membrane installed under the floor, and with a lot of water being used in the cleaning process I was concerned White efflorescence salts could appear later as the floor dried. To counter this, I gave the floor an acid wash using Tile Doctor Acid Gel to counter and dissolve the salts, it also gives the tiles another clean and will remove any old grout smears further improving the appearance of the tiles. Once done the floor was left to dry overnight.
On my return I tested the floor was dry by taking several moisture readings around the floor with a damp meter. Applying sealer to a damp floor is never advised and can lead to clouding and an unwanted finish.
Happy that the tiles were dry, a single coat of Tile Doctor Colour Grow sealer was applied. This is an impregnating sealer with a colour enhancing component to ‘lift’ the stronger colours of the floor. Colour Grow however does leave a matt appearance and as the client had asked for a shiny finish it was topped up with five coats of Tile Doctor Seal and Go. This is a compatible topical sealer which added a mid to high sheen.
By the end of the third day the Victorian floor looked brand new, and I received the following feedback from the client. Its rare to receive feedback from commercial customers so they were clearly overwhelmed with the transformation.
Did not think this glued covered bad old floor could look sooooo good Fabulous Fantastic job Looks Amazing Thank you
For aftercare I recommend the use of Tile Doctor Neutral Cleaner which isn’t as harsh as many of the products you find in supermarket. Stronger products can actually strip off the sealer over time leaving it vulnerable to dirt and detracting from its appearance.
Graham Davis
North Kent Tile Doctor
 Five Star Tree Care
When the weather begins to get colder, this can be a dangerous time for trees. There are many reasons how the cold and other elements during winter can harm your trees and surrounding landscape. This also means that there are many ways in which you can help prevent any unfortunate accidents due to the weather.
Some of the most common reasons trees can get damaged from the cold weather are as follows:
-Root damage
-Extensive bark
-Core chewing from pests
We here at Five Star Tree Services want to provide you with the right information on how to help prevent winter tree damage.
Root Damage Prevention
Unlike the rest of the tree, which includes the stems, branches, and buds, the roots are the last part of the tree to go dormant for the winter. This means that they are more vulnerable when the weather takes a sharp cold turn. The reason this tends to happen is that the soil temperatures stay warmer than the air, hence why the branches go dormant first and the roots take longer.
There are also a number of different things that dictate soil temperatures. For instance, dry soil gets colder quicker than sodden soil. Making it so that there is more ice present in sandy or dry soils, which is how it gets colder in temperature.
If you want your soil temperatures to be higher, mulch and snow can help insulate the ground and keep it sheltered from the harsher elements. If you have recently planted a tree, the disturbed soil will now allow cold air to get at the roots, which will hinder any root development or even kill newly grown roots.
How To Prevent
For newly planted trees, you should cover the roots with 3-4 inches of wood mulch. The best thing to do is make a 6-inch circle surrounding the base of your tree but make sure to keep it away from the trunk. Doing this is going to help support the tree during the winter and help stop unusual roots from growing. Before you lay your mulch down, you should also be checking for holes or breaks in the soil and fill them in before laying your mulch down. In the fall and spring, the soil is continuously being defrosted and refreezing again. This makes the soil contract and expand and can hurt newly planted roots. It can also be enough to push them out of the ground completely! Making mulch even more important since it can provide more consistent temperatures in the soil.
If you are experiencing a dry fall with little to no rain happening, you need to give your tree a really good watering before the ground starts to freeze. Doing this is going to lower the risk of your tree getting infiltrated by ice or frost.
Pest Damage Prevention
There are plenty of things that can harm your trees when the weather turns cold. Some of these other things include:
-Sunscald
-Dieback
-Brown evergreen foliage
-Salt damage
But aside from weather related ailments, you also need to worry about the damage done by certain pests as well. This can include:
-Mice
-Hares
-Voles
-Deer
These seemingly harmless animals are known to do major damage to plants during the winter when they are foraging on things like twigs, bark, stems, and leaves. They have even been known to completely eat bushes, right to the ground, and kill trees when they destroy their bark. One of the only ways to prevent animals from chewing on the bark is by building barriers around your trees in order to keep the pests from getting at them. Luckily, making these barriers isn’t as hard as you might be thinking. There are numerous potions for you to choose from that are easy to assemble and disassemble that you can find at your local garden center or landscaping stores.
How Five Star Tree Services Can Help
Colder weather insights many potential negative things for your trees that can severely harm them, damage them, or even kill them if they are not properly protected. It is always important to make sure that your trees are properly prepared for the winter months ahead. This means utilizing preventative measures to alleviate the risks of things like root and animal damage. If you require help to prepare your trees for winter, our team at Five Star Tree Services is here to help you with our tree care services in Richmond Hill, don’t wait until it’s too late, give us a call today at (416) 990-3355!
 Teness Herman
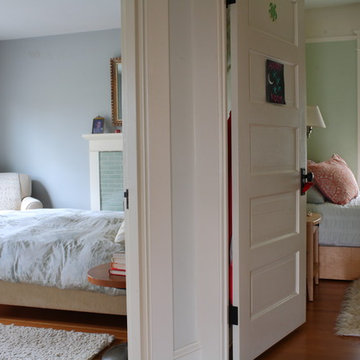
Photo: Teness Herman © 2015 Houzz
Home design - eclectic home design idea in Los Angeles
Home design - eclectic home design idea in Los Angeles

 MEC
PEACOCK FANTASY - Custom Designed Peacock Wall Mural in brilliant colors. Notice how it has just the right amount of color | Have a custom mosaic idea? We can help, with our brilliant Italian-trained mosaicists and easy-to-install tiled masterpieces. Worldwide shipping available on the complete range of quality handcrafted marble & glass mosaic products. For inquires and more info, contact us: http://mecartworks.com

 Ashley Martin Home
Bedroom - large transitional master light wood floor and brown floor bedroom idea in Orlando with white walls, a standard fireplace and a tile fireplace
 menakaimai architects
Project Type : Residential
Location : Ethul Kotte
Land Area :3267 sqft ( 12 p )
Architects : Archt. Sameera Dharmasena (menakaimai design studio)
: Archt. Menaka Karunarathna (menakaimai design studio)
Structural Engineering : Eng Sajeewa Edirrisingha
Write-up : Archt. Navoda Rthnayaka
Photographs : Amila Rathnayaka (Amila Rathnayaka photography)
Just as the eyes are the windows to a person’s soul, a house is a window to its architect’s aspirations. The residence for Mr. Alex and family at Ethul Kotte is a perfect example for this, which is an open book with multiple layers. From the entrance to the rooftop, each space creates a specific impression and reveals a little more about the users, as it has been perfectly captured by the architect.
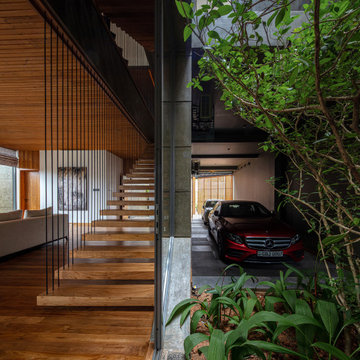
The house is located at the further end of a narrow drive-way, almost hidden from view with its dark façade and greenery, and sits in a compact lot that opens to a marsh at its rear end. With its cladded wall of cement blocks with a unique imprint and the line of bamboo covering the length of the front wall, the boundaries are defined effortlessly while drawing focus to the main entrance. Earthy feeling created at this point heavily dwells on the solidity of the materials and the muted color palette, which is juxtaposed by the lightness of the timber gate, perforated external façade and screen of vines flowing down from the rooftop. Upon entering, the ambiance of the house changes from its somber guarded exterior to a bright and spacious interior that completely opens to its surroundings.
The floating staircase that climbs along the dark titanium wall and the adjoining courtyard run through the full height of the building, merging the solids and the voids at all levels.
Spatial organization in the house is predominantly in three layers and each section of a floor has a clear demarcation between the public and private spaces. Spaciousness is achieved through the simplicity of the spaces, minimalistic furniture and muted tones that are complemented by the complete openness created by the glass facades covering the full height of the spaces. Another noticeable feature is the landscaping where thick low hedges are broken by thin trees to mimic a rampart that characterizes the intermediate space between the interior and boundary of the site, which is demarcated by the alternating solids and voids of the boundary fence.
The ground level creates a warm, welcoming ambiance that is ideal for entertaining guests. From the lines of textures and materials used, to heights and orientations of furniture, each element complements each other to add volume and composure to the space. A peculiar feature is a subtle inspiration from Japanese architecture that is visible in the sharp lines and several decorative features, which enhance the ambiance with splashes of vibrancy created by the simple, yet colorful elements. While the open living-dining space is a subtle fusion between a modern western living space and the Sri Lankan lifestyle that welcomes nature and social interactions, privacy of adjoining spaces such as the kitchen and bedroom is ensured by isolation made pleasant by their private courtyards.
Gradually gracing a visitor at the extended landing of the first floor is the calming sight of the full height cross formed by light filtering through crafted gaps on the wall which becomes a feature and an open shrine. This , seamless flows to the rest of the floor with its vibrant, spacious family living room and TV lobby a that connects all these well as the custom-designed bedrooms
The ambiance of each room voices the unique needs and tastes of its user, while the private balcony screened from the outside by a perforated aluminum façade and a screen of vines, creates an intimate niche. A significant feature is the glazed walls of the master bedroom, which are only screened by thick canvas shades that open to a mesmerizing sunset and a view of the marsh. This makes one question the concepts of privacy traditionally Sri Lankans, whereas the user appears to be embracing the vulnerability in openness and enjoying the soothing beauty in nature through the same.
The second floor is mostly the rooftop garden and bar, which is a multi-functional space ideal for a small gathering. The curtain of creepers covering the full height glass façade separating the bar and open terrace creates a significant change in ambiance by defining the cozy, timber interior of the bar, against the outdoor-, where the monotonous greenery is only broken by a splash of red from the punctured cover of a service staircase running to the upper rooftop level. The uniqueness is in how each space caters for contrast in transition between ambiances spanning from an intimate, mystic bar area ideal for isolation, to a lively social space creates a unique mood compared to the rest of the house. The rooftop thus completes the transition of spaces from open and interactive interior to a mind-palace and a garden that inspires the soul.
“I think that my job is to observe people and the world, and not to judge them; I always hope
To position myself away from so-called conclusions; I would like to leave everything wide open
To all the possibilities in the world.”
-Haruki Murakami-
Layering is a key feature in this design, which is evident in how the façade filters inwards from the curtain of greenery, permeable panel and the external wall, as well as the spatial structure of the interior. The linear form of the building, where the living spaces completely open-out through the glazed facades at the rear end of each floor merges these family-spaces with the neighborhood, which avoids complete isolation of the family. Thus, the design is inspired by the need for a sense of freedom in the residents, while allowing the house to become a place for escape when desired.
9