
Search results for "Write up" in Home Design Ideas

 Adaptiv DC
THEME Inspired by the Magic Tree House series of children’s books, this indoor tree house provides entertainment, fun and a place for children to read about or imagine adventures through time. A blue sky, green meadows, and distant matching beech trees recreate the magic of Jack and Annie’s Frog Creek, and help bring the characters from the series to life. FOCUS A floor armoire, ceiling swing and climbing rope give the structure a true tree house look and feel. A drop-down drawing and writing table, wheeled work table and recessed ceiling lights ensure the room can be used for more than play. The tree house has electric interior lighting, a window to the outdoors and a playful sliding shutter over a window to the room. The armoire forms a raised, nine-foot-wide play area, while a TV within one of the wall’s floor-to-ceiling cabinets — with a delightful sliding ladder — transforms the room into a family theater perfect for watching movies and holding Wii competitions. STORAGE The bottom of the drawing table is a magnetic chalk board that doubles as a display for children’s art works. The tree’s small niches are for parents’ shoes; the larger compartment stores children’s shoes and school bags. Books, games, toys, DVDs, Wii and other computer accessories are stored in the wall cabinets. The armoire contains two spacious drawers and four nifty hinged storage bins. A rack of handy “vegetable buckets” above the armoire stores crayons, scissors and other useful items. GROWTH The room easily adapts from playroom, to party room, to study room and even to bedroom, as the tree house easily accommodates a twin-size mattress. SAFETY The rungs and rails of the ladder, as well as the grab bars beside the tree house door are wrapped with easy-grip rope for safe climbing. The drawing table has spring-loaded hinges to help prevent it from dropping dangerously from the wall, and the table door has double sets of locks up top to ensure safety. The interior of each storage compartment is carpeted like the tree house floor to provide extra padding.
 Adaptiv DC
THEME Inspired by the Magic Tree House series of children’s books, this indoor tree house provides entertainment, fun and a place for children to read about or imagine adventures through time. A blue sky, green meadows, and distant matching beech trees recreate the magic of Jack and Annie’s Frog Creek, and help bring the characters from the series to life. FOCUS A floor armoire, ceiling swing and climbing rope give the structure a true tree house look and feel. A drop-down drawing and writing table, wheeled work table and recessed ceiling lights ensure the room can be used for more than play. The tree house has electric interior lighting, a window to the outdoors and a playful sliding shutter over a window to the room. The armoire forms a raised, nine-foot-wide play area, while a TV within one of the wall’s floor-to-ceiling cabinets — with a delightful sliding ladder — transforms the room into a family theater perfect for watching movies and holding Wii competitions. STORAGE The bottom of the drawing table is a magnetic chalk board that doubles as a display for children’s art works. The tree’s small niches are for parents’ shoes; the larger compartment stores children’s shoes and school bags. Books, games, toys, DVDs, Wii and other computer accessories are stored in the wall cabinets. The armoire contains two spacious drawers and four nifty hinged storage bins. A rack of handy “vegetable buckets” above the armoire stores crayons, scissors and other useful items. GROWTH The room easily adapts from playroom, to party room, to study room and even to bedroom, as the tree house easily accommodates a twin-size mattress. SAFETY The rungs and rails of the ladder, as well as the grab bars beside the tree house door are wrapped with easy-grip rope for safe climbing. The drawing table has spring-loaded hinges to help prevent it from dropping dangerously from the wall, and the table door has double sets of locks up top to ensure safety. The interior of each storage compartment is carpeted like the tree house floor to provide extra padding.
 Naaya Studio
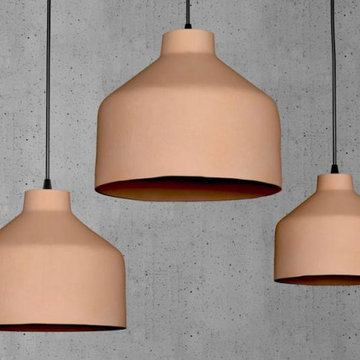
Introducing one of the most requested shapes, inspired by milk canisters this design is picking up quite a bit of trend off lately. and hence our design for those who are looking for classic good old looks and a barn feeling. An edgy form available in three sizes that allows you to suit all the requirement whether you are looking to buy for bedside, above dining or kitchen island.
3 variation of sizes available as per below dimensions:
1. 8.5" dia x 7" height
2. 10.5" dia x 8.75" height
3. 12.5" dia x 10.5" height
Buy assorted of more than 1 and save big!
PRODUCT INFO
- A small Naaya logo (approx 3/4") is embossed in 1 place on the inside surface of lamp.
- All the shades are available in Plug in as well as hard wired version.
- 10 feet (3 meter) of wire comes as standard with plug in versions. country specific converter is supplied with Indian pin
- 6 feet (2 meter) wire is supplied with all the hard wired version
- All Light electrical Fixtures are in compliance with US, European, UK, Australian, Canadian and International Standard.
- Each lamp comes with individual canopy. Individual canopy are available black or white color (please specify). By default Black canopy will be sent.
- Lamp comes with E27 holder (bulbs not supplied)
- 3 port black / white canopy is available on request.
- Wire/cord length and color (black/white) can be changed on request, please write to us. Black cord will be sent by default
Find the right local pro for your project
 Naaya Studio
Introducing one of the most requested shapes, inspired by milk canisters this design is picking up quite a bit of trend off lately. and hence our design for those who are looking for classic good old looks and a barn feeling. An edgy form available in three sizes that allows you to suit all the requirement whether you are looking to buy for bedside, above dining or kitchen island.
3 variation of sizes available as per below dimensions:
1. 8.5" dia x 7" height
2. 10.5" dia x 8.75" height
3. 12.5" dia x 10.5" height
Buy assorted of more than 1 and save big!
PRODUCT INFO
- A small Naaya logo (approx 3/4") is embossed in 1 place on the inside surface of lamp.
- All the shades are available in Plug in as well as hard wired version.
- 10 feet (3 meter) of wire comes as standard with plug in versions. country specific converter is supplied with Indian pin
- 6 feet (2 meter) wire is supplied with all the hard wired version
- All Light electrical Fixtures are in compliance with US, European, UK, Australian, Canadian and International Standard.
- Each lamp comes with individual canopy. Individual canopy are available black or white color (please specify). By default Black canopy will be sent.
- Lamp comes with E27 holder (bulbs not supplied)
- 3 port black / white canopy is available on request.
- Wire/cord length and color (black/white) can be changed on request, please write to us. Black cord will be sent by default

 TVL Creative Ltd.
Our clients had just recently closed on their new house in Stapleton and were excited to transform it into their perfect forever home. They wanted to remodel the entire first floor to create a more open floor plan and develop a smoother flow through the house that better fit the needs of their family. The original layout consisted of several small rooms that just weren’t very functional, so we decided to remove the walls that were breaking up the space and restructure the first floor to create a wonderfully open feel.
After removing the existing walls, we rearranged their spaces to give them an office at the front of the house, a large living room, and a large dining room that connects seamlessly with the kitchen. We also wanted to center the foyer in the home and allow more light to travel through the first floor, so we replaced their existing doors with beautiful custom sliding doors to the back yard and a gorgeous walnut door with side lights to greet guests at the front of their home.
Living Room
Our clients wanted a living room that could accommodate an inviting sectional, a baby grand piano, and plenty of space for family game nights. So, we transformed what had been a small office and sitting room into a large open living room with custom wood columns. We wanted to avoid making the home feel too vast and monumental, so we designed custom beams and columns to define spaces and to make the house feel like a home. Aesthetically we wanted their home to be soft and inviting, so we utilized a neutral color palette with occasional accents of muted blues and greens.
Dining Room
Our clients were also looking for a large dining room that was open to the rest of the home and perfect for big family gatherings. So, we removed what had been a small family room and eat-in dining area to create a spacious dining room with a fireplace and bar. We added custom cabinetry to the bar area with open shelving for displaying and designed a custom surround for their fireplace that ties in with the wood work we designed for their living room. We brought in the tones and materiality from the kitchen to unite the spaces and added a mixed metal light fixture to bring the space together
Kitchen
We wanted the kitchen to be a real show stopper and carry through the calm muted tones we were utilizing throughout their home. We reoriented the kitchen to allow for a big beautiful custom island and to give us the opportunity for a focal wall with cooktop and range hood. Their custom island was perfectly complimented with a dramatic quartz counter top and oversized pendants making it the real center of their home. Since they enter the kitchen first when coming from their detached garage, we included a small mud-room area right by the back door to catch everyone’s coats and shoes as they come in. We also created a new walk-in pantry with plenty of open storage and a fun chalkboard door for writing notes, recipes, and grocery lists.
Office
We transformed the original dining room into a handsome office at the front of the house. We designed custom walnut built-ins to house all of their books, and added glass french doors to give them a bit of privacy without making the space too closed off. We painted the room a deep muted blue to create a glimpse of rich color through the french doors
Powder Room
The powder room is a wonderful play on textures. We used a neutral palette with contrasting tones to create dramatic moments in this little space with accents of brushed gold.
Master Bathroom
The existing master bathroom had an awkward layout and outdated finishes, so we redesigned the space to create a clean layout with a dream worthy shower. We continued to use neutral tones that tie in with the rest of the home, but had fun playing with tile textures and patterns to create an eye-catching vanity. The wood-look tile planks along the floor provide a soft backdrop for their new free-standing bathtub and contrast beautifully with the deep ash finish on the cabinetry.

 Landis Architects | Builders
We worked with a corporation and their out-of-town architect on this residential condominium construction in Washington D.C. The company uses the apartment for executive housing and meetings. Its goal was to create a flexible space to be used for both purposes. We renovated the kitchen, two bathrooms, and one bedroom. The central focus is the sleek new open kitchen, though we worked on the entire 1200 square foot apartment.
The client provided the architectural design for the kitchen and the rest of the apartment. The biggest layout changes were:
*Removing the walls of the existing kitchen to create a dramatic open kitchen that runs all the way to the window on one side and an island with a waterfall countertop on the other side.
*A layout that provided space for a large conference table
*Closing off one door of the bedroom and creating a larger opening from the living room side and installing pocket doors
These changes required extensive systems work throughout the apartment, including redoing all the ductwork, modifying the sprinkler system and relocating sprinkler heads to meet fire code. We didn’t run into any surprises with the systems because our team had investigated the structure in the pre-construction stage and cut holes in the drywall to locate the plumbing pipes, columns, and wiring. We had to turn and move the existing HVAC system so we could hide it in one of the kitchen cabinets.
We built the structure that anchors one end of the kitchen. It hides a refrigerator (with flush panel doors), electrical panel, and writing for the flat screen television. A soffit above the kitchen hides all the ductwork, and is fitted with recessed lights and LED cove lighting above.
The client supplied the kitchen cabinetry. The countertops are quartz by Caesarstone in Haze. We installed the flooring material on the base of one side of the island.
Backsplash. The dramatic backsplash is made of thin sheets of porcelain. The 5 mm thick material by Fiandre comes in 5-foot by 10-foot sheets that comes in a continuous pattern or can be book-matched. A fabricator measured the layout and cuts for the wall outlets, cut the material and installed it. Our team delivered three sheets of the material up the stairwell of the building. Though they created a template of the material out of wood to make sure it would fit, the actual material was more rigid and it took them a while to maneuver it.
The new wide opening at the end of the living room has pocket doors. We closed off the original hallway door to the bedroom.
Michael K. Wilkinson
 Landis Architects | Builders
We worked with a corporation and their out-of-town architect on this residential condominium construction in Washington D.C. The company uses the apartment for executive housing and meetings. Its goal was to create a flexible space to be used for both purposes. We renovated the kitchen, two bathrooms, and one bedroom. The central focus is the sleek new open kitchen, though we worked on the entire 1200 square foot apartment.
The client provided the architectural design for the kitchen and the rest of the apartment. The biggest layout changes were:
*Removing the walls of the existing kitchen to create a dramatic open kitchen that runs all the way to the window on one side and an island with a waterfall countertop on the other side.
*A layout that provided space for a large conference table
*Closing off one door of the bedroom and creating a larger opening from the living room side and installing pocket doors
These changes required extensive systems work throughout the apartment, including redoing all the ductwork, modifying the sprinkler system and relocating sprinkler heads to meet fire code. We didn’t run into any surprises with the systems because our team had investigated the structure in the pre-construction stage and cut holes in the drywall to locate the plumbing pipes, columns, and wiring. We had to turn and move the existing HVAC system so we could hide it in one of the kitchen cabinets.
We built the structure that anchors one end of the kitchen. It hides a refrigerator (with flush panel doors), electrical panel, and writing for the flat screen television. A soffit above the kitchen hides all the ductwork, and is fitted with recessed lights and LED cove lighting above.
The client supplied the kitchen cabinetry. The countertops are quartz by Caesarstone in Haze. We installed the flooring material on the base of one side of the island.
Backsplash. The dramatic backsplash is made of thin sheets of porcelain. The 5 mm thick material by Fiandre comes in 5-foot by 10-foot sheets that comes in a continuous pattern or can be book-matched. A fabricator measured the layout and cuts for the wall outlets, cut the material and installed it. Our team delivered three sheets of the material up the stairwell of the building. Though they created a template of the material out of wood to make sure it would fit, the actual material was more rigid and it took them a while to maneuver it.
The new wide opening at the end of the living room has pocket doors. We closed off the original hallway door to the bedroom.
Michael K. Wilkinson
Sponsored
Sunbury, OH

J.Holderby - Renovations
Franklin County's Leading General Contractors - 2X Best of Houzz!

 Stonelace Designs
Originally, the exterior of the Napa ranch residence was a standard knocked down stucco finish. We covered over the entire exterior of the house with a natural plaster product that has been made in Italy for centuries, known as Rialto or Vero. This product is a combination of slaked lime mixed with 60% reconstituted crushed marble dust. Quarried from the legendary Carrara marble mines. The finish itself is a vertically combed striated texture embedded into the plaster. While it cures, a transparent group of patinas are applied to the stone-like plaster substance to create a look of an aged villa.
 Tile Doctor Ltd
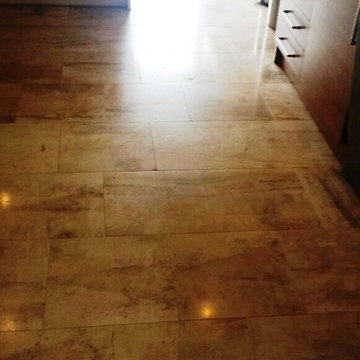
This customer from the historic city of Cardiff was keen to see what Tile Doctor could do to put some life back into their treasured Limestone kitchen floor that was laid in 2008. My first observations were mainly centred on the horrific condition of the surface which although adequately sealed initially the floor had not received any subsequent maintenance and its condition had deteriorated over time. The light shining in from the patio doors highlighted all the imperfections in the floor caused by surface wear and tear commonly seen in high traffic areas such as a kitchen.
Upon closer inspection, there were further problems: the floor was stained and scuffed, and in most places the sealer had worn off completely allowing the dirt to become ingrained into the pores of the Limestone. Additionally the grout was recessed but was now flush with the tile surface due to dirt build-up. There were also areas contaminated with grease and kitchen cooking oil.
The Limestone floor tiles were 20mm thick French Limestone, and had been laid very well so there was no requirement to do any tile or grout repairs however to get this floor back to its original condition the surface would need to be reconditioned using the Tile Doctor four stage burnishing system.
I started by giving the floor a wash with a medium dilution of Tile Doctor Pro-Clean, focusing mainly on the grout lines in order to remove the muck that had built-up there. I used a special stiff grout brush for this activity; it’s quite narrow and ideal for grout scrubbing.
This worked well, but the significant build-up of dirt along some of the grout lines meant more work was required. I tackled this problem with a hand scraper assisted with steam. At the end of this process, the whole floor was then rinsed down with water to remove any soil and the resulting slurry was then extracted using a wet vacuum.
The next step was to start the burnishing process, which basically involves applying four diamond encrusted floor pads in sequence over the floor. Each pad is a different grade, starting with the most abrasive coarse pad and moving through to the finer grades using a little water to lubricate and rinsing away any slurry between each pad.
I eventually finished with the extra fine pad which builds up shine and lustre on the tile; it had taken two days to clean the grout and burnish the Limestone but the floor was much improved and so after a final rinse down I left the floor to dry off overnight with the aid of the underfloor heating.
During this time, I also addressed the stained Limestone in the area of the kitchen where the dustbin was situated. This had been a major upset for the customer and I’m happy to report I managed to deal with it. However, it was quite an involved process, so I’ll write about this in a separate post.
On the third day I came back to seal the floor, checking first that it had dried sufficiently with a damp meter. Fortunately, the underfloor heating had done a great job of drying the stone and I was able to seal the floor using three coats of Tile Doctor Colour Grow sealant. This sealant not only provides a durable seal but also penetrates deep into the pores of the stone protecting it from within and enhancing the natural colours of the Limestone in the process.
After the final layer of sealant, I worked over the floor again with the extra fine burnishing pad both to add shine again following sealing, and to ensure that no smear marks were visible as the lighting conditions were unforgiving and highlighted any imperfections.
The customer was delighted with the results: so much so, in fact, that they booked me in to restore their Victorian hallway floor as well but that’s a story for another time!
Julian Iancono
SE Wales Tile Doctor

 Chermak Construction, Inc.
Our client’s intension was to make this bathroom suite a very specialized spa retreat. She envisioned exquisite, highly crafted components and loved the colors gold and purple. We were challenged to mix contemporary, traditional and rustic features.
Also on the wish-list were a sizeable wardrobe room and a meditative loft-like retreat. Hydronic heated flooring was installed throughout. The numerous features in this project required replacement of the home’s plumbing and electrical systems. The cedar ceiling and other places in the room replicate what is found in the rest of the home. The project encompassed 400 sq. feet.
Features found at one end of the suite are new stained glass windows – designed to match to existing, a Giallo Rio slab granite platform and a Carlton clawfoot tub. The platform is banded at the floor by a mosaic of 1″ x 1″ glass tile.
Near the tub platform area is a large walnut stained vanity with Contemporary slab door fronts and shaker drawers. This is the larger of two separate vanities. Each are enhanced with hand blown artisan pendant lighting.
A custom fireplace is centrally placed as a dominant design feature. The hammered copper that surrounds the fireplace and vent pipe were crafted by a talented local tradesman. It is topped with a Café Imperial marble.
A lavishly appointed shower is the centerpiece of the bathroom suite. The many slabs of granite used on this project were chosen for the beautiful veins of quartz, purple and gold that our client adores.
Two distinct spaces flank a small vanity; the wardrobe and the loft-like Magic Room. Both precisely fulfill their intended practical and meditative purposes. A floor to ceiling wardrobe and oversized built-in dresser keep clothing, shoes and accessories organized. The dresser is topped with the same marble used atop the fireplace and inset into the wardrobe flooring.
The Magic Room is a space for resting, reading or just gazing out on the serene setting. The reading lights are Oil Rubbed Bronze. A drawer within the step up to the loft keeps reading and writing materials neatly tucked away.
Within the highly customized space, marble, granite, copper and art glass come together in a harmonious design that is organized for maximum rejuvenation that pleases our client to not end!
Photo, Matt Hesselgrave
 Change Your Bathroom©
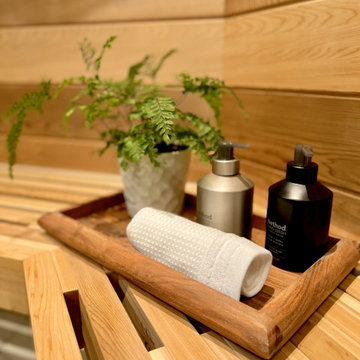
This transformation started with a builder grade bathroom and was expanded into a sauna wet room. With cedar walls and ceiling and a custom cedar bench, the sauna heats the space for a relaxing dry heat experience. The goal of this space was to create a sauna in the secondary bathroom and be as efficient as possible with the space. This bathroom transformed from a standard secondary bathroom to a ergonomic spa without impacting the functionality of the bedroom.
This project was super fun, we were working inside of a guest bedroom, to create a functional, yet expansive bathroom. We started with a standard bathroom layout and by building out into the large guest bedroom that was used as an office, we were able to create enough square footage in the bathroom without detracting from the bedroom aesthetics or function. We worked with the client on her specific requests and put all of the materials into a 3D design to visualize the new space.
Houzz Write Up: https://www.houzz.com/magazine/bathroom-of-the-week-stylish-spa-retreat-with-a-real-sauna-stsetivw-vs~168139419
The layout of the bathroom needed to change to incorporate the larger wet room/sauna. By expanding the room slightly it gave us the needed space to relocate the toilet, the vanity and the entrance to the bathroom allowing for the wet room to have the full length of the new space.
This bathroom includes a cedar sauna room that is incorporated inside of the shower, the custom cedar bench follows the curvature of the room's new layout and a window was added to allow the natural sunlight to come in from the bedroom. The aromatic properties of the cedar are delightful whether it's being used with the dry sauna heat and also when the shower is steaming the space. In the shower are matching porcelain, marble-look tiles, with architectural texture on the shower walls contrasting with the warm, smooth cedar boards. Also, by increasing the depth of the toilet wall, we were able to create useful towel storage without detracting from the room significantly.
This entire project and client was a joy to work with.


Sponsored
Sunbury, OH
J.Holderby - Renovations
Franklin County's Leading General Contractors - 2X Best of Houzz!

 LTB Designs
With a farmhouse feel, this guest bedroom serves to keep its guests feeling warm and relaxed.
Designed by: LTB Designs
Photographed by: Picture Perfect LLC

 SUPERIOR CHIMNEY SERVICES CORPORATION
As you may know, Superior Chimney writes a lot of articles to educate the Chicagoland area on chimneys and how to identify problems. Every once in a while, it is good to go back and review the basics. That’s what we’re going to do. We’re going to discuss what are the components of a chimney. Let’s get started.
What are the Components of a Fireplace?
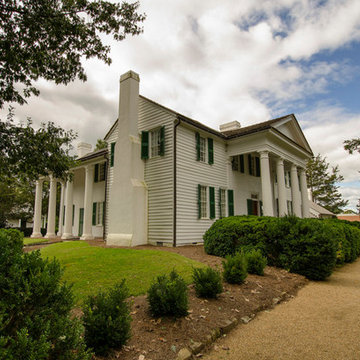
We’re going to get started on the actual chimney itself. Most chimneys are built of brick and some are constructed of a wood framed chase with siding on it to match the rest of the home. The traditional masonry fireplace chimneys include (from the inside out) a firebox, where the firewood burns and gas starter are located. Going up is the throat, smoke chamber and then chimney flue. These are the components of a masonry chimney where the exhaust/air travels through - From the firebox and out through the top of the chimney. You can most often ‘see’ your chimney from the ground, you will notice the bricks and on top of that will be the chimney crown (cement slab) which keeps the elements away from the brick chimney. On top of the chimney crown is the chimney cap. This is what keeps animals & debris from entering the chimney flue… raccoons, squirrels, birds, bats, etc… down the flue, and into the firebox.
Now that we know what components that a chimney has, let’s focus on a couple of key areas.
Fireplace Dampers
All chimneys are fitted with a fireplace damper. A fireplace damper is a metal plate that opens and closes, allowing smoke from the fireplace to move up and out of the home. If you have a fire and the fireplace damper is closed, or restrictive, the smoke will back up into your home. The smoke needs a place to go. When the fireplace is not in use, the damper should remain closed in order to keep the cold air out of your home and warm air from escaping your home. Just because you have a fireplace does not mean that you have to deal with cold drafts in the room the fireplace is in.
Chimney Flues
As we all know, heat rises. The heat from the fireplace is going to rise taking with it the smoke, and other gases. This process is known as drafting. It is important to have good drafting as it prevents the smoke or gases from staying in your home and harming your family.
Chimney Flue Liners
Flue liners are important to the chimney; they are your firewall. It works to prevent overheating of any combustibles next to the chimney. And, it helps so the chimney construction doesn’t corrode from the byproducts of burning wood, or creosote. There are a few types of flue liners, such as fire clay tiles, heat resistant concrete, and stainless steel. Superior Chimney recommends the use of stainless steel in our geographic freeze and thaw climate. Our technicians can give you the details when we are at your home.
What is the Purpose of Taking Care of the Chimney?
Chimney Fires. This is where regular sweep & inspection is crucial to the health of your home. Without a chimney sweep or chimney cleaning each year, (whether you use the chimney or not, gas or wood burning) the chimney can cause a fire to transfer to your home. Only Nationally credentialed service technician professionals know and can inspect the key components of a fireplace for known condition and continued use. Be sure to contact us today!
 julianhardacre
Top Tips for Selling a Home in 2016
Want to sell your house in 2016? It’s a great year to sell your home and if you go about it the right way you’ll get what it’s worth and maybe more.
Now I could write this post and do the usual “do this, “do that” type stuff but I wouldn’t be doing you any favors. Because unless you know your numbers and the value of your home, you could wind up leaving money on the table or even losing it.
So here you go.
If you want tips for selling your house in 2016, listen to me - a guy who has bought and sold hundreds of properties as a full-time professional Real Estate Investor. Before you repair anything or call a real estate agent…
...you have to know your numbers.
Tip #1: Know the After Repair Value (ARV) of Your Home
If you’re going to get the right amount of money for your house, you have to know the After Repair Value (ARV). Essentially this means that you should know what your home can sell for after it’s is 100% rehabbed.
If you have a house that you can sell for $120,000, you need to know that. If it will sell for $350,000, you need to know what you need to do to your house to get it there. At the same time, you don’t want to overdo it.
If you have a house that’s currently worth $100,000 as is and it can sell for $115,000 when it’s all fixed up, you may or may not want to put the money into a rehab job. If you put $10,000 in just to make an extra $5,000, it might not be worth the hassle.
So whatever you do, know what it’s worth now (as -is) and know what it’ll sell for afterward. If you want to find out how much your house is worth, there are plenty of agents out there who will give you comps (Comps is a term that is short for “Comparisons” that lets you determine an appraisal value for your home by comparing it to recently sold homes in your area that are similar to yours) or advice for free, so ask them.
So don’t over do it, but don’t be hesitant to put money into your house if it’ll yield a big payoff when you sell it.
TIP #2: Make Your Agent Work For You
After you determine your ARV and enlist a good agent to help you sell your home, It might be worthwhile to hop in their Escalade to drive around town and look at some high end houses in your area to see what kind of upgrades they have. And when you see a common theme, you’ll have a good idea as to what kind of upgrades you might want to do to be able to sell your house.
Granite? Concrete? Tile? Carpet? Wood floors?
It depends.
I don’t know your area or market so you have to do the research, ask your agent questions, and exercise wisdom. Every market is different and you don’t want to put money into an upgrade or rehab if it’s not the type of thing people in your area are looking for.
So talk to a competent agent, and even offer to pay them a bit more in commissions if they can sell your home for a higher price.
This is not a waste of money.
A good agent with a proven track record is worth every penny because they know exactly what needs to be done to sell your home for the most money.
Tip #3: Interior Improvements
So once you have an idea about what your home is worth, have a good agent, and have toured homes in your area to see what kind of upgrades homes in your area typically have, it's time to look at your interior to decide what you should and shouldn’t do to sell your house in 2016.
No matter what you do, you need to be wise about it. Maybe you live in non-traditional or funky house. That’s fine. Just go through 2 or 3 times with a notepad, write down the frustrations you have with it, and do what you need to do to make it functional, warm, beautiful, and inviting.
Interior must-haves:
1. Make sure your kitchen is functional.
2. Always have (or add) a 2nd bathroom: If you don’t have a second bathroom, build one. Sure it could cost you $5-$6k, but it could net you an additional $20k when you sell. No matter what you do, make sure there is a second bathroom. It’s a must.
1. Open floor plans are huge in 2016: If you don’t have one, first- make sure it’s right for your area, and if it is, create one. This might mean building or breaking down a wall, but it’ll pay off in the end.
2. Stage your house: Just do it. Staging your home means that you hire a home stager and/or an interior design consultant (like the lady on Love It or List It) to set up your home in the most inviting way possible and tell you everything you need to do to make it sell. You’ll pay some cash up front but staged homes are shown to sell for 6% to 10% higher according to realtor.org.
Tip #4: Exterior Improvements
Just like the interior, you have to make sure the exterior of your house looks appealing if you want to get the most value of your house in 2016.
Exterior must haves:
1. Add curb appeal: When people pull up to your house, most won’t even want to go inside or look at it unless it looks good from the curb. So make sure it looks gorgeous. Rake the leaves, plant some flowers, mow the lawn - make it inviting.
2. Make sure the picture on the MLS listing matches what your house currently looks like: People don’t want to look at a picture and pull up to your house, only to be disappointed.
3. Hire a professional photographer: This is crucial. It could mean the difference between someone viewing your house, or someone skipping it because the pictures look like a child took them. Hire a pro - it’s worth it. Ask me how I know.
4. Don’t paint your house diarrhea green or brown: This is just common sense. If you’re going to paint, use a neutral color. You don’t want to make your house unsellable because you chose an odd color or made a bad decision elsewhere.
Tip #5: Common Sense, Common Sense, Common Sense
No matter what you do or do not do, don’t make any hasty decisions. Ask your agent questions, look around, be observant, and don't do anything extreme. If you need to fix up your house to see a big profit, do it. If you have a modest budget and improvements won’t raise the value or your house (the ARV) anyways, don’t go crazy.
2016 is a great year to sell your house.
Do it right and do it wisely.
Cheers,
Nate
---
Nate Pyles is a long term Real Estate Investor who made it through the crash in 2008 and spends his week buying and selling houses for profit in the Boise, ID area. He runs House Flip Mentor, has 4 kids, a gorgeous wife, loves to fly, and even built his own Irish pub on his property.
 TVL Creative Ltd.
Our clients had just recently closed on their new house in Stapleton and were excited to transform it into their perfect forever home. They wanted to remodel the entire first floor to create a more open floor plan and develop a smoother flow through the house that better fit the needs of their family. The original layout consisted of several small rooms that just weren’t very functional, so we decided to remove the walls that were breaking up the space and restructure the first floor to create a wonderfully open feel.
After removing the existing walls, we rearranged their spaces to give them an office at the front of the house, a large living room, and a large dining room that connects seamlessly with the kitchen. We also wanted to center the foyer in the home and allow more light to travel through the first floor, so we replaced their existing doors with beautiful custom sliding doors to the back yard and a gorgeous walnut door with side lights to greet guests at the front of their home.
Living Room
Our clients wanted a living room that could accommodate an inviting sectional, a baby grand piano, and plenty of space for family game nights. So, we transformed what had been a small office and sitting room into a large open living room with custom wood columns. We wanted to avoid making the home feel too vast and monumental, so we designed custom beams and columns to define spaces and to make the house feel like a home. Aesthetically we wanted their home to be soft and inviting, so we utilized a neutral color palette with occasional accents of muted blues and greens.
Dining Room
Our clients were also looking for a large dining room that was open to the rest of the home and perfect for big family gatherings. So, we removed what had been a small family room and eat-in dining area to create a spacious dining room with a fireplace and bar. We added custom cabinetry to the bar area with open shelving for displaying and designed a custom surround for their fireplace that ties in with the wood work we designed for their living room. We brought in the tones and materiality from the kitchen to unite the spaces and added a mixed metal light fixture to bring the space together
Kitchen
We wanted the kitchen to be a real show stopper and carry through the calm muted tones we were utilizing throughout their home. We reoriented the kitchen to allow for a big beautiful custom island and to give us the opportunity for a focal wall with cooktop and range hood. Their custom island was perfectly complimented with a dramatic quartz counter top and oversized pendants making it the real center of their home. Since they enter the kitchen first when coming from their detached garage, we included a small mud-room area right by the back door to catch everyone’s coats and shoes as they come in. We also created a new walk-in pantry with plenty of open storage and a fun chalkboard door for writing notes, recipes, and grocery lists.
Office
We transformed the original dining room into a handsome office at the front of the house. We designed custom walnut built-ins to house all of their books, and added glass french doors to give them a bit of privacy without making the space too closed off. We painted the room a deep muted blue to create a glimpse of rich color through the french doors
Powder Room
The powder room is a wonderful play on textures. We used a neutral palette with contrasting tones to create dramatic moments in this little space with accents of brushed gold.
Master Bathroom
The existing master bathroom had an awkward layout and outdated finishes, so we redesigned the space to create a clean layout with a dream worthy shower. We continued to use neutral tones that tie in with the rest of the home, but had fun playing with tile textures and patterns to create an eye-catching vanity. The wood-look tile planks along the floor provide a soft backdrop for their new free-standing bathtub and contrast beautifully with the deep ash finish on the cabinetry.
Sponsored
Columbus, OH
Free consultation for landscape design!

Peabody Landscape Group
Columbus' Reliable Landscape Design & Contracting
 Chermak Construction, Inc.
Our client’s intension was to make this bathroom suite a very specialized spa retreat. She envisioned exquisite, highly crafted components and loved the colors gold and purple. We were challenged to mix contemporary, traditional and rustic features.
Also on the wish-list were a sizeable wardrobe room and a meditative loft-like retreat. Hydronic heated flooring was installed throughout. The numerous features in this project required replacement of the home’s plumbing and electrical systems. The cedar ceiling and other places in the room replicate what is found in the rest of the home. The project encompassed 400 sq. feet.
Features found at one end of the suite are new stained glass windows – designed to match to existing, a Giallo Rio slab granite platform and a Carlton clawfoot tub. The platform is banded at the floor by a mosaic of 1″ x 1″ glass tile.
Near the tub platform area is a large walnut stained vanity with Contemporary slab door fronts and shaker drawers. This is the larger of two separate vanities. Each are enhanced with hand blown artisan pendant lighting.
A custom fireplace is centrally placed as a dominant design feature. The hammered copper that surrounds the fireplace and vent pipe were crafted by a talented local tradesman. It is topped with a Café Imperial marble.
A lavishly appointed shower is the centerpiece of the bathroom suite. The many slabs of granite used on this project were chosen for the beautiful veins of quartz, purple and gold that our client adores.
Two distinct spaces flank a small vanity; the wardrobe and the loft-like Magic Room. Both precisely fulfill their intended practical and meditative purposes. A floor to ceiling wardrobe and oversized built-in dresser keep clothing, shoes and accessories organized. The dresser is topped with the same marble used atop the fireplace and inset into the wardrobe flooring.
The Magic Room is a space for resting, reading or just gazing out on the serene setting. The reading lights are Oil Rubbed Bronze. A drawer within the step up to the loft keeps reading and writing materials neatly tucked away.
Within the highly customized space, marble, granite, copper and art glass come together in a harmonious design that is organized for maximum rejuvenation that pleases our client to not end!
Photo, Matt Hesselgrave
 Eco Design & Builders Inc.
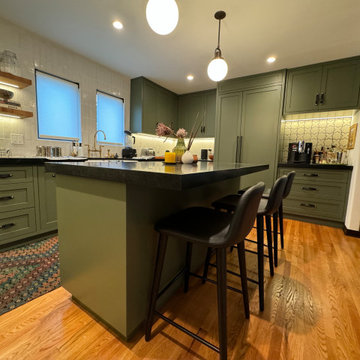
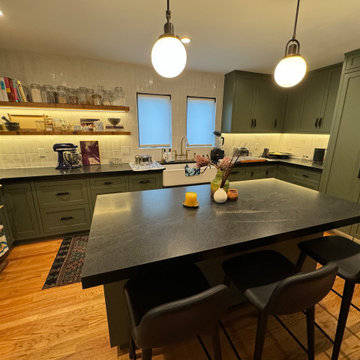
Custom made kitchen cabinets with a color that we created after many tests and the results...wow. I love simplicity, even when I write to you what you see, so lets do this:
The custom cabinets are 3/4'' plywood frame and the doors and the face of the drawers are maple as well. Remember, when you hear Maple kitchen cabinets, that is what it means.
NOT all of it Maple, there is but very uncommon. Unless you can afford it and really want it so why not, right?
Self close, smart stops, pantry. Regarding any pantry, custom cabinets or semi custom, they both have pull out shelves but up to 5' high. City Code.
The city worry that nothing will full on you or little children.
The counter is Hond, no sheen Quartz with straight edge.
The floor is the original Oak. It always amaze me that they used to build houses with solid Oak floor. WOW!! The backsplash is Porcelain with wavy look.
The floating shelves are heavy duty, meaning, the wood is solid and we need to create a custom metal to drill it to the shelve and installing it to the studs. This is if you want to put heavy stuff like plats, glasses etc.
Island with a sitting area so we extended the counter out by 16''. If you want to extend more, brackets will ne needed for supporting the countertop.
That is it basically.
I hope I made it clear. I know it's not easy to do/plan a project with many challenges and the main one is to who are you going to give your savings, your money to do the remodeling, to create your dream. I know. Just follow your heart, take 3 bids, no need more, you will just get more confused.
Much blessing to you.
Ori
 Eco Design & Builders Inc.
Custom made kitchen cabinets with a color that we created after many tests and the results...wow. I love simplicity, even when I write to you what you see, so lets do this:
The custom cabinets are 3/4'' plywood frame and the doors and the face of the drawers are maple as well. Remember, when you hear Maple kitchen cabinets, that is what it means.
NOT all of it Maple, there is but very uncommon. Unless you can afford it and really want it so why not, right?
Self close, smart stops, pantry. Regarding any pantry, custom cabinets or semi custom, they both have pull out shelves but up to 5' high. City Code.
The city worry that nothing will full on you or little children.
The counter is Hond, no sheen Quartz with straight edge.
The floor is the original Oak. It always amaze me that they used to build houses with solid Oak floor. WOW!! The backsplash is Porcelain with wavy look.
The floating shelves are heavy duty, meaning, the wood is solid and we need to create a custom metal to drill it to the shelve and installing it to the studs. This is if you want to put heavy stuff like plats, glasses etc.
Island with a sitting area so we extended the counter out by 16''. If you want to extend more, brackets will ne needed for supporting the countertop.
That is it basically.
I hope I made it clear. I know it's not easy to do/plan a project with many challenges and the main one is to who are you going to give your savings, your money to do the remodeling, to create your dream. I know. Just follow your heart, take 3 bids, no need more, you will just get more confused.
Much blessing to you.
Ori
62