
Search results for "Your own zones" in Home Design Ideas
 Value Builders
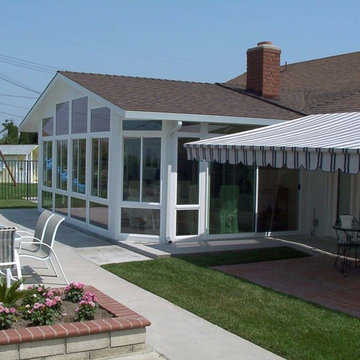
Have you ever wondered about the installation Process of a C-Thru Sunroom? Take a look at the Video Below to see the process from start to finish. Contact us for more information on a C-Thru Sunroom.
1- The first step in any sunroom build is pre-construction and demo. Here you can see our builders are setting forms for the foundation. A nice level foundation will ensure a water tight seal to last and last and prevent against perimeter leaks.
3 - In this particular sunroom the client wanted a higher roof so we built her what is called a roof saddle
4 - The benefits of a roof saddle include, extra height, better drainage, more light with upper glass transoms and even an option to match your existing roof
5- We have the safest delivery methods for your materials they will arrive in customized prepackaging.
6 - We carefully unload and stage materials in your backyard.
7- Here, our certified C Thru Installers are anchoring perimeter channels that holds the walls in place.
8 - These channels are specially designed with an anti-moisture system to prevent perimeter leaks Guaranteeing a moisture free environment.
9- Our installers are putting up the walls - carefully leveling and plumbing each section to the house, we can achieve a custom fit to any house wall with modifications as needed.
10- all though our roof systems are water tight as is, we offer composition roofing to match your existing roof and add to the over all aesthetics of the structure. Flooring, Heating and cooling, fans, lights, and many other custom interior and exterior aesthetic options are available.
While other sunroom additions are only available in stock sizes, or rely on panels and miscellaneous parts to be mixed and matched to fit your home as best they can, C-Thru sunrooms are individually designed and engineered according to the exact specifications of your home. Each and every piece of our sunrooms is fabricated with total precision in our innovative manufacturing facility using industry-leading Computer Aided Design technology. This means that every single sunroom we build is engineered with efficiency, perfect sizing, and optimal visual appeal in mind.
Custom Sunroom Additions for Every Home
When it comes to custom sunroom additions, C-Thru offers a multitude of options to fit your exact preferences and the specific needs of your home. And thanks to our efficient, precision manufacturing technology, a sunroom addition installation with us can be finished in a matter of days—not weeks. When you work with us, you’ll have access to a variety of energy efficient elements to choose from, including Roof Styles: Window Styles: Interior/Exterior Styles:
Make your sunroom truly your own, with options to personalize every feature to your preference. From heated flooring to cable-ready installation, we can make sure your sunroom is ready for its intended purpose.
Thank you for watching, for an estimate please do not hesitate to contact us! We are happy to help with your patio cover or sunroom project.
Contact us today for an estimate!
P: 1-650-339-1477
E: marco.truvaluebuilders@gmail.com
cthrusunroomsnocal.com
patiocoversgalore.com
https://www.youtube.com/watch?v=OoFZ3vZ_yfk&t=71s
#GabledSunrooms #PatioCovers #PatioEnclosures #ScreenRooms #StudioSunrooms #ThreeSeasonRooms #FourSeasonRooms #Enclosures #Solarium #Awning #Retractable #Awning #BayArea #SF #SanJose #SantaClara #Hayward #SanMateo #Burligame #EastBay #Concord #Penninsula #California #NorCal #NorthBayArea #sunroom #patioenclosure #pergola #patiocovering #shed #greenhouse #Solarium #sunroom
At C-Thru Sunrooms we have bi-parting windows and doors! Easy to operate door panels allow for quick opening and closing allowing for lots of ventilation and easy of movement in and out. These doors are great for entertaining a large croud or family event!
We are also one of the first sunroom manufactures to offer a solution to all your lighting needs. Our recessed lighting and fans are sure to illuminate your night!
Contact us today for an estimate!
P: 1-650-339-1477
E: marco.truvaluebuilders@gmail.com
cthrusunroomsnocal.com
patiocoversgalore.com
link to video
https://www.youtube.com/watch?v=esXIo3IA1uQ&t=56s
#GabledSunrooms #PatioCovers #PatioEnclosures #ScreenRooms #StudioSunrooms #ThreeSeasonRooms #FourSeasonRooms #Enclosures #Solarium #Awning #Retractable #Awning #BayArea #SF #SanJose #SantaClara #Hayward #SanMateo #Burligame #EastBay #Concord #Penninsula #California #NorCal #NorthBayArea #sunroom #patioenclosure #pergola #patiocovering #shed #greenhouse #Solarium #sunroom
 Thyme & Place Design LLC
When my client had to move from her company office to work at home, she set up in the dining room. Despite her best efforts, this was not the long-term solution she was looking for. My client realized she needed a dedicated space not on the main floor of the home. On one hand, having your office space right next to the kitchen is handy. On the other hand, it made separating work and home life was not that easy.
The house was a ranch. In essence, the basement would run entire length of the home. As we came down the steps, we entered a time capsule. The house was built in the 1950’s. The walls were covered with original knotty pine paneling. There was a wood burning fireplace and considering this was a basement, high ceilings. In addition, there was everything her family could not store at their own homes. As we wound though the space, I though “wow this has potential”, Eventually, after walking through the laundry room we came to a small nicely lit room. This would be the office.
My client looked at me and asked what I thought. Undoubtedly, I said, this can be a great workspace, but do you really want to walk through this basement and laundry to get here? Without reservation, my client said where do we start?
Once the design was in place, we started the renovation. The knotty pine paneling had to go. Specifically, to add some insulation and control the dampness and humidity. The laundry room wall was relocated to create a hallway to the office.
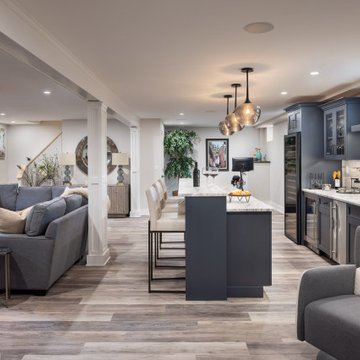
At the far end of the room, we designated a workout zone. Weights, mats, exercise bike and television are at the ready for morning or afternoon workouts. The space can be concealed by a folding screen for party time. Doors to an old closet under the stairs were relocated to the workout area for hidden storage. Now we had nice wall for a beautiful console and mirror for storage and serving during parties.
In order to add architectural details, we covered the old ugly support columns with simple recessed millwork panels. This detail created a visual division between the bar area and the seating area in front of the fireplace. The old red brick on the fireplace surround was replaced with stack stone. A mantle was made from reclaimed wood. Additional reclaimed wood floating shelves left and right of the fireplace provides decorative display while maintaining a rustic element balancing the copper end table and leather swivel rocker.
We found an amazing rug which tied all of the colors together further defining the gathering space. Russet and burnt orange became the accent color unifying each space. With a bit of whimsy, a rather unusual light fixture which looks like roots from a tree growing through the ceiling is a conversation piece.
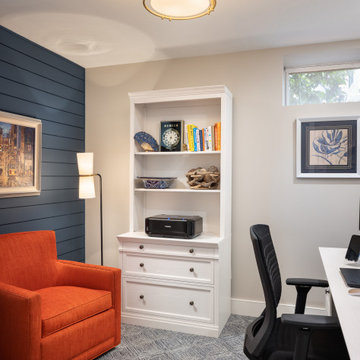
The office space is quite and removed from the main part of the basement. There is a desk large enough for multiple screens, a small bookcase holding office supplies and a comfortable chair for conference calls. Because working from home requires many online meetings, we added a shiplap wall painted in Hale Navy to contrast with the orange fabric on the chair. We finished the décor with a painting from my client’s father. This is the background online visitors will see.
The last and best part of the renovation is the beautiful bar. My client is an avid collector of wine. She already had the EuroCave refrigerator, so I incorporated it into the design. The cabinets are painted Temptation Grey from Benjamin Moore. The counter tops are my favorite hard working quartzite Brown Fantasy. The backsplash is a combination of rustic wood and old tin ceiling like porcelain tiles. Together with the textures of the reclaimed wood and hide poofs balanced against the smooth finish of the cabinets, we created a comfortable luxury for relaxing.
There is ample storage for bottles, cans, glasses, and anything else you can think of for a great party. In addition to the wine storage, we incorporated a beverage refrigerator, an ice maker, and a sink. Floating shelves with integrated lighting illuminate the back bar. The raised height of the front bar provides the perfect wine tasting and paring spot. I especially love the pendant lights which look like wine glasses.
Finally, I selected carpet for the stairs and office. It is perfect for noise reduction. Meanwhile for the overall flooring, I specifically selected a high-performance vinyl plank floor. We often use this product as it is perfect to install on a concrete floor. It is soft to walk on, easy to clean and does not reduce the overall height of the space.
 Lorraine G Vale, ASID Allied
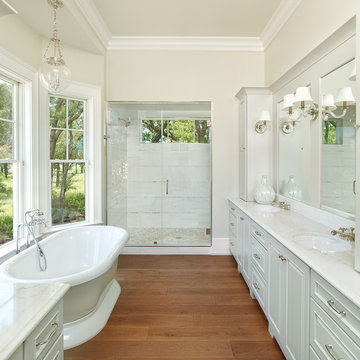
One of the main features of the space is the natural lighting. The windows allow someone to feel they are in their own private oasis. The wide plank European oak floors, with a brushed finish, contribute to the warmth felt in this bathroom, along with warm neutrals, whites and grays. The counter tops are a stunning Calcatta Latte marble as is the basket weaved shower floor, 1x1 square mosaics separating each row of the large format, rectangular tiles, also marble. Lighting is key in any bathroom and there is more than sufficient lighting provided by Ralph Lauren, by Circa Lighting. Classic, custom designed cabinetry optimizes the space by providing plenty of storage for toiletries, linens and more. Holger Obenaus Photography did an amazing job capturing this light filled and luxurious master bathroom. Built by Novella Homes and designed by Lorraine G Vale
Holger Obenaus Photography
Find the right local pro for your project
 Donald A. Gardner Architects
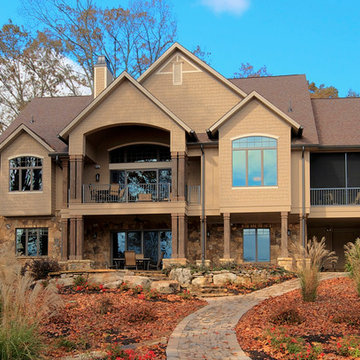
What’s your interpretation of a cottage floor plan? Take a look at this eye-catching home and imagine how you and your family can live your dream in a rustic cottage with all of the modern conveniences.
Stone, shake, multiple metal roofs and gables all combine for a truly unique exterior. At almost 3500 square feet, this home is stunning inside and out. Entertaining is a breeze with the open kitchen, dining and great room, as well as on the screen porch with fireplace, cathedral ceiling and grill. A flexible bedroom/study has its own bath and is an ideal guest suite.
The master bedroom is positioned in the rear of the home and features a window seat, built-in shelves and a vaulted ceiling. His-and-her walk-in closets and a dressing room add special touches. A luxurious master bath completes the master suite.
Downstairs, the basement level includes two guest rooms, each with their own full bath and a wine cellar. A large storage area and rec room complete the basement.
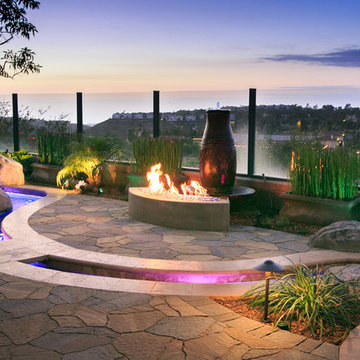
 Western Outdoor Designs
Creating your outdoor living space means claiming your own little slice of nature and customizing it to suit your lifestyle and enhance your daily routine. Sometimes there is nothing more relaxing than sitting on your favorite patio chair, feeling the warm sun mixed with a cool breeze, and smelling the fragrant flowers blossoming in your garden. Imagine how much more time you would spend outside if you had your very own cabana, bungalow, pergola, sunroom or pool house to enjoy! Think of all the ways an outdoor room could enhance your Southern California lifestyle and prime your home for entertaining guests year-round.
Our knowledgeable and experienced team of landscape design professionals and outdoor living specialists will sit down with you and explain the features and benefits of each structure. Whatever your dreams may be, Western Outdoor Design & Build can turn them into reality. (800) 789-7510!
Www.westernoutdoordesign.com
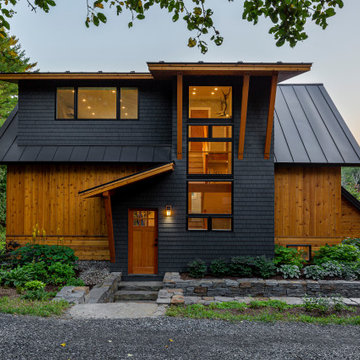
 Newschool Builders LLC
The cobblers kids have no shoes rang true as this builder worked on his own home for many years. Originally a 1980’s split level, this project slowly transformed from a once outdated and run down building into a beautiful contemporary home. Mixing natural wood and stone created a classic, yet contemporary feel throughout the interior and exterior.
A full gut down to the studs allowed the structure to be up fitted with new mechanicals, electrical, insulation, windows and doors. We moved the kitchen to the south side, removed the attic and built full length dormers and a stair tower allowing epic views of cables hump. The interior is built out with custom builtins, cabinets and furniture. The exterior was laid out in a way that makes entertaining a dream. Landscaping and hardscaping tied this whole project together. It feels good to finish building out your own home from a dream all the way through to reality.
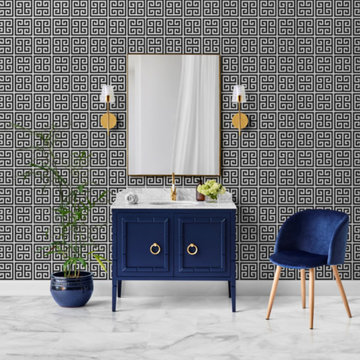
 Vanity by Design
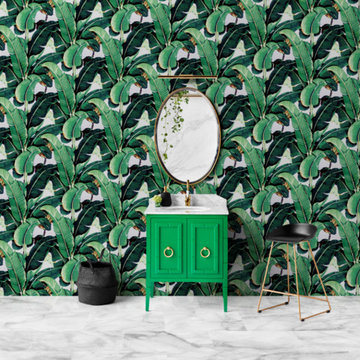
White and neutral colours will probably never go out of style in homes, but colour is slowly being introduced back into our homes. By adding colour through tiles, grout, stone and even wallpaper we can create these amazing areas that capture individuality and style. We are currently in the process of redesigning our Vanity by Design Brisbane showroom in Darra, and have some trendy new ideas that will definitely change your choice of neutral colours.
Wallpaper produces an elegant way to completely change the look of a space and allows you to put your own personal touch on the walls. Whether you’re on a budget or you just want to add more attention to your high-end interiors you can play around with your own creativity in so many different ways through wallpaper. Normally we are used to having spaces like our living rooms, dining rooms and bedrooms wallpapered, but we forget that our bathrooms and powder rooms can also be an uplifting and creative area within your homes.
It’s important to realise that by choosing the correct wallpaper for a space can make a room appear bigger, brighter and warmer than it is. If your bathroom has low ceilings try to pick patterns with cool colour backgrounds like greens and blues. For colder environments you want colours that make the room feel warmer, these colours are oranges, yellows and reds.
In regards to the type of wallpaper suitable for bathrooms usually vinyl wallpaper is the best option. This material is resistant to water and water vapour making it appropriate for kitchens and bathrooms. Wallpaper can make so much difference in a room, from creative patterns, smooth surfaces and a huge variety of colour you are sure to find a wallpaper that suits your individual flair and character.

Sponsored
Delaware, OH

Buckeye Basements, Inc.
Central Ohio's Basement Finishing ExpertsBest Of Houzz '13-'21
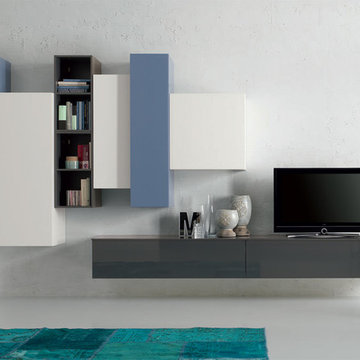
 Valentini Kids Furniture Brooklyn NY
Modern Wall Unit Exential Y16 by Spar
Made in Italy
Exential by Spar is an italian modular wall unit line that could be an excellent design solution for any modern or contemporary styled living room, especially if the space is limited. Individual units allow to make a large TV area and functionally organize only those areas you need, which is impossible to do with the joint wall unit compositions. This italian entertainment center will complement your home and the areas of your daily life, not only as an aesthetic, but also as a functional addition, featuring an abundance of storage space, both hidden and exposed, to aid you with the organization of all your belongings, bringing the elegance into your interior. An original modern look of this wall unit composition is also achieved by a different depth of the wall mounted units.
The Wall Unit Composition Exential Y16 is shown in the next colors/finishes:
Structure - White and Gray Smoke Gloss, Blue and Gray Smoke Matt lacquers;
Front - White and Gray Smoke Gloss, Blue Matt lacquers.
PLEASE NOTE: The Exential is a modular wall unit line offering a wide variety of units in different sizes. You can order this wall unit either as a complete composition, as shown in the main picture, or build your own composition according to your own dimensions and preferences. Please contact our office about details on the customization of this wall unit.
MATERIAL/CONSTRUCTION:
Structure: Made with particle board of wood, covered with E1 melamine finishes or high gloss lacquer
Drawers: Made with panels of wood particles in E1-coated finish PVC beech. Metal runners with fine race to fall
Glass: 4mm glass
The starting price is for the Exential Wall Unit Composition Y16 as shown in the main picture.
Dimensions:
Wall Unit Composition: W136" x D17.7" x H72"
 Vanity by Design
White and neutral colours will probably never go out of style in homes, but colour is slowly being introduced back into our homes. By adding colour through tiles, grout, stone and even wallpaper we can create these amazing areas that capture individuality and style. We are currently in the process of redesigning our Vanity by Design Brisbane showroom in Darra, and have some trendy new ideas that will definitely change your choice of neutral colours.
Wallpaper produces an elegant way to completely change the look of a space and allows you to put your own personal touch on the walls. Whether you’re on a budget or you just want to add more attention to your high-end interiors you can play around with your own creativity in so many different ways through wallpaper. Normally we are used to having spaces like our living rooms, dining rooms and bedrooms wallpapered, but we forget that our bathrooms and powder rooms can also be an uplifting and creative area within your homes.
It’s important to realise that by choosing the correct wallpaper for a space can make a room appear bigger, brighter and warmer than it is. If your bathroom has low ceilings try to pick patterns with cool colour backgrounds like greens and blues. For colder environments you want colours that make the room feel warmer, these colours are oranges, yellows and reds.
In regards to the type of wallpaper suitable for bathrooms usually vinyl wallpaper is the best option. This material is resistant to water and water vapour making it appropriate for kitchens and bathrooms. Wallpaper can make so much difference in a room, from creative patterns, smooth surfaces and a huge variety of colour you are sure to find a wallpaper that suits your individual flair and character.
 Kasia Karska Design
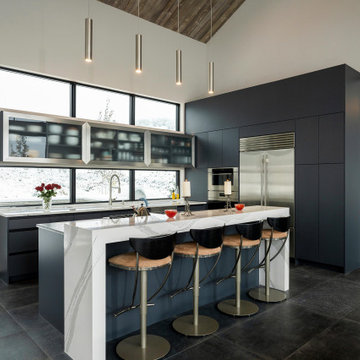
Kasia Karska Design is a design-build firm located in the heart of the Vail Valley and Colorado Rocky Mountains. The design and build process should feel effortless and enjoyable. Our strengths at KKD lie in our comprehensive approach. We understand that when our clients look for someone to design and build their dream home, there are many options for them to choose from.
With nearly 25 years of experience, we understand the key factors that create a successful building project.
-Seamless Service – we handle both the design and construction in-house
-Constant Communication in all phases of the design and build
-A unique home that is a perfect reflection of you
-In-depth understanding of your requirements
-Multi-faceted approach with additional studies in the traditions of Vaastu Shastra and Feng Shui Eastern design principles
Because each home is entirely tailored to the individual client, they are all one-of-a-kind and entirely unique. We get to know our clients well and encourage them to be an active part of the design process in order to build their custom home. One driving factor as to why our clients seek us out is the fact that we handle all phases of the home design and build. There is no challenge too big because we have the tools and the motivation to build your custom home. At Kasia Karska Design, we focus on the details; and, being a women-run business gives us the advantage of being empathetic throughout the entire process. Thanks to our approach, many clients have trusted us with the design and build of their homes.
If you’re ready to build a home that’s unique to your lifestyle, goals, and vision, Kasia Karska Design’s doors are always open. We look forward to helping you design and build the home of your dreams, your own personal sanctuary.
 Advance Design Studio, Ltd.
Jennifer and Dan have lived in their Deer Park Illinois home for 15 years, slowly making minor fixes like painting and decorating; but they had a new plan for their kitchen the entire time. An awkwardly placed garage door, and an island cooktop with a terrible downdraft made a full-scale kitchen remodel an absolute must. Jennifer had many ideas in mind and wanted to work with a company that could provide high-end work, while partnering with a designer that would tailor the kitchen to her ideas.
She was intrigued by the phrase “Common Sense Remodeling” in Advance Design’s feature she discovered while perusing an issue of the community’s Quintessential Barrington Magazine. Doing further research on the company’s website, as she looked through project profiles and read about Advance Design’s “Common Sense Remodeling” philosophy, she promptly scheduled an appointment to see if the people and ideas she read about were truly who they said they were. The more she read, the more she knew that the “Common Sense” approach to remodeling they described was exactly the type of company she was looking for.
The partnership was sealed after an initial consultation with Owner Todd Jurs and Project Designer Michelle Lecinski. They displayed a combination of friendliness, professionalism and respect that was unmatched by any of the other companies Jennifer talked to. She knew that with Advance Design, she would be able to retain the vision that she had in mind with high-quality craftsmanship.
“I reached out to Advance Design because of the ‘Common Sense Remodeling’ tagline,” Jennifer said. “That’s what lingered for me”. “Advance Design was the most respectful- of the house and of my design ideas, and the most professional of the handful of companies that looked at my project”.
Soon after the meeting Jennifer began working with Michelle on the project design. They quickly developed chemistry. Jennifer loved how Michelle researched and located every detail that Jennifer wanted for the kitchen. Between the two of them, every concept and idea was worked through and perfected. “Jennifer had definite ideas about what she wanted the new kitchen to look like, she just didn’t know how to bring it all together. We worked together really well to make her ideas into the practical reality necessary for a well-functioning kitchen, with the look and feel that she had envisioned”, says Michelle.
“Michelle was wonderful in using the CAD system she would show me new drawings every time we changed the layout while working through the design,” Jennifer said. “She was a really wonderful partner in execution, she made sure everything happened quickly and easily.”
The finished design drew out elements of Jennifer’s style and personality. The pair call the look “sophisticated farmhouse” to describe the kitchen renovation to family and friends. The result was a beautifully crafted, authentic-feeling space that satisfied Jennifer’s dreams 15 years in the making. The whole project consisted of a kitchen remodel, mudroom upgrade with powder room, and garage entry relocation. “The projects I personally like the best, are the ones that put the client’s dreams on display,” Project Designer Michelle said. “And this is one of those projects.”
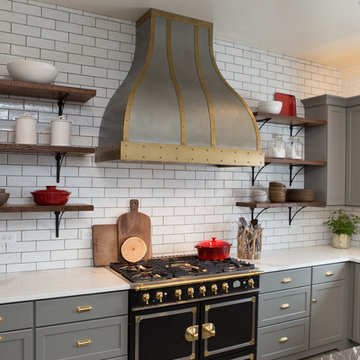
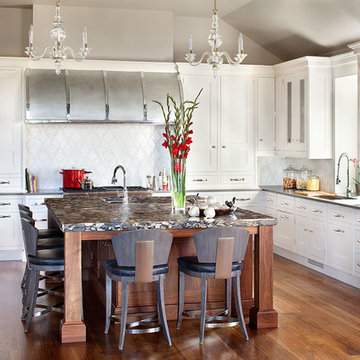
The main focal point of the kitchen is custom zinc and brass ventilation hood with a vintage sheen, which was hand made to order by a small company in Indiana named Vogler Metalworking. “It’s like sculpture, a true work of art”, says Jennifer. Your eye is immediately drawn towards this elegant yet practical hood that eliminated the home’s downdraft problem and added a striking conversation piece at the same time. The carpenters had to use special gloves when transporting and installing it, so they didn’t smudge it with fingerprints. The beautiful hood centers proudly over the stunning black enamel and brass LaCornue Range. “I had a friend who had a LaCornue range and after learning how easy it was to cook perfect meals, I was convinced I wanted to have one”, says Jennifer. This unique, breathtaking combination anchors the entire kitchen and is apparent immediately as you walk into the great room the surrounds the space.
DuraSupreme Crestwood cabinets with a Kendall Panel add function and sophistication. A custom gray paint color paired with a storm blue was developed so that the new kitchen looked like it belonged to the existing space. Unlacquered brass faucets and hardware were important to Jennifer because she wanted the living finishes to age over time. Remarkable brass diamond mesh cabinet door inserts imported from the UK continue to add this one-of-a-kind kitchen renovation; giving it a “you won’t see this everywhere” quality. The use of old railcar flooring for the coffee bar countertop and reclaimed oak for the open shelving gives an authenticity to the space uncommon in kitchens today.
Jennifer and Michelle fell in love with the Limestone Grey Stone while they were investigating unique island countertop ideas. They liked the fact that the limestone as a living finish will age and change over time. Calcutta Miel Quartz countertops made for an excellent pairing around the perimeter, as it’s durable and perfect for cooking preparations. A textured white subway tile backsplash that runs to the ceiling keeps your eye moving towards the open shelving, and to the main focal point of the stunning range hood combination.
“The kitchen functions beautifully, and it’s gorgeous,” beams Jennifer as she gestures with both hands while smiling ear to ear. “The most important thing was I wanted a kitchen that had a wonderful flow, cooked beautiful meals and was a great gathering place for family and friends, and this space does that perfectly! Beauty wise, it turned out exactly how I had envisioned. I felt the function part was the hardest part, and that was nailed”!
Relocating the garage entry to the new mudroom was a huge priority and has finally separated the family’s arriving home functions from their kitchen. Now coats and shoes and bags have their own area for dropping once members arrive home. Matching gray DuraSupreme cabinetry helped create gorgeous, purposeful lockers for the family. A reclaimed vintage sink and custom wall paper were added to the tiny powder room to beautify the once previously only functional space. Advance Design was even able to create a custom space for their dog to sleep while the family is away.
“It was unbelievable that a project of this size was completed in such a short time, and I think that’s because of the large amount of planning and preparation that went into it,” Jennifer marveled, “When we started, we were ready, and everything was prepared”.
When it came to execution, Project Manager Justin Davis and his crew were quick, accessible, and organized. Projects like this kitchen are typically completed in as little as 8-10 weeks. Jennifer’s kitchen however despite the relocation of some challenging HVAC in a soffit and moving of an exterior door was completed remarkably fast in part because the team was working with an existing tile floor that ran throughout the first floor that the client really loved.
“You get to know these people really well because they’re living in your house while you’re living in your house. They were so fast and really good, it didn’t take as long as even planned” reported Jennifer. “I would text Justin and he always responded almost immediately. I got to know all the guys who were working in our house and they were all wonderful people”.
Details in a customized kitchen like this one require skill and care from the people who install it. “All the guys on the job were skilled at what the did. I wanted small details like little feet to look like furniture, that is where their carpentry skill came in to make these all perfect”, said Jennifer. “The tile guys were wonderful. They even let me determine how I wanted the texture with the grout to appear for a salt and pepper look; now that is a very skilled trade person making it custom”.
In Jennifer’s interview, she continued to reference Advance Design’s “Common Sense Remodeling”, so I took a minute to ask her exactly what that phrase meant to her and how it played out in her experience with her project and the Advance Design team. Here is what she said: “I was intrigued about Common Sense Remodeling and in my head that there would be clear costs and prices, great communication between the design team, the execution team and me”, said Jennifer. They did deliver on that, it was so clear about the cost breakdown, what I could expect from everyone who came to my house, and everything that we had ordered. That to me is the Common Sense”!
It’s great to see a client take literally our assertion that a well-planned remodeling project is simply “Common Sense”! She anticipated each step of the way would be clear, concise, and predictable, all the while protecting the outcome due to the careful upfront planning. “Advance Design delivered on their ‘Common Sense Remodeling’ promise,” Jennifer said. “From the design team, to the execution team - everything was straight forward like I imagined. The project turned out exactly how I envisioned, I enjoyed this process and absolutely would recommend Advance Design Studio to anyone.”
 Your Western Decor.
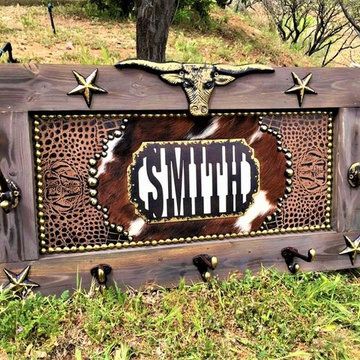
This wall mount hat and coat rack is made of solid wood, genuine hair on cowhide and embossed leathers. Add a custom name, business or any text on the plasma cut playbill nameplate. This piece is made from aged barn wood and augmented with cast iron stars and hooks.
Custom hides and leathers are available. Shown here in embossed crocodile leather and brindle hair on cowhide and embossed crocodile leather and tri-color hair on cowhide. Ask about available options if interested in creating your own look.
· Rack measures 32″ W x 15″ T. 20 lbs.
· Made of aged barn wood and genuine leathers.
· Custom made to order in the USA.
 John Cannon Homes
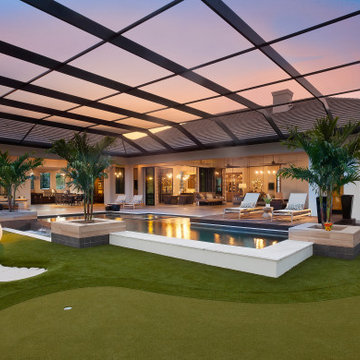
Designed with a nod to the Modern Movement of architectural styles, The Newcastle's exterior elements include horizontal Nichiha vintage wood cedar planks offset by Modera tailored and stacked ledgestone and a welcoming path of deep gray slate pavers. The horizontal grid lines in the home's 10' black iron double doors are mimicked throughout the home and add a classic modern feel to the windows, sliding glass doors, and an all-glass, temperature-controlled wine room.
The Newcastle's great room is open to the chef's kitchen that features two separate quartzite islands, one with a beveled waterfall edge that's perfect for either casual dining or entertaining. Just off the kitchen, the wine room with a backlit blue-agate accent wall leads you into the home's bonus room, complete with a beverage refrigerator, humidor, and access to a private courtyard. The great room overlooks the spacious outdoor living areas which feature your own putting green, fire pit, pool and plenty of space for lounging, cooking and dining.
The master suite has a volume ceiling, oversized windows overlooking the pool and lake with a private entrance to the rear lanai. The master bath features a recessed tub, a glass-enclosed shower that is centered within the room and surrounded by walls of glass, two separate vanities, water closets, and elegant courtyards, and of course spectacular closets.
Additional living spaces inside this 4,806 SF home include a separate Casita, two additional en-suite guest rooms, study, walk-in pantry, laundry room, and 4-car split garage.
Sponsored
Columbus, OH

Snider & Metcalf Interior Design, LTD
Leading Interior Designers in Columbus, Ohio & Ponte Vedra, Florida
 Advance Design Studio, Ltd.
Jennifer and Dan have lived in their Deer Park Illinois home for 15 years, slowly making minor fixes like painting and decorating; but they had a new plan for their kitchen the entire time. An awkwardly placed garage door, and an island cooktop with a terrible downdraft made a full-scale kitchen remodel an absolute must. Jennifer had many ideas in mind and wanted to work with a company that could provide high-end work, while partnering with a designer that would tailor the kitchen to her ideas.
She was intrigued by the phrase “Common Sense Remodeling” in Advance Design’s feature she discovered while perusing an issue of the community’s Quintessential Barrington Magazine. Doing further research on the company’s website, as she looked through project profiles and read about Advance Design’s “Common Sense Remodeling” philosophy, she promptly scheduled an appointment to see if the people and ideas she read about were truly who they said they were. The more she read, the more she knew that the “Common Sense” approach to remodeling they described was exactly the type of company she was looking for.
The partnership was sealed after an initial consultation with Owner Todd Jurs and Project Designer Michelle Lecinski. They displayed a combination of friendliness, professionalism and respect that was unmatched by any of the other companies Jennifer talked to. She knew that with Advance Design, she would be able to retain the vision that she had in mind with high-quality craftsmanship.
“I reached out to Advance Design because of the ‘Common Sense Remodeling’ tagline,” Jennifer said. “That’s what lingered for me”. “Advance Design was the most respectful- of the house and of my design ideas, and the most professional of the handful of companies that looked at my project”.
Soon after the meeting Jennifer began working with Michelle on the project design. They quickly developed chemistry. Jennifer loved how Michelle researched and located every detail that Jennifer wanted for the kitchen. Between the two of them, every concept and idea was worked through and perfected. “Jennifer had definite ideas about what she wanted the new kitchen to look like, she just didn’t know how to bring it all together. We worked together really well to make her ideas into the practical reality necessary for a well-functioning kitchen, with the look and feel that she had envisioned”, says Michelle.
“Michelle was wonderful in using the CAD system she would show me new drawings every time we changed the layout while working through the design,” Jennifer said. “She was a really wonderful partner in execution, she made sure everything happened quickly and easily.”
The finished design drew out elements of Jennifer’s style and personality. The pair call the look “sophisticated farmhouse” to describe the kitchen renovation to family and friends. The result was a beautifully crafted, authentic-feeling space that satisfied Jennifer’s dreams 15 years in the making. The whole project consisted of a kitchen remodel, mudroom upgrade with powder room, and garage entry relocation. “The projects I personally like the best, are the ones that put the client’s dreams on display,” Project Designer Michelle said. “And this is one of those projects.”
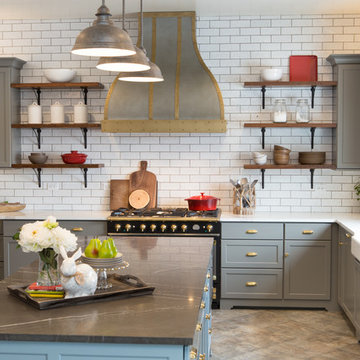
The main focal point of the kitchen is custom zinc and brass ventilation hood with a vintage sheen, which was hand made to order by a small company in Indiana named Vogler Metalworking. “It’s like sculpture, a true work of art”, says Jennifer. Your eye is immediately drawn towards this elegant yet practical hood that eliminated the home’s downdraft problem and added a striking conversation piece at the same time. The carpenters had to use special gloves when transporting and installing it, so they didn’t smudge it with fingerprints. The beautiful hood centers proudly over the stunning black enamel and brass LaCornue Range. “I had a friend who had a LaCornue range and after learning how easy it was to cook perfect meals, I was convinced I wanted to have one”, says Jennifer. This unique, breathtaking combination anchors the entire kitchen and is apparent immediately as you walk into the great room the surrounds the space.
DuraSupreme Crestwood cabinets with a Kendall Panel add function and sophistication. A custom gray paint color paired with a storm blue was developed so that the new kitchen looked like it belonged to the existing space. Unlacquered brass faucets and hardware were important to Jennifer because she wanted the living finishes to age over time. Remarkable brass diamond mesh cabinet door inserts imported from the UK continue to add this one-of-a-kind kitchen renovation; giving it a “you won’t see this everywhere” quality. The use of old railcar flooring for the coffee bar countertop and reclaimed oak for the open shelving gives an authenticity to the space uncommon in kitchens today.
Jennifer and Michelle fell in love with the Limestone Grey Stone while they were investigating unique island countertop ideas. They liked the fact that the limestone as a living finish will age and change over time. Calcutta Miel Quartz countertops made for an excellent pairing around the perimeter, as it’s durable and perfect for cooking preparations. A textured white subway tile backsplash that runs to the ceiling keeps your eye moving towards the open shelving, and to the main focal point of the stunning range hood combination.
“The kitchen functions beautifully, and it’s gorgeous,” beams Jennifer as she gestures with both hands while smiling ear to ear. “The most important thing was I wanted a kitchen that had a wonderful flow, cooked beautiful meals and was a great gathering place for family and friends, and this space does that perfectly! Beauty wise, it turned out exactly how I had envisioned. I felt the function part was the hardest part, and that was nailed”!
Relocating the garage entry to the new mudroom was a huge priority and has finally separated the family’s arriving home functions from their kitchen. Now coats and shoes and bags have their own area for dropping once members arrive home. Matching gray DuraSupreme cabinetry helped create gorgeous, purposeful lockers for the family. A reclaimed vintage sink and custom wall paper were added to the tiny powder room to beautify the once previously only functional space. Advance Design was even able to create a custom space for their dog to sleep while the family is away.
“It was unbelievable that a project of this size was completed in such a short time, and I think that’s because of the large amount of planning and preparation that went into it,” Jennifer marveled, “When we started, we were ready, and everything was prepared”.
When it came to execution, Project Manager Justin Davis and his crew were quick, accessible, and organized. Projects like this kitchen are typically completed in as little as 8-10 weeks. Jennifer’s kitchen however despite the relocation of some challenging HVAC in a soffit and moving of an exterior door was completed remarkably fast in part because the team was working with an existing tile floor that ran throughout the first floor that the client really loved.
“You get to know these people really well because they’re living in your house while you’re living in your house. They were so fast and really good, it didn’t take as long as even planned” reported Jennifer. “I would text Justin and he always responded almost immediately. I got to know all the guys who were working in our house and they were all wonderful people”.
Details in a customized kitchen like this one require skill and care from the people who install it. “All the guys on the job were skilled at what the did. I wanted small details like little feet to look like furniture, that is where their carpentry skill came in to make these all perfect”, said Jennifer. “The tile guys were wonderful. They even let me determine how I wanted the texture with the grout to appear for a salt and pepper look; now that is a very skilled trade person making it custom”.
In Jennifer’s interview, she continued to reference Advance Design’s “Common Sense Remodeling”, so I took a minute to ask her exactly what that phrase meant to her and how it played out in her experience with her project and the Advance Design team. Here is what she said: “I was intrigued about Common Sense Remodeling and in my head that there would be clear costs and prices, great communication between the design team, the execution team and me”, said Jennifer. They did deliver on that, it was so clear about the cost breakdown, what I could expect from everyone who came to my house, and everything that we had ordered. That to me is the Common Sense”!
It’s great to see a client take literally our assertion that a well-planned remodeling project is simply “Common Sense”! She anticipated each step of the way would be clear, concise, and predictable, all the while protecting the outcome due to the careful upfront planning. “Advance Design delivered on their ‘Common Sense Remodeling’ promise,” Jennifer said. “From the design team, to the execution team - everything was straight forward like I imagined. The project turned out exactly how I envisioned, I enjoyed this process and absolutely would recommend Advance Design Studio to anyone.”
 Hudson Place Realty
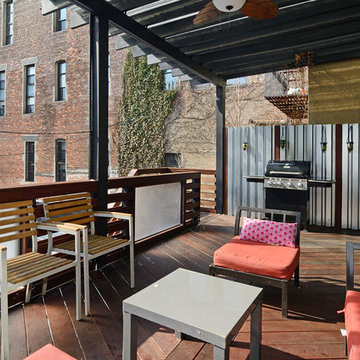
Property Marketed by Hudson Place Realty - Style meets substance in this circa 1875 townhouse. Completely renovated & restored in a contemporary, yet warm & welcoming style, 295 Pavonia Avenue is the ultimate home for the 21st century urban family. Set on a 25’ wide lot, this Hamilton Park home offers an ideal open floor plan, 5 bedrooms, 3.5 baths and a private outdoor oasis.
With 3,600 sq. ft. of living space, the owner’s triplex showcases a unique formal dining rotunda, living room with exposed brick and built in entertainment center, powder room and office nook. The upper bedroom floors feature a master suite separate sitting area, large walk-in closet with custom built-ins, a dream bath with an over-sized soaking tub, double vanity, separate shower and water closet. The top floor is its own private retreat complete with bedroom, full bath & large sitting room.
Tailor-made for the cooking enthusiast, the chef’s kitchen features a top notch appliance package with 48” Viking refrigerator, Kuppersbusch induction cooktop, built-in double wall oven and Bosch dishwasher, Dacor espresso maker, Viking wine refrigerator, Italian Zebra marble counters and walk-in pantry. A breakfast nook leads out to the large deck and yard for seamless indoor/outdoor entertaining.
Other building features include; a handsome façade with distinctive mansard roof, hardwood floors, Lutron lighting, home automation/sound system, 2 zone CAC, 3 zone radiant heat & tremendous storage, A garden level office and large one bedroom apartment with private entrances, round out this spectacular home.
 Thyme & Place Design LLC
When my client had to move from her company office to work at home, she set up in the dining room. Despite her best efforts, this was not the long-term solution she was looking for. My client realized she needed a dedicated space not on the main floor of the home. On one hand, having your office space right next to the kitchen is handy. On the other hand, it made separating work and home life was not that easy.
The house was a ranch. In essence, the basement would run entire length of the home. As we came down the steps, we entered a time capsule. The house was built in the 1950’s. The walls were covered with original knotty pine paneling. There was a wood burning fireplace and considering this was a basement, high ceilings. In addition, there was everything her family could not store at their own homes. As we wound though the space, I though “wow this has potential”, Eventually, after walking through the laundry room we came to a small nicely lit room. This would be the office.
My client looked at me and asked what I thought. Undoubtedly, I said, this can be a great workspace, but do you really want to walk through this basement and laundry to get here? Without reservation, my client said where do we start?
Once the design was in place, we started the renovation. The knotty pine paneling had to go. Specifically, to add some insulation and control the dampness and humidity. The laundry room wall was relocated to create a hallway to the office.
At the far end of the room, we designated a workout zone. Weights, mats, exercise bike and television are at the ready for morning or afternoon workouts. The space can be concealed by a folding screen for party time. Doors to an old closet under the stairs were relocated to the workout area for hidden storage. Now we had nice wall for a beautiful console and mirror for storage and serving during parties.
In order to add architectural details, we covered the old ugly support columns with simple recessed millwork panels. This detail created a visual division between the bar area and the seating area in front of the fireplace. The old red brick on the fireplace surround was replaced with stack stone. A mantle was made from reclaimed wood. Additional reclaimed wood floating shelves left and right of the fireplace provides decorative display while maintaining a rustic element balancing the copper end table and leather swivel rocker.
We found an amazing rug which tied all of the colors together further defining the gathering space. Russet and burnt orange became the accent color unifying each space. With a bit of whimsy, a rather unusual light fixture which looks like roots from a tree growing through the ceiling is a conversation piece.
The office space is quite and removed from the main part of the basement. There is a desk large enough for multiple screens, a small bookcase holding office supplies and a comfortable chair for conference calls. Because working from home requires many online meetings, we added a shiplap wall painted in Hale Navy to contrast with the orange fabric on the chair. We finished the décor with a painting from my client’s father. This is the background online visitors will see.
The last and best part of the renovation is the beautiful bar. My client is an avid collector of wine. She already had the EuroCave refrigerator, so I incorporated it into the design. The cabinets are painted Temptation Grey from Benjamin Moore. The counter tops are my favorite hard working quartzite Brown Fantasy. The backsplash is a combination of rustic wood and old tin ceiling like porcelain tiles. Together with the textures of the reclaimed wood and hide poofs balanced against the smooth finish of the cabinets, we created a comfortable luxury for relaxing.
There is ample storage for bottles, cans, glasses, and anything else you can think of for a great party. In addition to the wine storage, we incorporated a beverage refrigerator, an ice maker, and a sink. Floating shelves with integrated lighting illuminate the back bar. The raised height of the front bar provides the perfect wine tasting and paring spot. I especially love the pendant lights which look like wine glasses.
Finally, I selected carpet for the stairs and office. It is perfect for noise reduction. Meanwhile for the overall flooring, I specifically selected a high-performance vinyl plank floor. We often use this product as it is perfect to install on a concrete floor. It is soft to walk on, easy to clean and does not reduce the overall height of the space.
 In Your Space Interior Design
Custom Hoods for One-of-a-Kind Kitchens
A one-of-a-kind custom hood is the focal-point of any designer kitchen. There is no better way to tie together all of the wood cabinets and granite tops than with a unique custom designed metal hood. Whether the material is copper, zinc, stainless or carbon steel, Runa Novak from In Your Space, Interior Design can provide the perfect solution for all of your custom designed kitchen needs
For this project, Runa chose to design a custom hood to compliment the large wood cabinets and walnut island in a Colorado mountain home. The end result, a zinc barrel hood with straps and rivets, was featured in Colorado Homes and Lifestyle Magazine for their special kitchen issue in Sept/Oct 2013.
Runa Novak can build a custom hood in any style of your choosing as part of her interior design services, including barrel, bell, modern and French country. You can also choose from different custom hood materials: copper and zinc, hammered, non-hammered, strapped, and rivets, etc.
Call Runa Novak for your custom kitchen hood needs.

Sponsored
Columbus, OH

Hope Restoration & General Contracting
Columbus Design-Build, Kitchen & Bath Remodeling, Historic Renovations
 Hudson Place Realty
Property Marketed by Hudson Place Realty - Style meets substance in this circa 1875 townhouse. Completely renovated & restored in a contemporary, yet warm & welcoming style, 295 Pavonia Avenue is the ultimate home for the 21st century urban family. Set on a 25’ wide lot, this Hamilton Park home offers an ideal open floor plan, 5 bedrooms, 3.5 baths and a private outdoor oasis.
With 3,600 sq. ft. of living space, the owner’s triplex showcases a unique formal dining rotunda, living room with exposed brick and built in entertainment center, powder room and office nook. The upper bedroom floors feature a master suite separate sitting area, large walk-in closet with custom built-ins, a dream bath with an over-sized soaking tub, double vanity, separate shower and water closet. The top floor is its own private retreat complete with bedroom, full bath & large sitting room.
Tailor-made for the cooking enthusiast, the chef’s kitchen features a top notch appliance package with 48” Viking refrigerator, Kuppersbusch induction cooktop, built-in double wall oven and Bosch dishwasher, Dacor espresso maker, Viking wine refrigerator, Italian Zebra marble counters and walk-in pantry. A breakfast nook leads out to the large deck and yard for seamless indoor/outdoor entertaining.
Other building features include; a handsome façade with distinctive mansard roof, hardwood floors, Lutron lighting, home automation/sound system, 2 zone CAC, 3 zone radiant heat & tremendous storage, A garden level office and large one bedroom apartment with private entrances, round out this spectacular home.
 Sweetlake Interior Design LLC
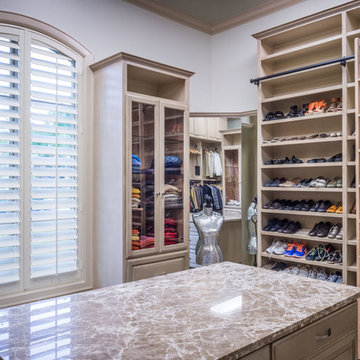
This incredibly amazing closet is custom in every way imaginable. It was designed to meet the specific needs of our client. The cabinetry was slightly glazed and load with extensive detail. The millwork is completely custom. The rolling ladder moves around entire closet for upper storage including the shoe rack. Several pull out and slide out shelves. We also included slide out drawers for jewelry and a custom area inside the glass for hanging necklaces.
The custom window nook has storage bench and the center of the room has a chandelier that finishes this room beautifully”
Closet ideas:
If you run out of room in your closet, maybe take it to a wall in the bedroom or make a bedroom into a master closet if you can spare the room”
“I love the idea of a perpendicular rail to hang an outfit before you put it on, with a low shelf for shoes”
“Arrange your wardrobe like a display. It’s important to have everything you own in view, or it’s possible you’ll forget you ever bought it. If you set it up as if you were styling a store, you’ll enjoy everyday shopping your own closet!”
“Leaving 24 inches for hanging on each side of the closet and 24 inches as a walk way. I think if you have hanging on one side and drawers and shelves on the other. Also be sure and leave long hanging space on side of the closest.
“If you travel the island can work as packing space. If you have the room designate a storage area for luggage.”
“Pull down bars are great for tall closets for additional storage in hard to reach spaces.”
“What is the size of the closet” Its 480 sq. ft.”
Anther closet idea from Sweetlake Interior Design in Houston TX.”
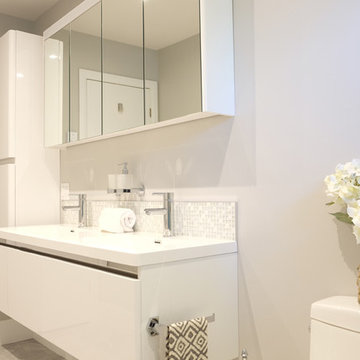
 TOC design & construction inc.
DESIGNED BY TOC design
CONSTRUCTION BY TOC design & Construction inc.
PHOTOS BY : Tania Scardellato
I was fortunate to have a young family approach me in desperate need to renovate there only 3 piece bathroom. This space was In dire need of a remodel, with old brown wall to wall tiles and a dated bulky yellow brown single sink vanity.
Storage was a must, lighting a necessity, and proper accessibility to the shower bath area.
We had a tight budget to respect, but a full gut of this bathroom was required. And a good thing too, once we started doing the demolition we noticed that mildew and rotting floors and walls had accumulated throughout the years. Doing it right the first time is no joke when dealing with water and electrical issues.
We discarded all reminisce of old and built from scratch, new walls, new plumbing, new electrical ,new insulation and a new window, a new fan that actually exhausted outside ( I say this laughing as you would be amazed at how many fans are installed but don’t exhaust outside, and you the client would never know unless you go inside the attic space.
Once all the hard stuff was done, the rest is just a matter of smart design. If you have a small bathroom here are some tips to guide you.
10 tips for making a small bathroom feel larger
Is your tiny bathroom cramping your functionality and style, leaving you longing for the enormous bathrooms gracing the pages of design magazines? Even if your bathroom is a fraction of the size, all it takes is some design savvy to make the most of the space you have. Consider these 10 smart tips that will help your bathroom look, feel and function like those larger contenders.
1-Get creative with corners
Space is at a premium in small bathrooms, so it's important to maximize every inch. Corners, for example, provide extra space for shelving, storage units and even hooks. Get creative and install unique design solutions that are not only functional, but also eye-catching. If you love the airiness of floating cabinets, add baskets or decorative boxes under for extra storage. If you are installing floating cabinets insure that they are installed securely to studs or plywood at wall.
2- Let solid colors shine
Busy patterns have a shrinking effect and make small bathrooms seem even smaller. Conversely, light natural hues make a space feel more open. If you're itching to get creative with design, experiment with textures but keep overpowering patterns to a minimum. Tone on tone is the best to achieve this.
3 - Maximize your bathtub
A bathtub takes up a significant portion of the room, but modern, compact options with curved basins, can make the tub feel larger when in use, all while conserving space.
4 - Select a smaller faucet
A faucet is jewelry for the bathroom. And just as accessories can overpower an outfit, a big bulky faucet isn't flattering in a small bath. Single-handle designs conserve counter space, while a wall-mount installation frees it up all together and can create quite the wow-factor, if the budget can accommodate the required changes to plumbing behind the wall.
5 - Make vanity storage simple
If you're in a storage war with your small bathroom, you're not alone in the battle. Toiletries and personal supplies without a place to call home only add clutter and chaos. Store smart with a space-saving vanity, the dual sink vanity shown here, looks quite simple, but in reality it has 4 sets of full extension drawers, and the vanity tower adds extra storage without overpowering the use of space.
6 - Show off the shower
Shower curtains may be pretty, but they interrupt the visual flow of a bathing space and make it feel significantly smaller. In bathrooms with small footprints, opt for a clear glass sliding shower door that doesn't require the clearance of one with a hinged design. Or as shown in this design and for fraction less expensive a half hinged panel installed on a fixed tempered glass panel. If you're embarking on a big remodel, create the illusion of more space by using same tile in the shower that's used throughout; instead of seeing them as two separate zones, the eye will read them as one.
7 - Discover the treasure of hidden storage
Work with a contractor, and you just might find some serious storage potential hidden behind your walls. Whether it's utilizing space between the studs for shallow shelving or a creating a small linen closet by annexing space from an adjacent room, even small additions can make a big difference.
8 - Focal Point
Tile is a beautiful, durable addition to any bathroom. For dainty spaces, consider installing tile at a diagonal to accentuate the focal point or as in this bathroom I used an oversized textured pattern to bring depth to the space at the window wall.
9 - Choose the right lights
Strategically install light to reflect and brighten a small bathroom to make it appear larger. Recessed lighting is an affordable solution for tiny rooms, offering ample light while taking up little space. Wall sconces alongside a mirror also reflect off the walls and make a room feel bright and airy. I always recommend going with LED lighting at 2800 to 3000K.
10 – Accessorize
This is your time to shine in your decorating skills, have fun with your towels, you can change the color scheme daily just by adding pops of color in your accessories, make sure to get items that serve a dual purpose, like baskets, boxes they can always be used as hampers, storing of towels and even a nice display for your guest.
24