Software
Houzz Logo Print
twiceremembered

Beadboard, Door Trim, Baseboard - What order?

17 years ago

We are in the process of remodeling and will soon be adding beadboard to our hallway. Currently we have installed new drywall and new doors, but no trimwork whatsoever. I am very confused as to what order the door trim, baseboard, and beadboard should be installed. I've read that the baseboard is installed after the beadboard, but should the door trim be the very first thing installed, even before the beadboard?

Or is it installed on top of the beadboard just like the baseboard? If so, what do you do about the gap created between the wall and the door trim above the beadboard (our beadboard will go up to about 48")

We are just using regular, flat 5" wide pine pieces for both the baseboards and the door trim. I would like for the baseboard and the door trim to be flush where they meet each other, but if the baseboard is installed on top of the beadboard, it won't be flush unless the door trim is also installed on top of the beadboard. I'm not crazy about the idea of creating a 45 degree angle where the two meet if we decide to add the door trim before the beadboard, either.

Does anyone have any solutions for us? I think I've just about read the whole internet on the topic, hehe, and am still just as confused as ever. Thanks so much!

Kim

Comments (9)

  • 17 years ago

    The following steps are for stained trim/beadboard. Painted trim/beadboard is covered in the last paragraph.

    In your case, installing the door trim first is step one.

    To get the base molding to match the door trim, it will need installing second, unless you cheat by planing the base molding thinner to allow it to match the door molding when installed over the beadboard. That will make the base molding thinner and it will be different looking in width from the door molding---but the surfaces will match. That generally is not acceptable to most people.

    That poses a double problem, however. That problem is how to get the edges of the beadboard to match the edges/bottom of the door and base molding.

    One way to eliminate this problem is to cut rabbets in the door and base molding. A rabbet is a groove cut into the side of a piece of wood and forms a notch the whole length(or as much as needed for the beadboard on the door molding sides) of the wood.

    That allows you to fit the edges/bottom of the beadboard in the rabbets and elininates any gaps.

    The only gaps will then be in the gaps created by the pattern of the beadboard. A colored caulk can be used to fill those if the moldings/beadboard are stained.

    If you are painting both trim and beadboard, it is much more simple. Install both moldings first. Then install the beadboard. Then caulk the gaps with a paintable caulk, prime, and paint.

  • 17 years ago

    If the beadboard goes in first, make sure you've made allowances so the baseboard doesn't stick out when you get to the part without beadboard.

    The downside of butting the beadboard up to the baseboard would be the very strong likelihood it'll look butted up, and may well tend to undulate.

    I agree, though, go in the order that makes the most sense in your situation, and measure twice, cut once.

  • 17 years ago

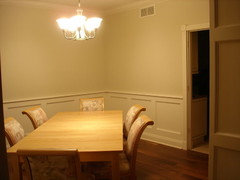
    I put raised panel wainscoting in our dining room, and where it butted up against a door, I put 3/4" MDF around the door to build it out, then attached the casing to the MDF. Here's the finished look:

  • 17 years ago

    The most common order is door casing, baseboard, bead board. That way, door trim and baseboard installation are the same throughout the house. It's not a problem to tidily install the bead board afterward.

    It would be difficult to keep a flush surface between casing and base, because the intersection of the vertical door trim and the horizontal baseboard will constantly flex and twist. Door casing usually sits proud of the baseboard an eighth inch or so for this reason.

  • 17 years ago

    Hi twiceremembered,

    For me, the first concern is to review the material being used. Material dimensions; thickness of beadboard, baseboard and door trim, style of router profiles on trimwork near the edges. Only then, would I determine what the best method is. The style of material will determine the best method.

    Woodwork Safely,
    Jim Barry

  • 5 years ago

    What did you end up doing? I am in the exact same predicament. Wondering if I can run the beadbord all the way to my reveal and trim doors over beadboard? Lots of good ideas on here but also installing battens and need those flush as well. I’m ready to do this project but so stuck on this! Don’t have the tools or skills to cut panels to fit inside each section of the board and batten.

  • 5 years ago

    Door mouldings will be first, they provide a vertical "stop" for any baseboard or beadboard. Will there be a moulding at the top of the beadboard? I would think about installing the beadboard _behind_ the baseboard so that the shape at the top of the baseboard is maintained. Check to make sure that the thickness of the beadboard + baseboard on the wall is _less than_ the outside edge of the door moulding. You don't want the baseboard and beadboard to stick out like pic at the top of this page


    If the thickness works out;


    - install door moulding

    - install beadboard

    - install baseboard

    - install beadboard cap


  • 3 years ago
    last modified: 3 years ago

    This is my same exact dilemma. Teaching yourself to be a master carpenter using the internet is exhausting😳😂🤪